TetraPond GREENFREE UVC-5 User manual
WARNING: To reduce the risk of electrocution, keep all
connections dry and off the ground. Do not touch plug with
wet hands.
This product conforms with the applicable provisions of The Code
of Federal Regulations (CFR) including Title 21, Chapter 1, Sub
part J - Radiological Health.
How the UV Clarifier Works
• The clarier works by exposing single-celled algae to very high levels
of ultra violet (UV) light as the pond water containing them is pumped
through the unit.
• The algae die and clump together, making them easier for the lter
to remove.
• While the UV clarier will destroy the algae, water clarity is also
dependent on adequate pond ltration to trap and remove the dead
algae.
• Dead algae may clump, sink and accumulate at the bottom of the
pond. It can be removed with a ne mesh net.
• For most ponds with normal levels of green water, the cleaning
process should take about one week; however, with thicker algal
blooms this may take 2-3 weeks.
• The clarifying process can be made more efcient by regularly
carrying out partial water changes (up to 25% of pond volume).
• Always add a dechlorinator water treatment when adding tap water
to a pond.
Turn unit off when treating the pond with any sh medication or
remedy.
SELECTING THE RIGHT EQUIPMENT FOR YOUR POND
Determining Pond Size:
In order to determine the gallons in your pond, use this easy
calculation:
Length (ft) x Width (ft) x Average Depth (ft) = Cubic Feet
Cubic Feet x 7.5 = Gallons
UV Clarifier Size Selection:
Use the chart below to help determine the proper size UV clarier using
your pond size.
It is still safe if the UV clarier selected is stronger than what is
specied for your pond size.
Pump Selection:
It is important to control the water through the UV clarier with a
ow rate that is within ±10% of the optimal ows shown below in the
chart. The UV clarication process will be most effective at these ows.
Water ow that is too fast will minimize the “dwell time” the algae
cells have in front of the lamp, thus making it less effective. The ow
rates should be measured on the return ow out of the UV clarier.
Pond Size UV Clarifier Optimal Flow
660 gallons / 2500 liters 5 watt 330 gal/hr / 1250 l/hr
1800 gallons / 6800 liters 9 watt 900 gal/hr / 3400 l/hr
4400 gallons / 16,600 liters 18 watt 2200 gal/hr / 8300 l/hr
8800 gallons / 33,300 liters 36 watt 4400 gal/hr / 16,600 l/hr
Measuring Water Flow:
It is highly recommended that the ow to and from the lter be
measured using the following technique.
Timing water flow: (determining gallons per hour)
A. Record the number of seconds it takes to ll a 5 gallon bucket
B. Divide the number of seconds into 3600, and then multiply by 5 gallons.
Example: If it takes 20 seconds to ll a 5 gallon bucket.
Seconds an hour Seconds to fill bucket Bucket Size Flow gallons per hour
3600 ÷ 20 x 5 gallons = 900 gal/hr
Pump packaging instructions will give you guidelines on the ow rates
(gal/hr) that can be expected at various pumping heights, as measured
from the water surface in which the pump is located. Use this as a
starting point, but measure the water going to and from the lter using
this timing method.
GREENFREE®UV CLARIFIERS
IMPORTANT SAFETY INSTRUCTIONS
READ AND FOLLOW ALL SAFETY INSTRUCTIONS
WARNING: To guard against injury, basic safety precautions should
be observed, including the following:
1. Read and follow all safety instructions.
2. DANGER: To avoid possible electric shock, special care should be
taken since water is employed in the use of this equipment. For each
of the following situations, do not attempt repairs yourself:
A. If the appliance falls into the water, do not reach for it! First
unplug it and then retrieve it. If electrical components of the appliance
get wet, unplug the appliance immediately.
B. Do not operate any appliance if it has a damaged cord or plug, if
it is malfunctioning, or if it is dropped or damaged in any manner.
3. When putting on or taking off parts, always unplug an appliance
from the outlet rst. Grasp the plug and pull to disconnect; never yank
the cord.
4. Only use an appliance for its intended use. Non-recommended
attachments that are not sold by the appliance manufacturer may
cause an unsafe condition.
5. Read and observe all the important notices on the appliance.
6. Do not allow children to handle this equipment. This equipment
should be kept away from children.
Grounding Instructions
This appliance must be grounded. In the event of a malfunction or
breakdown, grounding will reduce the risk of electric shock by providing
a path of least resistance for electric current. This appliance is
equipped with a cord that has an appliance grounding conductor and a
grounding plug. The plug must be plugged into the appropriate outlet
that has been installed and grounded in accordance with all local codes
and ordinances.
WARNING: Improper connection of the appliance-grounding
conductor can result in a risk of electric shock. Check with a
qualified electrician or service representative if you do not know
whether the appliance is properly grounded. Do not modify the
plug provided with the appliance. If it will not fit the outlet, have
a proper outlet installed by a qualified technician.
Ground-Fault Circuit-Interrupter Protection
To comply with the National Electrical Code (NFPA 70), and to provide
additional protection from the risk of electric shock, this unit should
only be connected to a receptacle that is protected by a ground-fault
circuit-interrupter (GFCI).
Extension Cords
Use only extension cords that are intended for outdoor use. These
extension cords are marked: “Acceptable for use with outdoor
appliances; store indoors while not in use.” Use only extension cords
that have an electrical rating that is not less than the rating of the
product. Do not use damaged extension cords; examine extension cords
carefully before use and replace if damaged. Do not abuse extension
cord and do not yank on any cord to disconnect. Keep cord away from
heat and sharp edges. Always disconnect extension cords carefully;
disconnect them from the receptacle before disconnecting the product
from the extension cord.
SAVE THESE INSTRUCTIONS
Safety Tips
• Never submerge the unit in water.
• To prevent overheating, always unplug the unit if there
is no water running through it.
• This unit produces harmful ultra violet light. Do not
look directly at the unshielded bulb as damage to the
eyes may occur. Monitoring of lamp operation should
only take place by looking through the viewing window
on the unit.
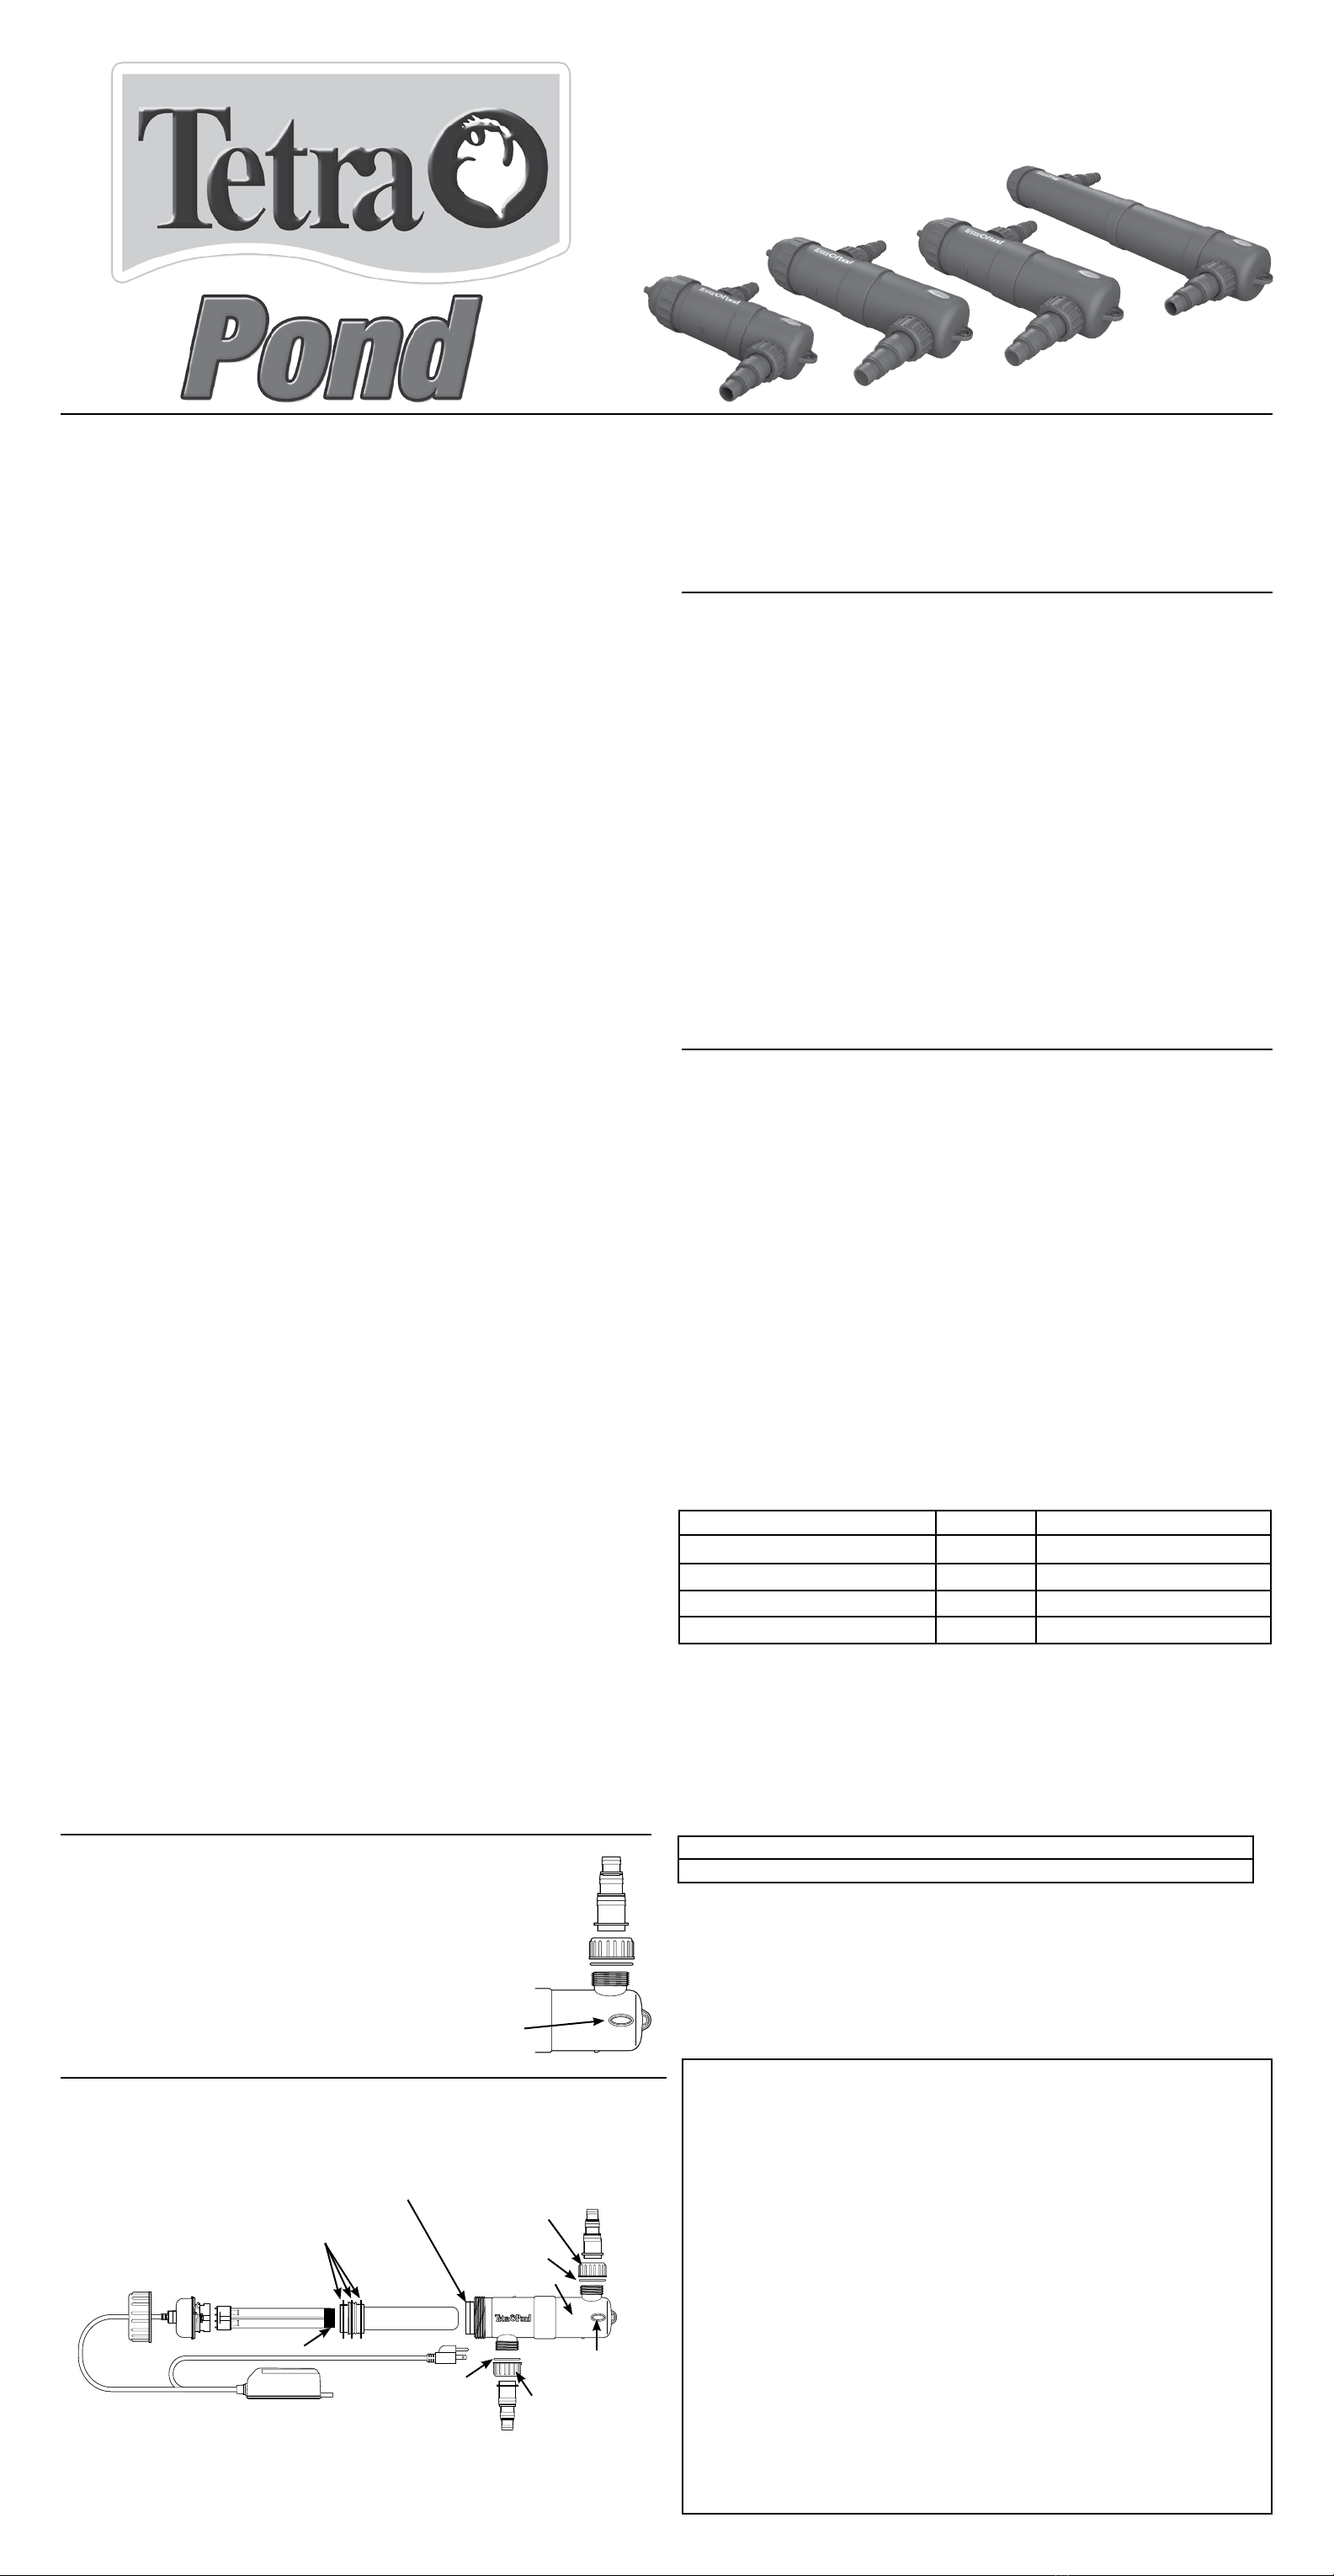
UV CLARIFIER COMPONENTS
Warranty information and mail in warranty card on reverse side.
©2010 Tetra Holding (US) Inc.
3001 Commerce Street, Blacksburg, VA 24060-6671
Tetra® is a trademark
Consumer Support Service (800)526-0650
www.tetrapond.com
Screw Cap
*Bulb Protector
+High Performance
UV Bulb
* Spare Parts Available from Tetra
+Replacement Parts Available from Retailer
*Rubber O-Rings
for Quartz Sleeve
Stainless Steel
Insert
+Quartz Glass
Tube
*Multi-Diameter
Inlet/Outlet
Hose Connector
*Multi-Diameter
Inlet/Outlet
Hose Connector
*Sealing Ring for
Hose Connector
*Sealing Ring for
Hose Connector
*Hose Coupling
Ring
*Hose Coupling
Ring
Ballast
Housing
Viewing
Window
UVC-5
UVC-9
UVC-18
UVC-36
4
3
2
6
1
5
Regulating Flow to the UV:
If the water ow through the UV clarier exceeds the
recommendations, you may put a ball valve in the tubing to restrict
and regulate the ow. Place the ball valve between the pump and the
UV clarier unit.
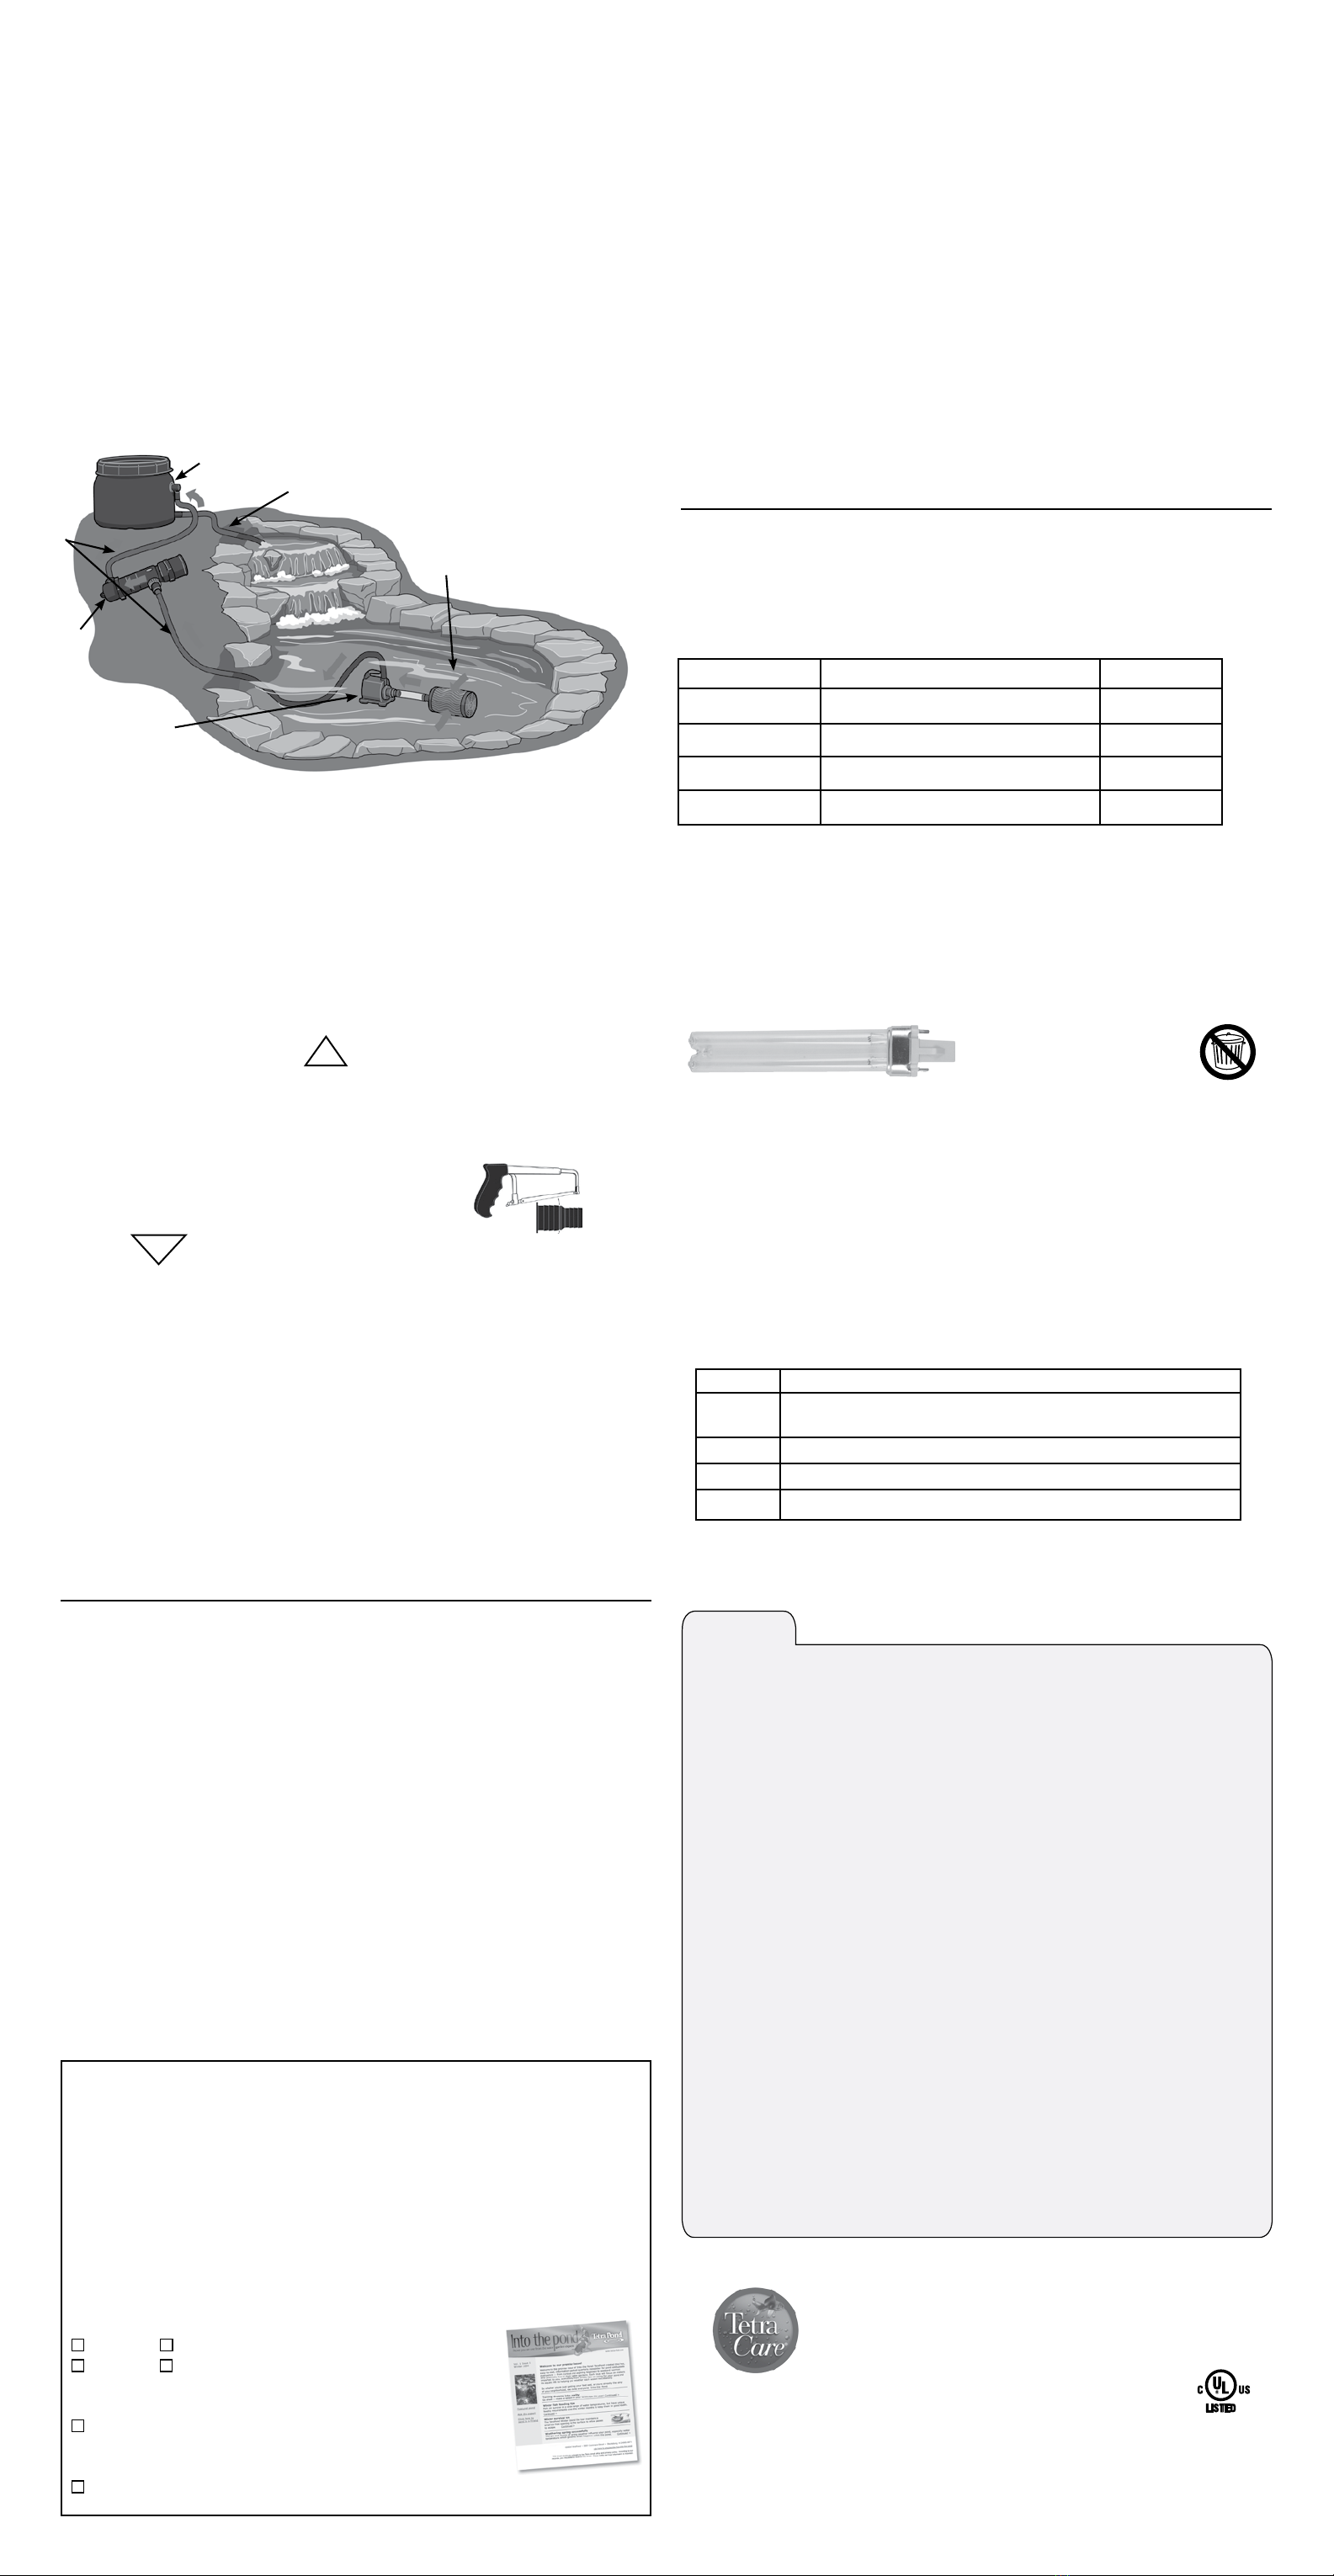
Positioning and Assembly
The TetraPond® GreenFree® UV Clarier is not submersible and should
be positioned outside the pond where there is little likelihood of it
sitting in puddles or falling into the pond.
It is recommended (but not necessary) that the UV clarier is attached
to the tubing that enters external pond lter. This prevents the ow
restriction caused by the UV restricting the ow of the lter.
Typical Set-Up for Small & Medium Ponds
1. Pre-Filter
2. Water Garden Pump
3. UV-Clarifier
4. Bio-Filter
5. Tubing
6. Discharge Tubing
UV Bulb and Quartz Glass Tube Installation
Insert the UV-C bulb into the connector. (Note: Avoid touching the
bulb with bare hands and remove any marks using a clean cloth or
tissue. Oil from your ngers can reduce the life of your bulb.)
The quartz glass tube is positioned with three rubber O-rings in place.
Be sure O-rings are positioned properly to form a tight seal. Water
entering inside the quartz tube may cause damage to the electrical
components.
Connecting the UV Clarifier to the Pump
The inlet connection (marked in ) is the one closest to the screw cap
of the UV unit. Connect the pump tubing to this inlet.
All UVs come with 2 three-stepped adapters that t the following
internal diameter tubing (ID):
¾ in., 1 in. and 1 ¼ in. ID
• Choose the hose adaptor size of the UV
according to the tubing used.
• Make sure that the hose adaptor for the outlet
(marked out ) is at least as large as the inlet.
- Cut the hose adaptor in the groove with hacksaw to t the tubing
selected (if necessary).
Ensure that the gasket is in place before attaching the hose adaptor
into the unit.
• Hand-tighten the hose coupling rings. Do not use a wrench.
• Secure hoses to adaptors with hose clamps (not included).
UV Clarifier – Electrical Connection
Please read safety instructions before plugging the unit into the
electrical outlet.
• When working, a purple UV light can be seen through the viewing
window located in the UV housing.
• An operational test can only be carried out when the equipment is
fully assembled.
Seasonal Use
Summer: The unit should remain in operation 24 hours a day.
Winter: It is recommended to store the unit in a frost-free location.
THE WARRANTY DOES NOT COVER DAMAGE TO THE UV CLARIFIER
DUE TO FREEZING TEMPERATURES.
Maintenance and Care
When carrying out any maintenance, the unit must be disconnected
from the electrical circuit.
• Clean the unit at least twice a year. A clean quartz tube will allow
the UV light to be more effective in controlling algae. More frequent
cleaning may be required for ponds with severe algae growth.
Tip: Use warm vinegar to wipe the quartz sleeve for a faster clean and
efcient removal of mineral build up.
WARNING: Do not allow water to come in contact with the
electrical socket or bulb.
To disassemble:
• Always remove inlet and outlets by unscrewing the hose couplings.
• Drain the unit before cleaning.
• Carefully dismantle the unit by rst unscrewing the screw cap and
removing the quartz tube.
• The quartz tube may be loosened by using a small coin or a screwdriver
and can then be carefully removed. Clean with a soft cloth and water to
avoid scratching the glass quartz tube.
To reassemble:
• Be sure that the inside of the quartz sleeve is completely dry prior
to reassembly.
• When reassembling, ensure that the sealing rings are properly seated
(lubricate with a small amount of silicone lubricant/grease if necessary).
Replacement Parts - Bulbs and Quartz Sleeves:
The following parts are available through your TetraPond dealer/retailer:
Bulbs
- Use TetraPond replacement bulbs for maximum effectiveness.
UV-Clarier UV Bulb Quartz Sleeve
UVC-5 5 Watt UV Bulb # 19526 # 19530
UVC-9 9 Watt UV Bulb # 19527 # 19531
UVC-18 18 Watt UV Bulb # 19528 # 19531
UVC-36 36 Watt UV Bulb # 19529 # 19533
Replacement of UV Clarifier Bulbs:
• TetraPond UV Clarier Bulb should be replaced after 8,000 hours
(about once every 11 months of operation).
• If using only 5 to 6 months a year, replace the bulb every two years.
• The bulb may continue to glow after 11 months of use, but its
effectiveness has been greatly diminished.
Replacement of Quartz Sleeves:
• Quartz glass tubes do not need to be replaced unless they are
damaged.
• Please handle with care, and do not leave outside in winter, since they
are fragile.
Additional Spare Parts - The following spare parts are available
direct from Tetra: Please call us at 1-800-526-0650 for further
information.
Item Description
19354 UVC Adapter Set (Multi-diameter hose inlet/outlet connector,
coupling ring and sealing ring for hose connector)
19355 Bulb Protector for UV 5W & 9W
19356 Bulb Protector for UV 18W & 36W
19362 Quartz Sleeve O-ring Set (3)
©2010 Tetra Holding (US) Inc. • 3001 Commerce Street Blacksburg, VA 24060-6671
Tetra® is a trademark • Consumer Support Service (800) 526-0650
www.tetrapond.com
Questions? Problems? Missing Parts?
• Before returning the product, please call
our Customer Care department at 800-526-0650,
Monday–Friday 7:30 a.m. to 5:30 p.m., Eastern USA Time,
• Or email us at consumer@tetra-fish.com
Often times, our Customer Care Department can provide
advice that will help you solve the problem.
Warranty
Tetra warranties the product on this document will be repaired or replaced free
of charge for the specified number of years from the date of purchase shown
below, if it fails to work because of faulty material or workmanship. (Proof of
purchase must be provided).
UVC-5 Item# 19523 3 years
UVC-9 Item# 19520 3 years
UVC-18 Item# 19521 3 years
UVC-36 Item# 19522 3 years
This warranty is subject to the following terms:
1. Should it become necessary to return the product during the warranty period,
send the product directly to Tetra, Consumer Services, 3001 Commerce Street,
Blacksburg, Virginia 24060-6671.
2. Tetra’s decision on all questions relating to alleged defects and repair shall be
conclusive.
3. This warranty does not invalidate your statutory rights, but preserves your full
benets.
4. Repair parts or replacement product will be given on an exchange basis and will
either be new,equivalent to new, or reconditioned. All customer returned parts or
products that we replace become the property of Tetra.
5. The warranty does not cover normal wear and tear, nor any deterioration suffered
through overloading, improper use, negligence or accident or wearing out or
breakage of the bulb and quartz glass tube. Similarly, any modication made
by the purchaser to the appliance will invalidate the warranty. Bulbs should be
replaced after 11 months of continuous operation, and are not covered by this
warranty.
6. Except as set forth in this warranty, Tetra expressly disclaims any and all liability
for any loss or damage whatsoever sustained by the purchaser to the fullest
extent permitted by applicable law.
19520-901 Rev. D
All fluorescent bulbs contain
mercury. Dispose of properly.
WARRANTY CARD
Please ll out this card and mail it to the address on back OR complete an
e-registration form by logging on to www.tetrawarranty.com to validate
your warranty. Thank you!
Name of Purchaser:____________________________________________
Address:_____________________________________________________
City___________________________ ST_____ Zip code:______________
E-mail Address:_______________________________________________
Date of purchase:_ ____________________________________________
TetraPond respects your privacy. Any and all personal information collected
here will be kept strictly condential and will not be sold, reused, rented,
or otherwise disclosed.
Which GreenFree® UV-Clarier did you purchase?
UVC-5 UVC-9
UVC-18 UVC-36
Electronic Newsletter
Yes, I would like to receive free e-mail updates on
water gardening, including tips, new products,
and or other helpful information.
No, I would not like to receive any e-mail updates at this time.
This manual suits for next models
3
Table of contents


