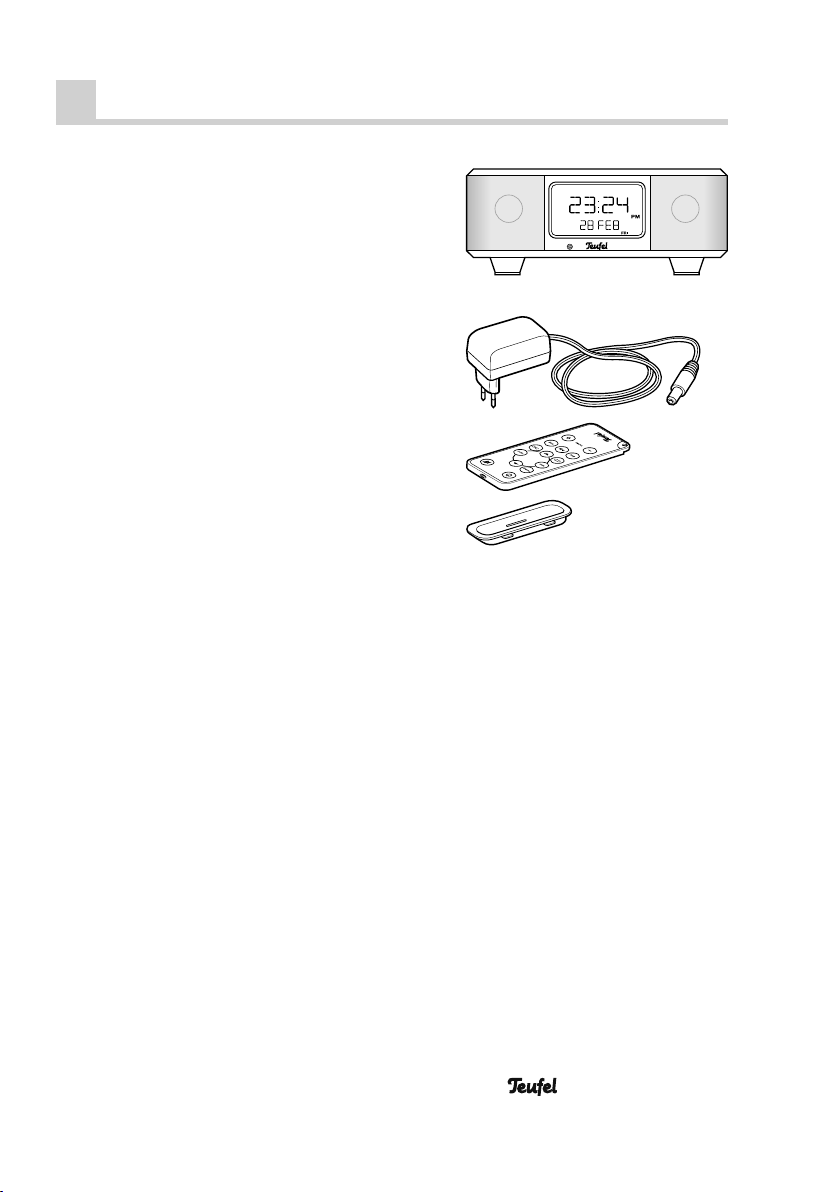
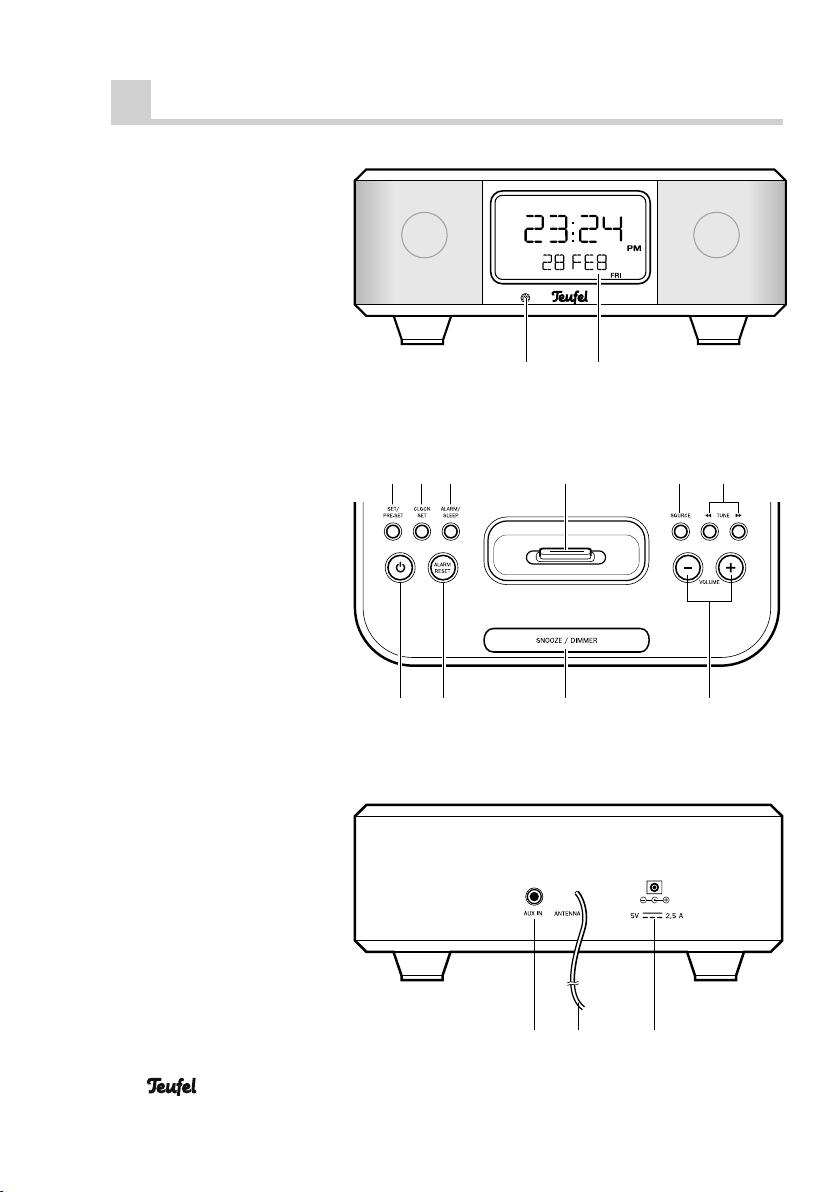
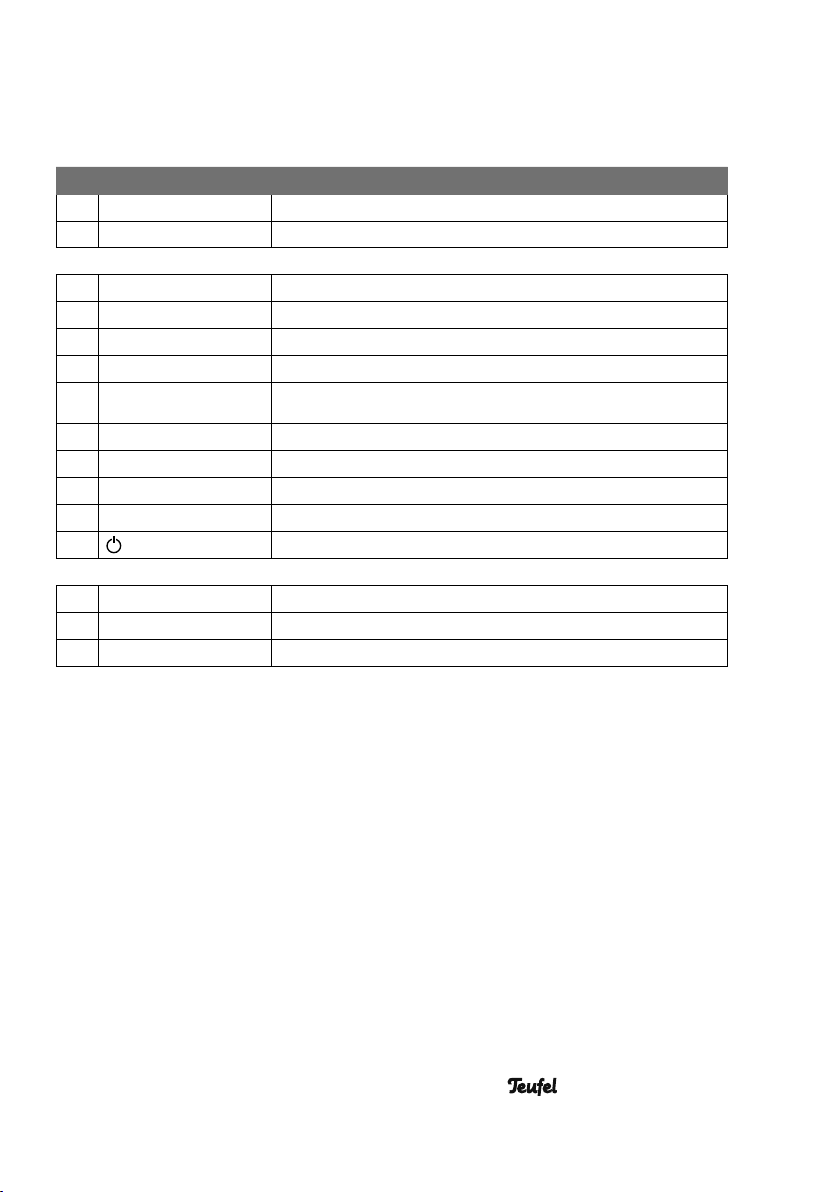
Teufel iTeufel Dock v3 Manual

gb was
here
Technical description and operating instructions
Radio alarm clock with iPod/iPhone dock
iTeufel Clock v3
91792 GB 20110308.indd 191792 GB 20110308.indd 1 09.03.11 09:3709.03.11 09:37

• iTeufel Clock v3
2
N
Th
ch
wa
of
N
pr
ed
ca
the
Te
©
Ve
M
O
If y
rig
so
ing
the
AG
Em
C
In
low
qu
1.
Ca
wi
fir
e.g
Contents
General notes and information ................................................................................3
Safety notes ............................................................................................................4
Product contents ......................................................................................................7
Control elements and connections ............................................................................8
Setup and preparation ..........................................................................................12
Clock and alarm....................................................................................................13
Setting the time and date............................................................................13
Alarm function (alarm)................................................................................ 14
iPod/iPhone operation...........................................................................................16
Connecting an iPod/iPhone ........................................................................ 16
iPod/iPhone playback ................................................................................ 16
Adjusting the volume .................................................................................. 17
Removing the iPod/iPhone .......................................................................... 17
Radio mode...........................................................................................................18
Antenna.................................................................................................... 18
Selecting radio mode ................................................................................. 18
Setting the radio stations............................................................................. 18
Saving radio stations.................................................................................. 18
Operation with an external device .........................................................................19
Special functions....................................................................................................20
Sleep function ...........................................................................................20
Display brightness......................................................................................20
Care and cleaning .................................................................................................21
Protecting the environment ....................................................................................21
Technical data .......................................................................................................22
91792 GB 20110307.indd 291792 GB 20110307.indd 2 08.03.11 08:3708.03.11 08:37

3
• iTeufel Clock v3
Notice
The information in this document may be
changed without prior notice and in no
way constitutes any liability on the part
of Lautsprecher Teufel GmbH.
No part of these instructions may be re-
produced in any form or be broadcast-
ed in any way electronically, mechani-
cally, by photocopy or recording without
the written permission of Lautsprecher
Teufel GmbH.
© Lautsprecher Teufel GmbH
Version 1.0
March 2011
Original packaging
If you wish to exercise your eight-week
right of return, we ask that you be ab-
solutely sure to hold onto the packag-
ing. We can only accept the return of
the speakers IN THE ORIGINAL PACK-
AGING.
Empty boxes are not available!
Complaints
In case of complaint we will need the fol-
lowing information to process your en-
quiry:
1. Invoice number
Can be found on the sales slip (enclosed
with the product) or on the order con-
firmation received as a PDF document,
e.g. 4322543.
2. Serial number or batch number
Located on the bottom side of the unit,
e.g. serial number: IT04....
Many thanks for your support!
Contact
For questions, suggestions or criticism
please contact our customer service de-
partment:
Lautsprecher Teufel GmbH
Gewerbehof Buelowbogen
Buelowstrasse 66
10783 Berlin (Germany)
Phone: 00800 – 200 300 400 (free of
charge)
Fax +49 (0)30 / 300 930 930
E-mail: service@teufelaudio.com
www.teufelaudio.com
Proper use
Only use the unit as described in these in-
structions. Any other use will be deemed as
not in accordance with the instructions and
may lead to damage to property or even
persons. The manufacturer accepts no lia-
bility for damage caused by use not in ac-
cordance with the instructions. The product
is intended for private use.
Before operating the unit for the
first time please read the safety
notes and operating instructions
carefully. This is the only way to use all
functions safely and reliably.
Keep the operating instructions safe and
pass them on to anyone who may own
the unit after you.
General notes and information
.3
.4
.7
.8
12
13
13
14
16
16
16
17
17
18
18
18
18
18
19
20
20
20
21
21
22
91792 GB 20110307.indd 391792 GB 20110307.indd 3 08.03.11 08:3708.03.11 08:37

• iTeufel Clock v3
4
Safety notes
Caution icons
You will find the following caution icons
in these instructions:
Danger High risk!
Failure to observe the warning
may result in severe personal
injury or death.
Attention Moderate risk!
Failure to observe the warning
may result in property damage.
Minor risk!
Points which should be ob-
served when handling the unit.
Safety notes
Danger Risk of electric shock!
Faulty installation of electri-
cal equipment or mains volt-
age which is too high can cause electric
shocks.
• The device is only suitable for use with
a mains voltage of 100 V–240V ~ /
50/60Hz.
• Only use the enclosed mains adapter.
When connecting the unit, make sure
that the correct voltage is present. You
can find more detailed information di-
rectly on the mains adapter.
• Immediately disconnect the mains
adapter and discontinue using the de-
vice if its case or the mains line is defec-
tive or exhibits other visible damages.
• If the unit emits smoke or smells of
burning or other unusual odours, dis-
connect it immediately from the power
supply and do not operate it.
• The standby button does not dis-
connect the device from the mains
line. Set the unit up so that the mains
adapter is easily accessible and no
vents are blocked.
• Never open the unit case.
• Repairs may only be carried out by
an authorised specialist workshop.
Only parts which conform with the
original unit specifications may be
used in this case. There are electri-
cal and mechanical parts in this unit
which are essential in order to avoid
exposure to sources of danger.
• Only use the accessory products spec-
ified by the manufacturer.
• Do not insert any objects through the
vents into the case.
• Only use the unit in indoor areas.
• Do not operate the unit in moist are-
as and protect it from drops of wa-
ter and splash water. Also take care
not to stand vases or other containers
of liquid on or near the unit in order
to avoid liquid getting into the case.
If water or other debris do penetrate
the case, immediately disconnect the
mains adapter and if applicable, re-
move any batteries present. Then send
the device in to our service address.
• Never touch the mains adapter with
wet hands.
• Check the unit regularly for damage.
Danger Danger to children!
Children can become trapped
in the packing film when play-
ing and suffocate.
• Do not allow children to play with the
unit or the packing film. Danger of
suffocation.
•
•
•
Th
hig
tiv
um
se
inj
ly
•
•
•
D
to
•
91792 GB 20110307.indd 491792 GB 20110307.indd 4 08.03.11 08:3708.03.11 08:37

5
• iTeufel Clock v3
s
ec-
e
rs
e
e
nd
.
d
y-
e
• Ensure that children do not remove
small parts from the unit or take them
off of the unit (e.g. the remote con-
trol batteries, control buttons or mains
adapter). They could swallow the
parts and choke.
• If a battery is swallowed, immediately
consult a physician with the child.
• Never allow children to operate elec-
trical devices unsupervised.
Danger to hearing!
Loud noise may lead to hear-
ing loss.
There is a potential risk of sudden very
high noise pressure especially when ac-
tivating the device which is set to full vol-
ume. This may have psychological con-
sequences and also cause physical
injury. Children and pets are particular-
ly at risk.
• Set your signal source unit volume
control to a low setting.
• When the volume is set high, always
keep a certain distance from the unit
and never place your ear directly on
the speaker.
• To avoid damage to health, avoid ex-
tended listening at high volume.
Danger Danger of chemical
burns!
Leaking battery acid may lead
to chemical burns.
• Do not allow battery acid to come in-
to contact with skin, eyes or mucous
membranes. In case of contact with
acid rinse the affected areas immedi-
ately with plenty of plain water and if
necessary see a doctor.
Danger Danger of explosion!
Lithium batteries can explode
if handled improperly.
• Never attempt to recharge lithium bat-
teries.
• Only use batteries of the same or
equivalent type.
• You may not heat, short circuit batter-
ies and storage batteries or dispose
of them in fire.
• Do not expose batteries and storage
batteries to direct sunlight.
Danger Danger of injury/damage!
Incorrect location may result in
damage.
• Never use the unit unmounted in vehi-
cles, in unstable locations, on wobbly
tripods or furniture, on underdimen-
sioned brackets etc. The device could
tip or fall down and cause injury to
persons or be damaged itself.
• Arrange the unit so that it cannot be
knocked over accidentally and make
sure that the cables do not pose a trip
hazard.
• Handle the speaker (subwoofer) on
the bottom of the device with care –
do not place the device on objects
that could damage the speaker.
• Do not place the unit near sources of
heat (e.g. heaters, ovens, other heat
generating equipment such as ampli-
fiers etc.)
Attention Fire hazard!
Improper use may lead to
damage or fire.
• Do not place open flames such as
burning candles or similar on the unit.
91792 GB 20110307.indd 591792 GB 20110307.indd 5 08.03.11 08:3708.03.11 08:37

• iTeufel Clock v3
6
• Do not place the unit in direct sun-
light.
• Ensure sufficient ventilation.
• Do not cover the vents with curtains,
cloths, newspapers or similar. Heat
build-up inside the unit can shorten
the lifetime of the unit.
Attention Risk of damage!
Power overload due to light-
ning strike may damage or de-
stroy the unit.
• If the unit is to be left unsupervised
for a long period (e.g. during a holi-
day), or if a thunderstorm is forecast,
disconnect the mains adapter from the
socket.
• If the unit is to be left unsupervised for
a long period (e.g. during a holiday),
or if a thunderstorm is forecast, dis-
connect the mains adapter from the
socket.
Leaked batteries may damage the re-
mote control. In case of prolonged ab-
sence, remove the battery from the re-
mote control.
Explanation of symbols
Protection class II Only use in indoor areas. Polarity on the circular
connector: outside (–), in-
side (+)
C
•
•
•
91792 GB 20110307.indd 691792 GB 20110307.indd 6 08.03.11 08:3708.03.11 08:37

7
• iTeufel Clock v3
or
,
-
b-
e-
Product contents
햲
햳
햴
햵
Check to be sure
• Check that all items have been deliv-
ered and that nothing is damaged:
햲1x iTeufel Clock v3
햳1x mains adapter
햴1x remote control including bat-
tery
햵Various dock adapters for various
iPod/iPhone models
• If the delivery is incomplete or exhibits
transport damage, please contact our
service department (see page 3).
• Do not operate the unit in the event of
transport damage!
91792 GB 20110307.indd 791792 GB 20110307.indd 7 08.03.11 08:3708.03.11 08:37

• iTeufel Clock v3
8
Control elements and connections
N
12
9101112
768
13 1514
Front view
View from
above
Rear view
345
91792 GB 20110307.indd 891792 GB 20110307.indd 8 08.03.11 08:3708.03.11 08:37

9
• iTeufel Clock v3
No Name Meaning/function
1Sensor for remote control
2Display panel
3 SET/PRE-SET For setting the time, date and alarm
4CLOCKSET Setting the clock
5 ALARM /SLEEP Alarm/sleep function
6iPod-/iPhone dock
7SOURCE
Selecting the signal source (radio, iPod/iPhone or ext. de-
vice)
8TUNE Configuring settings/selecting radio stations
9VOLUME
Adjusting the volume
10 SNOOZE / DIMMER
Snooze button/changing the display brightness
11 ALARM RESET
Deactivating the alarm
12
On/Standby button
13 AUX IN Connector jack for external device
14 ANTENNA
FM throw-out aerial
15 DC 5V
Input jack for the mains adapter
91792 GB 20110307.indd 991792 GB 20110307.indd 9 08.03.11 08:3708.03.11 08:37

• iTeufel Clock v3
10
1716 18 19 20 21
22
23
24
25
26
28
29
30
31
32
33
34
35
36
37
27
N
2
2
2
2
2
2
2
2
2
3
3
3
3
3
3
3
Display
Remote control
91792 GB 20110307.indd 1091792 GB 20110307.indd 10 08.03.11 08:3708.03.11 08:37

11
• iTeufel Clock v3
No Name Meaning/function
16 Sleep function is activated
17 Alarm setting
18 Alarm source: Buzzer
19 Radio mode/alarm source: Radio
20 Signal source: External device
21 iPod/iPhone mode/alarm source: iPOD
22 Time display, alarm time
23 AM = before noon, PM = afternoon
24 Display of the date/the (alarm) volume
25 Display of the weekday
26 Mute
27 ▲▼
Navigating in the iPod/iPhone menu/selecting saved stations
28 SELECT Selecting menu items or tracks
29 Random playback
30 ►►|Skipping to the next track
31 ►|| Starting/pausing playback
32 VOLUME Adjusting the volume
33 |◄◄ Skipping to the beginning of the track or to the previous track
34 Repeat function
35 MENU Accessing the iPod/iPhone menu
36 SOURCE Selecting the signal source
37 On/Standby button
91792 GB 20110307.indd 1191792 GB 20110307.indd 11 08.03.11 08:3708.03.11 08:37

• iTeufel Clock v3
12
Setup and preparation
Setup location
• Select a stable, level base.
• Make sure that the environment is
clean and free from dust.
• Avoid placing the unit close to sourc-
es of heat or in direct sunlight.
• Arrange the connector cables so that
they do not pose a trip hazard.
• Do not place any heavy objects on
top of the cables or the unit.
Connecting to a power
supply
15
1. Insert the small mains adapter plug 햳
in the jack DC 5V (15).
2. Insert the mains adapter in an easily
accessible mains socket.
Remote control
A type CR2025 lithium battery powers
the remote control.
This battery is already located in the re-
mote control upon delivery and is in-
sulated with a plastic strip. Part of this
plastic strip protrudes from the battery
compartment. Carefully pull out the strip.
The remote control is now ready for use.
Changing the batteries
1. Hold the remote control with the bot-
tom facing up.
2. Push the battery compartment cov-
er down towards the arrow and fold
it open.
3. Remove the battery and replace it
with a new one. When inserting the
battery, make sure the polarity is cor-
rect (see figure).
4. Fold the battery compartment cov-
er back into the closed position and
push it up.
Functionality
The remote control relays the control sig-
nals by means of infrared light. For this,
it is necessary that you point the remote
control towards the unit and no objects
are in the way.
Fluorescent and energy-saving lamps,
which are installed in the immediate vi-
cinity, may affect the functions of the re-
mote control or even disable them.
Se
1
1
1
1
91792 GB 20110307.indd 1291792 GB 20110307.indd 12 08.03.11 08:3708.03.11 08:37

13
• iTeufel Clock v3
-
r-
g-
,
e
-
e-
Clock and alarm
Setting the time and date
1. Push and hold
CLOCK SET (4)
The display will
blink.
2. Briefly push
◄◄
TUNE ►► (8)
Set 12 / 24 hour
time mode (AM
or PM (23) is dis-
played in 12 hour
time mode).
3. Briefly push
SET/PRE-SET (3)
Hours blink
4.
Repeatedly push
◄◄TUNE ►► (8)
Set the hours
5. Briefly push
SET/PRE-SET (3)
Minutes blink
6.
Repeatedly push
◄◄TUNE ►► (8)
Set the mintues
7. Briefly push
SET/PRE-SET (3)
Year blinks
8.
Repeatedly push
◄◄TUNE ►► (8)
Set the year
9. Briefly push
SET/PRE-SET (3)
Month blinks
10.
Repeatedly push
◄◄TUNE ►► (8)
Set the month
11. Briefly push
SET/PRE-SET (3)
Day blinks
12.
Repeatedly push
◄◄TUNE ►► (8)
Set the day
13. Briefly push
SET/PRE-SET (3)
Done
83 4 5 7
23
91792 GB 20110307.indd 1391792 GB 20110307.indd 13 08.03.11 08:3708.03.11 08:37

• iTeufel Clock v3
14
Alarm function (alarm)
Alarm einstellen
1. Briefly push
Alarm/Sleep (5)
Symbols on the
display blink
2. Repeatedly push
SOURCE (7)
Select the alarm
source
Buzzer
Radio
iPod/iPhone
3. Repeatedly push
–VOLUME + (9)
Set the alarm vol-
ume
4. Repeatedly push
Alarm/Sleep (5)
Select the alarm
setting
(5 days): alarm from Mon. – Fri.
(7 days): alarm on every day
no symbol: alarm deactivated
5. Briefly push
SET/PRE-SET (3)
Hours blink *)
6. Repeatedly push
◄◄TUNE ►► (8)
Set the hour
7. Briefly push
SET/PRE-SET (3)
Minutes blink
8. Repeatedly push
◄◄TUNE ►► (8)
Set the Minute
9. Briefly push
SET/PRE-SET (3)
Done
*) If the hours do not blink, briefly push
the button ALARM/SLEEP (5) again.
Important!
If you have selected FM or
iPOD as the alarm source,
make sure that the corresponding de-
vice is available for playback. That is,
the
the
do
the
the
W
Th
pr
al
Sn
If y
pu
Th
ute
Yo
ho
Di
In
the
De
If y
fo
pu
pe
pl
Af
wi
ca
sa
Alarm setting
Alarm volume
Alarm sources
87
9
35
91792 GB 20110307.indd 1491792 GB 20110307.indd 14 08.03.11 08:3708.03.11 08:37

15
• iTeufel Clock v3
the desired station must be selected or
the iPod/iPhone must be located in the
dock. If no iPod/iPhone is in the dock,
the buzzer alarm will sound instead of
the music from the iPod/iPhone.
When the alarm sounds ...
The alarm of the selected source with the
previously set volume sounds when the
alarm time is reached.
Snooze function
If you would like to sleep a bit longer,
push the button SNOOZE/DIMMER (10).
The alarm will be disengaged for 5 min-
utes, after which time it will sound again.
You can repeat this process for up to 2
hours.
Disengaging the alarm
In order to disengage the alarm, push
the button ALARM RESET (11).
Deactivating/activating the alarm
If you would like to deactivate the alarm,
for example, if you are on holidays,
push the button ALARM/SLEEP (5), re-
peatedly until the symbol on the dis-
play disappears.
After approx. 8 seconds, the blinking
will stop and the setting is saved. You
can also reactivate the alarm in the
same manner.
5
911 10
No symbol: Alarm deactivated
91792 GB 20110307.indd 1591792 GB 20110307.indd 15 08.03.11 08:3708.03.11 08:37

• iTeufel Clock v3
16
iPod/iPhone operation
Connecting an iPod/iPhone
1. Search for the corresponding dock
adapter 햵(see adapter back side).
2. Push the adapter into the iPod/iPhone
dock 6until it audibly locks into
place.
3. Carefully place the iPod/iPhone on
the plug-in contact in the dock.The
iPod/iPhone is now ready for play-
back and the storage battery is
charged.
Important!
With the iPod
Touch and iPhone,
you have to launch the appli-
cation “iPod”, which is nor-
mally located in the dock ar-
ea of the home screen.
iPod/iPhone playback
1. Activate the device with the On/
Standby button (12) or (37).
2. With the button SOURCE (7) or (36)
select “iPOD” as a source.
You can now directly control the basic func-
tions of your iPods/iPhones with the remote
control or the buttons on the device:
Button on the device or
on the remote control
Corresponds to
the iPod button
35 Menu MENU
28 Select Select
33
30
31
27 ▲/▼Scroll wheel
A
•
•
Re
3.
4.
28
30
31
33
35
36
37
27
6
12 7
91792 GB 20110307.indd 1691792 GB 20110307.indd 16 08.03.11 08:3708.03.11 08:37

17
• iTeufel Clock v3
Adjusting the volume
• You can adjust the volume with the
buttons – VOLUME + (9) or
–VOLUME + (32).
• With the button Mute (26), you can
turn the sound off and on again.
Removing the iPod/iPhone
3. Turn the device off with the On/Stand-
by button (12) or (37).
4. Carefully remove the iPod/iPhone
from the dock.
37
32
26
91792 GB 20110307.indd 1791792 GB 20110307.indd 17 08.03.11 08:3708.03.11 08:37

• iTeufel Clock v3
18
Radio mode
Antenna
Unwind the throw-out aerial (14) and ad-
just the position of the antenna for ideal
reception. Then fix the antenna in place
with adhesive tape.
Selecting radio mode
1. Turn the device on with the On/Stand-
by button (12) or (37).
2. Select the source with the button
SOURCE (7) or (36).
Setting the radio stations
• Set the tuning frequency with the but-
tons TUNE (8) or ►►| ( 30) or |◄◄ (33):
The frequency is increased or reduced
by one increment (0.05 MHz) each
time the button is tipped.
Pushing and holding the button con-
tinually increases or decreases the fre-
quency until a station has been found.
Saving radio stations
You can save up to 6 radio stations.
1. Set the frequency of the station to be
saved.
2. Hold the button SET/PRE-SET (3) un-
til the memory slot appears and blinks
under the frequency display.
3. With the buttons ◄◄TUNE ►► (8) se-
lect a memory slot between 1 and 6.
4. Briefly push SET/PRE-SET (3).The sta-
tion has been saved.
14
30
33
36
37
38
Station memory slot
Ac
Yo
ar
or
PR
•
•
•
•
91792 GB 20110307.indd 1891792 GB 20110307.indd 18 08.03.11 08:3708.03.11 08:37

19
• iTeufel Clock v3
Operation with an external device
Accessing saved stations
You can access saved stations with the
arrow buttons (27) on the remote control
or by repeatedly pushing the button SET/
PRE-SET (3).27
13
• To connect an external device (e.g.
mobile or MP3 player) you will need
a cable with a 3.5 mm stereo jack
plug (not included in the product con-
tents).
• With this cable, connect the line out
or earphone jack of the external de-
vice and the jack AUX IN (13).
• Select the source with the button
SOURCE (7) or (36).
• All control functions can only be exe-
cuted on the external device. Only the
volume control and the mute function
can be controlled with the buttons of
the iTeufel Clock v3.
91792 GB 20110307.indd 1991792 GB 20110307.indd 19 08.03.11 08:3708.03.11 08:37

• iTeufel Clock v3
20
Special functions
Sleep function
This function deactivates your iTeufel
Clock v3 after a preset time.
1. During music playback, push and
hold the button ALARM /SLEEP (5) un-
til appears on the display.
2. With the buttons –VOLUME + (9) or
◄◄TUNE ►► (8), set the desired time
until deactivation in increments of 15
minutes.
The maximum time amounts to 60 min-
utes. The sleep function is deactivated
with the setting “OFF”.
A few seconds after being set, the dis-
play returns to the original readout.
To display the remaining time, push
and hold the button ALARM/SLEEP (5)
until the remaining time appears.
Display brightness
By repeatedly pushing the button
SNOOZE/DIMMER (10), you can set the
display brightness to three intensities.
85
9
Cl
da
lut
in
D
or
•
•
Ba
ba
Ev
br
te
sta
by
or
di
ly
Ple
te
*)
Hg
10
91792 GB 20110307.indd 2091792 GB 20110307.indd 20 08.03.11 08:3708.03.11 08:37
Other manuals for iTeufel Dock v3
1
Table of contents