Texsport 01082 User manual

INSTRUCTIONS
Item 01082
Deluxe Cam Shower/Shelter Combo
Thank you for purchasing this Texsport shower/shelter. Please read and understand each step of the set-up instructions. We encourage you to set-
up this shower/shelter at least once prior to your camping trip, ensuring that you have a satisfactory understanding of the set-up process. We
hope you enjoy your new shower/shelter and that it will give you many years of camping pleasure.
Do not apply excessive force to this product.
PARTS LIST:
A......1 Shower/shelter skin
B......2 Towel holder poles
C......4 Leg poles
D......4 Curved roof poles
E......4 Eave poles
F......1 Molded roof joint
G......4 Molded corner joints
H......Solar shower
I......Stakes, clews, and guy rope
J......Towel holder straps
......Removable floor
NOTE:
Prepare your camp site by removing all sharp stones,
twigs, etc. The site should be flat and have no depres-
sions that could collect rain water.
A
B
C
D
E
FG
H
I
J
NOTE: ALL FRAME POLES HAVE A
LOC ING TAB. LINE UP THE TAB
AND SLOT ON EACH POLE FOR A
SECURE FIT.
STEP 1 - Assemble the curved roof
poles (D) and insert each one into
the molded roof joint (F).
STEP 2 - Make sure all curved roof
poles are secure as shown above.
STEP 3 - Insert the curved roof
poles into the molded corner joints
(G).
STEP 4 - Assemble the eave poles
(E) and insert each one into the
molded corner joint.
STEP 5 - Make sure all poles have
snapped into their locking tab for
a secure fit as shown above.
01082 Instructions 9-12_Layout 1 10/20/12 1:07 PM Page 1

STEP 6 - Assemble ONLY the top 2
sections of the leg poles (C). The
top section will have a small hole.
STEP 7 - Insert the top section of
the leg poles into the bottom sock-
ets of the molded corner joints. STEP 8 - This is what your frame
should look like at this point.
STEP 9 - Spread the shower/shel-
ter skin and locate the web loop at
the top of the skin.
STEP 10 - Hook the web loop onto
the molded roof joint.
STEP 11 - Attach the speed clips to
the frame.
STEP 12 - This is what your frame
should look at this point.
STEP 13 - Connect the last section
of the leg poles and insert the pin
and ring into the bottom of each
leg pole.
STEP 14 - Stake down all 4 sides
of the shower/shelter at the rings.
STEP 15 - This is what your
shower/shelter should look like
without the fly or other acces-
sories.
STEP 16 - Drape fly over
shower/shelter and insert the at-
tached hooks into the small holes
on the leg poles as shown above.
STEP 17 - This is what your
shower/shelter with fly should
look like.
STEP 18 - Secure your
shower/shelter combo by using
guy ropes. Insert the guy rope into
the clews and knot the end as
shown above.
STEP 19 - Tie the other end of the
guy rope onto the fly loops. STEP 20 - Loop the guy rope
around a stake and insert into the
ground.
01082 Instructions 9-12_Layout 1 10/20/12 1:07 PM Page 2

STEP 21 - Slide the clew up or
down the guy rope to adjust the
tension.
STEP 22 - Attach the towel holder
straps (J) onto the shower/shelter
side roof poles with the speed
clips.
STEP 23 - Insert a towel holder
pole (B) into the loops on the
straps.
STEP 24 - Hook the camp shower
from the attached hook inside
shower/shelter as shown above.
You can also use the rope in-
cluded.
STEP 25 - To attach the shower
caddy inside, insert the toggle into
the ring. STEP 26 - Secure all toggles though
the rings as shown above.
WARNING:
Texsport shelter fa rics are flame retardant treated per C.P.A.I.-84 specification. However, for your
safety, we recommend that NO OPEN FLAME BE USED IN OR NEAR YOUR SHELTER.
SOME ADDITIONAL INFORMATION:
Always secure your shelter (with the shelter stakes included). Stake one corner, then stake each consecu-
tive corner in a clockwise rotation. Make sure the shelter remains tight. Always place your shelter a safe
distance from your campfire - unstaked shelter placed upwind of the fire can e lown into the fire. Shel-
ter placed downwind of the fire are often showered with tiny sparks that can urn holes into the light-
weight fa rics of your shelter.
WATERPROOFING YOUR SHELTER:
Texsport shelters are made from coated water-repellent fa rics. However, the sewing process, necessary
in all shelter fa rication, can cause water leakage where the sewing needles have perforated the fa ric
in the seams. Without treatment the shelter will leak. Every new shelter needs to e seam sealed to make
it water tight. We recommend using Texsport Spray Waterproofing/Seam Sealer which may e found at
your local outdoor outfitter or camping store. DO NOT APLY SEAM SEALER TO ZIPPERS.
STA ES:
All shelters should e staked down. The stakes supplied with your shelter are effective for most conditions;
however, specialized stakes are recommended in certain cases:
a. Sand Stakes: Long road stakes designed to hold in loose sand.
. Steel Stakes: ..........Most effective in hard, rocky or frozen soil. These can rust and their sharp edges could damage the shelter if stored with the shelter. In
............................extremely hard soil a steel rod can e used to make the starter hole.
c. Skewer Stakes: ......Lightweight, ut less holding power that the standard stakes.
d. Snow Stakes: ........The most common method is to ury o jects with a great deal of surface area in the snow i.e. ranches, aluminum pie plates, stuff sacks or
............................shelter ags filled with snow and uried: (this may e referred to as the dead man method). Shelters can also e secured to snow skis or
............................ poles which are stuck into the snow.
ZIPPERS:
If zippers stick, lu ricate with silicone. Never force a zipper which has material caught in it as this will end the slider and prevent the zipper from closing. Continual
use in a sandy environment can cause the slider to erode and fail to close the zipper.
STORAGE:
Shelters should e stored dry and loosely folded away from heat and water. Keep out of reach of mice as they like to nest in shelters. Never store directly on concrete as
moisture and chemicals in concrete may damage the nylon.
WASHING:
Hand wash with a sponge using a mild soap. Never use detergents or washing machines as they may damage the coating or seams. Remem er to use seam sealer
once shelter has een washed to insure waterproofing.
HOW LONG WILL A NYLON SHELTER LAST?
Various conditions will affect the length of service which you receive:
a. A nylon shelter which is left erected all summer may last only one or two seasons as the sun’s ultra-violet rays damage the nylon.
. Never store a shelter wet or damp as mildew may develop. It will not harm nylon, however, mildew is unsightly and may damage other parts of the
shelter (i.e. zipper tapes)
s c. Avoid spraying insect repellent or hair sprays, etc. on shelter fa ric as they may e harmful.
REPAIR:
For small tears use a an adhesive acked rip-stop nylon patch. We recommend Texsport Nylon Shelter Repair Kit (#14113) which may e found at your local outdoor
outfitter or camping store.
QUESTIONS:
If you should have any questions, pro lems or comments, please call our Customer Service Department at
This Department is open M–F from 8 a.m.–5 p.m. CST.
STEP 27 - To attach the removable
floor, clip at the bottom of the
shower/shelter web loops.
MODEL: DELUXE CAMP
SHOWER/SHELTER COMBO
ITEM 01082
MADE IN CHINA
EMC13
01082 Instructions 9-12_Layout 1 10/20/12 1:07 PM Page 3

INSTRUCCIONES
#01082
Combo de Tienda de Cam aña-Regadera de Lujo
Gracias por comprar esta parrilla y asador Texsport. Por favor lea y comprenda cada paso de las instrucciones de montaje. Lo invitamos a re-
alizar el montaje por lo menos una vez antes de su viaje al aire li re, asegurándose de que ha entendido satisfactoriamente el proceso. Esper-
amos que disfrute su nueva parrilla y asador y que le proporcione muchos años de diversión al aire li re.
No aplique fuerza excesiva sobre este producto.
LISTA DE PARTES:
A......1 CARPA DE TIENDA DE CAM-
PAÑA/REGADERA
B......2 POSTES DE TOALLEROS
C......4 POSTES DE PATA
D......4 POSTES DE TECHO CURVEADOS
E......4 POSTES DE ALERO
F......1 JUNTA DE TECHO MOLDEADA
G......4 JUNTAS DE ESQUINA MOLD-
EADAS
H......REGADERA SOLAR
I......ESTACAS, OVILLOS Y CUERDAS DE
MANIOBRA
J......CORREAS DE TOALLEROS
......PISO DESMONTABLE
NOTA:
PREPARE EL SITIO DEL CAMPAMENTO RETIRANDO TODAS
LAS PIEDRAS FILOSAS, RAMAS, ETC. EL SITIO DEBERÁ
ESTAR PLANO Y NO DEBERÁ TENER DEPRESIONES QUE
PUEDAN ACUMULAR AGUA DE LLUVIA.
A
B
C
D
E
FG
H
I
J
NOTA: TODOS LOS POSTES DE LA
ESTRUCTURA TIENEN UNA
LENGÜETA DE BLOQUEO. ALINEE LA
LENGÜETA Y LA RANURA EN CADA
POSTE PARA UN AJUSTE SEGURO.
PASO 1 – ENSAMBLE LOS POSTES
DE TECHO CURVEADOS (D) E IN-
SERTE CADA UNO EN LA JUNTA DE
TECHO MOLDEADA (F).
PASO 2 – ASEGÚRESE QUE TODOS
LOS POSTES DE TECHO CURVEADOS
ESTÉN UNIDOS COMO SE MUESTRA
ARRIBA.
PASO 3 – INSERTE LOS POSTES DE
TECHO CURVEADOS DENTRO DE
LAS JUNTAS DE ESQUINA MOLD-
EADAS (G).
PASO 4 – ENSAMBLE LOS POSTES
DE ALERO (E) E INSERTE CADA UNO
DENTRO DE LA JUNTA DE ESQUINA
MOLDEADA.
PASO 5 – ASEGÚRESE QUE TODOS
LOS POSTES SE HAYAN ASEGU-
RADO A PRESIÓN DENTRO DE SUS
LENGÜETAS DE BLOQUEO PARA UN
AJUSTE SEGURO COMO SE MUES-
TRA ARRIBA.
01082 Instructions 9-12_Layout 1 10/20/12 1:07 PM Page 7

PASO 6 – ENSAMBLE ÚNICAMENTE LAS 2
PARTES SUPERIORES DE LOS POSTES DE
PATA (C). LA PARTE SUPERIOR TENDRÁ UN
PEQUEÑO ORIFICIO.
PASO 7 – INSERTE LA PARTE SUPERIOR DE
LOS POSTES DE PATA DENTRO DE LOS
HUECOS INFERIORES DE LAS JUNTAS DE
ESQUINA MOLDEADAS.
PASO 8 – ASÍ ES COMO SU ESTRUCTURA
DEBERÍA VERSE HASTA AHORA.
PASO 9 – EXTIENDA LA CARPA DE LA
TIENDA DE CAMPAÑA/REGADERA Y
UBIQUE LA SOLAPA DE FIJACIÓN PARA ES-
TACA EN LA PARTE SUPERIOR DE LA
CARPA.
PASO 10 – ENGANCHE LA SOLAPA DE FI-
JACIÓN PARA ESTACA EN LA JUNTA DE
TECHO MOLDEADA.
PASO 11 – COLOQUE LOS GANCHOS RÁPI-
DOS A LA ESTRUCTURA.
PASO 12 – ASÍ ES COMO SU ESTRUCTURA
DEBERÍA VERSE HASTA AHORA.
PASO 13 – TERMINE DE CONECTAR LA ÚL-
TIMA PARTE DE LOS POSTES DE PATA E IN-
SERTE EL PASADOR Y EL ANILLO DENTRO
DE LA PARTE INFERIOR DE CADA POSTE DE
PATA.
PASO 14 – CLAVE LOS 4 LADOS DE LA RE-
GADERA/REFUGIO EN LOS ANILLOS.
PASO 15 – ASÍ ES COMO SU TIENDA DE
CAMPAÑA/REGADERA DEBERÍA VERSE SIN
EL TECHO U OTROS ACCESORIOS.
PASO 16 – COLOQUE EL SOBRETECHO
SOBRE LA REGADERA/TIENDA DE CAM-
PAÑA E INSERTE LOS GANCHOS INCLUI-
DOS DENTRO DE LOS PEQUEÑOS
ORIFICIOS EN LOS POSTES DE PATA COMO
SE MUESTRA ARRIBA.
PASO 17 – ASÍ ES COMO SU
REGADERA/TIENDA DE CAMPAÑA DEBERÍA
VERSE CON EL TECHO.
PASO 18 – ASEGURE SU COMBO DE RE-
GADERA/TIENDA DE CAMPAÑA UTI-
LIZANDO LAS CUERDAS DE MANIOBRA.
INSERTE LA CUERDA DE MANIOBRA DEN-
TRO DE LOS OVILLOS Y HAGA UN NUDO
EN EL EXTREMO COMO SE MUESTRA AR-
RIBA.
PASO 19 – AMARRE EL OTRO EXTREMO DE
LA CUERDA DE MANIOBRA DENTRO DE
LOS LAZOS DEL TECHO.
PASO 20 – AMARRE LA CUERDA DE MAN-
IOBRA ALREDEDOR DE LA ESTACA E IN-
SÉRTELA DENTRO DE LA TIERRA.
01082 Instructions 9-12_Layout 1 10/20/12 1:07 PM Page 8

PASO 21 – DESLICE EL OVILLO HACIA AR-
RIBA O DEBAJO DE LA CUERDA DE MANIO-
BRA PARA AJUSTAR LA TENSIÓN.
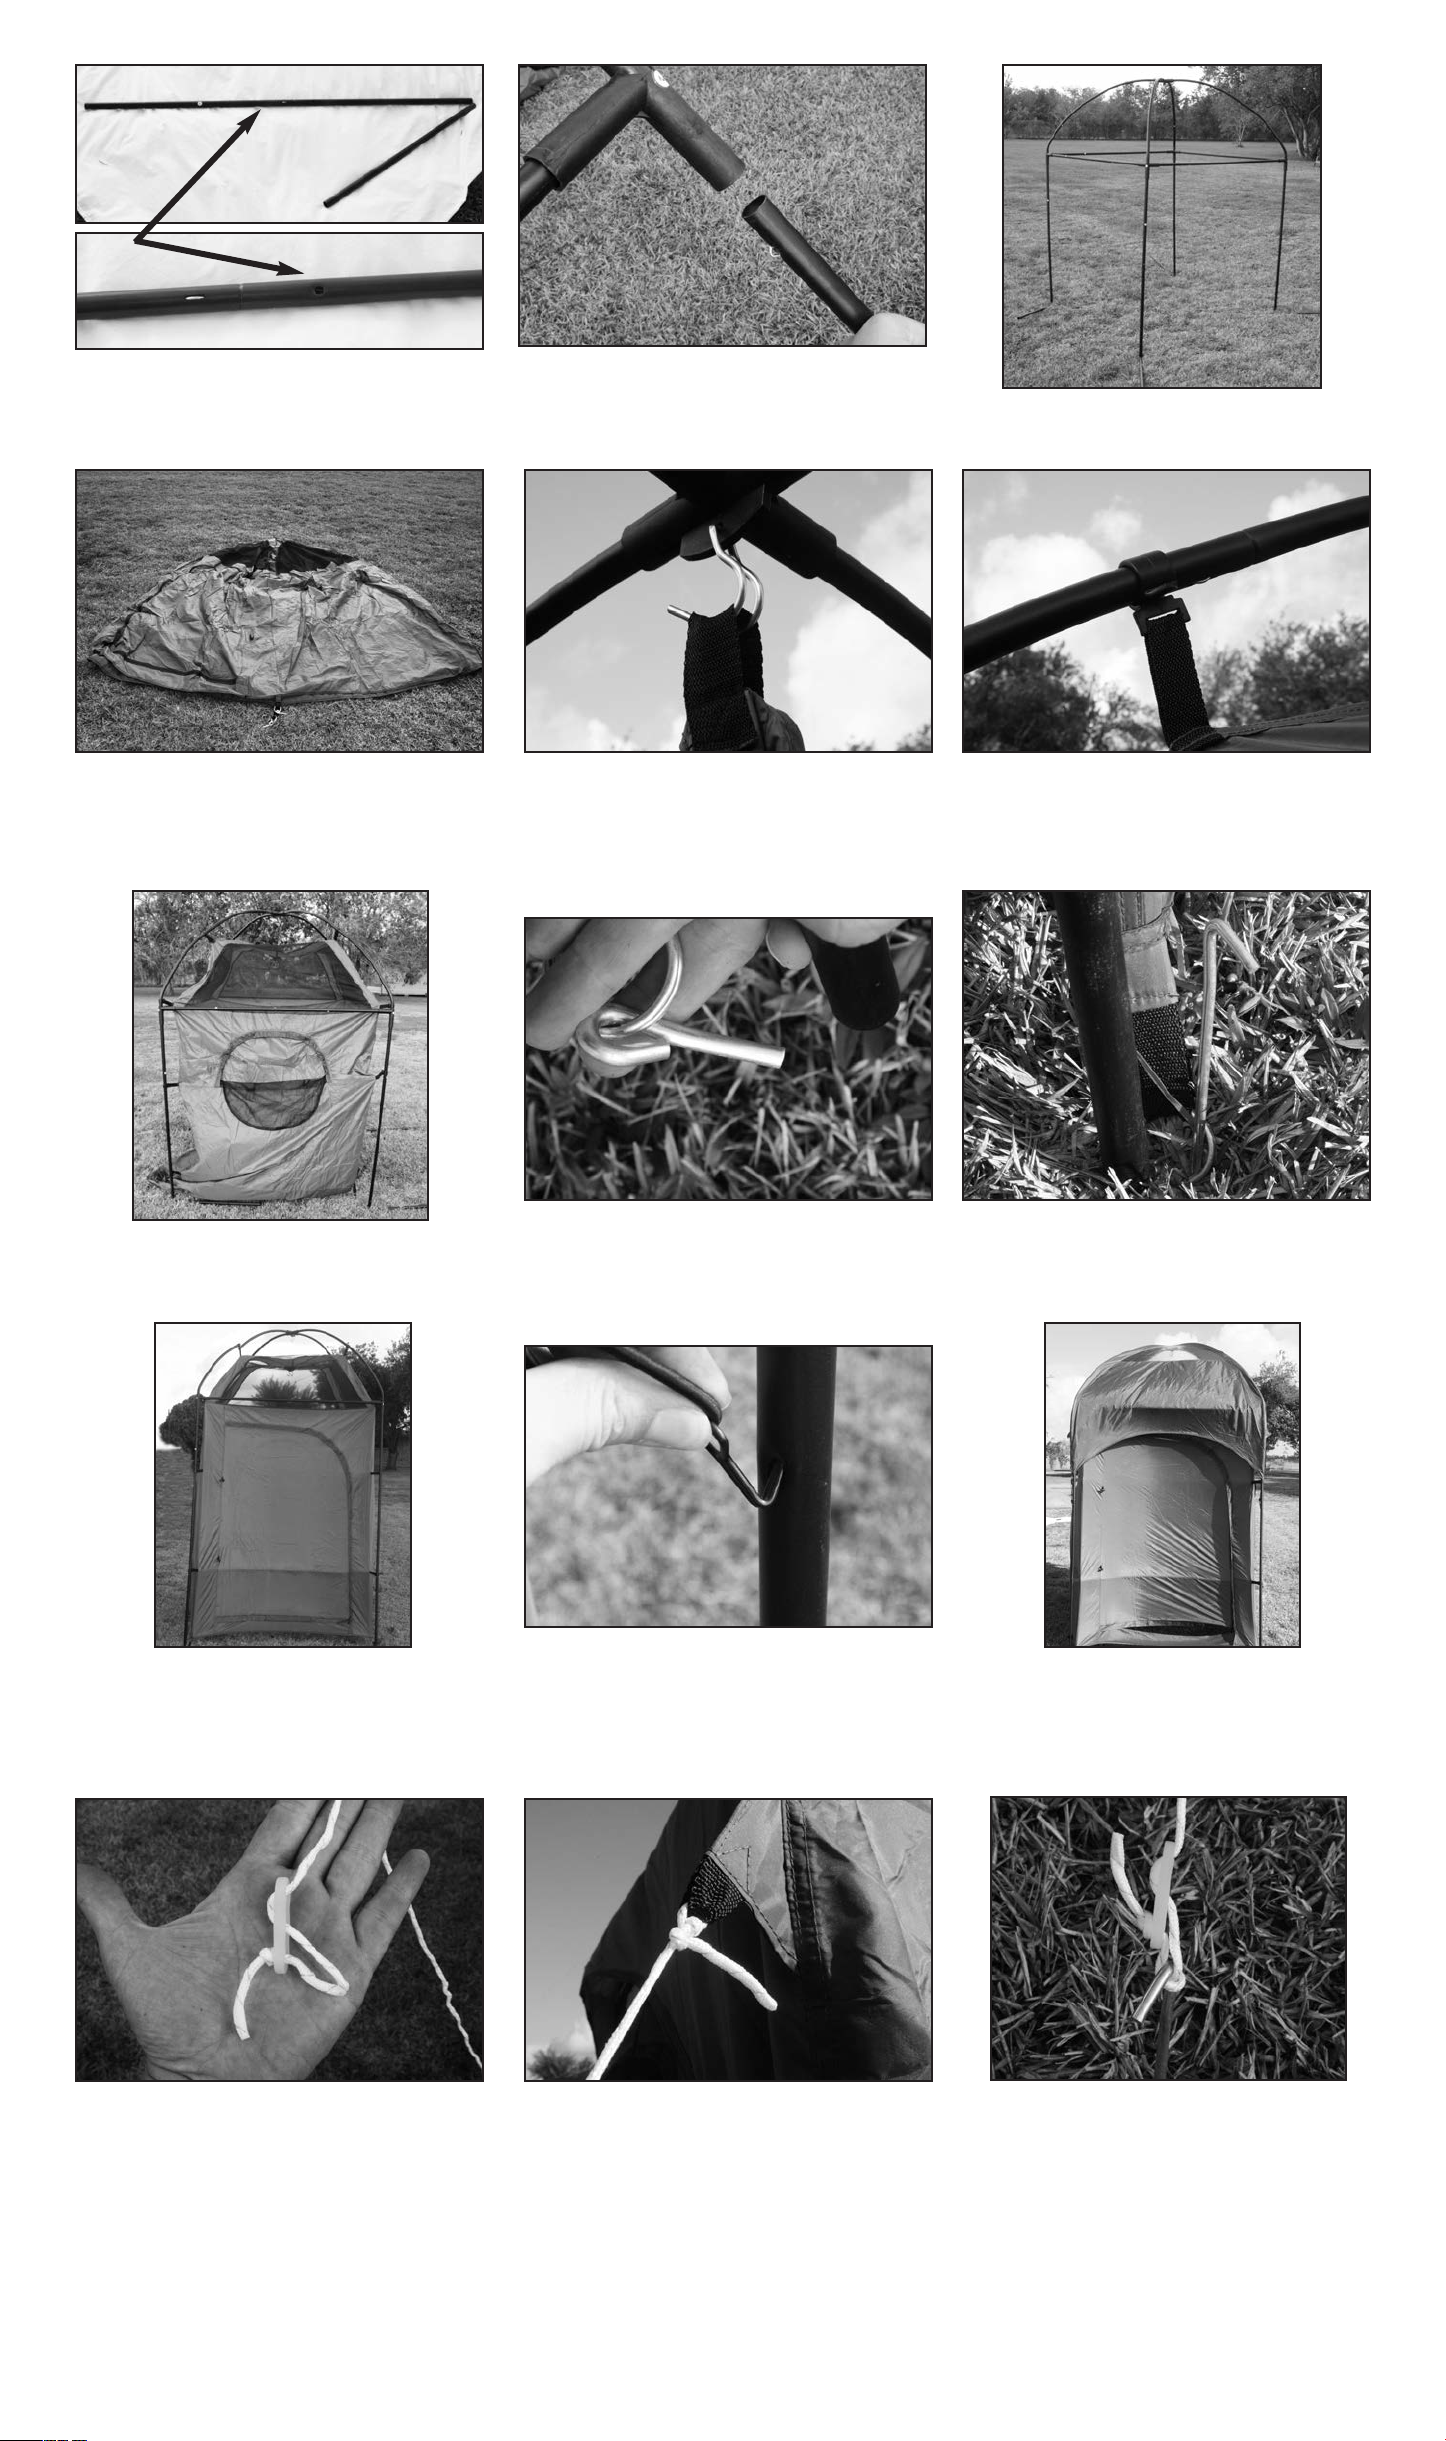
PASO 22 – COLOQUE LAS CORREAS DE
TOALLEROS (J) DENTRO DE LOS POSTES
DEL TECHO LATERALES DE LA
REGADERA/TIENDA DE CAMPAÑA CON
LOS GANCHOS RÁPIDOS.
PASO 23 - INSERTE UN POSTE DE
TOALLERO (B) DENTRO DE LOS LAZOS EN
LAS CORREAS.
PASO 24 – ENGANCHE LA REGADERA DE
CAMPAMENTO DEL GANCHO ADJUNTO
DENTRO DE LA REGADERA/TIENDA DE
CAMPAÑA COMO SE MUESTRA ARRIBA.
TAMBIÉN PUEDE UTILIZAR LA CUERDA IN-
CLUIDA.
PASO 25 – PARA COLOCAR EL CARRITO DE
BAÑERA ADENTRO, INSERTE EL PEQUEÑO
PASADOR EN EL ANILLO. PASO 26 – ASEGURE TODOS LOS
PASADORES A TRAVÉS DE LOS ANILLOS
COMO SE MUESTRA ARRIBA.
PRECAUCIÓN: Las telas para com o de tienda de campaña-regadera de lujo de Texsport son pirorre-
tardantes tratadas de conformidad con la especificación C.P.A.I.-84. Sin em argo, por su seguridad, re-
comendamos NO USAR FLAMAS ABIERTAS DENTRO O CERCA DE LA CASA DE CAMPAÑA.
INFORMACIÓN ADICIONAL: Siempre asegurar la carpa (con las estacas incluidas). Estacar una es-
quina, después las siguientes consecutivamente en sentido de las manecillas del reloj. Asegurarse de que
la carpa no esté floja. Siempre poner la carpa a una distancia segura de la fogata – una carpa que no
esté ien estacada u icada contra el viento hacia la fogata puede volar hacia ésta. Una carpa u icada
a favor del viento de la fogata a menudo puede reci ir pequeñas chispas que pueden quemar orificios
en las telas ligeras de la carpa.
PARA QUE LA CARPA QUEDE A PRUEBA DE AGUA: Las com o de tienda de campaña-re-
gadera de lujo Texsport están hechas con telas cu iertas con repelentes de agua. Sin em argo, el pro-
ceso de costura, necesario en la fa ricación de todas las com o de tienda de campaña-regadera de
lujo, puede ocasionar filtraciones de agua donde las agujas para coser hayan perforado la tela en las
costuras. Sin tratamiento, la carpa tendrá goteras. Todas las com o de tienda de campaña-regadera de
lujo nuevas necesitan sellar las costuras para que queden a prue a de agua. Recomendamos usar el Sel-
lador de costuras a prue a de agua de Texsport que se puede conseguir en las tiendas de artículos para
campamento. NO APLICAR ESTE SELLADOR EN LOS CIERRES.
ESTACAS: Todas las com o de tienda de campaña-regadera de lujo de en estacarse. Las estacas proporcionadas con la carpa son eficaces en la mayoría de condi-
ciones; sin em argo, se recomiendan estacas especializadas en ciertos casos:
a. Estacas para arena: Estacas largas diseñadas para sostenerse en arena suelta.
. Estacas de acero: Más eficaces en suelos duros, rocosos o congelados. Se pueden oxidar y sus ordes agudos pueden dañar la carpa si se guardan con ella.
En suelos extremadamente duros se puede usar una varilla de acero para hacer la guía del orificio para la estaca.
c. estacas rocheta: de peso ligero pero con menos fuerza para sostener la carpa que las estacas estándar.
d. Estacas para nieve: El método más común es enterrar o jetos con una muy Buena área de superficie en la nieve, por ejemplo, ramas, platones de alu-
minio, costales rellenos o olsas de carpa rellenas con nieve y enterradas: (a este se le refiere como el método del muerto). Las com o de tienda de campaña-regadera
de lujo tam ién pueden asegurarse a esquís o astones que se meten en la nieve.
CIERRES: Si se atora un cierre, lu ricar con silicón. Nunca forzar un cierre que tenga material atorado pues esto lo puede do lar y evitar que se cierre. El uso continuo
en un entorno arenoso puede ocasionar que el cierre se desgaste y no se pueda cerrar.
ALMACENAMIENTO: Las com o de tienda de campaña-regadera de lujo de en guardarse secas y do ladas sin apretar lejos del calor y el agua. Mantener fuera del
alcance de los ratones pues les gusta anidar en ellas. Nunca guardar directamente so re el concreto pues la humedad y los químicos de este pueden dañar el nailon.
LAVADO: Lavar a mano con una esponja usando ja ón suave. Nunca usar detergentes o lavadoras pues se podría dañar la cu ierta o las costuras. Recuerde usar un
sellador de costuras una vez que la carpa se haya lavado para asegurar que sigue a prue a de agua.
¿CUÁNTO TIEMPO DURA UNA CARPA DE NAILON? Varias condiciones afectan la duración del servicio que reci e:
a. Una carpa de nailon que se deje erigida todo el verano puede durar solo una o dos temporadas pues los rayos ultravioleta del sol dañan la fi ra.
. Nunca guardar una carpa húmeda o mojada pues se puede producir moho. Sin em argo esto no daña al nailon pero el moho es antiestético y podría afectar
otras partes de carpa (cintas de los cierres).
c. Evitar poner repelentes de insectos o sprays para el pelo, etc. En la tela de la carpa pues estos productos pueden ser dañinos.
REPARACIONES: Para pequeñas rasgaduras usar un parche adhesivo de nailon. Recomendamos el Equipo de reparación de com o de tienda de campaña-regadera
de lujo de nailon de Texsport (#14113) que puede o tenerse en tiendas de productos para acampar.
PREGUNTAS:
Si tiene preguntas, pro lemas o comentarios, por favor comuníquese con nuestro Departamento de Servicio al
Cliente al 1-800-231-1402 o envíe un correo electrónico a info@texsport.com. Este departamento está a ierto
de lunes a viernes de 8 a.m.–5 p.m. CST.
PASO 27 – PARA COLOCAR EL PISO
DESMONTABLE, SUJÉTELO A LA PARTE IN-
FERIOR DE LAS SOLAPAS DE FIJACIÓN
PARA ESTACAS DE LA REGADERA/TIENDA
DE CAMPAÑA.
MODELO:
COMBO DE TIENDA DE CAMPAÑA-
REGADERA DE LUJO #01082
HECHO EN CHINA
EMC13
01082 Instructions 9-12_Layout 1 10/20/12 1:07 PM Page 9
Table of contents
Languages:
Other Texsport Camping Equipment manuals