TFC TS1 User manual
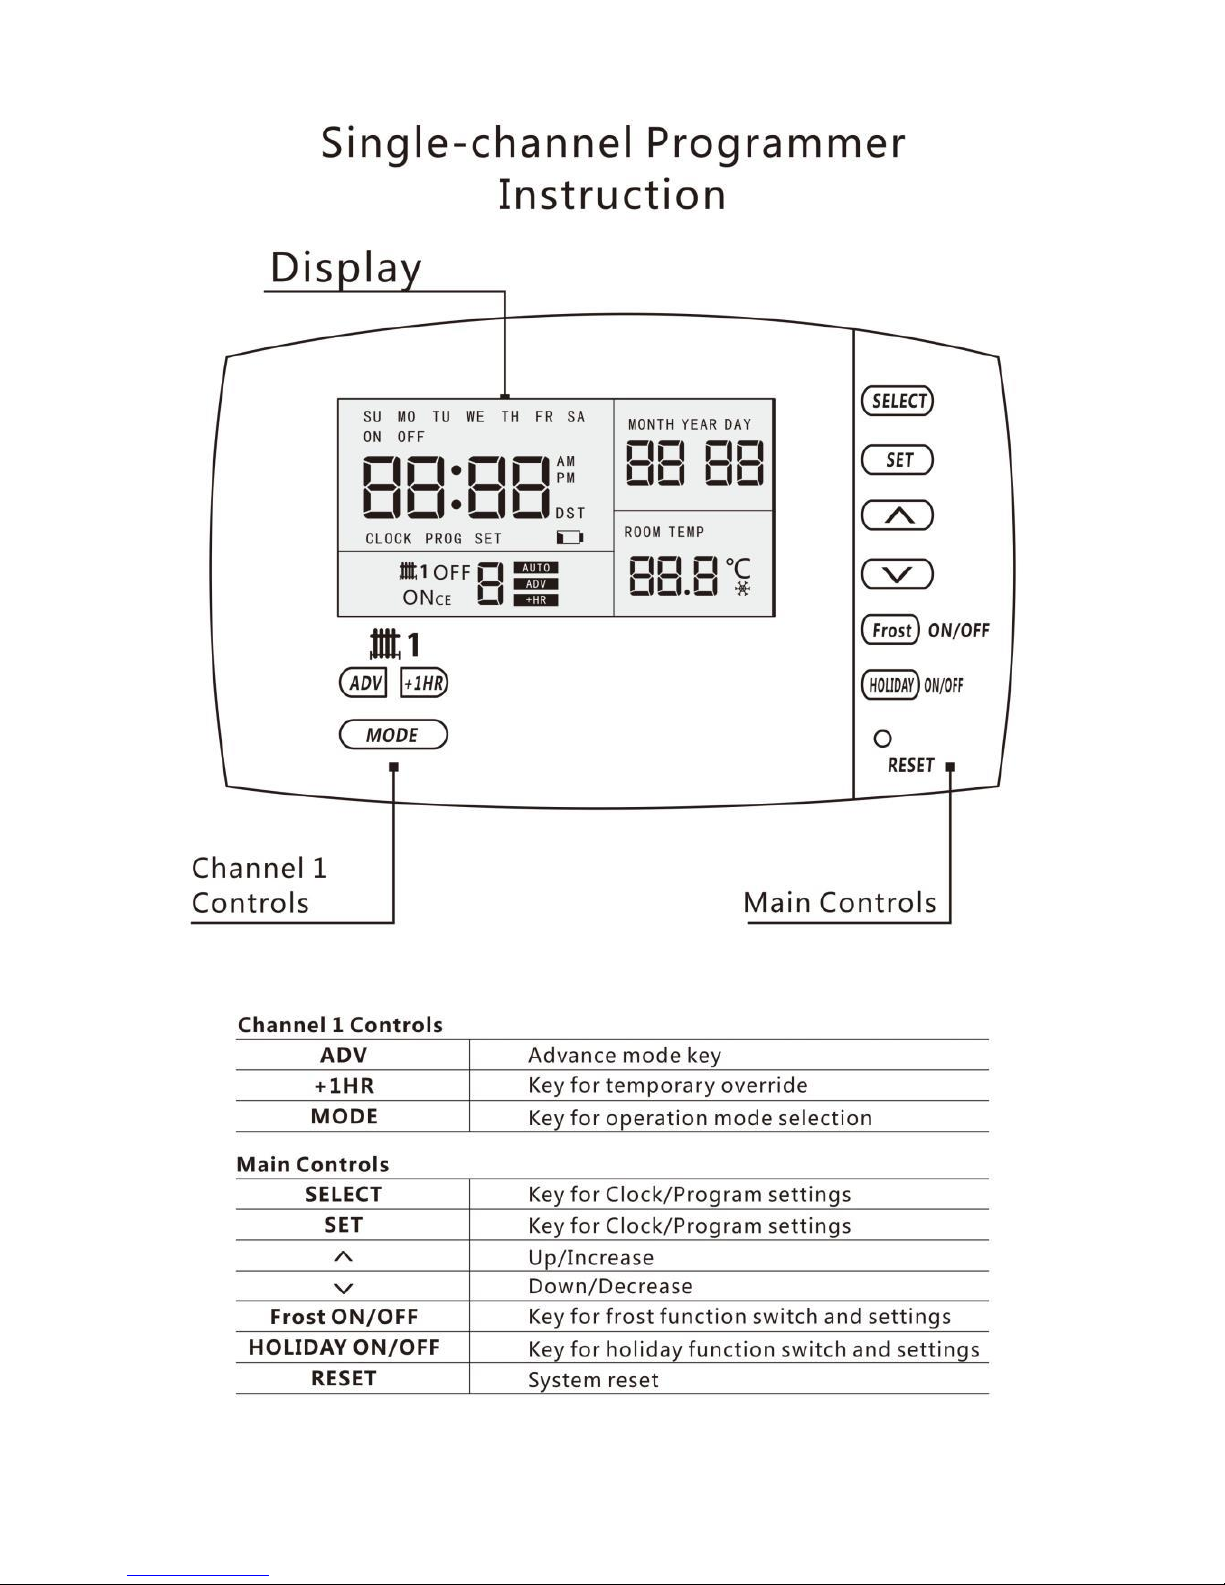
1.Normal Mode
2. Clock and Date Setting
2.1
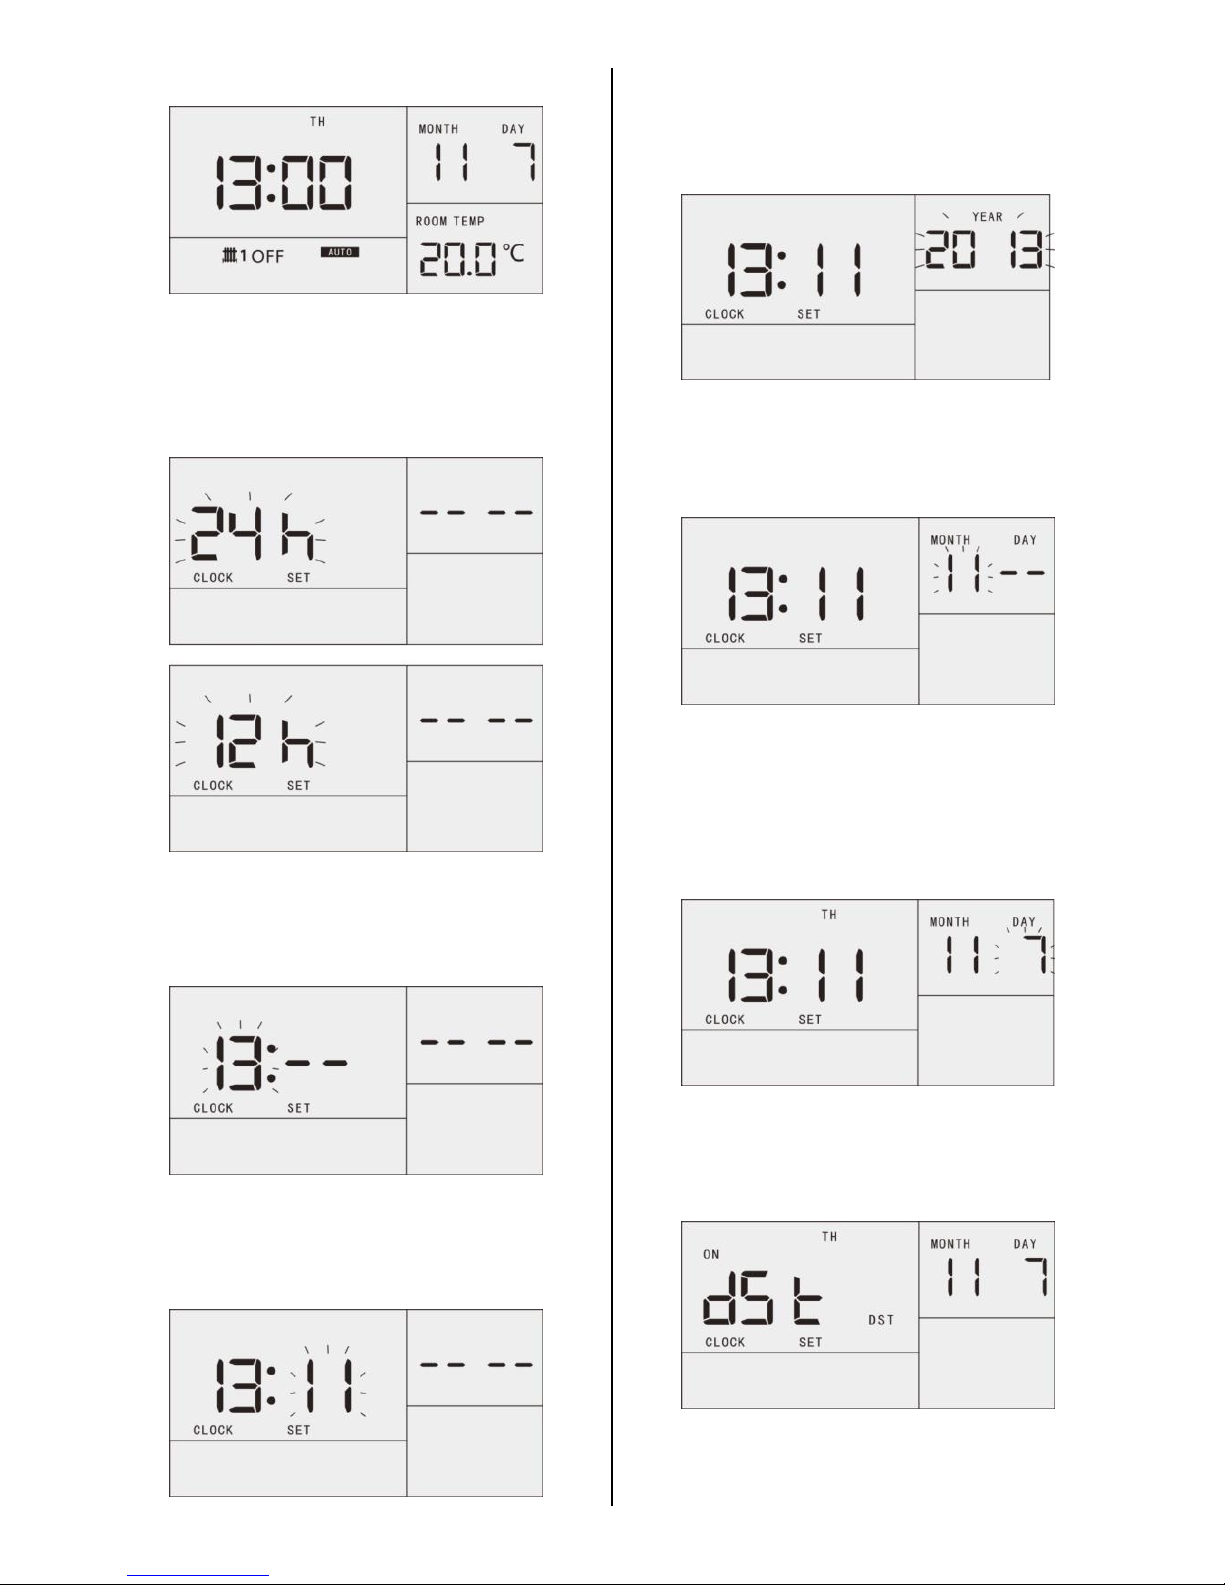
Press Both [SET] and [SELECT] for 3 seconds during
Normal Mode to enter the following screen.
Press [UP] or [DOWN] to select 24hr mode or 12hr mode.
2.2
Press [SELECT] button to set hour in following screen,
Then press [UP] or [DOWN] to set hour.
Press and hold [UP] or [DOWN] to scroll quickly.
2.3
Press [SELECT] button to set minute in following screen,
Then press [UP] or [DOWN] to set minute.
Press and hold [UP] or [DOWN] to scroll quickly.
2.4
Press [SELECT] button to set year in following screen,
Then press [UP] or [DOWN] to set year.
Press and hold [UP] or [DOWN] to scroll quickly.
2.5
Press [SELECT] button to set month in following screen,
Then press [UP] or [DOWN] to set month.
Press and hold [UP] or [DOWN] to scroll quickly.
2.6
Press [SELECT] button to set day in following screen,
Then press [UP] or [DOWN] to set day.
Press and hold [UP] or [DOWN] to scroll quickly.
The weekday will automatically calculate and display
during adjusting.
2.7
Press [SELECT] button to set daylight saving time in
following screen, Then press [UP] or [DOWN] to switch it
on/off.
Daylight saving time is set to ON
DST symbol displays.
Daylight saving time is set to OFF
DST symbol disappears.
Daylight saving time:When enabled, the clock will
automatically shift 1 hour ahead of the set standard time
from the last Sunday in March at 2:00am until the last
Sunday in October at 2:00am.
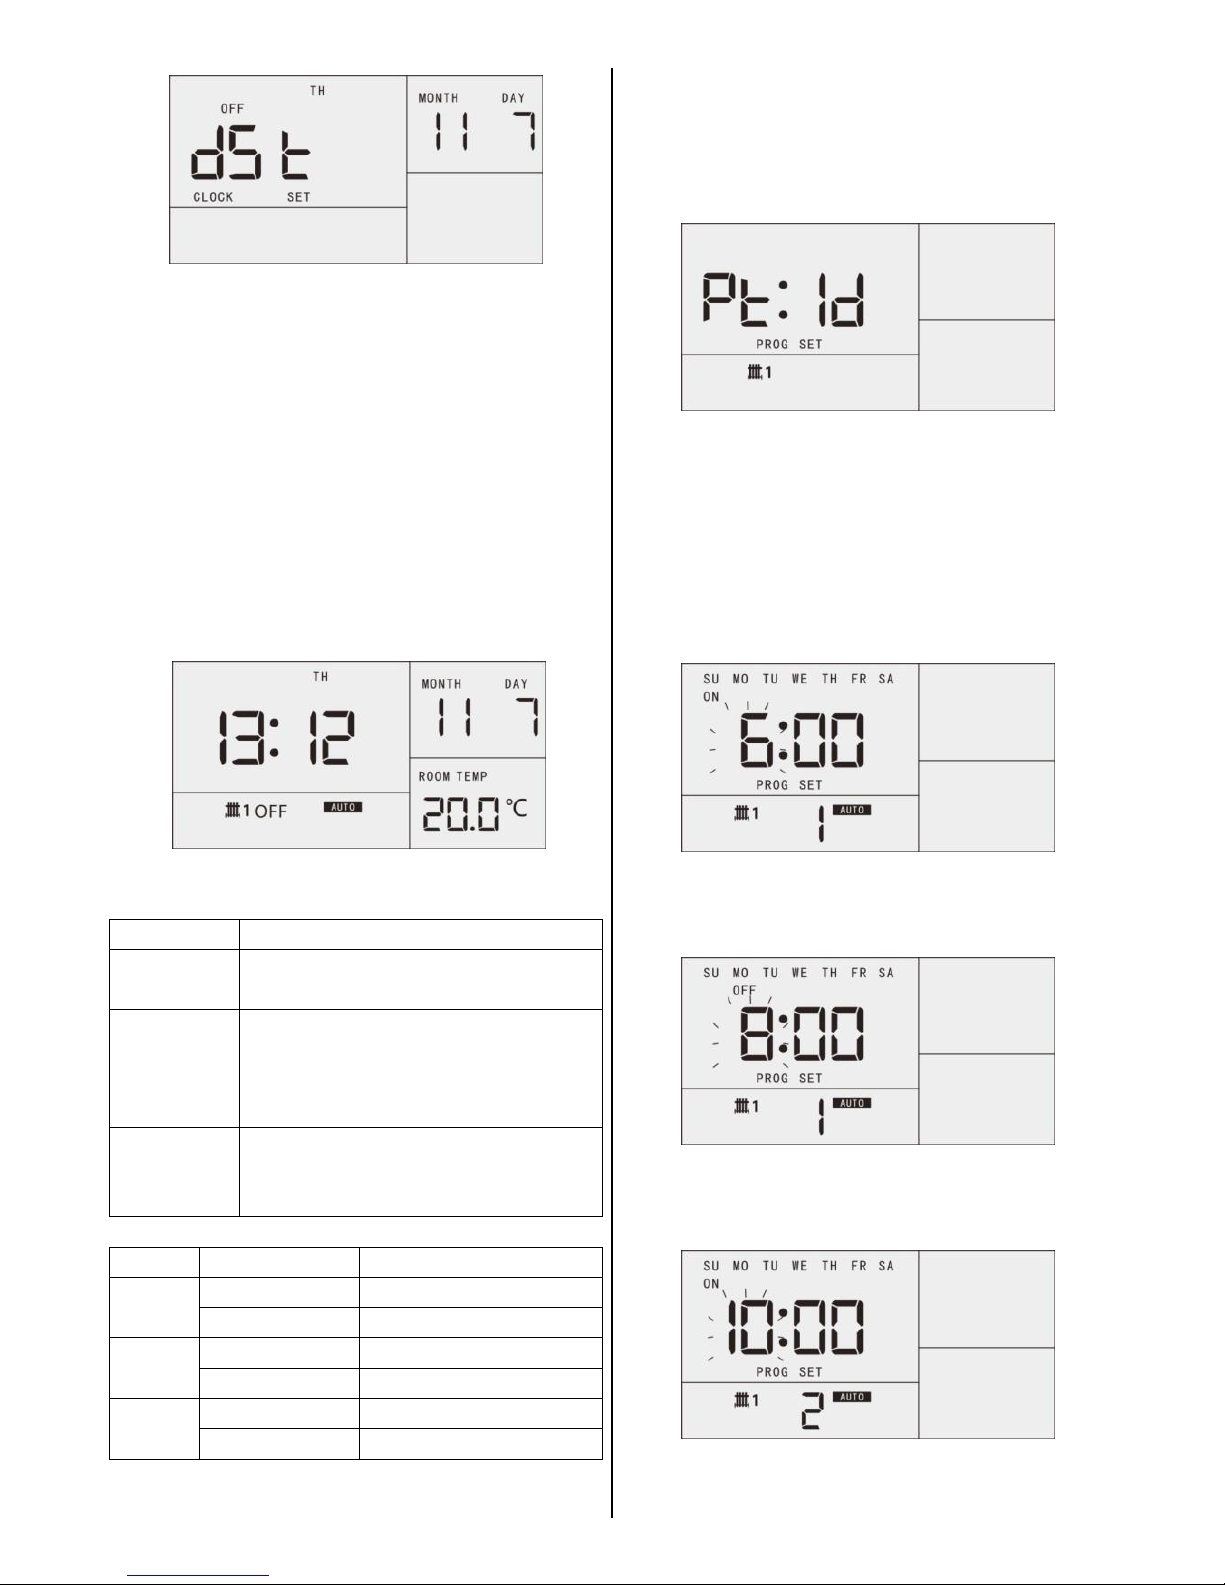
2.8
Press [SELECT] to go back to 2.1.
Press [SET] to confirm setting and back to Normal Mode.
The device will automatically confirm settings and revert
to Normal Mode, if no button is pressed for 15 seconds
.
3. Program Setting
Type
Operation
1day
Every day of the week is programmed
with the same ON/OFF times.
5/2day
Monday to Friday are programmed with
the same ON/OFF times.
Saturday to Sunday are programmed with
the same ON/OFF times.
7days
Each day of the week is programmed
independently thereby allowing different
ON/OFF times.
Factory default program setting (in 24hr mode)
Prog
Switching
[1day] [5/2day] [7days]
1
ON
6:00
OFF
8:00
2
ON
10:00
OFF
12:00
3
ON
18:00
OFF
22:00
3.1
Press [SET] Button at normal mode to enter into Main
Program Setting Mode.
Press [UP] or [Down] to select program type.
LCD display: 1day=Pt:1d 5/2day=Pt:52 7day=Pt:7d
3.2.1
1day mode program setting.
After selecting the 1day program type, press the channel
1 [MODE] button to confirm and to set the channel 1
program.
To set Channel 1 P1-ON.
Press [UP] or [DOWN] to set hour. Then press [SELECT]
and press [UP] or [DOWN] to set minute.
Press [SELECT] to set Channel 1 P1-OFF.
Press [UP] or [DOWN] to set hour. Then press [SELECT]
and press [UP] or [DOWN] to set minute.
Press [SELECT] to set Channel 1 P2-ON.
Press [UP] or [DOWN] to set hour. Then press [SELECT]
and press [UP] or [DOWN] to set minute.
Press [SELECT] to select among the items to be reviewed
or adjusted with the below sequences.
P1ON(Hour→Minute) →P1OFF(Hour→Minute) →
P2ON(Hour→Minute) →P2OFF(Hour→Minute) →
P3ON(Hour→Minute) →P3OFF(Hour→Minute) →
P1ON(Hour→Minute)
Press [SET] at any
time to confirm current setting and go back to main
program setting mode, then press [SET] to go back to
normal mode.
The device will automatically confirm current setting and
revert to Normal Mode, if no button is pressed for 60
seconds.
3.2.2
5/2day mode program setting.
After selecting the 5/2day program type, press the
channel 1 [MODE] button to confirm and to set the
channel 1 program.
To set Channel 1 Weekday P1-ON.
Press [UP] or [DOWN] to set hour. Then press [SELECT]
and press [UP] or [DOWN] to set minute.
Press [SELECT] to set Channel 1 Weekday P1-OFF.
Press [UP] or [DOWN] to set hour. Then press [SELECT]
and press [UP] or [DOWN] to set minute.
Press [SELECT] to set Channel 1 Weekday P2-ON.
Press [UP] or [DOWN] to set hour. Then press [SELECT]
and press [UP] or [DOWN] to set minute.
Press [SELECT] to select among the items to be reviewed
or adjusted with the below sequences.
Weekday P1ON(Hour→Minute) →Weekday
P1OFF(Hour→Minute) →
Weekday P2ON(Hour→Minute) →Weekday
P2OFF(Hour→Minute) →
Weekday P3ON(Hour→Minute) →Weekday
P3OFF(Hour→Minute) →
Weekend P1ON(Hour→Minute) →Weekend
P1OFF(Hour→Minute) →
Weekend P2ON(Hour→Minute) →Weekend
P2OFF(Hour→Minute) →
Weekend P3ON(Hour→Minute) →Weekend
P3OFF(Hour→Minute) →
cycle back to Weekday P1ON(Hour→Minute)
Press [SET] anytime to confirm current setting and go
back to main program setting mode, then press [SET] to
go back to normal mode.
The system will automatically confirm current settings
and go back to Normal Mode, if no button is pressed for
60 seconds.
3.2.2
7day mode program setting.
After selecting the 7day program type, press the channel
1 [MODE] button to confirm and to set the channel 1
program.
To set Channel 1 Monday P1-ON.
Press [UP] or [DOWN] to set hour. Then press [SELECT]
and press [UP] or [DOWN] to set minute.
Press [SELECT] to set Channel 1 Monday P1-OFF.
Press [UP] or [DOWN] to set hour. Then press [SELECT]
and press [UP] or [DOWN] to set minute.
Press [SELECT] to set Channel 1 Monday P2-ON.
Press [UP] or [DOWN] to set hour. Then press [SELECT]
and press [UP] or [DOWN] to set minute.

Press [SELECT] to select among the items to be reviewed
or adjusted with the below sequences.
Monday P1ON(Hour→Minute) →Monday P1OFF(Hour→
Minute) →
Monday P2ON(Hour→Minute) →Monday P2OFF(Hour→
Minute) →
Monday P3ON(Hour→Minute) →Monday P3OFF(Hour→
Minute) →
......
Sunday P1ON(Hour→Minute) →Sunday P1OFF(Hour→
Minute) →
Sunday P2ON(Hour→Minute) →Sunday P2OFF(Hour→
Minute) →
Sunday P3ON(Hour→Minute) →Sunday P3OFF(Hour→
Minute) →
cycle back to Monday P1ON(Hour→Minute)
Press [SET] anytime to confirm current setting and go
back to main program setting mode, then press [SET] to
go back to normal mode.
The system will automatically confirm current setting and
go back to Normal Mode, if no button is pressed for 60
seconds.
Note: After confirming / adjusting the program
settings, all channels will reset to auto mode.
4. Operating Mode Selection
4.1 Normal Operating Mode
ON
Continuously on
ONCE
On for 1 period a day, from
Program 1 ON to Program 3 OFF
AUTO
Automatic program control
OFF
Continuously off
Press [MODE] of Channel 1 Controls to select different
operating modes with the below sequences.
ON→ONCE→AUTO→OFF→ON
Operating mode: ON
Operating mode: ONCE
Operating mode: AUTO
Operating mode: OFF
4.2 Special Operating Mode
4.2.1 [+1Hr] function.
Press [+1Hr] of Channel 1 Controls to temporarily switch
on channel 1. Subsequent press of [+1Hr] to increase the
duration by 1 hour. Maximum duration is 9 hours. If the
number rolls back to "0", this will disable the [+1Hr]
Program Override.
Press [SET] or wait 5 seconds without key press to start
counting down.
Press [+1Hr] to set the number to “0” to cancel.

+1Hr function is activated.
Note: Remaining run time, 1minute to 60minutes will be
indicated as 1hour
[+1Hr] function can be activated from AUTO, ON, ONCE
and OFF modes.
4.2.2 Advance function.
This function allows the user to bring forward the next
switching time.
If the channel is currently timed to be OFF and the ADV is
pressed, the channel will be switched ON until the next
switching time.
if the channel is currently timed to be ON and the ADV is
pressed, the channel will be switched OFF until the next
switching time.
Press the [ADV] button of channel 1 controls to advance
channel 1.
Press the respective [ADV] button to cancel this function.
ADV function is activated
[ADV] function can be activated from AUTO and ONCE
modes.
4.2.3 Note
Only one special operation mode can be activated at the
same time. If [+1Hr] is activated, the [ADV] cannot be
set to be activated.
When a special operation mode is activated, the normal
operation mode cannot be selected, until the special
operation is deactivated, or manually cancelled.
5. Other functions
5.1 Frost Protection function
This function is set to protect pipes against freezing or to
prevent low room temperature when the programmer is
programmed to be OFF, or is manually OFF.
At normal mode screen, press and hold [Frost ON/OFF]
for 3seconds to set the frost protection temperature.
Then press [UP] or [DOWN] to adjust. Selectable range
5~20℃in 0.5℃steps.
At normal mode screen, press [Frost ON/OFF] button one
time to activate this function, denoted by the display frost
symbol. Press [Frost ON/OFF] button again to deactivate,
and the frost symbol `will disappear.
When the Frost Protection starts to work, the frost
symbol will flash. All channels will be switched ON in the
event of the room temperature falling to the frost
protection set point.
5.2 Holiday Mode
At normal mode screen, press and hold [HOLIDAY
ON/OFF] for 3seconds to enter holiday mode setting
mode.
Press [UP] or [DOWN] to adjust. Selectable 0~60days
Then press [SET] to confirm setting, and activate holiday
mode.
All channel will be switched OFF, until the holiday mode is
deactivated.

Press and hold [HOLIDAY ON/OFF] button for 3seconds
to deactivate, when the holiday mode is activated. The
programmer returns to normal mode.
The Programmer counts each pass through midnight as a
day.
6. Other & Specifications
Press any key to activate Backlight.
The backlight will automatically turn off 5 seconds after
all keys are released.
LCD backlight can only operate when AC supply is
connected.
LCD backlight is illuminated throughout the Clock,
Program, and Temporary Override Temperature settings.
If the AC supply fails, the programmer will stop working.
The cell battery will keep the clock working and saves the
program setting for 1 year.
Replace the cell battery, when the battery symbol is
flashing on the display.
Replacement battery model: CR2032
Power supply: 230VAC 50/60Hz
Switch rating: @ 230VAC 3(1)A
Operating temperature range:0~50OC
Table of contents


