THE GALLERY COLLECTION Inset Electric User manual
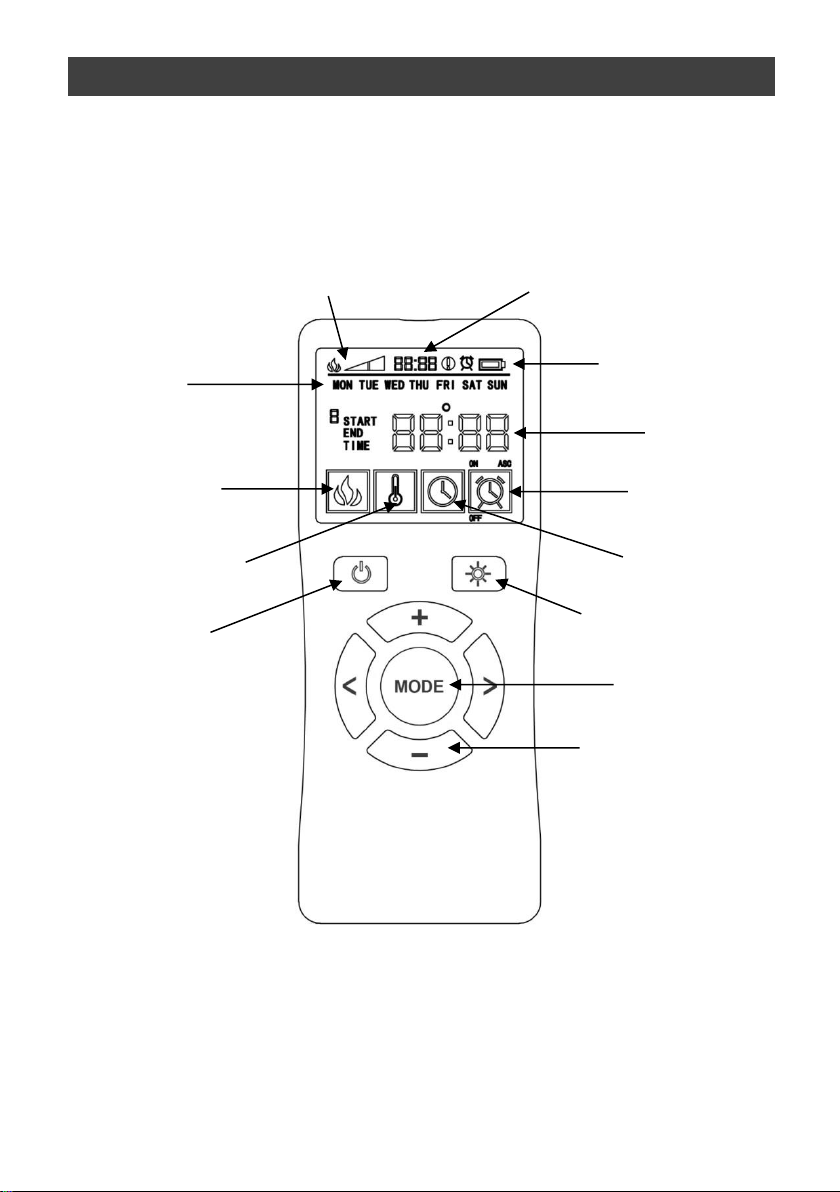
FIRE
Inset Electric
THEGALLERYCOLLECTION.CO.UK

INSTALLATION AND USER GUIDE
READ CAREFULLY AND KEEP FOR FUTURE REFERENCE
THIS PRODUCT IS ONLY SUITABLE FOR WELL
INSULATED SPACES OR OCCASIONAL USE
INSTALLATION AND USER GUIDE
READ CAREFULLY AND KEEP FOR FUTURE REFERENCE
THIS PRODUCT IS ONLY SUITABLE FOR WELL
INSULATED SPACES OR OCCASIONAL USE

oWARNING: In order to avoid overheating, do not cover the heater or air vents
located on the appliance.
oCAUTION: Some parts of this product can become very hot and cause burns.
Under no circumstances should persons under the age of 12 be left alone with the
product when it is in operation unless a suitable fireguard is used to protect them
against the possibility of coming into direct contact with the appliance.
oIf the supply cord is damaged, it must be replaced by the manufacturer, its service
agent or similarly qualified persons in order to avoid a hazard.
oParticular attention has to be given where children and vulnerable people are
present.
oThe heater must not be located immediately below a socket-outlet.
oThe plug must remain easily accessible after installation of the appliance.
oOnly use this heater on a 240V AC 6Amp circuit. NEVER overload the circuit.
oDo not use this heater in the immediate surroundings of a bath, a shower or a
swimming pool.
oKeep the appliance away at least 1 meter from furniture, curtains or other
combustible material when in use.
oThis appliance is intended for indoor use only and is not suitable for outdoor
operation.
oDo not use the appliance in rooms with explosive gas (e.g. petrol) or while using
inflammable glue or solvent (e.g. when gluing or varnishing parquet floors, PVC
etc.).
oDo not insert any objects into the appliance.
oDo not place the power cord under carpet or a rug.
oDo not operate the appliance near flammable materials or fire.
oSwitch off and unplug the appliance from the mains socket when not in use or
before cleaning and maintenance.
oRegularly inspect all air vents to make sure they are free from dust, lint or any other
blockage. Unplug the unit and clean with a vacuum cleaner only. Do not rinse or
get wet.
oDo not clean the appliance with abrasive cleaners.
oThis product is not intended for use as a primary heat source. It is for supplemental
heat only.
oNever modify this heater. Doing so could result in personal injury or property
damage and would void warranty.
IMPORTANT INFORMATION


Carefully unpack the appliance and dispose of the packaging responsibly. Keep plastic
wrapping away from children.
Offer the appliance to the intended installation location and fix in place using using
appropriate screws (not supplied) through the holes indicated below with black arrows.
Take the decorative trim and offer to the appliance. The magnets (indicated below with
white arrows) will secure the decorative trim to the appiance.
NOTE: Some decorative trims may require additional magnets to achieve a firm grab. If
required, these additional magnets are packed with the decorative trim. Gently place one
of the additional magnets onto each of the existing magnets indiciated below with white
arrows.
Arrange the fuel onto the appiance. The crystals, logs, pebbles or 1 piece coal bed can
be arranged directly onto the plastic fuel bed.
INSTALLATION
Plastic Fuel Bed

This appliance can be operated manually (with limited, basic functions only) or by remote
control.
Manual Control
Ensure that the appliance is turned on at the mains. Locate the manual operating buttons
situated to the right side of the heater outlet.
BUTTON
FUNCTION
ACTION & INDICATION
ON: Enables control panel functions and
remote
control.
OFF: Disables control panel functions
and remote
control.
ON: Turns the flame effect on at its brightest
setting. All functions are on standby,
and the
flame on.
OFF. Flame effect turns off.
Power and all
functions
turn off.
HEATER buttons: Turns heater on and off.
NOTE: The heater only
works when the
flame effect is on. If the flame effect is
off,
the heater will not turn
on.
NOTE: Heating at Level 2
only works
when the Level 1 heat setting is active.
NOTE: To prevent overheating, the heater
blows cool
air for 10 seconds after the
heater turns
off.
Press once. Heating at Level 1 will
commence.
Press once. Heating at Level 2 will
commence.
Press twice. Heating at Level 2
turns off and returns to Level 1 heating.
Press twice. All heating turns off. The
Heater blows cool air for 10 seconds then
turns off.
USER INSTRUCTIONS - OPERATION
Power ON/OFF
Heater –Level 1 (1kW)
Heater –Level 2 (2kW)

Remote Control
USER INSTRUCTIONS - OPERATION
Current Mode
Battery Level
Day
Current Time
Timer Settings
Flame Effect &
Heating Mode
Temperature Mode
Timer Mode
Set Date/Time
Select Mode
Power/Standby
Adjust
flame/fuel bed
colour
Plus/minus buttons to
adjust heat setting
(1kW/2kW)

Remote Control
When the appliance is in standby mode, the remote control will show the current time,
battery level and operating mode at the top of the screen.
The appliance can be turned on by pressing the POWER/STANDBY button on the remote
control. This will turn on the flame effect only. The desired operating mode can then
be selected.
Flame Effect and Heating Mode
Press the MODE button to choose . The flame and heating function can now be
adjusted. The symbol will show in the top left of the display.
When the appliance is turned on, the flame is at its brightest setting.
To adjust the colour of the flames/fuel bed, press the button. The flames will
cycle through the full spectrum of colours available. A second press of the button will
stop the cycling and select the current colour.
Press the +/- buttons to adjust the heating between Level 1 (1kW) and Level 2 (2kW)
Temperature Mode (Thermostatic)
In temperature mode, a specific temperature limit can be set so that the appliance
automatically turns off the heater when the room temperature reaches that limit, after
which the appliance will continue to operate in flame effect mode only. The temperature
range that can be set is:
Fahrenheit 65-95°F
Centigrade 18-35°C
Press MODE to choose . Continue to press MODE to choose between Fahrenheit
and Centigrade settings.
Press +/- buttons to select the required temperature limit and activate the heater.
For the heater to operate in Temperature mode, the set temperature limit must be
higher than the current room temperature. If the temperature limit is set lower than the
current room temperature then the appliance will operate on flame effect mode only.
USER INSTRUCTIONS - OPERATION
Level 1
Level 2

When the appliance is in standby mode, the remote control will show the current time,
battery level and operating mode at the top of the screen.
Timer Mode
In timer mode the appliance can be set to operate and turn off at a set of pre-
programmed times.
Timer Mode - Setting the Day/Time
Press MODE to choose . ‘MON’ will blink on the screen.
Press +/- buttons to select a date from ‘MON’ to ‘SUN’.
When correct day is blinking press </> buttons to select the hour setting. The hour
setting will now blink –press the +/- buttons to select the correct hour.
When the correct hour is blinking press </> buttons to select the minute setting. The
minute setting will now blink –press the +/- buttons to select the correct minute.
Timer Mode - Setting the Programme
Press MODE to choose . ‘OFF’ will blink under the icon.
Press +/- buttons to highlight ‘ON ASC’ above the icon. This switches to smart
mode. Press > button to move to the next step.
Press MODE button to highlight the day to set a programmed start/end time to
operate the heater. Press +/- to cycle between ‘MON’ and ‘SUN’. When the correct
day is blinking press </> to adjust the start time setting.
The word ‘START’ and the will now blink on the screen. Press +/- buttons to
select the correct hour. Press > to move to the next step.
The ‘START’ and minutes will now blink on the screen. Press +/- buttons to select the
correct minute. Press > to move to the next step.
The word ‘END’ and the will now blink on the screen. Press +/- buttons to select
the correct hour. Press > to move to the next step.
The ‘END’ and minutes will now blink on the screen. Press +/- buttons to select the
correct minute. Press > to move to the next step.
USER INSTRUCTIONS - OPERATION

The temperature display will now blink. Press +/- buttons to select the correct
temperature.
Press > to move to the next step. Note: A sound will be heard to indicate you have
completed the preset time mode.
Repeat the steps above to preset each day of the week.
Note: If Timer Mode has been programmed incorrectly, e.g. the END time is earlier than
the START time, will show on the screen.
Note: When Timer Mode is on, the icon will show on the top of the screen.
Note: When the battery power is low the battery log will blink on the screen. You should
insert a new battery. The original settings can remained programmed for up to 30
minutes after the battery is taken out of the remote control handset.
Ensure that the appliance is completely cooled down and disconnected from the mains
supply before undertaking any cleaning or maintenance work.
Do not use abrasive cleaners.
Use a lightly damp cloth to wipe clean the glass panels and metal surfaces.
Keep the air inlets clear and free from dust and debris. Regular cleaning is advised to
prevent performance problems. Clean the areas around the air inlets (indicated with
arrows below) with a soft cloth/duster or vacuum cleaner.
USER INSTRUCTIONS - OPERATION
CLEANING & MAINTENANCE

No power to the appliance
Check that the appliance is connected to the mains supply and switched on
Check the remote control batteries
Check the consumer unit breaker has not tripped
Check the fuse in the plug
Confirm the output from the socket by plugging in a different appliance
Flame effect working but no heat
Determine if Temperature Mode is activated and that the set temperature is higher than
the current room temperature
Check for blockages/obstructions around air intakes as the safety cut-out may have
activated. Clear any blockages/obstructions
Switch appliance off at the mains, wait for 1 minute then switch back on. These actions
should reset the safety feature
Noise during operation
It is normal for some noise during operation due to moving mechanical components and
air movement
Check for any foreign objects deposited through the air vents
Remote control not working
Refer back to check that the appliance has power
Check the batteries in the handset are in working order and show no signs of corrosion
or damage
Burning smell coming from appliance
Check for a build-up of dust or obstruction on the air vents and clear if
necessary
Check for any foreign objects or liquids deposited through the air vents
Do not operate the appliance if the smell persists.
TROUBLESHOOTING

TECHNICAL INFORMATION
2.0
1.0
2.0
1.851
0.964
0.00029
9

INSTALLATION AND USER GUIDE
READ CAREFULLY AND KEEP FOR FUTURE REFERENCE
THIS PRODUCT IS ONLY SUITABLE FOR WELL
INSULATED SPACES OR OCCASIONAL USE
INSTALLATION AND USER GUIDE
READ CAREFULLY AND KEEP FOR FUTURE REFERENCE
THIS PRODUCT IS ONLY SUITABLE FOR WELL
INSULATED SPACES OR OCCASIONAL USE
Percy Doughty & Co
Imperial Point, Express Trading Estate, Stone Hill
Road,
Farnworth, Bolton. BL4 9TN
Tel: 01204 868 550
Fax: 01204 868 551
Email: sales@percydoughty.com
INSTALLATION AND USER GUIDE
READ CAREFULLY AND KEEP FOR FUTURE REFERENCE
THIS PRODUCT IS ONLY SUITABLE FOR WELL
INSULATED SPACES OR OCCASIONAL USE
GI16 / REV B/ 09/20
Table of contents
Other THE GALLERY COLLECTION Indoor Fireplace manuals
Popular Indoor Fireplace manuals by other brands

Amantii
Amantii ZECL-26-2923-BG Installation and operation instructions

Kozy-World
Kozy-World GFN4311 Owner's operation & installation manual

LOHBERGER
LOHBERGER INDALO operating instructions

GHP Group
GHP Group PHIMD-2H Assembly instructions

Firecraft
Firecraft Superior Standard BBV-42RMN Homeowner's care and operation instructions

Regency Fireplace Products
Regency Fireplace Products U900E-11 quick start guide