The Handy THPLS User manual

66cm (26”) PUSH
LAWN SWEEPER
Model No: THPLS -- Product No: 193847002
ASSEMBLY REQUIRED
SAVE THESE INSTRUCTIONS
SPARES & SUPPORT: 01793 333212
IMPORTANT
Please read & understand this manual, payingattention to the safety instructions, before use.
The manufacturer reserves the right to change the product specification & livery according to
continued product improvements.
Images used are for illustration purposes only.
INSTRUCTION MANUAL


CONTENTS
SPECIFICATION
IMPORTANT INFORMATION
GENERAL SAFETY INSTRUCTIONS
KNOW YOUR PRODUCT
ASSEMBLY
OPERATION & ADJUSTMENT
MAINTENANCE
STORAGE
PARTS DIAGRAM & LIST
ASSEMBLY IS REQUIRED
This product requires assembly before use. See the “Assembly” section for instructions.
Please check that all parts required for the assembly of this spreader are included. If for any reason,
you believe a part for the assembly is missing or damaged, please contact us.
If you require any assistance with regards to the contents or operation of
your machine, please contact us:
TEL: 01793 333212
(MON –FRI 8.00AM TO 5.30PM EXCL. BANK HOLIDAYS)

SPECIFICATION
The manufacturer reserves the right to change the product specification and livery according to
continued product improvements.
Model
THPLS
Product Number
193847002
Hopper Dimensions (mm)
600 x 560 x 650
Product Dimensions (mm)
1240 x 830 x 770
Wheel Size (mm)
254
Hopper Capacity (Litre)
200
WARNING
Read this instruction manual carefully before operating this machine. Make sure that you are familiar
with the controls and properly operate the machine. Following these instructions to reduce the risk
of fire, electric shock or personal injury.
IMPORTANT INFORMATION
INTENDED USE
The product is intended for domestic use only. This product is not intended for commercial use.
Generally acknowledged accident prevention regulations and enclosed safety instructions must be
observed. Only perform work described in these instructions for use, any other use is incorrect. The
manufacturer will not assume responsibility for damage resulting from such use.
DESIGNED FOR DOMESTIC USE ONLY.
The Push Lawn Sweeper is designed for use in private gardens, but not in public facilities, parks or
sports grounds and not for agricultural or forestry use. The product is designed to collect grass,
twigs, leaves and other light garden material. This is not a commercial product.
Compliance with this manual supplied by the manufacturer is a prerequisite for the proper usage of
the machine. The operating manual contains servicing and maintenance instructions as well as
directions for use.
TRAINING
Read the instructions carefully: Be familiar with the controls and the proper use of the equipment.
Never allow children or people unfamiliar with these instructions to use the product. Local
regulations can restrict the age of the operator.
Never operate while people, especially children, or pets are nearby.
Keep in mind that the operator or user is responsible for accidents or hazards involving the machine
that occur to other people or their property.
GENERAL SAFETY INSTRUCTIONS
Read and understand the owner’s manual and labels affixed to the product. Learn its application
and limitations as well as the specific potential hazards. Retain these instructions for future
reference. The operator is responsible for following the warnings & instructions in this manual and
on the product.
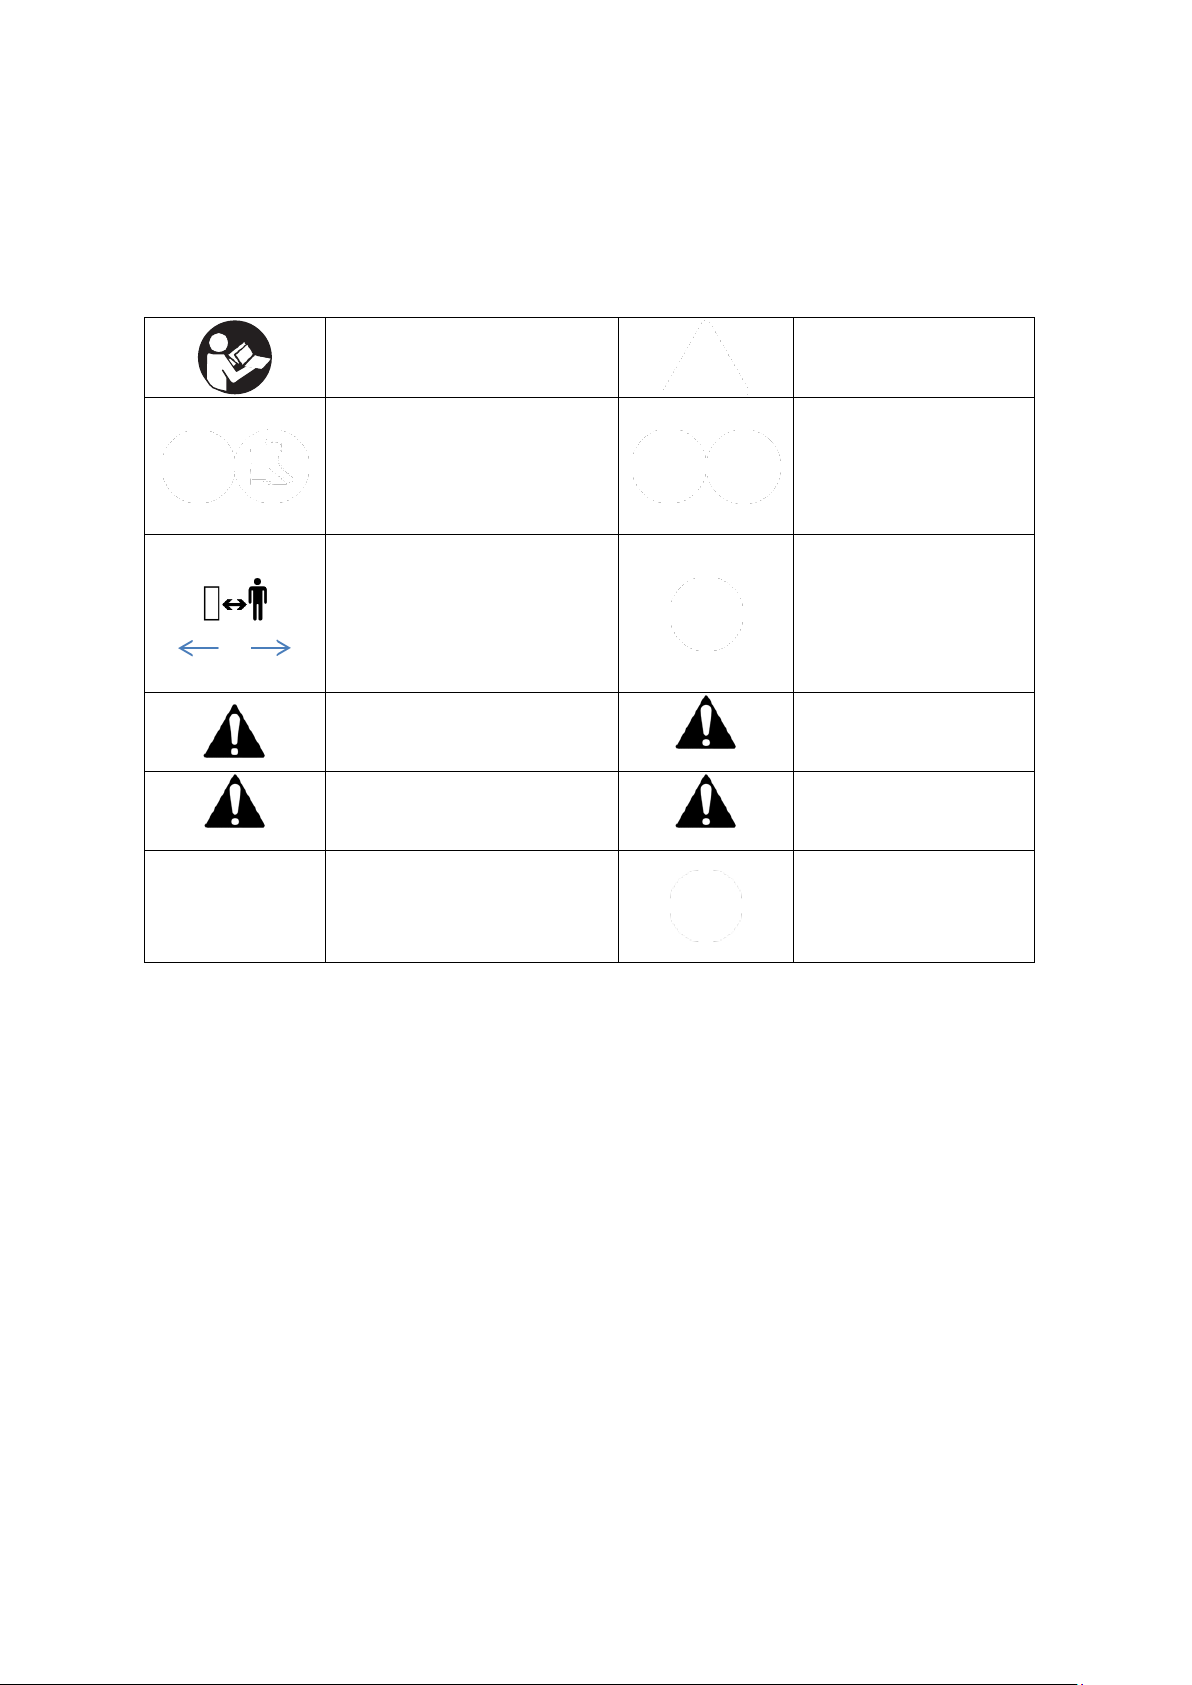
Read & understand operator’s manual
before using the machine. Failure to
follow instructions could result in death
or serious injury.
DANGER
Beware of sharp edges, which
can continue to rotate after the
product has come to a standstill.
Wear gloves to protect your hands
Wear foot protection
Whenever the machine is in use,
we recommend safety glasses are
worn to safeguard against flying
objects.
Face masks are also
recommended to avoid
inhalation of debris.
10m
Keep all bystanders & animals at least 10
metres away from the machine during
operation.
If approached, stop the machine
immediately.
Check your machine before
using. Keep guards in place and
in working order. Frequently
check to see that foreign objects
are removed from the tool area
before operating. Replace
damaged, missing or failed parts
before using it.
Safety alert symbol. Used to alert you to
potential personal injury hazards. Obey
all safety messages that follow this
symbol to avoid possible injury.
DANGER
Indicates an imminently
hazardous situation which, if not
avoided, will result in serious
injury.
WARNING
Indicates a potentially hazardous
situation which, if not avoided, could
result in serious injury.
CAUTION
Indicates a potentially hazardous
situation which, if not avoided,
may result in minor or moderate
injury.
CAUTION
Used without the safety alert symbol,
indicates a potentially hazardous
situation which, if not avoided, may
result in property damage.
Do not expose to rain or damp
conditions
STAY ALERT
Do not operate the machine while under the influence of drugs, alcohol, or any medication that
could affect your ability to use it properly. Do not use this machine when you are tired or distracted
from the job at hand. Be aware of what you are doing at all times. Use common sense.
AVOID DANGEROUS CONDITIONS
Make sure there is adequate surrounding workspace. Cluttered areas invite injuries.
Keep your work area clean with sufficient light. Keep the area around the machine clear of
obstructions, grease, oil, rubbish and other debris which could cause persons to fall onto moving
parts.
INSPECT YOUR MACHINE
Check all bolts, nuts, and screws for tightness before each use, especially those securing guards and
drive mechanisms. Vibration during use, may cause these to loosen.
Form a habit of checking to see that all other tools/equipment are removed from the working area
before turning it on.
Replace damaged, missing or failed parts before using it. Warning labels carry important
information. Replace any missing or damaged warning labels.

DRESS PROPERLY
Do not wear loose clothing, gloves, scarfs, neckties or jewellery (rings, wrist watches), which can be
caught in moving parts. Protective electrically non-conductive gloves and non-skid heavy duty
footwear are highly recommended when working. Wear a face or dust mask if the operation is dusty.
Always wear safety glasses/goggles and/or face shields. Everyday eyeglasses have only impact
resistant lenses; they are not safety glasses/goggles. Wear protective hair covering to contain long
hair, preventing it from getting caught in machinery.
KEEP BYSTANDERS AND CHILDREN AWAY
Keep unauthorised persons a minimum distance of 10 metres away from the machine. If
approached, stop the machine immediately. Do not allow children to handle, climb on or in the
machine. Do not carry passengers in the hopper.
DO NOT OVERREACH
Keep proper footing and balance at all times when using the machine. Never stand on the machine.
Serious injury could occur if the machine is tipped or if the moving parts are unintentionally
contacted. Do not store anything above or near the machine, where anyone might stand on the
machine to reach them.
AVOID INJURY FROM UNEXPECTED ACCIDENT
Keep hands & feet out of the way of all moving parts. Do not place any part of your body or any tool
e.g. in the machine during operation.
DO NOT FORCE TOOL
Always work within the rated capacity. Do not use the machine for a purpose for which it was not
intended. The machine operates better in dry conditions; however it will pick up damp garden
debris. The product should not be used in wet conditions, the product may become clogged.
MAINTAIN YOUR MACHINE WITH CARE
Clean the machine immediately after use. Keep the machine clean to ensure it operates to its full &
safest performance. When maintaining this machine, only the manufacturer’s original replacement
parts should be used. The use of non-original manufacturer parts may invalidate your warranty.
PROTECT THE ENVIRONMENT
Take left over materials to an authorised collection point or follow the stipulations in the country
where the machine is used. Do not discharge into drains, soil or water.
STORE IDLE EQUIPMENT
When not in use, the machine should be stored in a dry location. Keep the machine away from
children and others not qualified to use it.
BE SURE OF FOOTING
Avoid large holes and ditches when using the sweeper. Be careful when operating on steep grades
(hill) the sweeper may tip over. Do not push close to creeks, ditches and public highways.
DO NOT TOW
This product should not be attached and towed behind any motorised product.

KNOW YOUR PRODUCT
Read this owner’s manual before operating the equipment. Familiarise yourself with the location and
function of the controls and features. Save this manual for future reference.
1. Handle –Pushes and moves the sweeper easily.
2. Hopper Bag –Do not exceed the rated load capacity 200 litres.
3. Support Leg –Provides stability to load and sweeper.
4. Wheel –25.4cm Heavy duty.
5. Hand Knob –Brush height adjuster
1
5
4
3
2

ASSEMBLY
Read and follow all instructions for assembly and operation. Failure to assemble this equipment
correctly, could result in serious injury to the user, bystanders, or cause equipment damage.
Take all parts out of the carton and inspect components to ensure there are no missing pieces,
before starting to assemble the push lawn sweeper, following steps 1 through 5.
TOOLS REQUIRED
10mm Spanners
COMPONENTS
REF.
QTY.
DESCRIPTION
A
8
M6x30 Carriage Bolt
B
4
Ø6 Lock Washer
C
4
Handle Knob
D
4
M6 Nylon Lock Nut
E
4
Bag Rod Clips
F
4
Ø6 Flat Washer
G
1
Wrench
REF.
QTY.
DESCRIPTION
1
1
Sweeper Assembly
2
1
Hopper Bag
3
1
Handle Frame
4
2
Support Leg
5
1
Short Bag Rod with
Rubber End Caps
6
1
Long Bag Rod with
Rubber End Caps

STEP 1 - INSTALL SUPPORT LEGS TO SWEEPER HOUSING
Attach the support leg to the sweeper assembly and secure with M6 x 30 carriage bolt and M6 nylon
lock nut (Fig. 1). Do not fully tighten yet. Repeat for the other side.
STEP 2 - ATTACH HANDLE TO SUPPORT LEGS
Assemble the handle frame to the support legs. Align the holes in the handle frame and support legs
(Fig. 2).

Secure the support legs & handle frame with two M6 x 30 carriage bolts, bag rod clips, flat washers,
lock washers, and handle knobs (Fig. 3).
Fully tighten all hardware in steps 1 & 2.
STEP 3 - ATTACH BAG ROD CLIPS
Put two bag rod clips on the inside of each support leg, secure with M6 x 30 carriage bolt, a flat
washer, a lock washer, and a handle knob (Fig. 4).
STEP 4 - ASSEMBLE HOPPER BAG HARDWARE
Slide the long bag rod through the top of the hopper bag along the stitched area. Slide the short bag
rod through the bottom of the hopper bag along the stitched area. (Fig. 5).
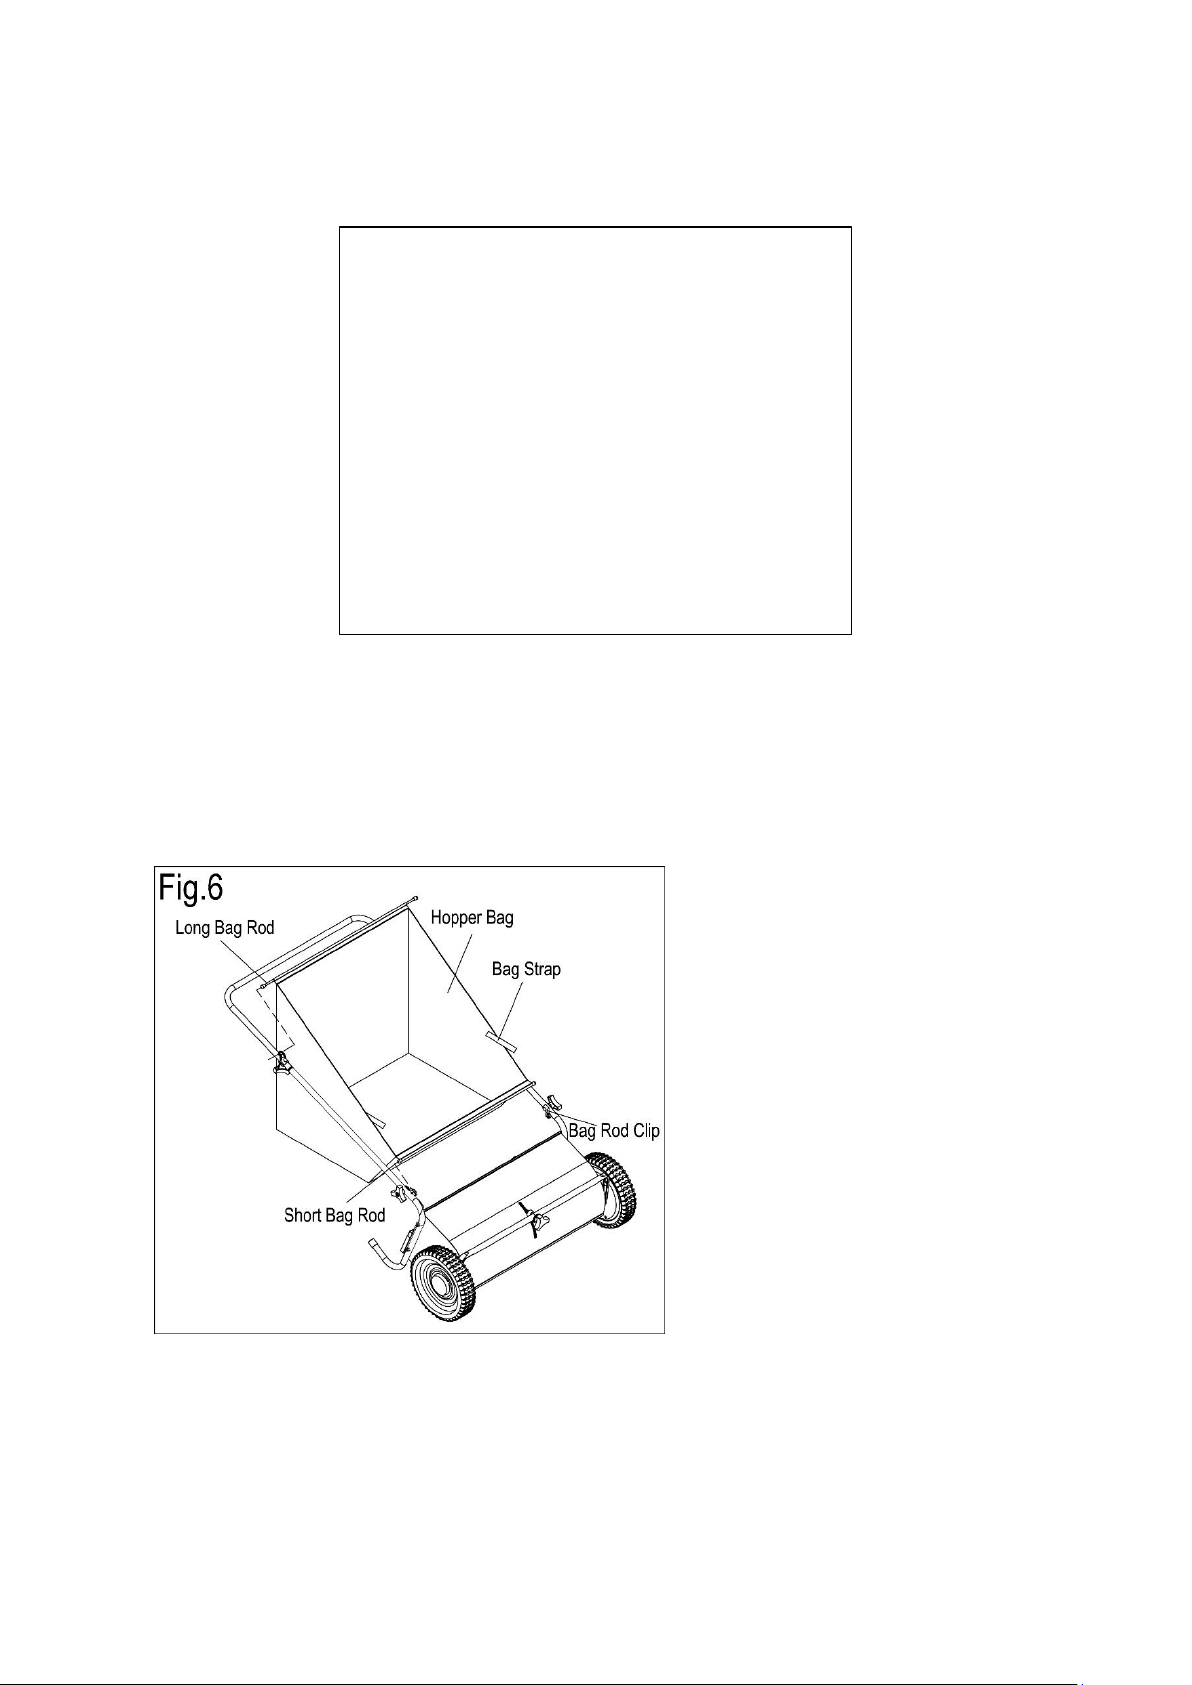
STEP 5 - ATTACH HOPPER BAG TO SWEEPER
Place the hopper bag assembly on the sweeper & frame assembly by inserting the long bag rod in to
the two rod clips on the handle frame, and the short bag rod into the two openings on each side of
the housing assembly. Hook the plastic straps on the bag flaps under the bag clips on the support
legs (Fig. 6).
Make sure all hardware and the hopper bag is installed correctly before operating the sweeper.

OPERATION / ADJUSTMENT
DANGER
The product must only be put into operation if no defects are found. It is crucial that defective
parts are replaced before the product is used again. Check the safety equipment & the safe
condition of the product: Check all parts to make sure that they fit tightly. Check whether there
are any visible defects: broken parts, cracks, etc.
BRUSH HEIGHT ADJUSTMENT
Unlock the height adjustment lock by turning the locking knob counterclockwise (Fig. 7).
Use hand to hold the handle (see arrow) to adjust the brush height by lifting the handle up and
down, several times. Tighten the Handle Knob at your desired height.
Note: sometimes you may need your hand to slide the height adjustment tube.

Adjust the brush scale according to the height of handle position. Lock the height lock by turning the
locking knob clockwise.
Scale
Handle Position (cm)
2
110
1
100
0
80
-1
65
-2
55
BASIC SWEEPING METHOD
Push sweeper forward at normal walking speed; it does not operate when pulled backwards.
NOTE: Always mow the grass to an even height before sweeping for best results collecting grass.
EMPTYING HOPPER BAG
To dump the hopper bag, tip the sweeper forward allowing the material to fall out.
You can also take the hopper bag off the sweeper to empty.
WARNING!
Always empty the hopper bag after each use. Damp or wet grass or leaves will cause damage to
hopper if stored for an extended period of time.
WARNING!
DO NOT empty or unload the sweeper too close to fire!
The brushes and the hopper bag can be destroyed by excessive heat of flame.
MAINTENANCE
CLEANING
After each use, empty and clean the hopper. Rinse/dry inside and outside of the sweeper after each
use.
STORING
Before storing, ensure that the machine is clean and dry. Store in a dry or protected area and coat
exposed metal with a glossy enamel spray paint to touch up scratched or worn painted areas.
CHECK ALL NUTS, BOLTS AND FASTENING
Before each use, check all fastenings are tight & secure.
ONLY USE MANUFACTURER APPROVED PARTS
If a part needs replacing, only use the manufacturer’s original parts. Non-original replacement parts
will invalidate your warranty and may result in a safety hazard or poor operation.
NEVER EXCEED CAPACITY
Never exceed the hopper load capacity rating of 200 Litres, it will damage the hopper bag.
LUBRICATION - ANNUALLY CLEAN OUT AND LIGHTLY LUBRICATE PARTS.
The bearings in the sweeper have been pre-lubricated at the factory. However, it’s recommended
that a few drops of light oil should be added to the brush shaft bearings twice a year. Also, the gear
should be cleaned every two years. After cleaning apply an even coat of light general purpose
grease. Follow below steps to action:
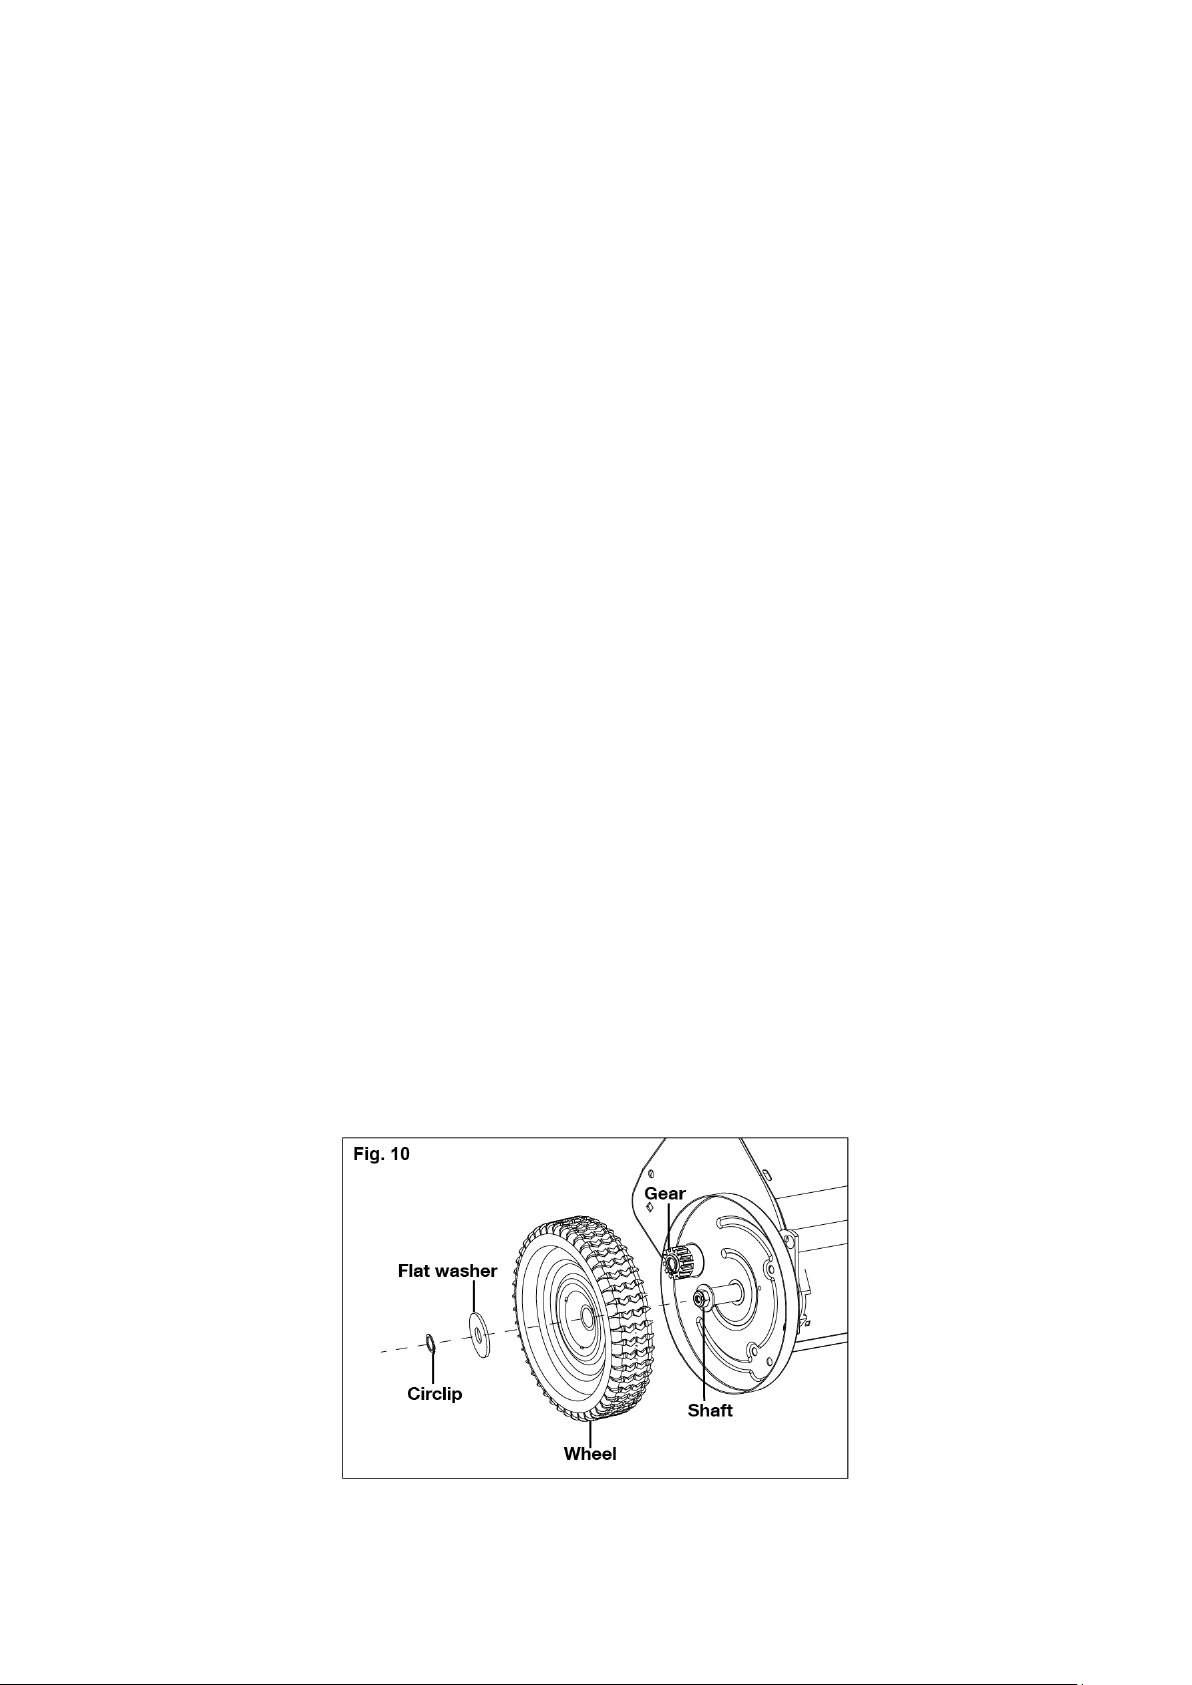
Use a screw driver to pop off the hub cap (Fig. 9).
To remove the wheel, take out the circlip & the flat washer; you will see the gear and the shaft (Fig.
10).

Remove the circlip on the gear, the gear can be taken off easily (Fig. 11). Clean the gear and lubricate
the shaft as needed, then reassemble the wheel in a reverse sequence.
BRUSH REPLACEMENT
Before replacing the brush, remove the hopper bag from the sweeper, and flip the sweeper over.
Remove all the nuts and bolts on the brush retainers, used for securing the brushes (Fig. 12).
Remove the old brushes, the long brush retainer, and the short brush retainer from the sweeper
(Fig. 13).

Insert new brushes between the long brush & the short brush retainers; fix with M6 nuts and hex
bolts (Fig. 14).
Fit the brush assembly onto the brush shaft; fix with a M5 nut and a M5 bolt (Fig. 15). Repeat the
steps to install the remaining brush.

NOTE: The two sets of brushes should remain vertical to each other after assembly, as shown
(Fig. 16).
STORAGE
Store indoors or in protected area during severe weather and winter months.
Never allow anything left in the hopper bag to remain for an extended period of time.
Before storing, make sure the sweeper is dry and clean.
Never allow items to be stored above the sweeper, which could step on the sweeper to reach.

PARTS DIAGRAM
NOTE: Parts Lists are supplied for information purposes only, not all parts are stocked individually & we recommend
you contact our Spares Team on 01793 333212 for expert advice.

PARTS LIST
REF#
HANDY PART NO.
DESCRIPTION
QTY
REF#
HANDY PART
NO.
DESCRIPTION
QTY
1
TH231-N28000032
Plastic Cover for Wheel
2
26
TH231-
NS260000014
Cushion Washer
1
2
TH231-
930416000FH
Back Ring Ø16
2
27
TH231-
N28000012
Pinion Gear R.H.
1
3
TH231-
930716000DX
Flat Washer Ø16
2
28
TH231-
NS260010000
Housing Assembly
1
4
TH231-
NS260000004
Bushing
4
29
TH231-
911408055DX
Carriage Bolt M8×55
1
5
TH231-N28020000
Wheel
2
30
TH231-
911406030DX
Carriage Bolt M6×30
8
6
TH231-
930415000FH
Back Ring Ø15
4
31
TH231-
N28030001DX
Brush Clamp
4
7
TH231-
N28000037FH
Washer for Adjustment
B
2
32
TH231-
920606000DX
Nylon Lock Nut M6
12
8
TH231-N28000030
Pinion Gear L.H.
1
33
TH231-
920605000DX
Nylon Lock Nut M5
4
9
TH231-940106020
Pin of Gear
2
34
TH231-
N28030002DX
Brush Retainer
8
10
TH231-
N28000029FH
Washer for Adjustment
A
4
35
TH231-
910206020DX
Hex Bolt M6×20
8
11
TH231-
NS260000008
Bearing for Brush
2
36
TH231-
931605000FH
Star Washer Ø5
4
12
TH231-
NS260000006
Washer for Adjustment
F
2
37
TH231-
910205025DX
Hex Bolt M5x25
4
13
TH231-
NS260000009DX
Wheel Axle
2
38
TH231-
NS260021000
Brush
4
14
TH231-
930210000DX
Big Washer Ø10
6
39
TH231-
NS260000007DX
Brush Axle
1
15
TH231-
920608000DX
Nylon Lock Nut M8
4
40
TH231-
N99000011
Plug
2
16
TH231-
NS260000005
Dust Cover Assembly
2
41
TH231-
930106000DX
Flat Washer Ø6
4
17
TH231-
920110000DX
Hex Nut M10
2
42
TH231-
930606000DX
Lock Washer Ø6
4
18
TH231-
N28000036DX
Endplate Bushing
2
43
TH231-
NS260000002
Support Leg
2
19
TH231-
920610000DX
Nylon Lock Nut M10
2
44
TH231-
NS260000003
Bag Rod Clip
4
20
TH231-
910108012DX
Hex Bolt M8×12
4
45
TH231-
NS260030000
Hopper Bag
1
21
TH231-
NS260000001
Connect Tube
1
46
TH231-
NS260000011
Plastic End Cover
2
22
TH231-N28070000
Knob
1
47
TH231-
NS260000012DX
Short Bag Rod
1
23
TH231-
930208000DX
Big Flat Washer Ø8
2
48
TH231-
NS260000013DX
Long Bag Rod
1
24
TH231-
931008000FH
Wave Washer
1
49
TH231-
NS260000010
Handle Frame
1
25
TH231-
NS260000015
Handle Knob
4

GJ HANDY & CO LTD USER WARRANTY POLICY
Users Statement of Warranty
Each new machine is warranted against defective material or assembly of material under normal
usage. The warranty applies to the original purchaser and covers faulty parts and the labour involved
in replacing and repairing those parts, which are of original manufacture.
Period of Warranty
All Webb & Webb Pro machines plus Sanli engines.
a) 2 years from the original date of sale to the first domestic user.
b) 90 days from the original date of sale to the professional/commercial user.
c) 90 days from the original date of sale when used for hire.
d) A reduced warranty period of 90 days applies to those items which are subject to normal wear
and tear (e.g. but not limited to wheels, tyres, cutter bars, cylinders, blades, belts, cables, grass
bags, spark plugs).
e) Engines as per the manufacturer’s warranty statement which will be supplied with the machine.
f) 90 days from the original date of purchase for Replacement Spare Parts (unless normal wear &
tear component, which are covered for 30 days).
g) All machines’ must be serviced within the first 12 months from the original date of purchase to
comply with the warranty, failure to do so will invalidate the 2nd year of the warranty.
All Handy, Mowerland and Q-Garden products.
a) 1 year from the original date of sale to the first domestic user.
b) 90 days from the original date of sale to the professional/commercial user.
c) 90 days from the original date of sale when used for hire.
d) A reduced warranty period of 90 days applies to those items which are subject to normal wear
and tear (e.g. but not limited to wheels, tyres, cutter bars, cylinders, bottom blades, belts,
cables, collection bags, spark plugs).
e) Engines as per the manufacturer’s warranty statement which will be supplied with the machine.
f) 90 days from the original date of purchase for Replacement Spare Parts (unless normal wear &
tear component, which are covered for 30 days).
All warranty repairs must be undertaken by an authorised service dealer. These dealers have been
accredited by GJ Handy & Co Ltd and agree to only use genuine parts and follow our repair
procedures.
Other manuals for THPLS
1
This manual suits for next models
1
Table of contents
Other The Handy Lawn Sweeper manuals


Popular Lawn Sweeper manuals by other brands

BLACK DECKER
BLACK DECKER LSWV36 instruction manual

Lawn Tender
Lawn Tender SW380LT owner's manual

P.Lindberg
P.Lindberg 9050619 Original manual

MID WEST PRODUCTS
MID WEST PRODUCTS HDT-38B Owner's manual and parts list

Hyundai power products
Hyundai power products HYSW1000 instruction manual

Toro
Toro RAKE-O-VAC 07052 Operator's manual


