Thermia 12 ZR-TI User manual
SPLIT TYPE
ROOM AIR / AIR HEAT PUMP
OPERATION MANUAL
SPLITT-TYPE
ROM LUFT/LUFT VARMEPUMPE
BRUKERMANUAL
JAETTU
ILMALÄMPÖPUMPPU
KÄYTTÖOPAS
LUFT/LUFTVÄRMEPUMP
BRUKSANVISNING
ENGLISH SUOMINORSK SVENSKA
INDOOR UNIT
INNENDØRSENHET
SISÄYKSIKKÖ
INOMHUSENHET
12 ZR-TI 12 ZR-TO
OUTDOOR UNIT
UTENDØRSENHET
ULKOYKSIKKÖ
UTOMHUSENHET
VUJSE202

Information on the Disposal of this Equipment and its Batteries
IF YOU WISH TO DISPOSE OF THIS EQUIPMENT OR ITS BAT-
TERIES, DO NOT USE THE ORDINARY WASTE BIN, AND DO
NOT PUT THEM INTO A FIREPLACE!
Used electrical and electronic equipment and batteries should
always be collected and treated SEPARATELY in accordance with
local law.
Separate collection promotes an environment-friendly treatment,
recycling
of materials, and minimizing final disposal of waste.
IMPROPER DISPOSAL can be harmful to human health and the
environment due to certain substances! Take USED EQUIPMENT
to a local, usually municipal, collection facility, where available.
Remove USED BATTERIES from equipment, and take them to a
battery collection facility; usually a place where new batteries are
sold.
If in doubt about disposal, contact your local authorities or dealer
and ask for the correct method of disposal.
ONLY FOR USERS IN THE EUROPEAN UNION, AND SOME
OTHER COUNTRIES; FOR INSTANCE NORWAY AND SWITZER-
LAND: Your participation in separate collection is requested by law.
The symbol shown above appears on electrical and electronic
equipment and batteries (or the packaging) to remind users of this.
If 'Hg' or 'Pb' appears below the symbol, this means that the battery
contains traces of mercury (Hg) or lead (Pb), respectively.
Users from PRIVATE HOUSEHOLDS are requested to use existing
return facilities for used equipment and batteries. Batteries are col-
lected at points of sale. Return is free of charge.
If the equipment has been used for BUSINESS PURPOSES, please
contact your installer who will inform you about take-back.
You might be charged for the costs arising from take-back. Small
equipment (and small quantities) might be taken back by your local
collection facility. For Spain: Please contact the established col-
lection system or your local authority for take-back of your used
products.
The equipment contains fluorinated greenhouse gas R410A (global
warming potential 2088*).
Contained quantity is indicated on the equipment outdoor unit name
label.
* Based on ANNEX I of REGULATION (EU) No 517/2014 of the European
Parliament and of the Council of 16 April 2014.
GB
Thermia 12ZR.indd 1 2016/8/10 16:07:16
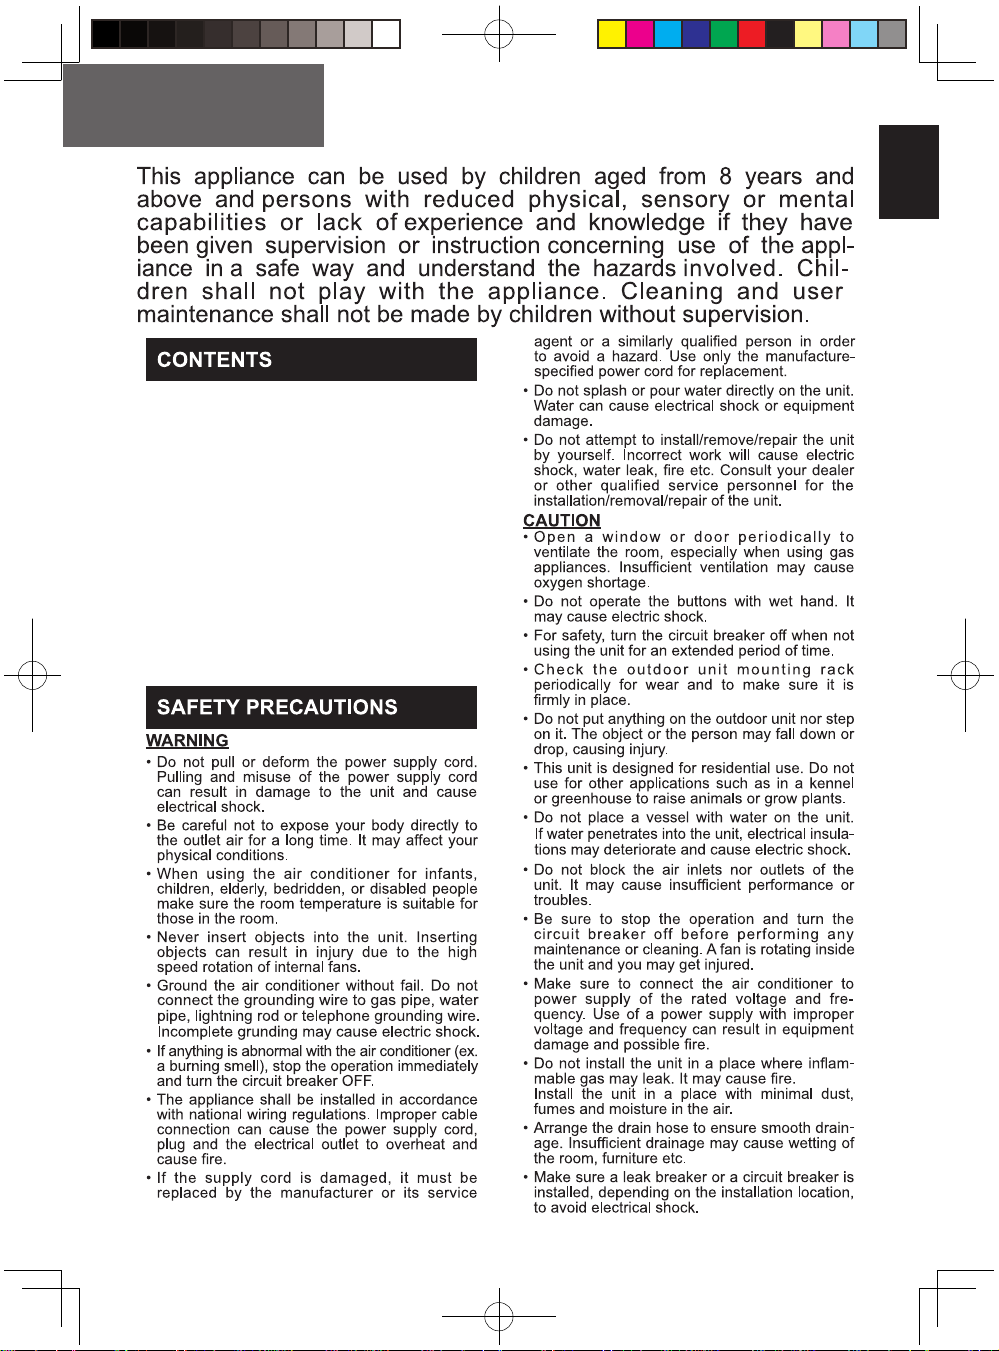
GB-1
Please read this manual carefully before using the product. This manual
should be kept in a safe place for handy reference.
ENGLISH
•SAFETY PRECAUTIONS.................................GB-1
•PART NAMES...................................................GB-2
•USING THE REMOTE CONTROL.................... GB-4
•TIPS ON SAVING ENERGY............................. GB-5
•AUXILIARY MODE ...........................................GB-5
•BASIC OPERATION......................................... GB-6
•ADJUSTING THEAIR FLOW DIRECTION ......GB-7
•COANDAAIRFLOW..........................................GB-7
•FULL POWER OPERATION.............................GB-8
•PLASMACLUSTER OPERATION..................... GB-8
•SELF CLEAN OPERATION.............................. GB-9
•1-HOUR OFF TIMER........................................ GB-9
•TIMER OPERATION......................................... GB-10
•MAINTENANCE FUNCTION OPERATION...... GB-11
•DISPLAY BUTTON ........................................... GB-12
•NOTES ON OPERATION................................. GB-12
•MAINTENANCE................................................ GB-13
•BEFORE CALLING FOR SERVICE ................. GB-14
ENGLISH

GB-2
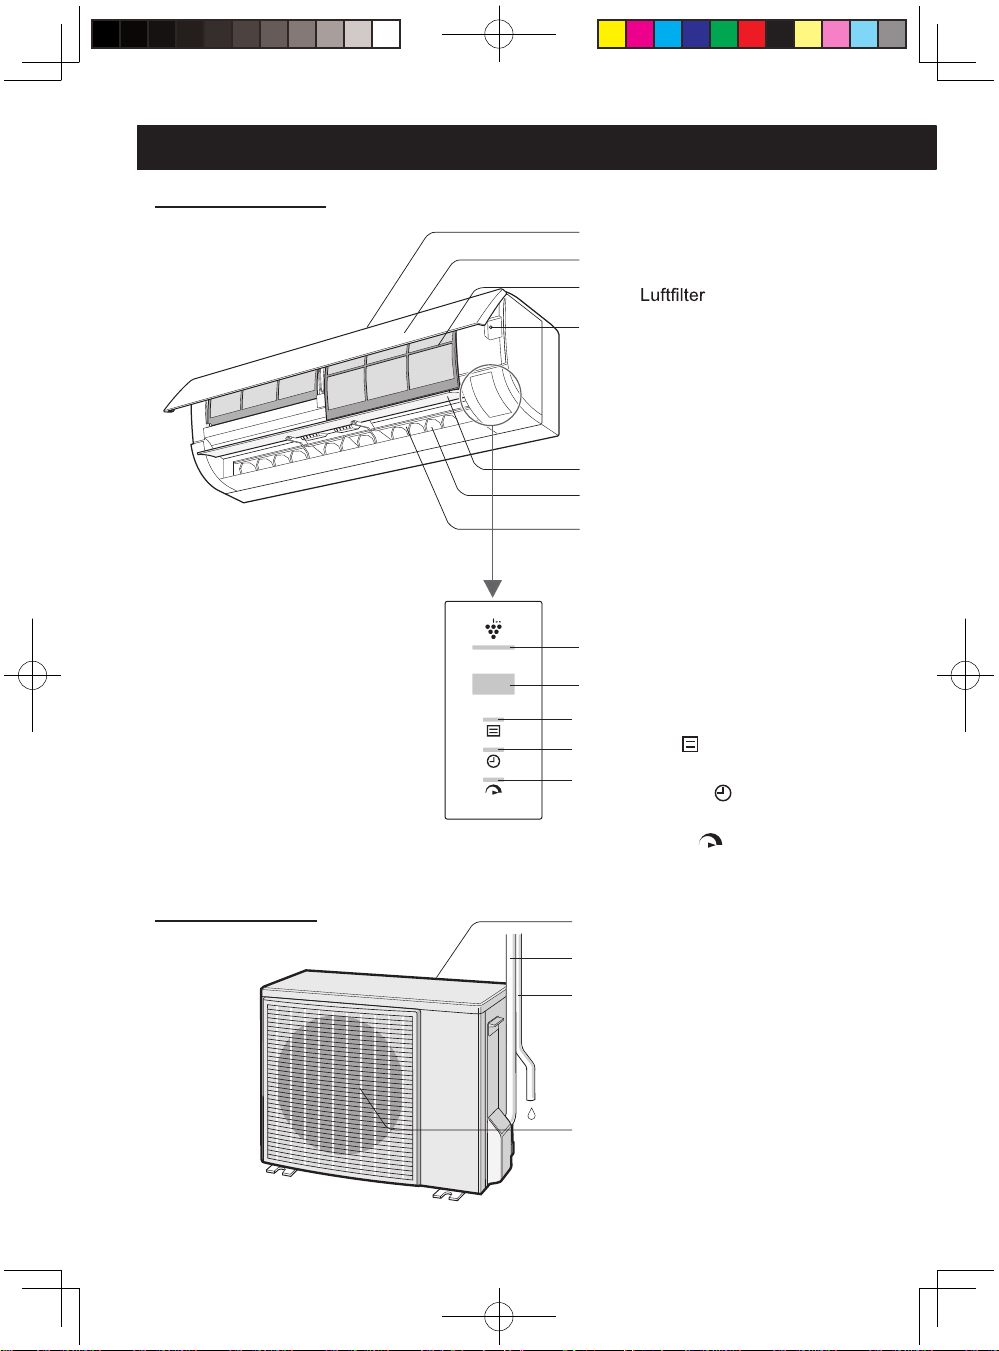
PART NAMES
INDOOR UNIT
OUTDOOR UNIT 13 Air inlet
14 Refrigerant Tube and Inter-
connecting Cord
15 Drainage Hose
16 Air outlet
NOTE:
Actual units might vary slightly
from those shown above.
13
14
15
16
1Inlet (Air)
2 Open Panel
3 Air Filter
4 AUX Button
5
6
7 Outlet (Air)
8 PLASMACLUSTER Lamp
(blue)
9 Receiver Window
10 OPERATION Lamp
(red )
11 TIMER Lamp
(orange )
12 FULL POWER Lamp
(green )
1
2
3
4
5
6
7
8
9
10
11
12
Vertical Airflow Louvre
Horizontal Airflow Louvre
GB-3
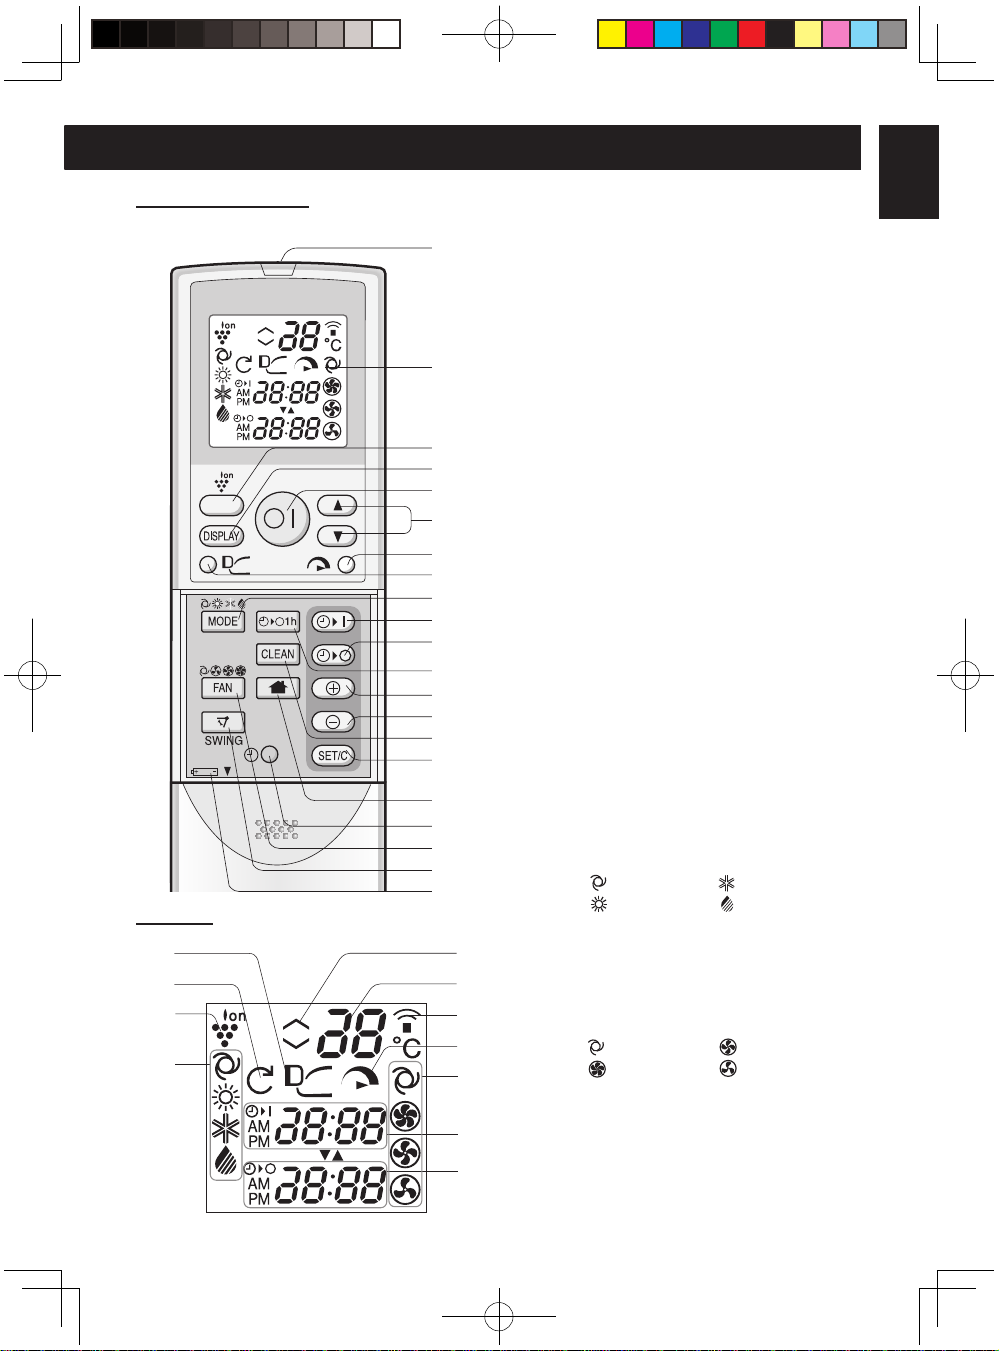
REMOTECONTROL
DISPLAY
22 COANDA AIRFLOW Symbol
23 SELF CLEAN Symbol
24 PLASMACLUSTER Symbol
25 MODE Symbols
: AUTO
: COOL
: HEAT : DEHUMIDIFY
26 Thermostat setting for AUTO and DE-
HUMIDIFYmodes
27 TEMPERATUREIndicator
28 TRANSMITTING Symbol
29 FULL POWER Symbol
30 FAN SPEED Symbols
: AUTO
: LOW
: HIGH : SOFT
31 TIMER ON Indicator/CLOCK
Indicatesthe on timer preset time or
current time.
32 TIMER OFF Indicator
Indicatesthe preset time for off timer
or 1-hour off timer.
3
4
5
6
7
8
9
10
11
12
13
14
15
16
17
18
19
20
21
22
1 TRANSMITTER
2 DISPLAY (Liquid Crystal Display)
3 PLASMACLUSTER Button
4 DISPLAY Button
5 ON/OFF Button
6 THERMOSTATButton
7 FULL POWER Button
8 COANDA AIRFLOW Button
9 MODE Button
10 TIMER ON Button
(for setting the timer)
11 TIMER OFF Button
(for setting the timer)
12 1-HOUR OFF TIMER Button
13 TIME ADVANCE Button
14 TIME REVERSE Button
15 SELF CLEAN Button
16 TIMER SET/CANCEL Button
17 MAINTENANCE+10°Button
18 CLOCK Button
19 FAN Button
20 SWING Button
21 Indicatesbattery compartment is
below this mark
2
1
23
24
25
26
27
28
29
30
31
32
ENGLISH

GB-4
USING THE REMOTE CONTROL
LOADING BATTERIES
Use two size-AAA (R03) batteries.
1
Remove the remote control cover.
2
Insert batteries.
•Make sure the (+) and (
-
) polarities are
correctly aligned.
•The display indicates “AM 6:00” when
batteries are properly installed.
3
Reinstall the cover.
Remote
control cover
NOTE:
•The battery life is approximately 1 year in
normal use.
•When replacing the batteries, always change
both and use the same type.
•If the remote control does not operate properly
after replacing the batteries, take out the
batteries and reinstall them again after 30
seconds.
•If you will not be using the unit for a long time,
remove the batteries from the remote control.
2
3
1
USING THE REMOTE CONTROL
Point the remote control towards the receiver
window and press the desired button. The unit
generates a beep when it receives the signal.
•Make sure nothing, such as curtains, block the
signal receiver window.
•The signal effective distance is 7 m.
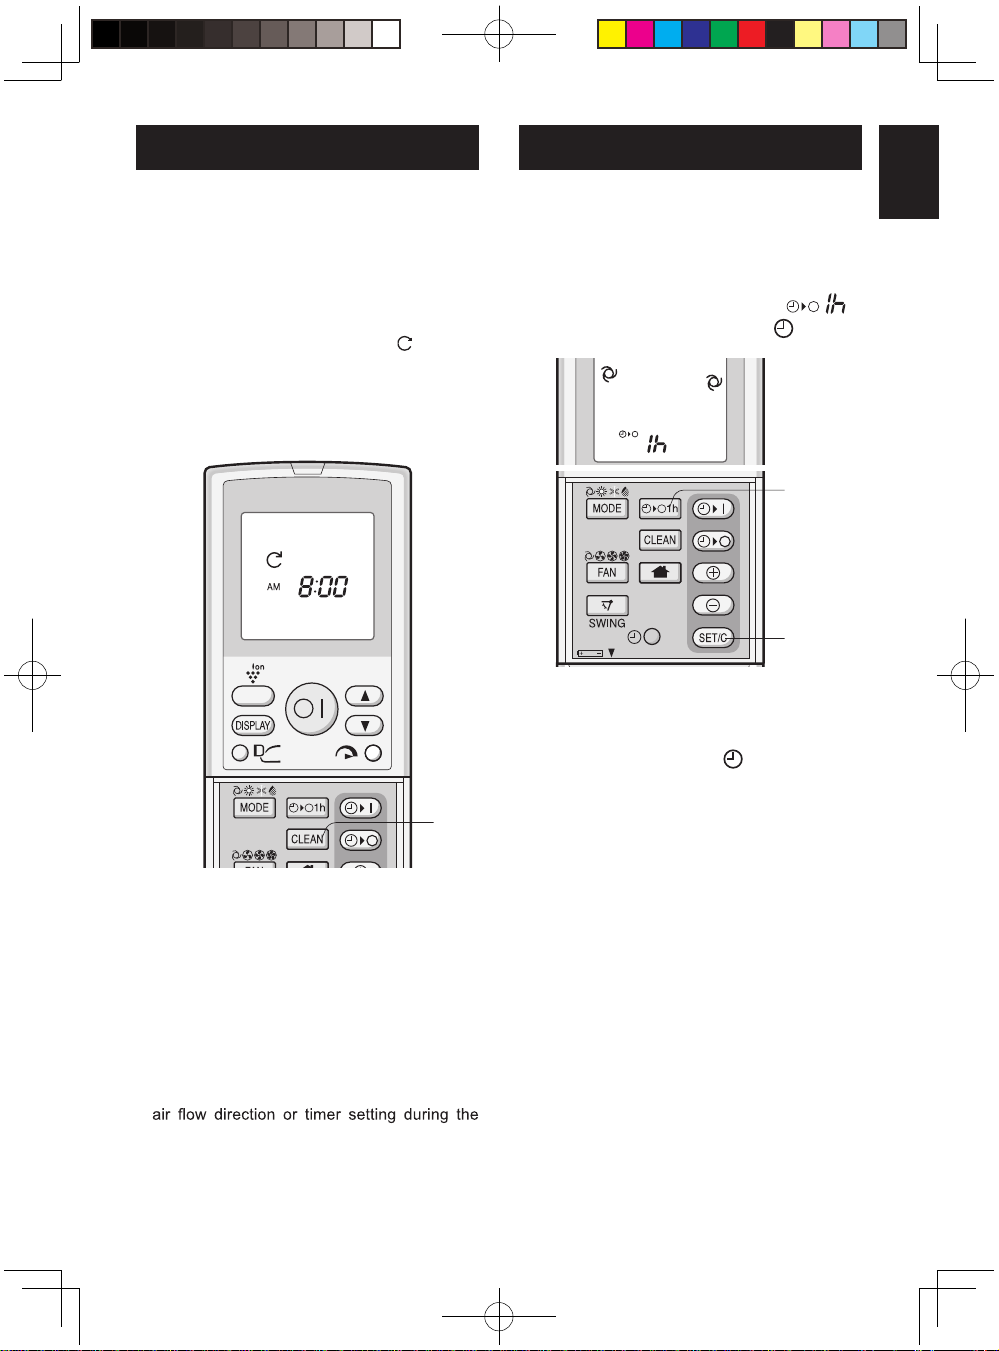
SETTING THE CURRENT TIME
There are two clock modes: 12-hour mode and
24-hour mode.
1
To set to the 12-hour mode, press
the CLOCK button once.
To set to the 24-hour mode, press
the CLOCK button twice.
2
Press the TIME ADVANCE or
REVERSE button to set the current
time.
•Hold down the button to advance or
reverse the time display quickly.
3
Press the SET/Cbutton.
•The colon (:) blinks.
NOTE:
•The current time cannot be set when the timer
is operating.
CAUTION:
•Do not allow the signal receiver window to
receive strong direct sunlight, since it can
adversely affect its operation. If the signal
receiver window is exposed to direct sunlight,
close a curtain to block the light.
•Using a fluorescent lamp with a quick
starter in the same room may interfere with
transmission of the signal.
•The unit can be affected by signals
transmitted from the remote control of a
television, VCR or other equipment used in
the same room.
•Do not leave the remote control in direct
sunlight or near a heater. Also,protect the unit
and remote control from moisture and shock
which can discolour or damage them.
7 m Receiver window
ENGLISH

GB-5
TIPS ON SAVING ENERGY AUXILIARY MODE
Below are some simple ways to save en-
ergy when you use your air/air heatpump.
Set the proper temperature
•Setting the temperature to higher or lower
than necessary will result in increased power
consumption.
Block direct sunlight and prevent drafts
•Blocking direct sunlight during cooling opera-
tion will reduce power consumption.
•Close the windows and doors during cooling
and heating operations.
-
Turn off the circuit breaker when the
unit is not used for an extended period
of time
•The indoor unit still consumes a small amount
of power when it is not operating.
Use this mode when the remote control is
not available.
TO TURN ON
Lift the open panel of the indoor unit
and press the AUX button.
•The red OPERATION lamp ( ) on the
unit will light and the unit will start operating in
the AUTO mode.
•The fan speed and temperature setting are
set to AUTO.
TO TURN OFF
Press the AUX button again.
•The red OPERATION lamp ( ) on the
unit will turn off.
NOTE:
•If the AUX button is pressed during normal
operation, the unit will turn off.
AUX
ENGLISH

GB-6
1
Press the MODE button to select
the operation mode.
AUTO HEAT COOL DEHUMIDIFY
2
Press the ON/OFF button to start
operation.
•The red OPERATION lamp ( ) on
the unit will light.
3
Press the THERMOSTAT button
to set the desired temperature.
AUTO/DEHUMIDIFY MODE
•The temperature can be changed up to an
additional ±2 °C from the automatically set
of temperature.
COOL/HEAT MODE
•The temperature setting range:18-32 °C.
4
Press the FAN button to set
the desired fan speed.
AUTO SOFT LOW HIGH
•In the DEHUMIDIFY mode, the fan speed
is preset to AUTO and cannot be changed.
5
To turn off the unit, press the ON/
OFF button again.
•The red OPERATION lamp ( ) on
the unit will turn off.
BASIC OPERATION
2
5
3
1
4
(Example: 1°C higher)
C
(Example: 2°C lower)
C
NOTE:
AUTO MODE
In the AUTO mode, the temperature setting and
mode are automatically selected according tothe
room temperature and outdoor temperature when
the unit is turned on.
During operation, if the outdoor temperature
changes, the temperature settings will automatically
change.
changed.
DEHUMIDIFY MODE
The fan speed is preset toAUTO and cannot be
GB-7
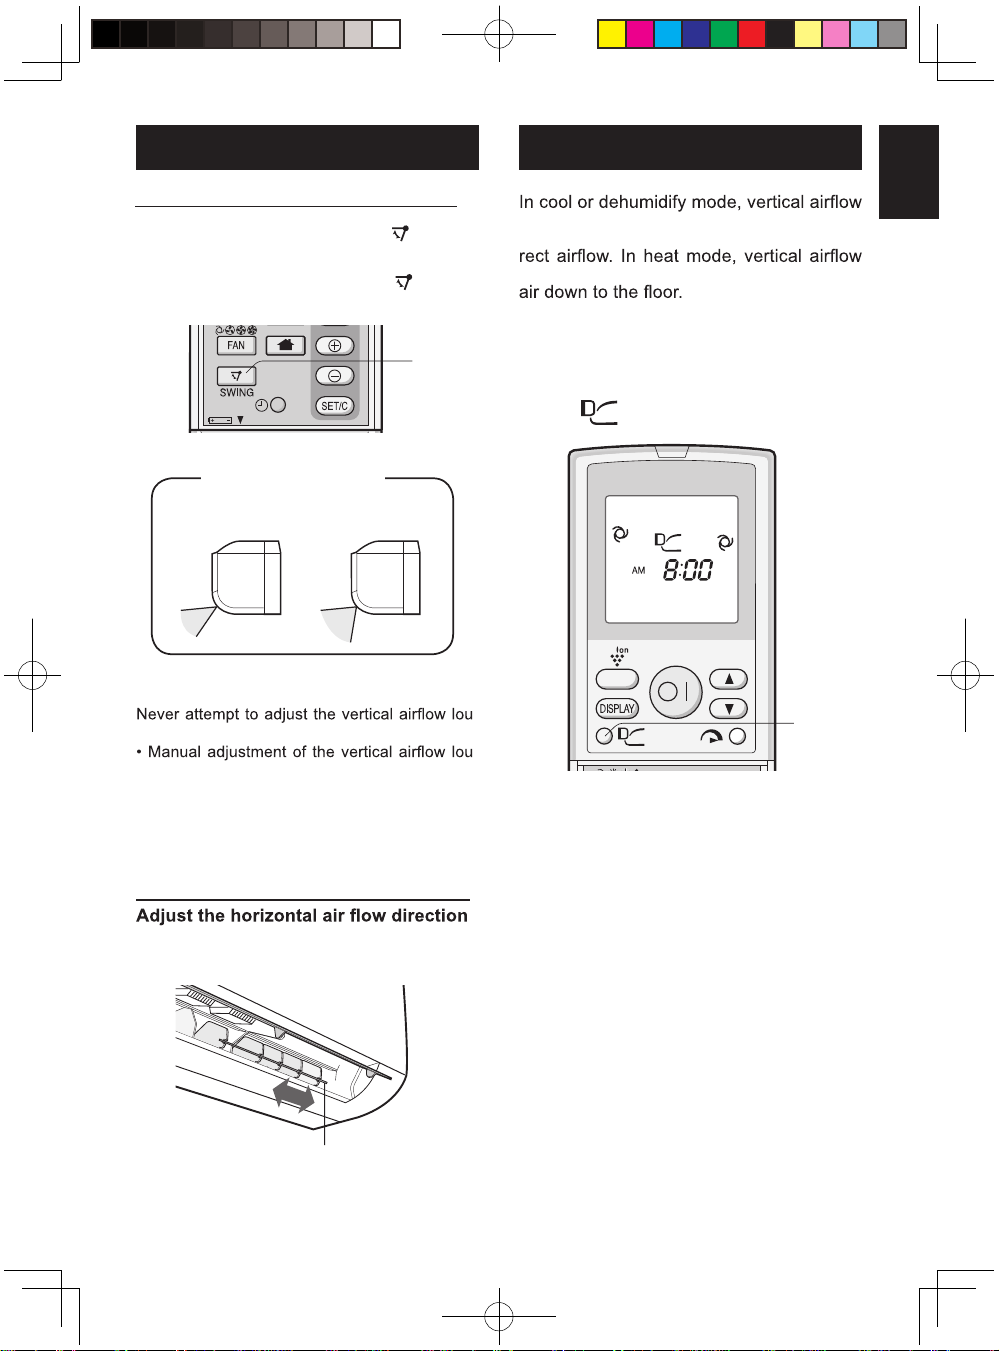
VERTICAL AIR FLOW DIRECTION
1
Press the SWING button( ).
•The vertical adjustment louvre will swing.
2
Press the SWING button( ) again
to stop at the desired position.
HORIZONTAL AIR FLOW DIRECTION
with the louvre lever.
ADJUSTING THE AIR FLOW
DIRECTION COANDA AIRFLOW
Adjustment range
1
2
COOL and DEHU-
MIDIFY modes HEAT mode
louvre is set obliquely upward to deliver
cool air to the ceiling in order to avoid di-
louvre is set downward to deliver the warm
1
During operation, press the
COANDA AIRFLOW button.
•The remote control will display
“ ”.
TO CANCEL
Press the COANDA AIRFLOW button
again.
NOTE:
1
CAUTION: -
vre manually. -
vre can cause the unit to malfunction.
•When the vertical adjustment louvre is posi-
tioned at the lowest position in the COOL or
DEHUMIDIFY mode for an extended period of
time, condensation may result.
Louvre lever
•If you want COANDA AIRFLOW operation
in FULL POWER mode, press COANDA
AIRFLOW button during FULL POWER
operation.
ENGLISH

GB-8
PLASMACLUSTER OPERATION
FULL POWER OPERATION
In this operation, the air/air heat pump
works at the maximum power to make the
room cool or warm rapidly.
1
During operation, press the
FULL POWER button.
•The remote control will display “ ”.
•The temperature display will go off.
•The green FULL POWER lamp ( )
on the unit will light up.
Active air purification mode with
plasmacluster ions. Actively reduces
airborne mold.
1
Press the PLASMACLUSTER
button during operation.
•The remote control will display “ ”.
•The blue PLASMACLUSTER lamp on the
unit will light up.
2
If you pressed the button
while unit is not in operation,
Plasmacluster operation starts
in fan only mode.
1
2
TO CANCEL
Press the PLASMACLUSTER button
again.
•The blue PLASMACLUSTER lamp on the unit
will turn off.
NOTE:
•Use of the PLASMACLUSTER operation will
be memorized, and it will be activated the
next time you turn on the air/air heat pump.
•To turn off the PLASMACLUSTER lamp,
press the DISPLAY button.
TO CANCEL
Press the FULL POWERbutton again.
•The FULL POWER operation will also be can-
celled when the operation mode is changed,
or when the unit is turned off.
•The green FULL POWER lamp ( ) on
the unit will turn off.
NOTE:
•The air/air heat pump will operate at “Extra
HIGH” fan speed for 15 minutes, and then
shift to “HIGH” fan speed.
•You can not set the temperature or fan speed
during the FULL POWER operation.
•To turn off the FULL POWER lamp, press the
DISPLAY button.
1
•The FULL POWER operation will be automati-
cally cancelled in one hour, and the unit will
return to the original settings. The green FULL
POWER lamp ( ) on the unit will turn off.
GB-9
When the 1-HOUR OFF TIMER is set, the
unit will automatically turn off after one
hour.
1
Press the 1-HOUR OFF TIMER
button.
•The remote control displays “ ”.
•The orange TIMER lamp ( ) on the
unit will light up.
TO CANCEL
Press the TIMER CANCEL button.
•The orange TIMER lamp ( ) on the unit will
turn off.
NOTE:
•The 1-HOUR OFF TIMER operation has
priority over TIMER ON and TIMER OFF
operations.
•If the 1-HOUR OFF TIMER is set while the
unit is not operating, the unit will operate for
an hour at the formerly set condition.
•If you wish to operate the unit for another
hour before the 1-HOUR OFF TIMER is
activated, press the 1-HOUR OFF TIMER
button again during operation.
•If TIMER ON and/or TIMER OFF are set,
TIMER CANCEL button cancels every
setting.
SELF CLEAN OPERATION 1-HOUR OFF TIMER
1
CANCEL
SELF CLEAN operation will reduce the
growth mold fungus with Plasmacluster
ions, and dry inside of the air/air heat pump
unit. Utilize the operation at seasonal
change over terms.
1
Press the SELF CLEAN button
when the unit is not operating.
•The remote control displays “ ”.
•unit will light up.
•The unit will stop operation after forty
minutes.
1
TO CANCEL
Press the SELF CLEAN button.
NOTE:
•You cannot set the temperature, fan speed,
SELF CLEAN operation.
•Mold fungus already grown can not be
eliminated by this operation.
The blue PLASMACLUSTER lamp on the
•unit will turn off.
The blue PLASMACLUSTER lamp on the
ENGLISH
GB-10
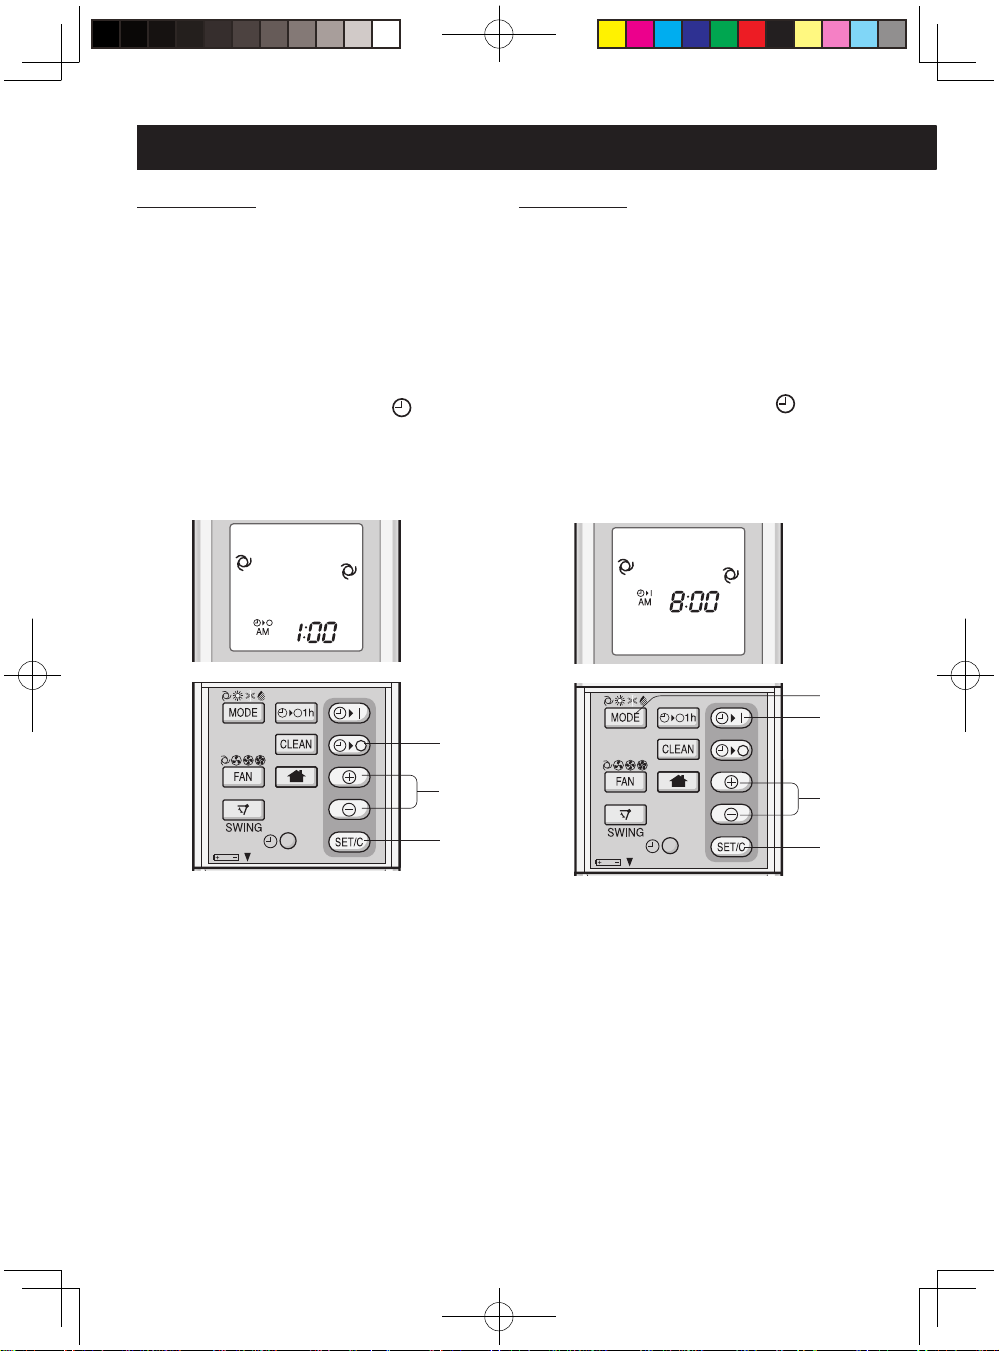
TIMER OPERATION
TIMER OFF
1
Press the TIMER OFF button.
•The TIMER OFF indicator will blink.
2
Press the TIME ADVANCE or RE-
VERSE button to set the desired
time.
•The time can be set in 10-minute incre-
ments.
3
Press the SET/C button.
•The orange TIMER lamp ( ) on the
unit will light.
1
2
3
TIMER ON
1
Press the TIMER ON button.
•The TIMER ON indicator will blink.
2
Press the TIME ADVANCE or RE-
VERSE button to set the desired
time.
•The time can be set in 10-minute incre-
ments.
3
Press the SET/C button.
•The orange TIMER lamp ( ) on the
unit will light.
4
Select the operation condition.
NOTE:
•The unit will turn on prior to the set time
to allow the room to reach the desired
temperature by the programmed time.
(Awaking function)
4
1
2
3
Before setting the timer, make sure the
clock is properly set with the current time.
NOTE:
When the TIMER OFF mode is set, the
temperature setting is automatically adjusted to
prevent the room from becoming excessively
hot or too cold while you sleep. (Auto Sleep
function) The Auto Sleep function will not
activate during the AUTO mode.
COOL/DEHUMIDIFYMODE:
One hour after the timer is set, the temperature
setting rises by1°C.
HEAT MODE:
One hour after the timer is set, the temperature
setting drops 3°C.
GB-11
MAINTENANCE FUNCTION OPERATION
A maintenance temperature of 10°C
eliminates moisture and extreme cold,
reducing the risk of mold and frost damage.
1Press the MODE button and
select HEAT mode.
2Press the ON/OFF button to
start HEAT operation.
3Press the MAINTENANCE
button.
•The remote control will display “ 10°C ” .
TO CANCEL
Press the MAINTENANCE +10° button again.
•MAINTENANCE FUNCTION operation will
also be cancelled when the operation mode is
changed, or when the unit is turned off.
NOTE:
•MAINTENANCE FUNCTION operation will
not be available during AUTO mode opera-
tion.
2
1
3
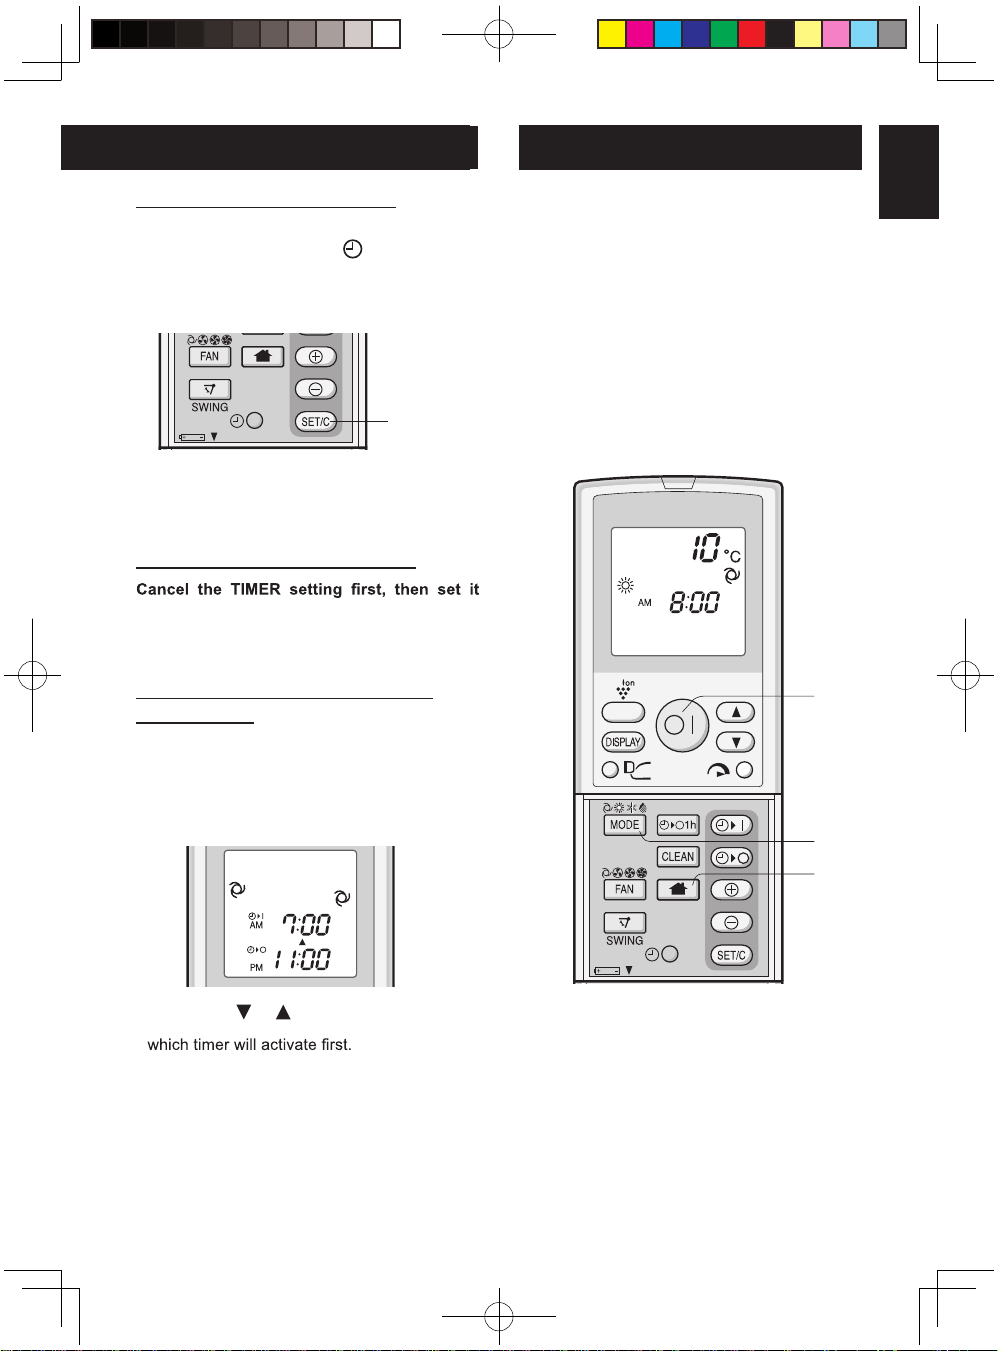
TO COMBINE TIMER ON AND
TIMER OFF
Set the TIMER OFF and TIMER ON.
Example:
(Current time: 9:00 p.m)
OFF TIMER at 11:00 p.m.
ON TIMER at 7:00 a.m.
•The arrow ( or ) between the TIMER ON
indicator and the TIMER OFF indicator shows
NOTE:
•You cannot program the ON-TIMER and
OFF-TIMER to operate the unit at different
temperatures or other settings.
•Either timer can be programmed to activate
prior to the other.
TO CANCEL TIMER MODE
Press the SET/C button.
•The orange TIMER lamp ( ) on the unit will
turn off.
•
The current time will be displayed on the
remote control.
TO CHANGE TIME SETTING
again.
CANCEL
ENGLISH

GB-12
NOTE ON OPERATIONDISPLAY BUTTON
OPERATING TEMPERATURE RANGE
INDOOR
TEMP.
OUTDOOR
TEMP.
COOLING upper limit 32˚C 43˚C
lower limit 21˚C–10˚C
HEATING upper limit 27˚C 24˚C
lower limit – –
•The built-in protective device may prevent the
unit from operating when used out of this range.
•Condensation may form on the air outlet if the
unit operates continuously in the COOL or
DEHUMIDIFY mode when humidity is over 80
percent.
WHEN POWER FAILURE OCCURS
•This air/air heat pump has a memory function
to store settings when a power failure occurs.
After power recovery, the unit will automatical-
ly restart in the same settings which were ac-
tive before the power failure, except for timer
settings.
•If a power failure occurs while the timer is set,
the timer setting will be cancelled and will not
be retrieved even after the power is restored.
NOTE ON HEATING OPERATION
DEFROSTING FUNCTION
•When frost forms on the outdoor unit during
heating operation, the unit will perform auto-
matic defrosting for about 5 to 10 minutes to
remove the frost. During defrosting, the inside
and outside fans stop operating.
HEATING EFFICIENCY
•The unit employs a heat pump that draws
heat from the outside air and releases it into
the room. The outside temperature therefore
•outside temperatures, use an additional heat-
er.
Press the DISPLAY button when the lamps on
the unit are too bright. (The redOPERATION
lamp and the orange TIMER lamp can not be
turned off.)
1
During operation, press the DIS-
PLAY button.
•The blue PLASMACLUSTER lamp( ) and/or
the green FULL POWER lamp ( )will turn
off.
TO LIGHT UP
Press the DISPLAY button again.
1
GB-13
ENGLISH
MAINTENANCE
Be sure to stop the operation and turn off
the circuit breaker before performing any
maintenance.
CLEANING THE UNIT AND THE
REMOTE CONTROL
•Wipe them with a soft cloth.
•Do not directly splash or pour water on
them. It can cause electrical shock or
equipment damage.
•Do not use hot water, thinner, abra-
sive powders or strong solvents.
MAINTENANCE AFTER AIR/AIR
HEAT PUMP SEASON
1
Operate the unit in the SELF CLEAN
operation to thoroughly dry inside
the unit.
2
Stop the operation and turn off the
circuit breaker.
3
MAINTENANCE BEFORE AIR/AIR
HEAT PUMP SEASON
1
dirty.
2
Make sure that nothing obstructs
the air inlet or outlet.
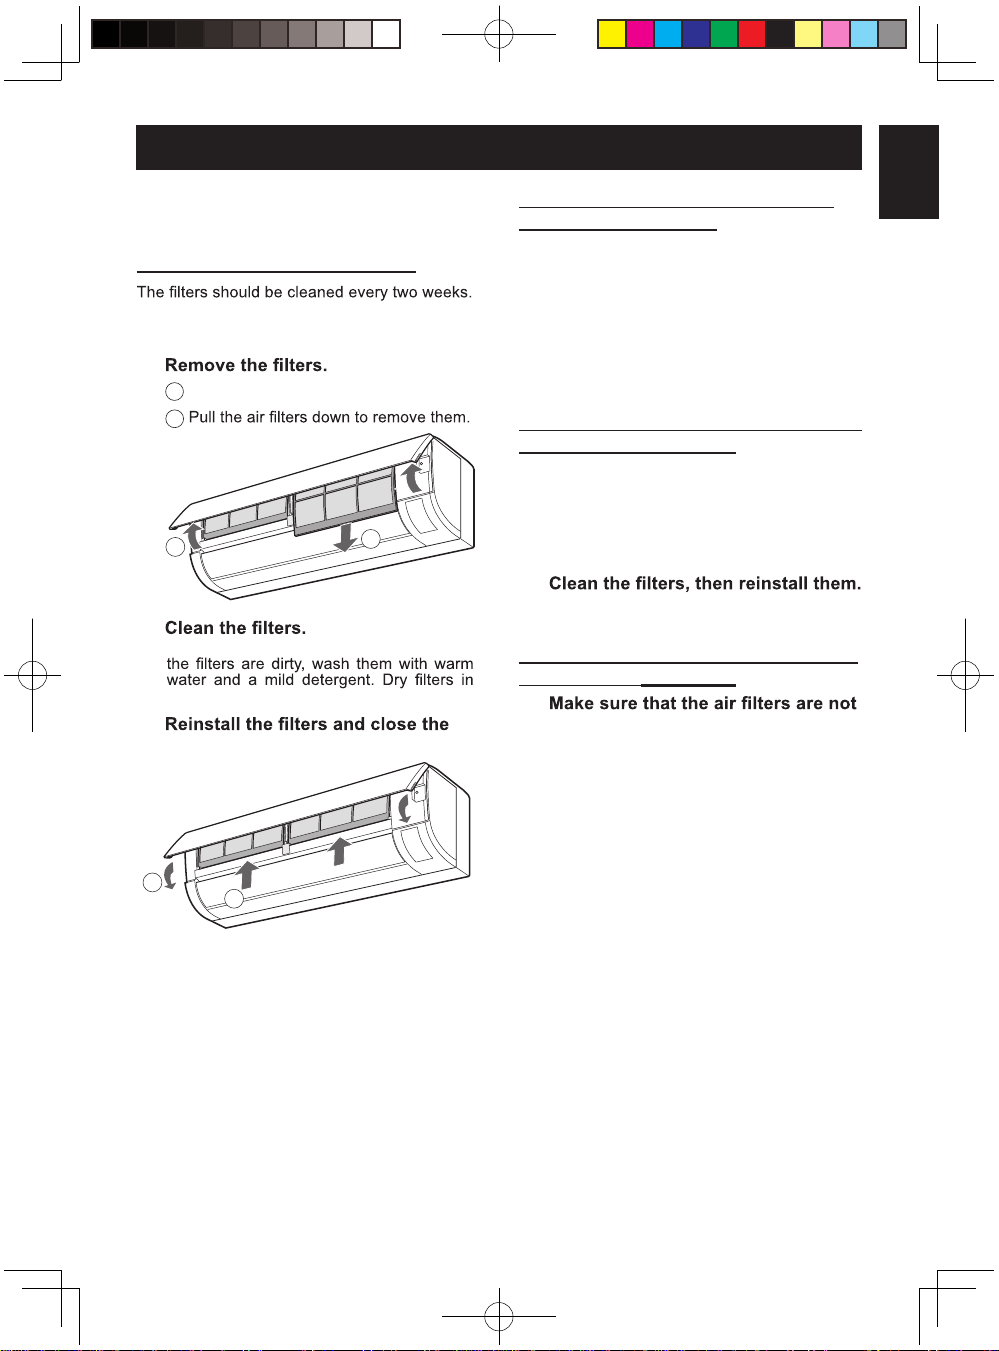
CLEANING THE AIR FILTERS
1
Turn off the unit.
2
1Lift the open panel.
2
3
Use a vacuum cleaner to remove dust. If
the shade before reinstalling.
4
open panel.
12
21
ENGLISH
GB-14
BEFORE CALLING FOR SERVICE
The following conditions do not denote
equipment malfunctions
UNIT DOESNOT OPERATE
•The unit will not operate if it is turned on
immediately after it is turned off. The unit
will not operate immediately after the mode
is changed. This is to protect the internal
mechanisms. Wait 3 minutes before operating
the unit.
UNIT DOESNOT SEND OUT WARM AIR
•In heating operation, the indoor fan may not
start for 2 to 5 minutes after the unit is turned
on to prevent cold air from blowing out of the
unit.
•Theunit is defrosting. Wait for 5 to 10 minutes.
ODORS
•Carpet and furniture odors that entered into
the unit may be sent out from the unit.
CRACKING NOISE
•The unit may produce a cracking noise. This
sound is generated by the friction of the front
panel and other components expanding or
connecting due to a temperature change.
ALOW BUZZING NOISEEMITTED
•This is a sound emitted when the unit is
generating Plasmacluster ions.
SWISHING NOISE
•The soft, swishing noise is the sound of the
MIST SEEN AT INDOOR AIR OUTLET
•In cooling operation, this is caused by the dif-
ference between the room air temperature
and the air discharged.
WATER VAPOUR
•out of the outdoor unit during de-icing.
THEOUTDOOR UNIT DOESNOT STOP
•After stopping the operation, the outdoor unit
will rotate its fan for about a minute to cool
down the unit.
ODOR EMITTED FROM THE PLASMA-
CLUSTER AIR OUTLET
•This is the smell of ozone generated from the
Plasmacluster Ion generator. The ozone con-
centration is very small, posing no adverse ef-
fect on your health. The ozone discharged into
the air rapidly decomposes, and its density in
the room will not increase.
If the unit appears to be malfunctioning,
check the following points before calling
for service.
IF THEUNIT FAILS TO OPERATE
Check to see if the circuit breaker hastripped or
the fuse hasblown.
IF THE UNIT FAILS TO COOL (OR
HEAT) THE ROOM EFFECTIVELY
•
•Check the outdoor unit to make sure nothing
is blocking the air inlet or outlet.
•Check the thermostat isproper setting.
•Make sure windows and doors are closed
tightly.
•A large number of people in the room can
prevent the unit from achieving the desired
temperature.
•Check whether any heat-generating
appliancesare operating in the room.
IF THE UNIT FAILS TO RECEIVE THE
REMOTECONTROLSIGNAL
•Check whether the remote control batteries
have become old and weak.
•Try to send the signal again with the remote
control pointed properly towards the unit’s
signal receiver window.
•Check whether the remote control batteries
are installed properly.
Please call for service when OPERATION
lamp, TIMER lamp and/or PLASMACLUS-
TER lamp on the unit blink.

Informasjon om avfallshåndtering av dette utstyret og batteriet
DERSOM DU ØNSKER Å KVITTE DEG MED DETTE UTSTYRET
ELLER BATTERIENE – BRUK IKKE ORDINÆR SØPPELKASSE.
AVFALLET MÅ HELLER IKKE KASTES I OVN/PEIS.
Brukt elektronisk avfall og batteri skal alltid sorteres separat og
kastes i henhold til lokale lover.
Innsamling fremmer en miljøvennlig behandling, resirkulering av
materialer og et minimum av endelig avfall.
FEILAKTIG HÅNDTERING AV AVFALL kan være skadelig for
menneskers helse og miljøet grunnet skadelige stoffer!
Lever brukt utstyr til en lokal miljøstasjon der dette er tilgjengelig.
Fjern BRUKTE BATTERIER fra utstyret og lever de til resirkulering.
For eksempel til steder hvor de selger nye batterier.
Dersom du er i tvil om avfallshåndteringen kan du kontakte
myndighetene eller din lokale forhandler for informasjon.
KUN FOR BRUKERE INNENFOR EU, OG ENKELTE ANDRE
LAND;
BLANTANNET NORGE OG SVEITS: Din deltakelse i
separat avfallshåndtering er fastsatt i loven.
Symbolet ovenfor vises på elektroniske produkter, utstyr og
batterier som en påminnelse for bruker.
Dersom “Hg” eller “Pb” vises under symbolet betyr dette at batteriet
inneholder spor av kvikksølv (Hg) eller bly (Pb).
Brukere fra PRIVATE HUSHOLDNINGER blir bedt om å bruke
eksisterende returfasiliteter for brukt utstyr og batterier. Batterier
kan kostnadsfritt leveres til utsalgssteder.
Dersom utstyret har blitt brukt I forretningsøyemed, ta kontakt med
din installatør som vil informere deg om retur. Du kan bli fakturert
for returkostnaden. Lite utstyr (og få kvanta) kan i noen tilfeller
leveres til lokal avfallshåndtering. For Spania: Vennligst kontakt det
etablerte innsamlingssystemet eller lokale myndigheter for retur av
dine brukte produkter.
Utstyret inneholder den flourholdige drivhusgassen R410A (global
oppvarmingspotensial 2088*)
Mengde innhold vises på utstyrets utendørs enhetsnavneskilt.
* Basert på BILAG I i EUROPAPARLAMENTETS OG RÅDETS
FORORDNING (EU) Nr. 517/2014 av 16. april 2014.
NO
NO-1
Les denne manualen nøye før produktet tas i bruk. Denne manualen må
oppbevares på et trygt sted for enkel tilgang ved behov for referanser.
NORSK
•SIKKERHETSFORHOLDSREGLER ................NO-1
•NAVN PÅ DELENE...........................................NO-2
•BRUK AV FJERNKONTROLL...........................NO-4
•TIPS OM ENERGISPARING ............................NO-5
•RESERVEMODUS ...........................................NO-5
•GRUNNLEGGENDE DRIFT.............................NO-6
•
JUSTERING AV RETNINGEN PÅ LUFTSTRØMMEN
......NO-7
•COANDAAIRFLOW..........................................NO-7
•DRIFT MED FULL EFFEKT..............................NO-8
•PLASMACLUSTER-DRIFT...............................NO-8
•SELVRENGJØRING.........................................NO-9
•TIDSUR SLÅS AV ETTER 1 TIME....................NO-9
•TIDSURDRIFT..................................................NO-10
•VEDLIKEHOLDSVARME...................................NO-11
•DISPLAY-KNAPP..............................................NO-12
•NOTE OM DRIFTEN.........................................NO-12
•VEDLIKEHOLDMAINTENANCE.......................NO-13
•
FØR DU KONTAKTER SERVICEREPRESENTANTEN
.... NO-14
NORSK
NO-2
NAVN PÅ DELENE
INNENDØRSENHET
UTENDØRSENHET 13 Luftinntak
14 Kjølevæskerør og forbin-
delsesledning
15 Dreneringsslange
16 Luftavløp
OBS:
Det faktiske produktet kan
se noe annerledes ut enn på
illustrasjonen til venstre.
13
14
15
16
1
2
3
4
5
6
7
8
9
10
11
12
1Inntak (Luft)
2Åpent Panel
3
4AUX-knapp
5Vertikalt luftspjeld
6Horisontalt luftspjeld
7 Utløp (Luft)
8 PLASMACLUSTER-lampe
(blå)
9 Mottaker-vindu
10 DRIFT-lampe (drift)
(rød )
11 TIMER-lampe
(oransje )
12 FULL EFFEKT-lampe
(grønn )
This manual suits for next models
1
Table of contents
Languages:
Other Thermia Air Conditioner manuals


