ThermoTex CoziStat Parts list manual

COZISTAT INSTALLATION I NSTRUCTIONS &OPERATING MANUAL
CoziStat
1. Introduction and Brief Description
The CoziStat is an easy-to-use, programmable thermostat with digital display.
CoziStat can be used with CoziMat and CoziFloor Underfloor Heating Systems by Thermotex.
The thermostat can be programmed to automatically maintain the preset floor or room
temperature or alternatively can be controlled manually - and provides economic use of
electricity by energizing the underfloor heater only as required.
For full technical characteristics of the CoziStat thermostat, please see the Technical
Specification, which is available from www.thermotex-direct.co.uk.
IMPORTANT:
Please read these installation instructions carefully before
attempting to install the CoziStat thermostat. Incorrect
installation may cause damage to the product.
All electrical connections and connection to the mains
supply must be carried out by a qualified electrician. The
power supply should be isolated.
Disclaimer: Any information given is believed to be reliable. However, users should treat this information as a guideline, and independently evaluate the suitability of the product for their particular
application. Thermotex Engineering Limited makes no warranties as to the accuracy and completeness of the information and disclaims any liability regarding its use.
Thermotex Engineering Ltd, 1a Broom Business Park, Broom Bank Road, Chesterfield S41 9QG
Revision 1.01
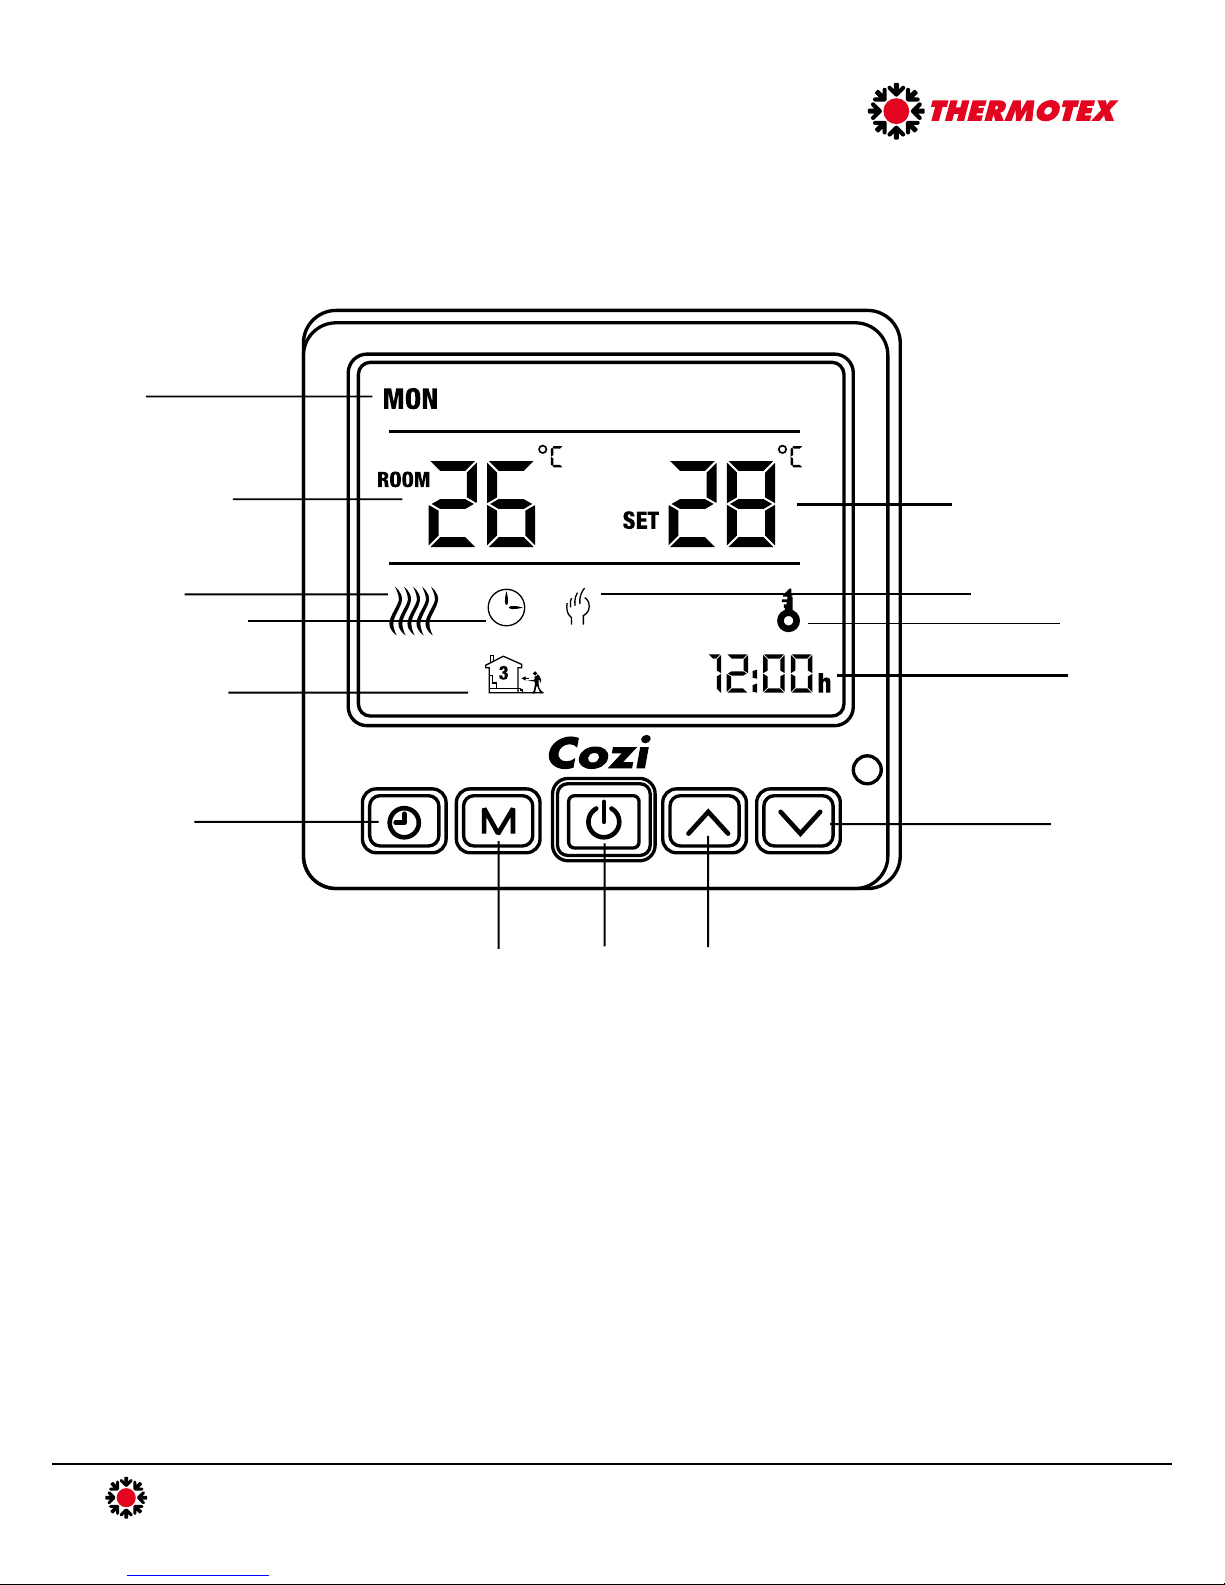
2. Overview
Guide to Buttons and Symbols
Day
Room or Floor
Temperature Set Temperature
Heating
Programmable
Mode
Manual Mode
Lock
Time Period
Time
Set Time
Mode Power Up
Down
COZISTAT INSTALLATION INSTRUCTIONS & OPERATING MANUAL
3. What You Will Require for Installation:
In the box;
30mA RCD (residual current device)
Cable trunking (for power and sensor cables in the wall)
Flexible conduit (for sensor cables in the floor)
Waterproof Tape (to seal the open end of the conduit in the floor)
Installation Instructions (available to download at www.thermotex-direct.co.uk)
4. IMPORTANT
DO NOT:
Do not load a single thermostat with more than 16A (i.e. 26sq.m of CoziMat or 100m of CoziFloor heating cable)
Do not position a thermostat in Bathroom Zones 0-2 (consult the latest IET Wiring Regulations or a qualified
electrician)
DO:
Do read these installation instructions carefully before attempting to install your CoziStat thermostat
Do protect the delicate sensor wire from damage during and after installation
Disclaimer: Any information given is believed to be reliable. However, users should treat this information as a guideline, and independently evaluate the suitability of the product for their particular
application. Thermotex Engineering Limited makes no warranties as to the accuracy and completeness of the information and disclaims any liability regarding its use.
Thermotex Engineering Ltd, 1a Broom Business Park, Broom Bank Road, Chesterfield S41 9QG
Revision 1.01
Sold Separately;
External Floor Sensor
CoziStat Digital Thermostat
Underfloor Heating System, such as CoziMat or CoziFloor
35-40mm Electrical Back Box
5. Electrical Safety During Installation
All mains electrical connections must be undertaken by a certified electrician and must conform to current IEE Wiring Regulations
You must use a floor sensor thermostat, such as CoziStat, to control the CoziMat underfloor heating system at all times
Use a 30mA residual current device for maximum safety
6.Positioning the Thermostat
Position the thermostat conveniently on the wall - preferably near an existing power source to avoid the need for additional wiring.
Always protect the heating circuits with a suitably rated fuse and a 30 mA residual current device.
In accordance with BS 7671: 2008 IET 17th Edition Wiring Regulations, thermostats must not be positioned within Zones 0-2,
which are considered the wettest areas. Please refer to the current IET Regulations or a qualified electrician to ensure that you
are guided by the latest regulations and code of practice.
If the room is big enough to incorporate an Outside Zone (an area outside of zones 0-2, where water jets are not used for cleaning
purposes), the thermostat can be positioned here. Otherwise the thermostat must be positioned outside of the room, away from wet
conditions.
COZISTAT INSTALLATION INSTRUCTIONS & OPERATING MANUAL

Disclaimer: Any information given is believed to be reliable. However, users should treat this information as a guideline, and independently evaluate the suitability of the product for their particular
application. Thermotex Engineering Limited makes no warranties as to the accuracy and completeness of the information and disclaims any liability regarding its use.
Thermotex Engineering Ltd, 1a Broom Business Park, Broom Bank Road, Chesterfield S41 9QG
Revision 1.01
COZISTAT INSTALLATION INSTRUCTIONS & OPERATING MANUAL
7.Installation
1. Prepare the position on the wall for the thermostat.
2. Channel out grooves in the wall for the cable trunking for the power supply wires, underfloor heating cable / connection
cable, and the floor temperature sensor.
3. Channel out a groove in the floor for the flexible conduit, which will be used to protect the floor sensor. The bulb end of the
floor sensor should be positioned centrally to two runs of heater cable in the floor.
4. Seal the end of the flexible conduit which will be installed in the floor with tape to ensure the sensor stays clean and dry.
Install the electrical back box for the thermostat, the cable trunking in the wall and the flexible conduit in the floor. If you are
installing more than two heaters, a junction box will also be required.
5.
Use the screws
provided to fix the
back plate of the
thermostat to the
electrical back box.
6.Connect the
Thermostat display unit
to power and the
sensor according to the
wiring diagram (See
Section 8). Install the
sensor in position in the
conduit in the floor.
7.
Clip the Thermostat
display unit to the
back plate.
8.You're ready to
go!
9.
8.Wiring
LNLoad
Sensor
RS485+
(Optional)
RS485-
(Optional)
Optional facility to use RS485 interface to
relay to a BMS system.
Disclaimer: Any information given is believed to be reliable. However, users should treat this information as a guideline, and independently evaluate the suitability of the product for their particular
application. Thermotex Engineering Limited makes no warranties as to the accuracy and completeness of the information and disclaims any liability regarding its use.
Thermotex Engineering Ltd, 1a Broom Business Park, Broom Bank Road, Chesterfield S41 9QG
Revision 1.01
COZISTAT INSTALLATION INSTRUCTIONS & OPERATING MANUAL
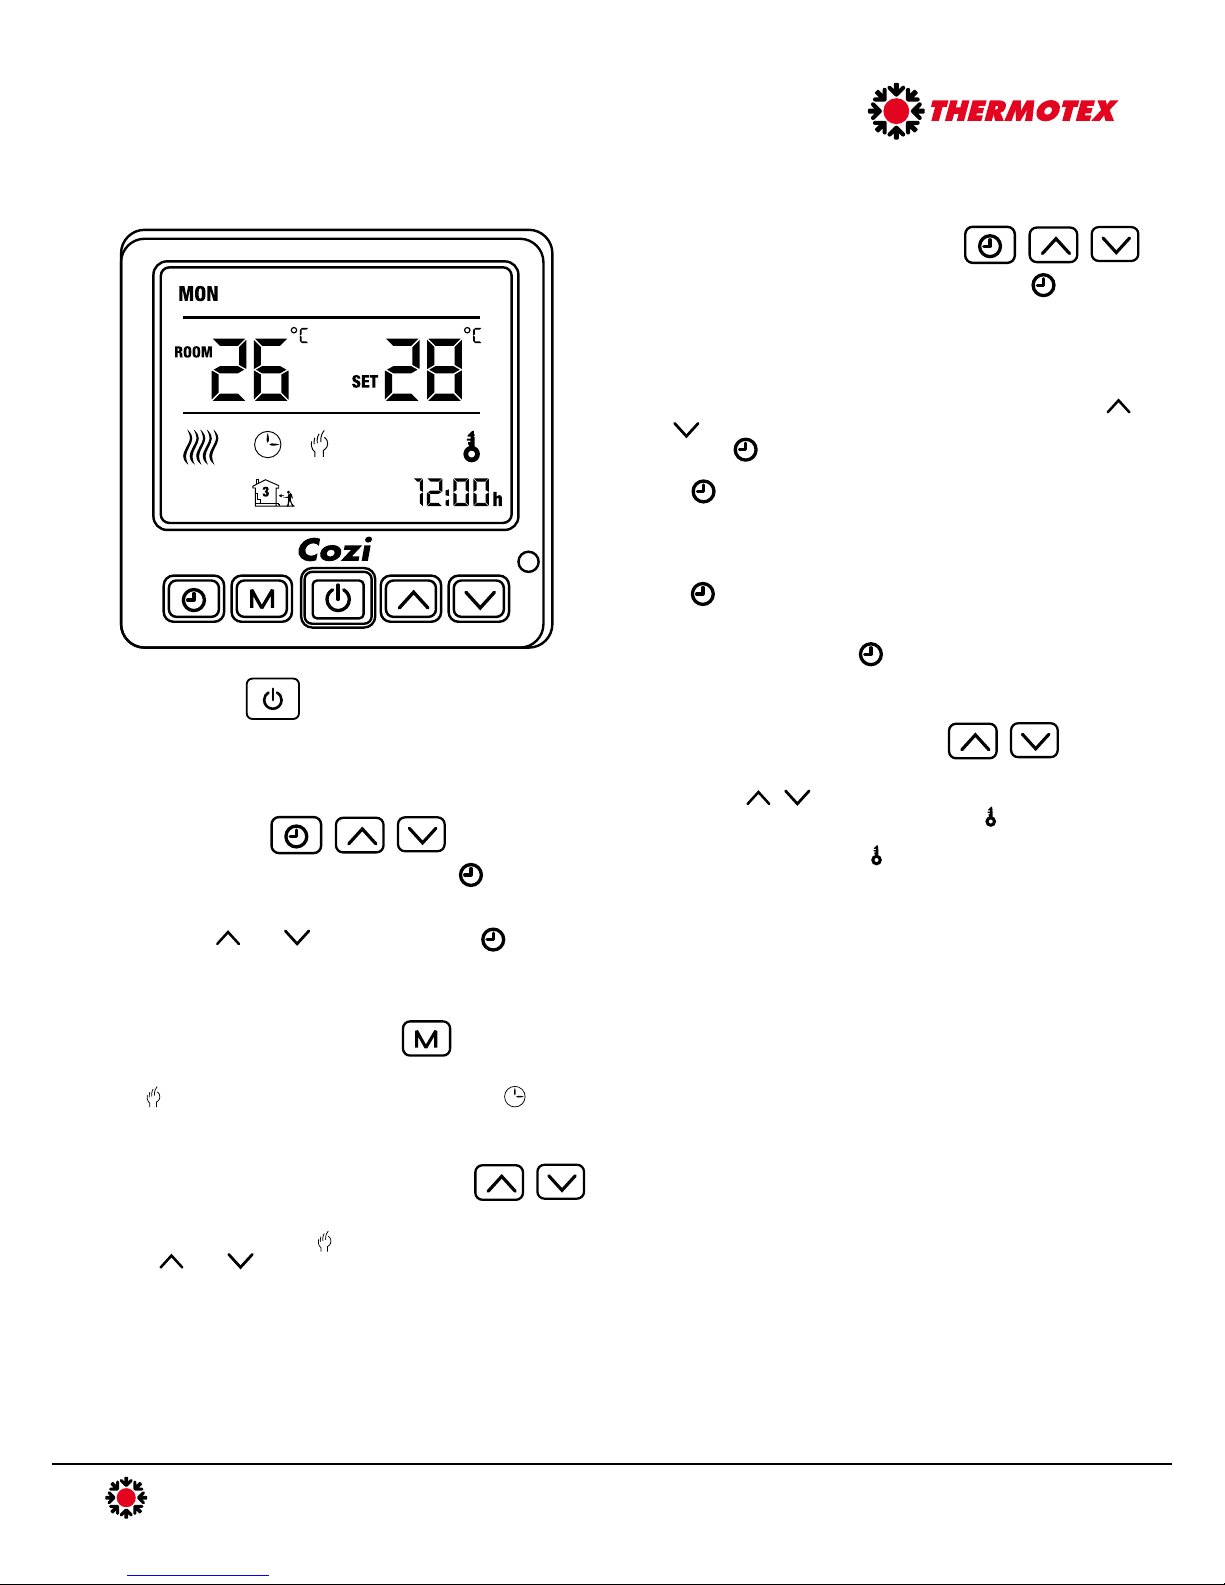
9.Operation Manual
POWER ON/OFF
Press once to switch the thermostat on. The display will activate
and light up blue. After approximately 10 seconds of inactivity the
screen backlight will switch off. Press once again to switch off.
SETTING THE TIME
To set the time and day of the week, first press . The minutes
shown on the time display in the lower right corner of the screen
have been selected and will be flashing. Adjust the minutes up or
down using the and arrow buttons. Press again to
select the hours, and then press once more to select the days,
adjusting with the arrow buttons.
CHANGING THE OPERATION MODE
Press to switch between Manual and Programmable Modes.
When shows Manual Mode is selected. When shows,
Programmable Mode is selected.
SETTING UP PROGRAMMABLE MODE
To set up Programmable Mode first press and hold for
approximately 3 seconds. The screen will light up and the time
will flash in the bottom right corner. You will also see all the
weekdays displayed across the top of the screen and the Period
1 house symbol showing in the bottom left.
To programme Period 1 (the morning switch on time) use the
and arrow keys to adjust the time (in 15 minutes intervals).
Next, press to select the Set Temperature and again use the
arrow keys to adjust the desired temperature up or down. Then,
press again to move to Period 2 and programme as before
first selecting the time and then the temperature. Select up to 6
weekday time periods.
Once you have selected the Set Temperature for time period 6,
press to move to setting the weekend programme. The
weekend days will now appear in the top right of the screen and
you can programme the times and temperatures as you did for
the weekdays. Finally, press once again to exit the
Programmable Mode setup.
TO LOCK OR UNLOCK THE PANEL
To lock or unlock the thermostat panel, press and hold both the
up and down arrow buttons at the same time for
approximately 5 seconds. When locking, the symbol will
appear to show the panel is locked and the buttons will become
inactive. When unlocking, the symbol will disappear to show
the panel is unlocked and the buttons will become active.
ADJUSTING THE TEMPERATURE IN MANUAL
MODE
With Manual Mode selected ( showing on the screen), simply
use the and arrow buttons to adjust the set (desired)
temperature up or down. The Set Temperature shown on the
right side of the display will adjust accordingly.
Disclaimer: Any information given is believed to be reliable. However, users should treat this information as a guideline, and independently evaluate the suitability of the product for their particular
application. Thermotex Engineering Limited makes no warranties as to the accuracy and completeness of the information and disclaims any liability regarding its use.
Thermotex Engineering Ltd, 1a Broom Business Park, Broom Bank Road, Chesterfield S41 9QG
Revision 1.01
COZISTAT INSTALLATION INSTRUCTIONS & OPERATING MANUAL
10.Advanced Settings
1. Temperature Compensation in internal sensor
Ensure the Display reads '01 -1'
2. Deadzone Temperature / Switching Tolerance
Switch the CoziStat Display OFF. Press and hold both the
and buttons at the same time for approximately 3
seconds to enter the Advanced Settings Menu. The display
should read '01 -1'. Press to change between the Menu
Option number on the left of the display, and use the up and
down arrow keys to switch between the options on the right
of the display. See below for explanations of the Menu
Options.
Options: 01, 02, 03, 04, 05
'01' means that the tolerance will be set to 1oC ('02' means that
the tolerance will be set to 2oC, and so on).
A 1oC tolerance means that the thermostat will switch the heater
ON when the Room Temperature falls 1oC or more below the Set
Temperature. Similarly, the thermostat will switch the heater OFF
when the Room Temperature rises 1oC or more above the Set
Temperature.
A 2oC tolerance means that the thermostat will switch the heater
ON when the Room Temperature falls 2oC or more below the Set
Temperature. Similarly, the thermostat will switch the heater OFF
when the Room Temperature rises 2oC or more above the Set
Temperature.
We recommend setting the tolerance at '01'. To do this ensure
the Display reads '02 01'.
3.Sensor Type
Options: In, Ou, AL
'In' refers to the internal sensor in the thermostat. This measures
the room (air) temperature only, not the floor temperature.
'Ou' refers to the external sensor installed in the floor. This
measures the floor temperature only, not the air temperature.
'AL' refers to the internal sensor measuring the room (air)
temperature and the external sensor used to limited the floor
temperature.
Using CoziStat to control underfloor heating, we recommend
you use the external sensor at all times. To do this ensure the
Display reads '03 Ou'.
4.Low Temperature Protection
Options: 5, 6, 7, 8, 9, 10, - -
'5' means that low temperature protction is set to 5oC. If the
Room Temperature drops below 5oC the thermostat will switch
the heating ON to maintain a minimum of 5oC. This Low
Temperature Protection Setting can be set to switch the
thermostat ON between 5oC and 10oC. Select '- -' to cancel the
Low Temperature Protection Setting.
5.High Temperature Protection
Options: 35-70*, - -
*DO NOT SET THE HIGH TEMPERATURE PROTECTION
SETTING HIGHER THAN 45 (45OC)
'35' means that high temperature protction is set to 35oC. If the
Temperature reading rises above 35oC the thermostat will
switch the heating OFF to maintain a maximum of 35oC. Use this
High Temperature Protection Setting to switch the thermostat
OFF between 35oC and 45oC.
6.Button Locking
Ensure the Display reads '06 0'
7.Weekend Setting
Options: 2 day weekend, 1 day weekend, no weekend
'MON TUES WED THURS FRI' displayed across the top of the
screen means a 2 day weekend is selected.
'MON TUES WED THURS FRI SAT' displayed across the top of
the screen means a 1 day weekend is selected.
'MON TUES WED THURS FRI SAT SUN' displayed across the
top of the screen means no weekend is selected (i.e. one
heating programme which is the same every day)
Table of contents
Popular Thermostat manuals by other brands

Silvercrest
Silvercrest Classic Model L Operating instructions and safety advices

Nu-Heat
Nu-Heat Solo user guide

Fantini Cosmi
Fantini Cosmi Intellitherm C32 manual

Gocontrol
Gocontrol GC-TBZ48 Installation & operation guide

Environmental Technologies
Environmental Technologies SST-2 Installation and operation manual

Comfort Stat
Comfort Stat CP2020 owner's manual


