Thonk VACTROL MIX User manual

Oct 5th 2015 www.thonk.co.uk 1
Vactrol Mix
Eurorack DIY Kit
Instructions
Version 1.1
VACTROL MIX OVERVIEW
For the most recent version of this
document please visit –
https://thonk.co.uk/documents/turing/
For all technical support please visit this
thread on Muffwiggler -
http://bit.ly/1VzDXPR
NOTE IF YOU ARE USING A NEW STYLE
ALUMINIUM PANEL THEN TAKE CARE
TO READ THE SECTION ON LEDS
CLOSELY.
All Thonk kits are sold under our standard Terms and Conditions -
http://www.thonk.co.uk/faq/
DIY INSTRUCTIONS
This document gives detailed instructions that assume you have purchased a
complete kit from www.thonk.co.uk. It also assumes no previous knowledge
of electronics.
To learn to solder try https://www.youtube.com/watch?v=IpkkfK937mU and
the Adafruit guide to excellent soldering – http://bit.ly/1l77tF4
Watch and understand that whole YouTube video! If you’re not achieving the
results shown in the video then you need to buy new tools or seek advice.
You will not end up with a working module otherwise.
TOOLS REQUIRED
Soldering iron, snipe nose pliers, wire strippers, small flat head screwdriver
and diagonal cutters AKA snips AKA side-cutters. A Digital Multimeter is
always helpful for checking for bad solder joints and continuity. Thonk sell a
range of inexpensive tools here - http://bit.ly/1jxqF3n
Oct 5th 2015 www.thonk.co.uk 2
Vactrol Mix
Eurorack DIY Kit
Instructions
Version 1.1
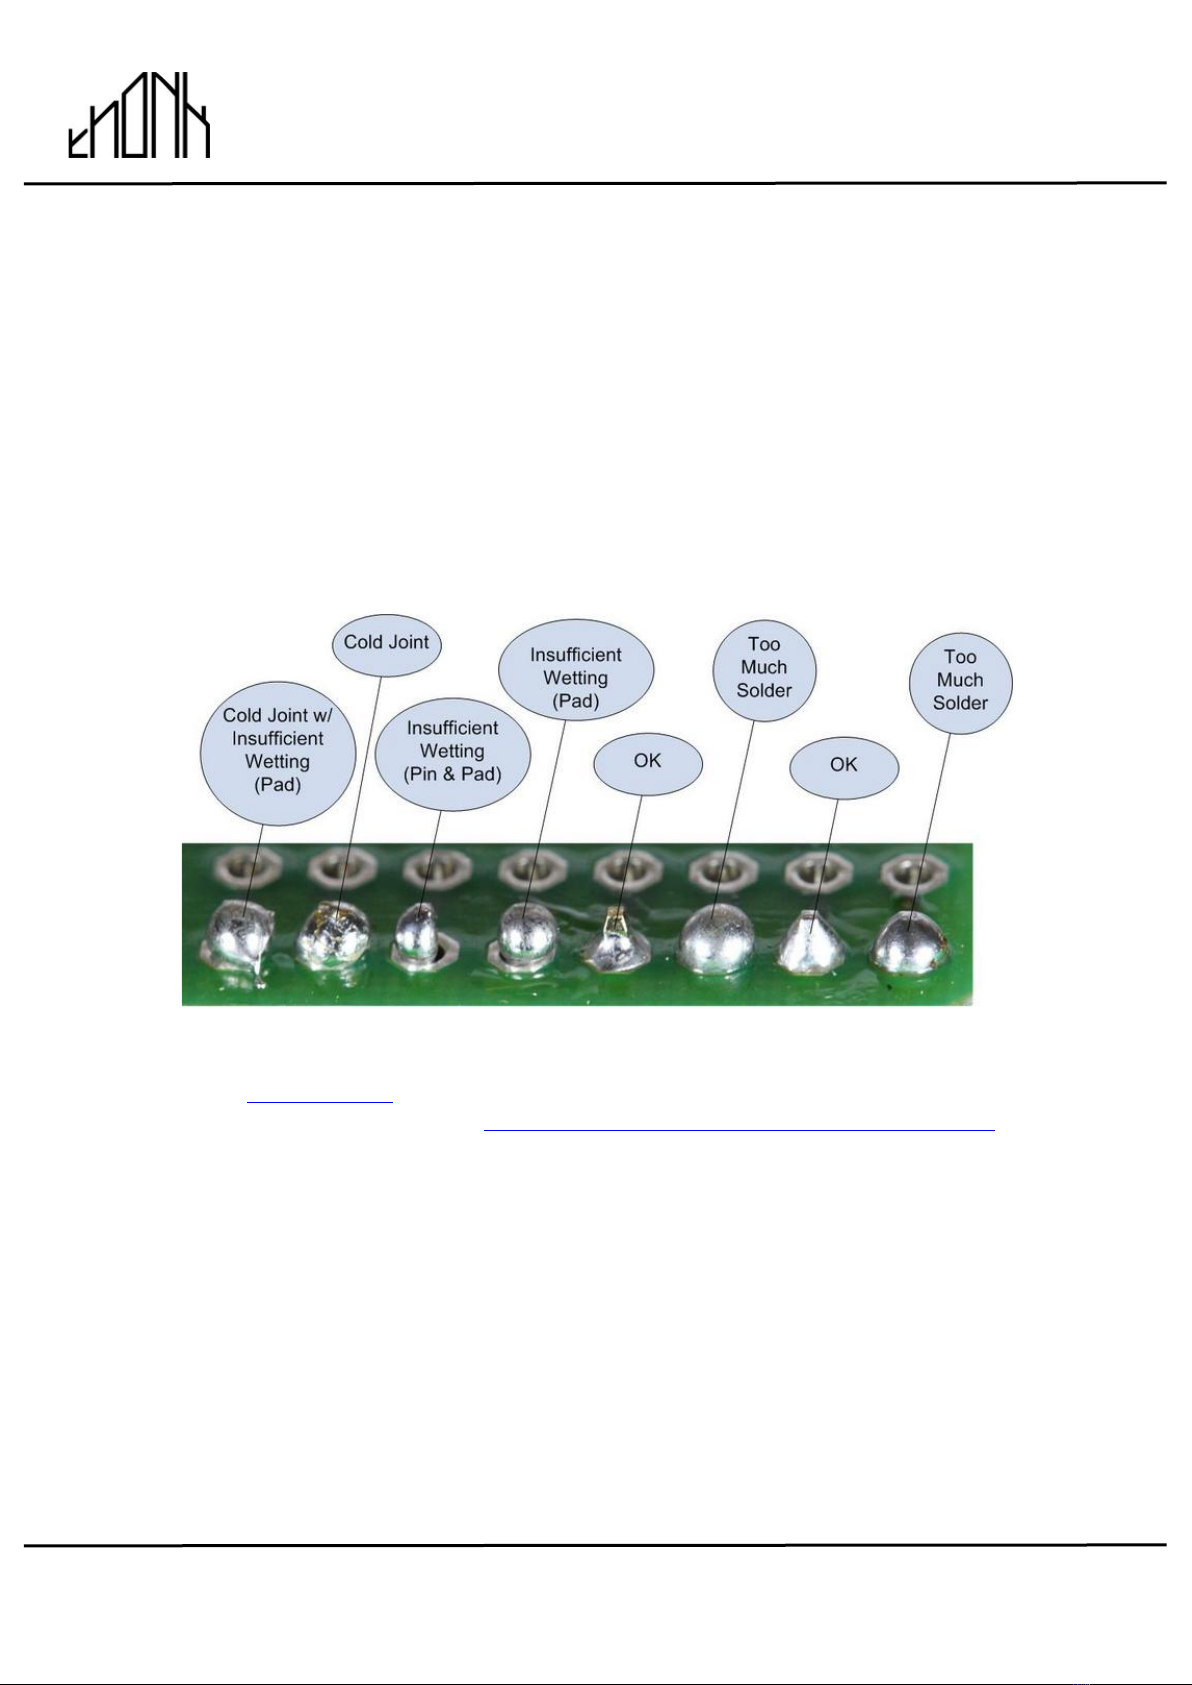
SOLDER JOINTS
Your solder joints should look like those shown as ‘OK’ below, they should
have that neat conical shape on BOTH sides of the PCB. If they don’t look
the same on both sides then stop! Work out why from the soldering guides
linked and don’t continue until you are getting those results.
This isn’t about perfectionism, you are very likely to end up with a destroyed,
damaged or defective unit if you’re not hitting that standard.
This photo is from the Adafruit guide to excellent soldering -
http://bit.ly/1l77tF4 and is reproduced under an Attribution-Sharealike
creative commons license - http://creativecommons.org/licenses/by-sa/3.0/
Oct 5th 2015 www.thonk.co.uk 3
Vactrol Mix
Eurorack DIY Kit
Instructions
Version 1.1
VACTROL MIX BUILD INSTRUCTIONS
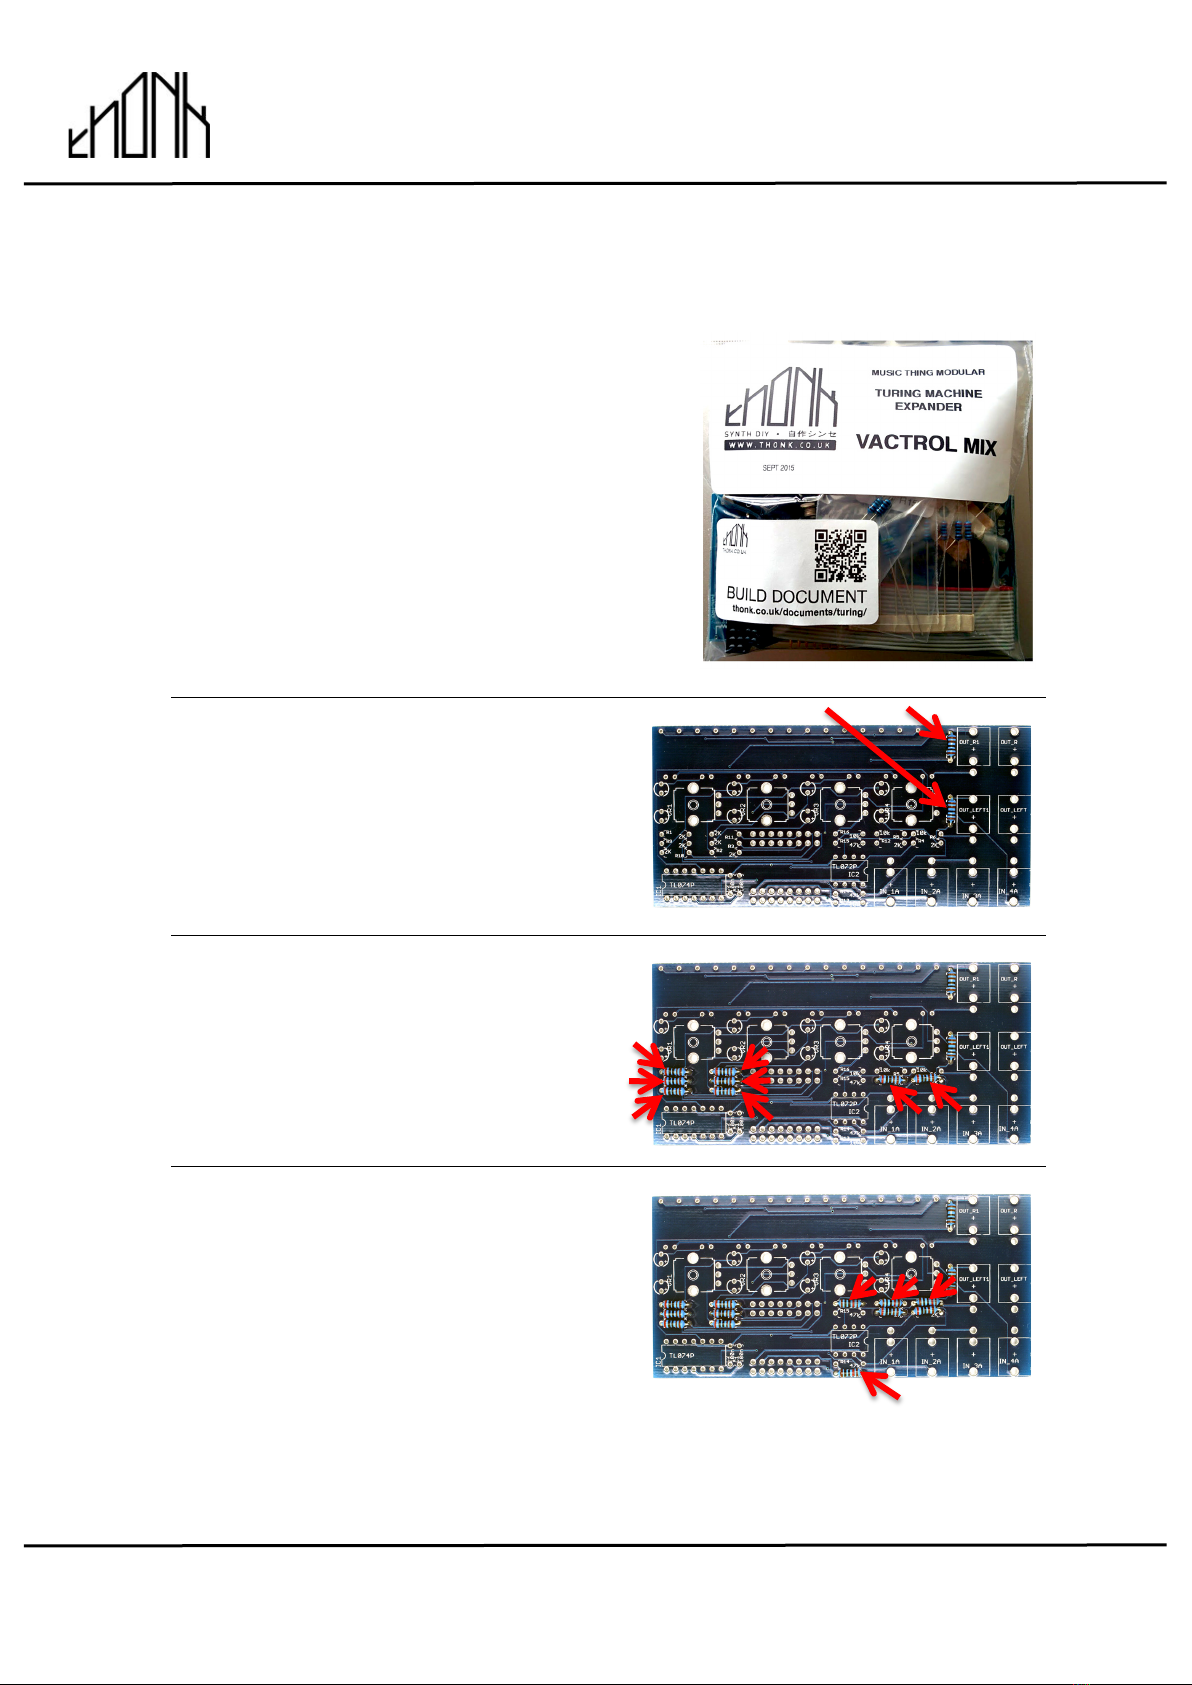
1.
Start by emptying the bag into a bowl or
container. This makes it much easier to
pick parts as you need them and you’re a
lot less likely to lose anything.
2.
First identify and solder the two 1K
resistors into positions R7 and R8
3.
Next identify and solder the eight 2K
resistors into positions R1, R2, R3, R4,
R9, R10, R11, R12
4.
Next identify and solder the four 10K
resistors into positions R5, R6, R13, R16
Oct 5th 2015 www.thonk.co.uk 4
Vactrol Mix
Eurorack DIY Kit
Instructions
Version 1.1
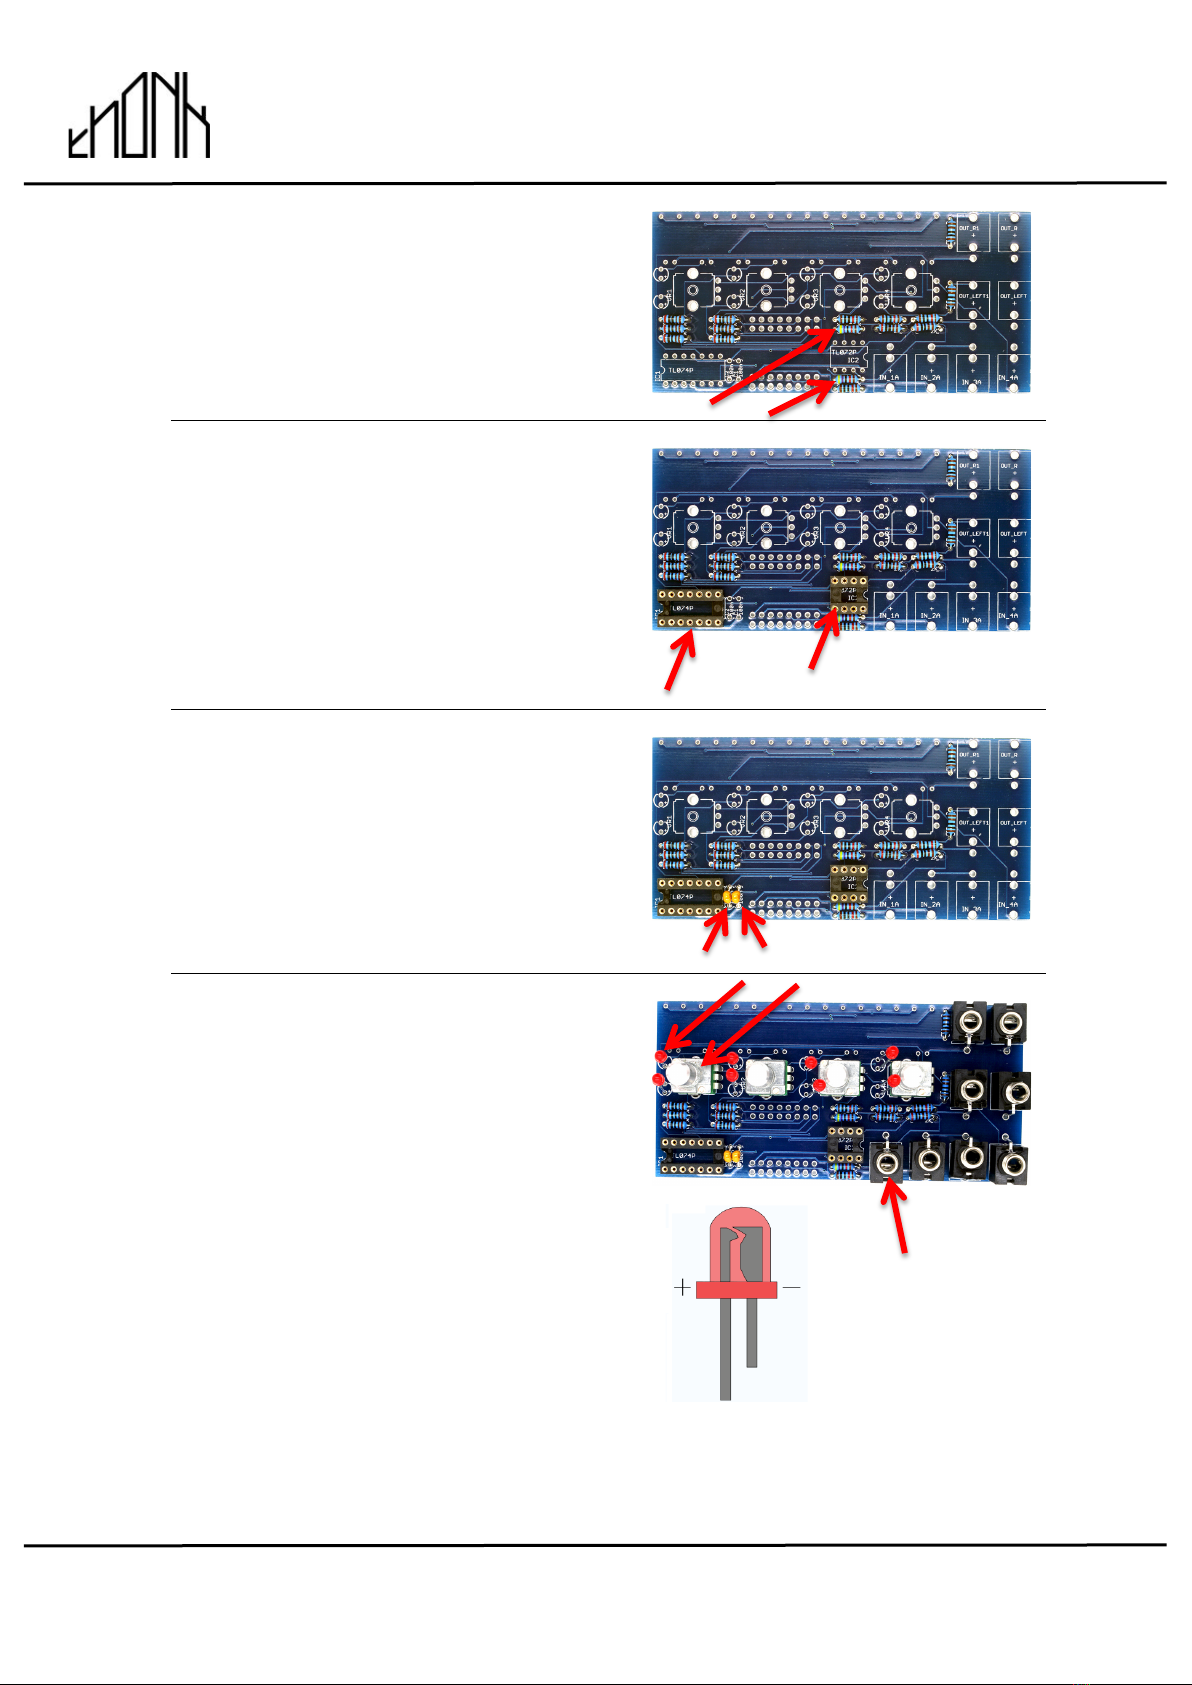
5.
Next identify and solder the two 47K
resistors into positions R14 & R15
6.
Next solder the 8 pin and 14 pin IC
Sockets into the positions shown.
NOTE!: ENSURE THE NOTCH IN THE
END OF EACH SOCKETS MATCHES
THE NOTCH ON THE PCB SILKSCREEN.
7.
Solder the two 100n caps into positions
C1 &C2.
8.
Next position these items into position
but DO NOT SOLDER yet.
1) Four B50K OR B100K pots
2) Eight jack sockets
3) Eight red LEDs
NOTE! The long lead on the LED is the
positive terminal, the Anode. This should
go into the hole marked with a + on the
LED footprint. Orientation is vital.
DO NOT SOLDER yet.
Oct 5th 2015 www.thonk.co.uk 5
Vactrol Mix
Eurorack DIY Kit
Instructions
Version 1.1
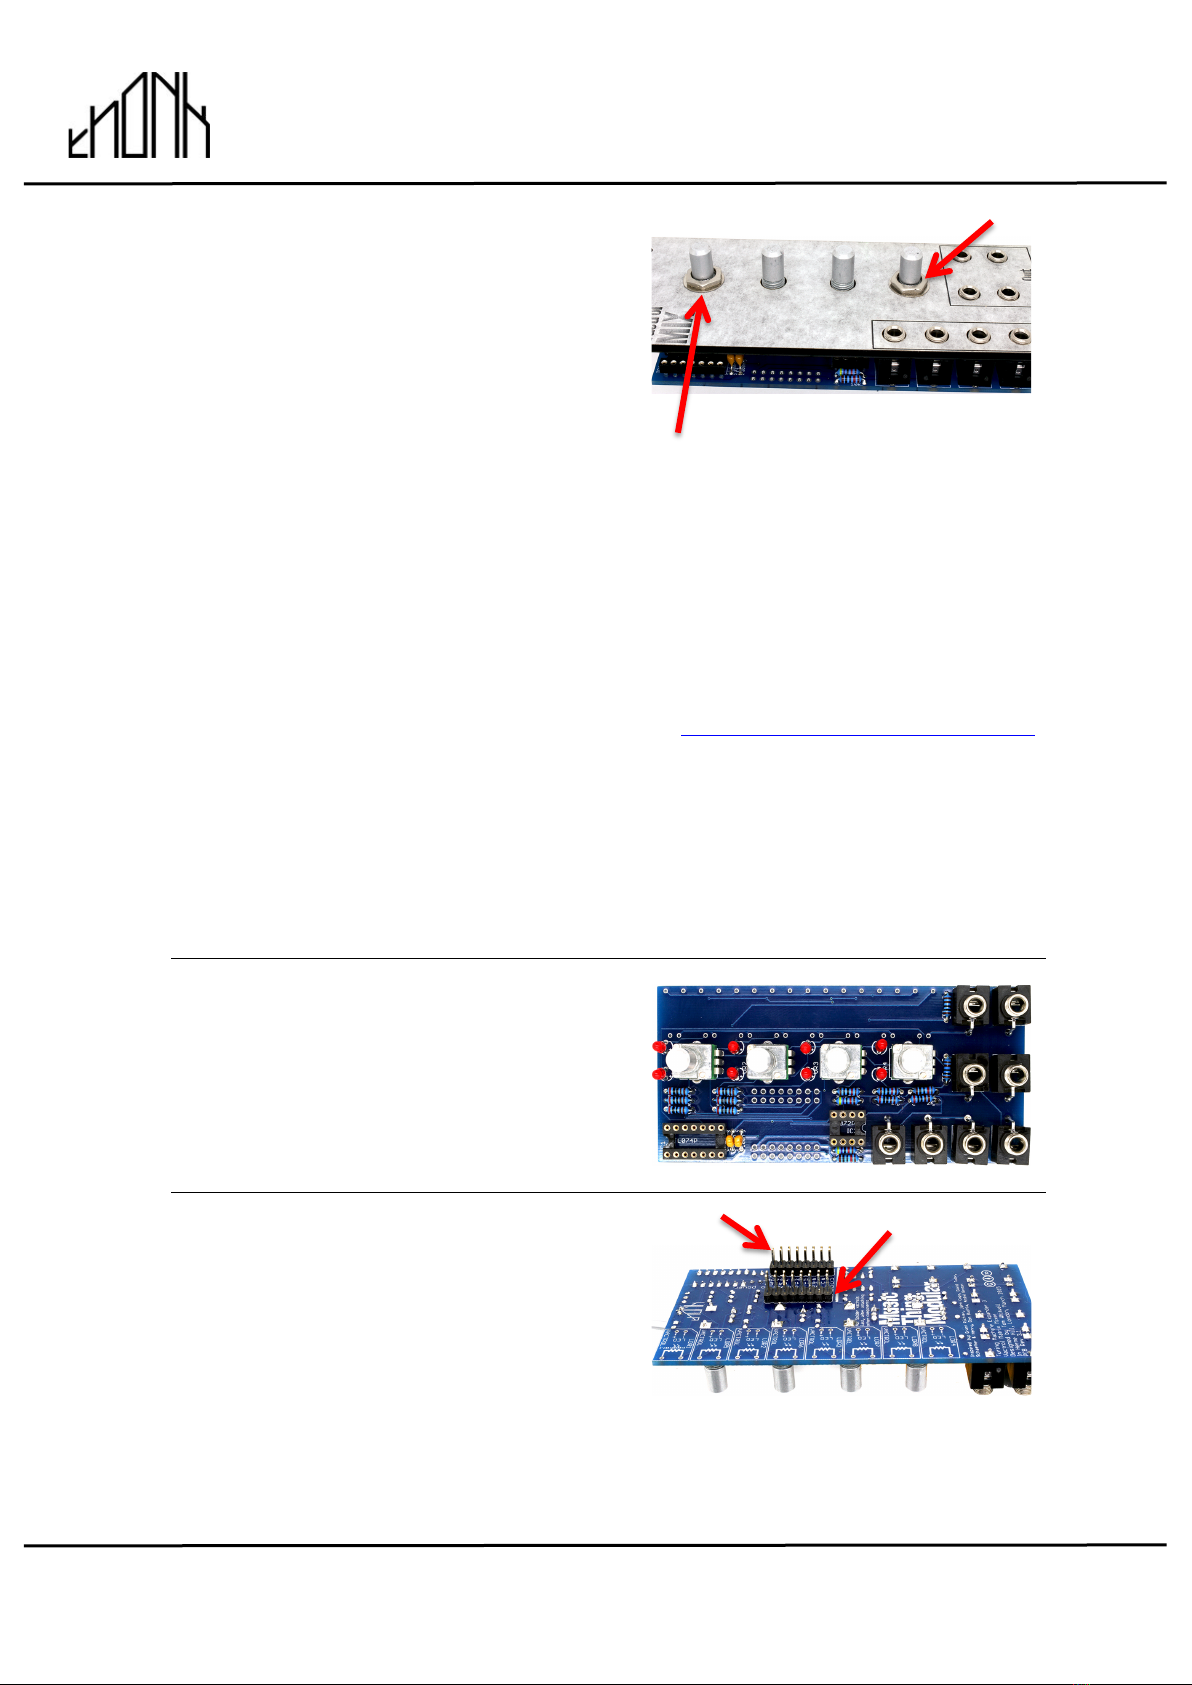
9.
If you are using a panel with holes for
the LEDs like the new 2016 version
from Thonk then read all details before
proceeding!
Lift the PCB so the LEDs drop down to
be flush with the surface of the PCB.
Take the front panel and carefully place
over the 4 pots and 8 jacks without
disturbing their connection to the PCB.
Put a couple of nuts and washers on the
pots as shown to hold the panel in place.
Carefully rotate the assembly so it is PCB
side up. Check all the LEDs have
dropped back again and are touching the
front panel and are perpendicular to the
PCB surface.
Now solder all the loose items… that’s 52
solder joints, double check you didn’t
miss any!
Don’t remove paper from the
Acrylic panel before painting!
If you are using a panel with holes
for the LEDs then ensure the LEDs
are pushed through before
soldering. If you are using the flat
top LEDs and want them flush to the
panel then follow the instructions in
the Turing Mk ii document here. Use
masking tape! :
http://thonk.co.uk/documents/turing2016
10.
Remove the panel, if the LEDs look a bit
wonky then now is the time to straighten
them up by hand.
11.
Flip the board over and solder the two 16
pin headers into position as shown.
Oct 5th 2015 www.thonk.co.uk 6
Vactrol Mix
Eurorack DIY Kit
Instructions
Version 1.1
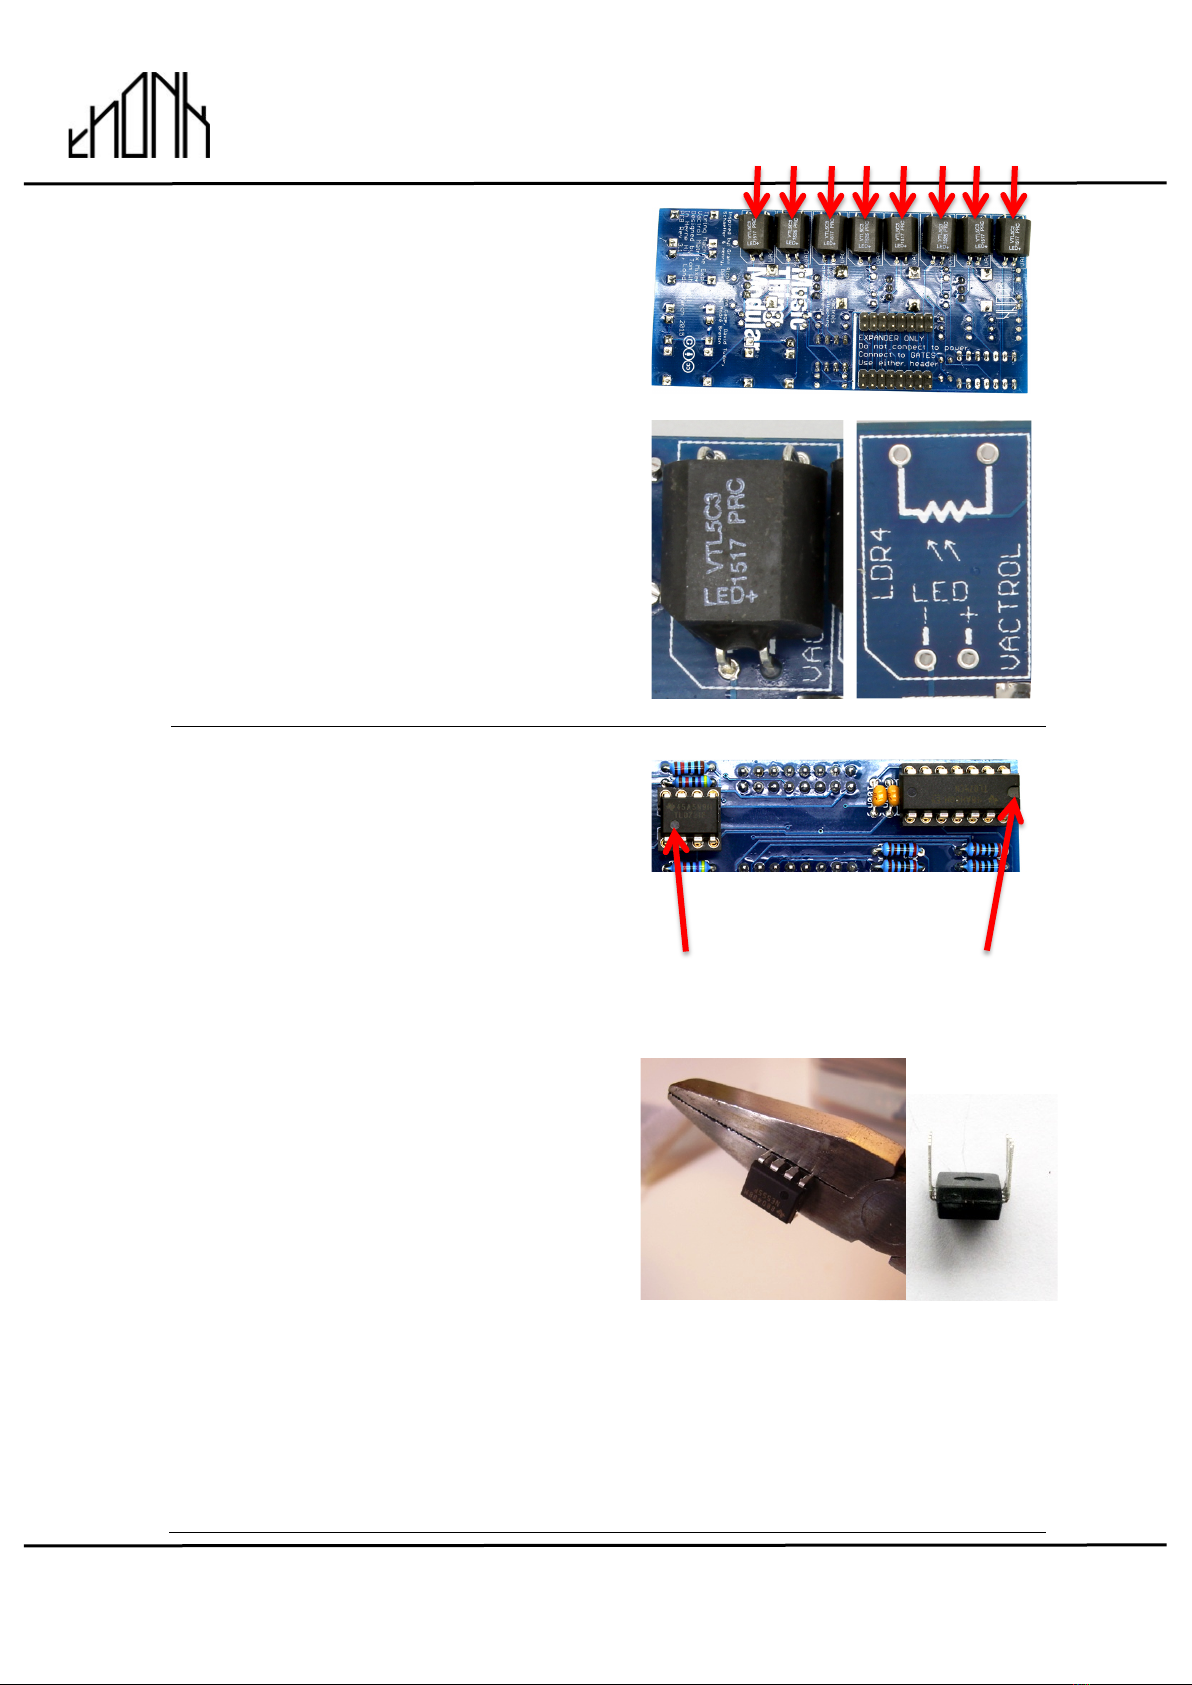
12.
Now solder the eight VTL5C3 vactrols
into position as shown.
NOTE! Orientation is vital. Solder exactly
as show. The LED ‘+’ symbol on the
Vactrol should match with the ‘+’ terminal
shown on the PCB.
13.
Next open the silver ESD packet and put
the TL072 and TL074 IC’s into position
as shown.
NOTE – Orientation is vital!
NOTE! You will need to bend the pins on
the IC inwards slightly so they are at 90
degrees to the body of the chip. They will
come slightly splayed out. This can be
done safely by clasping the 4 pins in a
pair of pliers and very gently bending
inwards together. Repeat for the other
side.
Circular depression Notch
this end this end

Oct 5th 2015 www.thonk.co.uk 7
Vactrol Mix
Eurorack DIY Kit
Instructions
Version 1.1
14.
You can now paint the panel, don’t peel off the paper until it is dry!
https://vimeo.com/54711135
Peel off the plastic film off the back too so the LEDs can shine through.
Once it is dry, affix to the PCB and screw on all the nuts and washers provided.
The washers are for the pots.
Do not over-tighten the pot nuts or you can shatter the acrylic panel.
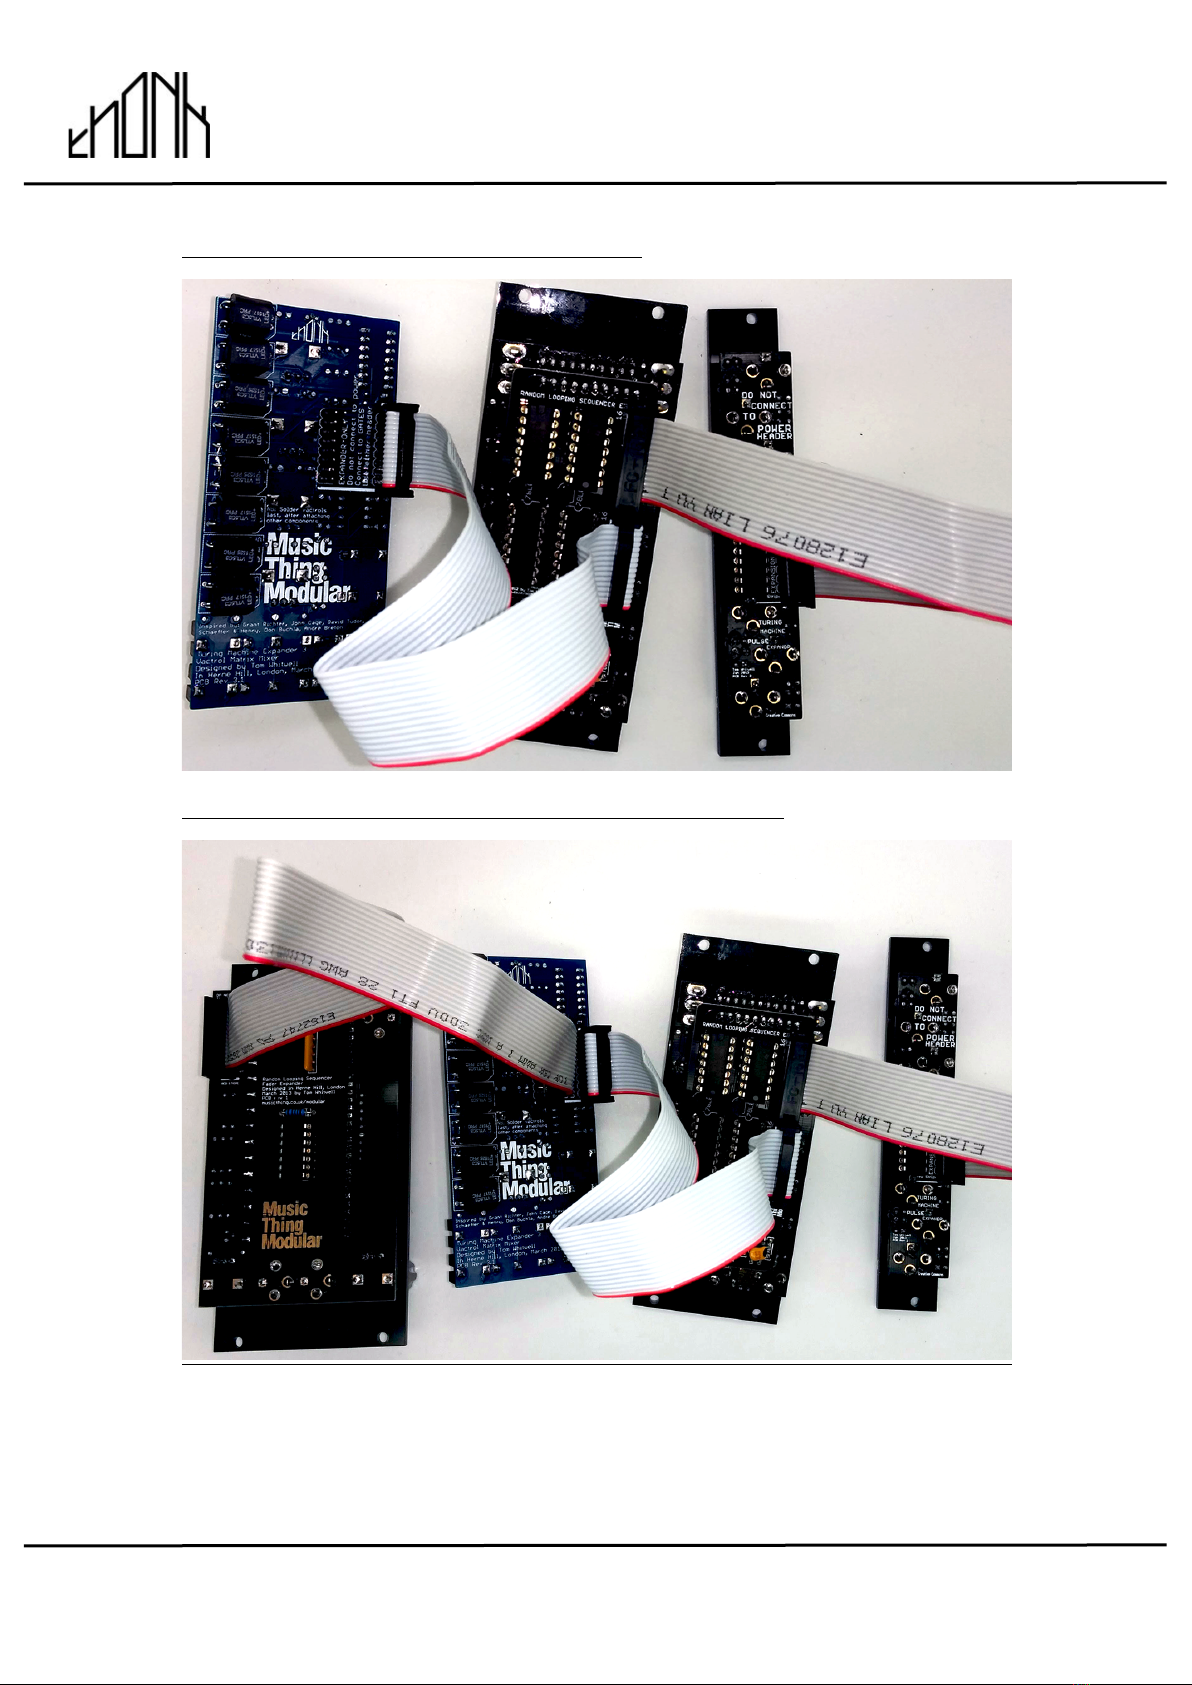
15.
The Vactrol Mix is attached to the GATES output of the BACKPACK. If you also
have a Voltages you just daisy chain it off the Vactrol Mix. Some different
options are shown below for hooking it up.
NOTE! If you are connecting more than 2 expander modules to a single
BACKPACK (i.e. PULSES, VOLTAGES & VACTROL MIX) then you need to
upgrade the positive rail fuse on the BACKPACK. More info on that here:
https://www.thonk.co.uk/shop/fuse-upgrade/
CONNECTING PULSES ONLY
Oct 5th 2015 www.thonk.co.uk 8
Vactrol Mix
Eurorack DIY Kit
Instructions
Version 1.1
CONNECTING VACTROL MIX & PULSES
CONNECTING VACTROL MIX, VOLTAGES & PULSES
Table of contents


