Tibo TI435 User manual

TI435 CD Player
Quick Start Guide

for purchasing the TI435 CD player
- Part of the TIBO TI435 Hi-Fi Separates.
We are confident that it will provide reliable,
high performance sound for many years to come.

If you like our product, please leave a review on our TIBO website:
www.tibo-audio.com
If you have any questions or issues about the product,
please contact our customer support:
suppor[email protected]
For full user manual, please check:
www.tibo-audio.com/support
Play
&
Enjoy!

1 2 3 4 5 6 7 8

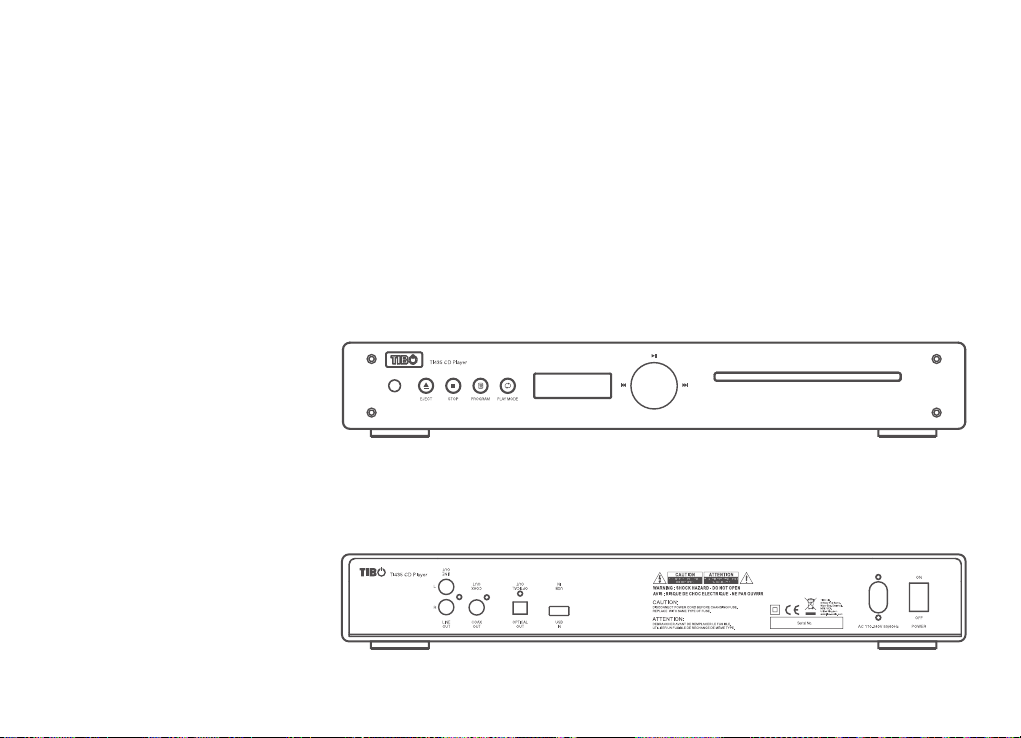
Front Panel
1. IR Remote Sensor
2. Eject CD Button
3. Stop Button
4. Program Tracks Button
5. Repeat / Random Button
6. LCD Display Screen
7. Power On / Standby, Play / Pause, Skip Track Forward / Backward
8. CD Insert Port
Frontpanel
1. IR-sensor til fjernbetjening
2. Skub CD ud
3. Stop
4. Programmér musiknumre
5. Gentag / Vilkårlig
6. Display
7. Strøm til / fra, Afspil / Pause og Spring musiknummer frem / tilbage
8. CD-loader

Panneau avant
1. Récepteur IR de la télécommande
2. Bouton Éjection CD
3. Bouton Stop
4. Bouton Programmer des pistes
5. Bouton Répéter / Aléatoire
6. Écran d'affichage
7. Marche / Arrêt, Lecture / Pause et Piste suivante / Piste précédente
8. Fente d'insertion CD
Vorderseite
1. IR Fernbedienungssensor
2. CD-Ausgabe-Taste
3. Stop-Taste
4. Titelprogrammierung
5. Wiedergabe / Taste für Zufallswiedergabe
6. Displayanzeige
7. Ein- / Ausschalten, Wiedergabe / Pause und Titel vorwärts / rückwärts überspringen
8. CD-Laufwerk

Pannello anteriore
1. Sensore remoto IR
2. Pulsante di espulsione CD
3. Pulsante di interruzione
4. Pulsante di programmazione delle tracce
5. Pulsante Ripeti / Casuale
6. Schermo di visualizzazione
7. Accensione / Spegnimento, Riproduci / Pausa e Passa alla traccia successiva / precedente
8. Porta di inserimento CD
Panel delantero
1. Sensor remoto IR
2. Botón Expulsar CD
3. Botón Parar
4. Botón Programar pistas
5. Botón Repetir / Aleatorio
6. Pantalla
7. Encendido / Apagado, Reproducir / Pausar y Saltar pista hacia delante / atrás
8. Puerto para insertar CD
4
mp3/wav/flac
321 5 6

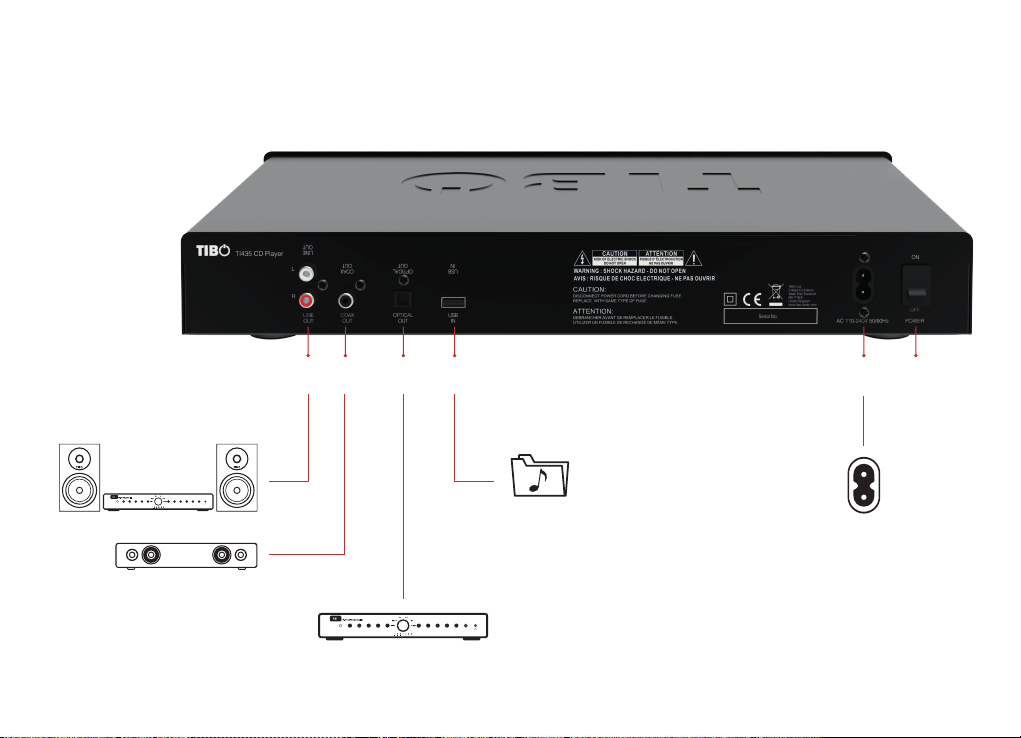
Rear Panel
1. RCA Line Out (L / R)
2. Coaxial Out
3. Optical Out
4. USB In
5. Power Cable Port
6. Power Switch On / Off
Bagpanel
1. RCA-linjeudgang (V / H)
2. Koaksialudgang
3. Optisk udgang
4. USB-indgang
5. Stik til strømledning
6. Strøm Til / Fra

Panneau arrière
1. Sortie de ligne RCA (G / D)
2. Sortie coaxiale
3. Sortie optique
4. Entrée USB
5. Port du câble d’alimentation
6. Commutateur Marche / Arrêt
Rückseite
1. RCA-Ausgang (L/R)
2. Koaxial-Ausgang
3. Optischer Ausgang
4. USB-Eingang
5. Netzkabel-Anschluss
6. Ein-/Ausschalten

Pannello posteriore
1. Uscita line out RCA (D/S)
2. Uscita coassiale
3. Uscita ottica
4. Ingresso USB
5. Porta per cavo di alimentazione
6. Interruttore di Accensione/Spegnimento
Panel posterior
1. Salida de línea RCA (Izq / Der)
2. Salida coaxial
3. Salida óptica
4. Entrada USB
5. Puerto de cable de alimentación
6. Interruptor de encendido / apagado
1
2
8
3
411
12
10
6
7
5
9

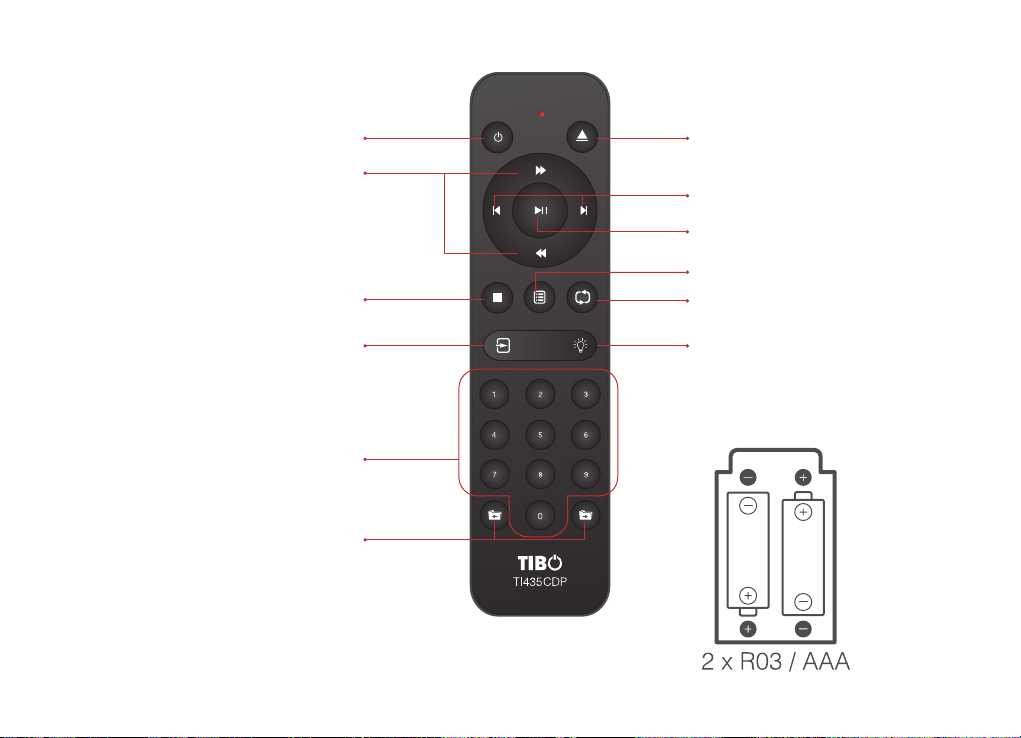
Remote Control
1. Power: On / Standby
2. Fast Forward / Rewind
3. Play Pause
4. Stop Track
5. CD / USB Mode
6. Select Track 1-9: Press 1 followed by 0 for track 10, press 1 followed by 1 for track 11 etc
7. Folder + / -: Change folders in USB mode only
8. Eject CD
9. Skip Track Forward / Backward
10. Program Tracks
11. Repeat / Random
12. Light: Change the colour of the light surrounding the central dial
Fjernbetjening
1. Til / Standby
2. Spol hurtigt frem / tilbage
3. Afspil / Pause
4. Stop musiknummer
5. CD / USB-tilstand
6. Vælg musiknummer 1-9: Tryk på 1 efterfulgt af 0 for musiknummer 10, tryk på 1 efterfulgt af 1
for musiknummer 11 osv
7. Mappe + / - : Der kan kun vælges mapper i USB-tilstand
8. Skub CD ud
9. Spring musiknummer frem/tilbage
10. Programmér musiknumre
11. Gentag / Vilkårlig
12. Skift farve på lyset omkring hoveddrejeknappen

Télécommande
1. Alimentation : Allumé / Veille
2. Avance rapide / Retour rapide
3. Lecture / Pause
4. Arrêter la lecture
5. Mode CD / USB
6. Sélectionner la piste 1 à 9: appuyez sur 1 puis 0 pour la piste 10, appuyez sur 1 puis 1 pour la
piste 11, etc
7. Dossier + / - : Changer de dossier en mode USB uniquement
8. Éjection CD
9. Piste suivante / Piste précédente
10. Programmer des pistes
11. Répéter / Aléatoire
12. Lumière: Changer la couleur de l'éclairage autour du cadran central
Fernbedienung
1. Power: Einschalten / Standby
2. Schnell vorwärts / rückwärts spulen
3. Wiedergabe / Pause
4. Titel anhalten
5. CD-/USB-Modus
6.
Titel 1-9 auswählen: Drücken Sie 1 gefolgt von 0 für Titel 10, drücken Sie 1 gefolgt bei 1 für Titel 11 usw
7. Ordner +/- : Ändern Sie Ordner im USB-Modus
8. CD-Ausgabe
9. Titel vorwärts/rückwärts überspringen
10. Titelprogrammierung

Telecomando
1. Accensione/Standby
2. Volume su/giù
4. Tasto modalità
5. Tasto Indicatore luminoso
6. Tasto 10+
7. Tasti preimpostazioni 1-9
8. Tasto silenzioso
9. Salta traccia avanti/indietro
10. Tasto Riproduci/Sospendi
13. Tasto Shift
14. Pulsante Raggruppa
Mando a distancia
1. Alimentación: Encendido / Espera
2. Avance / Rebobinado
3. Reproducir / Pausar
4. Detener pista
5. Modo CD / USB
6.
Seleccionar pista 1-9: pulse 1 seguido de 0 para la pista 10, 1 seguido de 1 para la pista 11, etc
7. Carpeta +/-: Cambia de carpeta solo en modo USB
8. Expulsar CD
9. Saltar pista hacia delante / atrás
10. Programar pistas
11. Repetir/Aleatorio
12. Luz: El color de la luz que rodea al dial central cambia.

www.tibo-audio.com
R L

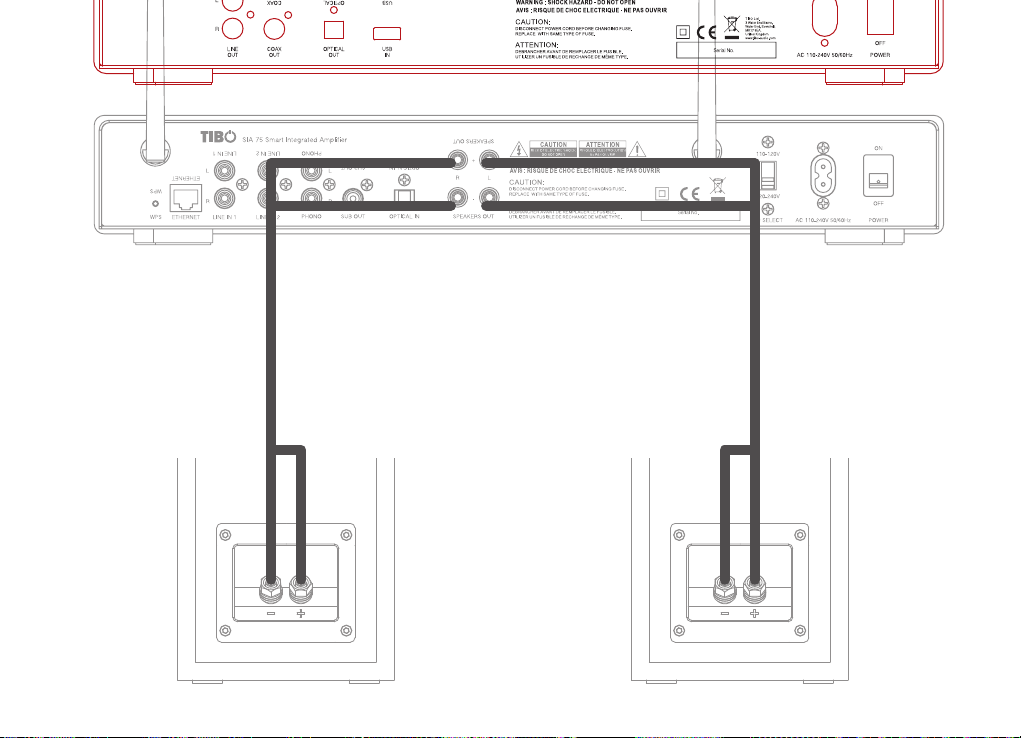
Wiring The Speakers
All SIA 50 models use screw terminals. Unscrew the terminal and insert the bare end of the cable into the
hole at the base of the terminal. Tighten the screws securely and ensure that positive (+) and negative (–)
are matched with the amplifier / receiver.
Kabeltilslutning af højttalerne
Alle SIA 50-højttalere anvender skrueterminaler. Løsn skruen på terminalen, sæt den strippede kabelende
i hullet i bunden af terminalen, og stram skruen fast til. Sørg for, at den positive (+) og negative (–) pol match-
er med forstærker/modtager.
Branchement des enceintes
Toutes les enceintes SIA 50 sont équipées de borniers à vis. Dévissez le bornier, insérez l’extrémité
dénudée du câble dans le trou situé à la base du bornier, revissez fermement. Assurez-vous que les bornes
positives (+) et négatives (-) de l’enceinte/du récepteur sont correctement appariés.

Lautsprecher verkabeln
Alle SIA 50-Lautsprecher haben Schraubklemmen. Schrauben Sie die Klemme auf, fügen Sie das freie
Ende des Kabels in das Loch an der Basis der Klemme und schrauben Sie die Klemme fest. Vergewissern
Sie sich das Positiv + und Negativ - mit dem Verstärker/Empfänger übereinstimmen.
Cablaggio degli altoparlanti
Tutti gli altoparlanti SIA 50 utilizzano i morsetti a vite. Svitare il morsetto, inserire l'estremità nuda del cavo nel
foro della base del morsetto, quindi serrare saldamente. Assicurarsi che i poli positivo (+) e negativo (–)
siano abbinati all'amplificatore/al sintoamplificatore.
Realizar el cableado de los altavoces
Todos los altavoces SIA 50 usan terminales de tornillos. Desatornille el terminal; inserte el extremo desnudo
del cable en el agujero situado en la base del terminal; apriételo con seguridad. Asegúrese de que el termi-
nal positivo + y el negativo – se correspondan con el amplificador/receptor.
Power handling: 2 x 75W RMS
Frequency response: 20Hz-20kHz
Impendence: 4ohms
Wi-Fi 802.11 b/g/n, 2.4 GHz
Bluetooth 4.0
2 x RCA Line in
1 x Phono in RCA
1 x Optical in
1 x Sub out
1 x Speaker out binding posts
Product: 430 x 230 x 65 mm
Remote: 135 x 48 x 10 mm
N.W: 5.0 kg
G.W: 6.5 kg
Other manuals for TI435
1
Table of contents
Other Tibo CD Player manuals


