TIPMATIC 1115 User manual

00
Bedienungsaneitung
nstructon
Book
Mode
d’emploi
Libretto
istruzion

4
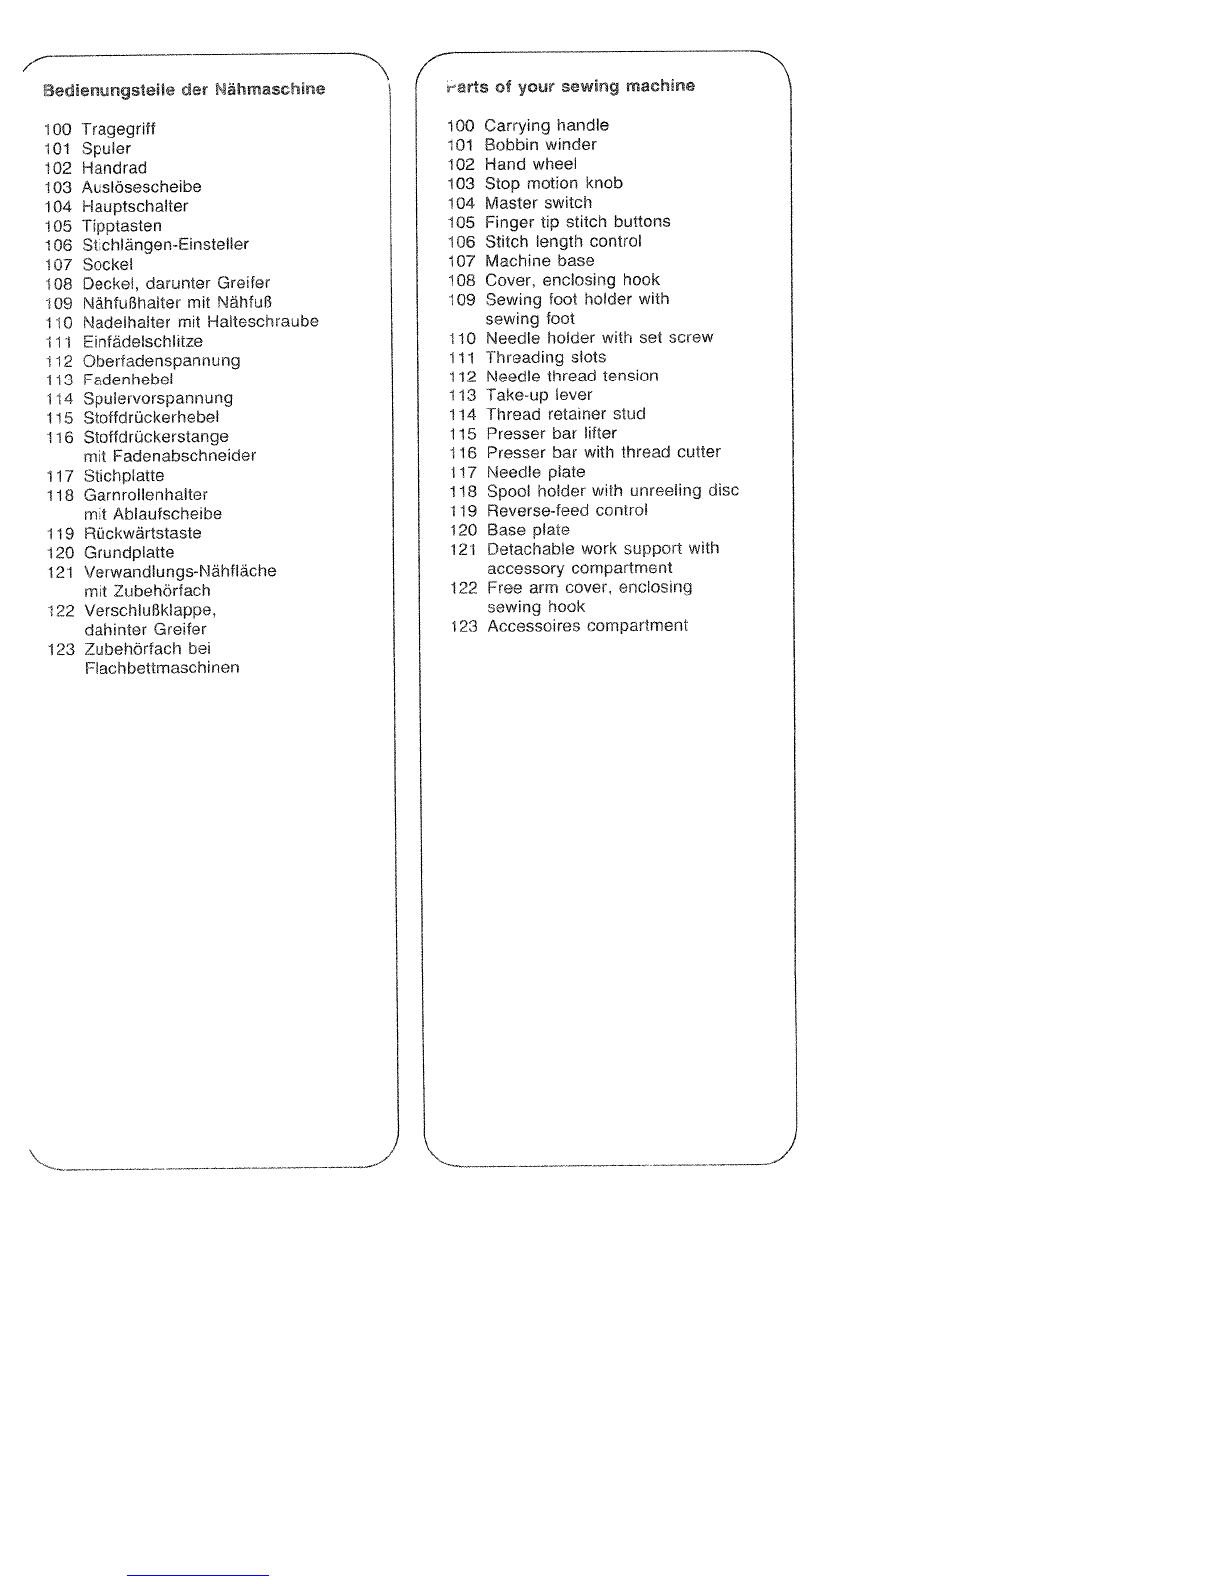
i3edienungstelle der Nähmaschine
100
Tragegriff
101
Spuler
102
Handrad
103
Auslösescheibe
104
Hauptschalter
105
Tipptasten
106
Stichlangen-Einsteller
107
Sockel
108
Deckel,
darunter
Greifer
109
NähfuI3haiter
mit Nähful3
110
Nadelhalter
mit
Halteschraube
111
Einfädelschlitze
12
Oherfadenspannung
113
Fadenhebel
114
Spulervorspannung
115
Stoffdrückerhebel
116
Stoffdruckerstange
mit
Fadenabschneider
117
Stichpiatte
118
Garnrollenhalter
mit
Ablaufscheibe
119
RUckwdrtstaste
120
Grundplatte
121
Verwandlungs-Nahfldche
mit
Zubehörfach
122
Verschlullkiappe,
dahinter
Greifer
123
Zubehdrfach
bei
Flachbettmaschinen
rarts
of
your
sewing
machine
100
Carrying
handle
101
Bobbin
winder
102
Hand
wheel
103
Stop
motion
knob
104
Master
switch
105
Finger
tip
stitch
buttons
106
Stitch
length
control
107
Machine
base
108
Cover,
enclosing
hook
109
Sewing
foot
holder
with
sewing
foot
110
Needle
holder
with
set
screw
111
Threading slots
112
Needle
thread
tension
113
Take-up
lever
114
Thread retainer
stud
115
Presser
bar
lifter
116
Presser
bar
with
thread
cutter
117
Needle
plate
118
Spool
holder
with
unreeling
disc
119
Reverse-feed
control
120
Base
plate
121
Detachable
work
support
with
accessory
compartment
122
Free
arm cover,
enclosing
sewing
hook
123
Accessoires
compartment
/
Dise
Seite
nach
auBen
kiappen
Fold
out this
page
Rabattre
ce
volet
vers
extérieur
Girare
questa
pagina
verso
‘esterno
Sicherheitshinweise
für
Haushaltnähmaschinen
raeh
DIN
57700
Tell
28
bzw.
IEC
335
Tell
28
a)
Der
Benutzer
hat
wegen
der
auf-
und
abgehenden
Nadel
genugend Vor
sicht
walton
zu
iassen
und
die
Näh
stelte
bei
der
Arbeit
standig
zu
beobachten.
b)
Beim
Verlassen
der
Maschine,
bei
Wartungsarbeiten
odor
beim
Wech
sein
von
rnechanischen
Teilen
odor
Zubehör,
st
die
Maschine durch
Her
ausziehen
des
Netzsteckers aus
der
Steckdose
vom
Netz
zu
trennen,
c)
Die
maximal
zulassige
Leistung
der
Lampe
botragt
15
Watt.
Some
safety
rules
a)
Take
care
to
avoid
injury
to
your
fin
gers
by
the
needle
during sewing.
b)
Be
sure
to
unplug the power
cord
whenever
you
leave
the
machine
or
wish
to
clean
it,
oil
1
or
change
mechanical
and
accessory
parts.
C)
Be
sure
to
use
only
a
15-watt
light
bulb
in
the
sewing
lamp.
For
safety
rules
applicable
to
the
UK
please
see
page
34.
j
Mesures
do
sécurité
a)
Toujours
faire
preuve
de
prudence
et
continuellement
surveiller
le
travail.
b)
Toujours
débrancher
a
machine
du
secteur
avant
do
quitter
a
machine,
avant
les
travaux
dentretien
et
en
cas
de
remplacement
do
pièces
mécaniques
ou
d’accessoires,
c)
Puissance
maximale
admissible
do
l’ampouie:
15
Watts.
Norme
di
sicurezza
per
macchine
per
cucire
per
uso
famiglia
secondo
DIN
57700
parte
28
oppure
lEG
335
parte
28
a)
In
virtU
del
movimento
alternativo
dell’ago,
‘utente
deve
prestare
suffi
ciente
attenzione
e
tenere
costante
monte
d’occhio
1
punto
di
lavoro.
b)
Net
cambiare
ago,
piedino,
spotina
e
placca
dago,
nelle
interruzioni
non
custodite
del
avoro
e
durante
i
avon
di
manutenzione
si
deve disinserire
la
corrente
della
macchina
togliendo a
spina
dalla
presa
a
muro.
c)
La
potenza massima
consentita
per
a
lampadina
è
di 15
Watt.
I
lndice
pagina
73
inhoud
pagina
75
nhaltsverzeichnis
Seite
69
Table
des
matières,
page
71
D

K
Pièces
de
Ia
machine
100
Poignee
101
Dévidoir
102
Volant
103
Bouton
de
debrayage
104
Interrupteur
general
105
Touches
de
réglage
106
Sélecteur
de
longueur
de
point
107
Socle
108
Compartiment
du
crochet
109
Support
du pied
prosseur
avec
pied
presseur
110
Pince-aiguille
avec
vis
de
fixation
111
Fentes
denfitage
112
Tension
du
fit
daiguille
113
Releveur
de
fit
114
Pretension
do
dévidoir
115
Levier
du
pied
presseur
116
Barre
du
pied
presseur
avec
coupe-fit
117
Plaque
a
aiguille
118
Porte-bobine avec
disque
dérouleur
119
Levier
de
marche
arrière
120
Plaque
de
base
121
Plaque
de
rangement
avec
bolte
a
accessoires
122
Cache
avec compartiment
de
crochet
123
Compartiment
a
accessoires
Elementi
di
comando
della
macchina
per cucire
100
Maniglia
101
Annaspatoio
102
Volantino
103
Disco
di
disinnesto
del
volantino
104
Interruttore
principale
105
I
tasti
automatici
106
II
regolapunto
107
Lo
zoccolo
108
Sportellino
—
dietro
crochet
109
Portapiedino
con piedino
1
10
Morsetto
d’ago
con
vite
di
fissaggio
111
Fessure
di
infilatura
112
La
tensione superiore
113
Leva
tendifilo
114
lensione
per
Iannaspatoio
115
Leva
alzapiedino
116
Barra
premistoffa
con tagliafilo
117
Placcadago
118
Portarocchetto
con
disco
di
scorrimento
119
Tasto
per cucire
indietro
120
Base
della
macchina
121
Piano
di
lavoro
variable con
scomparto
per
accessori
122
Sportellino dietro
it
crochet
123
Scomparto
per
accessori
da
macchine
con
base
piana

Eektrischer
AnschluB
Tragegriff
umklappen.
Machine
connection
Fold
down
the
carrying
handle.
Branchement
électrique
Basculer
Ia
poignée.
II
collegamento elettrico
Ribaltare a
maniglia.
}
N
Kofferhaube
abheben.
Lift
off
the
cover.
Enlever
le
couvercle
de
Ia
valisette.
Alzare
Ia
custodia.
4
Den
Anlasser
aus
der
Maschine
neh
men.
Zum
Wegraumen
den
Anlasser,
wie
die
Abbildung
zeigt,
in
die
Maschine
stellen,
Remove the
foot
control
from
the
machine.
To
store
the
foot
control
again
place
it
in
the
machine
as
shown
in
the
illustration.
Degager
le
rheostat
a
pédale
de
Ia
machine.
Pour
le
rangement,
disposer
le
rheostat
sur
le
plateau,
selon
illustration.
Togliere
ii
reostato
a
pedale
dalla
macchina.
Per
riporre
Ia
macchina,
sistemare
nou
vamente
ii
reostato
nella
macchina
come
si
mostra
nella
figura.

4
Elektrischer
Anschlul3:
Antasser
auf
den
Boden
stellen.
Stecker
N
in
die
Maschine,
und
Stecker
0
in
die
Wand
steckdose
stecken.
Electrical
connection:
Set
the
foot
con
trol
on
the
floor.
Insert
plug
N
in
the
machine
and
plug
0
in
the
wall
socket.
Branchement électrique:
Placer
le
rheostat
a
pédale
sur
le
sot.
Brancher
a
fiche
N
dans
Ia
machine
et
Ia
fiche
0
dans
Ia
prise
murale.
Collegamento
elettrico:
Porre
il
reostato
sul
pavimento. lnserire
spina
N
nelta
macchina,
0
spina
0
nella
presa
a
mu
ro.
Hauptschalter
P
drücken,
wobei
das
Nählicht
aufteuchtet.
Anlasser
nieder
treten.
Je
tiefer
man
drUckt,
um
so
schnelter
näht
die
Pfaff.
Electronic-Anlasser
(Schalter
0)
Steitung
=
halbe
Endgeschwindigkeit
Stellung
+4
=
voIle
Endgeschwindigkeit
Push
master
switch
P;
the
sewing
light
goes
on.
Operating
the
foot control:
The farther
you
press
the pedal
down
the
faster
the
machine
runs.
Electronic
foot
control
(slide
0)
Position
=
half
the
top
speed
Position
+4
=
full
top
speed
Enfoncer
le
bouton
do
liriterrupteur
general
P;
a
lampe
&allume.
Abaisser
Ia
pédale
du
rheostat.
Plus
Ia
pedale
sera
abaissée,
plus
Ia
Pfaff’
coudra
vite.
Rheostat
électronique
(interrupteur
0)
Position
=
demi-vitesse
maximale
Position
+4
vitesse
maximale intégrale
Premendo
t’interruttore
principale
P
si
accende
it
riflettore.
Premere
II
reostato:
Piü
a
fondo
si
preme
it
pedale,
piü
veloce
cucirà
Ia
“Pfaff”.
Reostato elettronico
(commutatore
0)
Posizione
=
velocità
finale
dimezzata
Posizione
+4
=
velocitá
finale
intera
)
>--‘
3
N
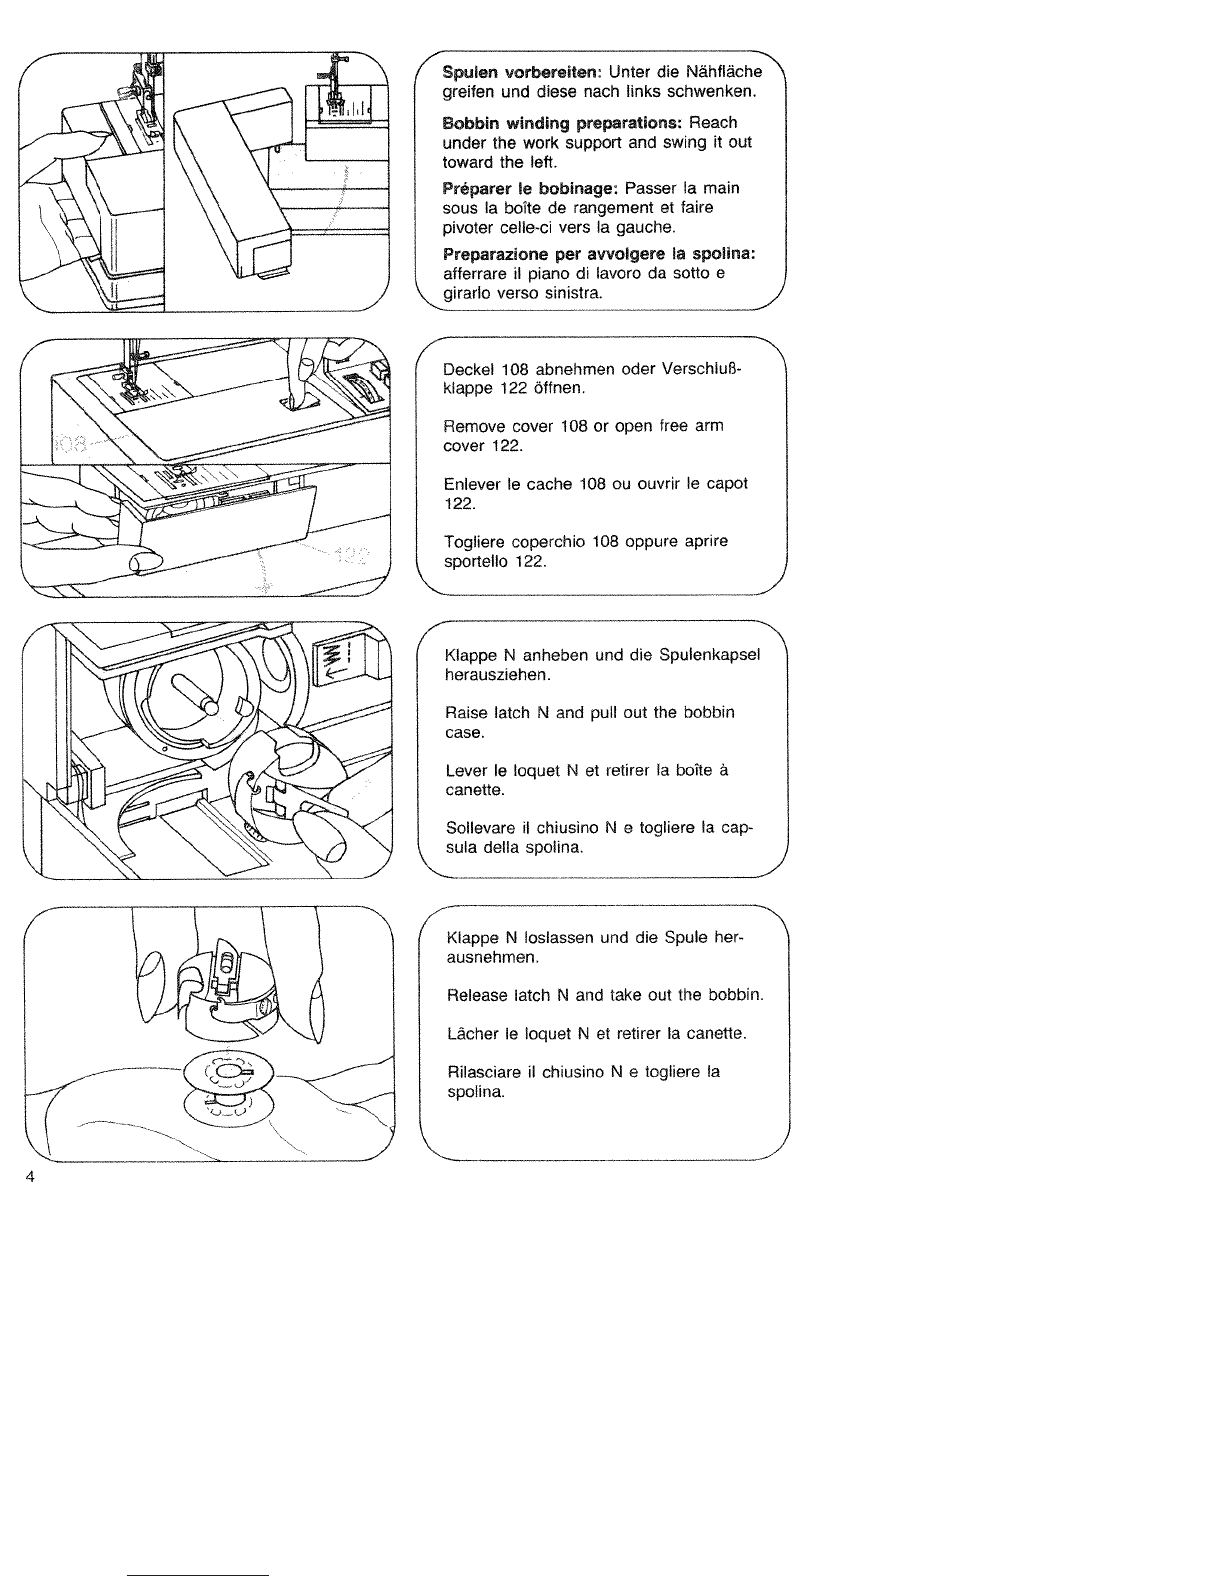
Spuen
vorbereiten
Unter
die
Nähfläche
greifen und
diese
nach
links
schwenken.
Bobbin
winding
preparations
Reach
under
the
work
support and
swing
it
out
toward
the
left.
Preparer
le
bobinage: Passer
Ia
main
sous
a
bolte
de
rangement
et
faire
pivoter
celle-ci
vers
Ia
gauche.
Preparazione
per
avvolgere
Ia
spolina:
afferrare
1
piano
di
Iavoro
da
sotto
e
girarlo
verso
sinistra.
Deckel
108
abnehmen
oder VerschluB
klappe
122
öffnen.
Remove
cover
108
or
open
free
arm
cover
122.
Enlever
le
cache
108
ou ouvrir
le
capot
122.
Togliere
coperchio
108
oppure
aprire
sportello
122.
4
N
Klappe
N
anheben
und
die
Spulenkapsel
herausziehen.
Raise
latch
N
and
pull
out
the
bobbin
case.
Lever
le
loquet
N
et retirer a boite
a
canette.
Sollevare
1
chiusino
N
e
togliere
Ia
cap
sula
della spolina.
/
Kiappe
N
oslassen
mid
die
Spule
her
ausnehmen.
Release
latch
N
and take
out
the
bobbin.
Lâcher
le
loquet
N
et
retirer
Ia
canette.
Rilasciare
1
chiusino
N
e
togliere
Ia
spolina.

N
Zweiten
Garnrollenhalter
rechts
auf
den
Tragegriff
stecken.
Er
befindet
sich
im
ZubehOr.
Fit
the
second
reel
pin
at
the
right.
It
is
included
in
the
accessories.
Monter
Ia
deuxième broche
a
bobines
a
droite.
Elle
se
trouve
parmi
les
accessol
res.
Inserire
ii
secondo
porta-rocchetto
a
destra
sulla
maniglia.
Esso
si
trova
nel
corredo.
Garnrolle
aufschieben.
N
Place
the
thread
reel
on
the
pin.
Passer
Ia
bobine
de
fil
sur
Ia
broche.
Inserire
ii
rocchetto.
Spule
auf
den Spuler
101
stecken
und
N
drehen,
bis
Stift
N
in
Schlitz
0
einrastet.
Place
the
bobbin
on
bobbin winder
101
and
turn
it
so
that
pin
N
engages
in
slot
0.
Mettre
Ia
canette
en
place
sur
le
dévidoir
101;
tourner
Ia
canette
jusqu’à ce
que
Ia
fente
0
passe
sur
Is
tenon
N.
lnserire
Ia
spolina
sullo
spolatore
101
e
girarla finchè
1
porno
N
si
inserisce
nella
fessura
0.
4
Nähwerk
ausschalten:
Handrad
festhal
ten
und
Scheibe
103
nach
vorn
drehen.
Disengaging
the
sewing
mechanism:
Hold
the
hand
wheel
steady
and
turn
knob
103
towards
you.
Débrayer
e
mécanisme:
Retenir
le
volant
et
tourner
le
disque
103
vers
‘avant.
Disinnestare
ii
meccanismo
di
cucito:
Tenere
fermo
1
volantino
e
girare
ii
disco
103
in
avanti.
5
&
4
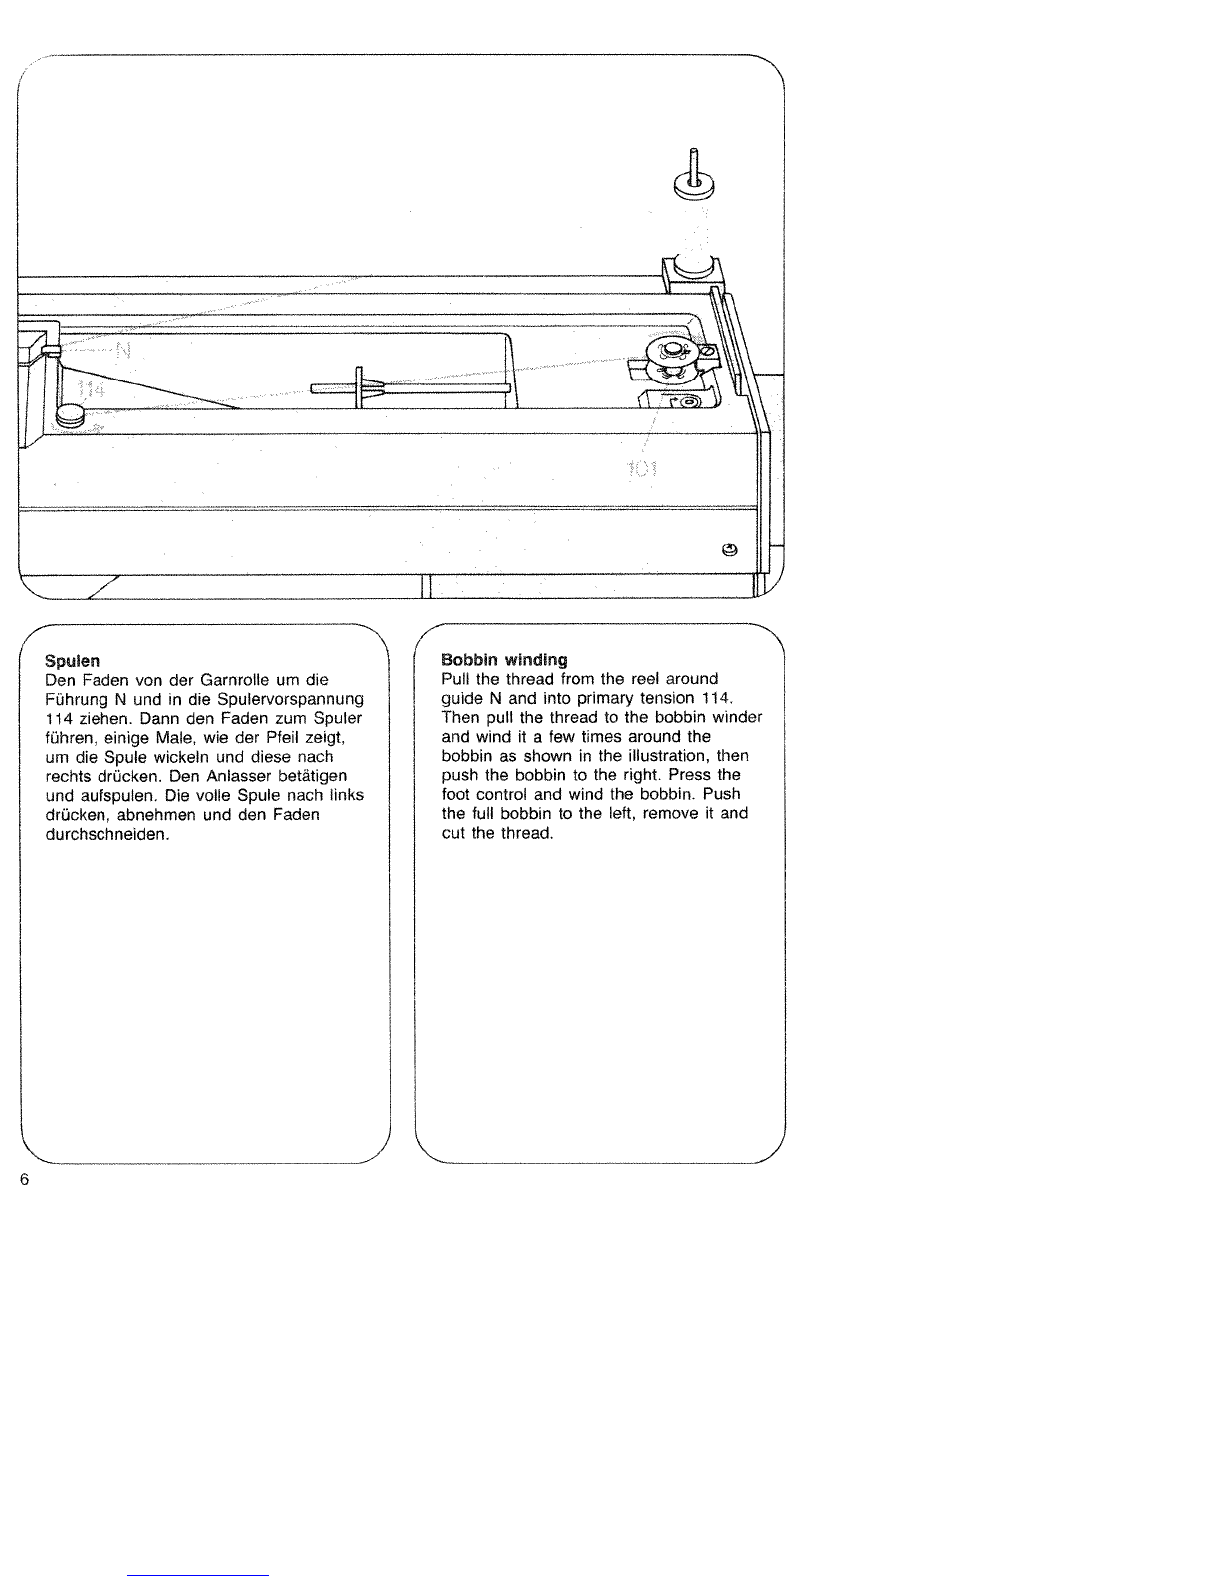
Spulen
Den
Faden
von
der
Garnrolle
urn
die
Fuhrung
N
und
in
die
Spulervorspannung
114
ziehen.
Dann
den
Faden
zurn
Spuler
führen, einige
Male, wie
der
Pfeii
zeigt,
urn
die
Spule
wickein
und
diese
nach
rechts
drücken.
Den
Anlasser betatigen
und
aufspuien.
Die
voile
Spule
nach
inks
drücken,
abnehmen
und
den Faden
durchschneiden.
N
Bobbin
winding
Pull
the
thread
from
the
reel
around
guide
N
and
into
primary
tension
114.
Then
pull
the
thread
to
the
bobbin winder
and
wind
it
a
few
times
around
the
bobbin
as
shown
in
the
illustration,
then
push
the
bobbin
to
the
right.
Press
the
foot
control
and
wind
the
bobbin.
Push
the
full
bobbin
to
the
left,
remove
it
and
cut the
thread.
)
4
Bobinage
des canettes
Tirer
le
fil
de
a
bobine,
autour
du
guide
fil
N,
dans
a
pretension de
dévidoir
114.
Puis,
enrouler
le
hi
de
quelques
tours,
dans
le
sens
de
Ia
flèche,
sur
Ia
canette.
Pousser
Ia
canette
vers
adroite.
Abais
ser
a
pédale
du
rheostat
et
garnir
Ia
canette.
Pousser
a
canette
remplie
vers
Ia
gauche,
Ia
retirer
et
couper
le
fil.
H
Avvolgere
Ia
spolina
Tirare
II
fib
dal
rocchetto
nella
guida
N
e
nella
tensione
dell’annaspatoio
114.
Por
tare
quindi
II
fib
aIb’annaspatoio,
avvol
gerlo
alcune
volte
attorno
alla
spolina
come mostra
a
freccia
e
premere
Ia
spo
lina
verso
destra.
Premere
ii
pedale
e
bobinare.
Premere
a
spolina
piena
verso
sinistra,
toglierla
e
tagliare
ii
fib.
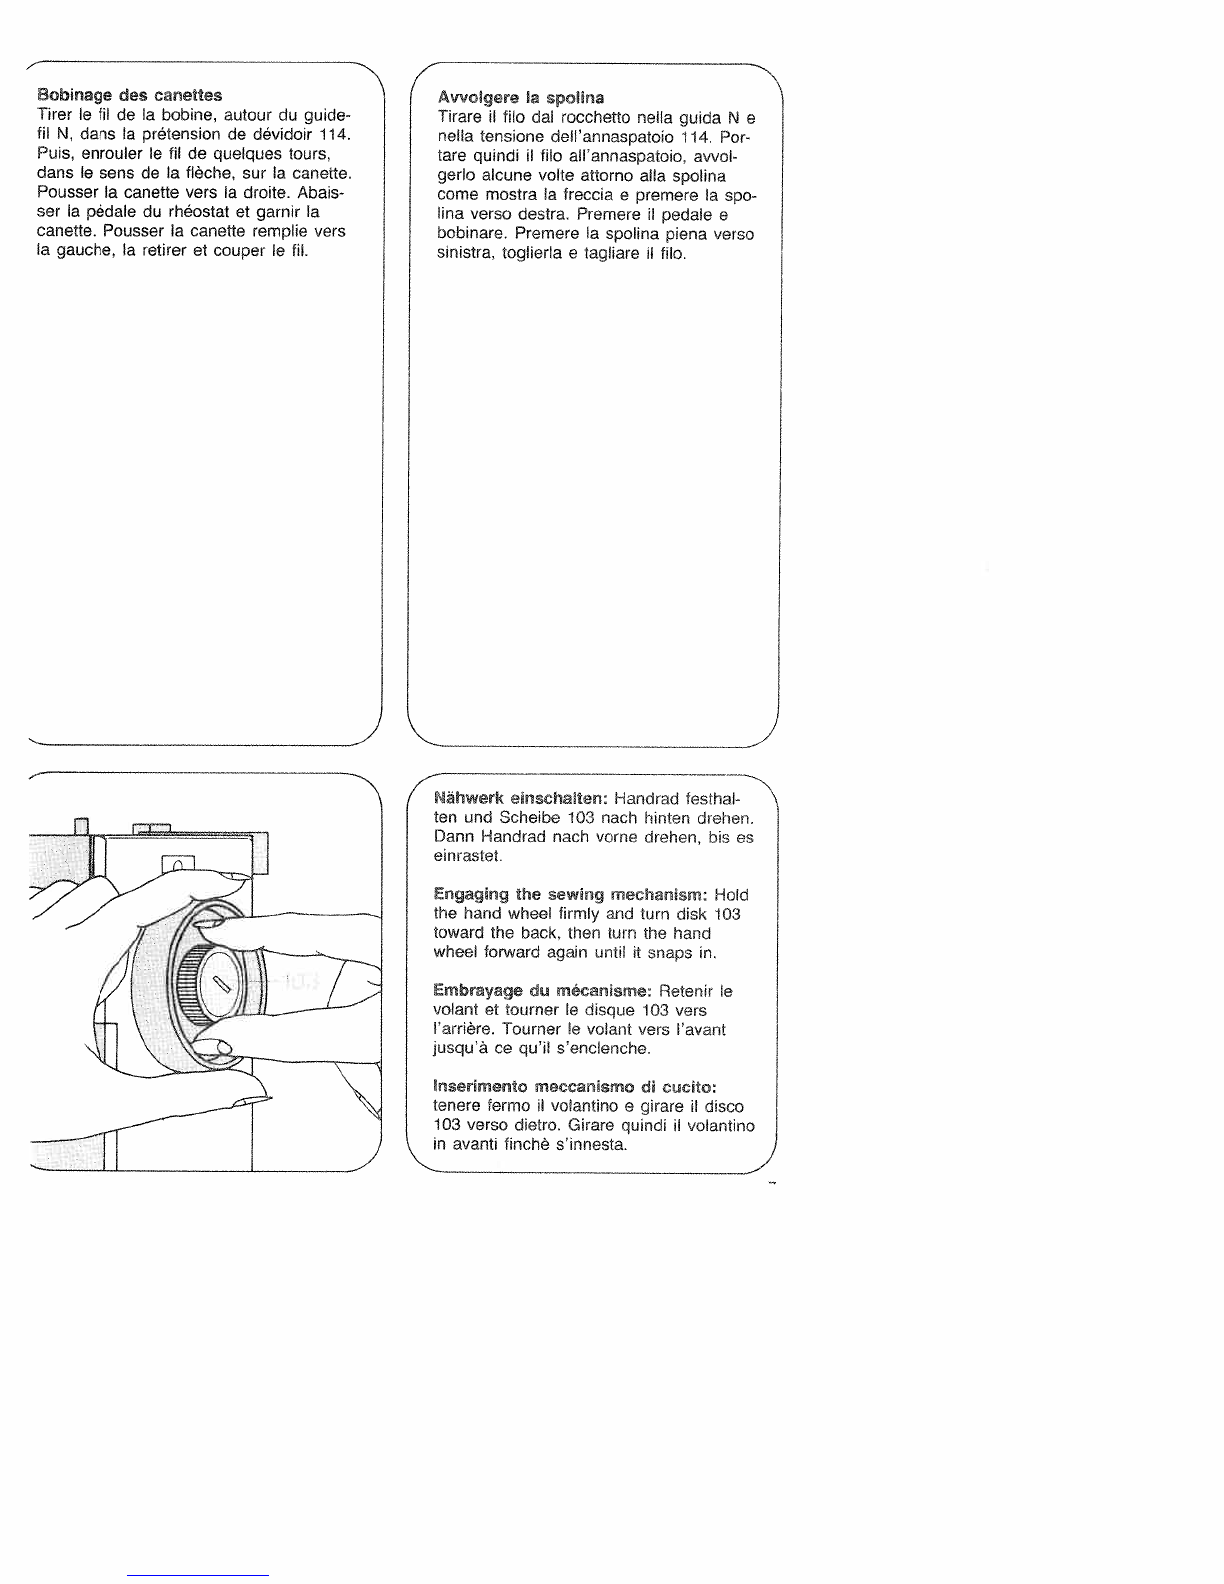
Nähwerk
einschalten:
Handrad
festhal
ten
und
Scheibe
103
nash
hinten
drehen.
Dann
Handrad
nach
vorne
drehen,
his
es
einrastet.
Engaging
the
sewing
mechanism:
Hold
the
hand
wheel
firmly
and
turn
disk
103
toward
the back.
then
turn
the
hand
wheel
forward
again
until
it
snaps
in.
Embrayaqe
du
mécanisme:
Retenir
le
volant et
burner
le
disque
103
vers
!‘arrière.
Tourner
Ic
volant
vers
‘avant
jusqu’à
cc
qu’ii
s’enclenche.
inserimento meccanismo
di
cucito:
tenere
fermo
ii
volantino
e
girare
ii
disco
103
verso
dietro.
Girare
quindi
ii
volantino
in
avanti
finchè
s’innesta.
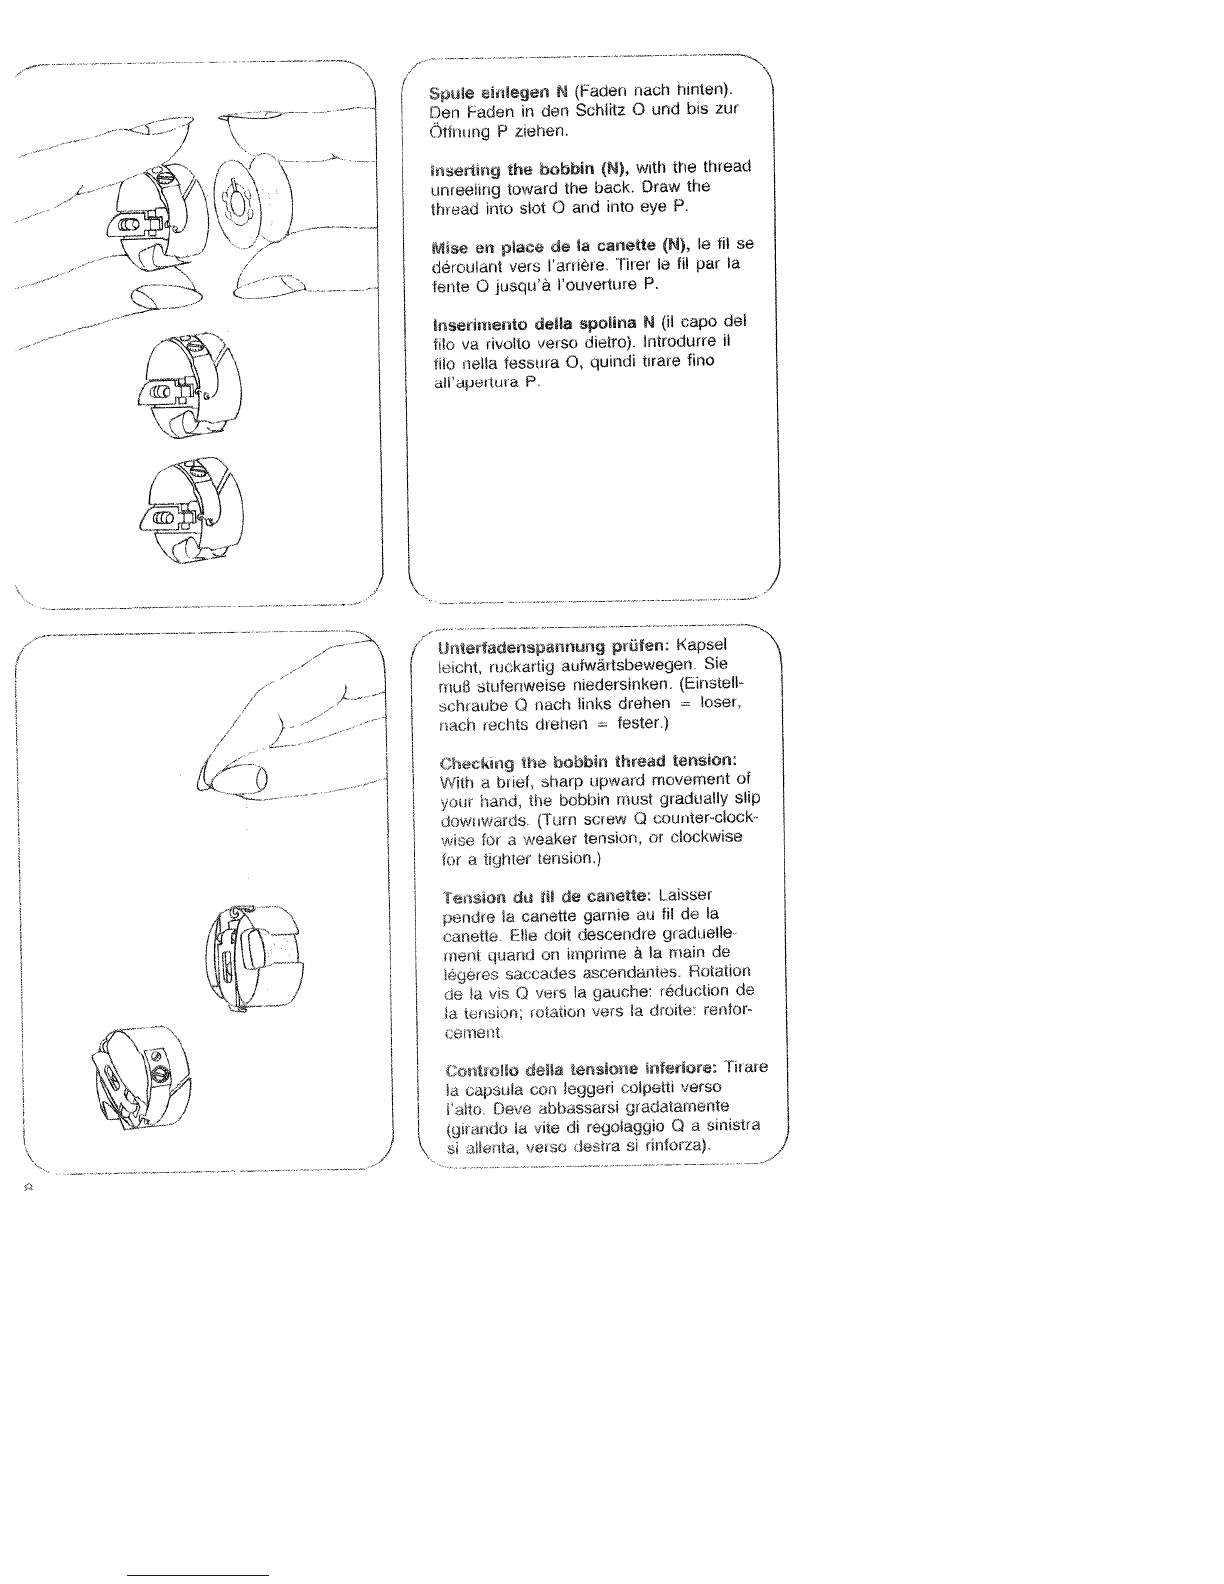
Spue
ebdegei
N
(Faden
nach
riinten),
-
-
,
Den
F-eden
in
den
Schlitz
0
und
bis
zur
-i--
)
\
Otinung
P
ziehen,
2
/
S
‘\
-
nerung
the
oabbn
(N),
with
the
thread
\
unreeling
toward
the back.
Draw
the
-
)
j
th
cad
into
slot
0
and
into
eye
P.
/
Mse
eti
pae
de
d
cariette
(N)
Ic
ru
se
/
-
déroulant
vers
l’arrièie
Tirer
Ic
hi
par
Ia
_A-
j
fente
0
jusqu’á
‘ouverture
P.
—
Iriserimento
dea
spohrta
N
(il
capo
dci
bin
ye
rivoito
“euso
dietro).
Introdurre
ii
thu
nella
tessura
0,
quindi
turare fino
aII’apertura
P
/
Unterfadeiispannuug
prüten:
Kapsel
teichi,
rui..kartig
autwaitsbewegen
Sic
mutt
stufenweise
niedersiuiken.
(Einsteli
I
schisuhe
0
nach
links
drehen
loser,
/
nach
rechts
drehen
fester.)
Checking
the
bobbin
thread tenskrn:
-
-
With
d
hi
ct,
sharp
upward
movement
of
-
your
tend,
the
bobbin
must gradually
slip
Jownwrds
(Turn
screw
0
counter-clock
wise
lur
a
weaker
tension,
(if
clockwise
tot
a
tighter
tension.)
fensuon
dL
ti
de
canette:
laisser
pendre
a
cenette
garnie
au
hi
de a
—1
‘anolte
File dolt
descendre
gradireile
l
\
—
rueni
uiand
on
imprime
a
Ia
main
de
J
I
I
légeres
saccades
ascendantes
Hotahori
de a
‘irs
0
vers
a
gauche
reduction
de
a
to
isk)n
roLStrurr
‘jars
a
diode.
renfor
-
-
-‘
tflCt
1
(ontnifo
de!a
tesioue
unferiore:
Trraue
C
capsule
con
leggeti
uolpttI
ierso
I/rho Deve
abbassarsi
gradatainente
(girarido
asite
di
regolaggio
0
a
sinistra
S
itiltit,
‘esu
terra
ci
nntorza)
-
‘
_J
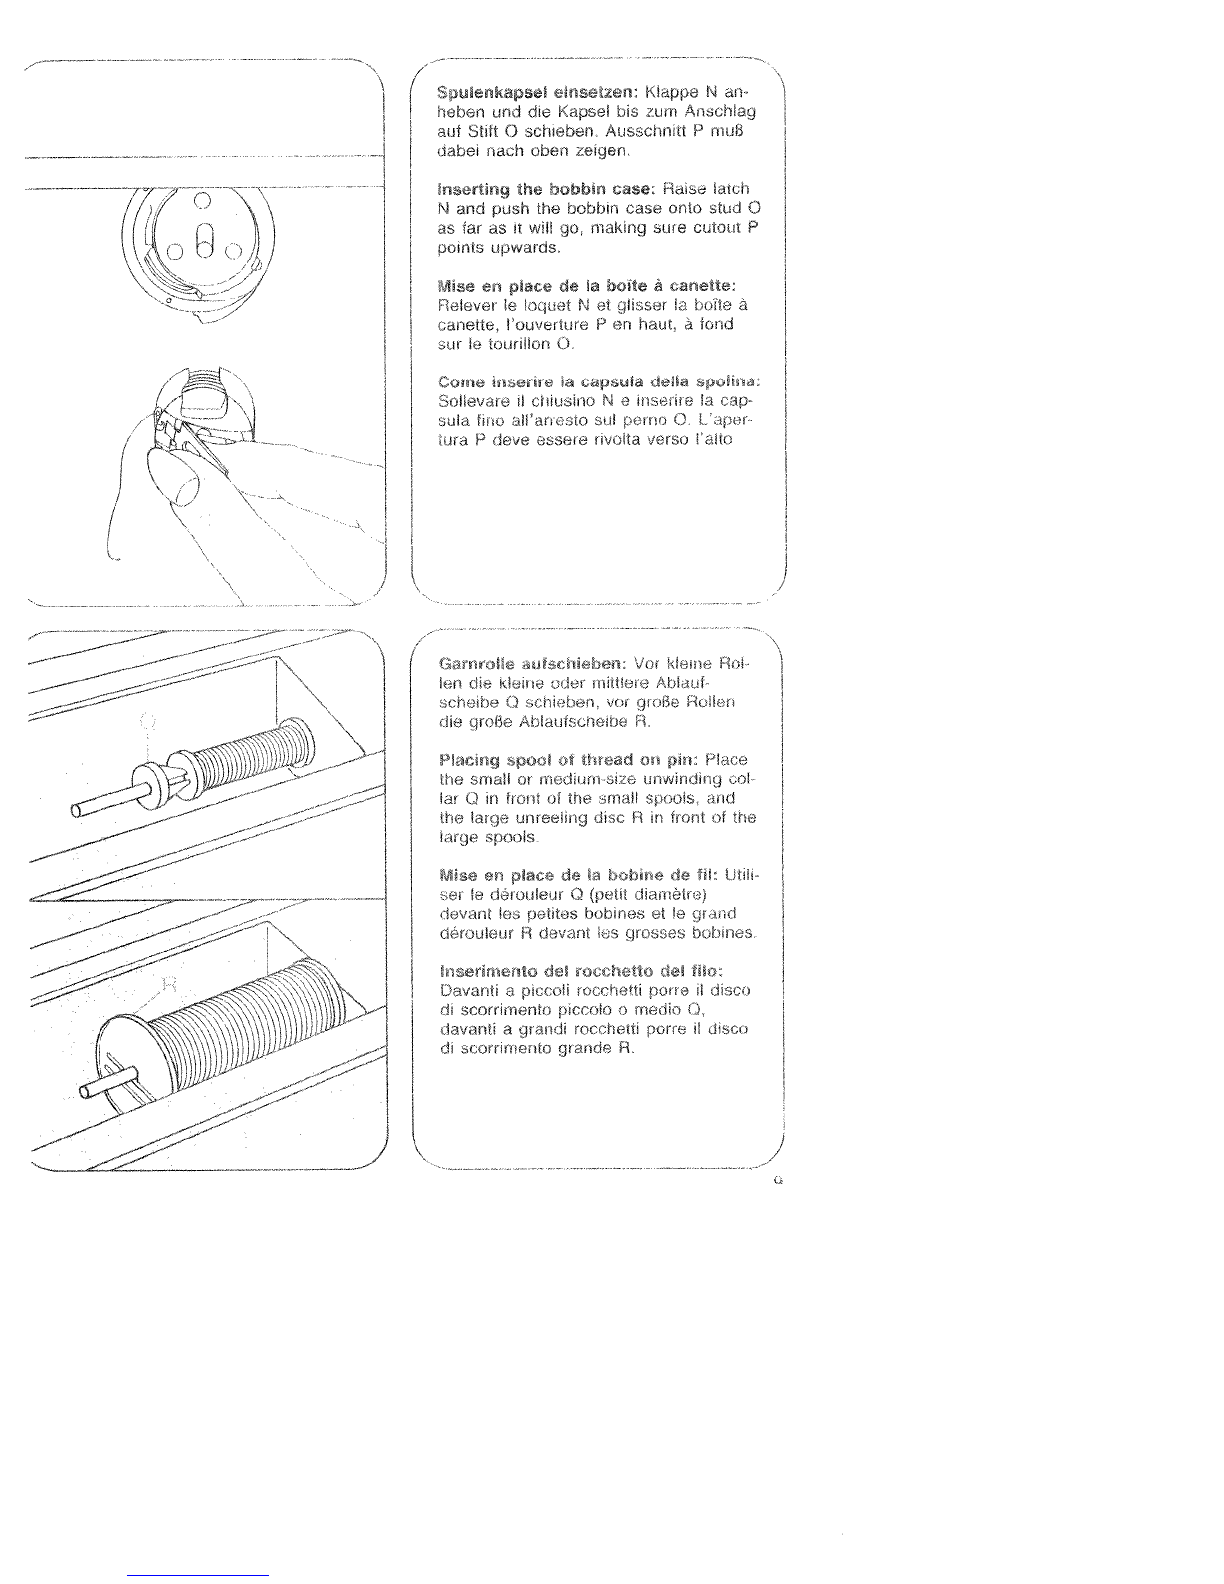
Sauenkapi
e
setzn:
Kiappa
Is
an
heLen
und
die
Kapsel
his
:‘urn
Aischlaçj
ant
Shft
C)
schieren Ausschnit
P
rnui3
uchet
nah
coca
ceigen
lneering
the
bobbin
case.
sa
arch
N
and
push
tire
riobbin
case
onto
tud
0
as
far
as
it
will
go,
making
sure
cutout
P
points
upwards.
n1se
en
piace
de
Ia
boite
a
candle:
Relever
Ic
I
N
ci
glisser
IC
Loire
a
USOCIIC,
louvertirre
P
en
haul,
a
land
ur
Ic
rorrri!iorr
3
Coma
inenre
ra
eapsula
deHa
pahiis
Sollevare
ii
clriuarrto
N
a
macnrc
ha
rep
sj1
line
ll
an
sto
aul per
no
0
-
aper
lOla
P
(le
esSee
nvolta
came
3tu
urebe:
cc-i
lrr
dc
icICre
uOr
rrr
t
aa
,
1
hi.:ut
)
lrs-Len
ye
gi
ura
Poll
lie
probe
Al.
aurrhcrhe
H
Planing
spoe
ot
thr
ad
v
pin:
Place
the
small
or
nadrunr
a
a
in
winding
cOl
lr
Q
in
ii
out
ul
the
small opoors
and
he
lair)
unreeling
duct
H
in
front
ci
the
age
spools
Clise
en
alace
do
a
bebhe
rio
ill: tint
—5.
a
dci
urileji
0
(peht
die
dIlOt
avert
,
ueinos
hoLmes
Ci
C
mr
tmd
Or
cute
r
H
liavant
s
pruscas
br[-ns
macna-ante
del
era
hc,tto
rie
file
Uavanh
a
pa
‘cli
rocchttm
Pore
ml
discs
di
scorrimento
piccolo
o
medic
0
lavirrir
a
grandi
rocohettu
purr
a
1
dsco
di
orm
mu
menlo
gu
ride
H.
—
————
—c
/
‘\
/
.1

Oberfaden einlegen:
Nadeisteliung
oben.
NähfuB
anheben.
Den
Faden den
Pfeilen
nach
in
Schlitz
N,
links
an
der
Fuhrung
0
vorbei.
von
unten
in
Schlitz
P,
in
den
Fadenhebel
113,
zurUck
in
Schlitz
P
und
die
rechte
Fuhrung
0
am
Nadelhalter
ziehen.
Upper
threading:
With
the
needle
posi
tioned
at the
top,
raise
the
sewing
foot.
Draw
the
thread
nto
slot
N,
to
the
left
past
guide
0,
from
below
into
slot
P
and
take-up
lever
113
(see
arrows),
then
back
into
slot
P
and
into
the
right
lhread
guide
Q
on
the
needle
holder.
Passage
du
fil
d’aigume:
Aiguille
at
releveur
cc
til
en
position
haute.
Tirer
a
fil
dans
Ia
fente
N
scion
las
fléches.
a
gauche
du
passe-fil
0,
remonter
par
a
fente
P
dans
Ia
releveur
do
fil
113,
redescendre
par
Ia
lente
P
at
passer
a
til
par
te
guide-fii
0
droit
au
pince
aguilIe.
tnserimento
d&
fNo
superiore:
Posi
zione
ago
alto.
Alzare
ii
piedino.
Tirare
ii
tfo
seguendo
Ic
freccie
verso
fessura
N.
a
sinistra
accanto
aila
guida
0,
da
sotto
nella
fessura
P,
nella lava
tendifilo
113
di
ritorno
nella
fessura
P
a
nella
guida
destra
0
del
morsetto
d’ago.
7
:
\:,
i
V
,
—
-
10
-
-
-
—
—--
-
—
.—
—--
—-----—
H
-
-r_
_H
1
ii
ii
I
/
/4.__
/7
i1,_.-i
iLi
S
4
Den
Oberfaden
von
corn
nach
hinten
Jurch
das
NadelOhr
tädeln.
thread
the
needle
from
front
to
back.
Faire
passer
te
fil
d’aiguilio
de
‘avant
vers
I’arrière
par
Ia
chas
do
l’aiguilie.
Lago
viene
infilato
da
davanti
verso
die
iO
attraverso
a
cruno
dell’ago
4
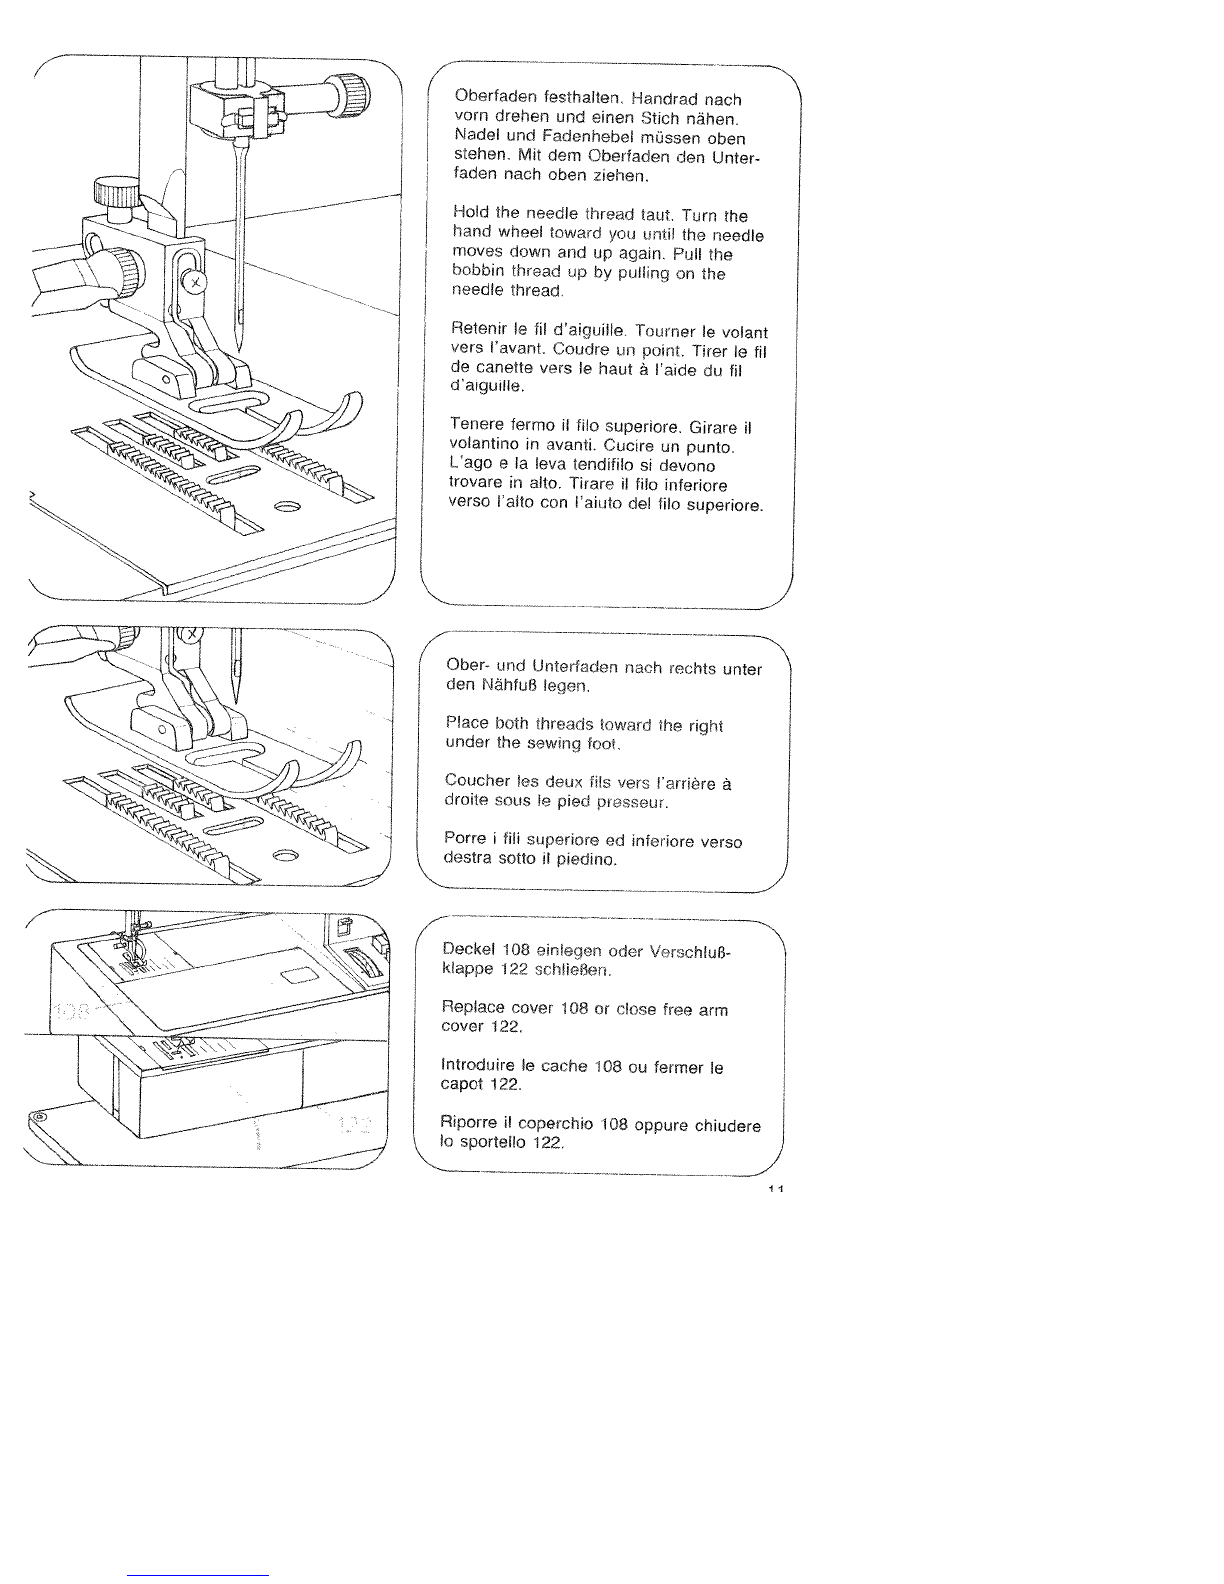
Oberfaden
festhalten. Handrad
nach
vorn
drehen
und
einen
Stich
nãhen.
Nadel und
Fadennebel
müssen
oben
stehen.
Mit
dem
Oberfaden
den
Unter
laden
nach oben
ziehen.
Hold
the
needle
thread
taut.
Turn
the
hand
wheel
toward
you until
the
needle
moves
dowrt
and
up
again.
Pull
the
bobbin
thread
up
by
pulling
on
the
needle
thread.
Retenir
Ic
fil
daiguille.
Tourner
Ic
volant
vers
Cavant.
Coudre
un
point.
Tirer
Ic
fil
de
canette
vers
1€
haut
a
‘aide
du
Ii!
d’aiguille.
Tenere
fermo
il
fib
superiore.
Girare
il
volantino
in
avanti.
Cucire
un
punto.
Lago
e
Ia
eva
lendifibo
si
devorto
trovare
in
alto.
Tirare
il
fib
inferiore
verso
‘alto
con
l’aiuto del
fib
superiore.
4
Ober-
und
Unterfaden
nach
rechts
unter
den
Nähfu8
legen.
Place
both
threads
toward
the
right
under
the sewing
loot.
Coucher
les deux
fils
vers
l’arrière
a
droite
sous
Ic
pied
presseur.
Porre
I
fili
superiore
ed
inferiore
verso
destra
sotto
il
piedino.
/
Deckel
108
einlegen
oder
Verschlul3-
klappe
122
schlieilen.
Replace
cover
108
or
close
free
arm
cover
122.
Introduire
be
cache
108
ou
fermer
be
capot
122.
Riporre
II
coperchio
108
oppure chiudere
Ic
sportelbo
122.
11

Nldhtliciie
122
an
liP
Maschine
schwen
ken
-
Svara
work
ciipport
122
back
against
tt,e
free
arm.
Remettre
en
place
a bolte
de
ranqement
122
contra
le
bras.
Avc
are
1
piano
variable
122
alla
maci
hin
N
Stoff
unte
den
NhfuB
legen.
Place
fabric
under
the
sewing
toot.
Placer
du
tissu
sous
le
pied
presseur.
Porre
Ia
stoffa
sotto
II
piedino.
/
Bairn
Einlegen
extrem
dicker
StoffIagen
Hebel
115
höher
anheben.
N
ist
die
Stel
lung
zurn
Stopfen.
To
insert
extrathick
fabric
plies
raise
lever
115.
N
shows the
darning
position.
Pour
las
tissus
très épais,
lever
davan
tage
le
levier
115
Pour
le
reprisage,
uti
user
a
position
N.
In
caso
di
spessori
di
stoffa
estrema
mente grossi
alzare
ulteriormente
Ia
leva
115.
N
corrisponde
alla
posizione per
rammendo
N
Stoffdrucl<erhehel
115
senken.
I
nwer
piesser
bar
lifter
115.
Descendre
Ic
levier
115.
Abbassare
Ia
eva
115.
zzz
/
/
7.
1•
12

-ç
2
Anlasser
niedertreten,
Jo
tiefer
man
drUckt
urn
so
schneller
nãht
die
Pfaff.
Operating
the
foot
control:
The more
you
press
down
the
pedal, the
faster
the
machine
runs.
Abaisser
Ia
pédale
du
rheostat.
Plus
l
pédale
sara
ahaissée,
plus
Ia
Pfaff
cnudra
vite
Prernere
ii
reostato:
Pij
a
fondo
si
preme
ii
perfale.
piü
veloce
cuCirà
a
“Pt
aff’
Oberfadenspannung
112
N
—
Einstellmarkierung.
Needle
thread
tension
112
N
=
Setting
mark.
Tension
du
til
d’aiguille
112
N
=
repAre
de
réglage.
Tensione superiore
112
N
-
marcatura
par
a
regolazione.
(
Fadenspannung
Die
normale
Einstellung
liegt
rn
weiI
markierten
Bereich
von
3—5.
Jo
hOher
die
Zahi,
je
tester
die
Spannung.
Die
Uberprufung
wird
mit
einem breiten
Zick
zackstich
vorgenommen.
Eine
kurze
Naht
näher
Die
Fadenverknotunq
soil
in
der
Mitte
der
Stofflaqen
liaqen,
/
Checking
the
needle thread
tension
The
nornial
setting
is
in
the
white
range
between
3
and
5.
The
higher
the
num
bar,
the
tighter
the
tension,
To
check
the
tension,
set
the
machine
at
a
wide
zig
zag
stitch.
Sew
a
short
seam.
The
threads
should
intetlock
in
the
middle
of
the
nateiial.
(1
4
----

4
Contralto
della
tensone
det
ttto
La
tensione
normale
si
trova
nel
settore
bianco
da
3—5.
Piü
alto
ii
numero,
plU
forte
sara
a
tensione.
II
controllo
viene
fatto
con
Ia
zig-zag
plU
argo.
Cucire
una
breve cucitura.
L’annodamento
del
fill
deve
avvenire
al
centro
della
spessore
del
materiale.
Tensions
des
Ills
Position
de
reglage
normale
dans
a
plage
blanche, entre
3
et
5.
Tension
d’autant
plus
forte
que
le
chiftre
ost
grand.
ContrOler
a
‘aide
dun
point
zig
zag
large.
Coudre
quelques
points.
Les
fils
doivent
se
nouer
dans
l’épaisseur
des
tissus,
/
4
Stoffdrückerhebel
115
hochstellen.
Stoff
nach
hinten
herausnehmen.
Raise
presser
bar
lifter
115.
Remove
the
fabric
by
pulling
it
toward
the
back.
Relever
le
levier
115.
Degager
Ia
tissu
vers
l’arrière.
Alzare
Ia
leva
alzapiedino
115.
Togliere
Ia
stoffa
versa
dietro.
Fadenabschneider
N.
Fäden einlegen
und
nach
unten ziehen.
Thread
cutter
N.
Draw
the
threads
into
the
slot
and
pull
them
downwards.
Coupe-fit
N.
Coucher
es
fils
dans
Ia
fente
et
les
tirer
vers
le
bas.
Tagtiafito
N.
Inserire
I
fili
e
tirarli
verso
II
basso.

Stichlänge einstellen
Die
Zahien
auf
dem
Stichlängen-Ein
steller
106
geben
die
Stichlãnge
in
mm
an.
Der
Einstellbereich
st
0
bis
6
mm
oder
0
bis
4
mm
Die
gewunschte
Such
lange
wird
an die
Einstellrnarkierung
N
gedreht,
De
Abbildung
0
unten
zeigt
die
Einstel
lung
des
Stichlängen-Einstellers
zurn
Nähen der
rot
abgebildeien Stretchstiche
auf
den
Tasten.
Regulating
the stitch
length
The
numbers
on
stitch
length control
106
indicate
the
stitch length
in
milli
meters.
The stitch length
range
is
0
to
6
mm
or
0
to
4
mm.
Turn
the
control
to
set
the
number
indicating the
stitch.
length
at
mark
N.
Fig.
0
(bottom
shows
how
to
set
the
stitch
length
control
br
sewing
stretch
stdches
Oed
stitch
symbols
on
push
bur
tonsf.
RCglage
de
Ia
Iorgueur
du
point
Les
chiffres
sur
Is
disque
106
indiquent
Ia
longueur
du
point
en
mm.
La
longueur
du
point
est
reglable
entre
0
et
6
mm
ou
entre
0
et
4
mm.
La
longueur de
point
choisie
est
indiquée
face
au
repére
N
Lillustratian
0
(en
bas)
montre
Ic
reglage
du
regis-point
pour
a
couture
des
points
Clastiques
marques
en
rouge
sur
es
touches.
Regolazione
della
lunghezza
del
punto
I
nurneri sul
bottone regolatore
della
lunghezza
del
punto
106
corrispondono
alla
lunghezza
del
punto
n
mm.
La
rego
lazione
si
estende
da
0
a
6
mm
oppure
do
0
a
4
mm.
La
lunghezza
del
punto
desiderata
si
regola
sulla
marcatura
N.
La
ligura
0
sotto
mostra
a
regolazione
del
bottone regolatore
per
cucire
i
punti
flexi
(stretch>
raffigurati
ri
rosso
sui
tasti.
4
\
\\\
*\
‘4
15

7-
eDflD EUfl4D3EW
e
onweid
euwu
OSEj
ii
6H-
OSE.
eJeWeJ
ojepu
Jnno
sq
iie
enueutw
se
aqDnoj
enb
sdwe5uoj
issnE
JJE
Lie
pflOD
Uf14OEW
i
6H.
eqono
El
.iessiqj
ejj
eqejew
ue
eJnno3
-)peq
SMES
euiLpEw
ciji
uonq
siq
poq
noA
se
6uoi
SV
6L
uop.nq
ssei
6uMes
asJaAa
SJEMN3flJ
eU!qoSE
e!p
qu
‘piim
pripe6
eisi
eip
ebuelog
ueNOnJpJepeiu
6[
esej
eia
uequsIçM)p
7-
9[
ll
111
spieM


