Viking H|Class 500E User manual

USER’S GUIDE
500E_cover.indd 1 2009-11-24 11:01:44

“IMPORTANT SAFETY INSTRUCTIONS”
“When using an electrical appliance, basic safety precautions should always be followed, including the following.”
“Read all instructions before using this sewing machine.”
“DANGER - To reduce the risk of electric shock:”
“This sewing machine should never be left unattended when plugged in. Always unplug this sewing machine from the
electric outlet immediately after using and before cleaning.”
“WARNING - To reduce the risk of burns, Àre, electric
shock, or injury to persons: ”
1. “Do not allow to be used as a toy. Close attention is necessary when this sewing machine is used by or near children.”
2. “Use this sewing machine only for its intended use as described in this manual. Use only attachments recommended by
the manufacturer as contained in this manual.”
3. “Never operate this sewing machine if it has a damaged cord or plug, if it is not working properly, if it has been
dropped or damaged, or dropped into water. Return the sewing machine to the nearest authorized dealer or service
center for examination, repair, electrical or mechanical adjustment.”
4. “Never operate the sewing machine with any air openings blocked. Keep ventilation openings of the sewing machine
and foot control free from the accumulation of lint, dust, and loose cloth.”
5. “Never drop or insert any object into any opening.”
6. “Do not use outdoors.”
7. “Do not operate where aerosol (spray) products are being used or where oxygen is being administered.”
8. “To disconnect, turn switch to the off (“0”) position, then remove plug from outlet.”
9. “Do not unplug by pulling on cord. To unplug, grasp the plug, not the cord.”
10. “Keep Àngers away from all moving parts. Special care is required around the sewing machine needle.”
11. “Never sew with a damaged needle plate as this can cause a needle to break.”
12. “Do not use bent needles.”
13. “Do not pull or push fabric while stitching. It may deÁect the needle causing it to break.”
14. “Switch the sewing machine off (“0”) when making any adjustments in the needle area, such as threading needle,
changing needle, threading bobbin, or changing presser foot, etc.”
15. “Always unplug sewing machine from the electrical outlet when removing covers, lubricating, or when making any other
user servicing adjustments mentioned in the instruction manual.”
16. “If the supply cord is damaged, it must be replaced by the manufacturer or its service agent or a similarly qualiÀed
person in order to avoid a hazard”
17. “Don’t tie up in a bundle while in use. Remove the power cord from the sewing machine after usage and clean it with
dry cloth and keep it a dry place with the sewing machine.”
“CAUTION”
Moving parts-To reduce risk of injury, switch off before servicing. Close cover before operating machine.”
“SAVE THESE INSTRUCTIONS”
“This product is for household use, or equivalent.”
This appliance complies with EEC Directive 2004/108/EC covering the electromagnetic compatibility.
FOOT CONTROL (USA & Canada only)
Use Model YC-485 EC or Model JF-1000 with this sewing machine.
POLARIZED PLUGS CAUTION (USA & Canada only)
This appliance has a polarized plug (one blade wider than the other). To reduce the risk of electric shock, this plug is
intended to Àt in a polarized outlet only one way. If the plug does not Àt fully in the outlet, reverse the plug. If it still does
not Àt, contact a qualiÀed electrician to install the proper outlet. Do not modify the plug in any way.
500E_cover.indd 2 2009-11-24 11:01:49

CONTENTS
GET TO KNOW YOUR MACHINE
Machine overview.........................................................................................2
Accessories .......................................................................................................3
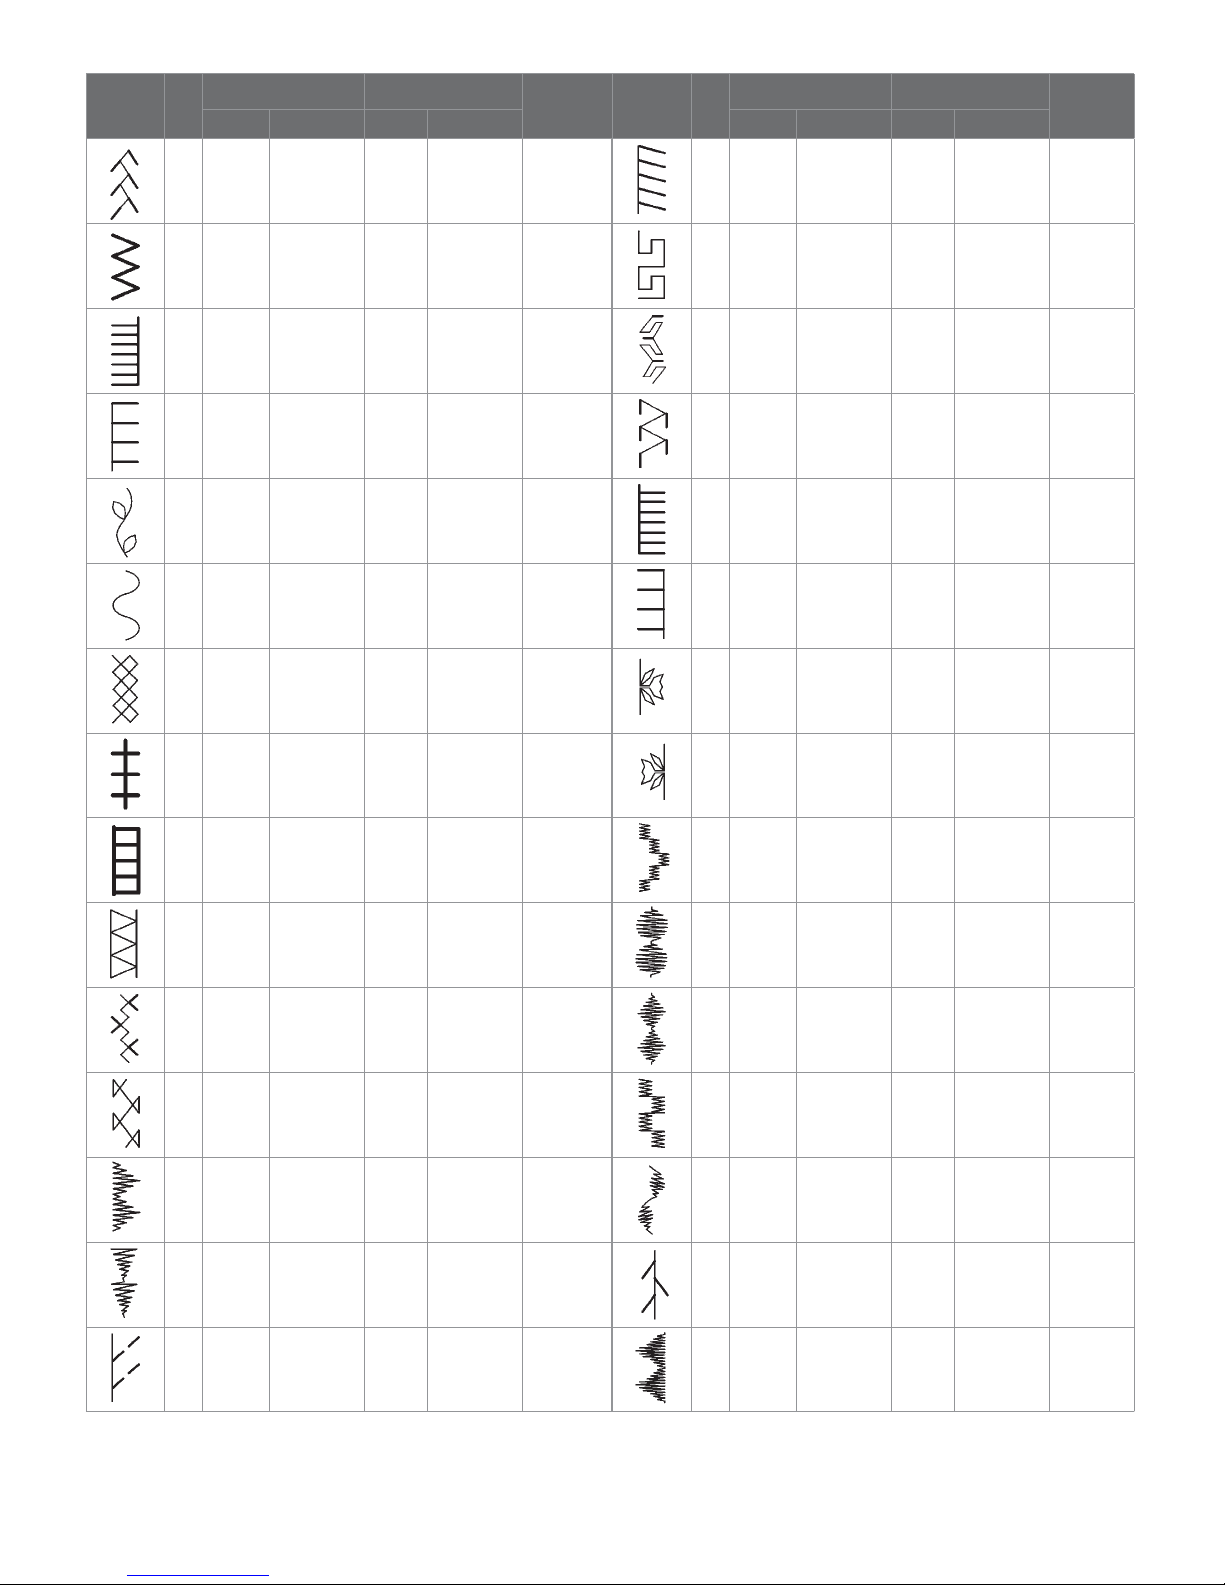
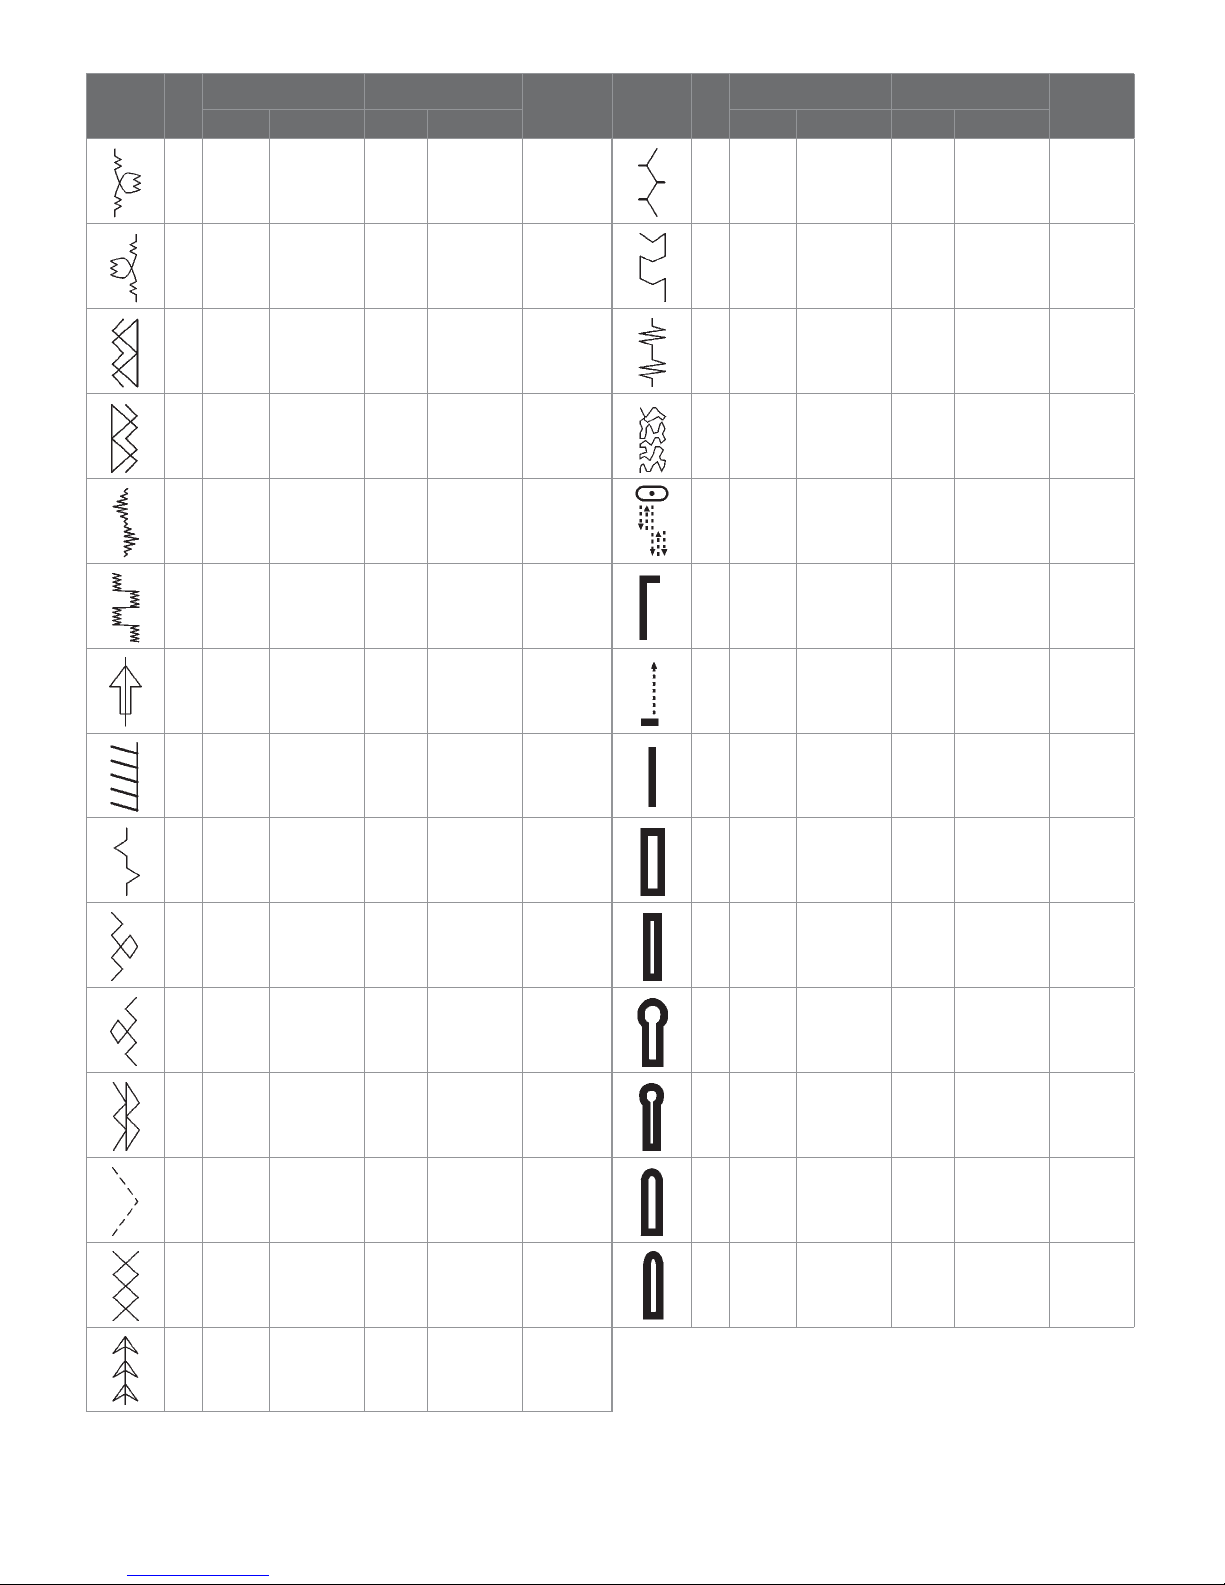
Stitch overview ...............................................................................................4
SET UP YOUR MACHINE
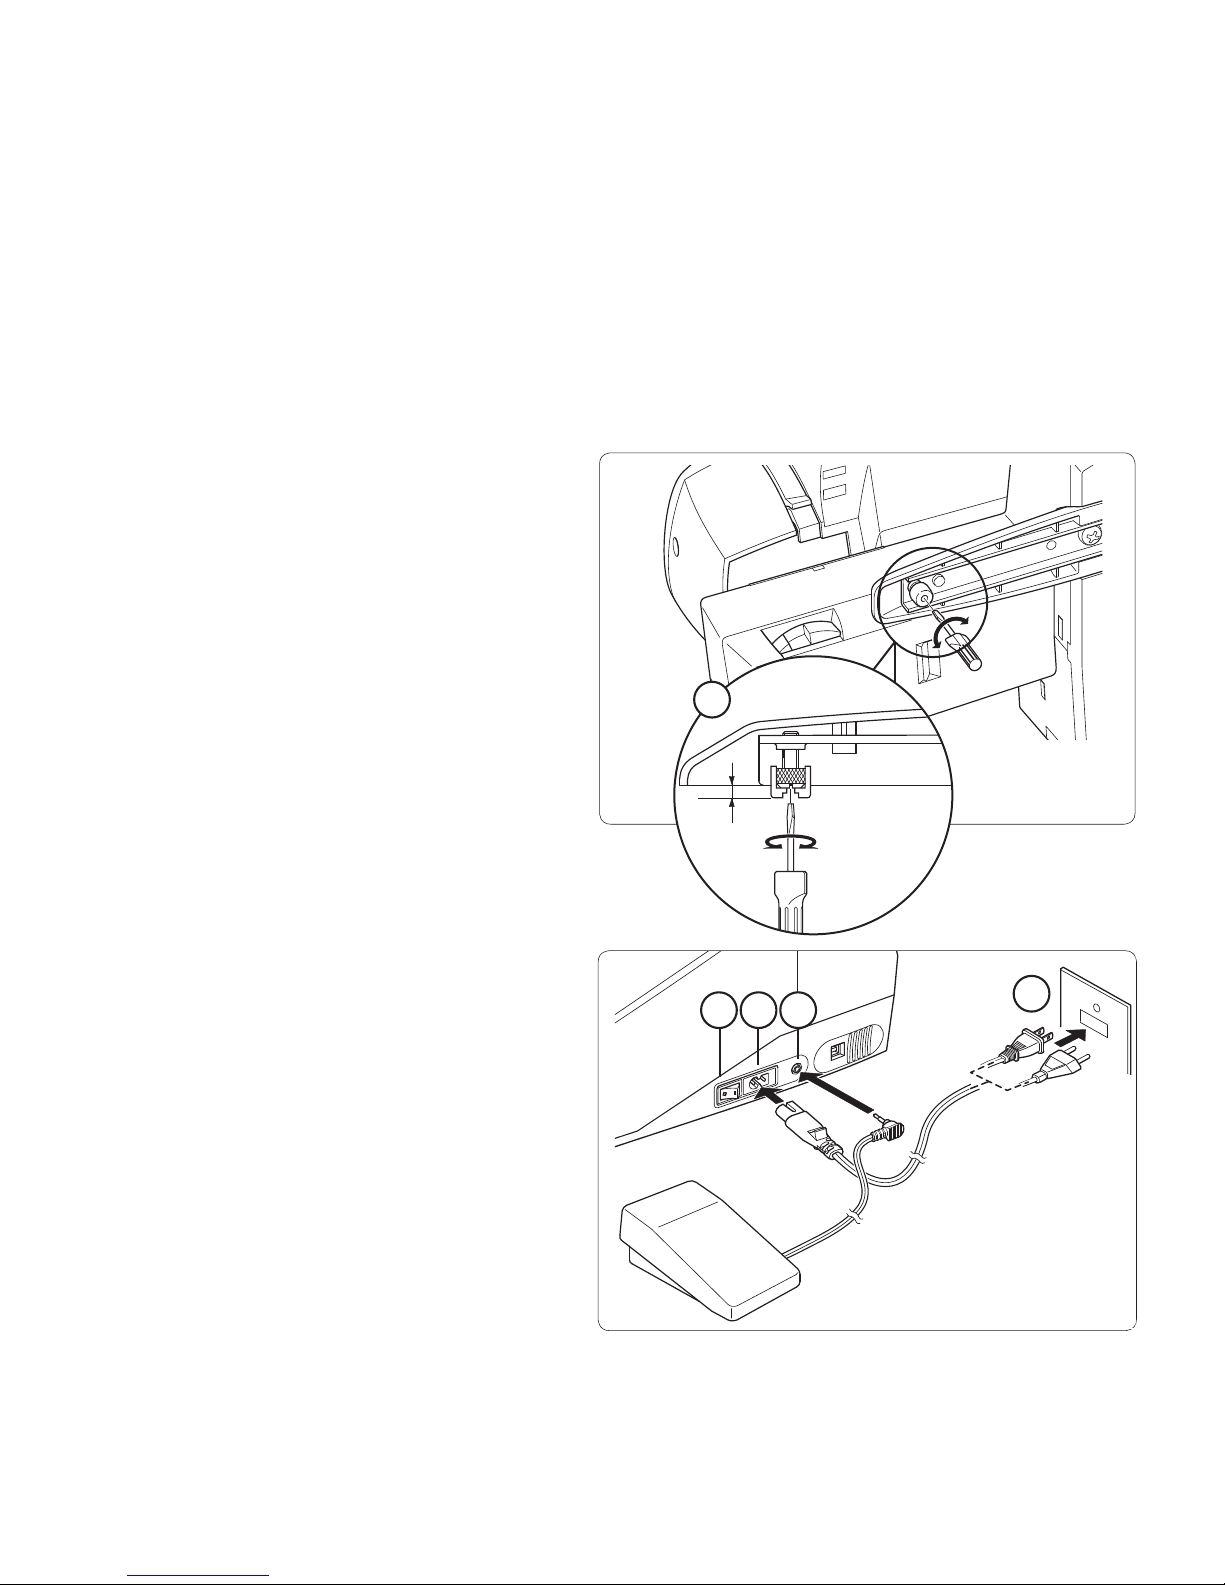
Unpack the machine....................................................................................8
Connect the power cord and foot control....................................8
Pack away after sewing .............................................................................9
Using the free arm........................................................................................9
Lower/raise the feed teeth.......................................................................9
Presser foot lifter ...........................................................................................9
Spool pins........................................................................................................10
Horizontal spool pin.................................................................................10
Vertical spool pin........................................................................................10
Thread the top thread.............................................................................11
Needle threader..........................................................................................12
Threading for twin needle.....................................................................13
Bobbin winding ............................................................................................14
Insert the bobbin........................................................................................15
Pull up the bobbin thread......................................................................16
Adjust top thread tension......................................................................17
Bobbin tension .....................................................................17
Change presser foot.................................................................................17
Changing the needle.................................................................................18
Needles............................................................................................................18
MACHINE FUNCTIONS
Function buttons.........................................................................................19
Needle Stop Up/Down ......................................................19
Reverse...................................................................................19
Start/Stop..............................................................................19
LED indicator.......................................................................19
Control panel functions .........................................................................20
Direct Selection buttons ....................................................20
Numerical Selection buttons .............................................20
Stitch length and width/needle position controls...........21
Twin needle safety................................................................21
Stitch reference guide..............................................................................21
SEWING
Utility Sewing .........................................................................................22-36
Decorative Sewing..............................................................................37-39
EMBROIDERY
Thread and stabilizer ................................................................................40
Attach the embroidery foot.................................................................41
Thread your machine...............................................................................41
Remove the accessory box..................................................................42
Feed teeth lever..........................................................................................42
Attach the embroidery unit .................................................................42
Remove the embroidery unit..............................................................43
Hoop the fabric...........................................................................................43
Attach and remove the embroidery hoop..................................44
Start embroidering ....................................................................................45
Installation of software.............................................................................45
Function buttons when embroidering............................................47
Start/Stop..............................................................................47
Needle Stop Up/Down .....................................................47
Reverse...................................................................................47
LED indicator.......................................................................47
Thread tension dial .............................................................47
Helpful information when embroidering......................................48
CARE OF YOUR MACHINE
Cleaning and oiling hook area and feed teeth...........................51
Oiling behind the sewing head cover ............................................52
Trouble Shooting ........................................................................................53
Display messages..................................................................53
Sewing....................................................................................55
Embroidery ...........................................................................56
eng manual rev1.indd 1 2009-11-24 11:12:23

~ 2 ~
1. Thread guide
2. Thread take-up lever
3. Thread tension dial
4. Sewing head cover
5. Thread cutter
6. Accessory box (Extension table)
7. Feed teeth lever
8. Bobbin winder
9. Bobbin winding stop
10. Needle stop up/down
11. Reverse Stitch button
12. Start/Stop button (only when
embroidering)
13. Control Panel
14. Stitch reference guide
15. Horizontal spool pin
16. Handle
17. Hand wheel
18. Thread guide
19. Vertical spool pin
20. Power/light switch
21. Cord socket
22. IdentiÀcation plate
23. Presser foot lifter
24. Buttonhole lever
25. Needle threader
26. Thread guide
27. Presser foot screw
28. Needle
29. Bobbin cover plate
30. Needle bar
31. Thread cutter
32. Needle clamp screw
33. Presser foot release button
34. Presser foot
35. Feed teeth
36. Stitch plate
37. Bobbin cover release button
38. Power cord
39. Foot control
40. USB cable
Note: Be sure to use the USB cable included with
your machine when doing embroidery.
MACHINE OVERVIEW
1Get to Know Your Machine
8
1
2
3
4
5
6
7
9
11
14
13
16
17
18
19
20
21
22
15
24
23
30
32
33
37
25
27
28
29
35
26
31
34
36
38
39
40
10
12
eng manual rev1.indd 2 2009-11-24 11:12:24

~ 3 ~1. Get to Know Your Machine
ACCESSORIES
User’s Guide (not pictured)
For Sewing Machine
1. Needles
2. Bobbins
3. Spool pin cap (small)
4. Spool pin cap (large)
5. Seam ripper (Buttonhole opener)/
Brush
6. Screwdriver for needle plate (large)
7. Screwdriver (large)
8. Screwdriver (small)
9. Zipper foot
10. Button sewing foot
11. Blind stitch foot
12. Buttonhole foot
13. Satin Stitch foot
14. Thread spool net (long)
15. Thread spool net (short)
16. Removable thread guide
For Embroidery
17. Vinyl bag
18. Bobbins
19. Scissors
20. Embroidery presser foot
Embroidery software CD (not pictured)
Note: embroidery system
is a software providing powerful options and
capabilities for embroidery. In order to install the
software, see page 45 or consult the software CD
for further information.
The Foot attached to your Sewing machine
upon delivery is called the Utility Foot. It
will be used for most sewing.
The Satin Stitch Foot (13) is another very
useful foot and should be used for most
decorative sewing.
When purchasing additional bobbins, make
sure they are Class I5 J. INSPIRA™,
#141001012 (4-pack)/#141001013
(12 pack).
Embroidery Unit
41. Embroidery hoop
attachment screws
42. Embroidery arm
43. Handle
44. Hoop bracket
45. Release lever
46. Connector
Hoops
One small and one large hoop
is included with the machine.
47. Embroidery hoop
connector
48. Hoop adjustment screw
49. Outer hoop
50. Inner hoop
414243
44
45
46
47
49
50
48
1234
567 8
9 10 11 12
14 15 16
13
17 18 19 20
47
49
50
48
eng manual rev1.indd 3 2009-11-24 11:12:24

~ 4 ~
STITCH OVERVIEW
Toward rightToward left
¿Adjusting needle position for straight stitch 13 needle positions are available for quilting, top stitching etc.
Width control
Toward rightToward left
STITCH No. LENGTH (mm) NEEDLE POSITION TWIN
NEEDLE
Auto Manual Auto Manual
00 2.5 0.5 - 4.75 CENTER LEFT - RIGHT¿|
01 2.5 1.5 - 3.0 CENTER LEFT - RIGHT¿|
02 2.5 2.0 - 4.0 CENTER -|
STITCH No. LENGTH (mm) WIDTH (mm) TWIN
NEEDLE
STITCH No. LENGTH (mm) WIDTH (mm) TWIN
NEEDLE
Auto Manual Auto Manual Auto Manual Auto Manual
03 2.0 0- 3.0 5.0 0 - 6.0 |07 3.0
-
5.0 5.0, 6.0 ±
04 2.0 1.0- 3.0 3.0 2.0 - 7.0 |08 2.5 1.5- 3.0 5.5 3.5 - 7.0 |
05 1.5 0- 2.5 6.0 2.5 - 6.0 |09 0.5 0.25 - 1.5 7.0 3.5 - 7.0 |
06 2.0 1.0- 3.0 3.0 1.0 - 6.0 |10 0
-
3.0 2.0 - 4.5 ±
On the following pages you will Ànd information on the stitches included in your machine. Next to each stitch you can
Ànd information about the stitch number and pre-set values (auto) for stitch width and length. Also provided are the levels
between which you can manually adjust the length and width of a stitch. Whether or not a twin needle can be used is
indicated in the table as well (|= Yes, ±= No).
For details on how to adjust the stitch length and stitch width, see page 21.
eng manual rev1.indd 4 2009-11-24 11:12:26

~ 5 ~1. Get to Know Your Machine
STITCH No. LENGTH (mm) WIDTH (mm) TWIN
NEEDLE
STITCH No. LENGTH (mm) WIDTH (mm) TWIN
NEEDLE
Auto Manual Auto Manual Auto Manual Auto Manual
11 2.0 1.0 - 3.0 6.0 3.0 - 6.0 |26 2.0 0.75 - 3.0 5.0 1.0 - 7.0 |
12 2.5 1.5 - 3.0 5.0 2.0 - 6.0 |27 2.5 1.25 - 3.0 7.0 3.5 - 7.0 |
13 2.5 1.5 - 3.0 5.0 1.0 - 7.0 |28 2.5 1.5 - 2.5 6.5 3.5 - 7.0 |
14 2.5 1.5 - 3.0 7.0 1.0 - 7.0 |29 2.5 1.5 - 2.5 5.5 3.0 - 7.0 |
15 2.0 1.5 - 2.5 7.0 3.5, 7.0 |30 2.5 1.5 - 3.0 5.0 1.0 - 7.0 |
16 1.75 0.75 - 2.5 7.0 3.5, 7.0 |31 2.5 1.5 - 3.0 7.0 1.0 - 7.0 |
17 2.0 1.5 - 3.0 6.0 3.0 - 6.0 |32 2.0
-
6.0 3.5, 6.0 |
18 2.5 1.5 - 3.0 5.0 2.0 - 7.0 |33 2.0
-
6.0 3.5, 6.0 |
19 2.5 1.5 - 3.0 5.0 1.0 - 7.0 |34 0.5 0.25 - 1.25 6.0 3.0 - 6.0 |
20 2.5 1.5 - 3.0 5.5 3.5 - 7.0 |35 0.5 0.25 - 2.5 7.0 3.5 - 7.0 |
21 2.0 1.5 - 3.0 6.0 3.0 - 6.0 |36 0.5 0.25 - 1.5 7.0 3.0 - 7.0 |
22 2.5 1.0 - 3.0 6.0 2.0 - 6.0 |37 0.5 0.25 - 1.5 7.0 3.0 - 7.0 |
23 0.5 0.25 - 1.5 7.0 3.5 - 7.0 |38 0.5 0.25 - 1.5 7.0 3.5 - 7.0 |
24 0.5 0.25 - 1.5 7.0 3.5 - 7.0 |39 2.5 0.75 - 2.5 5.0 1.0 - 7.0 |
25 2.0 1.0 - 3.0 5.0 1.0 - 7.0 |40 0.5 0.25 - 1.5 7.0 3.5 - 7.0 |
eng manual rev1.indd 5 2009-11-24 11:12:27

~ 6 ~
STITCH No. LENGTH (mm) WIDTH (mm) TWIN
NEEDLE
STITCH No. LENGTH (mm) WIDTH (mm) TWIN
NEEDLE
Auto Manual Auto Manual Auto Manual Auto Manual
41 2.0 1.0 - 3.0 3.0 1.0 - 6.0 |56 1.25 0.75 - 4.0 7.0 3.5 - 7.0 |
42 2.5 1.5 - 3.0 3.0
-
|57 0.75 0.5 - 1.5 7.0 3.5 - 7.0 |
43 2.5
-
7.0
-
±58 0.75 0.5 - 1.5 7.0 3.5 - 7.0 |
44 2.0
-
7.0
-
±59 0.5 0.5 - 1.0 5.0 2.0 - 6.0 |
45 2.5 1.5 - 2.5 7.0 3.5 - 7.0 |60 0.5 0.5, 0.75 5.0 2.0 - 7.0 |
46 2.5 1.5 - 2.5 7.0 3.5 - 7.0 |61 1.25 1.0 - 2.0 6.25 3.75 - 6.25 ±
47 2.5 1.5 - 2.5 6.0 3.0 - 6.0 |62 2.5 1.5 - 2.5 7.0 3.5 - 7.0 |
48 0.5 0.25 - 1.5 7.0 3.5 - 7.0 |63 1.75 1.5 - 2.5 7.0 3.0 - 7.0 |
49 0.5 0.25 - 1.5 7.0 3.5 - 7.0 |64 2.5 1.5 - 2.5 7.0 4.0 - 7.0 ±
50 0.5 0.25 - 1.5 7.0 3.5 - 7.0 |65 0.5 0.25 - 1.5 7.0 3.0 - 7.0 |
51 0.5 0.25 - 3.0 7.0 3.0 - 7.0 |66 0.5 0.25 - 1.5 7.0 3.0 - 7.0 |
52 0.5 0.25 - 3.0 7.0 3.0 - 7.0 |67 1.75 1.0 - 4.0 7.0 3.5 - 7.0 |
53 2.5 1.5 - 2.5 7.0 3.5 - 7.0 |68 1.75 1.0 - 4.0 7.0 3.5 - 7.0 |
54 2.5 1.5 - 2.5 7.0 3.5 - 7.0 |69 2.5 1.5 - 2.5 5.0 3.0 - 7.0 |
55 1.25 0.75 - 4.0 7.0 3.5 - 7.0 |70 2.5 1.5 - 2.5 5.0 3.0 - 7.0 |
eng manual rev1.indd 6 2009-11-24 11:12:27

~ 7 ~1. Get to Know Your Machine
STITCH No. LENGTH (mm) WIDTH (mm) TWIN
NEEDLE
STITCH No. LENGTH (mm) WIDTH (mm) TWIN
NEEDLE
Auto Manual Auto Manual Auto Manual Auto Manual
71 2.5 1.0 - 2.5 7.0 3.0 - 7.0 |86 2.5 1.5 - 2.5 6.0 3.5 - 7.0 |
72 2.5 1.0 - 2.5 7.0 3.0 - 7.0 |87 2.5 1.0 - 2.5 6.0 2.0 - 7.0 |
73 2.5 1.5 - 2.5 6.0 3.0 - 6.0 |88 1.5 0.5- 2.0 6.0 2.0 - 7.0 |
74 2.5 1.5 - 2.5 6.0 3.0 - 6.0 |89 1.5
-
6.0
-
±
75 0.5 0.25 - 1.5 7.0 3.0 - 7.0 |90 2.0 2.0 - 4.0 3.5
-
±
76 0.5 0.25 - 1.5 7.0 3.5 - 7.0 |91 0.5 0.5, 0.75 6.0
-
±
77 2.5 1.5 - 2.5 7.0 3.5 - 7.0 |92
----
±
78 2.0 0.75 - 3.0 5.0 1.0 - 7.0 |93 0.5 0.5, 0.75 6.0
-
±
79 2.0 1.0 - 2.5 6.0 3.0 - 7.0 |94 0.5 0.5, 0.75 3.5
-
±
80 2.5 1.5 - 2.5 6.0 3.0 - 6.0 |95 0.5 0.5, 0.75 3.5
-
±
81 2.5 1.5 - 2.5 6.0 3.0 - 6.0 |96 0.5 0.5, 0.75 3.5
-
±
82 2.5 1.5 - 2.5 7.0 3.0 - 7.0 |97 0.5 0.5, 0.75 3.5
-
±
83 1.5 0.5 - 1.5 7.0 3.0 - 7.0 |98 0.5 0.5, 0.75 3.5
-
±
84 2.5 1.5 - 2.5 5.0 3.5 - 7.0 |99 0.5 0.5, 0.75 3.5
-
±
85 2.5 1.5 - 2.5 7.0 3.5 - 7.0 |
eng manual rev1.indd 7 2009-11-24 11:12:28

~ 8 ~
UNPACK THE MACHINE
Unpack the machine and place it on a Áat table. Check
the balance of the machine. If the machine does not
stand sturdy on the table, adjust the level of the machine
following these steps:.
Lay machine on its back gently and carefully with both
hands. Be careful not to make scratches on machine and/
or table. Be careful not to drop the machine or to have
your Àngers caught between the machine and table.
Insert the small screwdriver into the hole (1) and adjust the
level of the machine by turning it. After the adjustment,
check that the machine stands sturdy on the table.
Note: Be sure to wipe off any surplus oil from needle plate area
before using your machine the Àrst time.
CONNECT THE POWER CORD
AND FOOT CONTROL
Among the accessories you will Ànd the power cord and
the foot control.
Note: Before plugging in the foot control, check to ensure that it
is type “YC-485 EC or Model JF-1000” (see underside of foot
control).
1. Connect the foot control cord to the rear socket on
the bottom right side of the machine (1).
2. Connect the power cord to the front socket on the
bottom right side of the machine (2) and your wall
outlet (3) as illustrated.
3. Press the ON/OFF switch to ON (|) to turn on
power and light (4).
2Set Up Your Machine
1
23
14
eng manual rev1.indd 8 2009-11-24 11:12:29

~ 9 ~2. Set Up Your Machine
ON/OFF switch
“OFF” ON/OFF
switch “ON”
LOWER/RAISE THE FEED TEETH
The feed teeth control the movement of the fabric when
sewing. They should be raised for all general sewing
and lowered for darning, freehand embroidery and
monogramming so that you, not the feed teeth, are moving
the fabric.
The feed teeth also have to be lowered when embroidering.
USING THE FREE ARM
Your machine can be used either as a Áat-bed or as a free-
arm model.
With the accessory box (extension table) in position, it
provides a large working surface as a standard Áat-bed
model.
To remove the accessory box, hold it Àrmly with both
hands and pull it off to the left as shown. To replace, slide
the extension table back into place until it clicks.
With the accessory box removed the machine has a slim
free-arm used for children’s clothes, cuffs, trouser legs, and
when sewing in other hard-to-reach places.
PRESSER FOOT LIFTER
There are three positions for your presser foot.
1. Lower the presser foot to sew.
2. Raise the lifter to the middle position to insert or remove
fabric.
3. Lift it to its highest position to change the presser foot
or to remove thick fabric.
PACK AWAY AFTER SEWING
1. Press the ON/OFF (3) switch to OFF (O).
2. Unplug the cord from the wall socket (3) and then
from the machine (2).
3. Unplug the foot control cord from the machine (1).
4. Place all accessories in the accessory tray. Slide the tray
onto your machine around the free arm.
eng manual rev1.indd 9 2009-11-24 11:12:29

~ 10 ~
SPOOL PINS
HORIZONTAL SPOOL PIN for normal thread spool
Place thread spool on the pin and secure with a spool cap
to ensure smooth Áow of thread.
VERTICAL SPOOL PIN for large thread spool
1. Place the removable thread guide on the horizontal spool
pin as illustrated.
2. Pull the base of the spool pin down, then pull up the
spool pin. Pull up the thread guide on base of the
horizontal spool pin..
3. Place thread spool on the vertical spool pin and pull
the thread through the thread guide and through the
removable thread guide.
Spool pin cap
Spool Spool pin
Removable
thread guide
Thread guide
Vertical spool pin
For large thread spool For extra large thread spool
1
23
eng manual rev1.indd 10 2009-11-24 11:12:30

~ 11 ~2. Set Up Your Machine
THREAD THE TOP THREAD
Raise the presser foot.
Note: Always raise the presser foot lifter before threading the top
thread. (If the presser foot lifter is not raised, correct thread tension
cannot be obtained.)
Turn the hand wheel toward you until the needle is in its
highest position and the thread take-up lever is visible.
Thread the machine in the following order as illustrated.
• Guide the thread through thread guide (1), then pull it
down along the groove.
• Continue threading in the direction of the arrow (pull
the thread around the inside of the tab (2)).
• Pass the thread through the thread take-up lever (3) from
the right to left.
• Insert the thread into the inside of the groove (4).
• Guide the thread into the thread guide (5).
• Use the needle threader (page 12) to thread the needle
eye (6).
2
1
3
5
4
6
1
eng manual rev1.indd 11 2009-11-24 11:12:30

~ 12 ~
NEEDLE THREADER
The needle threader allows you to thread the needle
automatically. The needle must be in the up position to
use the needle threader. We also recommend lowering the
presser foot.
1. Place the thread under the hook as illustrated.
2. Use the handle to pull the needle threader all the way
down. The threader hook swivels through the needle eye.
Place the thread under the thread hook.
3. Let the needle threader gently swing back. The hook
pulls the thread through the needle eye and forms a loop
behind the needle. Pull the thread loop out behind the
needle.
Note: For smooth threading, it is recommended that the machine is
set for straight stitch (in center needle position) when using the needle
threader.
Note: The needle threader is designed to be used for size 70-120
needles. You cannot use the needle threader for needles size 60
or smaller, the wing needle, twin needle, triple needle or when the
Buttonhole foot is attached. There are also some optional accessories
that require manual threading of the needle.
When threading the needle manually, make sure that the needle is
threaded from front to back.
2
1
3
eng manual rev1.indd 12 2009-11-24 11:12:32

~ 13 ~2. Set Up Your Machine
THREADING FOR TWIN NEEDLE
A twin needle sews two rows of parallel stitches for pin
tucks, double top stitching and decorative sewing.
When using twin-needles, the stitch width should never
be set above the twin needle limitation (see page 21),
regardless of the stitch you have selected. Doing so will
result in broken needles and possible damage to your
machine.
The twin needle is an optional purchase.
Threading the Twin Needle
1. Place a spool on each spool pin. Thread the two threads
as one. Draw one thread through each needle from front
to back.
2. Pull up the bobbin thread as for single needle sewing.
Pull the three threads together under the presser foot to
the back of the machine, leaving a thread end about 6”
(15 cm) long.
Note: Needle threader cannot be used to thread the twin needle.
Helpful Hints:
1. Always activate the Twin Needle Safety (see page 21) prior to
selecting a stitch. This will preclude any possibility of the twin
needle breaking.
2. Turning off the machine returns the machine to normal sewing
mode. Twin Needle is only active when the Twin Needle Safety
button is lit red.
eng manual rev1.indd 13 2009-11-24 11:12:32

~ 14 ~
BOBBIN WINDING
1. Place a spool of thread on the spool pin, and secure
it with the spool pin cap. Pull the thread out from the
spool through thread guide as illustrated.
2. Pull the thread end through the hole in the bobbin as
shown.
3. Push bobbin winder to the far left position. Place the
bobbin onto the bobbin winder with end of the thread
coming up from top of the bobbin. Push the bobbin
winder to the right until it clicks. Hold onto the thread
end.
4. Start the machine by pressing the foot control. The
bobbin winding stops automatically when the bobbin is
full. Push the bobbin winder to the left to remove the
bobbin and cut thread.
eng manual rev1.indd 14 2009-11-24 11:12:32

~ 15 ~2. Set Up Your Machine
INSERT THE BOBBIN
1. Raise the needle to its highest position by rotating the
hand wheel toward you (counter clockwise).
2. Remove the bobbin cover plate by pushing the release
button to the right while pushing the left corner of plate.
3. Insert the bobbin making sure it rotates counter-
clockwise.
4. Pull thread through the slot (A) and then to the left.
5. With a Ànger held gently on top of the bobbin, pull
thread through the slot (B), pull out about 6" (15 cm) of
thread.
6. Replace the bobbin cover plate onto the needle plate.
B
A
A
eng manual rev1.indd 15 2009-11-24 11:12:33

~ 16 ~
PULL UP THE BOBBIN THREAD
1. Raise the presser foot lifter.
2. Hold the needle thread loosely with your left hand. Turn
the hand wheel toward you with your right hand, Àrst
lower the needle, then continue until the needle is in its
highest position.
3. Lightly pull the top thread to pick up the bobbin thread.
The bobbin thread appears in the hole in the needle
plate.
4. Pull both top and bobbin threads under the presser foot,
toward the back of the machine (pull out about 6” (15 cm)
of thread).
eng manual rev1.indd 16 2009-11-24 11:12:33

~ 17 ~2. Set Up Your Machine
Under side
Decrease tension Increase tension
Top side
Presser foot ankle
Well balanced
Top tension
too tight
Top tension
too loose
ADJUST TOP THREAD TENSION
The correct appearance of your stitching is mainly
determined by the balanced tension of both top and
bobbin threads. The tension is well balanced when these
two threads ‘lock’ in the middle of layers of the fabric you
are using.
If, when you start to sew, you realize that the stitching is
irregular, the thread tension needs to be adjusted.
Make any adjustments of the thread tension with the
presser foot lowered.
Bobbin Tension
The bobbin tension has been correctly set at the factory, so
you do not need to adjust it.
CHANGE PRESSER FOOT
Be sure that the needle is in its highest position. Raise the
presser foot.
1. Push presser foot release button to remove the foot.
2. Place the desired foot on the stitch plate aligning the
presser foot pin with the presser foot ankle.
3. Lower the presser foot lifter so that the presser foot
ankle snaps on the foot.
2
1
3
eng manual rev1.indd 17 2009-11-24 11:12:35

~ 18 ~
CHANGE THE NEEDLE
1. Raise the needle to its highest position by turning the hand
wheel.
2. Loosen the needle clamp screw by turning it toward you.
3. Remove the needle by pulling it downward.
4. Insert the new needle into the needle clamp with the Áat side
toward the back.
5. Push the needle up as far as it will go.
6. Tighten the needle clamp screw Àrmly with the screw driver.
Always disconnect the machine from power supply by
removing the plug from the wall-outlet.
Flat side toward
the back
Flat side
Needle
1
2
AE
BD
NEEDLES
The sewing machine needle plays an important role in successful
sewing. To ensure you will get a quality needle, we recommend
INSPIRA™ needles of system 130/705H. Below, Ànd a
description of the most frequently used needles for sewing on
woven and stretch fabrics.
Universal needle (A)
Universal needles have a slightly rounded point and come in a
variety of sizes. For general sewing in a variety of fabric types and
weights.
Stretch needle (B)
Stretch needles have a special scarf to eliminate skipped stitches
when there is a Áex in the fabric. For knits, swimwear, Áeece,
synthetic suedes and leathers. Marked with a yellow band.
Embroidery needle (C)
Embroidery needles have a special scarf, a slightly rounded point
and a slightly larger eye to avoid damage to thread and materials.
Use with metallic and other specailty threads for embroidery and
decorative sewing.
Denim needle (D)
Denim needles have a sharp point to penetrate tightly woven fabrics
without deÁecting the needle. For canvas, denim, microÀbers.
Marked with a blue band.
Wing needle (E)
The Wing needle has wide wings on the side of the needle to poke
holes in the fabric when sewing entredeux and other hemstitches
on natural Àber fabrics.
Note: Change the needle often. Always use a straight needle with a sharp point
(1). A damaged needle (2) can cause skipped stitches, breakage of needles or
snapping of thread. A damaged needle can also damage the stitch plate.
Do not use asymmetrical twin needles (3) since they may damage your sewing
machine.
C
3
eng manual rev1.indd 18 2009-11-24 11:12:36
Table of contents
Other Viking Sewing Machine manuals

Viking
Viking Designer EPIC User manual

Viking
Viking Scandinavia 300 User manual

Viking
Viking Designer I User manual

Viking
Viking Turissa Service manual

Viking
Viking Huskylock S15 User manual

Viking
Viking ER10 User manual

Viking
Viking Designer Ruby User manual

Viking
Viking 2780 User manual

Viking
Viking Huskystar 207 User manual

Viking
Viking Designer Topaz User manual