Tiptop Audio CIRCADIAN RHYTHMS User manual
CIRCADIAN RHYTHMS
User Manual
Circadian Rhythms
for modular music composers

Introduction ...................................... p.02
Section 1
Quick Start Tutorials ............................ p.03
1 - Vertical View Basics ..................... p.03
2 - Other Views ................................. p.07
3 - Groups and Presets Plus Copy,
Paste and Save ............................p.09
4 - Looping Presets and Groups for
More Complex Patterns ............... p.11
Advanced Tutorials .............................. p.13
1 - Zoom Programming ..................... p.17
2 - Fills and Programming Triggers ... p.20
3 - Programming Gates .....................p.22
4 - Syncing to Your DAW .................. p.24
CR Tips and Programming Ideas ....... p.31
Section 2
Functions in Detail ............................... p.32
Views ..................................................... p.33
- Vertical View
- 8x8 View
- 4x16 View
- 2x32 View
- 1x64 View
- Zoom View
Clock In ................................................. p.37
SyncBus and Channel Expansion ...... p.38
Swing .................................................... p.39
Looping ................................................ p.40
Preset Loops
Group Loops
Editing While Looping
Programming Triggers and Gates ......... p.41
Channel Step Editing .............................. p.41
Trigger Buttons ........................................ p.42
Fills
Trigger Recording
Startup and Utility Functions ................. p.43
Updating Firmware
Clearing Internal Memory
Checking Firmware Version
Mode D ..................................................... p.44
USB Save/Load ........................................ p.45
Specicatons ........................................... p.46
Credits ...................................................... p.46
INDEX

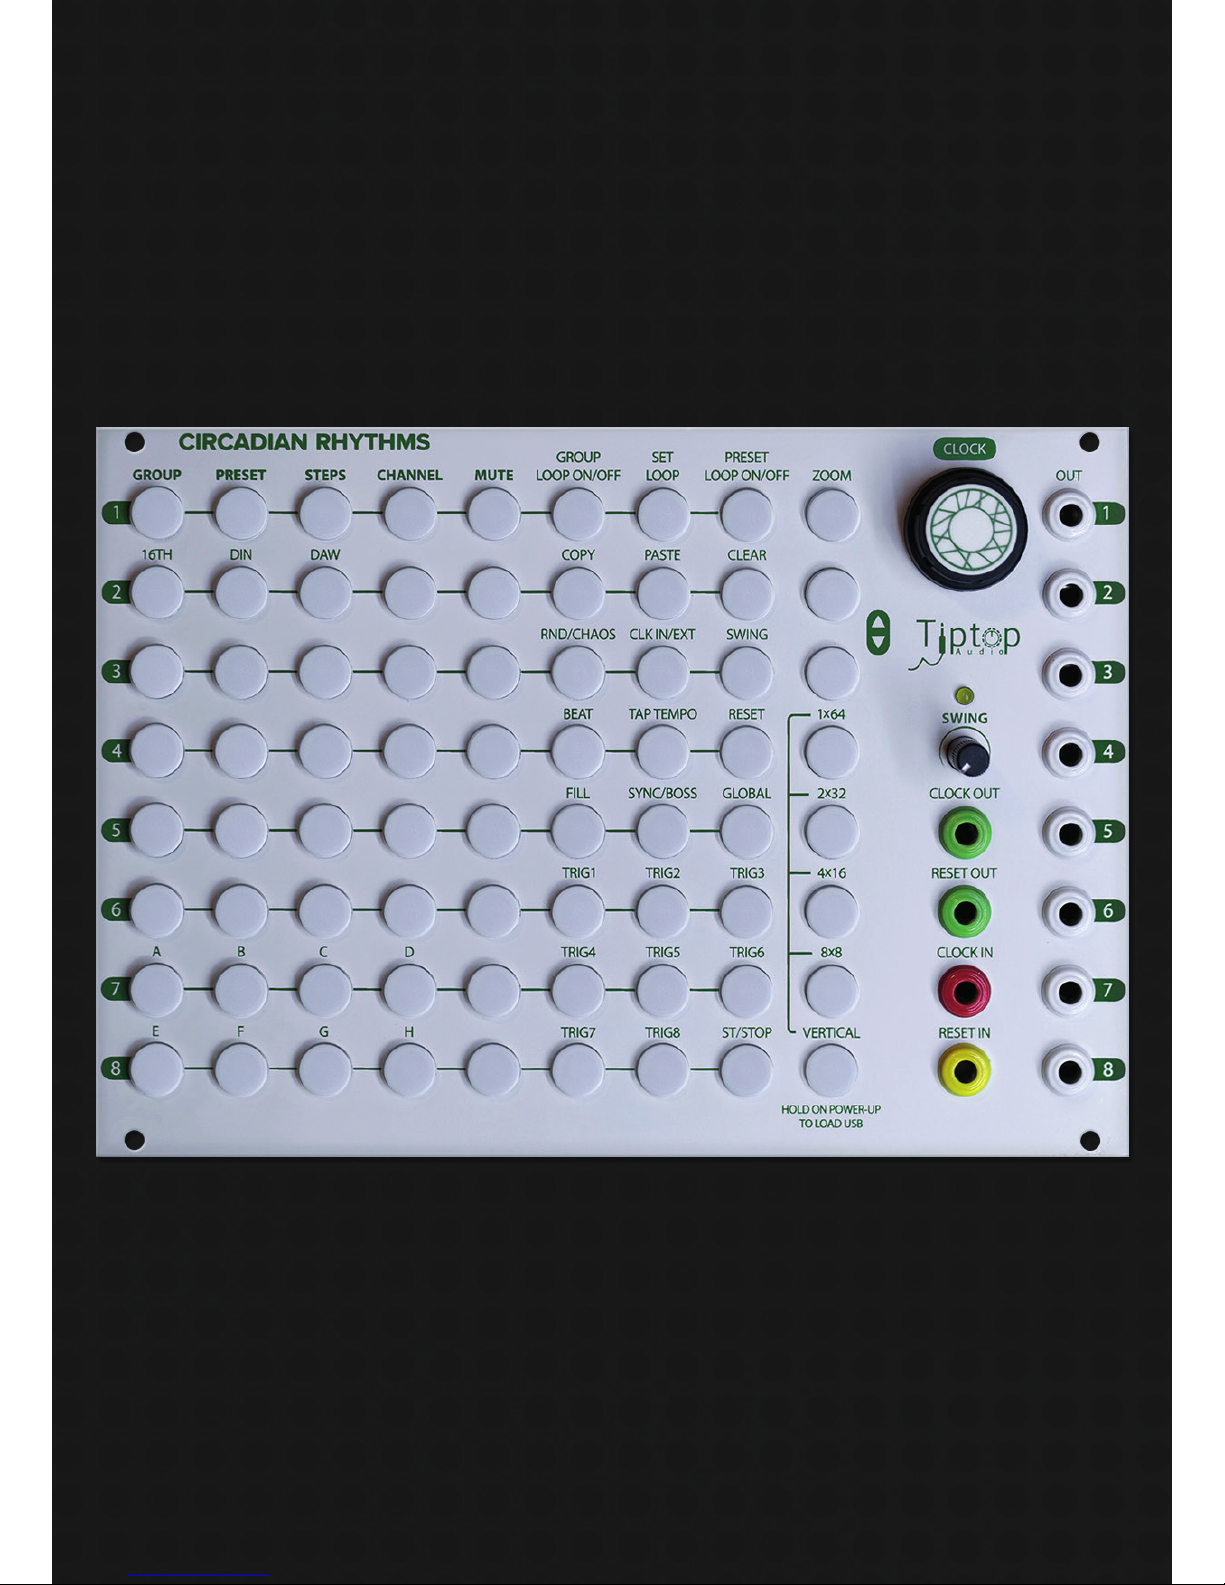
Circadian Rhythms Features
Hardware:
• 8 trigger/gate outputs
• Highly Accurate Internal Clock and Reset output
• External Clock and Reset input
Rhythmic Functions:
• Up to 512 step sequences - 8x8x8 storage in memory
• 16th note main grid resolution
• 24ppq resolution in Zoom view for deep-dive, detailed sequence editing
• Trigger delay per step
• Swing with 8th or 16th notes
• Gate width outputs gates up to 64 steps long
Introduction
Thank you for purchasing the Circadian Rhythms. The CR (as we’ll refer to it henceforth) is a uni-
que rhythm sequencer for the Eurorack format that takes the original idea behind the XOX step se-
quencer and transforms it into a more exible performance tool that encourages improvisation and
experimentation.
We recommend placing the CR in front of your modular in a desktop rack, like the Happy Ending Kit
or other skiff case, for easy access to the buttons. The CR was designed to be the master controller
of your modular: it will supply clock and reset signals for sync to all other sequencers, clock dividers
and such in your system, trigger the envelopes of your patched synth sounds and all your drum
sounds. The CR gives you eight sequencer channels for multi-voice musical composition entirely
on the modular. Additional channels can be added with additional CRs and/or Trigger Riots using
Tiptop SyncBus connectors located at the back of the module which keeps them all in perfect sync
as if they were one big sequencer.
This manual has two sections:
1) Quickstart and Advanced tutorials for step by step instructions on a specic task. These examples
will give you enough knowledge of the CR’s structure and functionality to start using it.
2) Detailed function descriptions that form the Reference part of the document including Specica-
tions.
Just FYI before we get started:
• In this manual, “Columns” refer to vertical lines of buttons. “Rows” refer to horizontal lines. The
CR has nine columns and eight rows.
• Terms that refer to labels on the CR are capitalized.
• NxN View to a concept or action that is applicable to any of the horizontal grid views: 1x64,
2x32, 4x16, 8x8.
02

Quickstart Tutorial 1: Vertical View Basics
For the purposes of this exercise, we’ll use the Tiptop 808 BD, Hihats, and Snares, but you can use
any module that takes a gate or a trigger for an input to make a sound (for example, this could be
an envelope generator triggering a VCA or a lo pass gate). Now, connect trigger outputs 1, 2, and
3 to the BD, Hihats, and Snares trigger/gate inputs respectively.
CR has ve main views (from top to bottom: 1x64, etc…), all in the lower righthand corner. For the
moment, we’re going to explore the vertical view.
First, let’s set our BPM to 120. Rotate the Clock knob. You’ll notice that the button matrix displays
in the BPM by lighting up the buttons. Pretty slick, right?
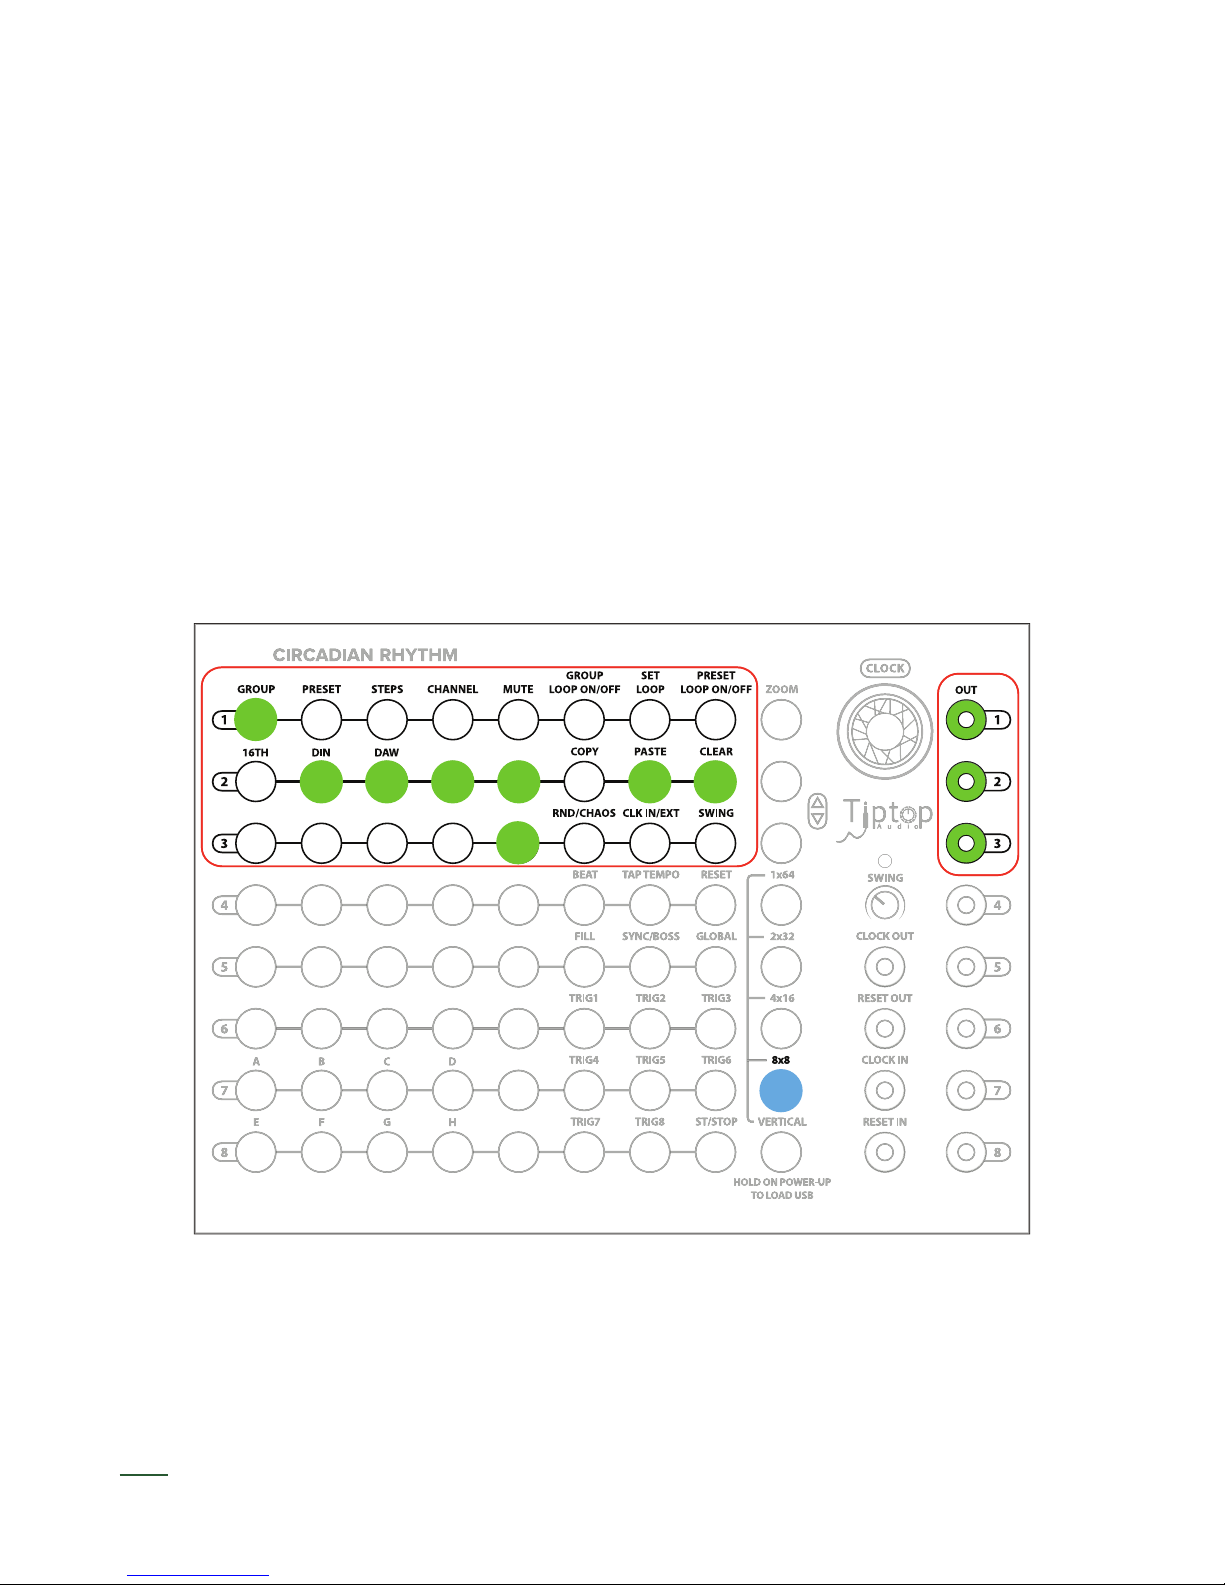
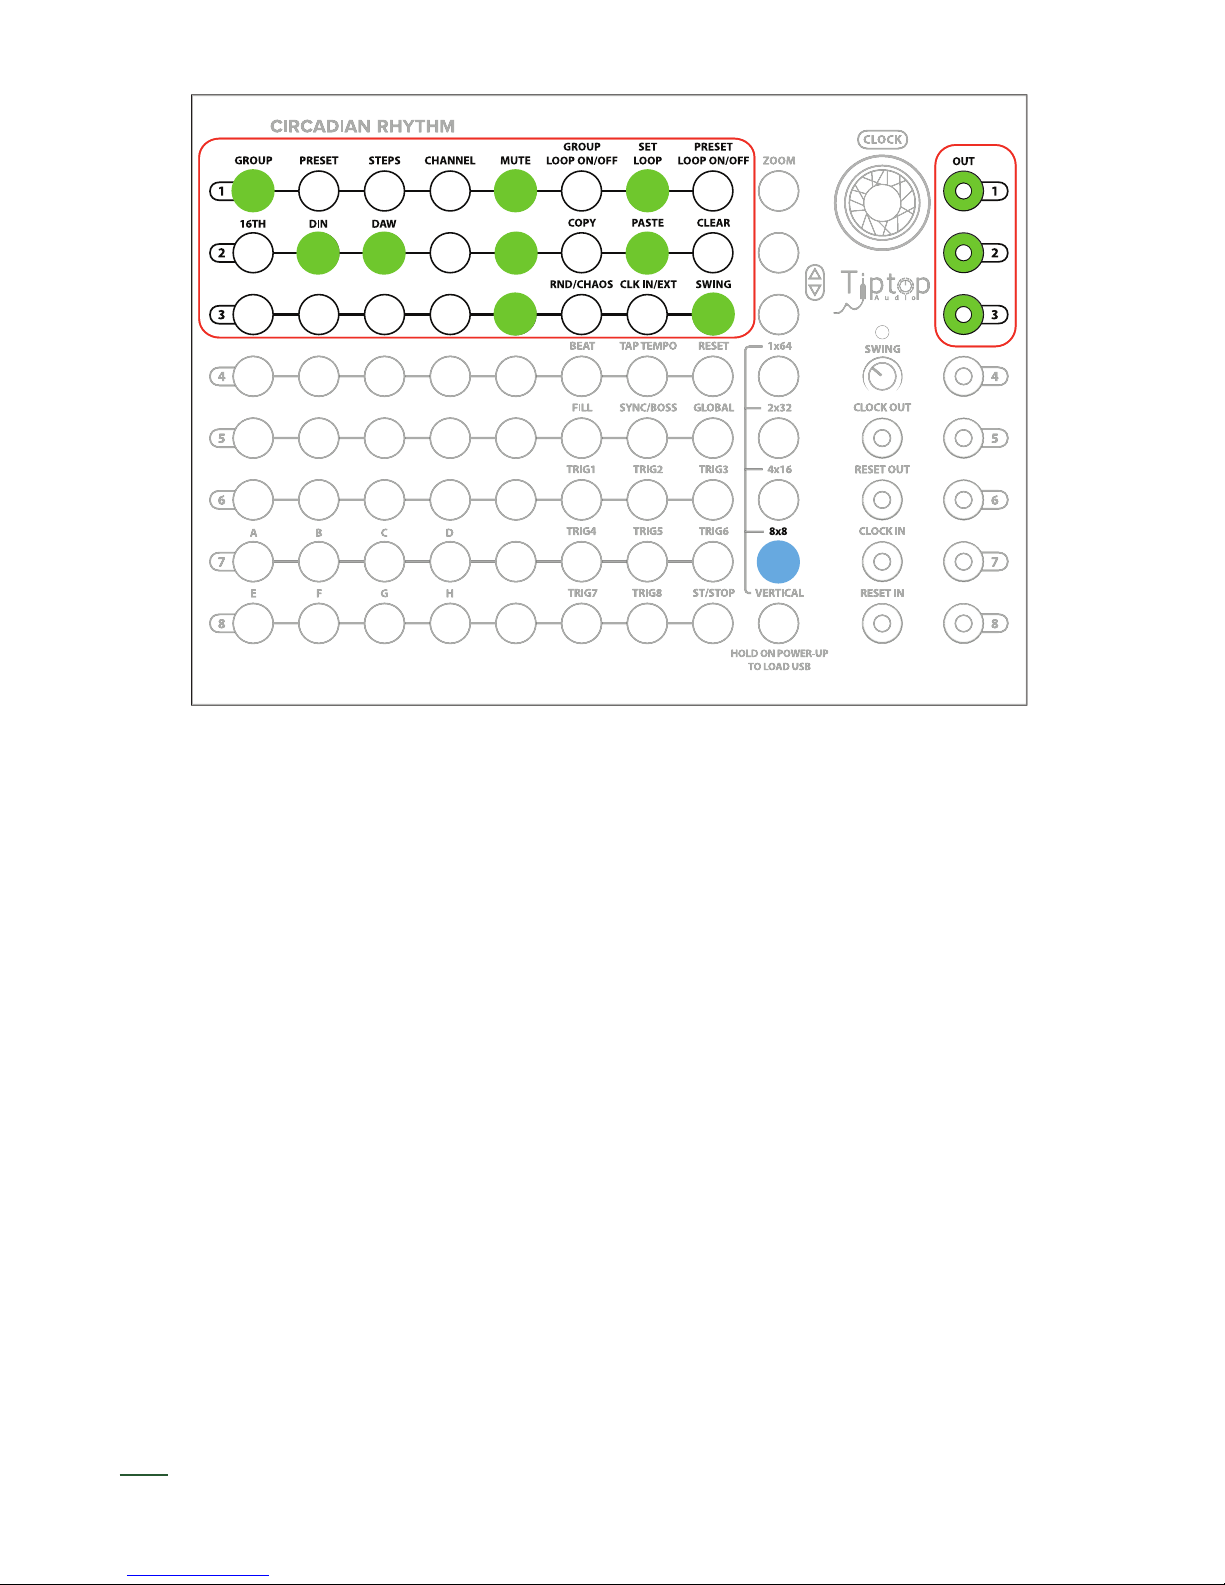
The button in the lower righthand corner of the CR is called Vertical: make sure it is illuminated in
Blue. Think of Vertical as your home button and primary view. Vertical displays most of the fun-
ctionality that you’ll be using to program rhythms. Further, all of the labels that appear above the
buttons in the primary eight columns are meaningful only in the Vertical view.
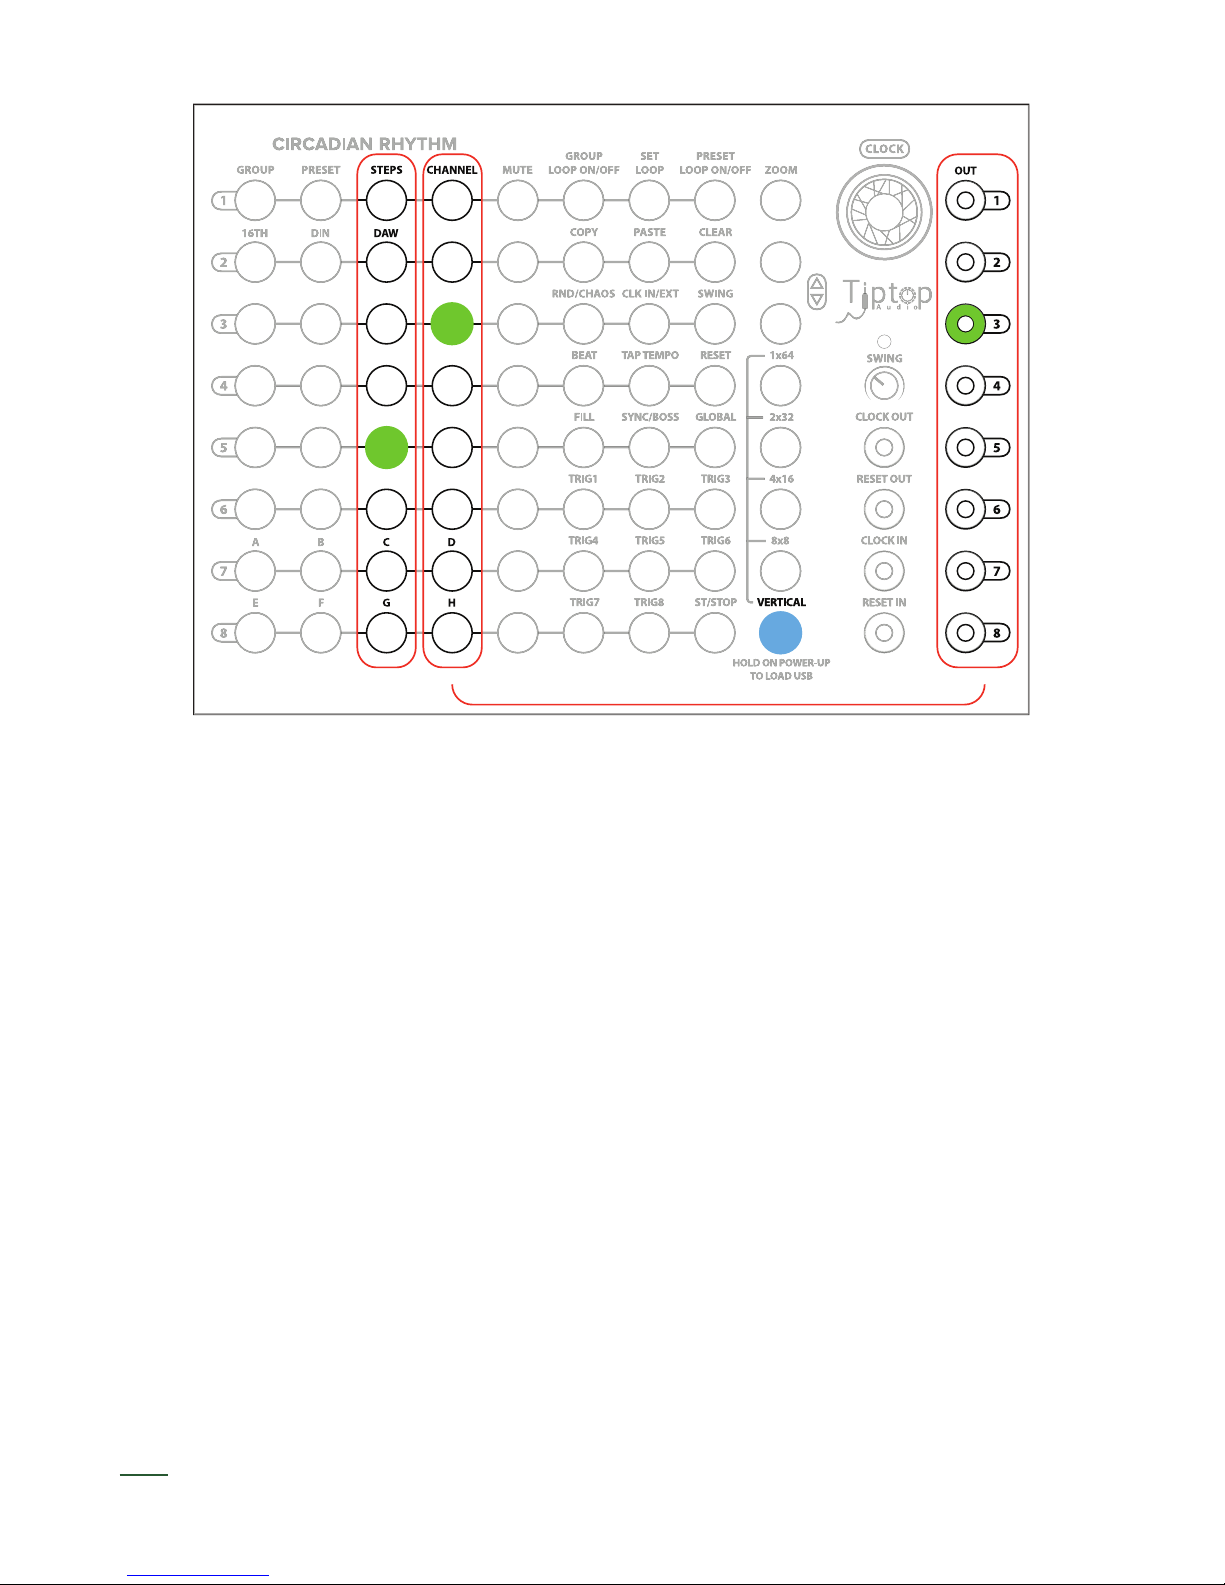
For this tutorial, in the Vertical view, we’re going to focus on the third and fourth columns called
Steps and Channels. The Channel column refers to the button that is selected in each row. So, if
the channel button for row 1 is green, it means that we are currently viewing Channel 1 which will
output to trigger/gate 1 on the right side of the CR (the BD in our example).
v v
+ -
03
CLOCK 120 BPM

04
v
v
v
v
v
v
Channel column and output
v
v
Channel 1, steps and output

Steps is where you can program your triggers/gates that will generate a rhythm. In Vertical view,
the Steps will appear vertically. Steps are a collection of eight steps. It’s always a collection of eight
steps, not six or three, just eight.
Ok, so we’re viewing Channel 1’s rst set of Steps. Let’s ll in some beats. Press the rst and the
fth button on the Steps column. They will illuminate in green. You should now hear a BD kick on the
one and the ve making the familiar four-on-the- oor kick.
Let’s add another Channel. Select Channel 2 (the second button in the Channel column will now be
green). The Steps are now blank because we haven’t programmed any Steps for this Channel yet.
In fact, if you selected Channel 1 again, you’ll see the 1 and the 5 in green.
For Channel 2, press the third and the seventh buttons on the column which will output triggers to
the HiHats in our example
v
v
Finally, let’s add the snare. Since we have connected a cable from the CR’s output 3 to our snare
trigger/gate input, select Channel 3. The Steps for Channel 3 are blank now. Press in the fth colu-
mn button on the Snare row.
Now you’ve got the classic house/techno rhythm pattern. If you press Channel 2 again, you can see
your selected triggers for your hihats coming from CR’s output 2; likewise for the BD for Channel 1.
The Mute button immediately in the column to the right of a Channel is associated with that Channel
(e.g., the Channel in row 3 is associated with the Mute button in row 3). When the Channel is actively
generating steps, the Mute button lights up green to let you know when that channel is ring. Press
the Mute button for the Channel you wish to mute. The muted Channel will no longer re triggers/
gates. Press the Mute button again to unmute the channel.
05
HiHats out example
QST 1: Review
• CR has multiple views. The Vertical view is the primary view for editing and utility functions.
• The CR’s outputs correspond to Channels.
• Steps are a collection of eight steps. Steps output to Channels.
• Channels have their associated Mute button on the same row in the column immediately to
the right of the Channel. When unmuted, Mute shows you when a Channel is triggering. Press
the associated Mute to mute a Channel.
v
v
Snare out example
06

Your 8x8 should look like this:
8x8 View of Pattern
07
BD
HIHATS
SNARE
Quickstart Tutorial 2: Other Views
Don’t reset the classic house/techno rhythm pattern we programmed in the previous tutorial.
Let’s explore the other four views besides Vertical. As stated earlier, Vertical is the primary view for
programming rhythms. However, the CR’s views can be used in performance to program and/or
view your Steps on the y.
For example, let’s select 8x8, the button right above Vertical. Switching to this view, you’ll notice
immediately that the lights switch from moving vertically to horizontally. the 8x8 view displays all
the current Steps for each of the eight Channels all outputting triggers/gates to their corresponding
numbered outputs on the right.
08
BD
HIHATS
2x32 View of Pattern
If we want to see the other channels, in the 2x32, we navigate up and down using the up and down
buttons immediately below the Zoom button. If you want to see channel 3 (the snare output), press
the down button. Press the up button to see the programmed steps for channels 1 and 2.
QST 2: Review
• Multiple views let us view step programs at the same time and edit on the y.
• The formula for each view is number of viewable channels x number of steps, e.g., 4x16 me-
ans 4 simultaneously viewable channels of 16 steps each.
• We can view other channel outputs in views larger than 8x8 by navigating up and down with
the up and down buttons.
You can edit your step patterns here in the 8x8 view also. Some users may prefer to start program-
ming rhythms here in this view.
The other three non-Vertical views besides the 8x8 view are similar except that they show patterns
larger than eight steps in length. Patterns larger than eight steps in length are created by looping
presets which will explore in Quickstart Tutorial 4.
Just to ll in our knowledge, let’s look at how the 2x32 View appears. In this view, you have visible
access to two rows of 32 steps each. The views of each Channel break down by this division, so you
can see 2 channels of 32 step patterns simultaneously (likewise, 4x16 shows 4 channels of 16 steps
each). This means that the top four rows show the 32 step output to channel 1 (the BD) and the the
top four rows show the 32 step output to channel 2 (the HiHat).
Quickstart Tutorial 3: Groups and Presets Plus Copy, Paste, Clear, and Save
So far, we’ve made a pretty simple rhythmic pattern, seen it in different views in the CR, and had the
opportunity to edit in those views. Now, we’re going dive into groups and presets which will pave the
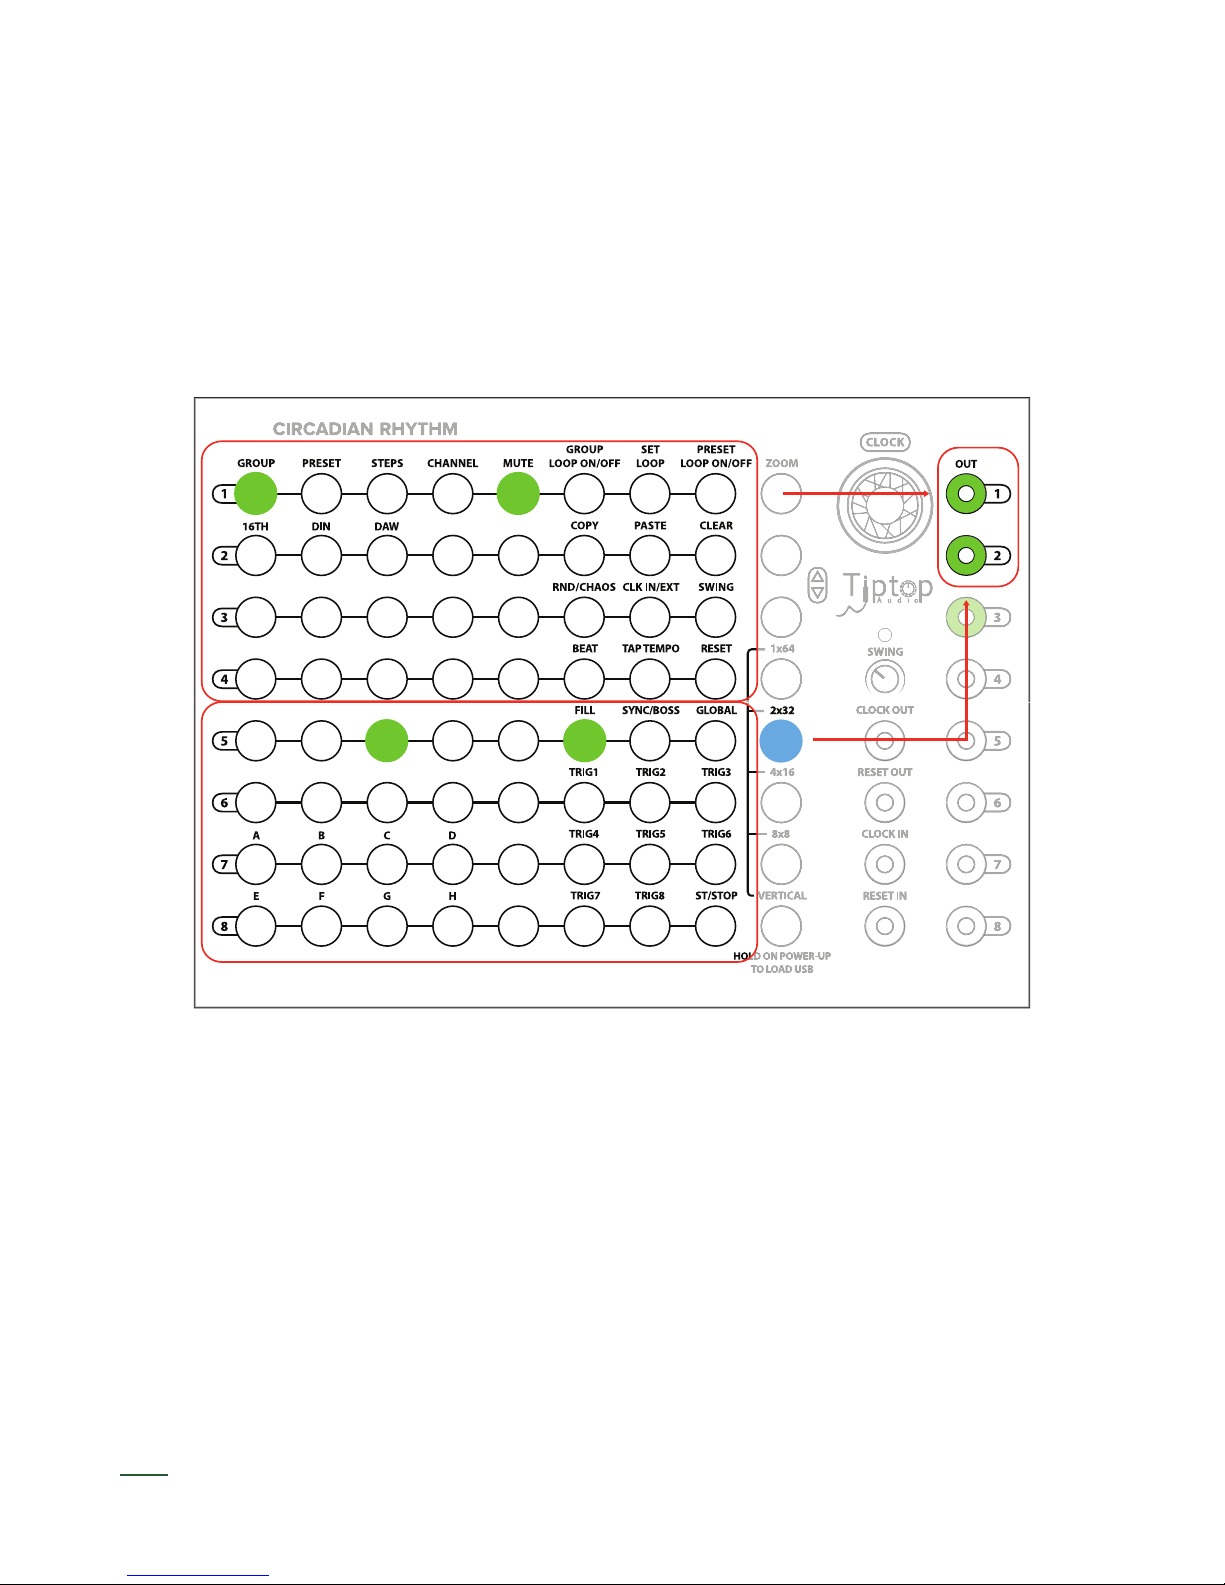
way for more complex pattern programming.
Let’s select the Vertical view we still have the basic house/techno beat running, let’s clear it and
start something different. To clear, a Channel (or Groups and Presets as we’ll see shortly), press the
Clear button in Vertical view. Nothing happens until you press the Channel you want to clear. In this
case, press the Channel 1 button. Now your kick drum should be cleared. To clear the other sounds,
press Clear and then the Channel you wish to clear.
Now, we’ll create a pattern and a variation to demonstrate. Keep your same outputs plugged into the
CR with BD on Channel 1, HiHat on 2, and Snare on 3. A Preset is a set of 8 Channels and a set of
Steps for each Channel.
For this pattern, let’s pick something slower. Dial your BPM down to 90 and Set up the following
pattern:
09
Slowed down pattern. 8x8 view.
10
The principle of copy and paste works for Channels also. If you want to copy a set of Steps into
another Channel out, press Copy and the Copy button will turn red, then press for example Channel
2. Now, press Paste and Press Channel 4.
Practice copying and paste from Presets 1 and 2 and into other Presets. Create variations in your
rhythmic patterns in different presets.
You should have this pattern in Preset 1 which is the rst button in Vertical under the Preset column.
Now, press the button for Preset 2 below Preset 1. You should hear no sound being output. This pre-
set is empty because you haven’t lled in this preset. Press the button for Preset 1 and you should
hear your original pattern.
We’re going copy the pattern for Preset 1 and paste it into Preset 2. Copy and Paste work similarly
to Clear: First you press the action button and then where you want it to happen. In this case, press
Copy and the Copy button will turn red, then press Preset 1 and copy will turn green. Green means
there is data in the buffer that can be copied. Now, press Paste and Press Preset 2. Your pattern
for Preset 1 should now be copied and pasted into Preset 2. You can test this by pressing back and
forth between Presets 1 and 2.
COPY PRESET 1 PASTE PRESET 2
C.R. MEMORY
COPY, THEN SELECT PRESET 1 PASTE, THEN SELECT PRESET 2
Copy and paste procedure.

11
Looping Presets and Groups for More Complex Patterns
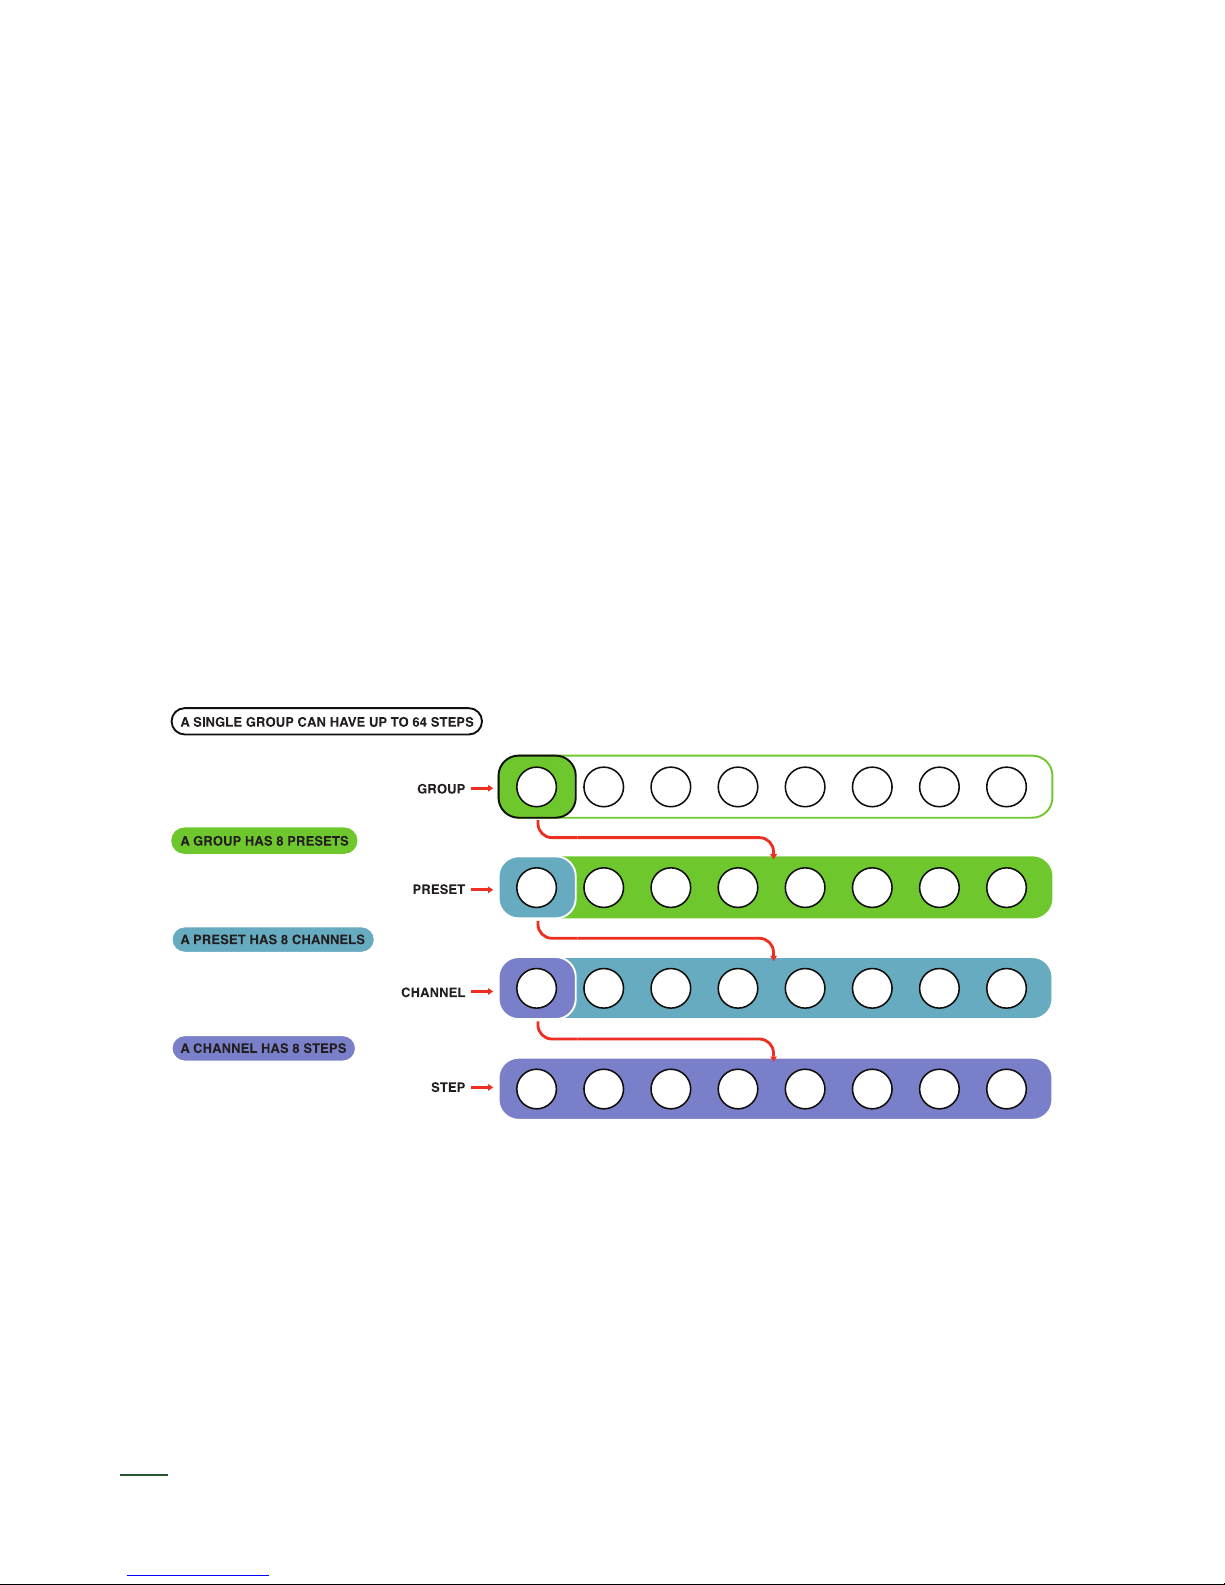
Let’s explore Groups. Groups are structurally similar to Presets except that Groups contain 8 Pre-
sets. Right now, we should be in Group 1. If you Press Group 2 (one button down from Group 1 in
the Group column), Group 2 will illuminate and you will hear no sound. Group 2 is empty.
You can copy and paste among Groups in the same manner and you copied and pasted Presets.
Press Copy and the Copy button will turn red, then press Group 1 and copy will turn green. Gre-
en means there is data in the buffer that can be copied. Now, press Paste and Press Group 2.
Your presets (of Channels and Steps) for Group 1 should now be copied and pasted into Group 2.
Press and hold down the Start/Stop button to the left of Vertical. This stops the CR clock and simul-
taneously saves all of your Groups, Presets, and Channels of Steps. Press Start/Stop to start the
CR clock running again.
QST 3: Review
• Groups and Presets are containers of eight that serve as organizational blocks for your rhyth-
mic patterns of Steps. A Group contains eight Presets. A Preset contains eight Channels of
Steps.
• Copy, paste, and clear all work on Groups, Presets, and Channels of Steps. To use them, you
press the action button and then where you want it to happen.
• Start/Stop stops and starts the CR’s clock. Holding it down also saves to non-volatile memory
the data (so the saved settings loads on next power up) in all your Groups, Presets, and Chan-
nels of Steps.
12
An Aside: The Ladder of Being
The Ladder of Being is an old concept used to describe a hierarchical set of containers that t insi-
de one another. The CR’s groupings are structured like the Ladder of Being. For more info: http://
en.wikipedia.org/wiki/Great_chain_of_being
Going down the ladder:
A Group has eight Presets. A Preset has eight sets of Steps and Channels. A set eight Channels has
eight Steps each.
Up the ladder. Channels and Steps are intimately tied together. Each Channel has eight Steps. Each
Preset has eight set of Channels and Steps. Each Group has eight set of Presets that belong to it.
This is the order of the CR universe.
CR’s Ladder of Being.
13
Quickstart Tutorial 4: Looping Presets and Groups for More Complex Patterns
“Yes,” you are saying, “groups and presets are interesting and all, but our patterns are still only 8
steps in length. How can I make patterns that are 16, 32, 64, or even 256 steps in length?”
Enter looping.
Looping as a function in the CR allows you to loop through a set of selected presets or groups. You
can also think of looping as combining (or really concatenating) a set of presents or groups, but that
would make the concept less exible than it is truly is.
Let’s create an example... Let’s choose Group 1, Preset 1 in Vertical View and enter in our standard
house/technopattern. Switch to 8x8 view to program the pattern:
In Group 1, Preset 2, let’s add a little variation to the HiHat and BD. Enter this pattern:
Simple House/Techno pattern for Group 1, Preset 1.
14
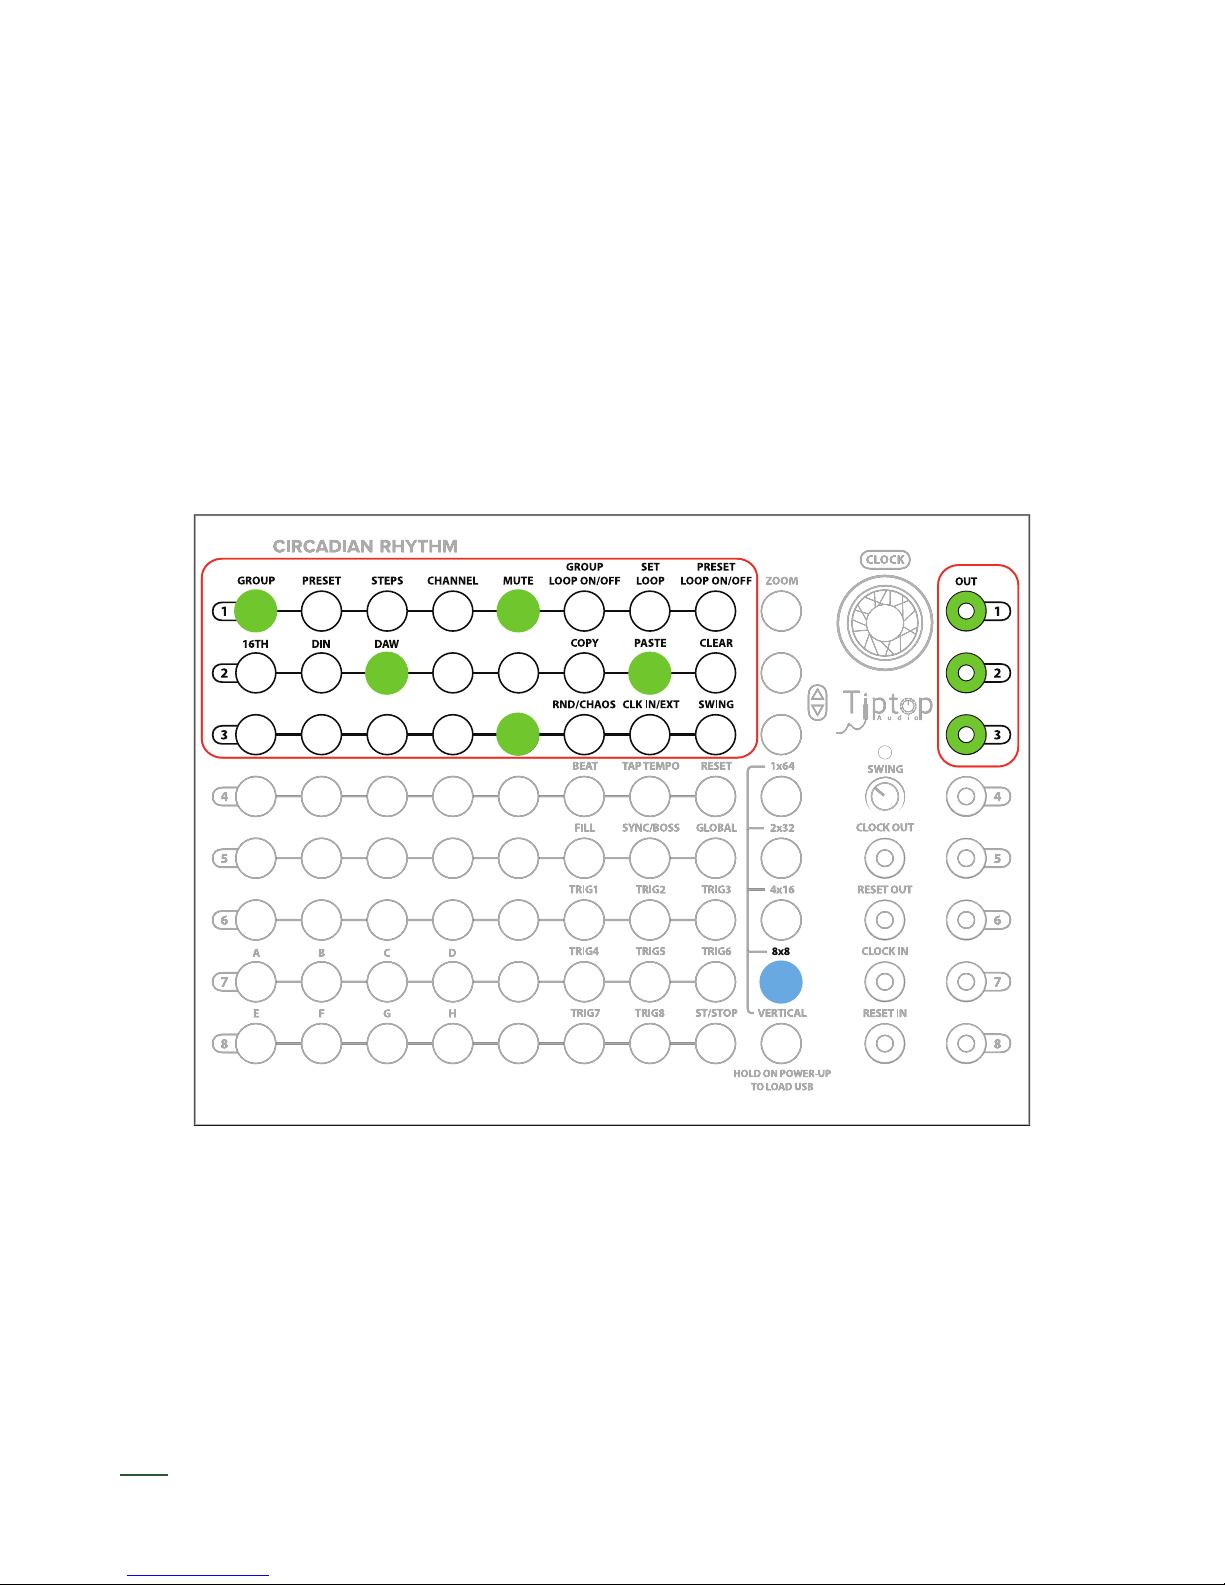
Switch back to Vertical View for the Loop programming. To Loop these two presets and create a
longer pattern, we need to press the Set Loop button. Looking at the Presets column, this shows us
which presets are currently part of our Preset loop. By default, all of the Presets will be activated.
For our loop, we only want Presets 1 and 2. Press the Preset buttons for Presets 3 through 8. This
will deactivate all the presets in the loop.
Now, press Preset Loop On/Off. Your two Preset loop should now be playing, cycling through Pre-
sets 1 and 2. The currently active Preset in the loop is red.
Simple House/Techno pattern variation for Group 1, Preset 2

15
Here’s what is really cool: Switch to the 4x16 View. You have a 16 Step Loop pattern of 2 Presets
and you can now view and edit the Steps in this View (or any of the other nXn Views).
If you want to add additional Presets to your loop, press the Preset Loop On/Off button. For exam-
ple, if you want to add Preset 3, press the Preset Loop On/Off button and press Preset 3 and it will
turn green. This preset is probably empty (unless you have been lling up your preset banks), so
we can select the 2x32 view to edit our entire 24 Step Loop pattern (or just edit Preset 3 in Vertical
view).
Just because we chose consecutive Presets for this example doesn’t mean you have to also. If you
want to loop, say, Presets 2,6,7, there’s nothing stopping you as far as the CR is concerned. Your
selected Presets will all be treated as the same looping block of Steps internally and also if you
switch views to a nXn view.
Looping Groups is the same as looping Presets except that you have a much larger range of Steps
to choose among.
One thing to remember about looping Groups: you need to select the Presets in the Group you want
to loop. Say we want to loop Group 1, Presets 1,3, and Group 2, Presets 1,2. You’ll need to select
those Presets within the Group and the Groups to loop.
Preset Looping active: Group 1, Preset 2 for Channel 3 (Snare) shown.

16
From our Presets example, copy Group 1 to Group 2. For Presets 1 and 2 in Group 2, add an addi-
tional Snare hit and add some variations to your HiHat pattern.
To Loop Groups 1 and 2 and Presets 1 and 2 from each Group, we need to press the Set Loop
button and the Group Loop On/Off. Looking at the Groups column, this shows us which Groups are
currently part of our Group loop. By default, all of the Groups will be activated.
Your two Group loop should now be playing, cycling through all the Groups. The currently active
Group in the loop is red. For our loop, we only want to loop Groups 1 and 2, so deactivate the others.
That’s it. You just looped some Groups. Step away. Pour yourself a beer. Let the compositional and
improvisational possibilities sink in. Also, consult page 40 of the document for further details on
Looping.
QST 4: Review
• Loops are the way to create step sequences longer than 8 steps. You can loop either Presets
or Groups.
• To loop Presets, activate Set Loop and Preset Loop On/Off. Select which presets you wish to
loop in the Preset column
• Looping Groups operates on the same principles as looping Presets, but with two differences:
you activate Group looping with Group Loop On/Off and you must select which Presets in the
Group you wish to loop.

17
Advanced Tutorial 1: Zoom Programming
Zoom is another view, but one with a very speci c and micro-focused purpose: Zoom allows you to
program your currently 8-step Step sequence at micro resolution.
If we enter Zoom view, we can see our pattern, but instead of having only 8 steps, we have 48; the
extra steps are between the standard 8 steps and we refer to them as Sub-Steps.
For example, say we have a HiHat pattern and we want a pattern denser than our 16th note 8 step
pattern or we want to have sub-steps that fall between our strict 16th note quantization. Let’s edit a
HiHat pattern.
Enter Zoom view and we can see our HiHat pattern look like this:
The standard 8 step pattern is on the rst column and you can add additional between notes with
the buttons on the right of the leftmost column. Add a couple of triggers after some of the 8 Steps
to hear what they sound like.
SUB STEP
PRIMARY HITHATS TRIGGERS
Zoom view: HiHats example.

18
A little music math behind the Zoom resolution might be useful here: the 6 SubSteps increase the
resolution from the standard 16th notes to a 96th note. In terms of Parts Per Quarter Note (PPQN),
16th notes are 4 PPQN (1⁄4 the duration of a quarter note) while Zoom is 24 PPQN (4 PPQN * 6)
which is a popular resolution for a number of reasons. First, it is used by MIDI as the timing of the
Beat Clock making it a standard, and second, it makes creating many useful note lengths easy. See
the details in Section 2 of the manual covering Zoom for a chart of common notes and how to enter
them.
For a musical example, create an 8th note triplet by entering a trigger on the rst Step then count 8
substeps to the 3rd substep on the second row to enter the next triplet, and nally count another 8
substeps to the 5th substep on the third row for the nal triplet. Consult the Zoom View section in the
second part of the manual for more details on entering other triplet and dotted values.
SUB STEP
PRIMARY HITHATS TRIGGERS
Zoom view: HiHats example with Sub Steps.
Table of contents
Other Tiptop Audio Synthesizer manuals


