Tivoli Audio ISONGBOOK User manual
1
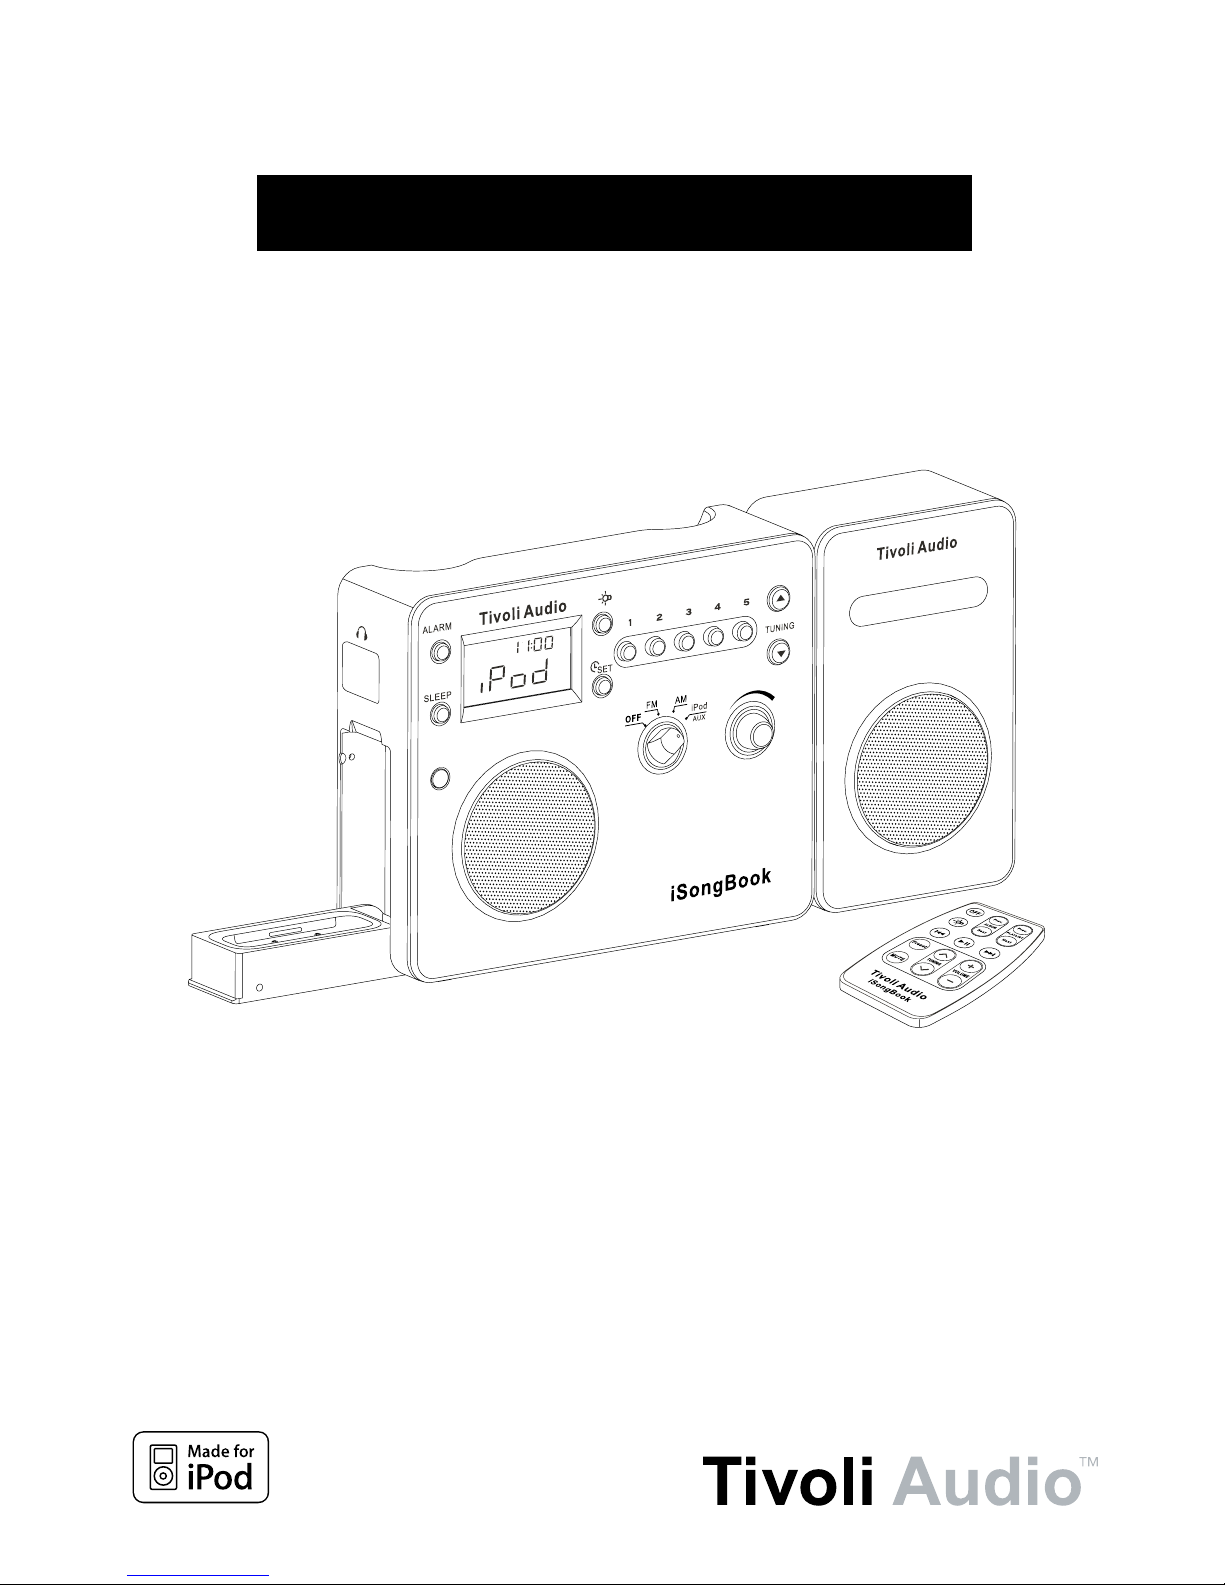
iSongBook™
OWNER’S MANUAL

2
This product can be recycled. Products bearing this symbol must NOT be thrown
away with normal household waste. At the end of the product’s life, take it to a
collection point designated for recycling of electrical and electronic devices. Find
out more about return and collection points through your local authority.
The European Waste Electrical and Electronic Equipment (WEEE) Directive was
implementedtodramaticallyreducetheamountofwastegoingtolandlls,there
by reducing the environmental impact on the planet and on human health. Please
act responsibly by recycling used products. If this product is still useable, consider
giving it away or selling it.
WARNING
1. Keepthisproductasafedistanceawayfromnakedame,suchasalitcandle.
2. Do not expose this product to splashing or dripping. Objects containing liquid, such as vases
or drinking glasses, should not be placed on top of this product.
3. The recommended operating temperature range is 5 degrees C to -40 degrees C.
4. The 12VDC input is suited for operating this product in a boat or camper using an optional
12VDC, 2A fused adaptor.

3
About Tivoli Audio
Tivoli Audio was started by Tom DeVesto with the goal of bringing simple to use, high quality
audio products to the consumer at reasonable prices. His long professional association with
Henry Kloss includes co-founding Cambridge SoundWorks*. As CEO and head of research and
development at his former company, Tom was responsible for the development of many of the
best selling home entertainment and multi-media products on the market. He also held senior
management positions in product development at both Advent and Kloss Video.
*Cambridge SoundWorks is a registered trademark of Creative Labs, Singapore.
iSongBook Instructions
Congratulations on your purchase of Tivoli Audio’s iSongBook portable FM/AM radio with built-in
iPod dock. We believe the iSongBook to be one of the finest sounding “Made for iPod” stereo
audio systems on the market today.
In order to take full advantage of what your new radio is capable of, please take a moment to read
this owner’s manual and the Safety Instructions. If you have any questions, please do not hesitate
to contact your dealer or Tivoli Audio.
Please save the carton and original packing should you ever need to ship your radio, as
shipping damage is not covered by the factory warranty.
On behalf of all of us, thank you for choosing Tivoli Audio and enjoy your new iSongBook!
Packed with your iSongBook you should find:
• 1 External Power Supply
• 1 Remote Control (battery installed)
• 7 iPod Dock Adapters (see “iPod Dock” on page 7)
Please contact your dealer/distributor or Tivoli Audio if any of these items are missing.
Getting Started
1. Set the iSongBook on a flat, stable surface. Attach the male mini plug from the secondary
speaker cable into the jack marked “R CH” on the side of the iSongBook and position the
speaker and main unit as desired.
2. With the iSongBook Off, connect the external power supply to the rear jack on the iSongBook
labeled 12VDC/1A and then plug it into a wall outlet.
3. Flip down the iPod docking station and insert the appropriate iPod adapter cup based on the
iPod model you own. Install your iPod in the dock by fitting the dock’s connector into the jack
on the bottom of the iPod.
4. Turn the iSongBook’s front source knob to the iPod/Aux position and set the volume control
to the desired level. The iPod will power On to its last state.
Note: Low (bass) frequencies place a heavy strain on speakers and amplifiers. The iSongBook
was engineered to reproduce the maximum amount of low frequencies for its size and power.
Therefore, we recommend setting your iPod’s EQ to “Off” for best overall performance.
English

4
English
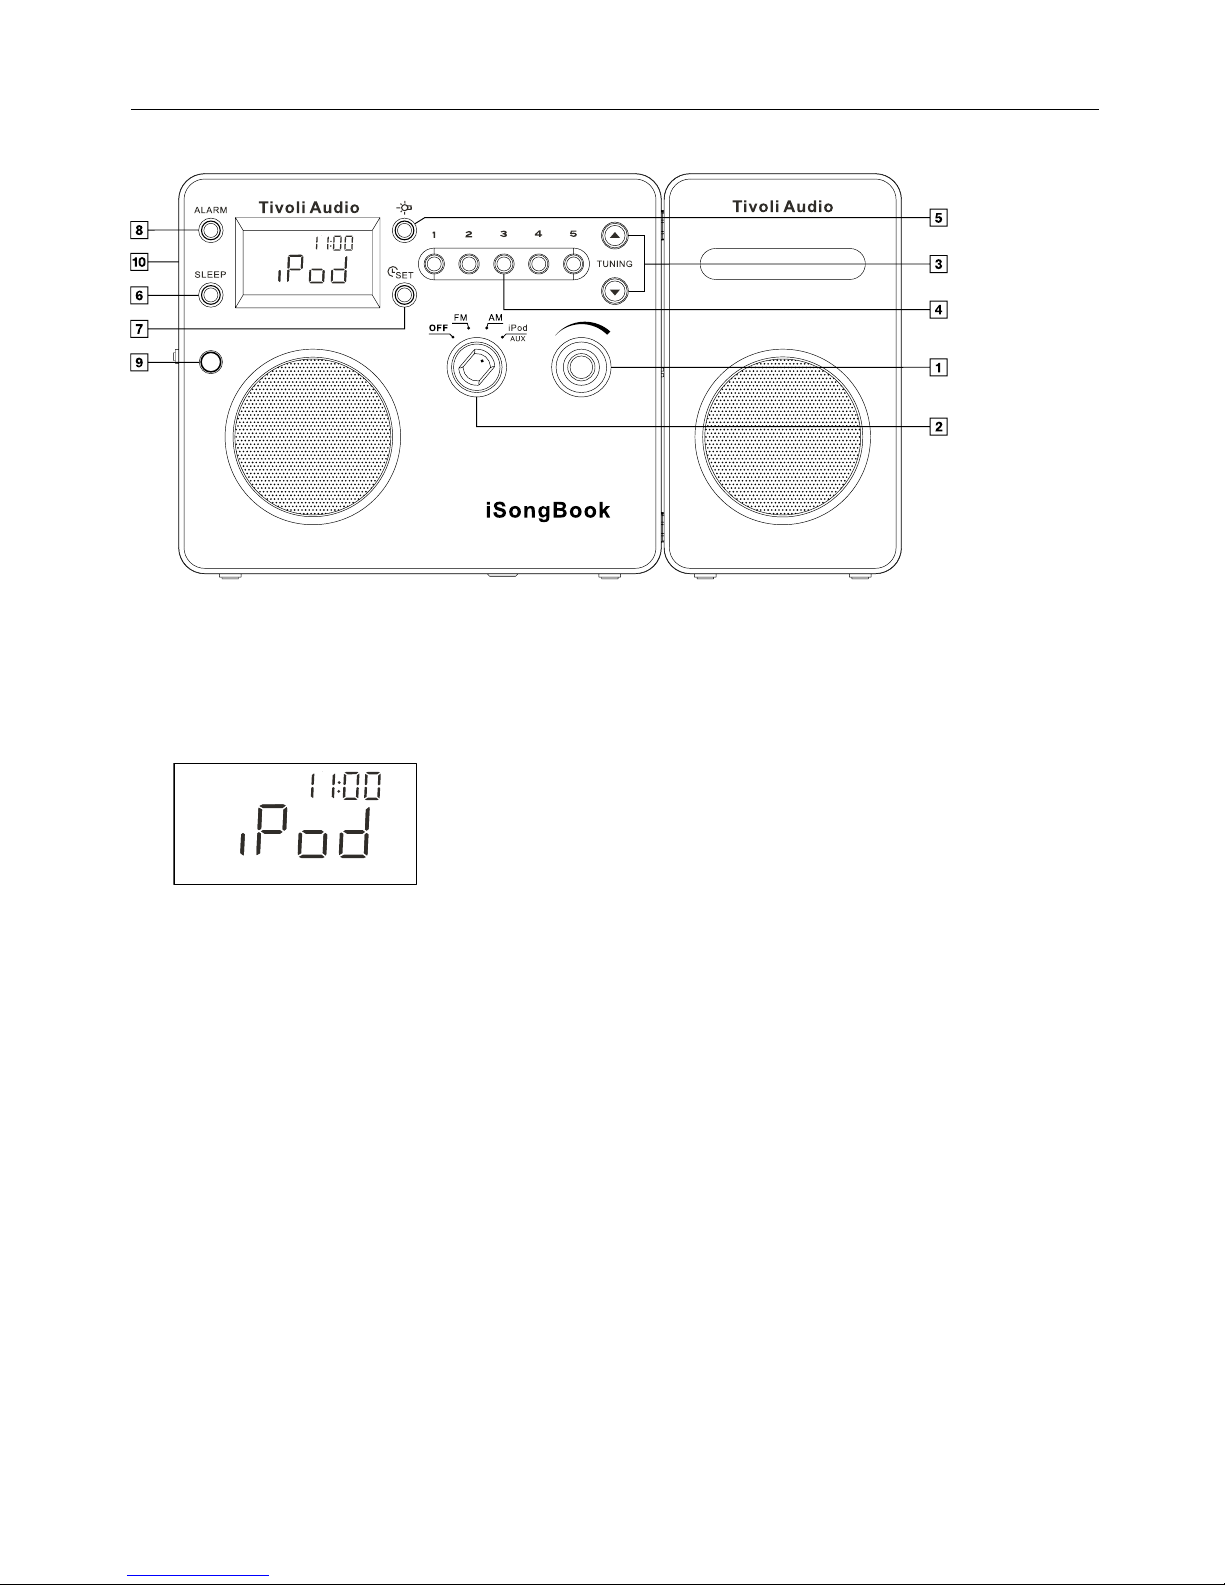
Guide to Features (Front Panel)
1. VOLUME KNOB: Rotate the volume knob to the right to increase the volume or to the left
to decrease the volume. This knob also controls the volume of the headphone output. The
volume level display ranges from 0 (no audio) to 30 (maximum output) and will appear
momentarily each time the volume is adjusted. If the volume ever sounds distorted, reduce
the level to prevent damage to the speakers. Since recording levels vary, you may need to
adjust the volume level when switching from the radio to the iPod and vise versa.
Figure 1
2. OFF/FM/AM/iPod/AUX KNOB: Turn the source knob one click to the right to hear the FM
band, two clicks to the right to hear the AM band, or three clicks to the right for the iPod/
Auxiliary input. When the iSongBook is switched to FM or AM the display will show the station
which was last tuned. When switched to the iPod/Auxiliary input, the display will show iPod
when an iPod is docked. (Figure 1) Otherwise, the display will show “AU”. In Off mode the
clock will be shown in a larger format.
3. TUNE ˆ/ˇBUTTONS: Press the Tune Up button briefly to increase the frequency steps or
the Tune Down button briefly to decrease the frequency steps. Press and hold the Tune Up/
Down buttons to rapidly scan through the stations. To Auto Search, press, hold for more
about .5 seconds, and release the Tune Up or Down button and the tuner will automatically
stop on the next strongly received station. When the tuner locks on to an FM stereo signal
the display will show a pair of headphones with the letters “ST”. These buttons are also used
to set the clock and alarm times.
4. #1-5: With the iSongBook set to FM or AM, press and hold to set the currently tuned radio
station. The Preset number will flash and a beep will be heard confirming the station has
been successfully stored. Once stored, press the Preset button briefly to recall the station

5
English
associated with that Preset. The tuned preset number will shown on the bottom of the
display. There are 5 presets for the FM band and 5 for the AM band.
5. LIGHT: Press briefly to engage the iSongBook's backlight. The backlight will turn off auto-
matically after 30 seconds to conserve power, or press again to cancel the backlight. Press
and hold to keep the backlight on for as long as the button is held in. If an iPod is docked
and the iSongBook is in iPod mode, when this button is pressed, the iPod backlight will also
activate for 30 seconds. However it cannot be turned off with the backlight button.
6. SLEEP: With the iSongBook tuned to an FM or AM station, or with a docked iPod playing,
press and hold for over 1.5 seconds to get 20 minutes of playback. An icon showing a figure
in bed will appear on the display and the number “20” will appear momentarily. A confirmation
beep will also be heard. After approximately 20 minutes the iSongBook will go into Standby
mode and the display will show “Standby”. You may now press the Sleep button for another
20 minutes of playback, turn the iSongBook Off, or switch to a different input. To prematurely
deactivate the Sleep function during playback, press and hold the Sleep button. The bed
icon will disappear from the display and a confirmation beep will be heard. The Sleep function
will not work when the source knob is set to the Off position.
To use the Sleep function in conjunction with the alarm, once the alarm has been set (see
"Using the Alarm") and the iSongBook goes into Standby, press the Sleep button. After 20
minutes, the iSongBook will return to Standby with the alarm set.
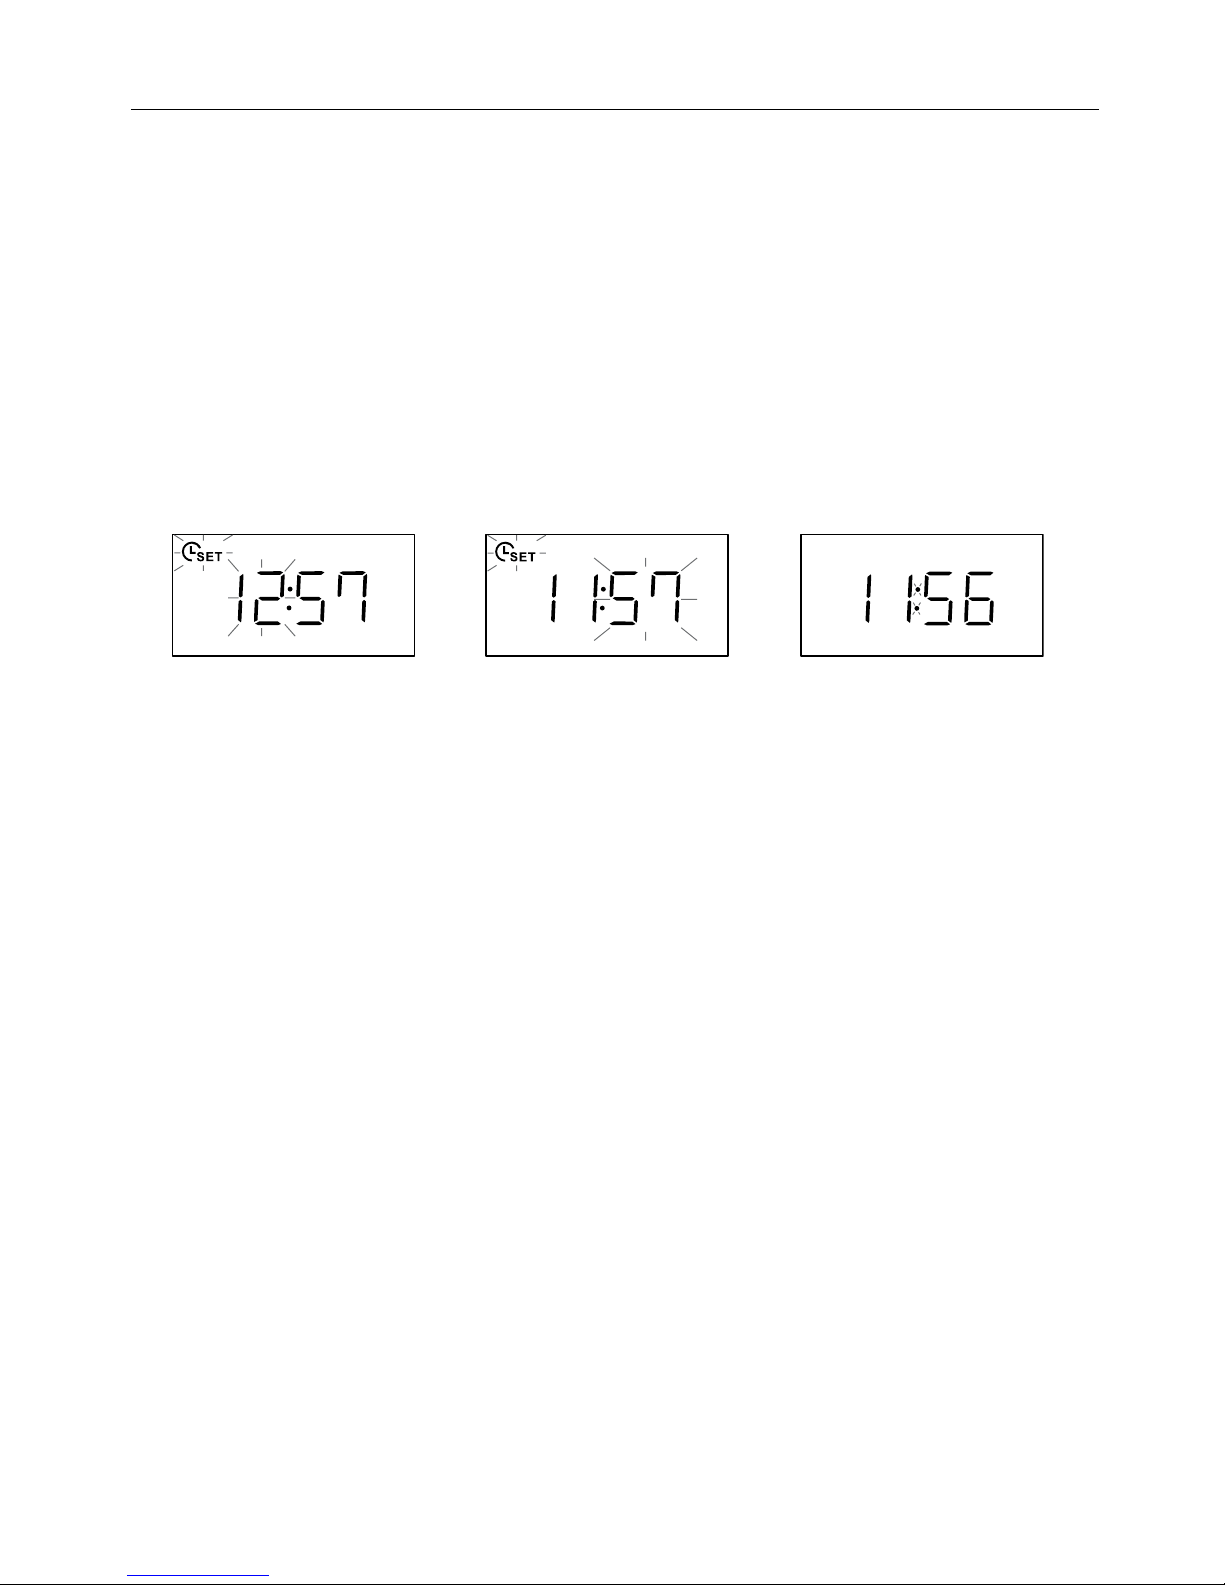
Figure 2 Figure 3 Figure 4
7. TIME SET: Press and hold to set the clock. A beep will be heard to confirm you have entered
the Time Set mode. (Figure 2) The hour will flash first. Press the Tune Up/Down buttons briefly
to change the hour or press and hold to rapidly change the hours. The “PM” designation will
appear for afternoon/evening hours but there is no “AM” designation for morning hours. Now
press the Time Set button to adjust the minutes using the Tune Up/Down buttons. (Figure 3)
The minutes will not affect the hour setting. Press the Time Set button a third time to store the
settings. (Figure 4) If the clock is set and there are no batteries (or the batteries are dead) inside
the iSongBook, disconnecting the external power supply will cause the time to flash to indicate
power was lost. The clock remains this way until power is restored and the time is set again.
Note: Non-US models use a 24-hour clock format.
8. ALARM: This button is used in conjunction with the Time Set and Tuning buttons. For more,
see the section marked “Using the Alarm”.
9. IR SENSOR: Receives commands from the remote control. Do not block this sensor.
10. HEADPHONE OUT (Upper Left Side): Connect a headset (not included) to this variable stereo
output for private listening. The headset will mute the primary speaker(s). The headset’s
volume is adjusted using the volume knob. This stereo output accepts a 1/8" stereo male mini
connector. Avoid using headphones at high volume levels to prevent possible hearing
damage. Do not wear headphones while driving.
6
English
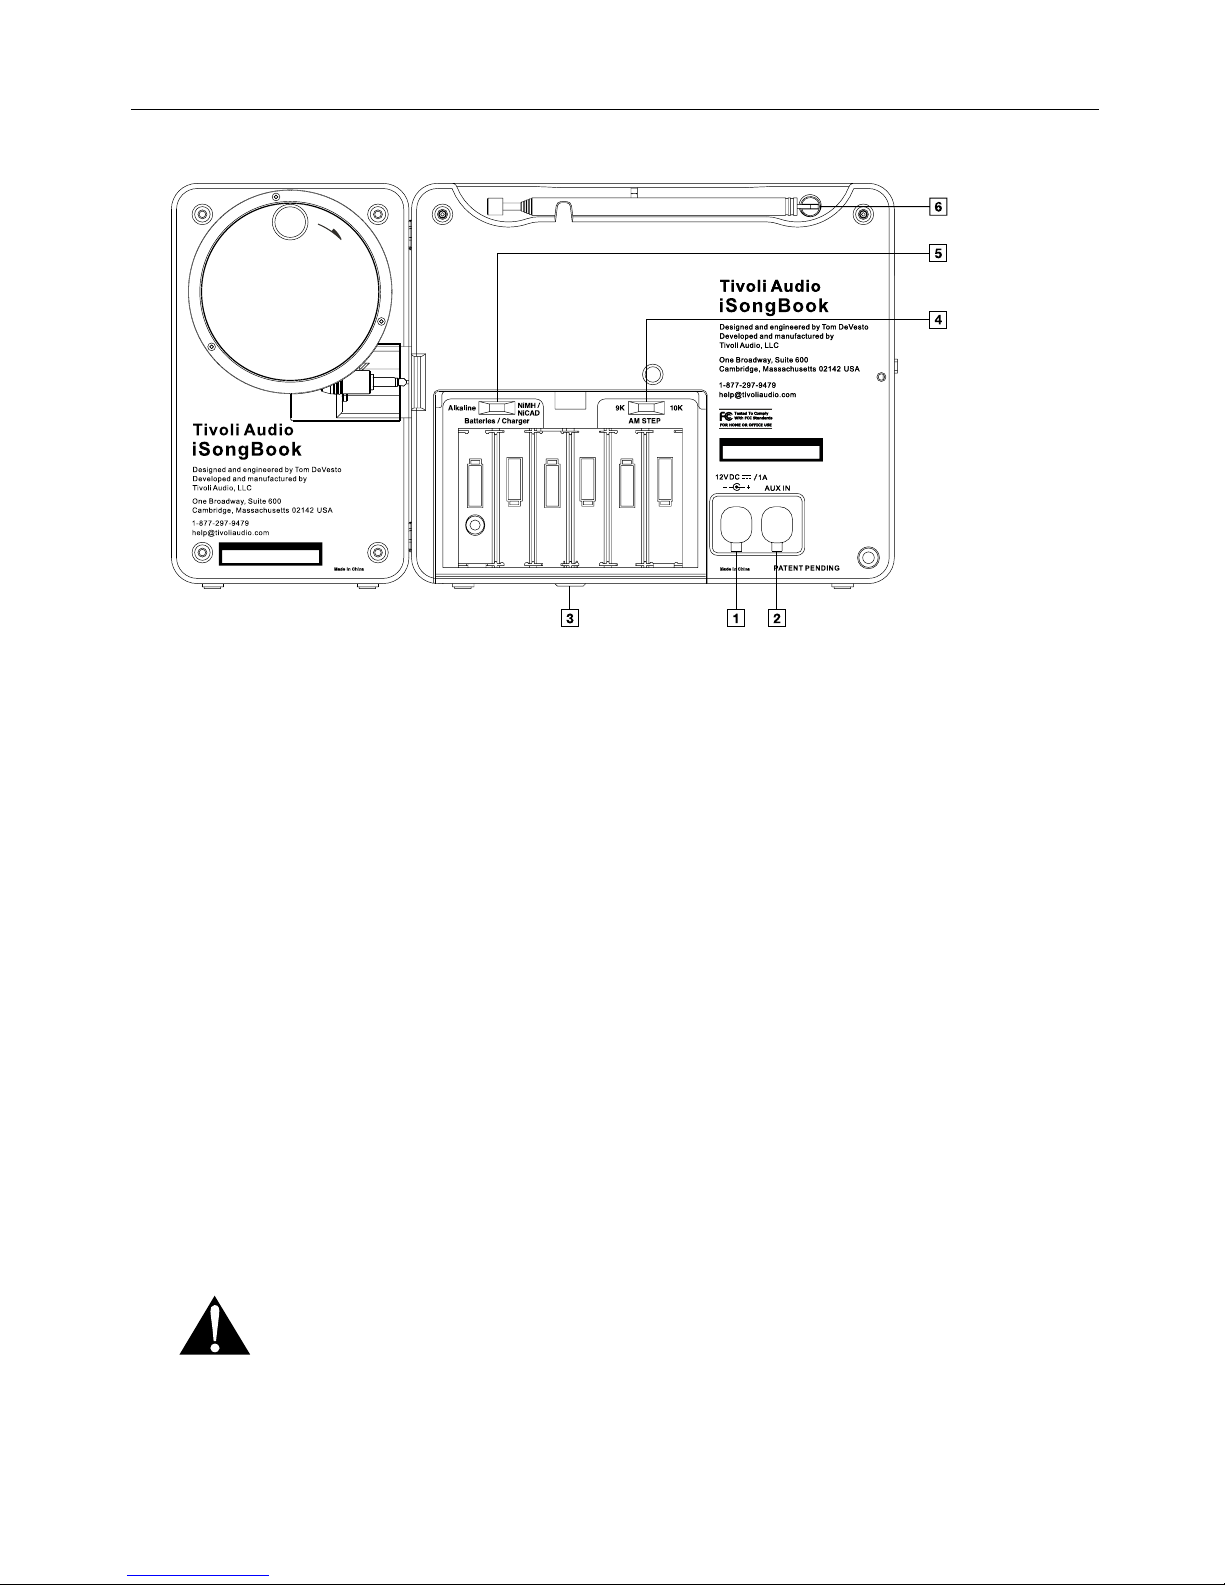
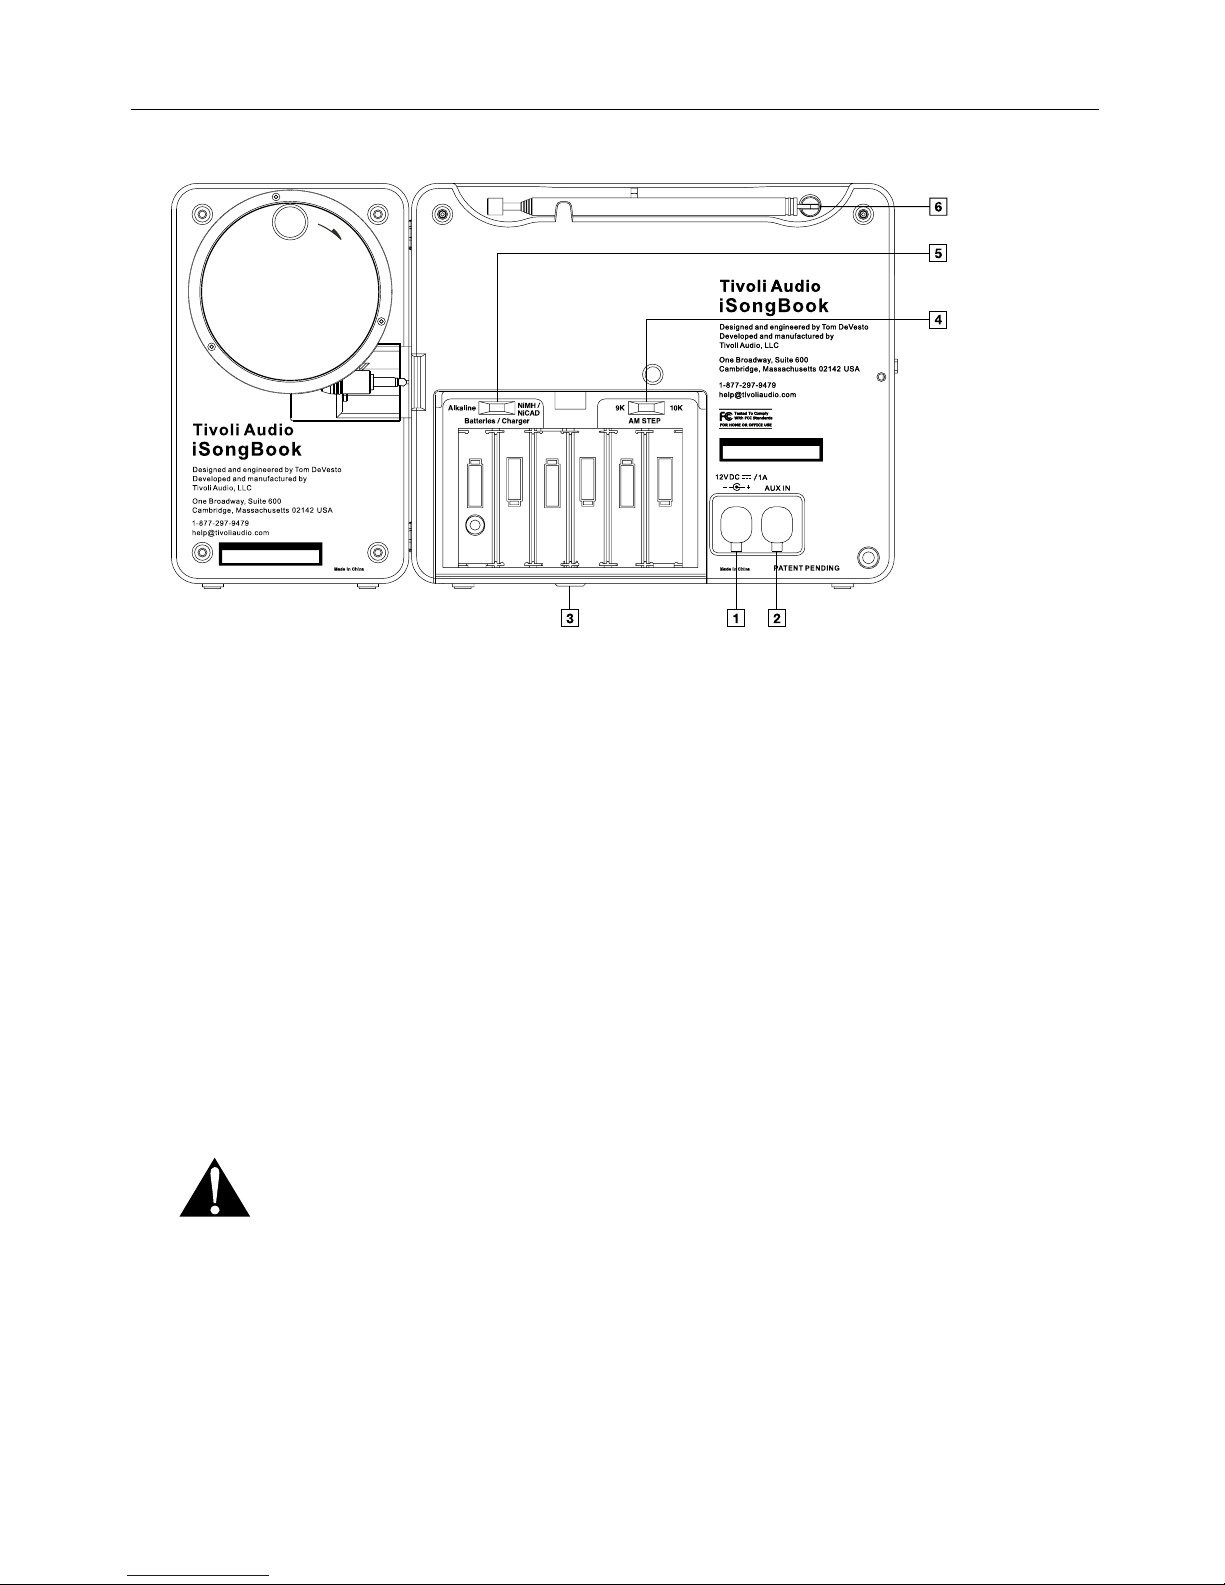
Guide to Features (Rear Panel)
1. 12VDC/1A: Connect the included external power supply to this input, or use an optional 2A
fused, 12VDC adaptor for operation in a boat or camper. The connector must be 5.5mm/
2.1mm center positive. When disconnecting the power supply from the wall outlet, never
pull it by the cord. Do not plug the iSongBook into a wall outlet controlled by a switch. It is
normal for the power supply to become warm during use. The included power supply is
designed for the country/voltage in which the iSongBook was purchased and should
be used accordingly. Use only the external power supply provided with the iSongBook.
To obtain a replacement contact your authorized dealer/distributor or Tivoli Audio USA
at 1-877-297-9479.
2. AUX IN: To hear audio from another device, such as a CD player, TV, or computer, connect
said device’s audio output to this stereo input and switch the front source knob to iPod/Aux.
Switching to the Aux position does not turn on the connected device. If an iPod is docked, it
must be removed from the docking station in order to hear a connected auxiliary device.
This stereo input accepts a 1/8" stereo male mini connector. Note you may need to adjust
the volume level differently for an auxiliary device than the level used for radio listening.
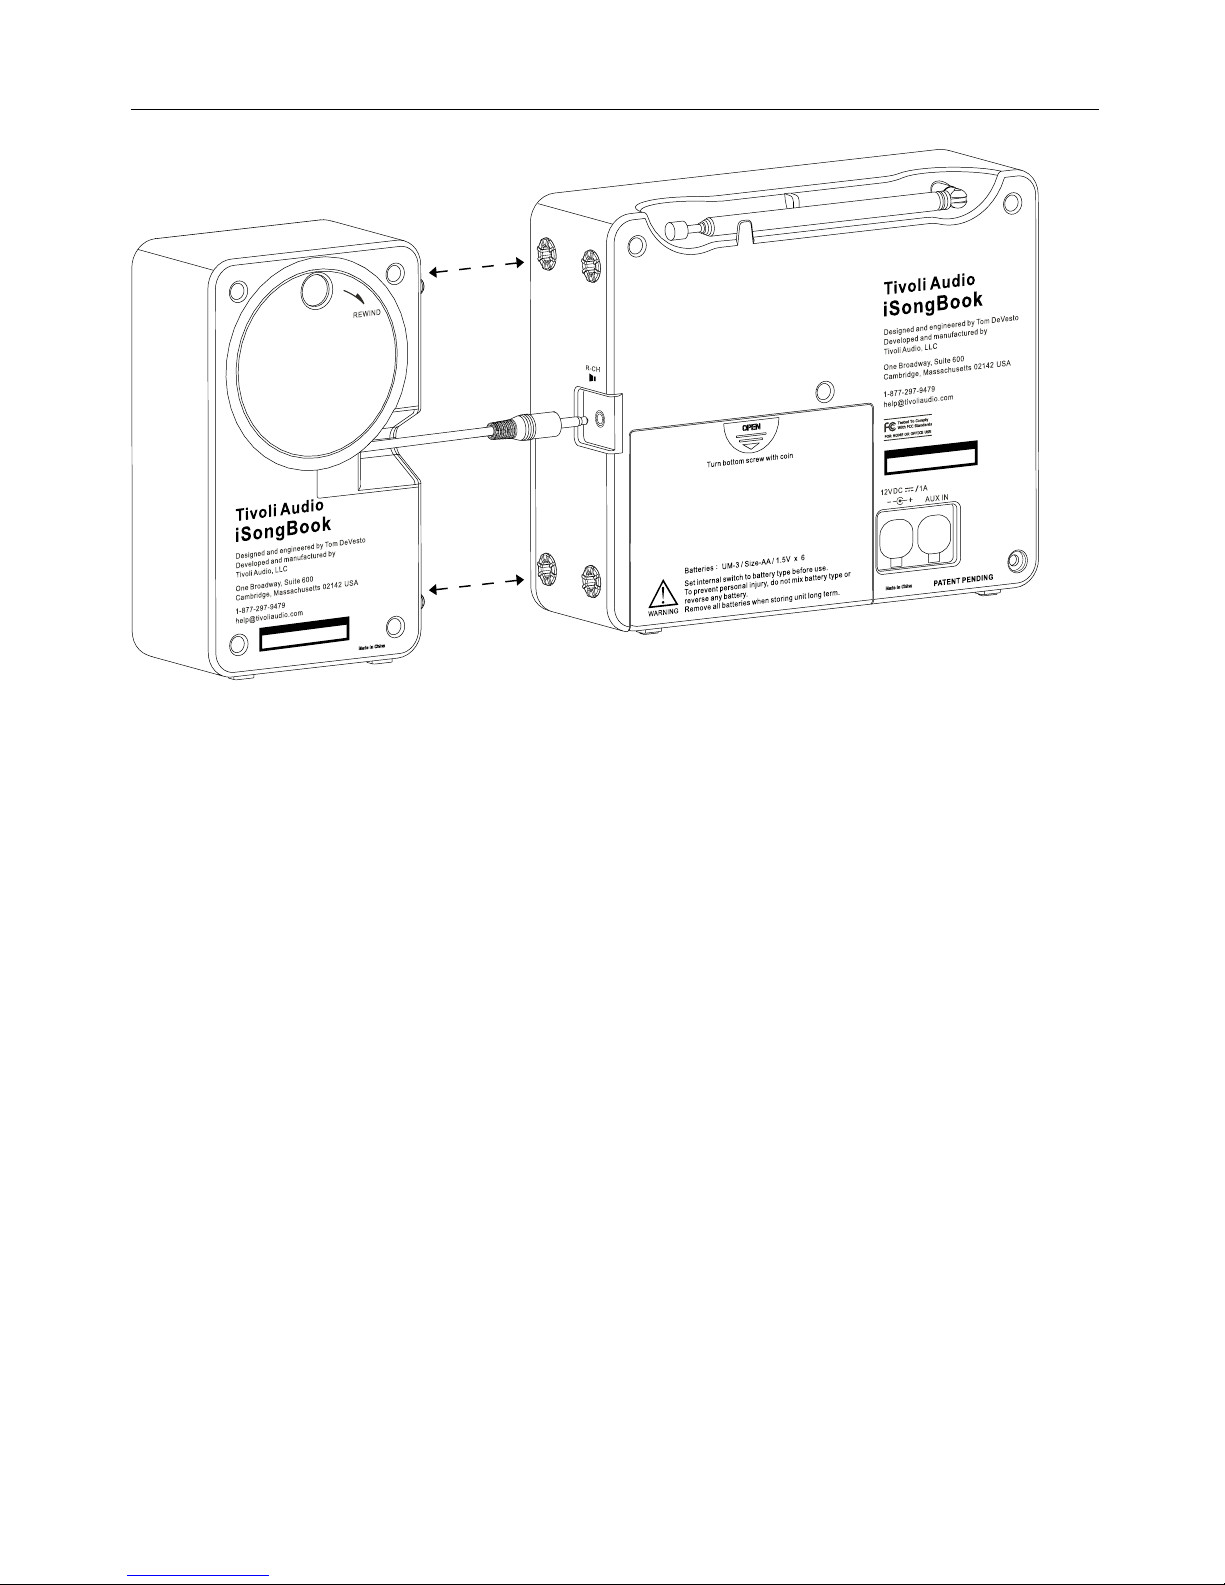
3. BATTERY COVER: Loosen the bottom screw with a coin until the battery cover is released.
The screw will not come off the cover completely. Slide the cover down and lift it up to access
the battery compartment. Note the cover is on hinges and cannot be removed completely.
4. AM STEP SWITCH (Inside Battery Compartment): Select 10k for AM reception in the USA
or 9k for use outside North and South America.
5. BATTERIES/CHARGER SWITCH (Inside Battery Compartment): Set to “Alkaline”
if using standard “AA” alkaline batteries, or set to NiMH for Nickel Metal Hydride, or
NiCAD if using Nickel Cadmium batteries. Batteries are not included. Do not set the switch
to NiMH/NiCAD if using Alkaline batteries, as the charger will try to charge the alkaline
batteries when the external power supply is connected which could damage the iSongBook.
Such damage is not covered by the factory warranty.

7
English
6. FM ANTENNA: For FM, extend and rotate the telescoping antenna for best FM reception. In
strong FM signal locations, reducing the antenna’s length usually provides better reception.
Keep the antenna retracted in its locked position when not being used to avoid damage. For
AM, rotate the iSongBook for best AM reception.
iPod Dock (Left Side)
Flip the dock down and install the dock adapter by aligning the 2 tabs with the 2 recesses in the
dock and push down until the plate snaps in place.
Be sure there is a firm, level, and stable support for the docking station whenever it is
being used. Improper support could result in damage to the hinge or the dock itself. To
avoid damage to the docking station or an iPod, we suggest the dock remain in its closed position
when the iSongBook is being transported.
Be sure the iPod is fully seated within the iSongBook’s docking well, as incomplete connection
may result in intermittent sound/operation. The iPod's controls will continue to operate while
docked in the iSongBook.
To remove the dock adapter, insert your fingernail in the horizontal slot and pull up until the cup
releases.
Secondary Speaker (Right Side)
Grasp the tip of the male mini connector on the end of the secondary speaker’s audio cable and
using only as much force as is required, pull it straight out to the desired length (up to six feet).
Insert the 1/8" male mini connector into the main unit’s right side female mini output labeled “R-CH”.
The secondary speaker mates securely with the main unit by pushing the 4 connecting pins into
the four rubber grommets on the right side of the iSongBook.
Any iPod model with dock connector will fit the iSongBook’s
Universal Dock through the use of inserts called “Dock
Adapters”. Match your iPod model to the chart to determine
which Dock Adapter is right for your iPod. Each Dock
Adapter is numbered according to the chart.
Adapter
Cup iPod Model Capacity
1 3rd Gen. iPod (thin) 10, 15, 20 GB
2 3rd Gen. iPod (fat) 30, 40 GB
3 iPod Mini 4, 6 GB
4 4th Gen. iPod (thin) 20 GB
5 4th Gen. iPod (fat) 40 GB
6 iPod w/Color Display (thin) 20, 30 GB
7 iPod w/Color Display (fat) 40, 60 GB

8
English
When the secondary speaker’s mini cable is connected to the main unit, the main unit automatically
acts as the left channel while the secondary speaker becomes the right channel. To detach the
secondary speaker, get a firm grasp and pull until all 4 pins are released from the grommets.
When the secondary speaker’s mini cable is disconnected from the main unit, the main unit
automatically becomes mono.
To draw the cable back inside the cabinet, place your finger in the finger recess of the rewind wheel
and rotate clockwise in the direction of the arrow. Stop rotating the wheel once the connector
comes to its resting position, as over-tightening could damage the mechanism or cause the
cable to bind.
For best stereo separation and imaging, place the secondary speaker as far apart from the main
unit as possible. A red band around the cable indicates you have reached the end of the cable
(slightly over 6 feet) and should not extract it any further*.
Using a secondary speaker other than the one provided will void your warranty and possible
damage the iSongBook. Conversely, do not use the secondary speaker with anything other
than the iSongBook.
*Do not splice the audio cable attached to the secondary speaker. If you require a longer cable,
please consult your local electronics supplier for an extension.
Although the secondary speaker secures tightly to the main unit, never pick up
the iSongBook by the secondary speaker only, as it could detach under such
force. Always grasp the main unit when transporting by hand

9
English
Remote Control
(Remove the clear protective plastic from battery compartment)
Functions 2-5 control an iPod only.
1. Off: Shuts a docked iPod Off and places the iSongBook into Standby.
2. Album Prev./Next: Advance to the next album or go back.
3. Playlist Prev./Next: Advance to the next Playlist or go back.
4. Play/Pause: Press once to play the song highlighted on the iPod, press again to pause play
back. Press and hold to power the iPod Off or On when docked with the iSongBook On and
in iPod mode. There is a slight delay before the iPod powers Off.
5. : Press to advance or go back a track. Press and hold to fast forward or fast reverse
through a track.
6. Light: Press to activate the iSongBook’s backlight for 30 seconds. Pressing a second time will
turn the iSongBook's backlight off but the iPod's backlight will remain on for the remainder of
the 30 seconds.
7. Presets: Press to cycle through each favorite station preset when the iSongBook is set to
FM or AM. This button cannot be used to memorize stations into the preset memory.
8. Tuning ˆ/ˇ:Press the Up arrow or the Down arrow to increase or decrease the FM or AM
frequencies.
9. Volume +/-: Press to increase or decrease the volume level.
Figure 5
10. Mute: Press to mute the output. The iSongBook’s LCD will flash “00” until audio is restored
by pressing mute again or adjusting the volume. (Figure 5)
Certain remote functions may not be
compatible with older iPod software.
To update your software, log on to
www.apple.com/ipod/download/

10
English
The remote will only operate an iPod when it is docked in the iSongBook. When it comes time to
replace the remote’s battery, use only a major brand name 3V Lithium battery with model number
compatible with CR2025. Slide the battery cover off and install the new battery with the positive
“+” side facing up.
Note: The remote control functions are not affected by the “hold” switch on an iPod.
Using the Alarm
Figure 6 Figure 7 Figure 8
1. To set the Alarm time: Press the Alarm button briefly. The word “Alarm” will flash on the display.
(Figure 6) Press and hold the Time Set Button to set the Alarm time. A beep will be heard to
confirm you have entered the Alarm Time Set mode. The hour will blink. (Figure 7) Press the
Tune Up/Down buttons briefly to change each hour or press and hold to rapidly change the hours.
“PM” will appear for afternoon/evening hours but there is no “AM” designation for morning
hours. Now press the Time Set button to adjust the minutes using the Tune Up/Down buttons.
(Figure 8) The minutes will not affect the hour setting. Press the Time Set button again to save
the settings.
Note: Non U.S. models use a 24 hour clock format.
Figure 9 Figure 10
2. To set the Alarm to wake: Set the iSongBook to the FM or AM station you wish to wake to and
that will be broadcasting during the time you wish to wake (or set to Off or Aux (without an iPod
docked) to wake to an increasing beep) and adjust the volume level accordingly. The beep
volume level is not adjustable. Press and hold the Alarm button. A beep will be heard confirming
the Alarm is set to wake and the word “Alarm” will show on the display. The iSongBook will go
into Standby mode and the display will show “Standby”. (Figure 9) When the alarm activates
the LCD will also light up and the word “Alarm” will flash. (Figure 10) Should you opt to wake
to the beep, the beep will sound for 60 seconds, then pause for 60 seconds, then resume for
another 60 seconds. This pattern will repeat for up to one hour or until the Alarm button is
pressed. When waking to the radio or iPod, if the unit is not turned off, the sound will play for
one hour, after which the iSongBook will automatically go into Standby mode to preserve power.
To wake to your iPod, follow the steps above but set the source knob to iPod/Aux and have an
iPod resting in the docking station.

11
English
Summary of Alarm Options:
Source Knob Position: OFF FM AM iPod/Aux
Alarm Action: Beep FM AM iPod (if docked)/Beep
After the alarm has been set and the iSongBook is On, press the Alarm button briefly any time
to verify the alarm set time. If the Alarm has been set and the iSongBook is in the Off position,
the alarm wake time will be shown in the upper right hand corner.
3. To Re-set the Alarm for the next day: After the alarm activates, press the Alarm button to
re-set the alarm for the following day. The word “Alarm” will appear and the unit will go into
Standby. Changing the source knob to another position will cancel Standby mode.
Charging
The iSongBook’s internal charger will “fast” charge the six NiMH or NiCAD batteries if the adapter
is connected, the Batteries/Charger switch is correctly set, and the iSongBook is switched Off.
Otherwise, the batteries receive a slow “trickle” charge. All six NiMH/NiCAD batteries must be
correctly installed for charging to take place. While charging, the LCD will show the battery icon
with the signal bars cycling. This will disappear from the display once the batteries have fully
charged. It is normal for the rear panel to become warm while the batteries are charging. A docked
iPod will also receive a full charge except when the iSongBook is tuned to AM. This is intentional
since the internal charger reduces AM reception. See the quick reference chart below for
charging status:
Source Knob Position: OFF FM AM iPod/Aux
iSongBook Charge: Fast Trickle Trickle Trickle
Docked iPod Charge: Fast Fast None Fast
The iSongBook operates strictly from battery power alone when the AC adapter is not connected
and all six batteries are correctly installed.
The iSongBook operates solely from the external power adapter whenever it is connected.
The iSongBook may be used with the AC adapter exclusively without batteries installed.
The LCD will show battery strength whenever the iSongBook is on and batteries are installed.
The battery strength meter is approximate. Three bars represent full strength, two bars represent
roughly 50% strength, and one bar represents about 25% remaining strength. The signal strength
meter will not be shown when there are no batteries installed and the iSongBook is operating
from the power supply.

12
English
Figure 11
An “E” (“Empty”) on the LCD represents batteries which are just about depleted and should be
replaced if Alkaline, or charged if NiMH/NiCAD, within approximately 10 minutes or the display will
go blank and all memory settings will be lost. (Figure 11) If the display shows “E” and alkaline
batteries are replaced while the iSongBook is On, the “E” will reappear on the LCD after the batteries
are replaced until the unit is switched Off and then turned back On to reset the microprocessor.
Batteries should be replaced with the iSongBook Off.
Other Important Battery Notes:
-Rechargeable batteries that are brand new, or have not been used in a long time, require
conditioning (5–6 full charge/discharge cycles) before lengthy playback time is realized.
Higher mA valves will yield longer playback time but will also require a longer charge time.
- Remove all of the batteries if the iSongBook is not to be used for an extended period of time.
- Dispose of spent batteries according to your state/country’s regulations.
- Do NOT mix battery types or different battery strengths.
- Change batteries while the iSongBook is OFF.
- The battery orientation should match the illustration in the battery compartment.
Reception
Buildings made with concrete, steel, or aluminum siding will hinder reception. Household appliances,
electric blankets, computers, CD players, microwave ovens, and other electronic devices can also
adversely affect reception or inject noise. If you experience this, move the iSongBook further from
the offending device or plug it into an electrical outlet not shared by another device. Metal surfaces
may hinder AM reception. For more reception advice, please refer to “FM Antenna” under the
“Guide to Features (Rear Panel)”.
Placement
Place the unit on a flat, stable surface. The iSongBook is shielded and may be used in close
proximity to a computer monitor or television set.
Note: For your own safety and to protect the iSongBook from accidental damage, route all audio
and power cables where they will not be tripped over.
Cleaning
Never use any harsh cleansers or solvents on your iSongBook. The iSongBook is designed to be
portable and weather-resistant, but it is not indestructible or weather proof. Also note the LCD
can be affected by hot and cold temperatures.

13
English
Warranty
Tivoli Audio manufactures its products to very high standards and we are confident our products
will perform well. Accordingly, we warranty this product against manufacturing defects in material
and workmanship to the original owner, for a period of one year from the original date of purchase.
This warranty is non-transferable. This warranty does not extend to any iPod model used with
this device.
This warranty does not extend to damage caused by improper use/installation, using the charger
to charge alkaline batteries, faulty ancillary equipment, modifications, unauthorized repair, shipping
damage or loss, abuse, accidents, use on improper voltage/current, power surges, lightning or
other acts of God, normal wear and tear, or commercial use. Please consult the dealer from
which you purchased this product for warranty service or repair. Proof of purchase
may be required.
Please resist the temptation to take apart this product. There are no user serviceable parts inside,
and any attempt at modifying or repairing your unit will void the warranty.
Tivoli Audio will not pay for costs incurred due to correction of reception problems, elimination of
externally generated static/noise, loss of time, inconvenience, loss of use of product, or damage
caused by improper use of this product.
This warranty gives you specific legal rights, and you may also have other rights which vary
from state to state. Some states do not allow limitations on implied warranties or the exclusion
of consequential damages, therefore, such restrictions may not apply to you.
If you purchased an extended service contract from your dealer and service is required after the
manufacturer’s warranty has expired, please contact your dealer to obtain service.
For your convenience, you may register your product for warranty coverage on the web at
www.tivoliaudio.com.
Please visit Tivoli Audio’s FAQ section before calling or e-mailing with questions:
www.tivoliaudio.com

14
English
Specifications
Model: Tivoli Audio iSongBook™
Type: FM/AM Digital Portable Stereo Radio with iPod Dock
Drivers: 2 x 2.5" (2 x 6.35 cm) full-range
Receiving Bands: FM: 87.5–108 MHz
AM: 520–1710kHz (522–1629kHz using 9k Step)
De–Emphasis: 75uSec UL/50uSec CE
Dimensions: 11" W x 6.19" H x 2.19" D
27.94 cm W x 15.72 cm H x 5.56 cm D
Weight: 2.81 lbs. (1.28 kg)
Specifications subject to change without notice.
Tivoli Audio reserves the right to make product changes without notice.
Tivoli Audio, the Tivoli Audio logo and the iSongBook are trademarks of Tivoli Audio, LLC.
iPod is a trademark of Apple Computer, Inc., registered in the U.S. and other countries.
Patent Pending
This manual was written by Peter Skiera and is the property of Tivoli Audio. Tivoli Audio
shall not be held liable for operational, technical, or editorial errors/omissions.
For more information about other exciting audio products by Tivoli Audio, please visit our
website or contact us directly:
Tivoli Audio, LLC.
One Broadway, Suite 600
Cambridge, MA 02142 USA
Tel: 877-297-9479
www.tivoliaudio.com

15
Om Tivoli Audio
Tivoli Audio er stiftet af Tom DeVesto med det formål at tilbyde forbrugerne brugervenlige
audioprodukter af høj kvalitet til rimelige priser. I sit langvarige faglige samarbejde med Henry
Kloss var han bl.a. medstifter af Cambridge SoundWorks*. Som CEO og leder af forskning
og udvikling i sit tidligere selskab havde Tom ansvaret for udviklingen af mange af de mest
populære home entertainment- og multimedie-produkter på markedet. Han har også været
medlem af den øverste ledelse inden for produktudvikling hos både Advent og Kloss Video.
*Cambridge SoundWorks er et registreret varemærke tilhørende Creative Labs, Singapore.
iSongBook Brugsanvisning
Til lykke med din iSongBook bærbare FM/AM-radio fra Tivoli Audio med indbygget iPod dock.
Vi mener, at iSongBook er et af de bedste “Made for iPod” stereo audiosystemer på markedet i
dag. For at få det fulde udbytte af din nye radio beder vi dig tage dig tid til at læse denne bruger-
manual og sikkerhedsanvisningerne. Hvis du har spørgsmål, er du meget velkommen til at
kontakte din forhandler eller Tivoli Audio.
Gem venligst æsken og den originale emballage, hvis du skulle få behov for at sende
radioen, idet transportskader ikke er dækket af fabriksgarantien.
På alles vegne takker vi dig, fordi du har valgt Tivoli Audio, og vi ønsker dig god fornøjelse med
din nye iSongBook!
Sammen med din iSongBook bør du have modtaget:
• 1 Ekstern Strømforsyning
• 1 Fjernbetjening (batteri monteret)
• 7 iPod Dockadaptere (se afsnittet “iPod Dock” på side 19)
Kontakt venligst din forhandler/distributør eller Tivoli Audio, hvis en eller flere af ovennævnte
genstande mangler.
Komme I Gang
1. Kobl pluggen fra høyttalerenheten til inngangen merket ”R CH” på siden av hovedenheten.
Plasser iSongBook’en og høyttalerenheten i ønsket posisjon.
2. LHa On/Off knappen i Off posisjon. Kobl den eksterne strømforsyningen til inngangen på
baksiden merket med 12DVC/1A.
3. Slå ned dockstasjonen til iPod. Sett i den riktige adapter holderen i henhold til hvilken iPod
modell du har. iPod’en installeres ved å koble dockenheten til jackpluggen på undersiden
av iPod’en.
4. Slå ned dockstasjonen til iPod. Sett i den riktige adapter holderen i henhold til hvilken iPod
modell du har. iPod’en installeres ved å koble dockenheten til jackpluggen på undersiden
av iPod’en.
Merk: lave bassfrekvenser sliter på høyttalere og forsterkere. iSongBook er utviklet
for å gjengi flest mulige lave lydfrekvenser i forhold til dens egen størrelse og styrke.
Vianbefaler derfor at iPod’ens EQ er avslått for størst mulig lytterglede.
Danish
16
Danish
Funksjoner Front
1. VOLUM: Skru volumknappen til høyre for å øke volumet. Til venstre for å senke lyden. Denne
knappen kontrollerer også lyden ved tilkobling av hodetelefoner. Volumstyrke måles fra 0 til
30 og vises kortvarig hver gang volumet endres.
Figure 1
2. OFF/FM/AM/iPod/AUX KNAP: Vri knappen en gang til høyre for å lytte til FM, to ganger
til høyre for AM og tre ganger til høyre for iPod/Aux. Displayet viser henholdsvis kanal ved
radiolytting, iPod symbol ved tilkobling av iPod (Fig.1).
3. SØKEKNAPPER ˆ/ˇ: Trykk enten opp eller ned knapper i henhold til hvilken kanal du søker.
Hold knappene inne for raskt søk. For automatisk søk; hold knappen inne i noen sekunder.
Når søkeren har fått inn et FM stereosignal, vises et par hodetelefoner samt ”ST” i displayet.
Søkeknappene brukes forøvrig også til å stille alarmen.
4. #1-5: Når iSongBook er på FM eller AM frekvens, kan i alt fem stasjoner på hver frekvens
lagres ved å holde lagre knappene inne et øyeblikk. Lagrings nummeret vises i displayet og
en signallyd bekrefter lagring av kanalen.
5. LIGHT: Trykk forsiktig på denne knappen for å aktivere bakgrunnsbelysningen på iSongBook.
Lyset vil slås av automatisk etter 30 sek. for strømbesparelse – eller trykk igjen for å slå av
lyset manuelt. Lyset vil vare så lenge knappen holdes inne. Bakgrunnslyset kan ikke slås av
manuelt dersom en iPod er dokket til og iSongBook stilt inn på iPod. Lyset vil da komme på
i 30 sekunder.
17
Danish
6. SLEEP: En innsovningsknapp som brukes når iSongBook’en er stilt inn på FM/AM eller
med tilkoblet iPod som spiller. Trykk og hold i 2 sekunder for å få 20 minutter lyttetid. Et
symbol med et sovende menneske i en seng vil vises. Tallet 20 samt en lyd vil oppstå et
øyeblikk. Etter 20 minutter vil iSongBook’en slutte å spille, ”Standby” vil vises i displayet.
Du kan nå velge mellom enten nye 20 minutter ved å trykke på Sleep knappen, bytte til en
annen kilde eller skru av iSongBook. For å avbryte Sleep funksjonen; trykk og hold knappen
inne. Symbolet med mennesket i sengen vil forsvinne og et bekreftende lydsignal vil høres.
Sleep funksjonen virker ikke når enheten er slått av.
For å bruke Sleep funksjonen i forbindelse med Alarm funksjonen, må vekketidspunktet først
stilles (se ”Bruk av alarm”). Deretter vises Standby symbolet og Sleep knappen kan trykkes.
Etter 20 minutter vil enheten igjen vise Standby – denne gang med tidspunktet for vekking.
Figure 2 Figure 3 Figure 4
7. TIME SET: Trykk og hold for å stille inn klokken. Et signal vil høres for å indikere at du har
kommet inn i innstillingsfunksjonen (Fig.2) Timen vil blinke først. Trykk på Tune Up/Down
knappene for å endre tid.Trykk Time Set knappen igjen for å justere minutter ved igjen å
trykke på Tune Up/Down knappene (Fig.3). Trykk på Time Set knappen en tredje gang for å
lagre innstillingene. Dersom batteriene ikke virker og enheten kobles ifra ekstern strømtilførsel,
vil tallene blinke helt til strøm –eller batteritilfø
9. IR SENSOR: Mottar signaler fra fjernkontrollen. Ikke blokk sensoren.
10. HODETELEFONER UT(øverste venstre side): iSongBook har stereoutgang for hodetelefoner
(er ikke inkludert).Når disse er tilkoblet, vil lyden fra radioens høyttaler(e) bli slått av.
18
Danish
Funksjoner Bak
1. 12VDC/1A: Bruk denne utgangen for å koble til strømforsyning, evnt. en 12V adapter for
bruk i båt, bil etc. Model DAB må ikke plugges inn i en stikkontakt med bryter. Benytt kun
strømtilførselskabelen som medfølger. Kontakt din forhandler dersom denne kabelen må
byttes ut. Den medfølgende strømforsyning er beregnet til det land/den spænding,
hvor iSongBook er købt og skal anvendes i henhold hertil. Brug kun den eksterne
strømforsyning, der følger med iSongBook. For at få en ny bedes du kontakte din
autoriserede forhandler/distributør eller Tivoli Audio USA på 1-877-297-9479.
2. AUX-INNGANG: Formidler stereolyd fra andre kilder som CD spiller, TV eller datamaskin.
Sett iPod/Aux-knappen i front i posisjon og skru på den tilkoblede enheten. iPod må kobles
fra docking stasjonen dersom man skal lytte på en annen ekstern lydkilde. Volumet kan
variere noe fra vanlig radiolytting.
3. BATTERI DEKSEL: Bruk en mynt for å løsne dekselet. Hverken skruen eller dekselet kan
fjernes helt. Skyv dekselet ned og løft for tilgang til batteriene.
4. AM TRINKONTAKT (i batterirummet): Vælg 10k for AM-modtagelse i USA eller 9k ved
brug uden for Nord- og Sydamerika.
5. BATTERI/LADER KNAPP (på innsiden av batterienheten): Skal stå på ”Alkaline”
ved bruk av standard ”AA” alkaline batterier. NiMH for Nickel Metal Hydride eller
NiCAD ved bruk av Nickel Cadmium batterier. Feil innstilling kan ødelegge enheten og
dekkes ikke av garantien.
6. FM ANTENNE: Teleskopantennen benyttes til FM-mottak. Vriantennen i riktig posisjon. Ved
gode mottakerforhold, vil vanligvis kortere lengde på antennen gi optimale forhold. Beskytt
antennen når radioen ikke er i bruk ved å legge den sammen. Antennen har ingen innvirkning
på AM-frekvensen. Snu da hele enheten for bedre mottak.

19
Danish
iPod Dock (Venstre Side)
Vip docken ned og monter dockadapteren ved at justere de 2 tapper ind efter de 2 fordybninger
i docken og skub ned, til pladen klikker på plads.
Kontroller, at der er et fast, plant og stabilt underlag til din docking station, når den
anvendes. Forkert underlag kan medføre skader på hængslet eller selve docken. For
at undgå skader på din docking station eller en iPod anbefaler vi, at docken forbliver lukket,
når du bærer rundt på din iSongBook.
Sørg for, at din iPod er anbragt helt i iSongBook’s docking well, idet ufuldstændig forbindelse
kan medføre afbrydelser i lyden/driften. iPod’ens betjeningsknapper kan fortsat anvendes,
medens den er anbragt i din iSongBook.
Dockadapteren tages af ved at sætte en fingernegl ind i den horisontale åbning og trække
opad, til den går løs.
Alle iPod modeller med dockingmulighet passer til
iSongBook’s universale dockstasjon ved hjelp av
forskjellige adaptere. Her finner du ut hvilken adapter
som passer til din modell.
Adapter
Holder iPod Modell Kapasitet
1 3.gen iPod (tynn) 10, 15, 20 GB
2 3rd Gen. iPod (tykk) 30, 40 GB
3 iPod Mini 4, 6 GB
4 4.gen iPod (tynn) 20 GB
5 4.gen iPod (tykk) 40 GB
6 iPod m/ farge display (tynn) 20, 30 GB
7 iPod m/ farge display (tykk) 40, 60 GB
20
Ta tak i pluggen på ekstra høyttalerens audiokabel og trekk forsiktig ut til ønsket lengde (ca.1.80m
totalt) og kobl til utgangen merket ”R-CH”. Ekstra høyttaleren festes sikkert til hovedenheten ved
å stikke de fire kontaktpluggene inn i gummringene på høyresiden av iSongBook. Når ekstra
høyttaleren er tilkoblet fungerer hovedenheten automatisk som en venstre kanal og høyttaleren
som en høyre kanal. Ekstra høyttaleren løsnes enkelt fra hovedenheten ved å dra den rett ut fra
gummiringene. Når kabelen mellom de to enhetene ikke er koblet, spiller iSongBook i mono.
Kabelen trekkes inn i ekstra høyttaleren ved å vri på hjulet i retning med pilen. For optimal
stereolyd, trekkes kabelen så langt som mulig mellom de to enhetene. En rød ring indikerer at
kabelen er fullt utstrukket. Ingen av enhetene bør brukes sammen med andre produkter enn
Tivoli Audio.
Danish
Ekstra høyttaler (Høyre Side)
Other manuals for ISONGBOOK
2
Table of contents
Languages:
Other Tivoli Audio Docking Station manuals


