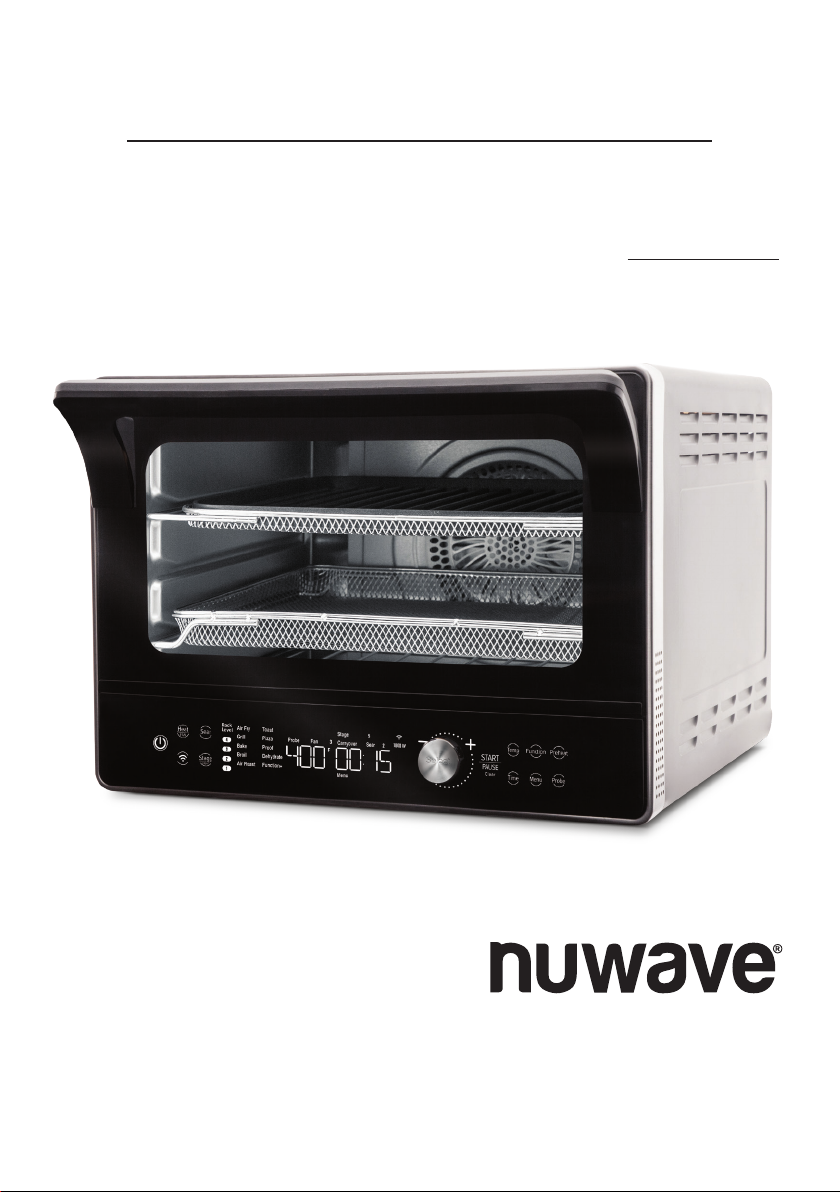
Todd English PRO-SMART 20902 User manual
Engineered by
Questions or Concerns?
Toll Free: 1-877-689-2838 • help@nuwavenow.com
(Mon-Fri 7:30am-4:30pm CST)
Owner’s Manual
Model: 20902 / 20901 / 20906 / 20905
PRO-SMART™OVEN
TODD ENGLISH

2| nuwavenow.com
PRODUCT REGISTRATION
Thank you for purchasing the Todd English Pro-Smart Oven
and welcome to the Todd English Cooking Family!
Congratulations on getting your new Todd
English Pro-Smart Oven! I am incredibly
excited for you and want to make sure you
get the most out of your new oven and
your cooking experience.
That’s what this manual is all about.
In it, we have provided detailed operating
and care instructions covering every as-
pect of your new Todd English Pro-Smart
Oven to make sure it fully meets your
needs.
I’m also thrilled to be working with Nu-
Wave, a company that prides itself on the
relationships it builds with its customers
- a relationship that only begins with the
purchase. So, if you have any questions,
comments, or concerns, please don’t hes-
itate to contact Customer Service. They’ll
take good care of you!
I’m glad you’re with us, and I know that you
will be, too!
Chef Todd English
REGISTER YOUR PURCHASE
1. Visit
nuwavenow.com/QR
2. Scan the QR code using your
mobile device.
3. Fill in the information requested on the
website.
RECORD THIS INFORMATION
Model Number: _________________
Serial Number:__________________
Date of Purchase________________
(Keep receipt)
Store of Purchase _______________
TECHNICAL SPECIFICATIONS
Voltage: 120V, 60Hz
Wattage: 1800 watts
TIP: You can locate the model and serial
numbers, as well as the QR code, on the
label on the back of the unit.
Connect with Us!
#nuwavenow
Visit
nuwavenow.com
to see other
great products and accessories.
WELCOME
REGISTER
NOW!
CUSTOMER SERVICE
Phone: 1-877-689-2838
(Mon-Fri 7:30am - 4:30pm CST)
Email:
help@nuwavenow.com

nuwavenow.com | 3
TABLE OF CONTENTS
Meet Todd English
Todd English began his cooking career
at the young age of 15 when he rst
entered the doors of a professional
kitchen. At 20, he attended the Culinary
Institute of America and graduated in
1982 with honors. He continued to hone
his craft with Jean Jacques Rachou at
New York’s La Cote Basque and then
relocated to Italy where he apprenticed
at the well-established Dal Pescatore
in Canneto sull’Oglio and Paracucchi in
Locanda dell’Angelo.
It was in Italy that Todd, drawing from
his Italian heritage, developed his
unique style and approach to cooking.
English returned to the United States at
25 and was asked to be the Executive
Chef of the award-winning Northern Ital-
ian restaurant Michela’s in Cambridge,
Massachusetts. He served there as an
executive chef for three years, garnering
high praise from both the press and the
public.
In the spring of 1991, English caught
the culinary world’s eye when the
James Beard Foundation named him
their National Rising Star Chef. English
followed through on that promise, as the
James Beard Foundation subsequently
named him Best Chef in the Northeast
in 1994. Nation’s Restaurant News
named English one of their Top 50 Tas-
temakers in 1999. In 2001, English was
awarded Bon Appetit’s Restaurateur of
the Year award and was named one of
People Magazine’s 50 Most Beautiful
People. Todd also has been named to
the James Beard Foundation’s Who’s
Who in Food and Beverage in America.
Safeguards & Information..................... 4-6
Power-Supply Cords................................ 6
Parts & Accessories.............................. 7
Ordering Parts ......................................... 7
Assembly Guide .................................... 8-9
Before First Use....................................... 8
Accessories ............................................. 8
Rack Positions......................................... 9
Connectivity........................................... 10-11
NuWave Connect App ............................. 10
Wi-Fi Activation........................................ 10
Extending Control.................................... 11
Getting Started....................................... 12-17
Key Features ........................................... 12
Control Panel........................................... 12
Helpful Tips.............................................. 13
Primary Controls...................................... 14
Basic Key Functions................................ 15
Using the Accessories ............................. 16
Selectable Cooking Time......................... 16
Quick Start............................................... 17
Adjusting Default Temp & Time ............... 17
Basic Functions..................................... 18-26
Time and Temperature............................. 18
Heat Sources and Fan............................. 18
Cooking Functions................................... 19-21
The Menu Function.................................. 22-23
The Preheat Function.............................. 23-24
The Probe Function................................. 24-25
The Mute Feature.................................... 26
The Clock Feature................................... 26
The Lock Feature .................................... 26
The Wattage Feature............................... 26
Advanced Functions ............................. 27-29
Stage Cooking......................................... 27
The Sear Function................................... 27-28
The Slow Cook Function ......................... 28-29
Care & Maintenance .............................. 30-32
Before First Use....................................... 30
After Each Use ........................................ 30
Storage.................................................... 30
Replacing the Lightbulb........................... 31
Error Messages ....................................... 31
Troubleshooting....................................... 32
Limited Warranty ................................... 33-34
Para la versión en español de este manual, visita www.nuwavenow.com

4| nuwavenow.com
SAFEGUARDS & INFORMATION
READ ALL INSTRUCTIONS and WARNINGS The failure to follow any of the import-
ant safeguards, warnings, or instructions for safe use is a misuse of the Todd English
Pro-Smart Oven that can void your warranty and create the risk of serious injury. When
using the Pro-Smart Oven, only use the appliance as intended and for no other use, and
always follow basic safety precautions.
ALWAYS KEEP THIS MANUAL HANDY FOR FUTURE REFERENCE.
1. Read all instructions.
2. Ensure the Pro-Smart Oven and all parts are clean and dry before each use.
3. Do not touch hot surfaces. The appliance’s surfaces may be hot during and after use.
Use handles.
4. Discard the protective plastic covering the power plug before use.
5. Do not let the electrical cord touch hot surfaces or hang over any edge.
6. Do not immerse cord, plug, or appliance in water or other liquid.
7. Close supervision is necessary when any appliance is used near children. This ap-
pliance is not intended for use by persons with reduced physical, sensory or mental
capabilities, children, or persons with a lack of experience or knowledge, unless super-
vised or instructed in the use of the appliance by one responsible for their safety.
8. Do not operate if the Pro-Smart Oven or cord malfunctions or has been damaged
in any way. Return the unit to the nearest authorized service facility for examination,
repair, or adjustment.
9. Use only on a clean, stable, dry, and level surface.
10. Do not use accessories or attachments not recommended by the
manufacturer.
11. DO NOT USE OUTDOORS. FOR INDOOR USE ONLY.
12. Do not place on or near a hot gas or electric burner, or in a heated oven.
13. Unplug the appliance when not in use and allow the appliance to cool completely
before cleaning or removing/replacing parts.
14. Do not cover or block the intake air vents located in the back and sides of the Pro-
Smart Oven, as doing so can prevent proper ventilation. There should be at least 5
inches of free space behind, to the sides of, and on top of the Pro-Smart Oven.
15. Use aluminum foil to wrap foods that produce oil or juice when operating and attach
the Grill/Griddle or use the Drip/Baking Pan to catch drippings and prevent re.
16. To prevent re, do not allow any foil to touch the heating elements.
17. Do not alter or modify any part of the Pro-Smart Oven or use attachments
or accessories not recommended by the manufacturer.
18. It is normal for some smoke to escape the Pro-Smart Oven when heating for the rst
time.
19. If excess smoke is escaping from the air vent during operation, unplug the Pro-Smart
Oven immediately and contact NuWave Customer Service at 1-877-689-2838 or email
help@nuwavenow.com

nuwavenow.com | 5
SAFEGUARDS & INFORMATION
ALWAYS KEEP THIS MANUAL HANDY FOR FUTURE REFERENCE.
20. During use, steam may be released from the air outlet vents. Keep your hands and
face away from these vents. Be careful of hot steam escaping when opening the Pro-
Smart Oven.
21. Avoid placing your face near the glass door during use.
22. Never touch the insides of the Pro-Smart Oven while it is operating.
23. Use extreme caution when moving an appliance containing hot oil or other hot liquids.
24. Never leave the Pro-Smart Oven unattended during use.
25. Do not disassemble the Pro-Smart Oven.
26. Allow the Pro-Smart Oven to cool before putting in or pulling out items or before clean-
ing.
27. Keep this manual handy for future reference.
28. Always make sure your ngers are clean and dry when pressing the
buttons.
Toaster Oven Warnings (UL Standard 1026, Section 71.7):
1. Oversize foods or metal utensils must not be inserted in a toaster oven as they may
create a re or risk of electric shock.
2. A re may occur if the toaster-oven is covered or touching ammable material, includ-
ing curtains, draperies, walls, and the like, when in operation. Do not store any item
on top of the appliance when in operation.
3. Do not clean with metal scouring pads. Pieces can break o the pad and touch electri-
cal parts creating a risk of electric shock.
4. Extreme caution should be exercised when using containers constructed of materials
other than metal or glass.
5. Do not store any materials, other than the manufacturers recommended accessories,
in this oven when not in use.
6. Do not place any of the following materials in the oven: paper, cardboard, plastic,
cloth, wood, ammable materials, sealed containers, and the like.
7. Do not cover the crumb tray or any part of the oven with metal foil. This will cause
overheating of the oven.
8. Turn o the Pro-Smart Oven by pressing the Power Icon before unplugging the unit
from the wall socket.
Question about your Pro-Smart Oven?
Contact our friendly customer service sta from 7:30am to 4:30pm CST, Monday-Fri-
day at 877-689-2838 or reach us via email anytime at
help@nuwavenow.com
6| nuwavenow.com
SAFEGUARDS & INFORMATION
A short power-supply cord (or detachable power-supply cord) is provided to reduce
the risk of becoming entangled in, or tripping over, a longer cord. Longer detachable pow-
er-supply cords or extension cords are available and may be used if care is
exercised in their use. If a longer detachable power-supply cord or extension cord is used:
1. The marked electrical rating of the extension cord should be at least as great as the
electrical rating of the appliance.
2. The longer cord should be arranged so that it will not drape over any countertop or
tabletop where it could be pulled on or tripped over unintentionally.
3. The Pro-Smart Oven should be operated on a separate electrical outlet from other
operating appliances due to wattage limitations.
4. This appliance is of the 3-pin grounded type, so the cord set or extension cord should
also be a grounding type 3-wire cord.
SAVE THESE INSTRUCTIONS: Read and understand the entire manual before using the
Pro-Smart Oven.
Power-Supply Cords
WARNING
To reduce the risk of electric shock, do not perform any servicing other than
that which is contained in these instructions.
To disconnect the Pro-Smart Oven, turn it o by pressing the Power Icon and
then remove the plug from the wall outlet.
NEVER use the Pro-Smart Oven with loose, damaged, or missing parts.
While cooking, ALWAYS use oven mitts and allow accessories to cool before
washing.
nuwavenow.com | 7
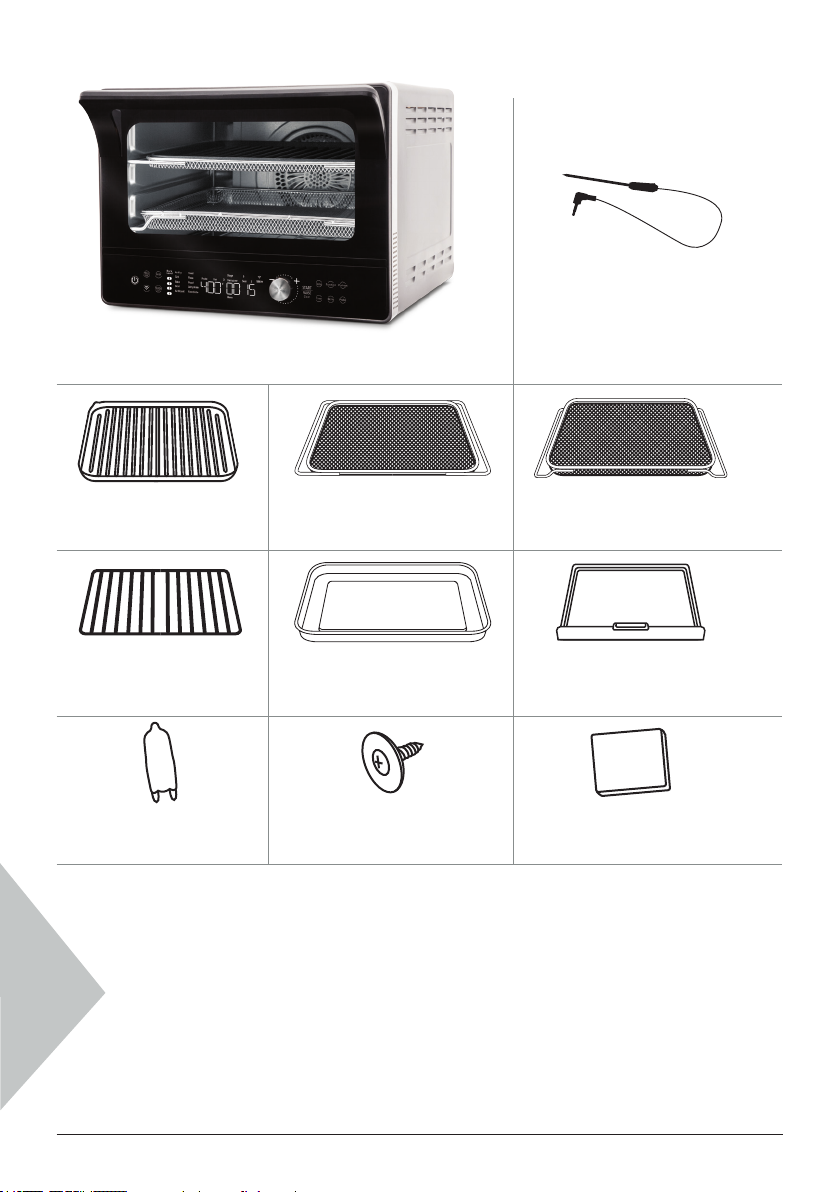
PARTS & ACCESSORIES
Over the lifetime of your Todd English Pro-Smart Oven, you may nd yourself needing
a new part or accessory, and if you do, NuWave has you covered.
Ordering new parts and accessories is quick and easy. Simply take down the name and
number for the part you want, then contact Customer Service. You can do that by:
• Phone at 877-689-2838 (M‒F, 7:30am‒4:30pm CST), or
• Email at
help@nuwavenow.com
You can even order directly online. Just visit
www.nuwavenow.com
ORDERING PARTS
Wire Rack
Part #: BEA6
Grill/Griddle
Part #: BEA3
Air Fry Basket
Part #: BEA5
Crumb Tray
Part #: BEA7
Temperature Probe
Part #: BEP3
Grill/Griddle Rack
Part #: BEA4
Light Bulb
Part #: BEP1
Light Cover Screw
Part #: BEP4
Light Bulb Cover
Part #: BEP2
Baking and Drip Pan
Part #: BEA8
Stainless-Steel Power Base
Part #: BEA2
Black Power Base
Part #: BEA1
8| nuwavenow.com
ASSEMBLY GUIDE
1. Remove and discard any packaging material from the unit.
2. Remove all accessories from their packaging and wash them in warm, soapy water
or in the dishwasher, top rack only, except for the Probe. NEVER submerge the
main unit in water.
While most of the accessories are dishwasher-safe, the Probe is not. Hand washing is,
therefore, highly recommended. Frequent dishwasher cleaning may lead to premature
wear.
Before First Use
Grill/Griddle
For grilling steaks and roasting vegetables.
Flip it to the Griddle side for baking. The
Grill/Griddle must be used with the Grill/
Griddle Rack.
Grill/Griddle Rack
½-inch depth is ideal for dehydrating.
Air Fry Basket
1-inch depth is perfect for making crispy
chicken, fries, and more.
Wire Rack
Can be used to hold cooking or baking
pans, or simply place your food directly on
the rack.
Crumb Tray
Catches crumbs and drippings and must
remain in the unit at all times while cook-
ing.
Baking and Drip Tray
Ideal for baking, roasting, and as a drip
pan when air frying, protecting the bottom
heating elements from dripping oils and
fats.
Temperature Probe
Eliminates the guesswork of cooking.
Consult the temperature guide in the Probe
section for more information.
Accessories

nuwavenow.com | 9
ASSEMBLY GUIDE
Rack Positions
The Todd English Pro-Smart Oven has 4 rack positions, with Position 1 at the bottom and
Position 4 at the top, where most of your accessories can slide into the unit.
When you select a cooking function, the appropriate rack number(s) will illuminate on the
control panel. These numbers coincide with those on the frame of the unit.
Position 4
Position 3
Position 2
Position 1
Position numbers on the control panelPosition numbers on the frame of the unit.
Rack
Level
Air Fry
Grill
Bake
Broil
Air Roast
Toast
Pizza
Proof
Dehydrate
Function+
1
2
3
4
Preheat Ready Stage
Probe Fan Carryover Sear
Rear TopShade Menu Bottom Slice
STAGE
Light

10 | nuwavenow.com
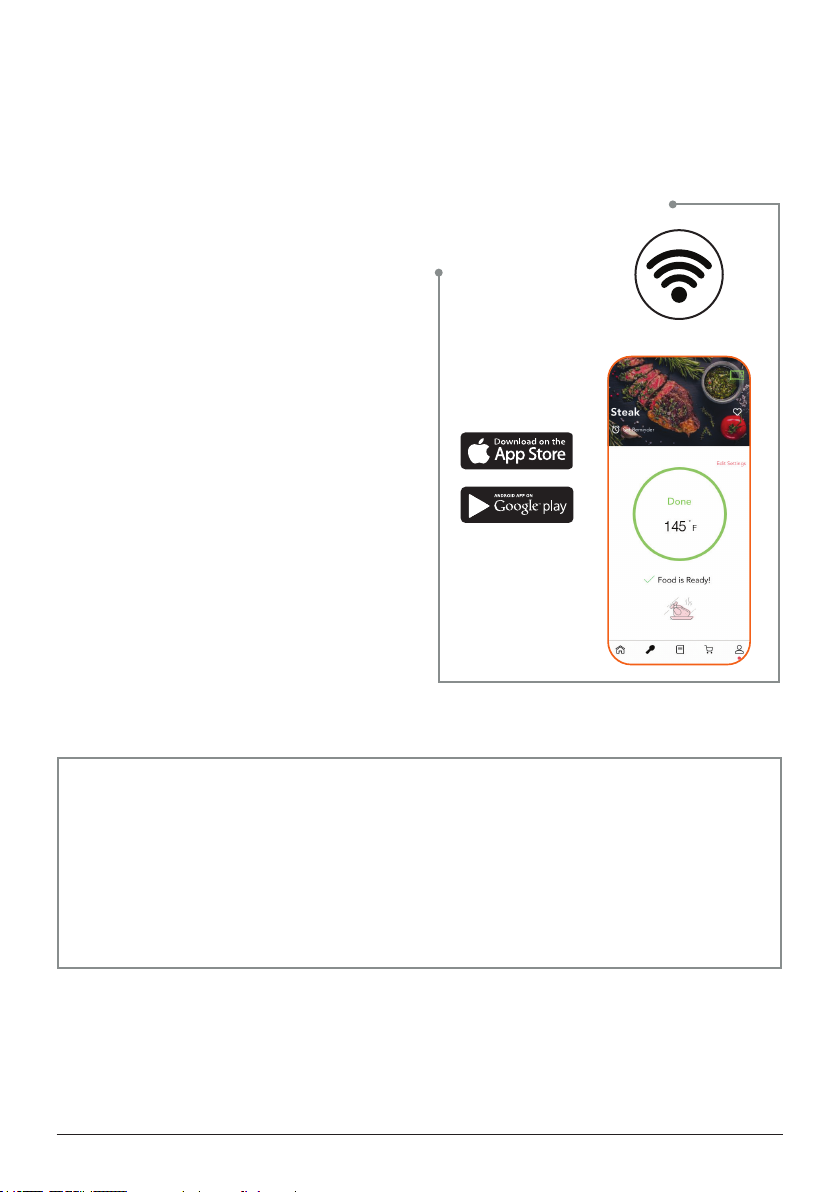
CONNECTIVITY
NuWave Connect App WiFi Activation
With the NuWave Connect App, you can operate your Todd English Pro-Smart Oven with
your Smart Device using your home Wi-Fi network.
Downloading the NuWave Connect App
Using the built-in QR reader in your Cam-
era App:
1. Scan the QR code below. It will take
you to the App’s download page on
either the Google Play Store or the
Apple AppStore.
2. Follow the app download and installa-
tion instructions.
If your phone does not have QR
scanning capability built-in, simply down-
load a third-party QR Scanning App before
scanning the NuWave QR code and you
are ready to go.
1. Open your mobile app store (App
Store, Google Play).
2. Search for “QR code readers.”
3. Simply download the QR code reader
to your phone, open it, scan the code,
and you are ready to go.
Once the NuWave Connect App is down-
loaded and properly installed, make sure
that your smart device is connected to your
home Wi-Fi 2.4GHz network and that the
Pro-Smart Oven is in Standby Mode. Then,
follow these steps:
1. On the Oven, press and hold WIFI for
up to 5 second to activate the built-in
WiFI. will be blinking rapidly.
2. Open the app and follow the in-app
verication instructions.
3. Once the verication is complete,
press the +in the upper right hand
corner, then press the Pro-Smart
Oven icon.
4. Press the WIFI icon until the WIFI
icons is rapidly blinking. Once suc-
cessful, press Done.
5. Enter the WIFI password. touch Next
and the pairing will begin.
If the connection process fails, or the WiFi
is disconnected, the Wi-Fi light will turn o.
Notes
• Sometimes the user may need to
hold the WiFi button again to return to
Wi-Fi pairing mode even if there was
previously a successful connection.
• If the incorrect WIFI network appears,
go to your smart device settings to
select the correct WIFI network.
• Make sure the Pro-Smart Oven Wi-Fi
is active and connected with your Wi-
Fi 2.4GHz network.
nuwavenow.com | 11
Extending Control A New Level
of Cooking
Remote control
using WiFi
Controlling the Pro-Smart Oven with your
smart device is both easy and convenient
with the NuWave Connect App.
1. Make sure that the NuWave Connect
App is installed on your smart device.
2. Make sure the Pro-Smart Oven Wi-Fi
is active and connected with your Wi-
Fi 2.4GHz network.
3. Press WIFI. This will extend control of
the Pro-Smart Oven to the NuWave
Connect App.
Notes
You will only have to do this once. After
control has been extended, it will remain
extended, and to use it, you will only have
to bring up the Pro-Smart Oven on the
NuWave Connect App.
Question?
The Answer is at Your Fingertips
If you can’t nd your answer here in the
Owner’s Manual, just contact our friendly
and knowledgable Customer Service sta from
7:30am‒4:30pm CST, Monday‒Friday
at 877-689-2838 or reach us via email anytime at
help@nuwavenow.com
CONNECTIVITY
12 | nuwavenow.com
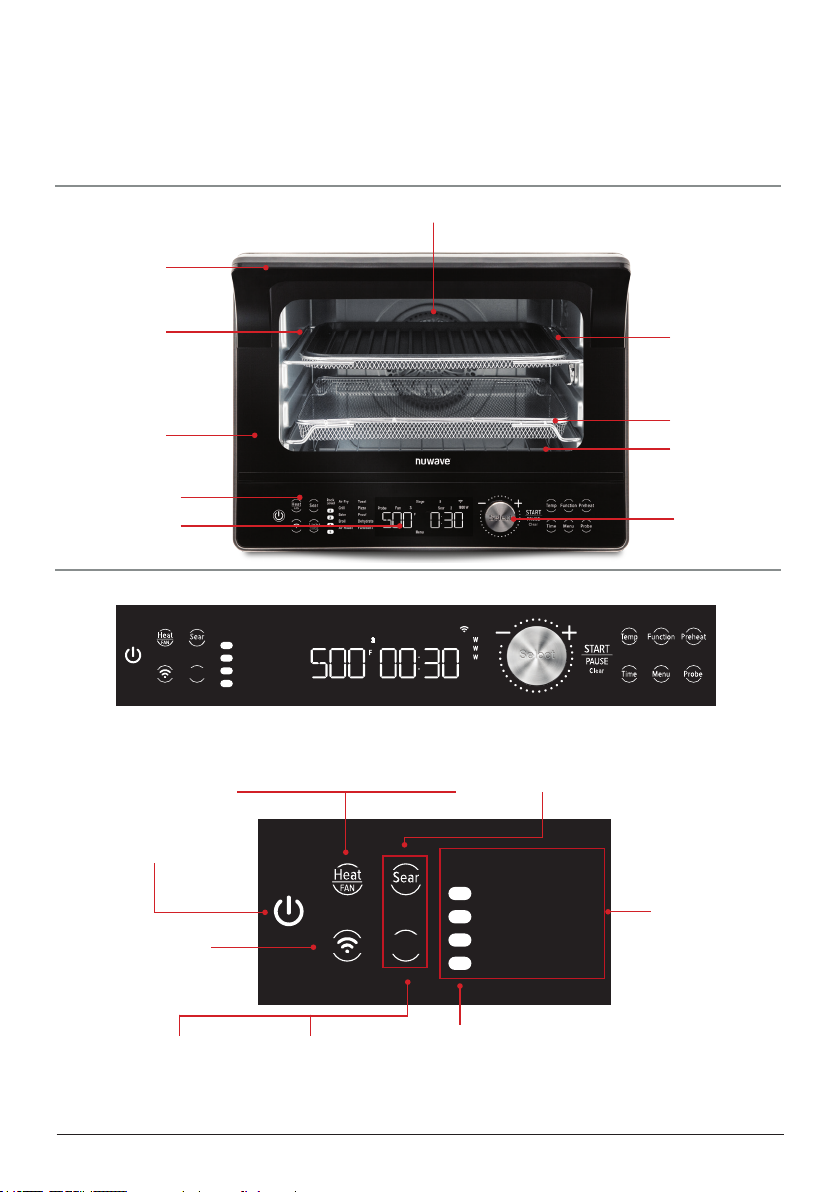
GETTING STARTED
KEY FEATURES
CONTROL PANEL
Door Handle
Rear Fan/Heating Element
The easy-to-use functionality of the Pro-Smart Oven is divided into Basic and Advanced
functions, with the former oering the full cooking functionality of the unit and the latter
giving you control over fan and heat strength and allowing you to program dierent cook-
ing stages, features you will primarily use to create your own cooking Presets.
Door Window
LED Display
Control Panel
Wire Rack
Air Fry Basket
Grill/Griddle in the
Grill/Griddle Rack
Door
Select Dial
Rack
Level
Air Fry
Grill
Bake
Broil
Air Roast
Toast
Pizza
Proof
Dehydrate
Function+
1
2
3
4
Preheat Ready Stage
Probe Fan Carryover Sear
Rear TopShade Menu Bottom Slice
STAGE
Light
Rack
Level
Air Fry
Grill
Bake
Broil
Air Roast
Toast
Pizza
Proof
Dehydrate
Function+
1
2
3
4
Preheat Ready Stage
Probe Fan Carryover Sear
Rear TopShade Menu Bottom Slice
STAGE
Light
Heat:
Controls Top,
Bottom and Rear
heat.
FAN:
Choose between
3 fan speeds.
Power:
Turns the oven on.
Wi-Fi:
Connects the oven to your
home Internet network,
allowing you to connect to
the NuWave Connect App.
Sear:
Choose between
3 Sear settings.
STAGE:
Press and hold Light /
STAGE to program up
to 5 cooking stages.
Light:
Press Light /STAGE to turn
the oven’s light on and o.
Rack Level:
The oven will highlight a rack
corresponding to the selected
preset.
Cooking
Functions:
Choose between
9 programmed
functions, plus an
additional 11 with
Function+.

nuwavenow.com | 13
GETTING STARTED
The LED Function Indicators—Preheat, Ready, Stage,
Probe, Fan, Carryover, Sear, Rear, Top, Bottom, Menu,
Shade and Slice—will light when that function is selected.
1. To add more time during the current cooking cycle, turn the Select dial clockwise.
Monitor your food to ensure it doesn’t overcook.
2. Some moisture may appear on the Pro-Smart Oven’s door during certain cooking
cycles. This is normal and no cause for worry.
3. When air-frying, food can be lightly coated with oil beforehand to boost crispiness
and browning.
4. When using your own recipes, especially those written for a conventional oven,
cooking times can be dierent. So, until you know how your recipe will work in the
Pro-Smart Oven, make sure to check on your food to keep it from overcooking.
Helpful Tips
Rack
Level
Air Fry
Grill
Bake
Broil
Air Roast
Toast
Pizza
Proof
Dehydrate
Function+
1
2
3
4
Preheat Ready Stage
Probe Fan Carryover Sear
Rear TopShade Menu Bottom Slice
STAGE
Light
Wi-Fi:
Operate your NuWave
Pro-Smart Oven with your
Smart Device.
Watts:
The selected wattage will be
displayed on the screen.
Cooking Time:
HOURS:MINUTES
The Time format can be
changed, see page 16.
Cooking Temperature:
The default will be set to Fahrenheit, but it
can be changed to Celsius, see page 16.
Rack
Level
Air Fry
Grill
Bake
Broil
Air Roast
Toast
Pizza
Proof
Dehydrate
Function+
1
2
3
4
Preheat Ready Stage
Probe Fan Carryover Sear
Rear TopShade Menu Bottom Slice
STAGE
Light
Select Dial:
The Select
dial adjusts the
cooking time and
temperature,
scrolls between the
cooking functions
and menu presets.
START/PAUSE:
Initiates and pauses and clears
cooking process.
Temp:
Adjusts the cooking
temperature.
Time:
Adjusts the
cooking time.
Function:
Scrolls through
the 20 functions.
Menu:
Select up to 100
presets and save up
50 of your own.
Preheat:
Preheats your
oven for better
results.
Probe:
Cooks by the
food's internal
temperature.
14 | nuwavenow.com
Primary Controls
GETTING STARTED
Control Function
Power The Power button turns the Pro-Smart Oven on and o.
Heat/FAN
Heat: Press Heat/FAN until the heater to be changed appears,
then adjust the rear, top, and/or bottom heat using the Select
dial. The odd percentage of Top/Bottom heat defaults to the
bottom.
Fan: Press and hold Heat/FAN and use the Select dial to
adjust the fan speed from 0–3. Note: If you are using the rear
heater, the fan speed must be 1 or more.
WiFi Press WiFi to connect to your local wi- network and, through
that, to the NuWave Connect App.
Sear
Press Sear, then adjust the Sear temperature and time, if de-
sired, and press START/PAUSE to begin cooking. Sear defaults
to 450°F for 5 minutes.
Light/STAGE
Light: Press Light/STAGE once to turn on the oven lamp.
Press it again to turn it o.
STAGE: Press and hold Light/STAGE to access Stage Cook-
ing. You can program up to 5 cooking stages.
Select Dial Used to change cooking times and temperatures, as well as to
scroll through and select cooking functions and presets.
START/
PAUSE
Clear
Once the cooking parameters are set, this starts and pauses
the cooking process. Pressing and holding the button allows
you to clear any selections.
Temp
Allows you to adjust the cooking temperature before and
during the cooking process. Press Temp and use the Select
dial to adjust the temperature.
Time
Allows you to adjust the cooking time before and during the
cooking process. Press Time and use the Select dial to adjust
the time.
Function
Allows you to choose from among 20 cooking functions, 9 on
the LED display and 11 under “Function+”. Press Function
and scroll through the cooking functions. At “Function+”, press
the Select dial for functions 10–20. Continue scrolling until you
reach the Function you want, then press the Select dial and
START/PAUSE to begin cooking.
STAGE
Light
Clear

nuwavenow.com | 15
Basic Key Functions
GETTING STARTED
Function Button(s)
Slow Cook Probe + Menu
Probe Target Temperature Press and hold Probe
Sear (as an independent function) Press and hold Sear
Automatic Preheat Preheat + Menu
Mute/Unmute Sear + STAGE
Mute/Unmute Door Press and hold Function
Clock Preheat + Time
Lock Menu + STAGE
Time Format Change ‒ Min:Sec Press and hold Time (4 sec.)
Temperature Format Change ˚F to ˚C Press and hold Temp (4 sec.)
Wattage WiFi + Light
Control Function
Menu
Provides access to the unit’s Cooking Presets. Press Menu
once for Presets 1–100, or twice for Presets 101–150. Once
the Preset is selected press START/PAUSE to begin cooking.
Refer to the 100 Presets on the back of the Quick Start Guide.
You can save 50 of your own.
Preheat
Ensures the Pro-Smart Oven is at the set cooking temperature
at the start of the main cooking cycle, giving you better results.
The default is 400°F (default cooking temperature). Once the
set temperature is reached, the Pro-Smart Oven will beep
twice, countdown for 10 seconds, beep once more, and then
start cooking automatically. To deactivate automatic Preheat,
press Menu + Preheat prior to cooking. Repeat to reactivate
automatic Preheat.
Probe
Allows you to accurately cook your food to a set internal tem-
perature. The Probe jack is on the upper right-hand side of the
cooking chamber. The default is 165°F. Plug the Probe into the
jack, then press and hold Probe for 1 second to set the Probe
target temperature using the Select dial. Insert the other end
of the Probe into your food at the thickest part not touching the
bone. Press START/PAUSE to begin cooking.
Control Function
Power The Power button turns the Pro-Smart Oven on and o.
Heat/FAN
Heat: Press Heat/FAN until the heater to be changed appears,
then adjust the rear, top, and/or bottom heat using the Select
dial. The odd percentage of Top/Bottom heat defaults to the
bottom.
Fan: Press and hold Heat/FAN and use the Select dial to
adjust the fan speed from 0–3. Note: If you are using the rear
heater, the fan speed must be 1 or more.
WiFi Press WiFi to connect to your local wi- network and, through
that, to the NuWave Connect App.
Sear
Press Sear, then adjust the Sear temperature and time, if de-
sired, and press START/PAUSE to begin cooking. Sear defaults
to 450°F for 5 minutes.
Light/STAGE
Light: Press Light/STAGE once to turn on the oven lamp.
Press it again to turn it o.
STAGE: Press and hold Light/STAGE to access Stage Cook-
ing. You can program up to 5 cooking stages.
Select Dial Used to change cooking times and temperatures, as well as to
scroll through and select cooking functions and presets.
START/
PAUSE
Clear
Once the cooking parameters are set, this starts and pauses
the cooking process. Pressing and holding the button allows
you to clear any selections.
Temp
Allows you to adjust the cooking temperature before and
during the cooking process. Press Temp and use the Select
dial to adjust the temperature.
Time
Allows you to adjust the cooking time before and during the
cooking process. Press Time and use the Select dial to adjust
the time.
Function
Allows you to choose from among 20 cooking functions, 9 on
the LED display and 11 under “Function+”. Press Function
and scroll through the cooking functions. At “Function+”, press
the Select dial for functions 10–20. Continue scrolling until you
reach the Function you want, then press the Select dial and
START/PAUSE to begin cooking.

16 | nuwavenow.com
Using the Accessories
GETTING STARTED
Function Grill/Griddle Grill/Griddle
Rack
Air Fry
Basket Wire Rack
Air Fry Yes Yes
Grill Yes
Bake* Yes Yes
Broil* Yes Yes
Air Roast Yes Yes Yes
Toast Yes Yes Yes
Pizza* Yes Yes
Proof Yes
Dehydrate Yes Yes
Cookie* Yes Yes
Defrost* Yes Yes Yes
D.I.Y. Yes Yes Yes Yes
Oven Poach* Yes Yes Yes
Rawtarian* Yes Yes Yes
Reheat* Yes Yes Yes
Sanitize* Yes Yes Yes
Slow Cook* Yes Yes Yes
Slow Roast* Yes Yes Yes
Warm* Yes Yes Ye s
Whole Roast* Yes Yes Yes Yes
*Use an oven-safe baking/cooking pan when using the Wire Rack. For best
results, use the Grill/Griddle and Grill/Griddle Rack. Flip the Grill/Griddle to the
Griddle side.
Selectable Cooking Time
Cooking Temperature Selectable Cooking Time
50°F–275°F 00:00–99:59
280°F–350°F 00:00–24:00
355°F–400°F 00:00–04:00
405°F–450°F 00:00–01:00
455°F–500°F 00:00–00:30

nuwavenow.com | 17
GETTING STARTED
1. Press the Power button to turn the Pro-
Smart Oven on or o.
• Each function will ash in turn
before defaulting to Air Fry.
• The default cooking time and tem-
perature will be displayed.
• If that function has Preheat, then
“Preheat” will be lit.
2. Press Light/STAGE to turn on the lamp
inside the Oven and press it again to
turn the lamp o.
3. Press Temp, then turn the Select dial
to adjust the cooking temperature.
Press Time and turn the Select dial to
adjust the cooking time.
• Temperature, time, and heating
source(s) can be adjusted before
and while cooking.
4. Open the oven door and place your
food in the Pro-Smart Oven.
• While cooking, opening the door
will pause cooking and turn on the
oven lamp.
• Closing the door again will resume
cooking and turn o the oven light.
• If the door remains open for 30
minutes or more, the Oven will turn
o.
5. Press START/PAUSE. The Oven will
begin cooking and the screen will show
the cooking temperature and count-
down Time. “:” will ash.
• Press START/PAUSE again to
pause cooking, and again to
resume it.
• Press and hold START/PAUSE
to clear all settings. The unit will
display “END”. Press it again to
return to the default settings.
• Once the Pro-Smart Oven has n-
ished cooking, it will beep 3 times
and the screen will show “END”.
Adjusting Default
Temp & Time Formats
Default Temperature Format
To change the default temperature format
from Fahrenheit to Celsius and back again,
press and hold Temp.
The Pro-Smart Oven will switch from “F”
(Fahrenheit) to “C” (Celsius), and the
temperature gure will change with the
temperature format.
• The temperature format cannot be
switched while cooking.
• The temperature format can only be
switched when the temperature is
displayed.
• If you switch the format, the unit will
maintain that format, even if unplugged,
until you change it back.
Default Time Format
To change the default Time format from
hours:minutes (hh:mm) to minutes:seconds
(mm:ss:) and back again, press and hold
Time.
• The time format cannot be switched
while cooking.
• The time format can only be switched
when the time is displayed.
• If you switch time formats, the Pro-
Smart Oven will maintain that format,
even if unplugged, until you change it
back.
• The maximum time setting in hh:mm
format is 99-hrs.; 59 min.
Quick Start

18 | nuwavenow.com
BASIC FUNCTIONS
With its numerous Cooking Presets and fea-
tures, the Pro-Smart Oven’s suite of Basic
Functions oers you all you need to make
delicious, healthy meals quickly and easily.
Time and
Temperature
You should, of course, set the cooking time
and temperature before cooking, but you
can always adjust them while you are cook-
ing as well.
To Set the Cooking Temperature and
Time Before Cooking:
1. Press the Power button. The screen
will show a cooking function, the
cooking temperature, the cooking count
down time (i.e., “00:15”), and “Pre-
heat” (if active). The “:” will also be lit.
2. Press Temp. Turn the Select dial to
adjust the cooking temperature.
3. Press Time. Turn the Select dial to
adjust the cooking time.
4. Press START/PAUSE to begin cooking
at the set temperature and time.
5. When nished, the screen will show
“END” and the Pro-Smart Oven will
beep 3 times.
To Adjust the Cooking Temperature and
Time While Cooking:
1. Press Temp. Use the Select dial to
adjust the cooking temperature.
2. Press Time. Use the Select dial to
adjust the cooking time.
3. The Pro-Smart Oven will now cook at
the new temperature and time.
4. When nished, the screen will show
“END” and Oven will beep 3 times.
The Todd English Pro-Smart Oven has three
heat sources, Top, Bottom, and Rear. The
Rear heater is part of the large rear fan
assembly.
The default heat settings are, in order:
80% (rear) / 10% (top) / 10% (bottom). All 3
heaters combined will always equal 100%.
To adjust these settings:
1. Press Heat/FAN for the defaults to ap-
pear. Continue to press HEAT/FAN until
the heater you wish to change appears
on the LED display.
2. Turn the Select dial to adjust the power
for the selected heater from 0–100%, in
5% increments.
3. Once all adjustments are made, press
START/PAUSE to begin.
The default fan setting is 3. To adjust that:
1. Press and hold Heat/FAN until the fan
speed ashes.
2. Turn the Select dial to adjust the fan
speed from 3 to OFF.
3. Press the Select dial to lock in the
change.
Notes
• Changing the power of one heater will
automatically adjust one or both of the
others, so they always total 100%.
• When the dierence is only ±5%:
• Rear Heater: The dierence is
applied to the bottom heater.
• Top Heater: The dierence is ap-
plied to the rear heater.
• Bottom Heater: The dierence is
applied to the rear heater.
• Whenever the percentage is 10% or
more, the dierence is split between the
2 remaining heaters.
• The fan can only be turned o if the
rear heater is o.
Heat and Fan
nuwavenow.com | 19
BASIC FUNCTIONS
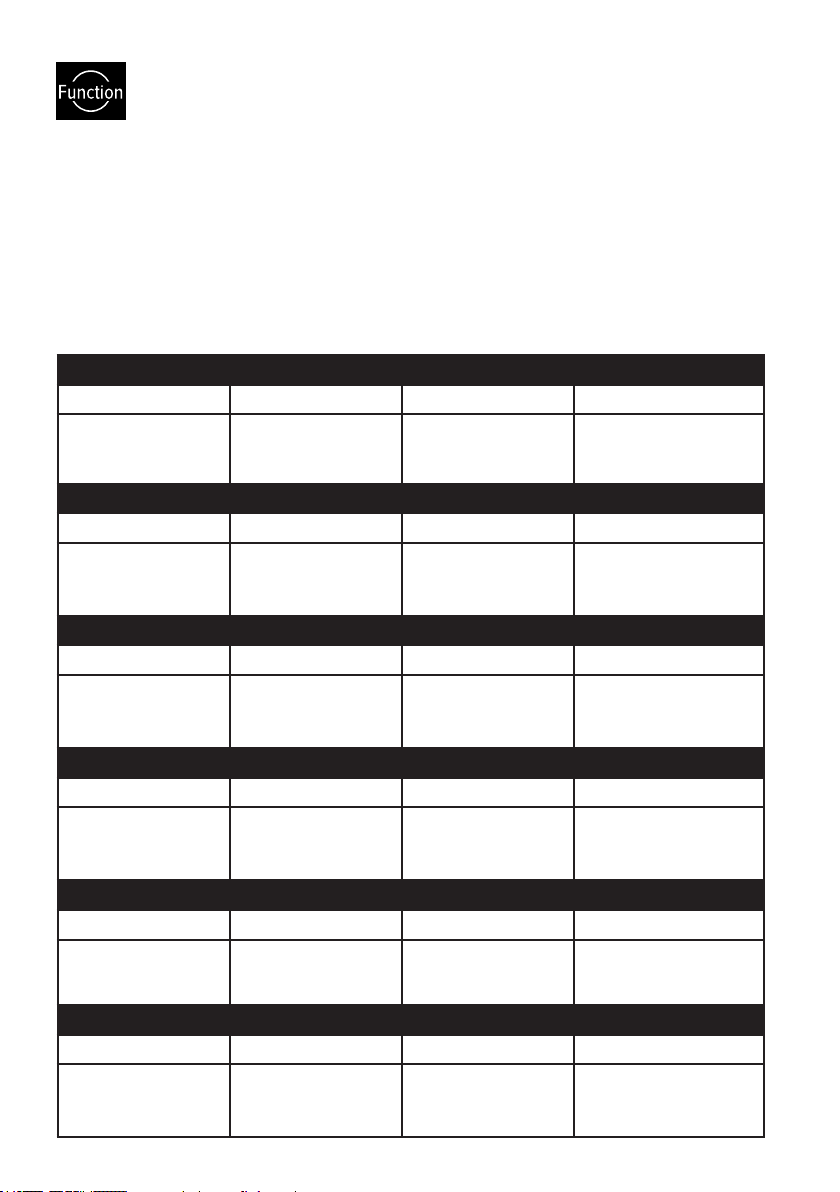
Cooking Functions
The Pro-Smart Oven has 20 Cooking Functions to help take the guesswork out of cooking.
Air Fry is the default function, but to access the remaining 11, begin by pressing Function.
1. The highlighted function will change from “Air Fry” to “Grill”. Now, turn the Select
dial or continue to press Function until you reach the Cooking Function you want.
2. To reach Cooking Functions 10–20, turn the Select dial until “Function+” is lit. Then,
press the Select dial. “10” will appear on the screen. Continue scrolling until you nd
the function you want and press the Select dial again. You will see the cooking time
and temperature, and the fan speed for that Cooking Function.
3. Once the desired Cooking Function is chosen, press START/PAUSE to start cooking.
#1 Air Fry To fry with superheated circulating air while using little to no oil.
Defaults Heat Fan Rack Position
Temp: 400°F
Time: 15 min.
Top: 10%
Bottom: 10%
Rear: 80% 3 2 or 3
#2. Grill To use contact and radiant heat to cook foods quickly on a direct heat source.
Defaults Heat Fan Rack Position
Temp: 450°F
Time: 15 min.
Top: 25%
Bottom: 25%
Rear: 50% 3 3
#3. Bake To cook rising foods in an oven using high heat.
Defaults Heat Fan Rack Position
Temp: 350°F
Time: 25 min.
Top: 40%
Bottom: 40%
Rear: 20% 1 2
#4. Broil To cook at high heat, top side only.
Defaults Heat Fan Rack Position
Temp: 500°F
Time: 5 min.
Top: 80%
Bottom: 0%
Rear: 20% 3 4
#5. Air Roast Using superheated air surrounding the food to cook it evenly.
Defaults Heat Fan Rack Position
Temp: 350°F
Time: 30 min.
Top: 30%
Bottom: 30%
Rear: 40%
3 2
#6. Toast To brown bread slices on both sides.
Defaults Heat Fan Rack Position
Temp: 425°F
Time: 5 min.
Top: 50%
Bottom: 50%
Rear: 0% 1 3
The Cooking Functions operate according to the following parameters:
20 | nuwavenow.com
#7. Pizza Flattened dough with a combination of toppings that is baked.
Defaults Heat Fan Rack Position
Temp: 400°F
Time: 15 min.
Top: 0%
Bottom: 70%
Rear: 30% 3 1 or 2
#8. Proof Resting raw, kneaded dough to allow it to rise before baking.
Defaults Heat Fan Rack Position
Temp: 90°F
Time: 30 min.
Top: 50%
Bottom: 50%
Rear: 0% 0 2 or 3
#9. Dehydrate To remove moisture from food to preserve and store it.
Defaults Heat Fan Rack Position
Temp: 100°F
Time: 2 hrs.
Top: 50%
Bottom: 50%
Rear: 0% 1 ANY
#10. Cookie Small baked goods made from a variety of ingredients.
Defaults Heat Fan Rack Position
Temp: 325°F
Time: 15 min.
Top: 40%
Bottom: 40%
Rear: 20% 2 2 or 3
#11. Defrost To thaw frozen foods to prepare them for cooking.
Defaults Heat Fan Rack Position
Temp: 50°F
Time: 30 min.
Top: 50%
Bottom: 50%
Rear: 0% 3 ANY
#12. D.I.Y. Allows you to create your own Cooking Function.
Defaults Heat Fan Rack Position
Temp: 350°F
Time: 15 min.
Top: 50%
Bottom: 50%
Rear: 0% 3 ANY
Notes
• To change the default Temp and Time in D.I.Y. (#12), press Temp or Time and adjust
to the new default. Then press and hold the Select dial for 1 second.
• With the Toast Function (#6), use the Select dial to choose the shade from 1 (lightest)
to 10 (darkest) and then press Select to lock in your choice. The default is 5. Turn the
Select dial again for the number of slices (1–6). The default is 2.
• All defaults (Temp, Time, Heat, Fan, and Rack Position) are guides. You may need to
adjust one or more to reach your desired results.
BASIC FUNCTIONS
This manual suits for next models
3
Table of contents
Other Todd English Oven manuals


Popular Oven manuals by other brands

AEG
AEG COMPETENCE B8920 Operating and installation instructions

Gorenje
Gorenje BO789S40X Detailed instructions

Yamato
Yamato DF Series instruction manual

Hoover
Hoover HOZ7173WI WF/E User instructions

Tricity Bendix
Tricity Bendix TBD903 Operating and installation instructions

ROBINHOOD
ROBINHOOD OBL909K70SS Service manual


