Todd English TEAO12BR User manual
INSTRUCTIONS
MODEL TEAO12BR
1
1600W 12.7QT MULTI FUNCTIONAL DIGITAL AIR FRYER OVEN

MEET
CHEF ENGLISH
Todd English is a celebrated chef, restaurateur, author, and television
personality. He has opened innovative and award-winning restaurants around
the globe. Among his numerous accolades from the culinary world, Chef
English is a four-time James Beard Foundation Award winner and was named
Bon Appetit’s Restaurateur of the Year. He has authored four critically
acclaimed cookbooks, including his most recent, Cooking in Everyday
English. Chef English has also created the record-breaking housewares line,
The Todd English Collection, and hosted the Emmy-nominated PBS travel
series Food Trip with Todd English.
Todd English Kitchen is an exceptional range of high-performance
countertop appliances. Todd’s passion for the creative process results in these
products delivering extraordinary blending, cooking, frying, mixing and ease of
use. As Todd continues pushing the limits of imagination, his attention to detail
and progressive design intrinsically allows endless possibilities that heighten
the delicious world that surrounds us.
2

IMPORTANT SAFEGUARDS
When using electrical appliances, basic safety
precautions should be followed as follows:
•" Read all instructions before first use. #
•" This appliance is designed for household use only.#
•" Do not place the appliance against a wall or against another
appliance. Leave at least 5 inches of free space on the back
and sides and 5 inches of free space above the appliance.#
•" Do not place anything on top of the appliance. #
•" Do not use the appliance for any purpose other than described
in this manual. #
•" Do not leave the unit unattended when in operation. #
•" Any accessible surfaces may become hot during use. #
•" Do not place the appliance on or near combustible materials,
such as a tablecloth or curtain.#
•" The appliance needs approximately 30 minutes to cool down
before safely handling or cleaning. #
•" Do not cover the air inlets and air outlets when the appliance is
working. #
•The LED light located in the rear top cavity can’t be replaced.#
•" Do not immerse the housing in water or rinse under the tap
due to the electrical and heating components.#
•" Keep all ingredients in the basket to prevent any contact with
the appliance’s heating elements. Do not overfill the basket. #
•" During hot air frying, hot steam is released through the air
outlets. Keep your hands and face at a safe distance from the
steam and from the air outlets. Also be careful of hot steam
and air when you remove the pan from the appliance. #
•" Do not touch the basket, tray, rotisserie spit rod and fork, fry
basket, wire rack, or the inside of the air fryer during and
immediately after use, as they get very hot. Always use oven
mitts. #
•" Keep all cords away from hot surfaces. #
•" Keep the appliance and its cords out of the reach of children. #
•" Do not use any unauthorized person to replace or fix a
damaged main cord. #
3

•" Do not use the appliance if there is any damage to the plug,
cord or other parts. #
•" Check that the voltage indicated on the appliance fits the
voltage for your outlet. #
•" Do not connect appliance to an external timer switch. #
•" Immediately unplug the appliance if you see dark smoke
coming out of the appliance. Wait for the smoke emission to
stop before you remove the pan from the appliance. #
•" Do not let any liquid enter the appliance (aside from cooking
liquids added to the pan) to prevent electric shock or short-
circuiting. #
•" Do not touch the inside of the appliance while it is operating,
as it will be very hot.#
•" Do not use with an extension cord, it must be plugged into a
wall outlet. #
•" Always power offthe appliance and unplug the appliance
when not in use. #
•" SAVE THESE INSTRUCTIONS.#
4

PARTS DESCRIPTION
5
1. Top
2. Control Panel
3. Upper Cover
4. Unit
5. Power Cord
6. Inner Housing
7. Door
8. Rotisserie Handle
9. Rotisserie Fork
10.Wire Rack
11.Wire Rack
12.Fry Basket
13.Fry Basket
14.Basket with Handle
15.Drip Tray
15
14
13
12
11
10
9
8
7
6
5
4
3
21
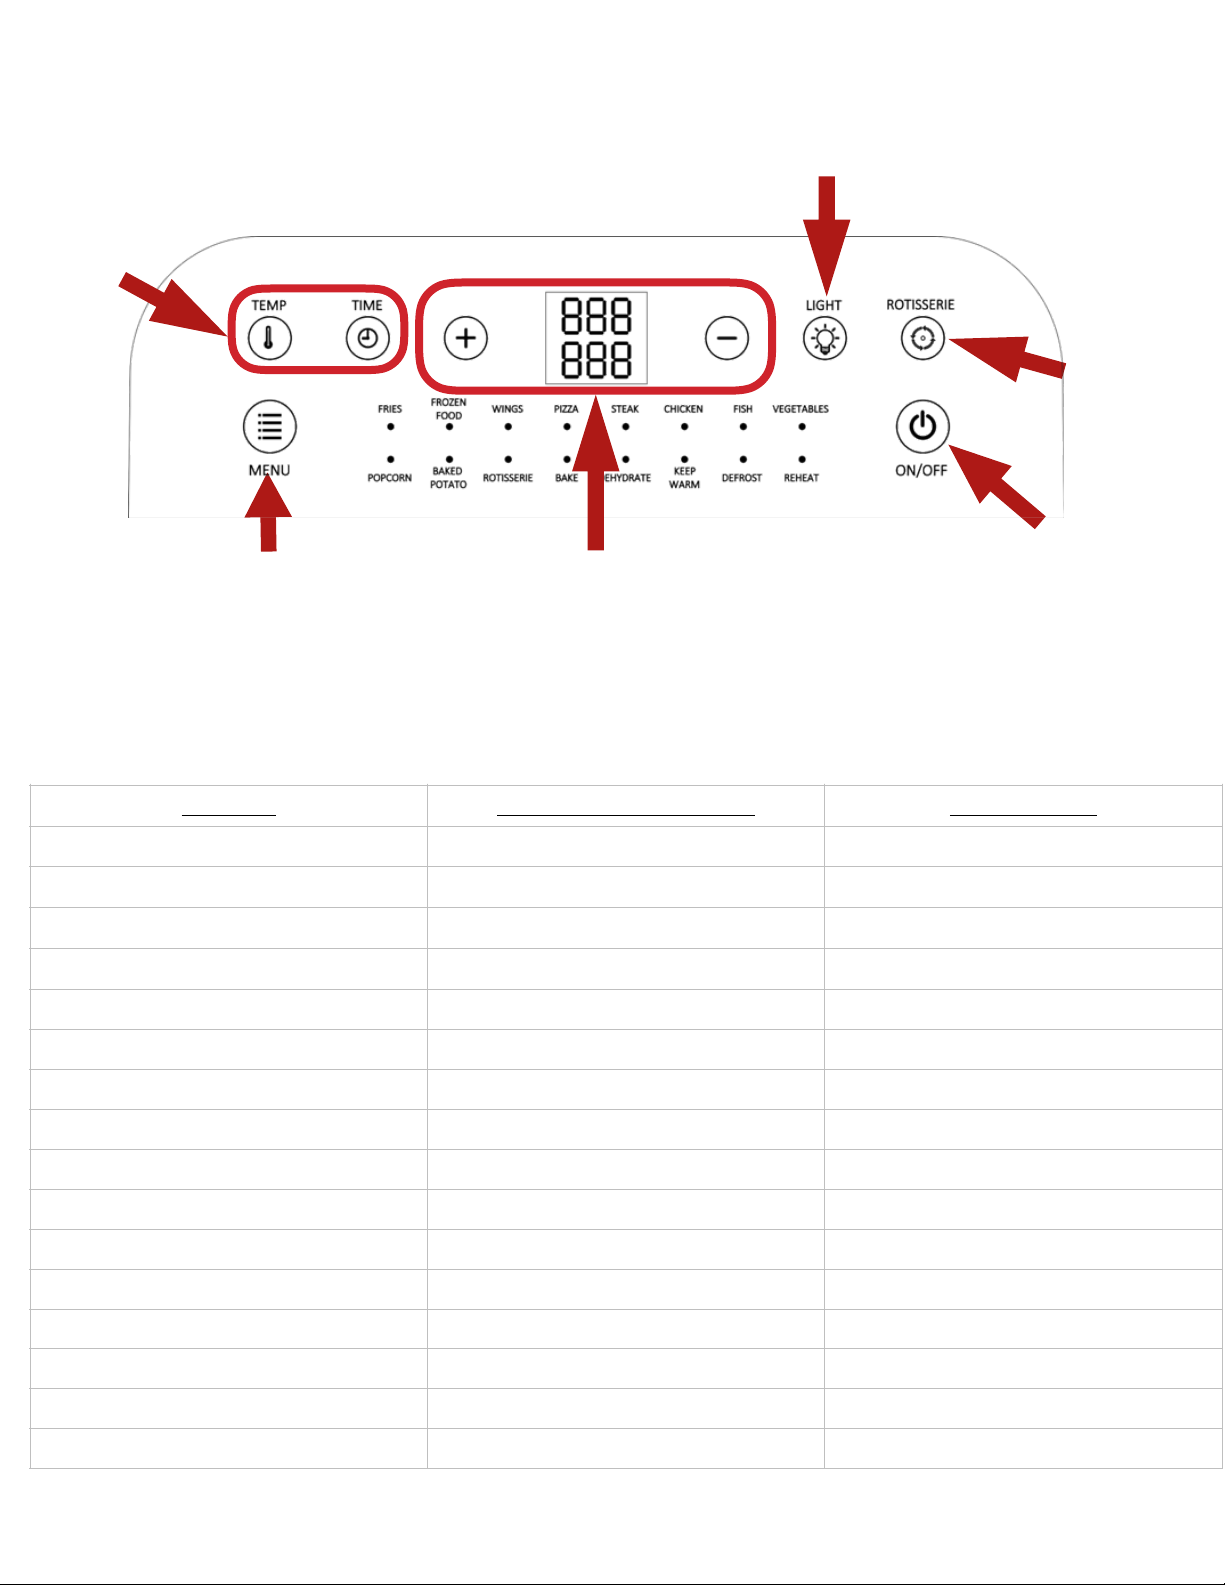
CONTROL PANEL
PRESET COOKING TIMES & TEMP
6
SETTING
PRESET TEMPERATURE
PRESET TIME
FRIES
430°F
15 MINUTES
FROZEN FOOD
340°F
20 MINUTES
WINGS
400°F
15 MINUTES
PIZZA
350°F
10 MINUTES
STEAK
400°F
12 MINUTES
CHICKEN
430°F
25 MINUTES
FISH
360°F
15 MINUTES
VEGETABLES
400°F
10 MINUTES
POPCORN
430°F
10 MINUTES
BAKED POTATO
400°F
40 MINUTES
ROTISSERIE
400°F
35 MINUTES
BAKE
350°F
30 MINUTES
DEHYDRATE
130°F
8 HOURS
KEEP WARM
150°F
30 MINUTES
DEFROST
120°F
30 MINUTES
REHEAT
250°F
20 MINUTES
Use the Menu
button to select
desired cooking
setting.
Press to
use the
rotisserie
function of
the unit.
NOTE: Settings are indications only. Since ingredients differ in origin, size, shape and brand, preset times
and temperatures can be adjusted up or down based on your desired results.
Press to turn the unit
On or Off. Can also
be pressed to start or
cancel a function.
Turns the light on during cooking process.
Press TEMP to adjust
temperature. Press
TIME to adjust time.
Use + or - to adjust time and
temperate. The screen in the
middle will display time and
temperate.

BEFORE FIRST USE
1."Remove all packaging materials, stickers and labels.#
2."Clean the basket and all other accessories with hot
water, dishwashing liquid, and a non-abrasive
sponge.#
3."Wipe the inside and outside of the appliance with a
cloth.#
USING THE APPLIANCE
Handle:
The handle should always be used when taking the
basket in and out of the unit. The metal locking hook
needs to be in place before lifting the basket. See images
below. #
To place on the basket squeeze the handle together in the
open position. Then attach to the basket with the hooks
facing down. Once it is secured lock the metal hook. See
images below. #
7
Open Position
Locked Position
Handle Facing
Down

Air Fryer:
1. Place the appliance on a stable, horizontal and even
surface.
2. Place the tray inside the unit, on the bottom position.
See figure below. #
3. Plug the unit into a 3-prong grounded wall socket.
4. Place the ingredients in the basket, if desired spritz with
cooking oil for a crispier finish. Slide the basket back into
the unit and remove the handle. NOTE: Do not over fill the
basket, as it may affect the quality of the food. See figure
below. #
5. Close the door of the unit once the basket is inside.
Note: The unit will not begin operation if the door is
open. #
6. To turn the unit on, press the ON/OFF button. To begin
cooking choose one of the sixteen presets, press Menu
until desired setting is selected. These settings can be
adjusted before cooking begins. Note: The unit will turn
offafter 30 seconds of inactivity. #
7. To adjust the time, press the TIME icon on the left side
and it will illuminate in the center. Toggle up and down
with the arrows on the right until desired time is
selected. The time can be adjusted between one minute
and one hour on all settings except Dehydrate which is
one minute to eight hours.#
8

8. To change the temperature, press the TEMP icon on the
left and it will illuminate in the center. Toggle up and
down with the arrows on the right until desired
temperature is selected. The temperature can be
adjusted from 120°F to 430°F. #
9. Once desired cooking setting and time are selected,
press the ON/OFF button to begin the cooking process.
If after 10 seconds, the ON/OFF button is not pressed
the unit will automatically begin to start cooking. To
cancel the cooking process at any time press the ON/
OFF button again.#
10. Some ingredients may require turning halfway during
the preparation time. At the halfway point, attach and
lock the handle in place using the metal locking clip. See
page 7 for how to attach. Pull the basket out of the
appliance with the drip tray by the handle and use tongs
to turn/move around ingredients. Then slide the basket
and drip tray back into the unit, remove the handle and
close the door. The unit will automatically begin cooking
again. NOTE: If the door is open for more than five
minutes the unit will shut down. #
11. When you hear the timer bell, the set preparation time
has elapsed. Attach the handle and lock the handle in
place using the metal locking clip. See page 7 for how to
attach. Pull the basket out of the unit, and place on a
heat proof surface.#
12. Empty the basket into a bowl or onto a plate. To
remove large or fragile ingredients, lift the ingredients out
of the basket using tongs.#
9
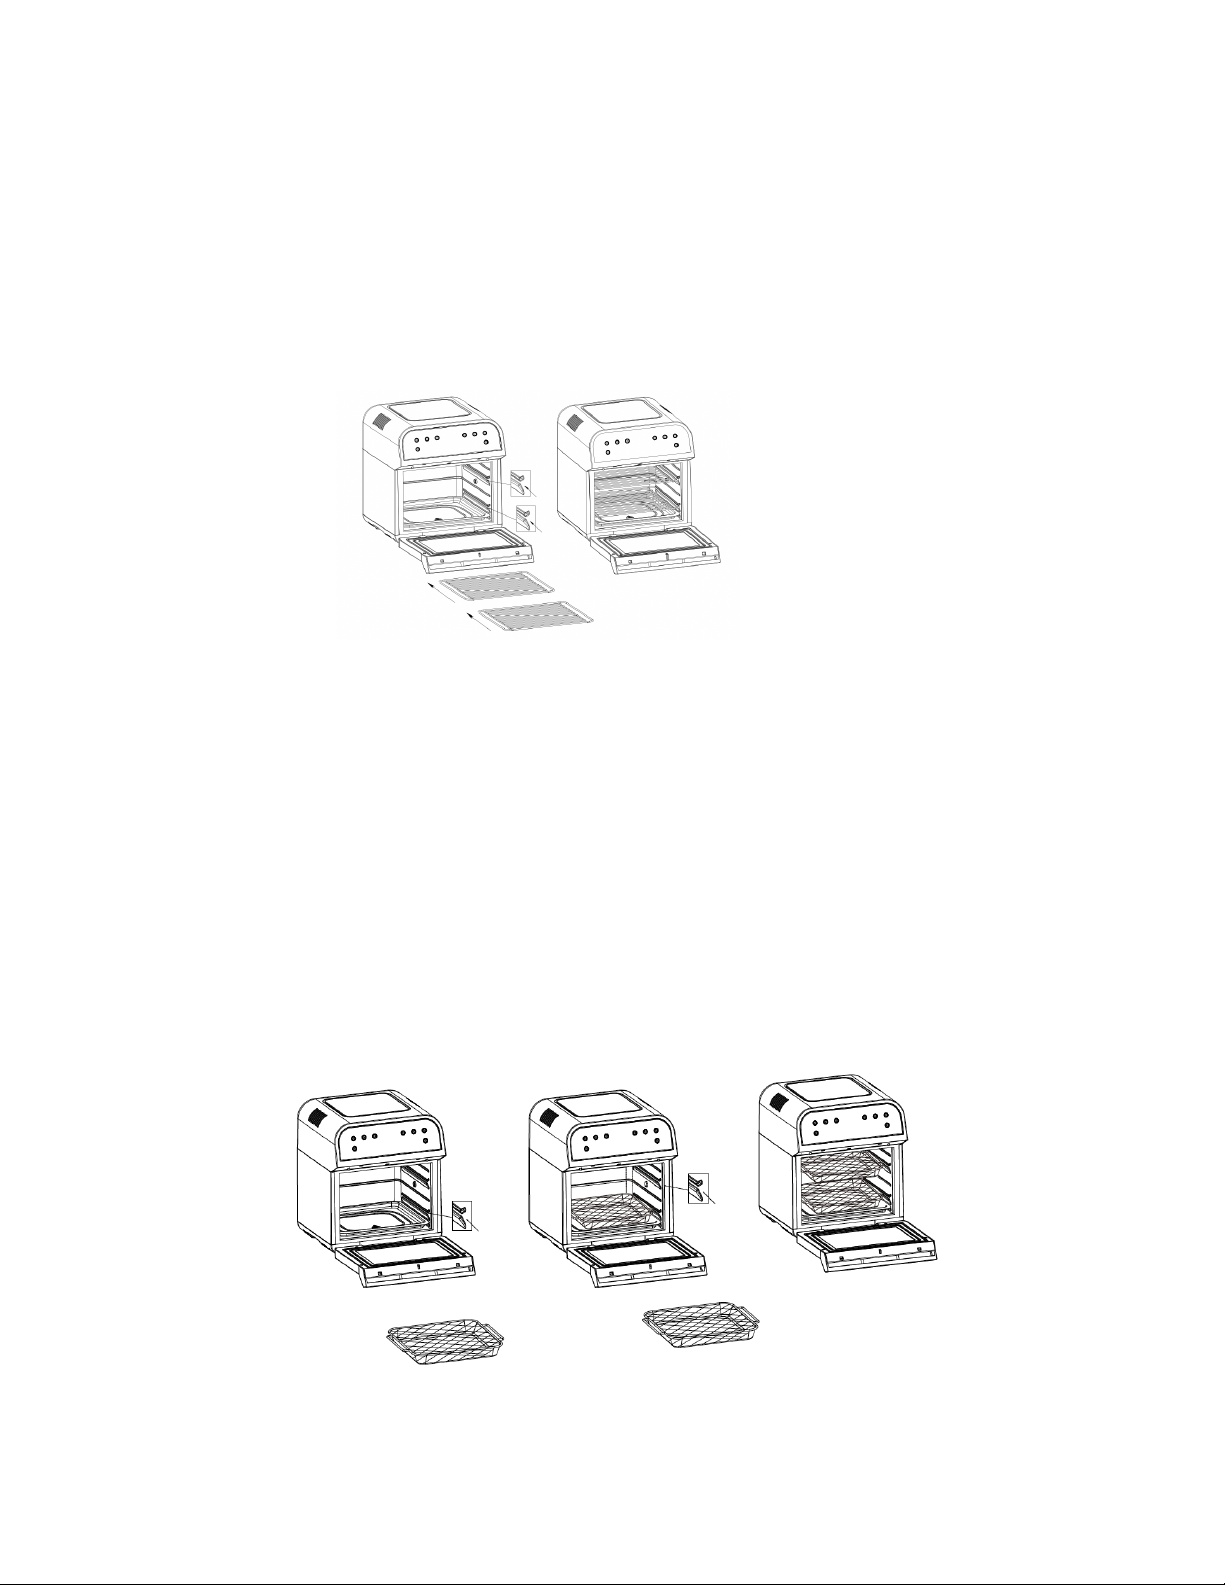
Wire Racks:
The wire racks should be placed in the unit after the drip
tray has been installed. Please see figure below. The wire
racks can be used to place food on. The wire racks are
perfect for more delicate items such as vegetables.
Fry Baskets:
The fry baskets should be placed in the unit after the drip
tray has been installed. Please see figure below. The fry
baskets can be used to put food in. The fry baskets are
perfect for frozen foods or cooking multiple items at a time.
10

How to Prepare Your Rotisserie for Proteins
-The protein needs to be placed on a spit so that it is
centered and evenly balanced. It must also be held in
place so it does not move around as it is cooking.
-Detach the fork on one side by unscrewing. Slide the
spit rod through the middle of the protein and out the
bottom end. Place the protein so that it is in the center
of the rod.
-Keep the rod running through the center of the protein
and attach the fork back on the end.
-Insert one end of the spit in to the spit mount hole in the
Air Fryer, then the other side.
Rotisserie
1. Place food through rotisserie spit rod and use
rotisserie forks to attach to rod. See above for how
to prepare protein for rotisserie. Use rotisserie
handle when hot.
Note: Please ensure that the protein has proper clearance around the oven to
ensure that it will be able to rotate while cooking. A 2lbs. or less pre trusted
chicken is recommended in this unit.
2. Place inside of the Air Fryer and then close the door.
3. Press the ON/OFF Button, then select Rotisserie. See
Using the Appliance on page 8 for how to set the time
and temperature of the unit. The ROTISSERIE button
can also be used with any of the functions.
11
Caution: The rotisserie spit rod and forks will be hot after cooking.
Always use oven mitts when handling.

CLEANING
•" Remove the main plug from the wall outlet and let the
appliance cool down for at least 30 minutes. #
"NOTE: Remove the accessories to let the air fryer
cool before cleaning. #
•" Clean the appliance after every use. Do not clean the
basket, tray, or accessories and the inside of the
appliance with any metal kitchen utensils or abrasive
cleaning materials, as this may damage the coating
on them.#
•" Wipe the outside of the appliance with a moist cloth. #
•" Clean the basket, tray, or accessories with hot water,
some liquid detergent and a non-abrasive sponge.
You can remove any remaining food residue with
degreasing liquid. #
•" Clean the inside of the appliance with a non-abrasive
sponge. #
•" Clean the heating element with a cleaning brush to
remove any food residue. #
STORAGE
1. Unplug the cord. #
2. Make sure all parts are clean and dry.#
12

LIMITED ONE YEAR WARRANTY
This warranty covers all defects in workmanship or materials in the
mechanical and electrical parts, arising under normal use and care in this product
for a period of 12 months from the date of purchase provided you are able to
present a valid proof-of-purchase. A valid proof-of-purchase is a receipt
specifying item, date purchased, and cost of item. A gift receipt showing item and
date of purchase is an acceptable proof-of-purchase. Product is intended for
household use only. Any commercial use voids the warranty.
This warranty covers the original retail purchaser or gift recipient. During the
applicable warranty period within normal household use, we will repair or replace,
at our discretion, any mechanical or electrical part which proves defective, or
replace unit with a comparable model. Shipping and handling costs are not
included for warranty replacements and are the responsibility of the customer.
To obtain service under the terms of this warranty, send an email to
312-526-3760 (Monday- Friday 10am-4pm CST). Please provide the model number
listed on the bottom of this page when contacting us.
THIS LIMITED WARRANTY COVERS UNITS PURCHASED AND USED WITHIN
THE UNITED STATES AND DOES NOT COVER:
• Damages from improper installation.
• Damages in transit.
•Normal wear and tear.
• Defects other than manufacturing defects.
• Damages from misuse, abuse, accident, alteration, lack of proper
care and maintenance, or incorrect current or voltage.
• Damage from service by other than authorized dealer/service center.
• Shipping and handling costs.
• This warranty gives you special legal rights and you may also have
other rights to which you are entitled which may vary from state to
state.
Manufacturer does not assume responsibility for loss or damage for return
shipment. We recommend that you keep your original packaging should you
require repair service. Before returning product please contact our customer care
department for return authorization. When returning product for repair please
include your full name, return address, daytime phone number and email. Also
include a brief description of the problem you are experiencing and a copy of
your sales receipt or other proof of purchase in order to validate warranty status.
MODEL TEAO12BR
13
Table of contents
Other Todd English Oven manuals


