TOLSEN TOOLS Force Xpress 79575 User manual

79575
HIGH PRESSURE WASHER
INSTRUCTION MANUAL 2000W
SAVE THIS MANUAL !
You will need this manual for safety instructions, operating procedures and warranty.
Put it and the original sales receipt in a safe dry place for future reference.
230V/50Hz
2 SAFETY
IMPORTANT SAFETY INFORMATION
Safety Instructions
1. The appliance has been designed solely for private use outdoors and not for commercial use. Keep this appliance away from
heat, direct sunlight, moisture and rain, ice and sharp edges.
2. Do not allow anybody that has not been trained to use a pressure washer to operate the machine without first reading the
instruction manual.
3. WARNING: High-pressure washers must not be used by children or untrained persons.
4. Before starting your machine, carefully check for defects. If you find any, do not start your machine and contact your local
distributor.
5. In particular, ensure that the electric cable insulation is in perfect condition and free of cracks. If the electric cable is damaged,
an approved local service centre must replace it.
6. WARNING: Hi pressure jets can be dangerous if they are used incorrectly. The jet must not be directed towards persons,
electrical equipment connected to the mains or the appliance itself.
7. WARNING: Do not use the appliance close to other people unless they are wearing protective clothing.
9. CAUTION: Do not direct the jet towards yourself or other persons to clean clothing or shoes.
10. Hold the lance firmly in your hands.
11. he operator and persons within close proximity to the cleaning area must take necessary measures to protect themselves from
dislodged debris when in use.
12. Wear protective gloves and clothing during use.
13. WARNING: The appliance has been designed for use with a cleaning agentsupplied or recommended by the manufacturer.
Using other cleaning products or chemical products may affect the safety of the appliance.
14. WARNING: Disconnect the appliance from the power supply before carrying out any maintenance.
15. CAUTION: To ensure the safety of the appliance, only use spare parts supplied or approved by the manufacturer.
16. Do not use the appliance if the power cable or important parts of the appliance are damaged, for example, the safety device,
high pressure hose and handgun.
17. Do not use the appliance with wet hands. If the appliance is damp or wet, unplug it immediately. Do not place it in water.
18. The tyres and valves on the tyres can be damaged by the high pressure jet and could burst.
19. Never use the machine in an environment where there is a danger of explosion.
20. It is forbidden to clean surfaces containing asbestos at high pressure.
21. This high-pressure washer must not be used in temperatures below 0 ° C.
22. CAUTION - The hoses, accessories and high pressure couplings are important for the safety of the machine. Only use hoses,
accessories and couplings recommended by the manufacturer.

3
SAFETY
23. WARNING: Inadequate extension cables may be dangerous. Cables and spools must always be completely unwound to
avoid letting the cable overheat.
24. If an extension cable is used, the plug and socket must be waterproof and conform to the requirements below regarding the
length and dimensions of the cable.
1,0 mm ² max. 12,5 m 1,5mm²max.20 m
25. If the power cable is damaged, it must be replaced by the manufacturer, their service agent or a qualified professional in
order to avoid any danger.
26. WARNING: This machine is not designed to be used by persons (including children) with reduced physical, sensory or mental
capacities or whose lack experience or knowledge.
27. WARNING: It is advisable that you supervise children to ensure that they do not play with the appliance.
28. CAUTION – Risk of explosion – do not spray flammable liquids, do not direct the jet towards flammable liquids.
29. WARNING: Water that has circulated in the anti-back flow system is not considered drinkable.
30. WARNING: Do not use the appliance if the power cable or important parts of the appliance are damaged, for example, the
safety devices, high pressure hoses and handgun.
31. WARNING: If you have an extension cable, it must be waterproof.
32. WARNING: When you switch on the machine, a recoil movement is produced due to the force of the water jet. Use two hands
to control the lance. Wear safety gloves when using the appliance. Wear suitable protective clothing.
33. In case of accidental contact with detergent, wash with water. If the liquid comes into contact with the eyes, also seek medical
assistance (the detergent can cause irritations or burns).
35. In the event that the appliance breaks down, do not attempt to repair it yourself but contact a professional technician to avoid
any danger.
Main power connection
The following must be observed when connecting the high pressure washer to the power supply:
36. Connecting the electrical connection should be done by a qualified electrician conforming to 60364-1 CEI
37. It is recommended that the electrical supply to this machine should comprise a residual current device which interrupts the
current if the leakage current exceeds 30 mA for 30ms.
CONNECTING TO THE WATER NETWORK WARNING
According to current guidelines, the unit must never be operated without a system separator on the potable water system. Use
a EN 12729 type BA system separator. Water that passes through a system separator is classified as non-potable.
WARNING: Always connect the system separator to the water supply and never directly to the device!

4SETUP AND SPECIFICATIONS
140bar/2030pis
5.5l/min
2000W
230V~50Hz
5~60℃
Max. pressure
Flow
power
Voltage
Water temperature
SETUP AND SPECIFICATIONS
1. Main ON/OFF switch
2. High-pressure outlet
3. Water connection with filter
4. Coupling section
5. Jet pipe was high-pressure nozzle
Technical data
The Circuitry
First time instructions
This section will explain in details how to make high pressure washer ready for use.
SAFETY DEVICES
The unloader valve can reduce pressure if it exceeds pre-set values.
Locking device on trigger gun (see illustration at the beginning of this manual): The trigger
gun features a locking device. When the knob is activated, the trigger gun cannot be
operated.
THERMAL SENSOR
A thermal sensor protects the motor against overloading. The machine will restart aer a
few minutes when the thermal sensor has cooled.
6. High-pressure hose
7. Gun safe lock
8. Power plug
9. Trigger
6
79
8
Push
Unlock
Push
lock
5
SETUP AND SPECIFICATIONS
1
A
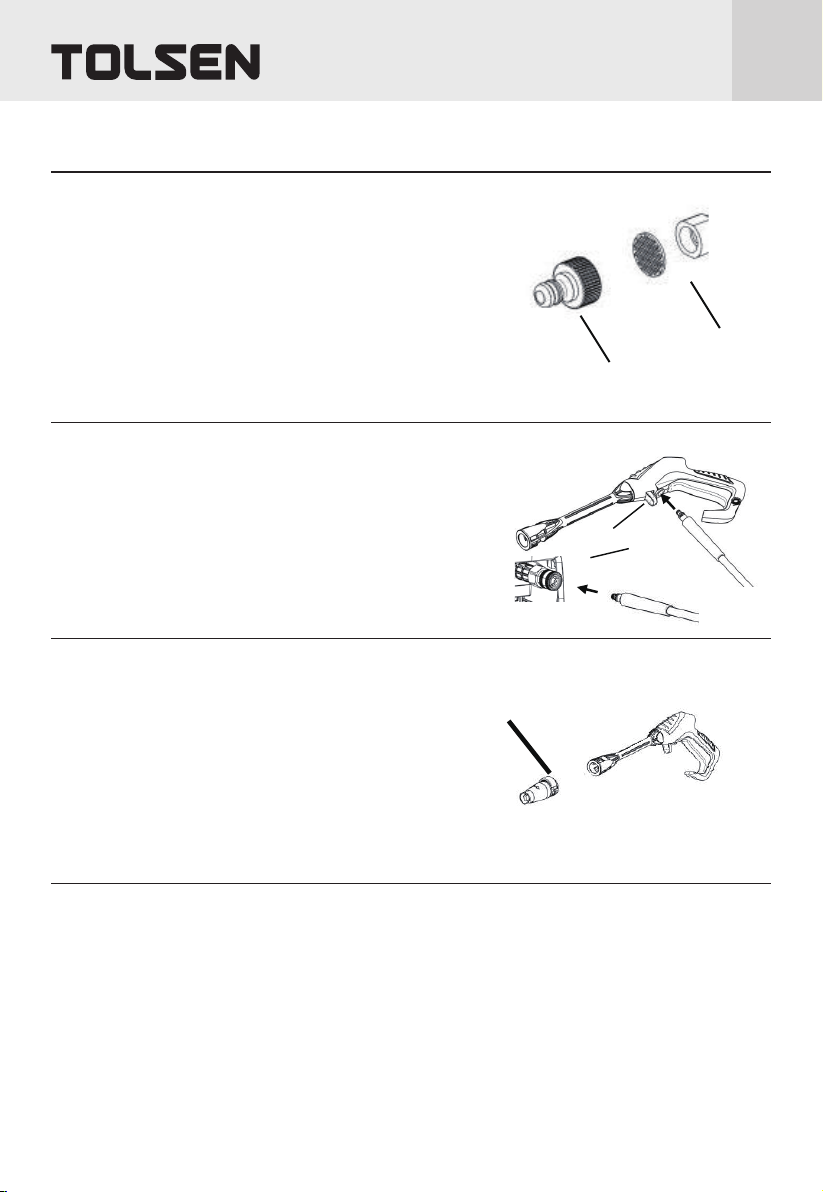
Connection of garden hose
Mounting of high pressure hose
A
B
Screw the water inlet coupling (1) tight on to the water inlet Note:
The inlet filter (A) must always be fitted in the water inlet pipe to filter
out sand, lime stone and other impurities as these will damage the
pump valves.
Caution: Failure to fit the filter will invalidate the guarantee.
Connect the garden hose with a standard quick coupling
Attach the high pressure hose to the trigger gun and machine.
Detach the high pressure hose by pressing the pawl (A) or button (B)
Mounting of lance and nozzle
Push the lance into the trigger gun
When inserted turn it. Caution: Make sure the lance is properly fixed to the
gun
Attach the nozzles. Caution: When attaching the nozzle the button (A) on
the nozzle should come out again. Check before activating the trigger that
the nozzle is properly fixed.
A
Water connection
Connecting the water supply pipe
Follow your water supplier’s instructions .
For connection information, see the data plate/technical specifications
Use a reinforced hose (not supplied) with a standard connection (ext. diameter: 16mm/int. 12mm, maximum length: 25m).
IMPORTANT! Only use water without any impurities. If there is a risk of sand particles in the inlet water (i.e. from your own well), an
additional filter should be mounted.
Let the water run through the water hose before connecting it to the machine to prevent sand and dirt from penetrating the
machine. Note: Check that the filter is fitted in the water inlet pipe and that it is not clogged up.
Connect the water hose to the water supply by means of the quick connector (inlet water, max. pressure: 10 bar, max. temperature:
60°C).
Turn on the water.

6SETUP AND SPECIFICATIONS
Start/stop of the machine
Multi Nozzle
The trigger gun and lance is affected by a thrust during operation - therefore always hold it firmly with both hands.
IMPORTANT: Point the nozzle at the ground.
Check that the machine is in upright position. NOTE: Do not place the machine in high grass!
Release the trigger lock .
Activate the trigger of the trigger gun and let the water run until all air has escaped from the water hose.
Press the Start/stop switch.
Activate the trigger of the trigger gun.
Always adjust the distance and thus the pressure of the nozzle to the surface, which is to be cleaned.
Do not cover the machine during operation or use it in a room without adequate ventilation!
NOTE: If the machine is le or not used for 5 minutes, it must be switched off on the start/stop switch "O":
Press the start/stop switch "O".
Disconnect the electrical plug from the socket.
Shut off the water supply and activate the trigger of the trigger gun to relieve the machine of pressure.
Lock the trigger gun
When releasing the trigger of the trigger gun, the machine automatically stops. The machine will start again when you re- activate
the trigger gun
The pressure can for the multi nozzle be adjusted by
tuning it. WARNING: Do not do this under operation to
avoid that the hand hits the jet.
Aer use instructions
The machine should be stored in a frost-free room!
Pump, hose and accessories should always be emptied of water prior to storing as follows:
Stop the machine (press the start/stop switch “O” and detach water hose, high pressure hose and nozzle
Restart the machine and activate the trigger of the trigger gun Let the machine run until no more water runs through the trigger
gun.
Stop the machine, unplug and wind up hose and cable.
Place trigger gun, lance, nozzles and other accessories in the holders of the machine. The hook can be used for storage of the
hose and cord All accessories can be stored in the washer aer using.
WARNING: Never start up a frozen machine. Frost damages are not covered by the guarantee!

7
SETUP AND SPECIFICATIONS
Environmental protection
Old appliances contain valuable materials that can be recycled. Please arrange for the proper recycling of old appliances. Please
dispose your old appliances using appropriate collection systems.
Maintenance, cleaner and repair
WARNING! Always disconnect the electrical plug from the socket prior to maintenance or cleaning.
To ensure a long and problem free working life, please take the following advice:
Wash out water hose, high pressure hose, spray lance and accessories before mounting.
Clean the connectors of dust and sand.
Rinse the detergent spraying attachment aer use.
Clean the nozzles.
Any repair should always be made in an authorized workshop with original spare parts.
Cleaning of inlet filter
Clean the water inlet filter regularly once a month or more frequently according to use.
Carefully loosen the filter with a screwdriver and clean it . Check that it is intact before re-mounting it.
The inlet filter must always be fitted inside the water inlet pipe to filter out sand, limestone and other impurities, as they will damage
the pump valves.
CAUTION: Failure to fit the filter will invalidate the warranty
Cleaning of air vents
The machine should be kept clean so as to let cooling air pass freely through the machine vents.
Greasing of couplings
To ensure an easy connection and that o-rings do not dry up; the couplings should be greased regularly.

8
The machine will
not start
Fluctuating pressure
The machine
stops
Fuse blown
Pulsing machine
The machine turns
on and off by itself
The machine is on
but no water
comes out
The machine is not plugged-in
Faulty receptacle
The fuse has blown
Faulty extension cable
The pump is drawing in air
Valves dirty, worn or sticking
The water supply is not sufficient
Pump seals worn
The fuse has blown
Incorrect mains voltage
Thermal sensor activated
Partially blocked jet
Fuse too small
Increase in the amperage
Air in inlet hose / pump
Inadequate supply of water generated
Partially blocked jet
Water filter blocked
Folded pipe
Pump fuse and/or trigger out of order
No water supply
Water filter blocked
Blocked jet
Clean the filter
Clean the jet with a needle and by spraying
water rearwardly through the jet
Contact your nearest service centre
Connect the inflow water.
Allow machine to run with open trigger until
regular working pressure resumes.
Increase water pressure, check for blockages
and / or change the large pipe.
Clean the jet with a needle and by spraying
water rearwardly through the jet
Clean the filter
Unfold the pipe
Replace it with a fuse with higher amp
consumption than the washer.
Try without the extension cable
Replace the fuse
Unplug other appliances
Check that the mains voltage corresponds to the
specifications on the nameplate
Leave the machine to cool for 5 mins
Clean the jet with a needle and by spraying water
rearwardly through the jet
Check that hoses and connections are airtight.
Contact your service centre
Increase water pressure, check for blockages and
/ or change the large pipe.
Contact your nearest service centre
Plug the machine in
Try another receptacle
Replace the fuse Unplug other
appliances
Try without the extension cable

ASSEMBLY DIAGRAM (MACHINE)
9
10 PARTS LIST
PARTS LIST (MACHINE)
1
2
3
4
5
6
7
8
9
10
11
12
13
14
15
16
Tapping screw
Le machine body
4 corners of gasket
filter
connector gastket
O-ring
water inlet connector
quick connector
quick connector gastket
Top cover
soket head cap screw
Flat gasket
right machine body
tension disc
Pump
Rubber front pad
1
1
1
1
1
1
1
1
1
1
4
4
1
1
1
7

ASSEMBLY DIAGRAM PART-B (PUMP)
11

B1
B2
B3
B4
B5
B6
B7
B8
B9
B10
B11
B12
B13
B14
B15
B16
B17
B18
B19
B20
B21
B22
B23
B24
B25
B26
B27
B28
B29
B30
B31
B32
B33
B34
B35
B36
B37
B38
B39
B40
B41
B42
B43
7
11
1
1
6
6
6
6
6
1
4
1
3
3
3
3
3
3
1
1
1
1
1
1
6
2
2
1
1
1
1
1
1
1
1
4
4
1
1
1
1
1
2
6
1
1
4
1
1
1
2
4
4
1
2
1
1
2
1
1
1
1
1
2
1
1
1
1
1
1
1
1
1
1
1
1
1
1
1
1
1
1
1
1
1
B44
B45
B46
B47
B48
B49
B50
B51
B52
B53
B54
B55
B56
B57
B58
B59
B60
B61
B62
B63
B64
B65
B66
B67
B68
B69
B70
B71
B72
B73
B74
B75
B76
B77
B78
B79
B80
B81
B82
B83
B84
B85
Cross element machine screw
Cross flat - ended spindle screw
Switch box cover
High and low screw
main switch
Waterproof cover pressing plate
Waterproof cover pressing plate
High and low screw
wire connector
connector sleeve
cable hose
Cable cover
ground terminal
micro wire
High and low screw
micro wire cover
micro switch
O-ring
pressure release valve end screw
O-ring
O-ring
clamping ring
O-ring
pressure release valve core
O-ring
pressure release valve cover
pressure release valve spring
pressure release valve handle
O-ring
O-ring
pressure holder valve body
O-ring
plunger ring
pressure holder valve handle
pressure holder valve spring
pressure holder valve cover
pressure holder valve spring
headless screw
Cross leveling screw
out water pump connector
Special sealing
o-ring
soket head cap screw
spring shim
water inlet connector
Triangle ring
K1200 one way valve seat
o-ring
one way valve core
one way valve spring
K 1200 one way valve body
Pump head
soket head cap screw
Mid-pump
sealing
guide sleeve
sealing
BCNT piston
BCNT piston spring
Plunger baffle
o-ring
soket head cap screw
Spring shim
Flat gasket
Flat gasket
Swash plate
Hexagon self-locking nut
Rubber foot
soket head cap screw
Flat gasket
Motor
Front cover of Motor
Motor cover
Back cover of Motor
wind page
wind scooper
wind scooper
hexagon screw
Pan head screws with cross
Motor le bracket
Motor right bracket
sealing gasket
switch box
Capacitance
Wire groove
12 PARTS LIST
PARTS LIST PART-B (PUMP)

NOTE

NOTE

NOTE

TOLSEN is a trademark or
registered trademark of TOLSEN
TOOLS. All rights reserved.
MADE IN CHINA
TOLSEN TOOLS
CO.,LIMITED
www.tolsentools.com
Table of contents
Other TOLSEN TOOLS Pressure Washer manuals


