Tonax Bellman BE8102 User manual

EN
Bellman
BRUGERVEJLEDNING
Håndledsvibrator
BE8102
Side 2
Introduction
The Visit system consists of a number of radio transmitters and receivers. The
transmitters detect different events in the surrounding area and transmit a radio
signal to the receivers. The receivers pick up this signal and provide indications using
light, sound and/or vibration.
The transmitter determines what type of light, sound or vibration should be displayed
so that the reason for the indication is evident. Read through the entire user manual
first and then start to install the system.

Side 3
Getting started
Unpacking, installing and testing the unit
The Charger is usually placed on a level surface and the Wrist Receiver should
normally be fastened around the wrist or placed in the Charger.
1. Remove the small paper tab sticking out of the battery cover (9) and connect
the power supply unit to the mains voltage and to the rst power supply unit
socket (15). The green LED (10) should come on and stay on as long as the
Charger is powered by an external power supply.
2. Place the Wrist Receiver in the Wrist Receiver Charger. The green LED (12)
should light up. If the battery is completely flat, the Wrist Receiver starts up but
can only be used when placed in the Charger until it has been charged for
approximately two hours.
3. Connect a BE1270 Bed-shaker (accessory) to the socket (14) and press the
Charger’s Test Button (11). The Bed-shaker should vibrate as long as the
button is pressed. Please note that when the Test Button (11) is pressed, the
Charger is only powered by the back-up batteries.
4. A Visit transmitter is required to test the radio reception. Press the test button
on the Visit Transmitter. The Wrist Receiver will emit a light signal and will
vibrate via the connected Bed-shaker. Please note that the Wrist Receiver itself
does not vibrate when it is placed in the Charger.
5. The Wrist Receiver is used around the wrist just like a wristwatch.
The BE1560 Visit Wrist Receiver is placed in the BE1570 Bellman Visit Wrist Receiver
Charger in order to charge it and to connect, via the Charger, a BE1270 Bellman Bed-
shaker (accessory) which is placed under the pillow to wake up the user. Charging is
controlled by the Wrist Receiver and takes up to 8 hours. During charging, the LED
(12) on the Wrist Receiver will light up green.
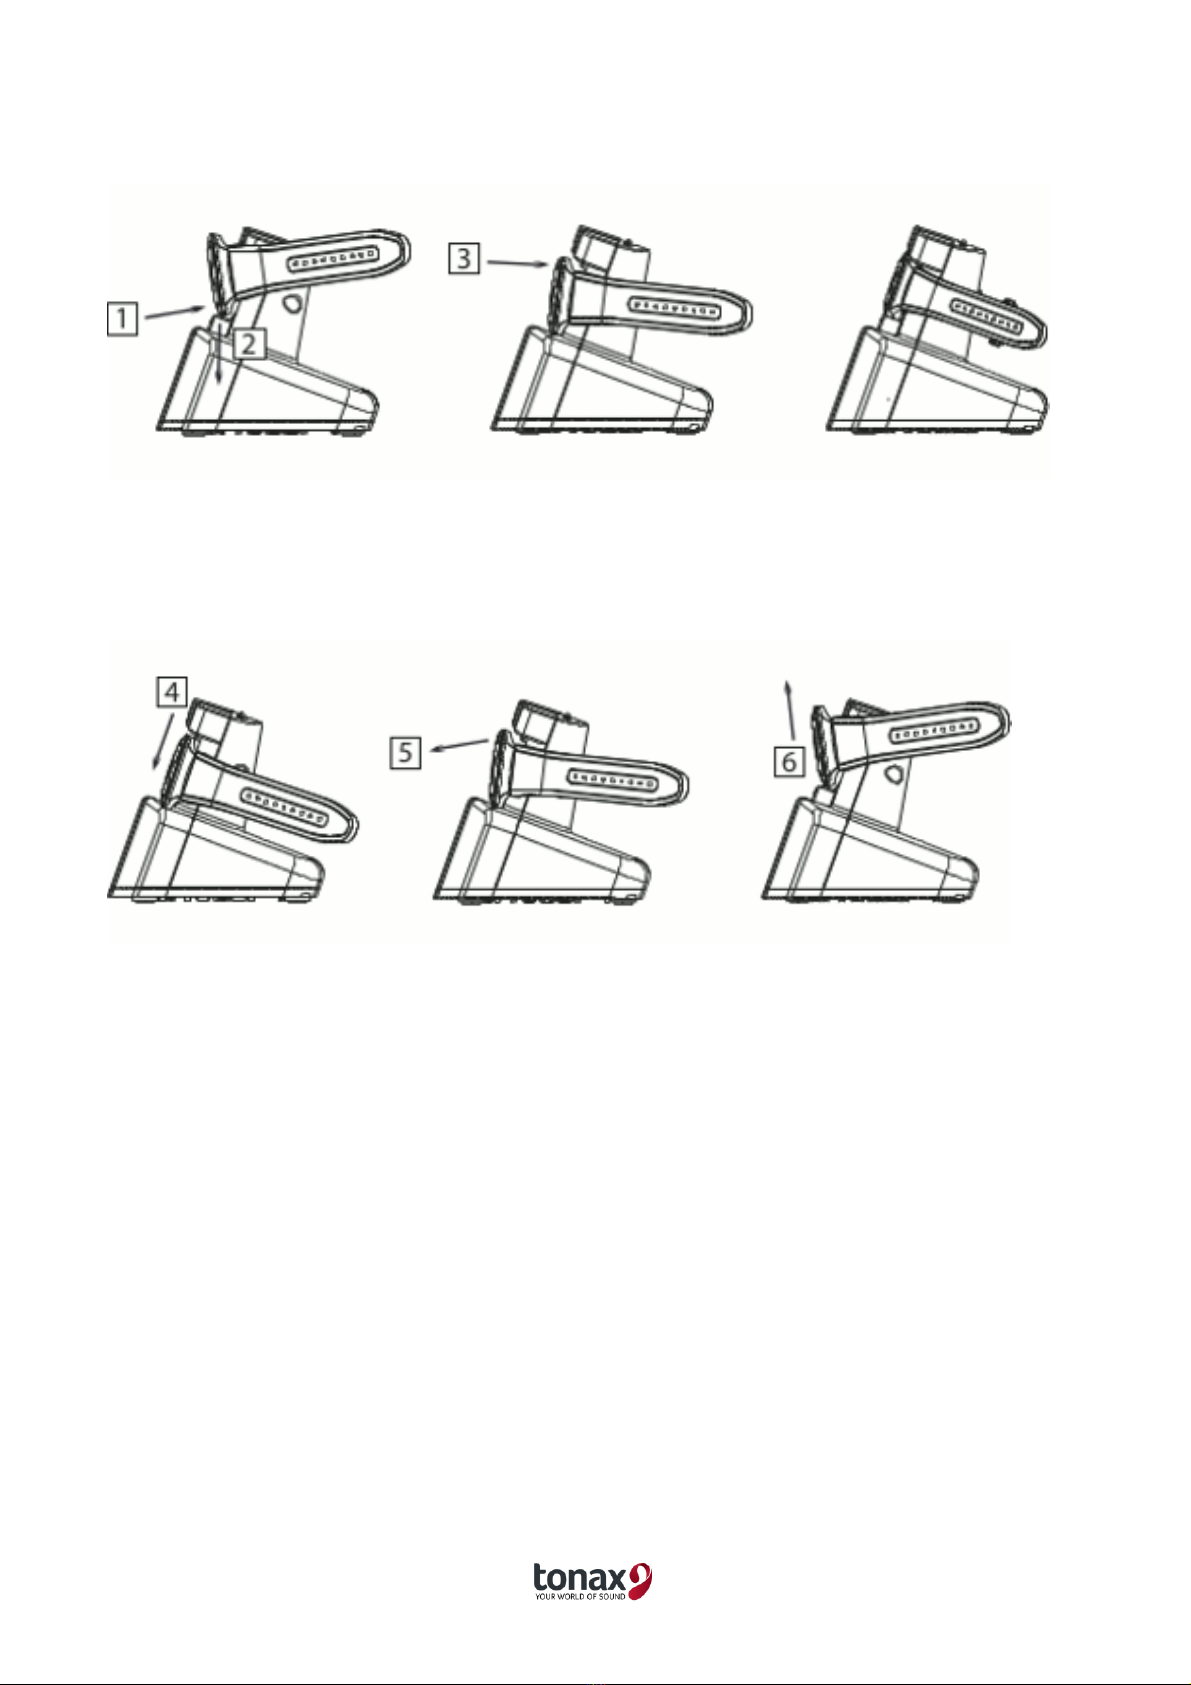
To charge the Wrist Receiver:
1. Angle the Wrist Receiver slightly outwards so that the 2 small holes in the edge
of the Wrist Receiver point downwards and move it towards the lower
moveable part of the Charger.
2. Press the Wrist Receiver and the moveable button downwards.
3. Move the upper part of the Wrist Receiver towards the back edge and release
carefully. The green LED (12) should light up.
Side 4
To use the Wrist Receiver when it has finished charging:
1. Press the Wrist Receiver and the moveable button downwards.
2. Angle the upper part of the Wrist Receiver.
3. Lift the Wrist Receiver out of the Charger.

Side 5
Function
General
The BE1560 Visit Wrist Receiver is a receiver in the Visit System and the BE1570
Bellman Visit Wrist Receiver Charger is a charger used to charge the Wrist Receiver’s
internal battery. Both products are for indoor use only and the Wrist Receiver attracts
the attention of the user using light and vibrations. Normally the Wrist Receiver
Charger should always be connected to mains power via the power supply unit, thus
automatically charging its internal back-up batteries. This enhances safety since the
back-up batteries remain operational even when there is a power failure.
If the Wrist Receiver is connected to the Charger, a BE1270 Bed-Shaker (accessory)
can also be connected and will therefore also be alerted to events while the Wrist
Receiver is being charged. This combination provides better functionality through
the Bed-shaker alarm options when the user is sleeping.
It is activated via radio signals from any transmitter within the Visit System.
Radio key
On delivery all Visit units are tuned to the same Radio Key. If you have a neighbour
with a similar system, you can change to different Radio Keys so that you do not
affect each other’s systems.
The Radio Key on this receiver can be changed by holding down the Function Button
(1) for about five seconds until the LEDs (3) and (4) blink alternately. Release the
Function Button (1) and then press the transmitter’s test button so that the receiver’s
LEDs l j m k (2-5) blink to confirm that the Radio Key has been changed. All units in a
Visit System must have the same Radio Key in order to operate as a group. Refer to
the user manual for the relevant unit.
Please note:
All Bellman Visit products within the same system must be tuned to the
same Radio Key in order to operate as a group.

Side 6
Indicators and Signals
It is generally the transmitters in the Visit System that determine how the receivers
will indicate an alarm. See the description in the relevant transmitter user manual for
further information.
System indicators
The LEDs (2 - 5) that indicate which transmitter has activated the Visit Wrist Receiver
normally have the following meanings:
Orange LED (2) indicates a baby monitor.
Green LED (3) indicates a door transmitter.
Yellow LED (4) indicates a telephone transmitter.
Red LED (5) indicates a smoke alarm.
If the green (3) and yellow (4) LEDs blink alternately, this indicates that the Wrist
Receiver is in radio key selection mode. The Wrist Receiver will then wait for a radio
signal from a transmitter in the Visit system which will adjust the receiver to the same
Radio Key as the transmitter is tuned to.
Vibration
The built-in vibrator in the Wrist Receiver vibrates differently according to which
transmitter has activated the Wrist Receiver. Refer to the user manual for the
relevant Visit transmitter for more information about vibration patterns.
A BE1270 Bed-shaker (accessory) can be connected to the Charger so that the Wrist
Receiver can also be used when sleeping. The Bed-shaker is placed under the pillow
and when the Wrist Receiver is placed in the Charger to charge it during the night,
the user is woken by the bed-shaker when the Visit Wrist Receiver is activated.
Please note! The Wrist Receiver will not vibrate whilst inserted in the Wrist Receiver
Charger. A BE1270 Bed-shaker (accessory) must be connected to the Charger to
provide a vibratory alert. Other indicators will act as normal.
Apart from a Bed-shaker, it is also possible to connect other products such as the
BE1370 Alarm Clock Pro to the vibrator output.
Power supply
If the LED (6) on the Wrist Receiver blinks yellow for a short period, this means that
the battery is flat and must be charged. Only use rechargeable VARTA V40H type
NiMH batteries for the Wrist Receiver.
If the LED (12) on the Wrist Receiver Charger lights up green, this indicates that the
Wrist Receiver is connected to the Charger and that the Wrist Receiver’s battery is
Side 7
being charged.
If the LED (10) on the Wrist Receiver Charger lights up green, this indicates that the
Charger is connected to the power supply unit and that the Charger is powered by
mains voltage.
If the LED (10) on the Wrist Receiver Charger blinks green, this indicates that the
Charger is powered by the back-up batteries. Only use rechargeable TMK AAA60CT
type NiMH batteries for the Wrist Receiver Charger.
Please note:
The Visit Wrist Receiver and Bellman Visit Wrist Receiver Charger CAN
ONLY BE USED WITH RECHARGEABLE NiMH BATTERIES!
Non-rechargeable batteries will start to leak if recharged! The acid in the batteries
will damage the electronics in the BE1560 Visit Wrist Receiver and the BE1570 Wrist
Receiver Charger. The resulting damage will not be covered by any guarantee. Only
use Varta V40H batteries for the Wrist Receiver and TMK AAA60CT batteries for the
Charger.
Troubleshooting in brief
PROBLEM
SOLUTION
Nothing happens.
Check that the power supply unit is connected
correctly and that the green LED (10) on the
Charger lights up.
Charge or renew the battery in the Wrist Receiver.
Only use a rechargeable VARTA V40H NiMH
battery. If the battery is completely flat, you can
still use the Wrist Receiver by placing it in the
Charger. The Wrist Receiver needs to be charged
for about two hours before it can be used
separately.
Check that the Wrist Receiver has been correctly
placed in the Wrist Receiver Charger and that the
LED (12) lights up green.
It is not possible to charge the
Wrist Receiver.
Check that the power supply unit is connected
correctly and that the green LEDs (10 and 12) on
the Charger light up.
Charge or change the batteries in the Wrist
Receiver Charger. Only use rechargeable TMK
AAA60CT NiMH batteries.

Side 8
Nothing happens when the
power supply unit is
disconnected. Nor does the Test
Button (11) work.
Charge or renew the batteries in the Charger.
Only use rechargeable TMK AAA60CT NiMH
batteries.
The LED p (6) on the Wrist
Receiver blinks yellow.
Charge or renew the battery in the Wrist Receiver.
Only use a rechargeable VARTA V40H NiMH
battery. If the battery is completely flat, you can
still use the Wrist Receiver by placing it in the
Charger. The Wrist Receiver needs to be charged
for about two hours before it can be used
separately.
The Bed-shaker does not vibrate
when the Wrist Receiver is
activated.
Check that the bed-shaker is correctly connected
to the Wrist Receiver Charger.
Check that the Wrist Receiver has been correctly
inserted in the Wrist Receiver Charger and that
the LED (12) lights up green.
The Wrist Receiver is not
activated.
Check the batteries in the transmitters.
Check that the Wrist Receiver is not placed too far
away from the transmitters by moving it closer to
the transmitters.
Check that the Wrist Receiver is set to the correct
Radio Key. For further information see
Function/Radio key.
The receivers in the system
transmit signals for no reason.
Change the Radio Key on all units in the system.
For further information see Function/Radio key.

Side 9
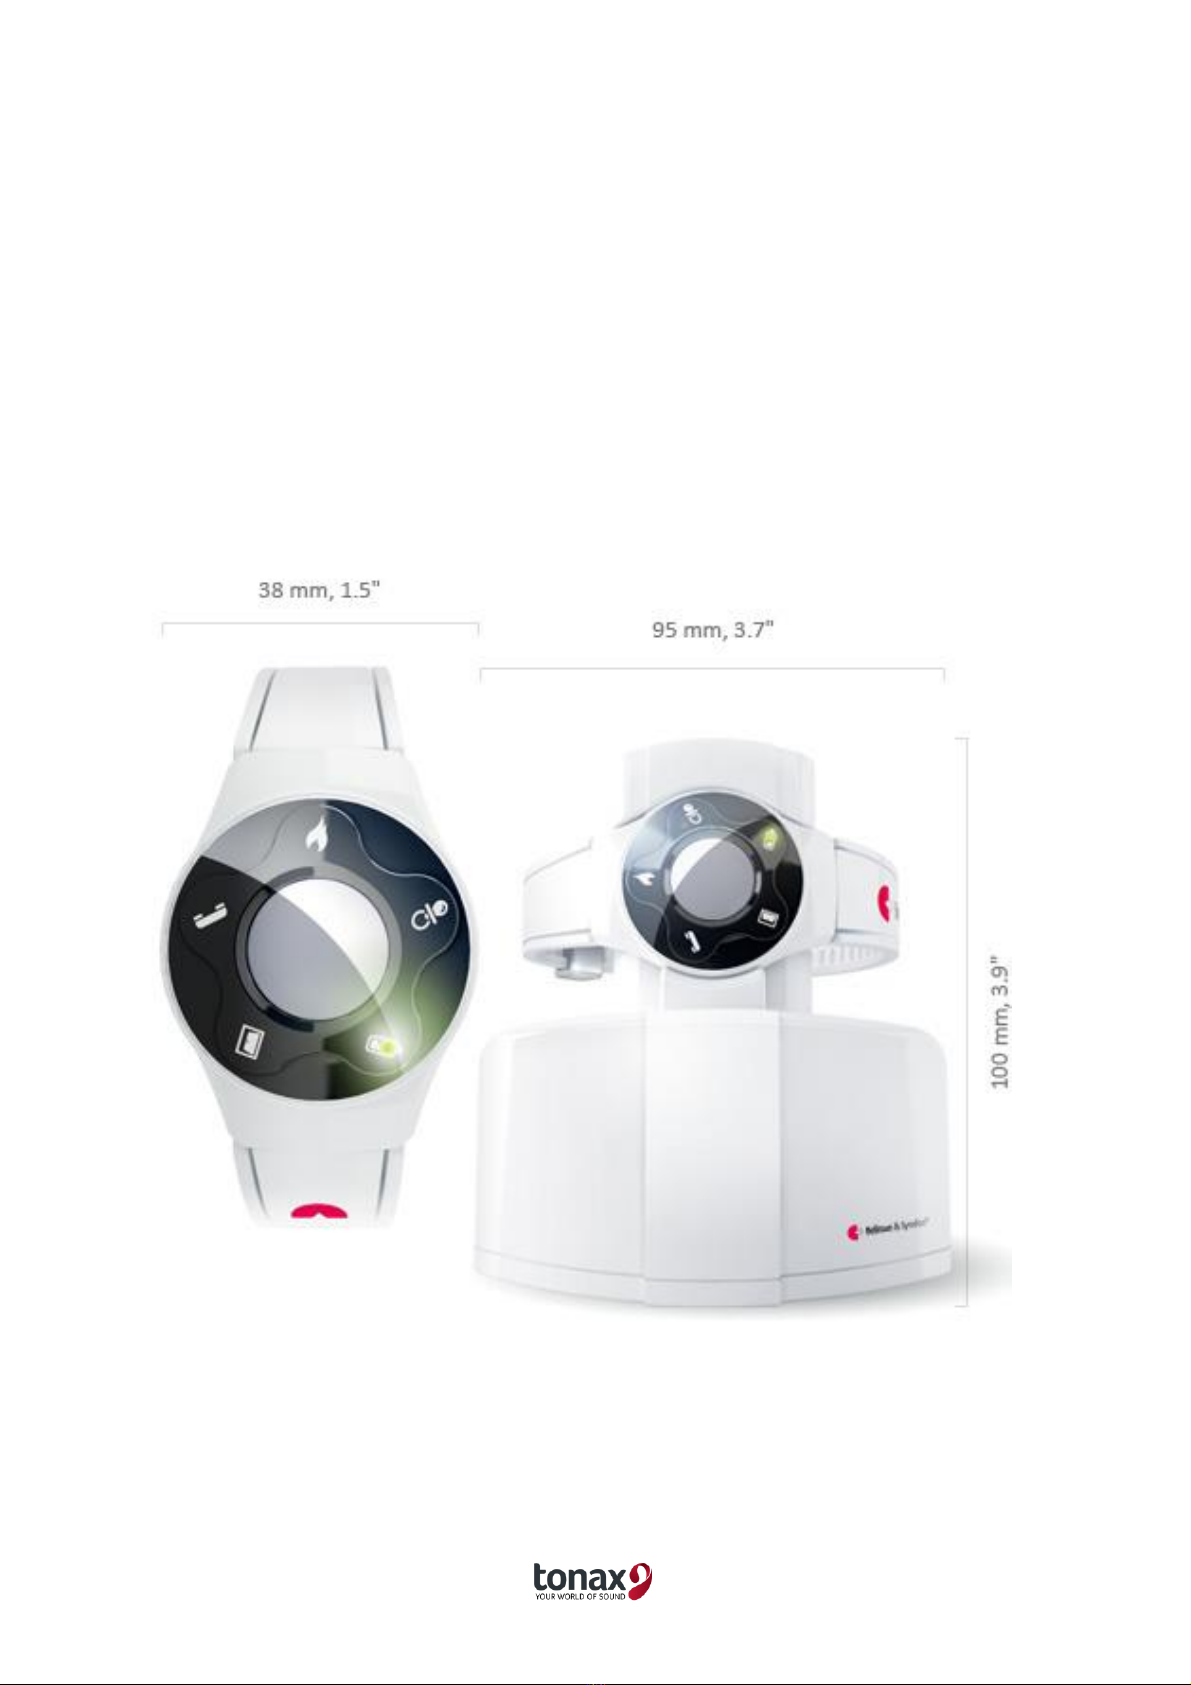
Technical illustration
1. Function button
2. Orange LED
3. Green LED
4. Yellow LED
5. Red LED
6. Yellow low battery
LED indicator
7. Wrist Receiver battery
cover
8. Wrist Strap
9. Charger battery cover
10. Green LED for mains
connection
11. Test button
12. Green LED for
charging Wrist Receiver
13. Charging area for
Wrist Receiver
14. Bed-shaker socket
15. Power supply unit
socket
Table of contents
Popular Receiver manuals by other brands


Settop
Settop M1 user manual

Edision
Edision agrus vip3 Magicvision Quick user guide

Philips
Philips DSR 9004 quick start guide

Kenwood
Kenwood DDX6706S quick start guide

Scientific Atlanta
Scientific Atlanta PowerVu D9850 Installation and operation guide

Scientific Atlanta
Scientific Atlanta Cox Business Video Digital Receivers user guide


