Tone Bliss Crunch Machine User manual

Tone Bliss
Crunch Machine
Crunch MachineCrunch Machine
Crunch Machine
User guide

2

3
Content
Page
1. Tone Bliss amplifiers 4
2. General warning 4
3. Description 5
3.1. Front panel 5
3.2. Rear panel 6
4. General operation 7
4.1. Channels 7
4.2. Power-up 7
4.3. Rectifier mode 7
4.4. Output power selection 8
4.5.Warning 9
5. Distortion types 9
6. Classic channel 10
7. Rock channel 11
8. Footswitch 12
9. Maintenance 13
10. Settings cheat sheets 14
11. Contact 14
Note
:
throughout this document, all controls are referred to with a blue number (example :[6]), which
you will also find on front & rear panel descriptions.

4
1.
Tone Bliss
Tone BlissTone Bliss
Tone Bliss
amplifiers
Congratulations ! You have just acquired a
Tone Bliss
amplifier, a true masterpiece of quality
and durability. Like all
Tone Bliss
amps, the
Crunch Machine
:
Is 100% handmade in Europe
Uses only highest-quality components
Is end-to-end managed by
Tone Bliss:
design, manufacturing, tests etc… are all
performed by
Tone Bliss
.
2. General warning
Thanks for thoroughly respecting the following guidelines in order to ensure a safe and durable
operation of your amplifier:
Place your amplifier on a stable surface and in an ventilated place.
Do not expose the amplifier to moist or liquids.
Do not open the amplifier on your own. If you encounter a technical problem, contact
Tone Bliss
Connect your amplifier exclusively to an earthed power outlet (230VAC).
Never power your amplifier before having connected a load (speaker or power
attenuator).
Always connect your load to the speaker outputs [18] connector showing the same
impedance: connecting the amplifier to a mismatched load can damage the amplifier.
Systematically wait 5 mn before switching the standby [3] switch in the Home or Stage
position. This allows the tubes to heat-up and reach their operating conditions. For more
details, please go to chapter 4.2 Power-up.

5
3. Description
3.1. Front panel
Below is a representation of the
Crunch Machine’
s faceplate:
You will find the following controls:
[1] Power : powers-up the amplifier and allows to choose the rectifier mode
[2] Power indicator
[3] Standby : puts the amplifier in standby mode or activates the amplifier with the
selected power level
[4] to [10] Rock channel: see chapter 7
[11] Channel switch
[12] Channel indicator
[13] to [15] Classic chanel: see chapter 6
[16] Input : guitar input connector
6
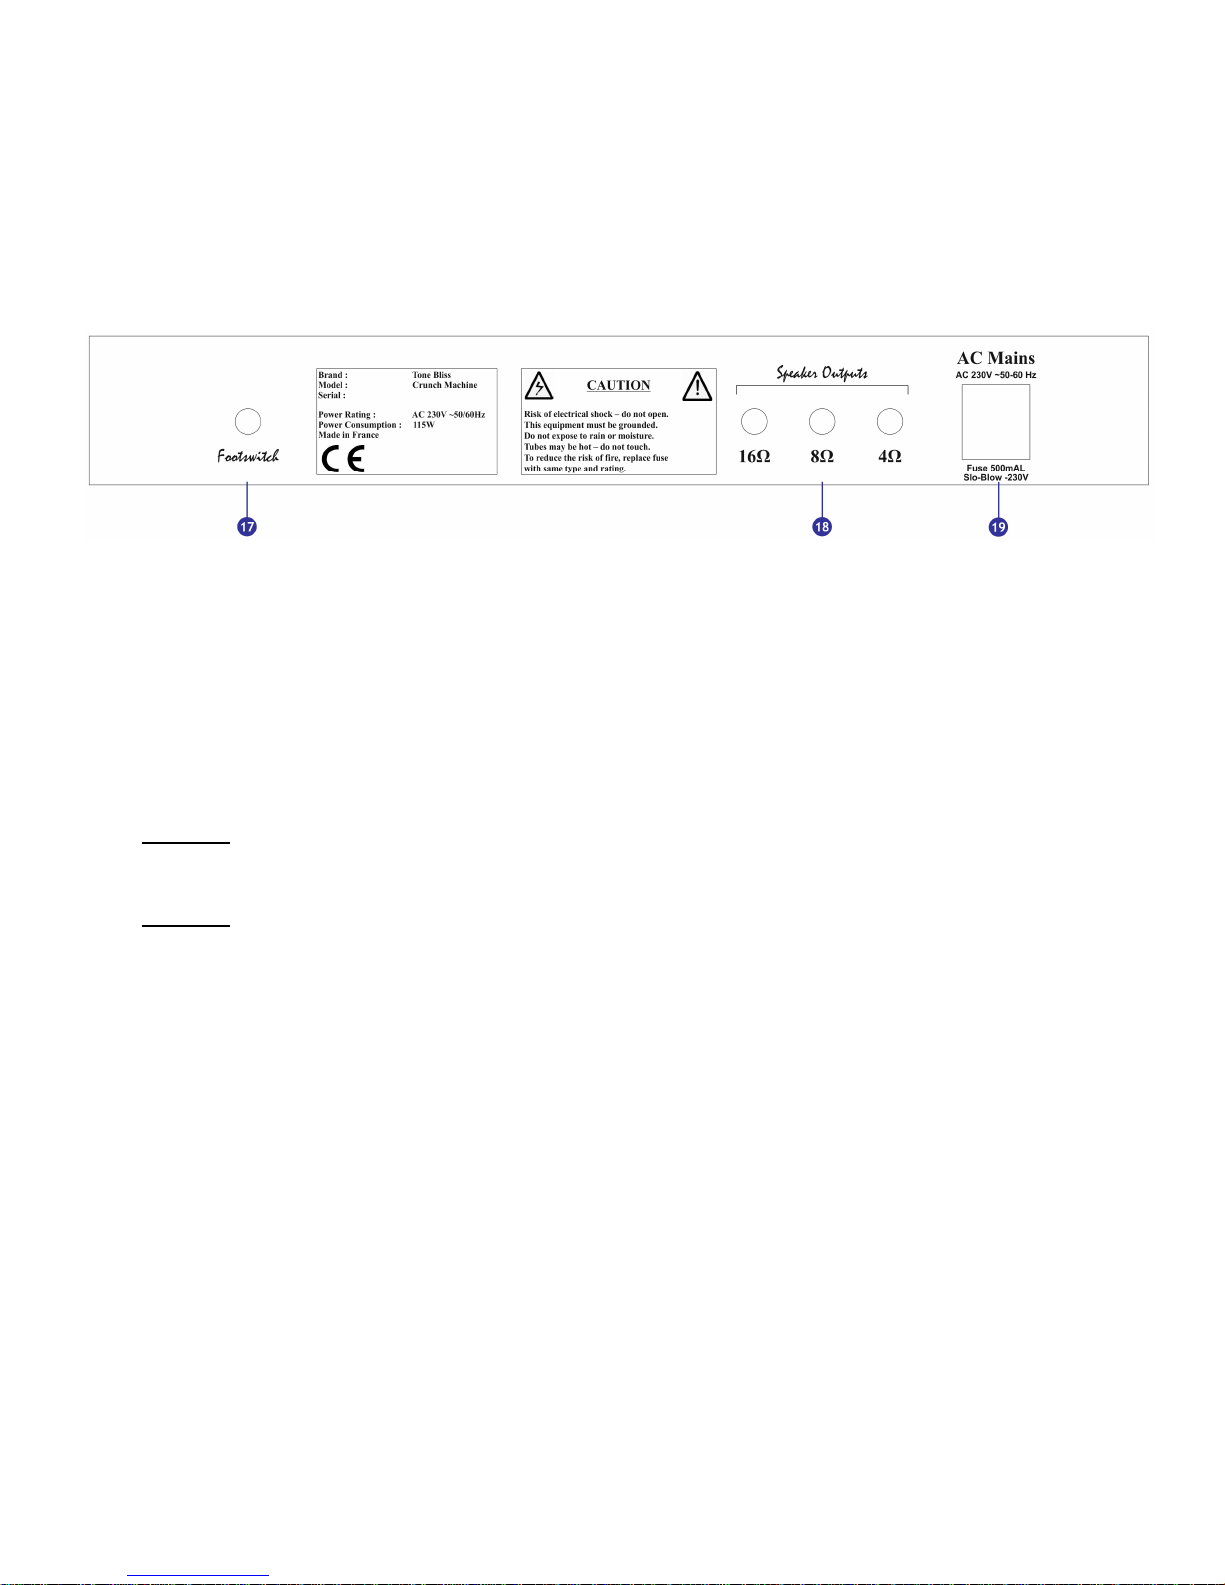
3.2. Rear panel
Below is a representation of the
Crunch Machine’s
rear faceplate :
You will find the following controls :
[17] Footswitch : allows to connect a footswitch to control the amplifier
[18] Speaker outputs : allow to connect your speakers to the amplifier. 3 outputs are
available, each one corresponds to a specific impedance: 4Ω, 8Ωor 16Ω.
[19] AC Mains : connects the amplifier to the power outlet. The AC Mains connector
includes a fuse compartment to protect the amplifier from electrical problems.
Warning : use only one speaker ouput [18] to connect your load to the amplifier. Do not use
two speaker output connectors at the same time.
Warning : if your fuse blows, replace it only with a fuse having the same specifications
(500mA, 230V – Slow Blow)

7
4. General operation
4.1. Channels
The
Crunch Machine
has 2 channels :
A Classic channel, which provides a smooth, full tone with a rich harmonic content.
A Rock channel, based on a Plexi-type circuit. This channel will allow you to reach
higher levels of ‘crunch’ and overdrive.
The channel [11] switch allows you to activate one or the other channel.
You can also use the footswitch to select your channel. See chapter 8. Footswitch for more
information.
4.2. Power-up
1) Check that the power [1] switch is in the off position, and the standby [3] switch is in the
standby position. The volume knobs on both Classic and Rock channels should be set on
0.
2) Connect a load to the appropriate speaker output [18] (showing the same impedance).
3) Connect the amplifier to an earthed 230VAC outlet
4) Put the power [1] switch in the S.S. or Tube position, depending on the desired rectifier
mode (see chapter 5.3 for more details)
5) Wait 5 mn before putting the standby [3] switch in the Home or Stage position,
depending on the desired maximum output power level (see chapter 5.4 for more details)
4.3. Rectifier mode
The
Crunch Machine
offers 2 selectable rectifier modes, which influence the amplifier’s power
supply:

8
In Tube mode, the supply voltage is rectified by an EZ81 (like in most vintage
amplifiers). This rectifier mode offers a slightly compressed tone.
In S.S. (Solid State) mode, the supply voltage is rectified by silicium diodes (like most
modern amplifiers). This rectifier mode offers a stiffer, direct tone. Your amplifier will
also have more headroom, the range of clean tones becomes larger.
The rectifier mode is selected thanks to the Power [1] switch:
In the middle position, your amplifier is Off : the amplifier is unpowered
In the upper position, your amplifier is powered and is in Tube mode
In the lower position, your amplifier is powered and is in S.S. mode
To swap from one rectifier mode to another, follow the ‘rectifier mode selection’ procedure
below: 1. Put the amplifier in Standby : put the Standby [3] switch in the middle position
2. Wait for 30 seconds
3. Turn the amplifier Off : flip the Power [1] switch to the middle position
4. Select the desired rectifier mode (Tube or S.S.)
5. Wait for a few minutes to let the tubes heat-up
6. Select the Stage or Home mode depending on the desired output level (see next
chapter).
4.4. Output power selection
The
Crunch Machine
allows you to select the maximum output level in order to take advantage
of its tone in any situation:
In Stage mode, your amplifier has its full 18 watts power range. This power level is
sufficient to play on small to medium-sized stages.
In Home mode, the maximum output power is approximately 4 watts. This power level
allows you to play at home while ‘pushing’ the power tubes and using all the settings
offered by your
Crunch Machine
.
The selection of the output power level is done thanks to the Standby [2] switch:
In the middle position, your amplifier is on Standby : only the tubes heating system is
active
In the upper position, your amplifier is in Stage mode
In the lower position, your amplifier is in Home mode
Whether in Stage or in Home mode, your amplifier is operational : you are ready to play !

9
To swap from one mode to the other without changing the rectifier mode, follow the ‘power
level mode selection’ procedure below:
1. Put the amplifier on Standby : flip the Standby [3] switch in the middle position
2. Wait for 30 seconds
3. Put the amplifier in Stage or Home mode depending on the desired output power
level (see former chapter).
4.5.Warning
Not respecting the rectifier mode selection procedure or the power level mode selection
procedure can damage your amplifier.
5. Distortion types
Before reviewing the operation of your amplifier, here is a short technical description of the
different types of distortions. This will help you better understand the specificities of tube
amplifiers, and therefore help you get the best out of your
Crunch Machine
.
An amplifier is built around 3 main blocks:
the preamplifier, which shapes the signal of your guitar (through the tone settings, boost
etc…) and amplifies the signal’s voltage
the power amplifier, which amplifies the current of the signal retrieved from the
preamplifier, and sends it to the load (i.e. your speakers)
The power supply, which converts the 230VAC voltage into voltage levels appropriate to
power the preamplifier and the power amplifier.
Each block uses different tubes, and each tube is used in a different way. When the tubes are
‘pushed’ in certain conditions, they produce this very specific and sought-after ‘tube’ distortion.
But you surely got the point: each of the afore-mentioned blocks produces a tone-wise specific
distortion :
preamplifier : the design of this block sets the type of preamp distortion : ‘warm’ or
‘low-gain’ for amplifiers designed between the 50s and the 70s; ‘hard’ or ‘high-gain’
after the 80s. In the ‘low-gain’ range, the dynamics of the amp are enhanced: this is
particularly well-suited for jazz, blues and light rock. In the ‘high-gain’ range, the tone is
more compressed and offers a great deal of sustain, which is ideal for more aggressive
styles, namely hard rock and metal. Generally speaking, the distortion is gradual: higher
gain settings will yield high distortion levels, which allows to easily set your desired
distortion level without changing the volume level.
10
Power amplifier: the distortion generated by increasing the amplifier’s volume is quite
different. First of all, the distortion ratio is smaller, but it highly influences the harmonic
content of your tone. Without getting ino the science behind it, this type of distortion
produces a warm, creamy tone. It is generally referred to as ‘overdrive’. Second, this
distortion interacts with the volume, in a non-linear way: above a certain threshold (called
‘breakup’), the volume of the amplifier does not increase anymore ; only the distortion
increases. This allows you to play the ‘old-fashion’ way: you can control the overdrive
level simply by adjusting the volume on your guitar; or even by controlling the attack of
your pickup on your strings.
Power supply : many modern amplifiers -even tube-based- use a solid state rectifier for
the power supply. It’s cheap and compact, unlike the tube rectifiers found in pre-60s
amplifiers. The power supply itself does not generate any distortion per say, but it
influences the dynamics of your tone. An S.S.-rectified amplifier will sound stiff and
focused. A tube-rectified amplifier, on the other hand, will produce a slight compression,
or ‘sag’, which participates in the mellow, round tone of vintage-style tube amps.
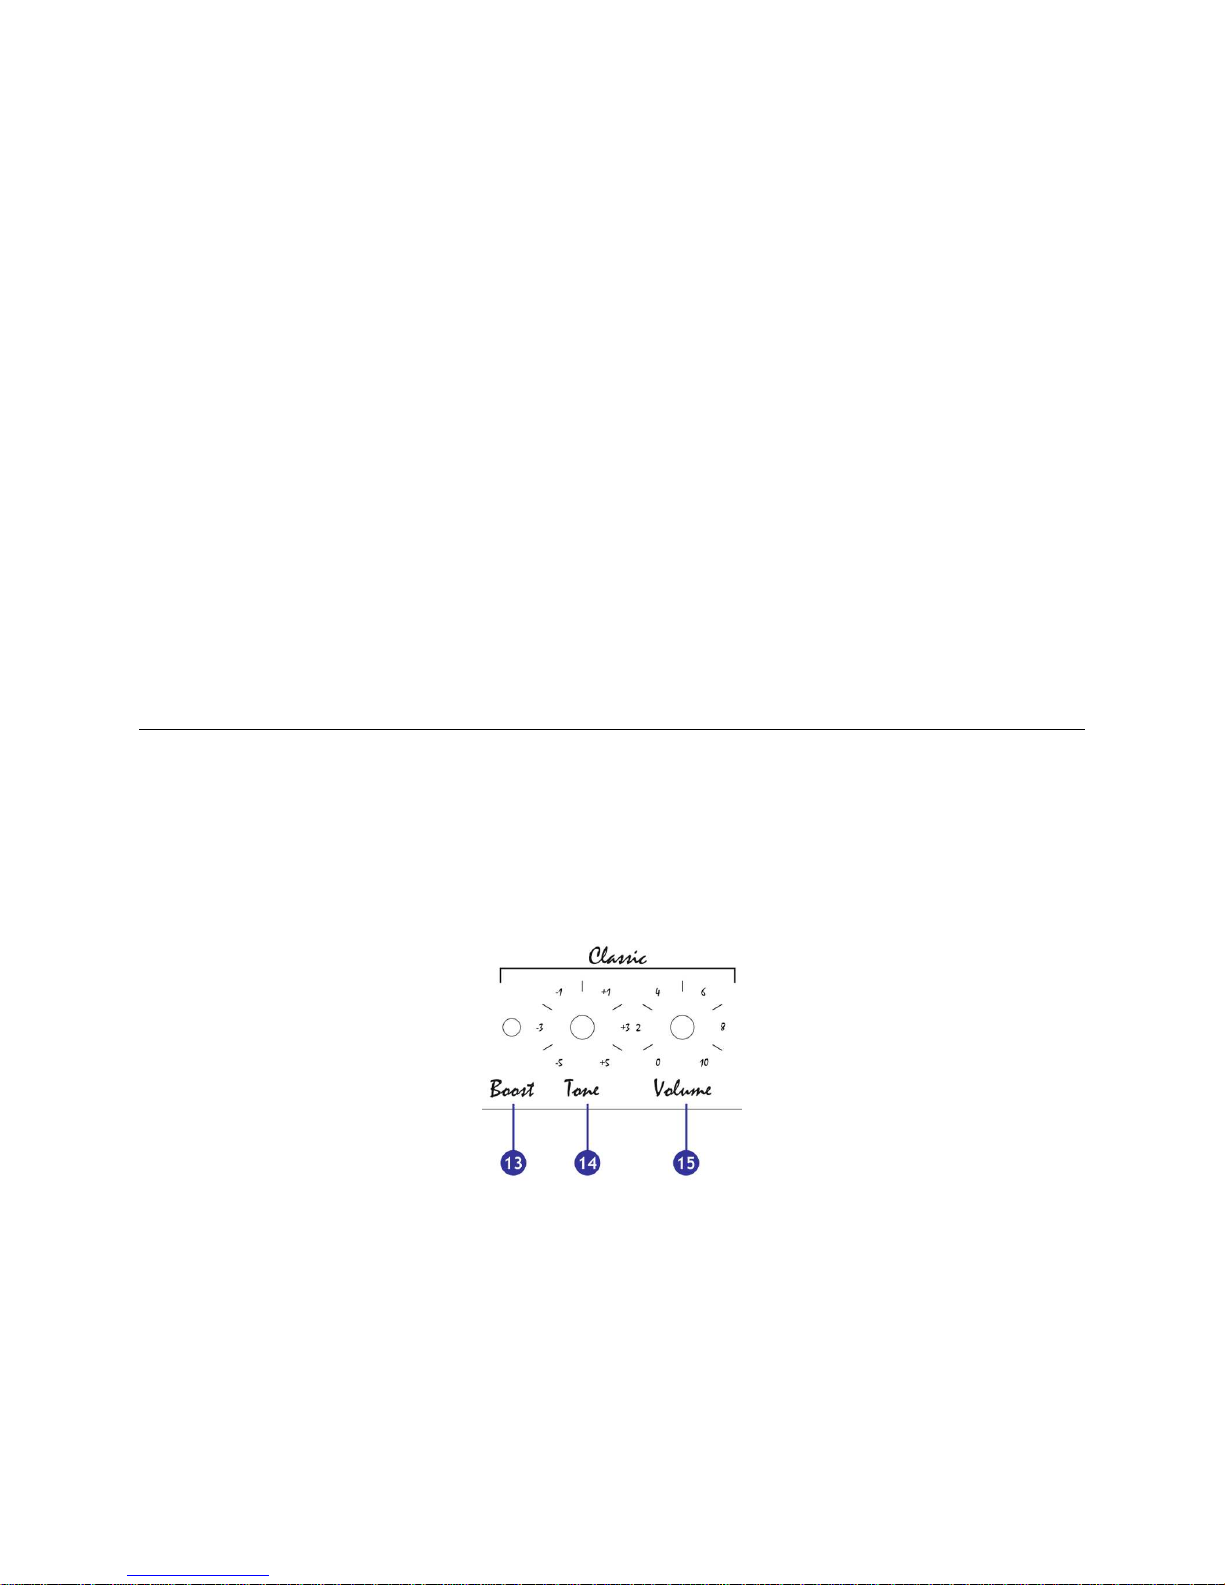
6. Classic channel
The Classic channel offers the following controls:
[13] Boost
[14] Tone
[15] Volume
Tone settings
The tone control is very progressive and efficient. Its rather high roll-off frequency allows to
keep the excellent balance between bass and mediums which is so specific to this channel.

11
Boost / volume settings
The boost [13] switch allows you to better set the ‘breakup’ threshold :
In the lower position, the boost is not active. The range of « clean » tones is wider
In the upper position, the boost is active. The range of « crunch » tones is expanded,
break-up is reached earlier.
The volume [15] control will set the perceived volume, and, as described in Chapter 5, will
influence the power tubes overdrive:
From 0 to 3, the tone stays clean. By adjusting the tone [14] setting, one can venture
in jazzy tones (by increasing the bass) or even funky tones (by adding more treble).
From 3 to 6, a slight ‘crunch’ appears. Great for classic blues.
From 6 to 10, the perceived volume stays unchanged. The volume [15] control only
influences the level of overdrive. You are now in heavy-blues and rock territory.
Note 1 : the above settings are for information only and can vary depending on the pick-ups used
on your guitar.
Note 2 : when the Classic channel is active, the Channel [11] indicator is off.
7. Rock channel
The Rock channel offers the following controls:
[4] Bright
[5] Raw
[6] Bass
[7] Middle
[8] Treble
[9] Gain
[10] Volume

12
This channel offers Plexi-style tones, definitely focused on rock styles.
Tone settings
The Bass [6], Middle [7] and Treble [8] controls allow you to shape your tone in greater detail.
The range has been limited to +/- 6 dB though, in order not to alter the Plexi-specific tone.
The Raw [5] switch, once set in the upper position, bypasses the Bass [6], Middle [7] and Treble
[8] controls. You instantly get the Plexi-specific tone applied to your raw guitar signal. The tone
has more ‘bite’ and reflects even better the personality of your guitar.
The Bright [4] switch adds some treble, independently from the Bass [6], Middle [7] and Treble
[8] settings. This can be used to give more sparkle to a humbucker pickup.
Gain / volume controls
The gain [9] control sets the preamplifier distortion level.
The volume [10] control allows to set the perceived volume ; above 6 (approximately) it sets the
power amp distortion (overdrive).
By playing with these 2 controls, you will be able to dial-in the right mix between preamp
distortion and power amp distortion.
Note : when the Rock channel is active, the Channel [11] indicator is on.
8. Footswitch
The footswitch allows to control certain functionalities from the tip of your feet. On the
Crunch
Machine
, 2 functionalities are selectable :
The boost on the classic channel
The active channel
Below is a picture of the footswitch :

13
The left-side switch [20] activates / deactivates the boost of the Classic channel.
The right-side switch [21] allows to switch from one channel to the other.
Note : the footswitch has priority over the panel switches. When the footswitch is connected,
the front panel boost and channel switches are not operational.
9. Maintenance
No maintenance is needed, apart from a tube change (to be done exclusively by an authorized
technician) once the tubes are worn.
In case a tube change is needed, no bias setting is required. Indeed, the
Crunch Machine
uses
cathode-biasing, which is auto-adjusting.
The
Crunch Machine
is complimented with JJ-Tesla tubes. You can use other brands, as long as:
The power tubes (V4 and V5) are matched
And you use the following types of tubes :
oV1, V2, V3 : 12AX7
oV4, V5 : EL84
oV6 : EZ81
20
21

14
10. Settings cheat sheets
Here-below are some blank faceplates, which will allow you to keep track of your preferred
settings :
Tone # 1 :
Tone # 2 :
Tone # 3 :
Tone # 4 :
Tone # 5 :
11. Contact
You have a question ? Contact
Tone Bliss
Table of contents


