Tool Fitness Homeform20 User manual

0
Product
Product
Product
Product may
may
may
may vary
vary
vary
vary slightly
slightly
slightly
slightly from
from
from
from the
the
the
the item
item
item
item pictured
pictured
pictured
pictured due
due
due
due to
to
to
to model
model
model
model upgrades
upgrades
upgrades
upgrades
H
H
H
H OMEFORM
OMEFORM
OMEFORM
OMEFORM 20
20
20
20 USER
USER
USER
USER ’
’
’
’ S
S
S
S
MANUAL
MANUAL
MANUAL
MANUAL
This is HIGH-POWER item; please DO NOT USE THE SAME OUTLET WITH OTHER
HIGH-POWER HOUSEHOLD APPLIANCE like air-conditioning etc.
Please choose an outlet exclusively for the machine and make sure the fuse is
10A.

1
1.
1.
1.
1. IMPORTANT
IMPORTANT
IMPORTANT
IMPORTANT SAFETY
SAFETY
SAFETY
SAFETY INSTRUCTIONS
INSTRUCTIONS
INSTRUCTIONS
INSTRUCTIONS
WARNING:
WARNING:
WARNING:
WARNING: To
To
To
To reduce
reduce
reduce
reduce the
the
the
the risk
risk
risk
risk of
of
of
of serious
serious
serious
serious injury,
injury,
injury,
injury, read
read
read
read all
all
all
all important
important
important
important precautions
precautions
precautions
precautions and
and
and
and instructions
instructions
instructions
instructions in
in
in
in this
this
this
this manual
manual
manual
manual and
and
and
and
all
all
all
all warnings
warnings
warnings
warnings on
on
on
on your
your
your
your treadmill
treadmill
treadmill
treadmill before
before
before
before using
using
using
using your
your
your
your treadmill.
treadmill.
treadmill.
treadmill. We
We
We
We assume
assume
assume
assume no
no
no
no responsibility
responsibility
responsibility
responsibility for
for
for
for personal
personal
personal
personal injury
injury
injury
injury or
or
or
or
property
property
property
property damage
damage
damage
damage sustained
sustained
sustained
sustained by
by
by
by or
or
or
or through
through
through
through the
the
the
the use
use
use
use of
of
of
of this
this
this
this product.
product.
product.
product.
1
1
1
1 .
.
.
.Before beginning this or any exercise program, consult your physician. This is especially important for persons
over age 4 5 or persons with pre-existing health problems.
2.
2.
2.
2. It is the responsibility of the owner to ensure that all users of this treadmill are adequately informed of all
warnings and precautions.
3.
3.
3.
3. Use the treadmill only as described in this manual.
4.
4.
4.
4. Place the treadmill on a level surface, with at least 8 ft. (2.4 m) of clearance behind it and 2 ft. (0.6 m) on each
side. Do not place the treadmill on a surface that blocks any air openings. To protect the floor or carpet from
damage, place a mat under the treadmill.
5.
5.
5.
5. Keep the treadmill indoors, away from moisture and dust. Do not put the treadmill in a garage or covered patio,
or near water.
6.
6.
6.
6. Do not operate the treadmill where aerosol products are used or where oxygen is being administered.
7.
7.
7.
7. Keep children under age 12 and pets away from the treadmill at all times.
8
8
8
8 .
.
.
.Never allow more than one person on the treadmill at a time.
9
9
9
9 .
.
.
.Wear appropriate exercise clothes while using the treadmill. Do not wear loose clothes that could become
caught in the treadmill. Athletic support clothes are recommended for both men and women. Always wear
athletic shoes; never use the treadmill with bare feet, wearing only stockings, or in sandals.
1
1
1
1 0
0
0
0 .
.
.
.When connecting the power cord, plug the power cord into an earthed circuit. No other appliance should be on
the same circuit. A 1 0 amp fuse should be used.
1
1
1
1 1
1
1
1 .
.
.
.If an extension cord is needed, use only a 3- conductor, 14-gauge (1 mm2) cord that is no longer than 6.5 ft.
( 2.0m)
1
1
1
1 2
2
2
2 .
.
.
.Keep the power cord away from heated surfaces.
1
1
1
1 3
3
3
3 .
.
.
.Never move the walking belt while the power is turned off. Do not operate the treadmill if the power cord or
plug is damaged, or if the treadmill is not working properly.
1
1
1
1 4
4
4
4 .
.
.
.Read, understand, and test the emergency stop procedure before using the treadmill.
1
1
1
1 5
5
5
5 .
.
.
.Never start the treadmill while you are standing on the walking belt. Always hold the handrails while using the
treadmill.
1
1
1
1 6
6
6
6 .
.
.
.The treadmill is capable of high speeds. Adjust the speed in small increments to avoid sudden jumps in speed.
1
1
1
1 7
7
7
7 .
.
.
.Never leave the treadmill unattended while it is running. Always remove the key, unplug the power cord, and
switch the reset/off circuit breaker to the off position when the treadmill is not in use.
1
1
1
1 8
8
8
8 .
.
.
.The pulse sensor is not a medical device. Various factors, including your movement, may affect the accuracy of
heart rate readings. The pulse sensor is intended only as an exercise aid in determining heart rate trends in
general.
19.
19.
19.
19. Do not attempt to rise, lower, or move the treadmill until it is properly assembled. You must be able to safely lift
45 lbs. (20 kg) to raise, lower, or move the treadmill.
2
2
2
2 0
0
0
0 .
.
.
.When folding or moving the treadmill, make sure that the storage latch is holding the frame securely in the
storage position.
2
2
2
2 1
1
1
1 .
.
.
.Do not change the incline of the treadmill by placing objects under the treadmill.
2
2
2
2 2
2
2
2 .
.
.
.Inspect and properly tighten all parts of the treadmill regularly.
2
2
2
2 3
3
3
3 .
.
.
.Never drop or insert any object into any opening on the treadmill.

2
2
2
2
2 4
4
4
4 .
.
.
. DANGER:
DANGER:
DANGER:
DANGER: Always unplug the power cord immediately after use, before cleaning the treadmill, and before
performing the maintenance and adjustment procedures described in this manual. Never remove the motor
hood unless instructed to do so by an authorized service representative. Servicing other than the procedures in
this manual should be performed by an authorized service representative only.
2
2
2
2 5
5
5
5 .
.
.
.This treadmill is intended for in-home use only. Do not use this treadmill in any commercial, rental, or
institutional setting.
26.
26.
26.
26. WARNING:
WARNING:
WARNING:
WARNING: If the supply cord is damaged, it must be replaced by the manufacturer, its service agent or similarly
qualified persons in order to avoid a bazar. This appliance is not intended for use by persons (including children)
with reduced physical, sensory or mental capabilities, or lack of experience and knowledge, unless they have
been given supervision or instruction concerning use of the appliance by a person responsible for their safety.
Children should be supervised to ensure that they do not play with the appliance.
2
2
2
2 7
7
7
7 .
.
.
.Install the treadmill on a flat level surface with a suitable volt /Hz which marked in the machine label , grounded
outlet.
2
2
2
2 8
8
8
8 .
.
.
.Allowed temperature: 5 to 40 degrees. If the treadmill has been exposed to cold temperatures, allow it to warm
to room temperature before turning on the power. If you do not do this, you may damage the console displays
or other electrical components.
1.1.
1.1.
1.1.
1.1. IMPORTANT
IMPORTANT
IMPORTANT
IMPORTANT ELECTRICAL
ELECTRICAL
ELECTRICAL
ELECTRICAL INFORMATION
INFORMATION
INFORMATION
INFORMATION
WARNING!
WARNING!
WARNING!
WARNING!
1.
1.
1.
1. NEVER use a ground fault circuit interrupt (GFCI) wall outlet with this treadmill. Route the power cord away from
any moving part of the treadmill including the elevation mechanism and transport wheels.
2.
2.
2.
2. NEVER remove any cover without first disconnecting AC power.
1.2.
1.2.
1.2.
1.2. IMPORTANT
IMPORTANT
IMPORTANT
IMPORTANT OPERATION
OPERATION
OPERATION
OPERATION INSTRUCTIONS
INSTRUCTIONS
INSTRUCTIONS
INSTRUCTIONS
1.
1.
1.
1. Understand that changes in speed and incline do not occur immediately. Set your desired speed on the
computer console and release the adjustment key. The computer will obey the command gradually.
2.
2.
2.
2. Use caution while participating in other activities while walking on your treadmill; such as watching television,
reading, etc. These distractions may cause you to lose balance or stray from walking in the centre of the belt;
which may result in serious injury.
3.
3.
3.
3. In order to prevent losing balance and suffering unexpected injury, NEVER
NEVER
NEVER
NEVER mount or dismount the treadmill
while the belt is moving. This unit starts with a very low speed. Simply standing on the belt during slow
acceleration is proper after you have learned to operate this machine.
4.
4.
4.
4. Always hold on to handrail while making control changes.
5.
5.
5.
5. A safety key is provided with this machine. Remove the safety key will stop the walking belt; the treadmill will
shut off automatically. Insert the safety key will reset the display.
6.
6.
6.
6. Do not use excessive pressure on console control keys. They are precision set to function properly with little
finger pressure.
3
2.
2.
2.
2. B
B
B
B RIEF
RIEF
RIEF
RIEF DESCRIPTION
DESCRIPTION
DESCRIPTION
DESCRIPTION
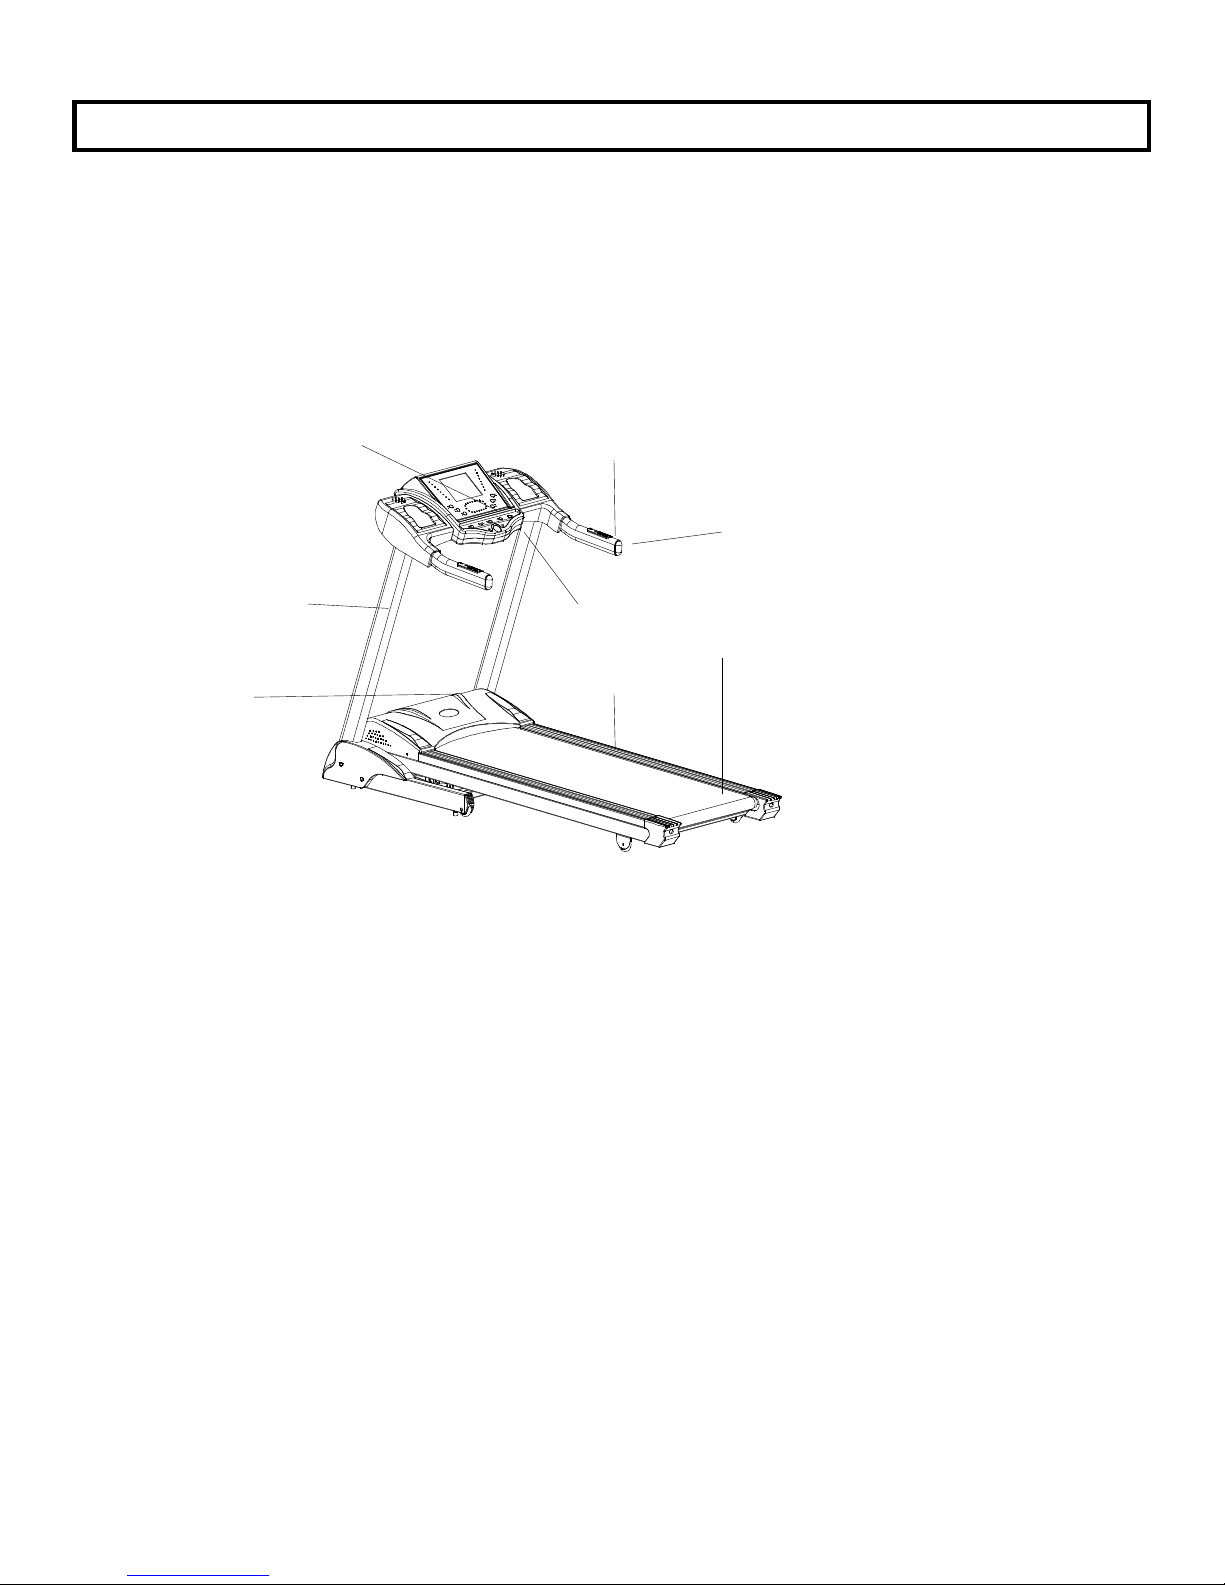
This motorized treadmill can help achieve your goal of staying fit. Together with the unique, elegant and dignified
shape, it takes a little space when folded by gasoline spring and the large Meter Panel provides easy readability of the
parameters.
Running belt
S ide rail
Heart rate sensor
Safety key
Handrail
Power
switch
U pright
Display

4
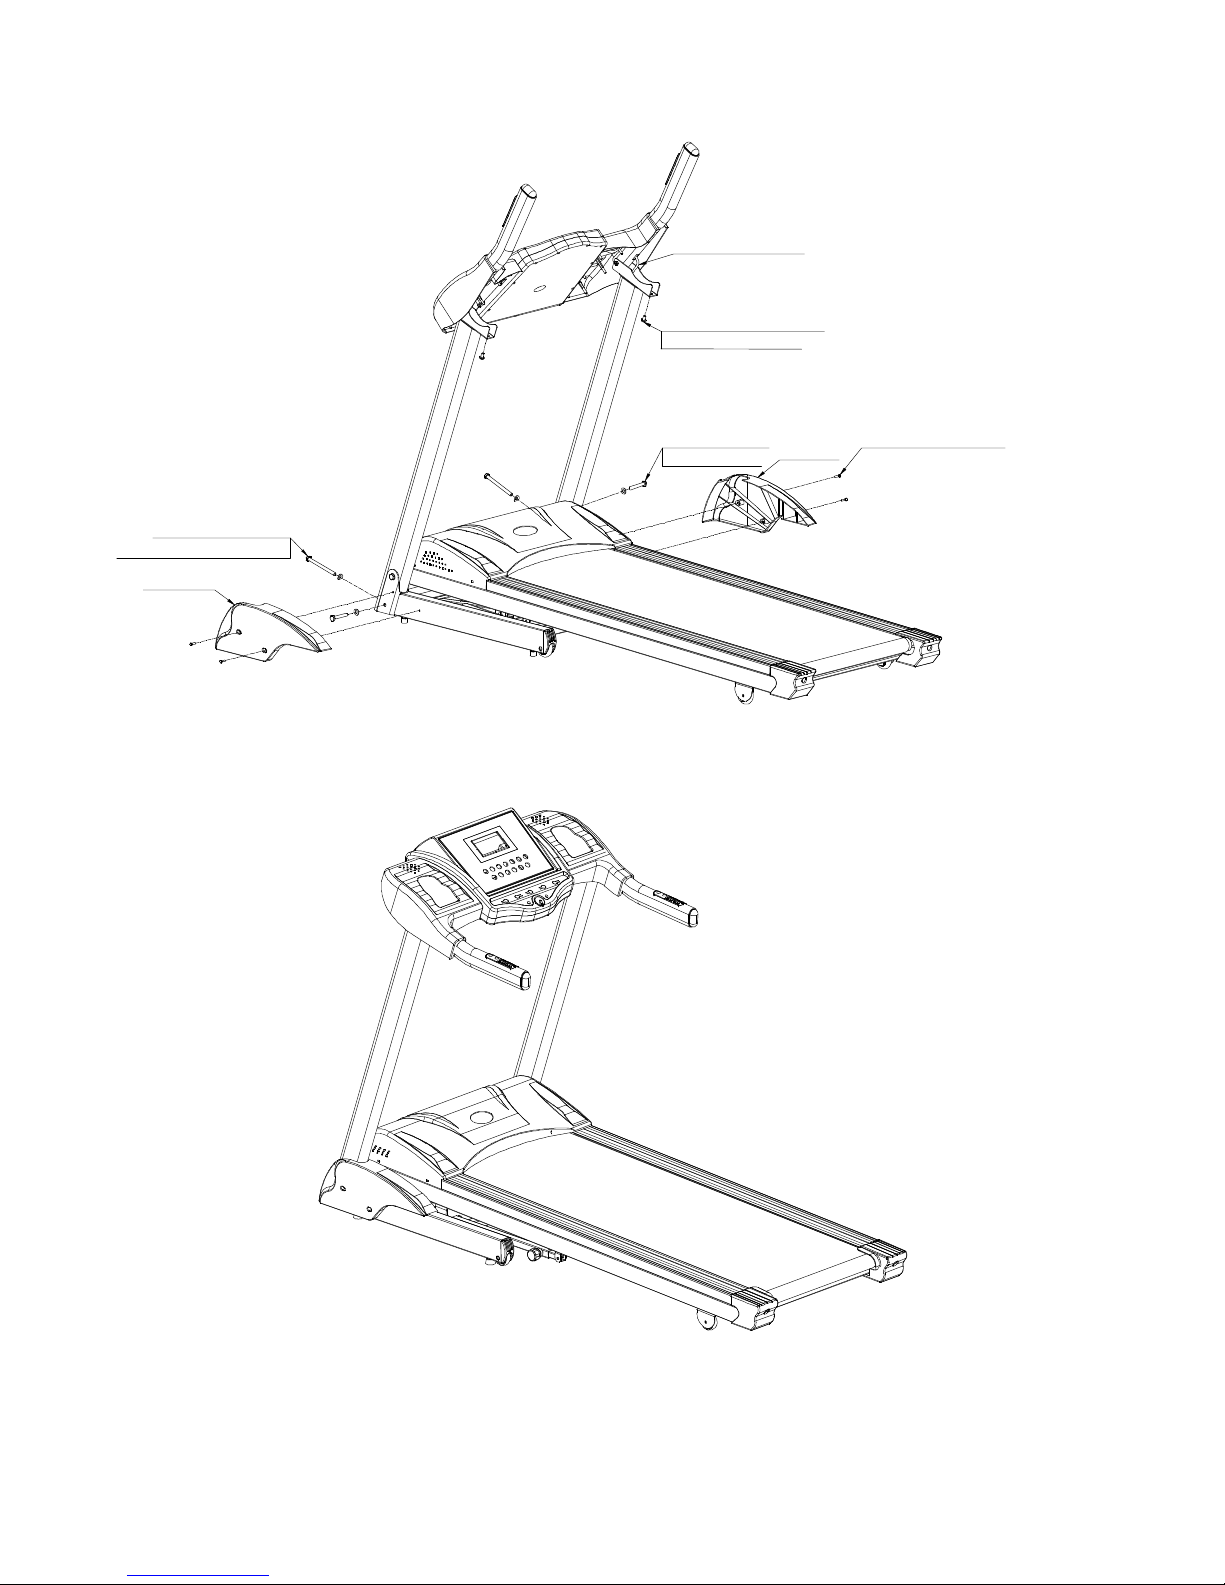
3. INSTALLATION
INSTALLATION
INSTALLATION
INSTALLATION GUIDE
GUIDE
GUIDE
GUIDE
Caution:
Caution:
Caution:
Caution:
Not cut the white tie on the upright
before you carry out the treadmill from
the box.
Right!
Wron
g
Caution
Caution
Caution
Caution :
Do not insert the finger when
install the console (meter).
Wrong!
Do not cut the wire. Check the wire
pins is connected well, each pin
should well.
Caution:
Caution:
Caution:
Caution: The wire pin usually will deflection, please check it carefully when connect.

5
Please check
the position of
the heads. Do
it carefully.

6
1
2
7
hex bolt M10*60*2pcs
flat washer D10*2pcs
cross screw M5*10*4pcs
hex bolt M10*120*2pcs
saddle washer D10*2pcs
pan hex screw M8*16*2pcs
flat washer D8*2pcs
left upright cover
right cover
console cable

8
4.
4.
4.
4. OPERATION
OPERATION
OPERATION
OPERATION INSTRUCTIONS
INSTRUCTIONS
INSTRUCTIONS
INSTRUCTIONS
4.
4.
4.
4. 1.
1.
1.
1. C
C
C
C onsole
onsole
onsole
onsole keys
keys
keys
keys
( 9 ) incline 9
( 8 ) incline 6
( 2 ) start /stop
(1 3 )speed 6
(1 2 ) speed 3( 7 ) incline 3
( 3 ) music
( 4 ) clear
(1 4 ) speed 9
(5) set
( 6 ) mode
(1) safety key
( 10 ) incline up
(11 ) incline down
(1 5 ) speed up
(1 6 ) speed down

9
(1)
(1)
(1)
(1) SAFETY
SAFETY
SAFETY
SAFETY KEY
KEY
KEY
KEY :
:
:
:Put on it, the console works. Remove it, machine stops immediately.
(2)
(2)
(2)
(2) START/STOP
START/STOP
START/STOP
START/STOP :
:
:
:Power on the machine, press it to start running. When running, press it to stop and record the
running. Press CLEAR to clear up the record.
(3)
(3)
(3)
(3) MUSIC
MUSIC
MUSIC
MUSIC :
:
:
:Press it to play the MP3, press it again to stop the music.
(4)
(4)
(4)
(4) CLEAR
CLEAR
CLEAR
CLEAR :
:
:
:Power on the machine during running, press it to clear time, distance, and calorie.
(5)
(5)
(5)
(5) SET
SET
SET
SET :
:
:
:Power on the machine, press it to set time, distance, calorie count-down training. Their figures can be
adjusted by pressing speed +, speed -. Press CLEAR to exit.
(6)
(6)
(6)
(6) MODE
MODE
MODE
MODE :
:
:
:Power on the machine, press it to choose pre-set programs P1-P 36 . Press CLEAR to exit.
(7)
(7)
(7)
(7) INCLINE
INCLINE
INCLINE
INCLINE 3
3
3
3 :
:
:
:When running, press it, incline turns to 3.
(8)
(8)
(8)
(8) INCLINE
INCLINE
INCLINE
INCLINE 6
6
6
6 :
:
:
:When running, press it, incline turns to 6.
(9)
(9)
(9)
(9) INCLINE
INCLINE
INCLINE
INCLINE 9
9
9
9 :
:
:
:When running, press it, incline turns to 9.
(10)
(10)
(10)
(10) INCLINE
INCLINE
INCLINE
INCLINE UP
UP
UP
UP :
:
:
:When running, press it, incline will be increased by 1%.
(11)
(11)
(11)
(11) INCLINE
INCLINE
INCLINE
INCLINE DOWN
DOWN
DOWN
DOWN :
:
:
:When running, press it, incline will be decreased by 1%.
(12)
(12)
(12)
(12) SPEED
SPEED
SPEED
SPEED 3:
3:
3:
3: When running, press it, speed turns to 3km/h.
(13)
(13)
(13)
(13) SPEED
SPEED
SPEED
SPEED 6:
6:
6:
6: When running, press it, speed turns to 6km/h.
(1
(1
(1
(1 4
4
4
4 )
)
)
) SPEED
SPEED
SPEED
SPEED 9:
9:
9:
9: Wh en running, press it, speed turns to 9km/h .
(15)
(15)
(15)
(15) SPEED
SPEED
SPEED
SPEED UP:
UP:
UP:
UP: When running, p ress it, speed will be increased by 0.5km/h.
(1
(1
(1
(1 6
6
6
6 )
)
)
) SPEED
SPEED
SPEED
SPEED DOWN:
DOWN:
DOWN:
DOWN: When running, p ress it, speed will be decreased by 0.5km/h.
(17)
(17)
(17)
(17) INCLINE
INCLINE
INCLINE
INCLINE +
+
+
+ in
in
in
in the
the
the
the handrail:
handrail:
handrail:
handrail: When running, press it to increase incline by 1 level. Hold on it, incline is increased
continuously.
(18)
(18)
(18)
(18) INCLINE
INCLINE
INCLINE
INCLINE –
–
–
– in
in
in
in the
the
the
the handrail:
handrail:
handrail:
handrail: When running, press it to decrease incline by 1 level. Hold on it, incline is decreased
continuously.
(19)
(19)
(19)
(19) SPEED
SPEED
SPEED
SPEED +
+
+
+ in
in
in
in the
the
the
the handrail:
handrail:
handrail:
handrail: When running, press it to increase speed by 0.5km/h. Hold on it, speed is increased
continuously.
(20)
(20)
(20)
(20) SPEED
SPEED
SPEED
SPEED –
–
–
– in
in
in
in the
the
the
the handrail
handrail
handrail
handrail :
:
:
:When running, press it to decrease speed by 0.5km/h. Hold on it, speed is deceased
continuously.

10
4.2.
4.2.
4.2.
4.2. User
User
User
User ’
’
’
’ s
s
s
s Mode
Mode
Mode
Mode Operation
Operation
Operation
Operation
Count-down
Count-down
Count-down
Count-down training:
training:
training:
training: Power on the machine, press SET to enter TIME count-down training, press it again to enter
DISTANCE count-down training, press it once more to enter CALORIE count-down training. Finally press CLEAR to exit.
TIME
TIME
TIME
TIME count-down
count-down
count-down
count-down training:
training:
training:
training: power on the machine, press SET, TIME figure glittering, showing 30:00. Press SPEED+,
SPEED- to choose the time between 5-99minutes. Press START/STOP to start at speed of 1.0km/h. Speed can be
adjusted by pressing SPEED+, SPEED-. The machine stops when time shows 0:00.
DISTANCE
DISTANCE
DISTANCE
DISTANCE count-down
count-down
count-down
count-down training:
training:
training:
training: power on the machine, press SET two times, distance figure glittering, showing
1.0KM . Press SPEED+, SPEED- to choose the distance between 1.00 and 9.00km. Press START/STOP to start at speed
of 1.0km/h. Speed can be adjusted by pressing SPEED+, SPEED-. The machine stops when distance shows 0.00.
CALORIE
CALORIE
CALORIE
CALORIE count-down
count-down
count-down
count-down training:
training:
training:
training: Power on the machine, press SET three times, calorie figure glittering, showing
50CAL. Press SPEED+, SPEED- to choose the calorie between 10- 99 0CAL. Press START/STOP to start at speed of
1.0km/h. Speed can be adjusted by pressing SPEED+,SPEED-. The machine stops when calorie shows 0.
4
4
4
4 .3.
.3.
.3.
.3. Getting
Getting
Getting
Getting Started
Started
Started
Started
Power the treadmill on by plugging it into an appropriate wall outlet, then turn on the power switch located at the
front of the treadmill below the motor shield. Ensure that the safety
safety
safety
safety key
key
key
key is installed, as the treadmill will not power
on without it. When the power is turned on, all the lights on the display will light for a short time.
4.4.
4.4.
4.4.
4.4. Self-Checking
Self-Checking
Self-Checking
Self-Checking
When using for the first time, it is necessary to make the machine carry on self-check:
Remove the safety key, press
MODE
and hold, then insert the safety key again, the machine enters into self-checking
state. During this state, pressing
START/STOP
can terminate the self-checking.
4.5.
4.5.
4.5.
4.5. Quick-Start
Quick-Start
Quick-Start
Quick-Start Operation
Operation
Operation
Operation
1. Press and release the
START/STOP
to wake display up (if not already on). Note: Installing the safety key will also
wake up the console.
2. Press and release the
START/STOP
to begin belt movement at 1.0 Km/h, then adjust to the desired speed using the
‘ + ’ or ‘ - ’ . You may also use the rapid speed keys (3, 6 and 9) to adjust the speed. You can also use ‘ + ’ or ‘ - ’ to adjust the
speed on handrail.
3. To slow the treadmill down, press and hold the ‘
-
’ key to desired speed. You may also press the rapid speed adjust
keys: 3, 6, 9.
4. In a state of running, single press
START/STOP
, the walking belt will gradually slow down .
5. In the state of running , single press
CLEAR
will reset all number except the speed.
6. To stop the tread-belt, press and release the
START/STOP
.

11
4
4
4
4 .6.
.6.
.6.
.6. Incline
Incline
Incline
Incline Feature
Feature
Feature
Feature
Incline may be adjusted any time after belt movement.
Incline can ’ t be back to 0 after removing safety key.
Incline can be back to 0 after starting machine again.
4
4
4
4 .7.
.7.
.7.
.7. 400
400
400
400 Metre
Metre
Metre
Metre Track
Track
Track
Track
The 400 Meters Track will be displayed on the simulation running track. The flashing dot indicates your progress, but
only to show an approximate speed of effort. Once the 400 meter is complete, the buzzer will sound three times , this
feature will begin again.
4
4
4
4 .8.
.8.
.8.
.8. Pulse
Pulse
Pulse
Pulse Grip
Grip
Grip
Grip Feature
Feature
Feature
Feature
Hold on both stainless steel pulse sensors in the handrails, the Pulse (Heart Rate) console window will display your
current heart rate during the workout within 15 seconds. Note: You must use both stainless steel sensors to display
your pulse.
4
4
4
4 .9.
.9.
.9.
.9. Calorie
Calorie
Calorie
Calorie Display
Display
Display
Display
Displays the cumulative calories burned at any given time during your workout.
Note: This is only a rough guide used for comparison of different exercise sessions, which cannot be used for medical
purposes.
4.10.
4.10.
4.10.
4.10. Folding
Folding
Folding
Folding and
and
and
and Unfolding
Unfolding
Unfolding
Unfolding Treadmill
Treadmill
Treadmill
Treadmill
�
�
�
�Folding
Folding
Folding
Folding the
the
the
the treadmill
treadmill
treadmill
treadmill
Pull out the latch on the left side, meanwhile lift the back part of the frame board with your hand till you hear a
light sound, which means the folding system has been locked. Running board can ’ t be turned to the opposite
direction now.
�
�
�
�Unfolding
Unfolding
Unfolding
Unfolding the
the
the
the treadmill
treadmill
treadmill
treadmill
Place the folded treadmill in a spacious area. Hold on the back part of the frame board with your hand,
meanwhile pull out the latch on the left side. Please stand back for more than 1.5 meters and release it, then it
will open automatically.
�
�
�
�Moving
Moving
Moving
Moving the
the
the
the treadmill
treadmill
treadmill
treadmill
Carefully lift the treadmill at the rear roller area, grasping the two side end caps, and roll the treadmill away.

12
5.
5.
5.
5. Programmable
Programmable
Programmable
Programmable Operations
Operations
Operations
Operations
Each pre-set program has a maximum speed level that is displayed when a desired workout is chosen. The speed that
the particular program will achieve will be displayed in the Speed window. Each program has various speed changes
throughout.
5.1.
5.1.
5.1.
5.1. To
To
To
To Select
Select
Select
Select a
a
a
a Program
Program
Program
Program
Make sure the machine is in the stop position , single press ‘ CLEAR
’
to enter into resetting state. Press ‘
MODE ’
to
choose desired program, then press and release ‘
START/STOP ’
to begin the program with default values.
The speed window will now be showing the preset speed of the selected program.
Totally 36 pcs pre-set programs. After every one minute program and speed can be altered manually or
automatically. 3 Seconds before the ending of program a buzzer will sound three times, then the running belt will
come to a stop.
P1,speed(km/h)
P1,speed(km/h)
P1,speed(km/h)
P1,speed(km/h)
5 5 6 6 6 6 7 7 8 8
P2,speed(km/h)
P2,speed(km/h)
P2,speed(km/h)
P2,speed(km/h)
5 5 8 8 7 7 6 6 5 5
P3,speed(km/h)
P3,speed(km/h)
P3,speed(km/h)
P3,speed(km/h)
5 6 8 6 8 10 7 12 10 6
P4,speed(km/h)
P4,speed(km/h)
P4,speed(km/h)
P4,speed(km/h)
5 6 10 11 12 12 11 10 6 5
P5,speed(km/h)
P5,speed(km/h)
P5,speed(km/h)
P5,speed(km/h)
5 10 6 12 8 8 8 8 10 5
P6,speed(km/h)
P6,speed(km/h)
P6,speed(km/h)
P6,speed(km/h)
5 8 10 12 8 8 9 10 8 5
P7,speed(km/h)
P7,speed(km/h)
P7,speed(km/h)
P7,speed(km/h)
5 5 6 6 9 9 12 12 12 12
P8,speed(km/h)
P8,speed(km/h)
P8,speed(km/h)
P8,speed(km/h)
6 6 8 8 10 10 6 6 5 5
P9,speed(km/h)
P9,speed(km/h)
P9,speed(km/h)
P9,speed(km/h)
6 10 10 10 10 10 10 10 10 6
P10,speed(km/h)
P10,speed(km/h)
P10,speed(km/h)
P10,speed(km/h)
6 8 11 11 11 11 8 10 11 6
P11,speed(km/h)
P11,speed(km/h)
P11,speed(km/h)
P11,speed(km/h)
6 12 12 10 8 6 8 10 12 6
P12,speed(km/h)
P12,speed(km/h)
P12,speed(km/h)
P12,speed(km/h)
5 10 8 12 6 12 10 12 10 6
P13,speed(km/h)
P13,speed(km/h)
P13,speed(km/h)
P13,speed(km/h)
6 6 6 6 8 8 11 12 12 12
P14,speed(km/h)
P14,speed(km/h)
P14,speed(km/h)
P14,speed(km/h)
6 8 12 12 12 12 10 8 8 8
P15,speed(km/h)
P15,speed(km/h)
P15,speed(km/h)
P15,speed(km/h)

13
6 6 8 8 8 10 10 10 8 8
P16,speed(km/h)
P16,speed(km/h)
P16,speed(km/h)
P16,speed(km/h)
5 11 11 11 10 10 10 8 12 12
P17,speed(km/h)
P17,speed(km/h)
P17,speed(km/h)
P17,speed(km/h)
5 10 6 8 8 8 10 10 10 8
P18,speed(km/h)
P18,speed(km/h)
P18,speed(km/h)
P18,speed(km/h)
8 11 12 12 11 8 10 12 10 8
P19,speed(km/h)
P19,speed(km/h)
P19,speed(km/h)
P19,speed(km/h)
5 5 6 6 7 7 9 9 10 10
P20,speed(km/h)
P20,speed(km/h)
P20,speed(km/h)
P20,speed(km/h)
8 9 10 10 9 8 7 6 6 6
P21,speed(km/h)
P21,speed(km/h)
P21,speed(km/h)
P21,speed(km/h)
5 5 8 6 6 10 8 8 12 6
P22,speed(km/h)
P22,speed(km/h)
P22,speed(km/h)
P22,speed(km/h)
6 9 9 9 10 10 6 5 10 10
P23,speed(km/h)
P23,speed(km/h)
P23,speed(km/h)
P23,speed(km/h)
6 6 5 8 8 6 10 10 7 5
P24,speed(km/h)
P24,speed(km/h)
P24,speed(km/h)
P24,speed(km/h)
8 9 10 11 9 6 8 9 10 6
P25,speed(km/h),incline(levels)
P25,speed(km/h),incline(levels)
P25,speed(km/h),incline(levels)
P25,speed(km/h),incline(levels)
6 6 6 6 8 8 11 12 12 12
6 9 10 11 11 12 12 10 6 3
P26,speed(km/h),incline(levels)
P26,speed(km/h),incline(levels)
P26,speed(km/h),incline(levels)
P26,speed(km/h),incline(levels)
6 8 12 12 12 12 10 8 8 8
3 3 3 3 6 8 11 10 10 8
P27,speed(km/h),incline(levels)
P27,speed(km/h),incline(levels)
P27,speed(km/h),incline(levels)
P27,speed(km/h),incline(levels)
6 6 8 8 8 10 10 10 8 8
10 10 6 12 12 10 11 11 12 8
P28,speed(km/h),incline(levels)
P28,speed(km/h),incline(levels)
P28,speed(km/h),incline(levels)
P28,speed(km/h),incline(levels)
5 11 11 11 10 10 10 8 12 12
6 6 6 6 6 8 10 11 11 8
P29,speed(km/h),incline(levels)
P29,speed(km/h),incline(levels)
P29,speed(km/h),incline(levels)
P29,speed(km/h),incline(levels)
5 10 6 8 8 8 10 10 10 8
6 6 12 9 9 10 10 10 12 8
P30,speed(km/h),incline(levels)
P30,speed(km/h),incline(levels)
P30,speed(km/h),incline(levels)
P30,speed(km/h),incline(levels)
8 11 12 12 11 8 10 12 10 8
8 9 10 12 10 12 12 12 12 10
P31,speed(km/h),incline(levels)
P31,speed(km/h),incline(levels)
P31,speed(km/h),incline(levels)
P31,speed(km/h),incline(levels)
5 5 6 6 7 7 9 9 10 10
6 9 12 12 12 12 10 10 6 3
P32,speed(km/h),incline(levels)
P32,speed(km/h),incline(levels)
P32,speed(km/h),incline(levels)
P32,speed(km/h),incline(levels)
8 9 10 10 9 8 7 6 6 6
3 3 3 3 6 8 11 12 12 8
P33,speed(km/h),incline(levels)
P33,speed(km/h),incline(levels)
P33,speed(km/h),incline(levels)
P33,speed(km/h),incline(levels)
5 5 8 6 6 10 8 8 12 6
10 10 6 12 12 10 8 8 12 8

14
P34,speed(km/h),incline(levels)
P34,speed(km/h),incline(levels)
P34,speed(km/h),incline(levels)
P34,speed(km/h),incline(levels)
6 9 9 9 10 10 6 5 10 10
6 6 6 6 6 8 10 13 13 8
P35,speed(km/h),incline(levels)
P35,speed(km/h),incline(levels)
P35,speed(km/h),incline(levels)
P35,speed(km/h),incline(levels)
6 6 5 8 8 6 10 10 7 5
6 6 12 9 9 10 10 10 10 8
P36,speed(km/h),incline(levels)
P36,speed(km/h),incline(levels)
P36,speed(km/h),incline(levels)
P36,speed(km/h),incline(levels)
8 9 10 11 9 6 8 9 10 6
8 9 10 10 10 10 10 10 10 10

15
6.
6.
6.
6. MAINTENANCE
MAINTENANCE
MAINTENANCE
MAINTENANCE
Reasonable cleaning/lubricating should be made to extend the life time of this unit. Performance is maximized when
the belt and mat are kept as clean as possible.
WARNING:
WARNING:
WARNING:
WARNING: THE
THE
THE
THE MAT/DECK
MAT/DECK
MAT/DECK
MAT/DECK FRICTION
FRICTION
FRICTION
FRICTION MAY
MAY
MAY
MAY PLAY
PLAY
PLAY
PLAY A
A
A
A MAJOR
MAJOR
MAJOR
MAJOR ROLE
ROLE
ROLE
ROLE IN
IN
IN
IN THE
THE
THE
THE FUNCTION
FUNCTION
FUNCTION
FUNCTION AND
AND
AND
AND LIFE
LIFE
LIFE
LIFE OF
OF
OF
OF YOUR
YOUR
YOUR
YOUR TREADMILL
TREADMILL
TREADMILL
TREADMILL
AND
AND
AND
AND THAT
THAT
THAT
THAT IS
IS
IS
IS WHY
WHY
WHY
WHY WE
WE
WE
WE RECOMMEND
RECOMMEND
RECOMMEND
RECOMMEND YOU
YOU
YOU
YOU CONSTANTLY
CONSTANTLY
CONSTANTLY
CONSTANTLY LUBRICATE
LUBRICATE
LUBRICATE
LUBRICATE THIS
THIS
THIS
THIS FRICTION
FRICTION
FRICTION
FRICTION POINT
POINT
POINT
POINT TO
TO
TO
TO PROLONG
PROLONG
PROLONG
PROLONG THE
THE
THE
THE
USEFUL
USEFUL
USEFUL
USEFUL LIFE
LIFE
LIFE
LIFE OF
OF
OF
OF YOUR
YOUR
YOUR
YOUR TREADMILL.
TREADMILL.
TREADMILL.
TREADMILL. FAILING
FAILING
FAILING
FAILING TO
TO
TO
TO DO
DO
DO
DO THIS
THIS
THIS
THIS MAY
MAY
MAY
MAY VOID
VOID
VOID
VOID YOUR
YOUR
YOUR
YOUR WARRANTY.
WARRANTY.
WARRANTY.
WARRANTY.
WARNING:
WARNING:
WARNING:
WARNING: UNPLUG
UNPLUG
UNPLUG
UNPLUG POWER
POWER
POWER
POWER CORD
CORD
CORD
CORD BEFORE
BEFORE
BEFORE
BEFORE MAINTENANCE.
MAINTENANCE.
MAINTENANCE.
MAINTENANCE.
WARNING:
WARNING:
WARNING:
WARNING: STOP
STOP
STOP
STOP TREADMILL
TREADMILL
TREADMILL
TREADMILL BEFORE
BEFORE
BEFORE
BEFORE FOLDING.
FOLDING.
FOLDING.
FOLDING.
6
6
6
6 .1.
.1.
.1.
.1. General
General
General
General Cleaning
Cleaning
Cleaning
Cleaning
Use a soft, damp cloth to wipe the edge of the belt and the area between the belt edge and frame. A mild soap and
water solution along with a nylon scrub brush will clean the top of the textured belt. This task should be done once a
month. Allow to dry before using.
On a monthly basis, vacuum underneath your treadmill to prevent dust build up. Once a year, you should remove the
black motor shield and vacuum out dirt that may accumulate.
6
6
6
6 .2.
.2.
.2.
.2. General
General
General
General Care
Care
Care
Care
Check parts for wear before use.
Always replace the mat if worn and any other defective parts.
If in doubt do not use the treadmill and contact our helpline.
TAKE CARE TO PROTECT CARPETS AND FLOOR in case of leakages. This product is a machine that contains moving
parts which have been greased / lubricated and could leak.
6
6
6
6 .3.
.3.
.3.
.3. Belt/Deck/Roller
Belt/Deck/Roller
Belt/Deck/Roller
Belt/Deck/Roller Lubrication
Lubrication
Lubrication
Lubrication
The mat/deck friction may play a major role in the function and life of your treadmill and that is why we recommend
you co nstantly lubricate this friction point to prolong the useful life of your treadmill.
You should apply the lubrication after approximately the first 4 0 hours of operation. We recommend lubrication of
the deck according to the following timetable:
Light
Light
Light
Light use
use
use
use (less than 3 hours per week): every 6 months
Medium
Medium
Medium
Medium use
use
use
use (3-5 hours a week): every 3 months
Heavy
Heavy
Heavy
Heavy use
use
use
use (more than 5 hours per week): every 6-8 weeks.
See below procedures for lubricating:

16
1. Use a soft, dry cloth to wipe the area between the belt and deck.
2. Spread lubricant onto the inside surface of belt and deck evenly (make sure the machine is turned off and power
is disconnected).
3. Periodically lubricate the front and rear rollers to keep them at there peak performance.
If the treadmill belt/deck/roller is kept reasonably clean it is possible to expect over 1200 hours before additional
re-lubricating is necessary.
6
6
6
6 .4.
.4.
.4.
.4. How
How
How
How to
to
to
to check
check
check
check the
the
the
the running
running
running
running mat
mat
mat
mat for
for
for
for proper
proper
proper
proper lubrication
lubrication
lubrication
lubrication
1. Disconnect the main power supply.
2. Fold the treadmill up into the storage position.
3. Feel the back surface of the running mat.
If the surface is slick when touched, then no further lubrication is needed.
If the surface is dry to the touch, apply a suitable silicone lubricant.
We
We
We
We recommend
recommend
recommend
recommend you
you
you
you use
use
use
use a
a
a
a silicone
silicone
silicone
silicone based
based
based
based spray
spray
spray
spray to
to
to
to lubricate
lubricate
lubricate
lubricate your
your
your
your Treadmill.
Treadmill.
Treadmill.
Treadmill. This
This
This
This Can
Can
Can
Can be
be
be
be purchased
purchased
purchased
purchased from
from
from
from your
your
your
your local
local
local
local
sports
sports
sports
sports Retailer
Retailer
Retailer
Retailer or
or
or
or a
a
a
a local
local
local
local hardware
hardware
hardware
hardware store.
store.
store.
store.
6.5.
6.5.
6.5.
6.5. Belt
Belt
Belt
Belt Adjustment
Adjustment
Adjustment
Adjustment
Belt Tension Adjustment-It is very important for joggers and runners in order to provide a smooth, steady running
surface. Adjustment must be made from the right and left rear roller in order to adjust tension with the Hexagonal
Wrench provided in the parts package. The adjustment bolt is located at the end of the rails as noted in diagram
below:
Note:
Note:
Note:
Note: Adjustment
Adjustment
Adjustment
Adjustment is
is
is
is thru
thru
thru
thru the
the
the
the small
small
small
small hold
hold
hold
hold on
on
on
on the
the
the
the end
end
end
end caps.
caps.
caps.
caps.
Tighten the rear roller only enough to prevent slippage at the front roller. Turn both the right and left bolt clockwise
reasonably and inspect for proper tension. When an adjustment is made to the belt tension, you must also make a
tracking adjustment to compensate for the change in belt tension.
DO NOT OVERTIGHTEN - Over tightening will cause belt damage and premature bearing failure .
.
.
.
6
6
6
6 .6.
.6.
.6.
.6. Belt
Belt
Belt
Belt Tracking
Tracking
Tracking
Tracking Adjustment
Adjustment
Adjustment
Adjustment
This treadmill is designed to keep the belt reasonably centred while in use. It is normal for some belts to drift near
one side while the belt is running with no one on it. After a few minutes of use, the belt should have a tendency
Left bolt
Right bolt

17
to centre itself. If during use, the belt continues to move toward one side, adjustments are necessary. The procedures
are as below:
First set speed at lowest position.
Second check the belt shifts to which side.
If the belt shifts to right, tighten the right bolt and loosen the left bolt by using 6mm Hexagonal Wrench, until the belt
is centered itself; If belt shifts to left, tighten the left bolt and loosen the right bolt by using 6mm Hexagonal Wrench,
until the belt is centered. When adjusting the belt using the 6 mm Hexagonal Wrenches, it is important to adjust the
belt in half turn increments. Over adjusting the belt can cause damage to the mat.

18
7.
7.
7.
7. TROUBLE
TROUBLE
TROUBLE
TROUBLE SHOOTING
SHOOTING
SHOOTING
SHOOTING
This treadmill is designed in a way that in the event of an electrical fault, the machine will turn off automatically to
prevent any injuries to the user and to prevent damage to the machine (i.e. motor).
When the treadmill behaves erratically, simply reset the treadmill by turning the power switch off, waiting for 1
minute then turning the power button back on.
If, after you have reset the treadmill, it is still not running correctly, please run the self-checking analyse (please refer
to Self-Checking
Self-Checking
Self-Checking
Self-Checking ) to distinguish what type of error problem the machine is encountering.
7
7
7
7 .1.
.1.
.1.
.1. Alarm
Alarm
Alarm
Alarm signals
signals
signals
signals and
and
and
and solutions
solutions
solutions
solutions
Before
Before
Before
Before attempting
attempting
attempting
attempting any
any
any
any work
work
work
work on
on
on
on the
the
the
the treadmill,
treadmill,
treadmill,
treadmill, ensure
ensure
ensure
ensure that
that
that
that the
the
the
the power
power
power
power is
is
is
is off
off
off
off
and
and
and
and the
the
the
the plug
plug
plug
plug is
is
is
is removed
removed
removed
removed from
from
from
from the
the
the
the power
power
power
power point.
point.
point.
point.
Do
Do
Do
Do not
not
not
not use
use
use
use extension
extension
extension
extension leads
leads
leads
leads as
as
as
as it
it
it
it may
may
may
may lead
lead
lead
lead to
to
to
to power
power
power
power decrease
decrease
decrease
decrease and
and
and
and failure.
failure.
failure.
failure.
PCB ERROR CODE AND SOLUTION
(EWAY)
ERROR CODE PROBLEM SOLUTION
E0 1. No safety key. 1. Put safety key.
2. Safety key sensor broken.
2. Open the meter, replace sensor
under the safety key.
3. Safety key not work. 3. Change the key.
E1 1. Motor not work. 1. Change or rework the motor.
2. Speed sensor not work.
2. Change or rework the speed
sensor.
3. Roller magnetic not work. 3. Change or rework the roller.
4. Connect wire not work. 4. Change or rework the wire.
E3:Only caused when use 'MODE'
key
1. Motor speed cannot be control. 1. Change motor.
2. Motor not work. 2. Change motor.
3. Speed sensor not work well, no
signal.
3. Change speed sensor.
7.2.
7.2.
7.2.
7.2. Problems
Problems
Problems
Problems and
and
and
and solutions
solutions
solutions
solutions
No
No
No
No display
display
display
display on
on
on
on meter
meter
meter
meter
Be sure the power is right.
- If new treadmill, be sure the connect cable all pin is right.

19
- If used treadmill, it maybe some PCB components broken or transformer broken. Let the engineer check use
millimeter.
Meter
Meter
Meter
Meter keys
keys
keys
keys not
not
not
not work
work
work
work
All keys not work; no beep sounds ,please check hand bar keys and meter keys will short circuit.
A part key not work, no beep sounds, please lift the meter sticker to check this key, and sometimes is the key board
not works.
Treadmill
Treadmill
Treadmill
Treadmill stops
stops
stops
stops automatically
automatically
automatically
automatically
- When starting the treadmill, after seconds, show E1 ,main problem is speed sensor, please check speed sensor,
magnet on roller, and connect wire.
- Speed sensor is a receiver for speed from roller and meter.
Speed
Speed
Speed
Speed up
up
up
up and
and
and
and down
down
down
down automatically
automatically
automatically
automatically
-
-
-
-In lower speed, user will feel break down; please clockwise turn TORQUE on the blue parts ,only a little.
- Middle speed feel break down, check speed sensor or PCB.
Incline
Incline
Incline
Incline function
function
function
function not
not
not
not work
work
work
work
- Incline motor not work, but in PCB UP / DOWN LED light and work ,it ’ s mean incline motor is broken.
- Sometime is incline keys not work.
Table of contents
Languages:
Other Tool Fitness Treadmill manuals


