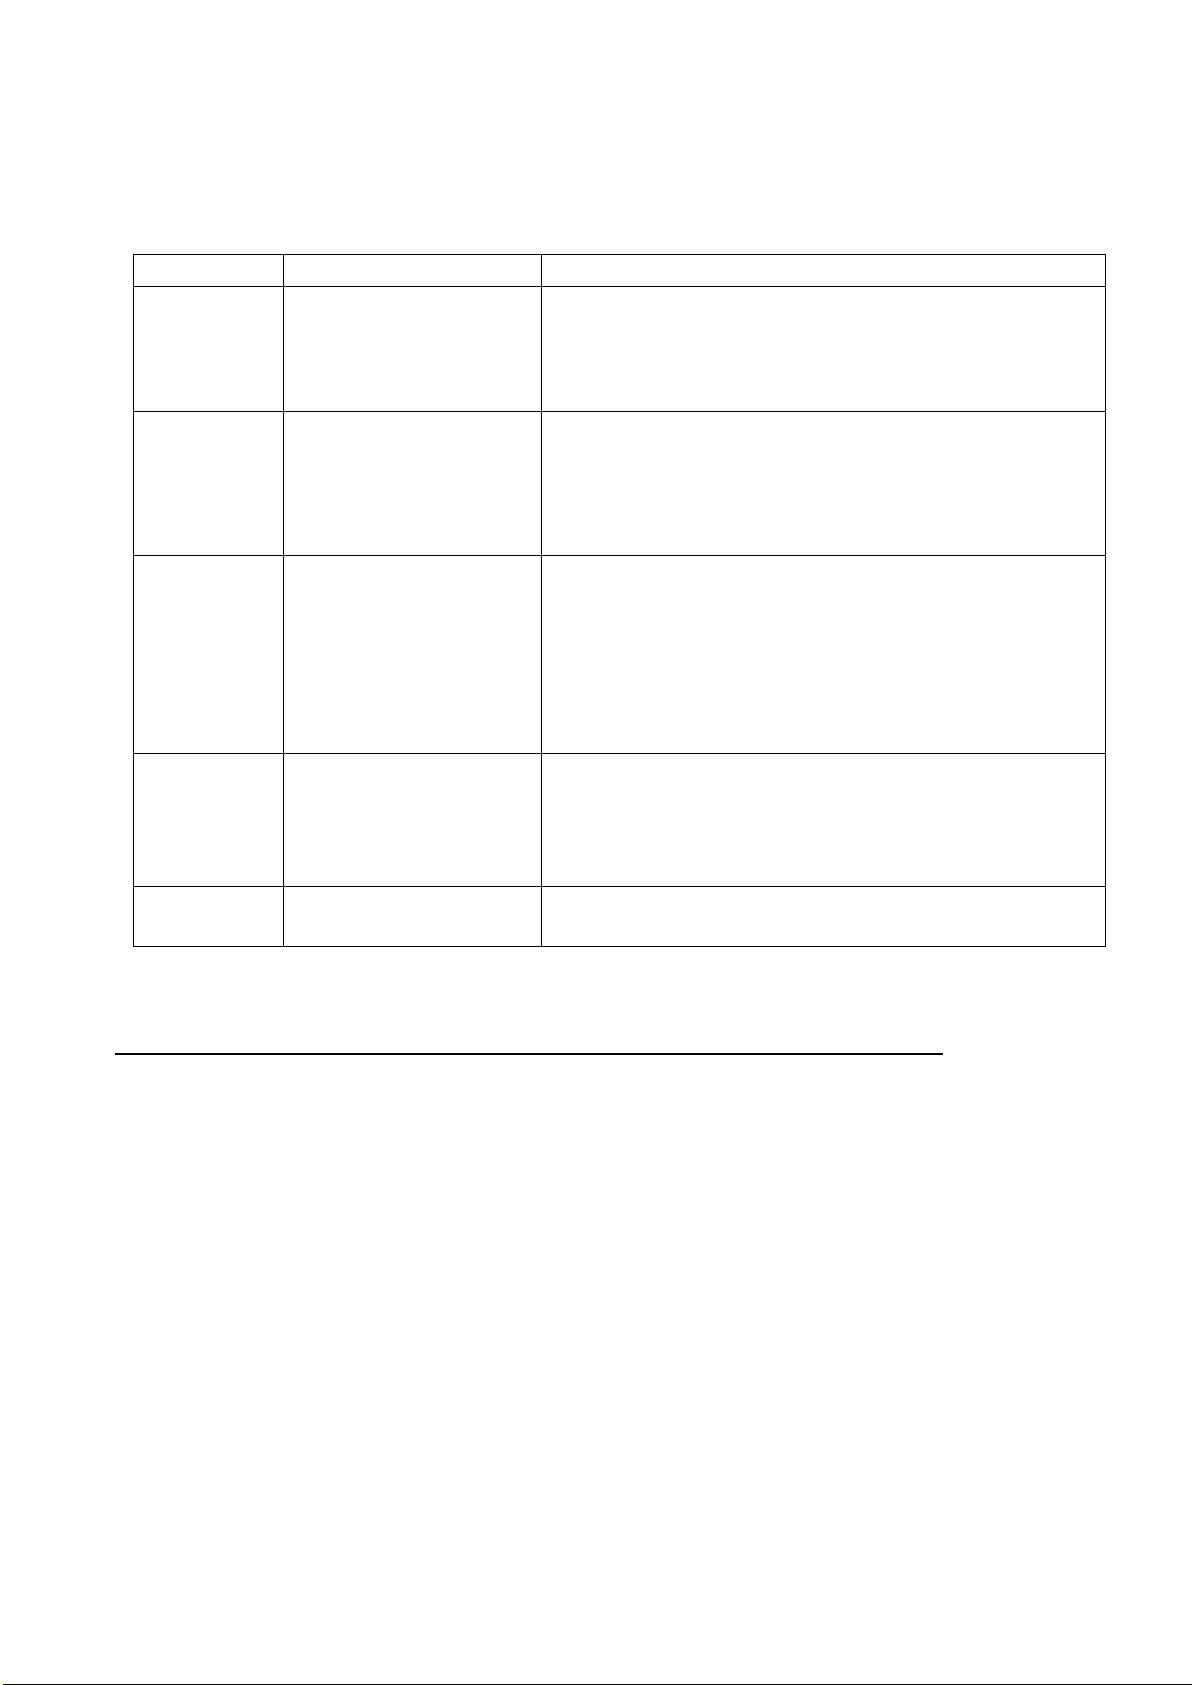
Powertrain MX1 User manual

MOTORIZED TREADMILL –MODEL MX1
INSTRUCTION MANUAL
Please read these instructions carefully before use and keep for future reference
FOR DOMESTIC INDOOR USE ONLY
WARNING: Keep young children away from this machine at all times. Contact
with the moving surface may result in severe friction burns.

PAGE \* MERGEFORMAT 1
1. CAUTION
To avoid injuries please read this manual carefully before using the treadmill.
Before starting any exercise program you should consult your doctor to determine if
you have any physical or health conditions which could create a risk to your health
and safety, or prevent you from using the equipment properly. Your doctor’s advice
is essential if you are taking medication that affects your heart rate, blood pressure
or cholesterol level.
Ensure you have tightened all the bolts and nuts on this machine before
commencing any exercise.
For safety reasons do not stand on running belt whilst starting the unit.
Please stop immediately if you feel unwell or nauseous.
Please adjust speed slowly.
Adjustment of belt is prohibited during use.
It is recommended that you wear sports shoes and appropriate clothing when using
the treadmill
Children, elderly, pregnant women and people with medical conditions should not
use the treadmill unless authorized by their doctor and in the presence of an adult
who may assist.
Clip the safety key on your clothing during use.
Firmly hold the handle bars during use.
Keep the safety key away from children when the treadmill is not in use, as it may
present a choking hazard.
Keep silicone oil away from children’s reach. If accidentally swallowed or comes into
contact with eyes, use water to wash out and immediately seek medical assistance.
The heart rate function is to be used as an exercise reference feature only and is not
to be relied on for accurate heart rate assessment and is not to be used for medical
purposes. Should you feel unwell, stop exercising immediately and contact your
doctor.
Before folding the treadmill, ensure that the gradient is "zero".

PAGE \* MERGEFORMAT 2
2. SAFETY NOTICE
Please place the machine on flat ground. It is unsuitable to use the machine in the
following situations:
oOutdoors. (The machine is specially designed for indoor use only)
oSlant ground or slant places on balcony.
oSunlit area or near heater.
oBig noisy places.
Machine requires a constant AC 220-240V power connection
Error may be displayed if power is not stable. Please do not share points with
integral equipment such as computers, air conditioners etc.
Be careful of children or other objects while folding and unfolding the machine.
Do not position unit near wet objects to avoid slippery surfaces and damage to
machine
3. CAUTION PRIOR TO USE
Do not use the machine if you are unwell and immediately stop using the machine if
you start feeling unwell whilst using it.
Disconnect the machine from power when not in use.
Prior to relocating or folding the machine, disconnect it from power.
Machine is to be used on a flat surface only.
Ensure a 2m clearance around the machine is available prior to using it.
Do not start the machine when it is folded.
Keep all liquids away from the machine as they will damage the unit and void all
warranty.
Machine is not to be used in poorly ventilated spaces or locations with flammable
objects in its vicinity.
Do not put any objects on the machine.
Switch off all functions and disconnect from power when not in use.
Please do not stand directly on the belt while starting the machine.
Do not disassemble the machine without a written authorization from the
manufacturer
Please make sure the running belt is fastened before use

PAGE \* MERGEFORMAT 2
4. PRODUCT SPECIFICATIONS
Main parameters and parts list
Main technical parameters
No.
Parameters Names
Description
1
Input power voltage
AC 220-50/60Hz
2
Motor power
1.0HP
3
Speed
1.0-10 Km/h
4
Running surface
400 x 1100 mm
Packing list
No.
Name
units
Qty
1
Treadmill Unit
set
1
2
Accessories
set
1
3
Base cover
set
1
Accessory list
NO.
Name
QTY
NO.
Name
QTY
1
Screw M8*22
1
6
Plum knob(M10*20)
1
2
Screw M8*25
1
7
Safety key
1
3
Inner hexagon wrench 5mm
1
8
Silicon oil
1
4
Inner hexagon wrench 6mm
1
9
User manual
1

PAGE \* MERGEFORMAT 2
5
Combination wrench
1
10
MP3 cable
1
5. ASSEMBLY INSTRUCTIONS
WARNING: THIS PRODUCT IS HEAVY. ENSURE TWO PEOPLE ARE ASSEMBLING
IT AT ALL TIMES
During assembly, first insert and moderately tighten screws and when the frame has
been fully assembled, inspect all the screws and tighten them completely.
Lay unit flat on the ground and cut the nylon cables on each side of the unit
Lift the upright columns and console in the direction demonstrated below.
NOTE: Do not cut or pinch the cables in the upright columns as that will void
warranty
Using the hexagon spanner (#5) install M8*22 screws to lock and fix the base of the
treadmill to the frame as shown below and then proceed by installing the plum knob
on the left side of the fixing plate and tighten to secure the base to the upright
column.
Holding both columns, use the hexagon spanner (#6) to insert and tighten screws
M8*25 to attach the console frame to the upright columns.
Tighten all screws in above steps and note not to damage the cables connected to
upright columns.
M8*22
Plum
knob
M8*22
M8*25

PAGE \* MERGEFORMAT 2
Using the combination wrench remove the two M5*14 screws pre-installed on the
base.
Remove base cover and use the screws M5*14 to lock them to the base.
Position the safety key in the correct position as shown below.
CAUTION: Please confirm that all screws are correctly tightened according to the
requirements after installation and check no part has been left out prior to
connecting to power.
M5*14
Locate the red color
safety key with the
accessories
supplied. Position it
on the designated
position on the
treadmill and clip to
your clothes for
safety.

PAGE \* MERGEFORMAT 2
Folding instructions
Folding: When the treadmill is not in use, you can lift the running deck and use plum
knob to lock the running deck and base, as shown in diagram A below.
Diagram A: Folding the treadmill Diagram B: Unfolding the treadmill
Unfolding instructions
To lower the running deck, hold the running deck while removing the plum knob.
When the plum knob is fully removed, lower the running deck slowly.
Put the running deck on the ground, then install the plum knob back as shown in
Diagram B. Please keep children away from treadmill to avoid injuries.
6. USING THE TREADMILL
Using treadmill
Power on –Connect the power adapter to a power point and turn on the unit by
using the red switch. The LED will illuminate and the treadmill will emit a beeping
sound. The screen on the control panel will switch on.
Press start button to start the treadmill. (Note: The treadmill can only start when the
safety key is placed in the correct position. If the screen displays error “E7”, it means
the safety key is not correctly positioned. Clip the safety key on clothes when using
the treadmill to prevent accidents.
Safety Key Function
1

PAGE \* MERGEFORMAT 2
oDisconnecting the safety key will immediately stop the running track and the
screen will display “E7”, and the treadmill will emit a beep.
oPlacing the safety key back on the designated area on the console will clear
all data in 2 seconds.
Display Function
oSpeed Display: Current running speed.
oTime Display: Under manual mode displays the time countdown time under
automatic modes and programs.
oDistance display: Cumulative distance under manual mode and programs.
Distance countdown in automatic mode.
oCalorie display: Cumulative calorie under manual mode and programs.
Calorie countdown in automatic mode.
oHeart rate display: Heart rate value will be shown when the signal is detected.
oHeart rate detection function: When the treadmill is on, hold the handlebars
for a while and the heart rate value will show on the screen. The heart rate
function is to be used as an exercise reference feature only and is not to be
relied on for accurate heart rate assessment and is not to be used for medical
purposes. Should you feel unwell, stop exercising immediately and contact
your doctor.
Start/Stop Button
oIn standby mode, pressing the button will start the treadmill.
oIn running mode, pressing this button will clear all data and gradually bring
the treadmill to a complete stop and reset it to manual mode.
Program Button:
oIn standby mode, pressing this button will cycle the options from manual

PAGE \* MERGEFORMAT 2
mode to P1 to P12 automatic programs. Manual mode is the default running
mode.
Mode Button:
oIn standby mode, pressing this button will cycle the 3 different countdown
options: time, distance and calorie consumption.
Speed +/- - Use these keys to adjust the running speed. Pressing “+” increases the
speed and “-“ decreases it.
Volume +/- - When playing music, use these keys to adjust the volume.
Automatic program
MX1 Treadmill features 12 automatic training programs. Each program is divided
into 10 segments and the running time of each segment is evenly distributed.
Time
Programs
Set time / 10 = running time of each period
1
2
3
4
5
6
7
8
9
10
P1
SPEED
3
3
6
5
5
4
4
4
4
3
P2
SPEED
3
3
4
4
5
5
5
6
6
4
P3
SPEED
2
4
6
8
7
8
6
2
3
2
P4
SPEED
3
3
5
6
7
6
5
4
3
3
P5
SPEED
3
6
6
6
8
7
7
5
5
4
P6
SPEED
2
6
5
4
8
7
5
3
3
2
P7
SPEED
2
9
9
7
7
6
5
3
2
2
P8
SPEED
2
4
4
4
5
6
8
8
6
2
P9
SPEED
2
4
5
5
6
5
6
3
3
2
P10
SPEED
2
5
7
5
8
6
5
2
4
3
P11
SPEED
2
5
6
7
8
9
10
5
3
2
P12
SPEED
2
3
5
6
8
6
9
6
5
3

PAGE \* MERGEFORMAT 2
Error Codes
Error code
Description
Solution
E1
Erroneous Connection:
when the power is on, the
connection between lower
controller and the console is
abnormal.
Possible Cause: the communication between the lower controller
and console is blocked, check each joint between the controller and
console, make sure that each core is fully plugged in. Check the
connection line, replace it if is damaged.
E2
No signal from motor.
Possible Cause: Check the motor cable to see whether it is
connected well or not, if not, re-connect the motor wire again.
Check the motor cable to see whether it is damaged or has a burnt
smell, if yes, replace the motor.
E5
Current overload
protection:
Whilst in use, the lower
controller detects the current
to be over 6A for more than
3 seconds.
Possible Cause:
Overloading leads to excessive current, and the system stops out of
self-protection, or some part is stuck, causing the motor to stop.
Adjust the treadmill and restart it. Check if there is liquid or burnt
smell while the motor is running, if yes, replace the motor; check if
the controller has a burnt smell, if yes, replace the controller; check
the power supply voltage, if it does not match the specifications,
change into correct voltage and test the machine again.
E6
Explosion-proof impact
protection: the abnormal
voltage or motor cause a
circuit fault which drives the
motor.
Possible Cause:
Check if the power supply voltage is 50% lower than normal
voltage,use the correct voltage and test the machine again;check
if the controller has a burnt smell and replace the controller; Check
if the motor cable is connected and connect the motor wire again.
E7
No safety key
Put the safety key on the right place.
7. Maintenance
Warning: Before cleaning or carrying out any maintenance, ensure the treadmill
is disconnected from power
Comprehensive cleaning will extend the life of your treadmill
Remove dust periodically in order to maintain all parts clean.
Be sure to clean running belt with both sides of the exposed portion, which will
reduce the accumulation of impurities.
Make sure to wear clean athletic shoes to avoid introducing dirt on to the running
board and belt.
Treadmill belts must be cleaned with a damp cloth with a mild soap.
Ensure none of the components and the treadmill itself come into contact with liquids
which will void all warranty.
Warning: Make sure power plug disconnect before moving motor cover away,
clean the motor at least once a year.

PAGE \* MERGEFORMAT 2
Maintenance of the Running Board and Belt - Lubrication and Cooling
Your treadmill's running board and running belt had been lubricated at the factory.
Friction between the running belt and running board has a great impact on the life
and performance of your treadmill.
Regular application of treadmill lubricant is needed. We advise you to check the
board regularly.
To check if the belt needs to be lubricated, simply lit each side of the belt with your
hands and feel the top surface of the running deck. If it is slick to the touch, then no
lubrication is required. If it is dry to the touch, then lubricate.
To lubricate (where required):
oLift the edge of the running to expose the running deck.
oPlace a few drops of the lubricant (all purpose household oil or sewing
machine oil is suitable) along the centre of the running deck
oRun the treadmill (without the user) at a slow speed for up to 5 minutes to
evenly distribute the lubricant.
CAUTION: Do not over lubricate. Wipe away excess lubricant from the belt.
If the board’s surface is damaged, please contact our customer service center to
purchase replacement parts.
We recommend applying lubricant between running belt and running board:
oInfrequent user (use less than 3 hours a week) - once per month;
oFrequent user (use more than 7 hours a week) - once a fortnight.
To safeguard your treadmill and extend the life of the unit, it is recommended that
after 2 hours of continued use, the machine be switched off and allowed to cool for a
minimum of10 minutes before using it again.
If the treadmill belt is loose, it will skid when running. Conversely, if it’s too tight, it
may reduce motor performance and harden the abrasion of roller and the running
belt.
You can lift two sides of the running belt for 50-75mm to adjust the tightness.
Adjusting alignment and tightness
The running belt is adjusted at the factory, however after prolonged use it may
stretch and will require to be re-tensioned. For best use, it may be required to adjust
the running belt for its optimum alignment.
Running Belt alignment
Place treadmill flat on the floor but do not stand on it.

PAGE \* MERGEFORMAT 2
Turn on treadmill and set the speed at 6-8km/hour .
If the running belt is shifting to the right, rotate the right adjusting bolt with 1/2 turn
clockwise, then rotate the left adjusting bolt with 1/2 turn counter-clockwise.
(Diagram A)
If the running belt is shifting to the left, rotate the left adjusting bolt with 1/2 turn
clockwise, then rotate the right adjusting bolt with 1/2 turn counter-clockwise.
(Diagram B)
Diagram A Diagram B
Multi-wedge Belt Tension Adjusting
After some time, the multi-wedge belt is expected to become loose as a result of the
abrasions, which will require the user to adjust the multi-wedge to ensure continued
safe use.
When to Adjust? Feeling of running with the occasional pause/slipping
experienced, indicates that the treadmill belt or multi-wedge belt are a little loose and
further assessment/confirmation is required.
Step 1: Which part is loose? Remove the four screws on protective cover, turn the
running speed to 1 km/h, stand on the running belt, grip the armrests, and tread the
treadmill belt slightly.( we advise treading the treadmill belts with the user's own
weight)
oA. If instantaneous steps cannot stop the belt, the tightness is appropriate.
oB. If your instantaneous step stops the running belt, but the multi-wedge belt
and former roller is still running, it indicates that the running belt is loose and
appropriate adjustments must be made to facilitate the safe use
oC. If you observe that the instantaneous step makes both the treadmill belt
and multi-wedge belt stop, but the motor is still running, it indicates that the
multi-wedge belt is loose and appropriate adjustments must be made to
facilitate continuous safe use
Step 2: Use a wrench to adjust the screws on the motor base according to the
condition. Gently flip the multi-wedge belt between the motor shaft and the front
roller, if it is too loose, you can flip the multi-wedge belt by 100%; if it is too tight, the
degree for you to flip the belt is very limited. It is appropriate to flip the multi-wedge
belt by 80% after adjustment. Please adjust the tightness of the multi-wedge belt into
the state that it could be flipped by 80%.
Step 3: Lock the motor base, and re- install the front cover.

PAGE \* MERGEFORMAT 2
Warranty and Contact Details
Kmate Pty Ltd provides a 12 month warranty for this product when used for domestic
purposes. This product is not intended for commercial use and any such use will void all
warranty.
The benefits of this warranty are provided in addition to other rights and remedies you
may have under a law in relation to the goods and services to which this warranty
relates. Our goods come with guarantees that cannot be excluded under the Australian
Consumer Law. You are entitled to a replacement or refund for a major failure and for
compensation for any other reasonably foreseeable loss or damage. You are also
entitled to have goods repaired or replaced if the goods fail to be of acceptable quality
and the failure does not amount to a major failure.
Before making a claim under warranty, please refer to your user/installation manual to
ensure that you have followed correct operating procedures of your product, and refer to
the trouble shooting section (if such exists) to assist solving any problems.
The warranty period begins from the day of purchase.
Your proof of purchase must be produced before assistance will be provided.
Where the Product is replaced pursuant to this Warranty, the replacement Product will
be subject to the warranty terms and warranty commencement date of the original
product.
This warranty is only valid if the product is operated and maintained in accordance with
the manufacturer’s instructions.
Damage to property including but not limited to furniture, carpets, walls, ceilings or any
other event either directly or indirectly are excluded from warranty as well as any losses
or expenses incurred by you in relation to the product or making a claim under this
warranty including without limitation any costs associated with installation, reinstallation
or transporting the product.
A claim may be refused if the defective claim has arisen for reasons other than a
manufacturers fault or defective parts or workmanship. Circumstances in which a
warranty claim may be declined include, but are not limited to the following:
Normal wear and tear;
Misuse or abuse, including failure to properly maintain or service;
Damages caused by improper or incorrect installation, force-majeure, electrical
surges, lightning, power grid fluctuations, water or by connection to alternative power
supply sources (such as solar inverters etc), are not eligible for warranty repair;
Insect or vermin infestation;
Failure to clean or improper cleaning and/or operation of the product;
Failure to periodically lubricate, adjust and maintain the treadmill;
Damaged or dislocated cables including internal and external power cables;
If the product is modified without authorisation from Kmate Pty Ltd in writing;
If you are unable to supply a certificate of compliance for installation of any type as

PAGE \* MERGEFORMAT 2
required by State & Territory Laws
Contact Details
Kmate Pty Ltd
PO Box 133, Braeside VIC 3195
Email: [email protected]
Phone: 03 9790 0055
PLEASE CHECK THE LATEST VERSION AT:
https://kmate.com.au/MX1
Table of contents
Other Powertrain Treadmill manuals