TOOL WAREHOUSE WT03056 User manual
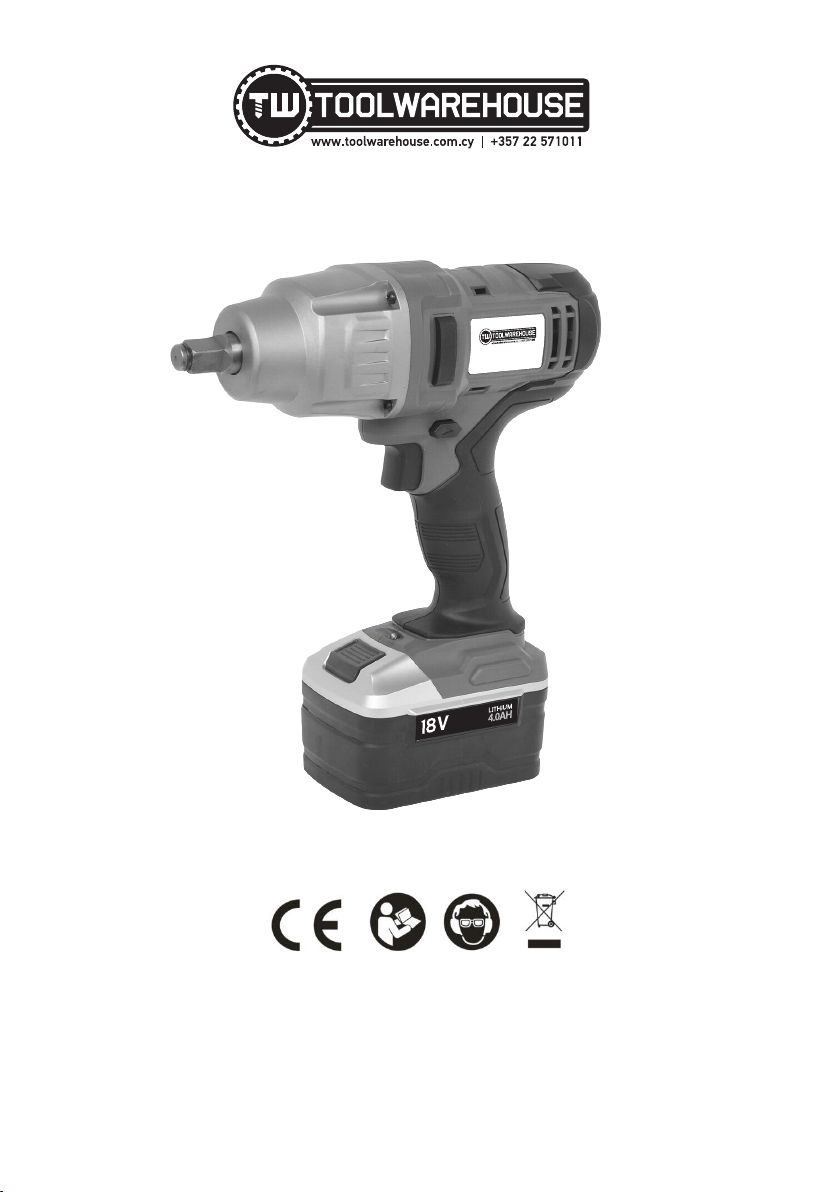
18V 4.0AH LI-ION CORDLESS IMPACT WRENCH
ORIGINAL INSTRUCTIONS
Please read the entire instruction manual before using the product and then save it for future reference. We reserve the right for any
errors in text or images and any necessary changes made to technical data. If you have any questions regarding technical problems
please contact our Customer Services.
SAVE THESE INSTRUCTIONS FOR REFERENCE
WT03056
18V 4.0A H LI -ION C ORDL ESS
IMPACT WRENCH
WT0 3056
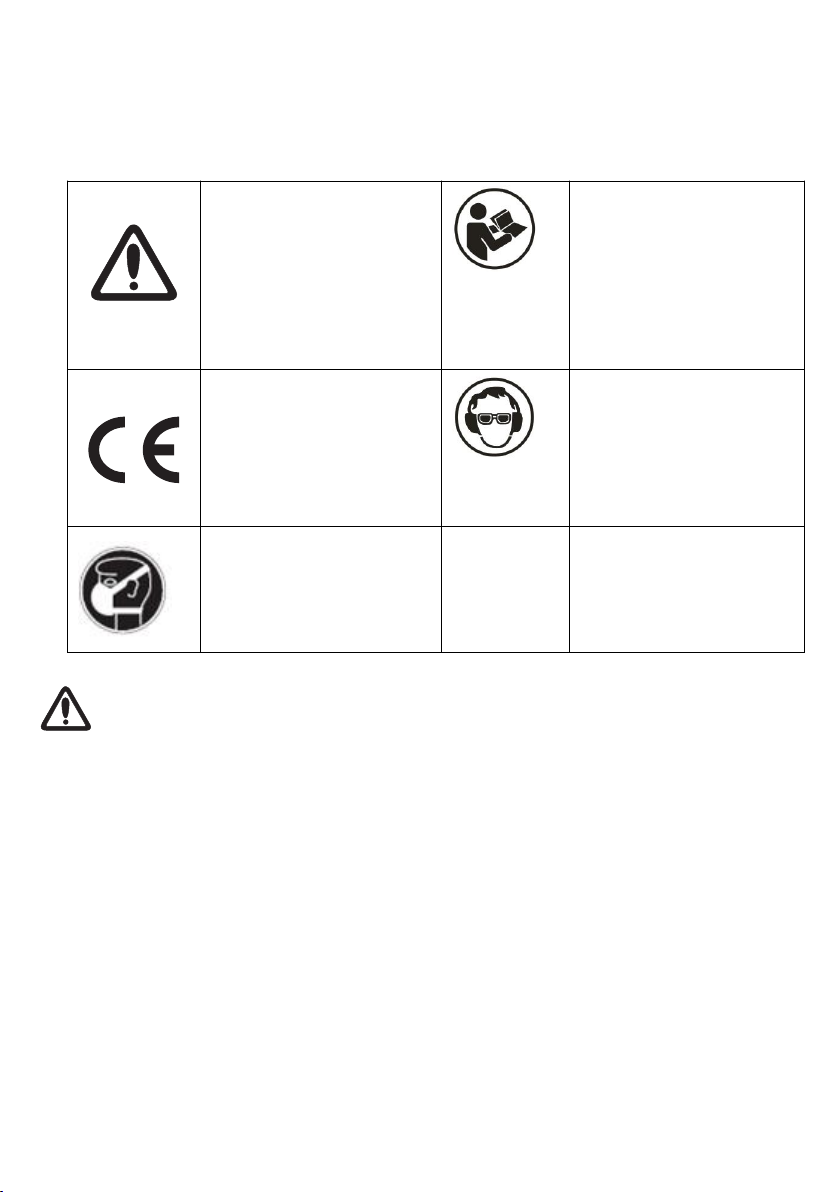
1. SYMBOLS
The following symbols are used in this manual and/or on the machine:
Denotes risk of
personal injury or
damage to the tool
WARNING – To
reduce the risk
of injury, user
must read
instruction
manual”
In accordance with
essential safety
standards of
applicable European
directives
Mandatory use of
eye protection
Wear noise
protection
Wear a mask in
dusty conditions
2. GENERAL POWER TOOL SAFETY WARNINGS
WARNING Read all safety warnings and all instructions. Failure to
follow the warnings and instructions may result in electric shock, fire and/or
serious injury.
Save all warnings and instructions for future reference.
The term "power tool" in the warnings refers to your mains-operated (corded)
power tool or battery-operated (cordless) power tool.
1) Work area safety
a) Keep work area clean and well lit. Cluttered or dark areas invite
accidents.
b) Do not operate power tools in explosive atmospheres, such as in the
presence of flammable liquids, gases or dust. Power tools create sparks
which may ignite the dust or fumes.
c) Keep children and bystanders away while operating a power tool.

Distractions can cause you to lose control.
2) Electrical safety
a) Power tool plugs must match the outlet. Never modify the plug in any
way. Do not use any adapter plugs with earthed (grounded) power tools.
Unmodified plugs and matching outlets will reduce risk of electric shock.
b) Avoid body contact with earthed or grounded surfaces, such as pipes,
radiators, ranges and refrigerators. There is an increased risk of electric
shock if your body is earthed or grounded.
c) Do not expose power tools to rain or wet conditions. Water entering a
power tool will increase the risk of electric shock.
d) Do not abuse the cord. Never use the cord for carrying, pulling or
unplugging the power tool. Keep cord away from heat, oil, sharp edges
or moving parts. Damaged or entangled cords increase the risk of electric
shock.
e) When operating a power tool outdoors, use an extension cord
suitable for outdoor use. Use of a cord suitable for outdoor use reduces the
risk of electric shock.
f) If operating a power tool in a damp location is unavoidable, use a
residual current device (RCD) protected supply. Use of an RCD reduces
the risk of electric shock.
3) Personal safety
a) Stay alert, watch what you are doing and use common sense when
operating a power tool. Do not use a power tool while you are tired or
under the influence of drugs, alcohol or medication. A moment of
inattention while operating power tools may result in serious personal injury.
b) Use personal protective equipment. Always wear eye protection.
Protective equipment such as dust mask, non-skid safety shoes, hard hat, or
hearing protection used for appropriate conditions will reduce personal
injuries.
c) Prevent unintentional starting. Ensure the switch is in the off-position
before connecting to power source and/or battery pack, picking up or
carrying the tool.
Carrying power tools with your finger on the switch or energising power tools

that have the switch on invites accidents.
d) Remove any adjusting key or wrench before turning the power tool on.
A wrench or a key left attached to a rotating part of the power tool may result
in personal injury.
e) Do not overreach. Keep proper footing and balance at all times. This
enables better control of the power tool in unexpected situations.
f) Dress properly. Do not wear loose clothing or jewellery. Keep your hair,
clothing and gloves away from moving parts. Loose clothes, jewellery or
long hair can be caught in moving parts.
g) If devices are provided for the connection of dust extraction and
collection facilities, ensure these are connected and properly used. Use
of dust collection can reduce dust-related hazards.
4) Power tool use and care
a) Do not force the power tool. Use the correct power tool for your
application. The correct power tool will do the job better and safer at the rate
for which it was designed.
b) Do not use the power tool if the switch does not turn it on and off. Any
power tool that cannot be controlled with the switch is dangerous and must be
repaired.
c) Disconnect the plug from the power source and/or the battery pack
from the power tool before making any adjustments, changing
accessories, or storing
power tools. Such preventive safety measures reduce the risk of starting the
power tool accidentally.
d) Store idle power tools out of the reach of children and do not allow
persons unfamiliar with the power tool or these instructions to operate
the power tool.
Power tools are dangerous in the hands of untrained users.
e) Maintain power tools. Check for misalignment or binding of moving
parts, breakage of parts and any other condition that may affect the
power tool’s operation. If damaged, have the power tool repaired before
use. Many accidents
are caused by poorly maintained power tools.
f) Keep cutting tools sharp and clean. Properly maintained cutting tools

with sharp cutting edges are less likely to bind and are easier to control.
g) Use the power tool, accessories and tool bits etc. in accordance with
these instructions, taking into account the working conditions and the
work to be performed. Use of the power tool for operations different from
those intended could result in a hazardous situation.
5) Battery tool use and care
a) Recharge only with the charger specified by the manufacturer. A charger
that is suitable for one type of battery pack may create a risk of fire when used
with another battery pack.
b) Use power tools only with specifically designated battery packs. Use of any
other battery packs may create a risk of injury and fire.
c) When battery pack is not in use, keep it away from other metal objects, like
paper clips, coins, keys, nails, screws or other small metal objects, that can
make a connection from one terminal to another. Shorting the battery
terminals together may cause burns or a fire.
d) Under abusive conditions, liquid may be ejected from the battery; avoid
contact. If contact accidentally occurs, flush with water. If liquid contacts eyes,
additionally seek medical help. Liquid ejected from the battery may cause
irritation or burns.
5) Service
a) Have your power tool serviced by a qualified repair person using only
identical replacement parts. This will ensure that the safety of the power
tool is maintained.

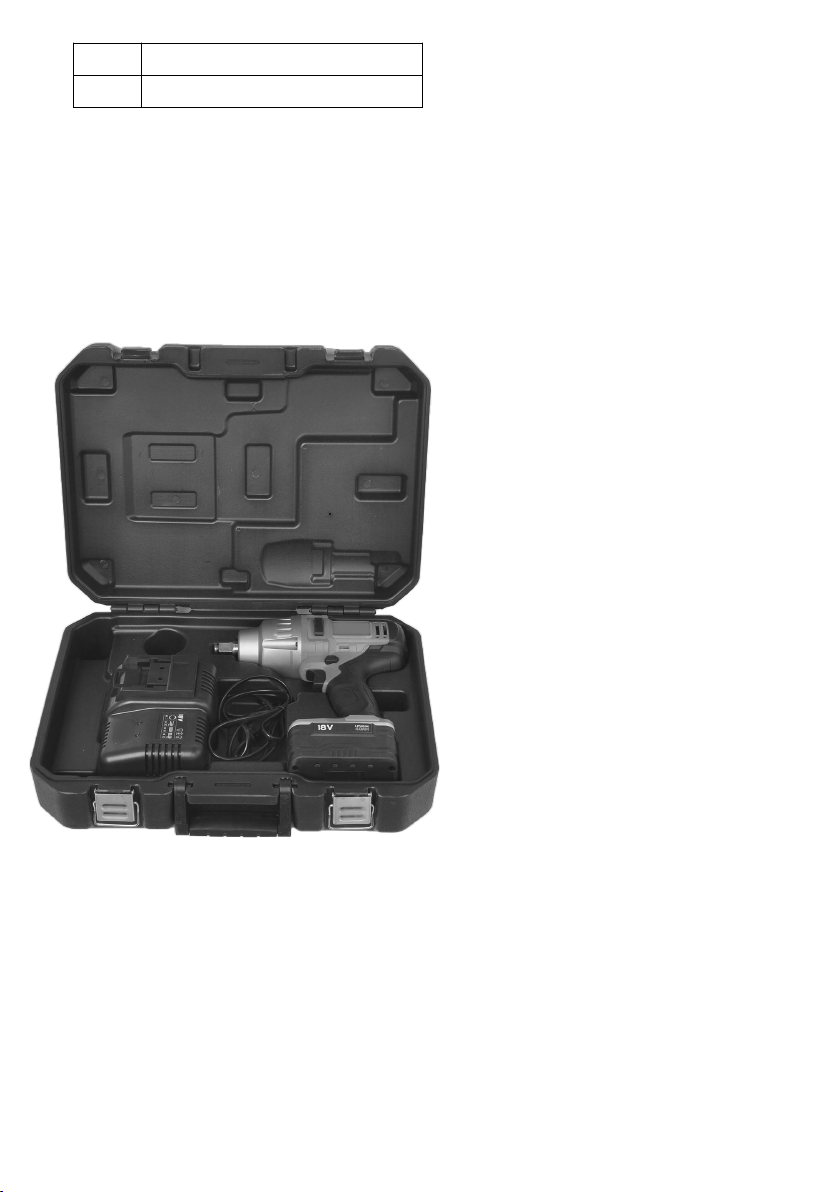
3. TECHNICAL DATA
Rated Voltage 18V d.c
Rated speed 0-1600rpm
Rated Impact
0-3200bpm
Chuck
1/2” square head
Max torque
520N.m
Battery pack
Rated 18Vd.c. 4.0Ah SAMSUNG li-ion battery
Battery Charger
Input voltage
100-240V AC, 50Hz, 75W
Output voltage
18V d,c, 2500mA
Charging time
100 mins
Class
II
FUNCTIONAL DESCRIPTION
1. 1/2” square head
2. Left/right switch button
3. ON/OFF Switch
4. Soft grip
5. Battery pack
6. Battery pack release button
7. LED work light
4. OPERATING INSTRUCTIONS
SHOW
The cordless impact wrench with 1/2” square head.

Selecting correct socket
Always use the correct size socket for bolts and nuts. An incorrect size socket will
result in inaccurate and inconsistent fastening torque and / or damage to the bolt
or nut. Refer to accessories section for socket size.
Installing or removing socket
Always be sure that the tool is switched off and the battery pack is removed
before installing or removing the socket.
To install the socket, push it onto the anvil (1) of the tool until it locks into place. To
remove the socket, simply pull it off.
Using the machine
Forward / Reverse
Select the direction of rotation by pressing
the forward / reverse switch (2).
The forward / reverse switch has a lock
function and cannot be used when the
trigger is depressed.
Ensure the impact wrench has come to a complete stop before
changing direction
Switching ON / OFF
To switch ON: Pull the trigger (3)
To switch OFF: Release the trigger

LED worklight
The impact wrench is equipped with an LED worklight(7).
The LED worklight
illuminates immediately after
pulling
the trigger and turns off once
you
release the trigger.
5. MAINTENANCE AND CLEANING
The driver is maintenance – free but must be kept clean. All replacement
parts must be replaced by a trained electrician or an authorized service centre
unless stated otherwise in this manual.
Lubrication
The machine does not require additional lubrication
Cleaning
Clean the battery charger housing using a soft, dry cloth. Disconnect the
charger from the mains before cleaning.
Remove the battery before cleaning the tool.
Ensure that the ventilation slots are not blocked and clean the machine’s
housing regularly with a soft cloth.
6. BATTERY PACK AND BATTERY CHARGER
Safety
Correct handing of battery pack and battery chargers
Ensure that the power tool is switched OFF before you insert the battery
pack. Inserting a battery pack into a power tool that is the switch can be
locked in on position can cause accidents.

Charging battery pack only with the chargers recommended by the
manufacturer.
Charging the battery pack in another type of charger can lead to injury or
fire.
Only use the battery pack with the power tools, The use of other batteries
can lead to injury or fire.
Keep unused batteries away from staples, coins, keys, nails, screws or
other metal objects that could bridge the contacts on the battery pack. A
short circuit between the battery pack contacts can lead to burns or fire.
Fluid can leak from the battery pack if the power tool or the battery pack
is used incorrectly. Avoid contact with any fluid which may leak from the
battery pack. Wash your skin with water should you come into contact
with the fluid. Should the fluid come into contact with your eyes, rinse with
water and seek immediate medical attention. Fluid leaking from batteries
can lead to irritation or burns.
Do not operate the battery charger on easily inflammable surfaces or in
combustible environments. The heat produced during the charging
process may pose a fire hazard.
Ensure sufficient ventilation whilst charging. Do not operate the battery
charger in enclosed cabinets or in close vicinity to heat sources and keep
it out of direct sunlight. Ambient temperatures in excess of +50oC can
lead to malfunctions.
Never attempt to recharge non-rechargeable batteries.
The battery charger is not intended to be used by persons (including
children) with limited physical, sensory or mental capabilities, or lack of
experience and/or knowledge, except if being supervised by a person
responsible for their safety or having received instructions from this
person on how to operate the device.
Keep the battery charger away from rain or moisture. Exposure of an
electrical device to water increases the risk of an electric shock.
Before each use, check the battery charger, battery pack, cable and plug
for signs of damage. Do not use the battery charger if damage is
detected. Never open the battery charger. Repairs must be carried out
only by the manufacturer or by a qualified electrician. Damaged battery
chargers, cables and plugs increase the risk of an electric shock.

Do not dispose of used batteries in the household waste. Consult your
local authority or dealership for details of recycling or disposal facilities.
Never dispose of battery pack in fire as this can lead to explosion. Never
attempt to open the battery pack.
Use only original replacement batteries. The use of other batteries can
lead to injury and / or damage to property.
Operation
Install and remove the battery pack
Fit a battery pack to the angle grinder and make sure that it is pushed all the
way into the battery holder
CAUTION:
• Always switch off the tool before installing or removing of the battery
cartridge.
• Hold the tool and the battery pack firmly when installing or removing battery
cartridge.
Failure to hold the tool and the battery cartridge firmly may cause them to slip
off your hands and result in damage to the tool and battery cartridge and a
personal injury.
To remove the battery cartridge, slide it from the tool while sliding the button
on the front of the cartridge.
To install the battery cartridge, align the tongue on the battery cartridge with
the groove in the housing and slip it into place. Insert it all the way until it locks
in place with a little click. If you can see the red indicator on the upper side of
the button, it is not locked completely.
1. Before operation
Fitting and removing the battery pack. Slide the
battery into the handle until it engages. To remove
the battery, hold down the battery pack release
button (A) and pull the battery pack out of the handle.
2. Charging the battery pack

Slide the battery pack onto the charger.
Connect the charger to a suitable mains socket. The charger may become
warm and buzz slightly during charging. This is normal and does not indicate
a fault.
3. When the charger is plug in ,the green light will light up.
When the battery pack is charging the red light will
blink. When the battery pack is fully charged, the red
light will stop blinking and remain lighted up
4. After charging, unplug the charger from the wall
outlet.
The battery pack can become warm if the machine is subject to heavy
use. Always allow the battery pack to cool down before re-charging.
OVERLOAD PROTECTION AND OTHER SAFETY FEATURES
The machine/battery pack has a number of safety features that prevent
damage to the machine and battery pack during use.
During short high-load situations the overload protection may turn off the
machine/ battery pack. This protection resets automatically. Release the
trigger, wait a few seconds, ensure that there is no load and restart the
machine. The machine should now function normally again.
During high-load for extended periods the overheating protection may turn
off the machine/battery pack. The protection resets itself but the machine
cannot be restarted until it has returned to normal operating temperature.
Let the machine cool properly before trying to restart it. Adverse
temperatures can occur in direct sunlight and should therefore be
avoided.
The battery pack has low-voltage protection which comes into effect when
the batteries becomes discharged. The low-voltage protection turns off
the machine automatically and the battery pack should be recharged.

Maintenance and cleaning
Maintenance
The contacts on the battery pack and the charger must be kept clean. All
replacement parts must be replaced by a trained electrician or an authorized
service centre unless stated otherwise in this manual
Cleaning
Clean the battery charger housing using a soft, dry cloth. Disconnect the
charger from the mains before cleaning.
Remove the battery before cleaning the battery charger.
Ensure that the ventilation slots are not blocked.
The contacts on the battery pack and the charger must be kept clean.
ENVIRONMENT
Should your appliance need replacement after extended use, do
not discard it with the household rubbish but dispose of it in an
environmentally safe way.
Waste produced by electrical machine items should not be
handled like normal household rubbish. Please recycle where
recycle facilities exist. Check with your Local Authority or retailer
for recycling advice.
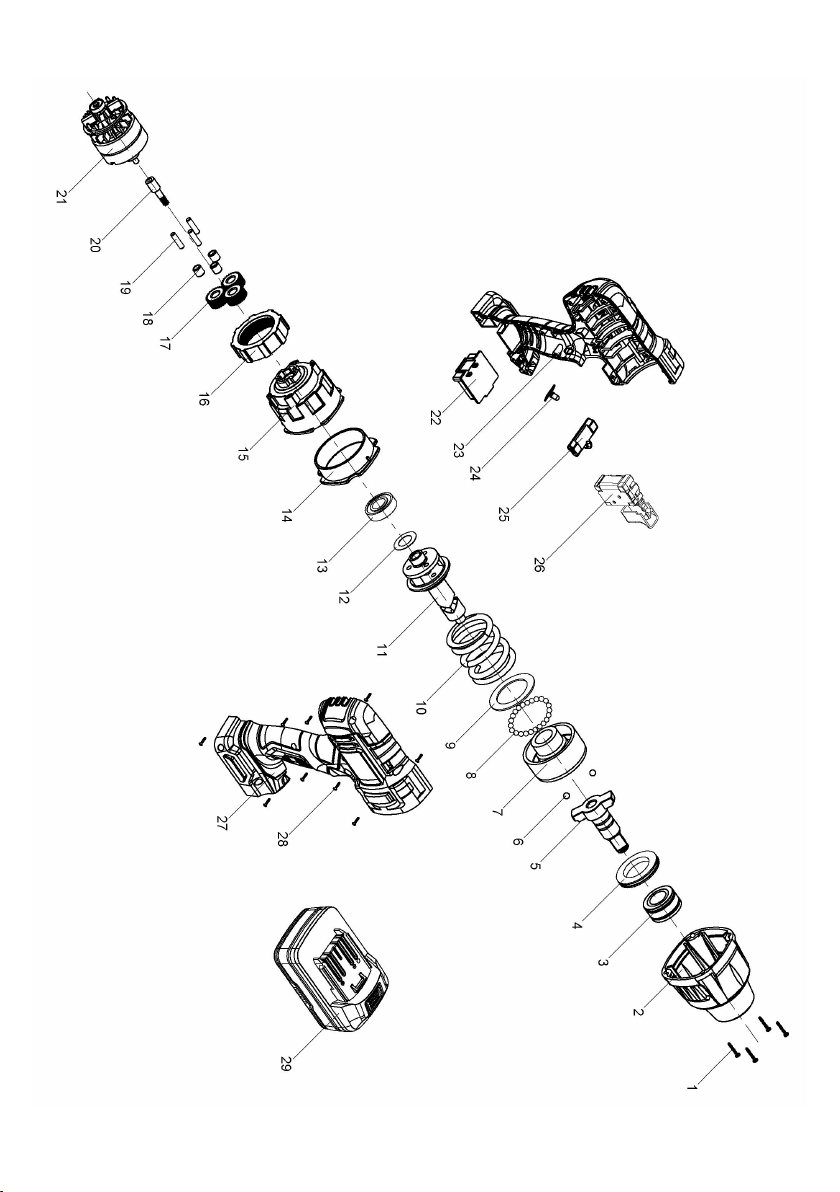
PARTS DIAGRAM

PARTS LIST
When servicing, use only identical replacement parts. Use of any other parts
may create HAZARD or cause damage to your power tool.
Any attempt to repair or replace electrical parts on this power tool may create
a hazard unless repair is performed by a qualified technician.
1 Cross recess head self tapping screws,black coating
2 Gearbox cover
3 Shaft sleeve
4 Deep groove ball bearing φ30×47×6
5 Output shaft, 20CrMo, carburizing treatment
6 Steel ball, Φ6.35
7 Impact block, 20CrMo, carburizing treatment
8 Steel ball,Φ5
9 Spacer,carbon steel,Ф36×Ф52×1.5,black coating
10 Compression spring
11 Central shaft
12 Spacer,stainless steel,Ф15.5×Ф26×0.5
13 Deep groove ball bearing Ф32×Ф15×9
14 Gear shift fixing gear ring
15 Gear box
16 Annular gear ring
17 Planetary gears
18 Deep groove ball bearing Ф9×Ф5×9
19 Straight pins, Φ5×19.5
20 Motor gear
21 Motor
22 Battery clamp
23 Left housing
24 Workarea indicator
25 Forward/Reverse lever
26 Switch
27 Right housing
28 Cross recess head self tapping screws,black coating
29 18V Battery pack
Table of contents


