Topdon ArtiLink300 User manual

Hotline (+86)0755-23576169
Email [email protected]
Website www.topdondiagnostics.com
Facebook @TopdonOcial
Twitter @TopdonOcial
If you have any questions or doubts, please contact
us via
PS
E

ArtiLink300
Code Reader
USER MANUAL

Content
Welcome ......................................................................................1
About............................................................................................1
Package List................................................................................1
Compatibility ...............................................................................1
Notice...........................................................................................1
General Information of OBDII (On-Board Diagnostics II).......... 2
Diagnostic Trouble Codes (DTCs) .............................................. 2
Features.......................................................................................3
Operation Introduction................................................................ 4
Technical Specication.............................................................17
Warranty ...................................................................................17
Warnings....................................................................................18
Cautions.....................................................................................18
FAQ.............................................................................................19

-1-
Thank you for purchasing TOPDON OBD2 scan tool ArtiLink 300.
Please patiently read and understand this User Manual before
operating this product.
About
As designed to work with all OBDII compliant vehicles, including
Controller Area Network (CAN), TOPDON ArtiLink 300 supports all
10 modes of OBDII test for a complete diagnosis. It enables users
to Read/Clear DTCs, run I/M Readiness test, check Live and Freeze
Frame Data etc., with built-in help menus and code denitions.
Package List
1.ArtiLink 300
2.Quick Start Guide
3.User Manual
Welcome
Compatibility
TOPDON ArtiLink 300 is compatible with following protocols:
• KWP2000
• ISO9141
• J1850 VPW
• J1850 PW
• CAN (Controller Area Network)
Notice
ArtiLink 300 may automatically reset while being disturbed by
strong static electricity. THIS IS A NORMAL REACTION.

-2-
Diagnostic Trouble Codes (DTCs)
General Information of OBDII (On-Board
Diagnostics II)
The OBDII system is designed to monitor emission control
systems and key engine components by performing either
continuous or periodic tests of specific components and
vehicle conditions, which will offer three pieces of such
valuable information:
1. Whether the Malfunction Indicator Light (MIL) is
commanded “on” or “off”;
2. Which, if any, Diagnostic Trouble Codes (DTCs) are stored;
3. Readiness Monitor status.

-3-
ArtiLink300CodeReaderUserManual
Features
▼
▲
1. LCD - Show test results.
2. OK - To conrm the current operation.
3. EXIT - Back to the previous page.
4. - Move down for selection. Or skip to the next page
when more than one page is displayed.
5. - Move up for selection. Or skip to the previous page
when more than one page is displayed.
6. 16-pin Connector - To connect to the vehicle's DLC (Data
Link Connector).
-4-
ArtiLink300CodeReaderUserManual
Operation Introduction
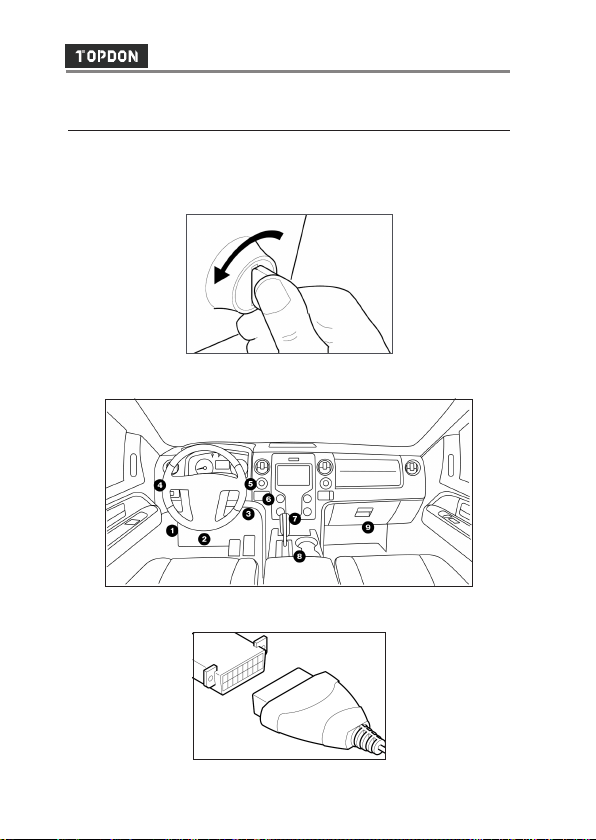
1. Preparation & Connection
1. Turn the ignition off.
2. Locate the vehicle’s DLC socket.
3. Plug the diagnostic cable into the vehicle’s DLC socket.

-5-
4. Turn the ignition on. The engine can be off or running.
5. ArtiLink 300 will start initializing and enter the main menu.
*Note: Don’t connect or disconnect any test equipment with
ignition on or engine running.
2. Diagnose
Select [Diagnose] in Main Menu and press [OK]. The tool will
automatically start a check of the vehicle’s computer.
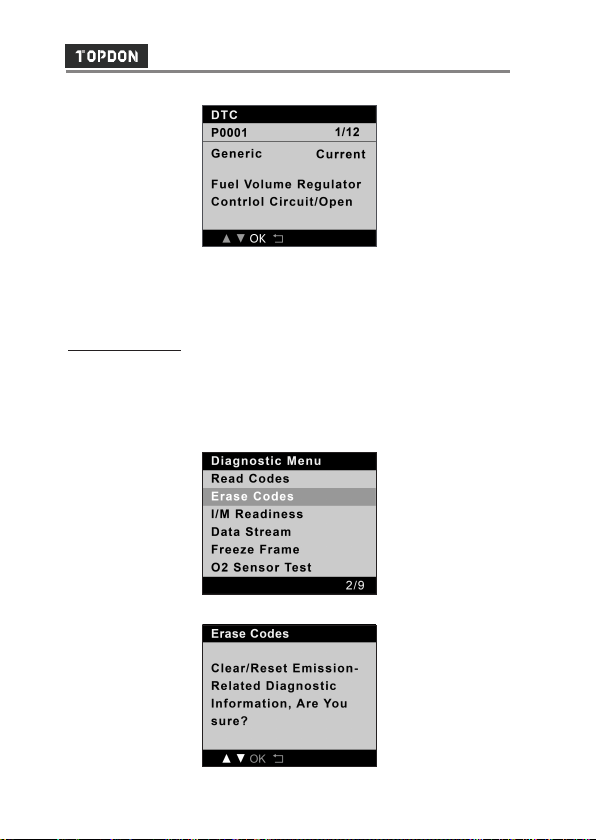
2.1 Read Codes
This option identies which section of the emission control
system has malfunctioned.
Select [Read Codes] and press [OK].
The DTC with its denition will be displayed on screen.
-6-
*Note:NeverreplaceapartbasedonlyontheDTCdenition.
Always refer to the vehicle’s service manual for detailed
testing instructions.
2.2. Erase Codes
This option erases the codes from the vehicle after retrieving
codes from the vehicle, and certain repairs have been carried
out.
Select [Erase Codes] and press [OK].
Press [OK] to conrm erasing.

-7-
The result will be displayed on screen.
*Note: Be sure the vehicle’s ignition key is in the ON position
with the engine off.
2.3 I/M Readiness
This option checks whether or not the various emissions-
related systems on the vehicle are operating properly, and
are ready for Inspection and Maintenance testing.
It is also can be used to confirm that the repair has been
performed correctly, and/or to check for Monitor Run Status,
after the repair of a fault has been performed.
Select [I/M Readiness] and press [OK].
Select an option, and press [OK].

-8-
The result will be displayed on screen.
*Explanation of terms:
• CAT_RDY - Catalyst Monitor Ready?
• HCAT_RDY - Heated Catalyst Monitor Ready?
• EGR_RDY - EGR System Monitor Ready?
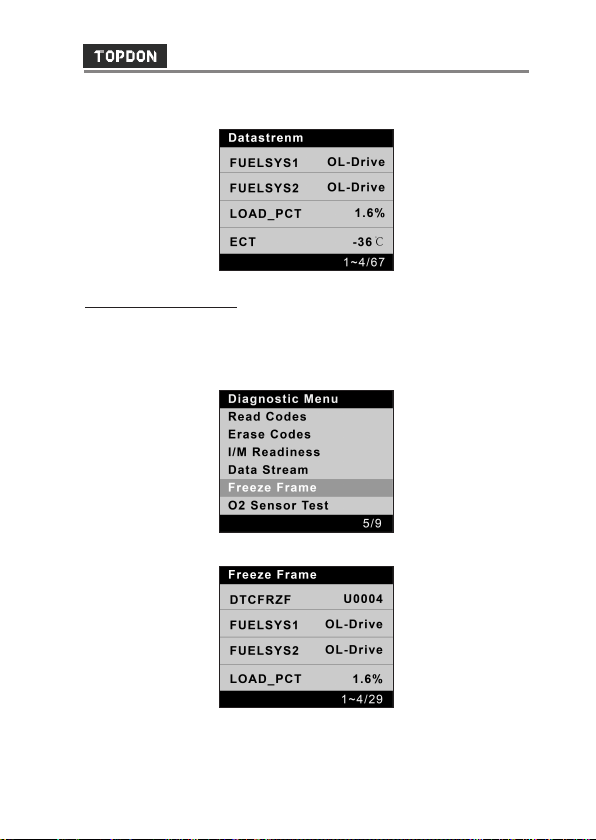
2.4 Data Stream
This option retrieves and displays live data and parameters
from the vehicle’s ECU.
Select [Data Stream] and press [OK].
-9-
The result will be displayed on screen.
2.5 View Freeze Frame
This option takes the snapshot of the operating conditions
when an emission-related fault occurs.
Select [Freeze Frame] and press [OK].
The result will be displayed on screen.
*Note: if DTCs were erased, Freeze Data may not be stored in
vehicle memory depending on vehicle.

-10-
2.6 O2 Sensor Test
This option retrieves O2 sensor monitor test results of the
most recently completed tests from your vehicle’s on-board
computer.
Select [O2 Sensor Test] and press [OK].
Select an option, and press [OK].
Select an option, and press [OK].
The result will be displayed on screen.

-11-
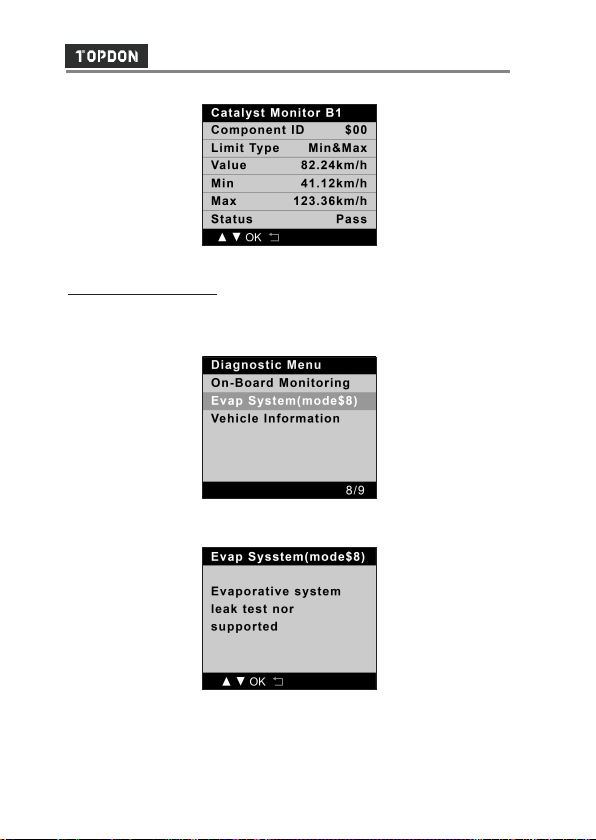
2.7 On-Board Monitor Test
This option retrieves test results for emission-related
powertrain components and systems that are not
continuously monitored. The tests available are determined
by the vehicle manufacturer.
Select [On-Board Monitoring] and press [OK].
Select an option, and press [OK].
The result will be displayed on screen.
-12-
2.8 EVAP System Test
This option initiates a leak test for the vehicle’s EVAP system.
Select [EVAP System (mode$8)] and press [OK].
If the vehicle doesn’t support mode$8, the following result will be
displayed on screen.
*Note: Before using the system test function, refer to the
vehicle’s service repair manual to determine the necessary
procedures.
-13-
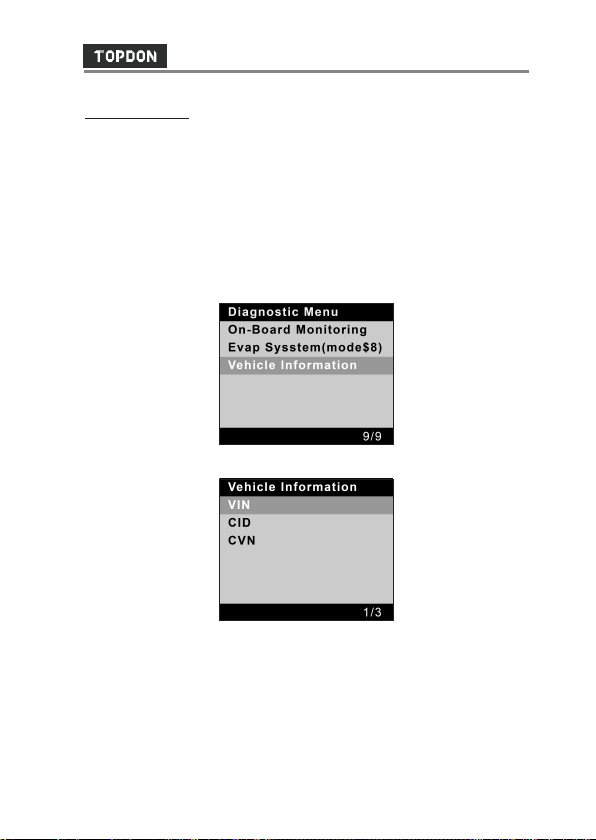
2.9 Vehicle Info
This option retrieves a list of information (provided by the
vehicle manufacturer) from the vehicle’s on-board computer.
This information may include:
• VIN (Vehicle identication Number).
• CID (Calibration ID).
• CVN (Calibration Verication Number).
Select [Vehicle Information] and press [OK].
Select an option, and press [OK].
The result will be displayed on screen.
-14-
ArtiLink300CodeReaderUserManual
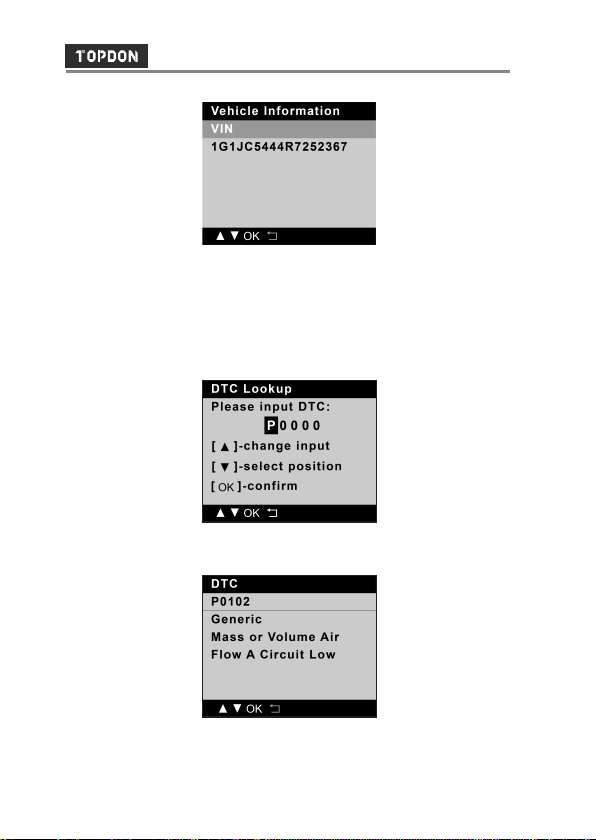
3. DTC Lookup
This function enables you to view the detailed definition of
the retrieved DTC.
Select [DTC Lookup] in the Main Menu and press [OK], the
following screen will appear:
After you input the DTC, press [OK] to view its detailed
denition.
-15-
ArtiLink300CodeReaderUserManual
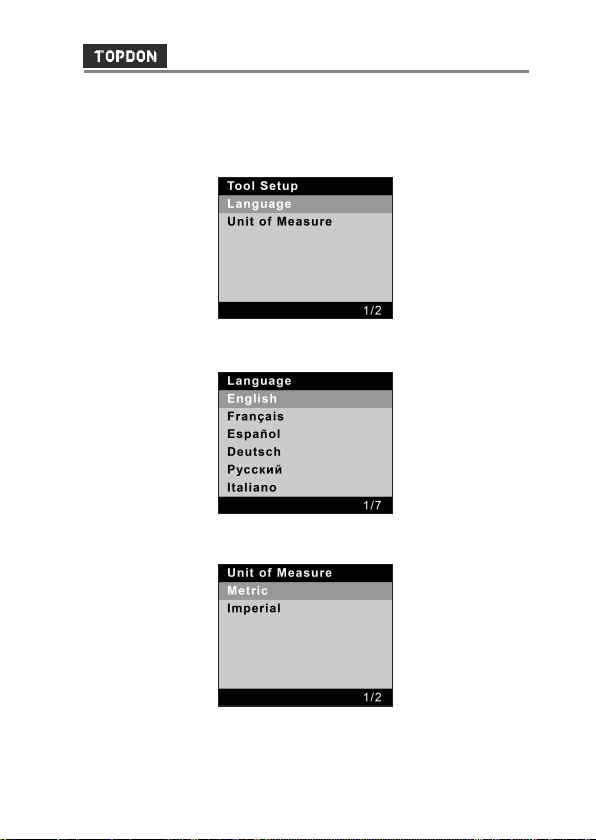
4. Settings
Select [Tool Setup] in the Main menu and press [OK], the
system will enter the tool setup screen.
• Language
This option enables you to set the user interface language.
• Unit of Measure
This option allows you to set measurement unit.

-16-
ArtiLink300CodeReaderUserManual
5. Help
This function enables you to view the tool information and the
OBD introduction.
Select [Help] in the Main menu and then press [OK].
The following options will be displayed on screen.
• About OBD - Relevant introduction information about OBD.
• About Datastream - Relevant introduction information
about Data Stream.
• About I/M - Introduces the full name and detailed
denition of each I/M monitor.
• Tool Information - Displays the related information of your
tool.

-17-
ArtiLink300CodeReaderUserManual
TechnicalSpecication
Display: 1.77”color LCD
Input Voltage Range: 9~18V
Working Temperature: 0 to 50°C (32℉to 122℉)
Storage Temperature: -20 to 70°C (-4℉to 158℉)
Dimensions: 119 * 71.7 * 23.3 mm (4.68 * 2.82 * 0.91 inch)
Weight: 210g (0.46 lb)
Warranty
TOPDONOne Year Limited Warranty
The TOPDON Company warrants to its original purchaser
that TOPDON products will be free from defects in material
and workmanship for 12 months from the date of purchase
(Warranty Period). For the defects reported during the
Warranty Period, TOPDON will, according to the technical
support analysis and conrmation, either repair or replace the
defective part or product.
This limited warranty is void under the following
conditions:
• Misused, disassembled, altered or repaired by a non-
TOPDON technical repair specialist.
• Careless handling and violation of operation.
Table of contents
Other Topdon Barcode Reader manuals


