Atid AT188N User manual

ATID Co., Ltd.
AT188N User guide
AT188N Product User guide
Won-Tak Choi
2016-03-02

AT188N User guide Page 2
AT188N User guide
AT188N Product User guide
Company
ATID Co., Ltd.
Doc Name
User guide
Writer
Won-Tak Choi
Date
2016-03-02
Ver.
v0.3
Revision History
Version
Revised Date
Revised Reason
Revised Contents
Writer
V0.1
2015-07-31
Draft
Issue Draft
Byung-Gil Choi
V0.2
2015-09-11
Revision
Revise the contents
Byung-Gil Choi
V0.3
2016-03-02
Revision
Revise the contents
Won-Tak Choi

AT188N User guide Page 3
AT188N User guide
AT188N Product User guide
Company
ATID Co., Ltd.
Doc Name
User guide
Writer
Won-Tak Choi
Date
2016-03-02
Ver.
v0.3
Contents
Contents ..........................................................................................................................................................................................3
1 Before Beginning, ..............................................................................................................................................................5
2 Product Overview..............................................................................................................................................................5
3 Strength of Product..........................................................................................................................................................6
4 H/W Specification..............................................................................................................................................................7
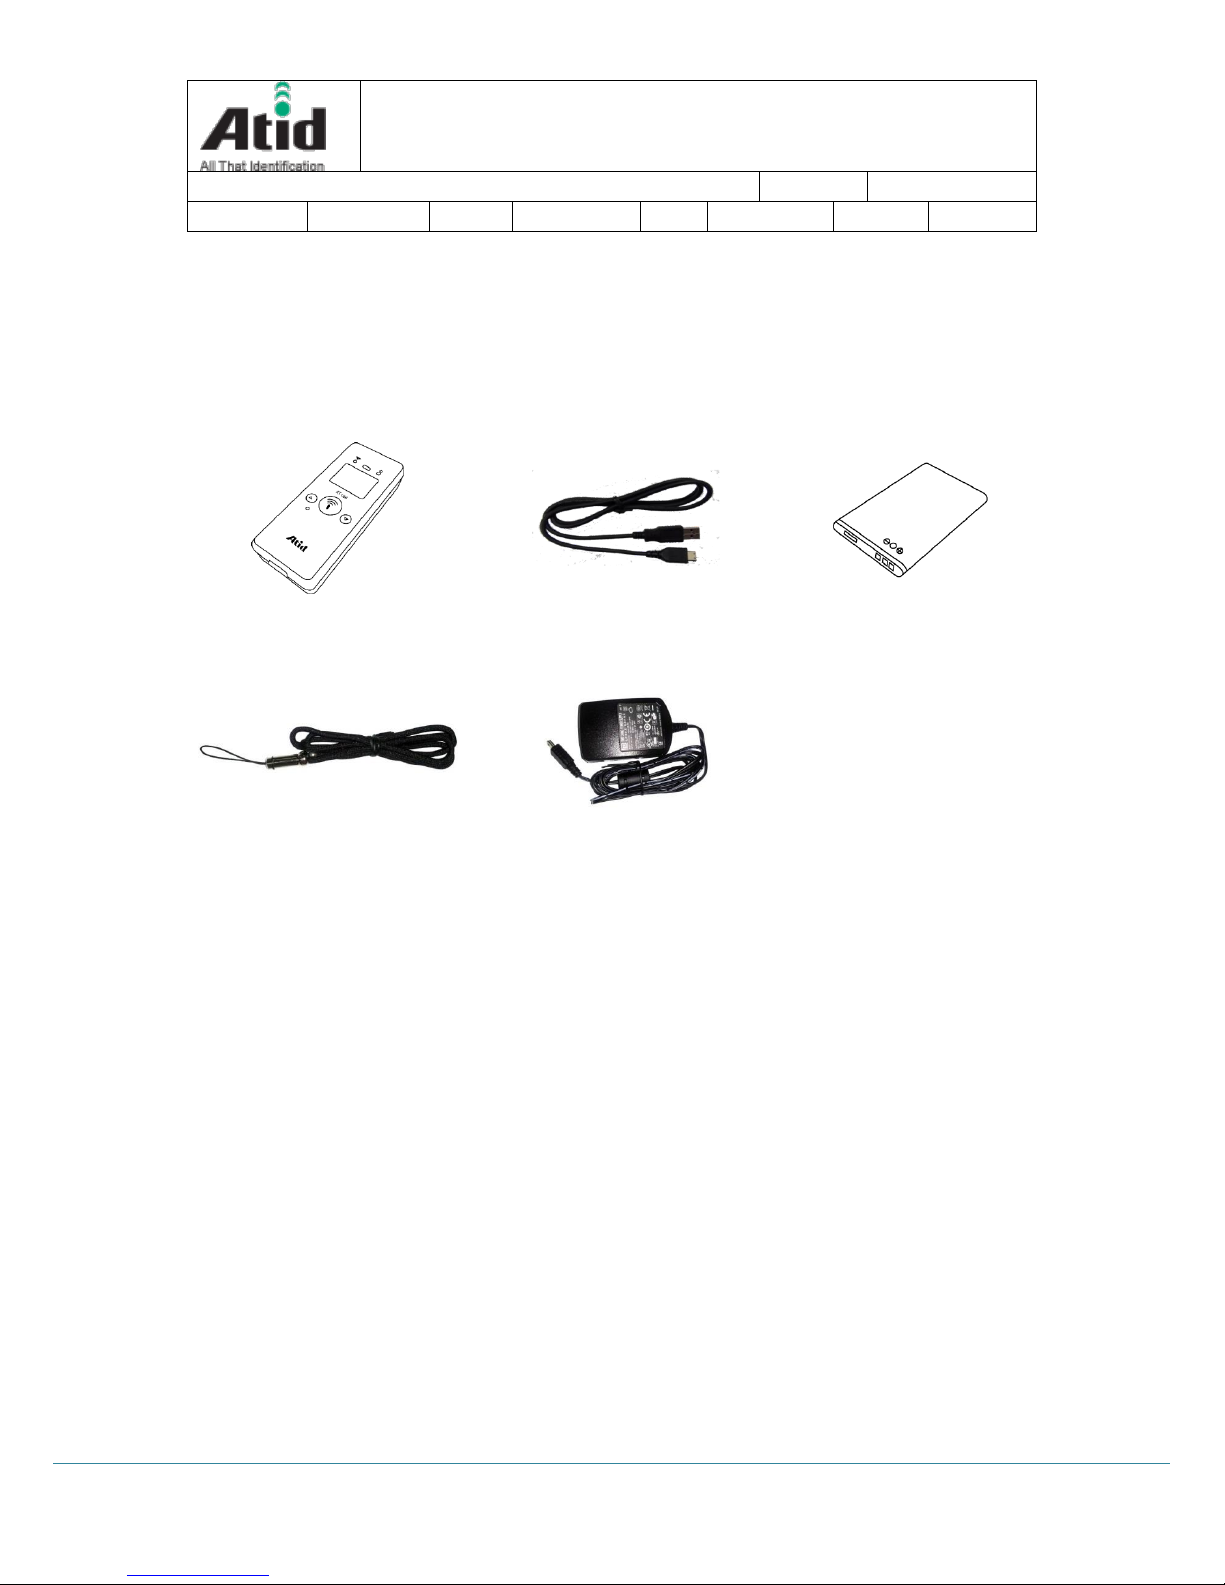
5 Product Composition.......................................................................................................................................................9
5.1 Product Composition .........................................................................................................................................9
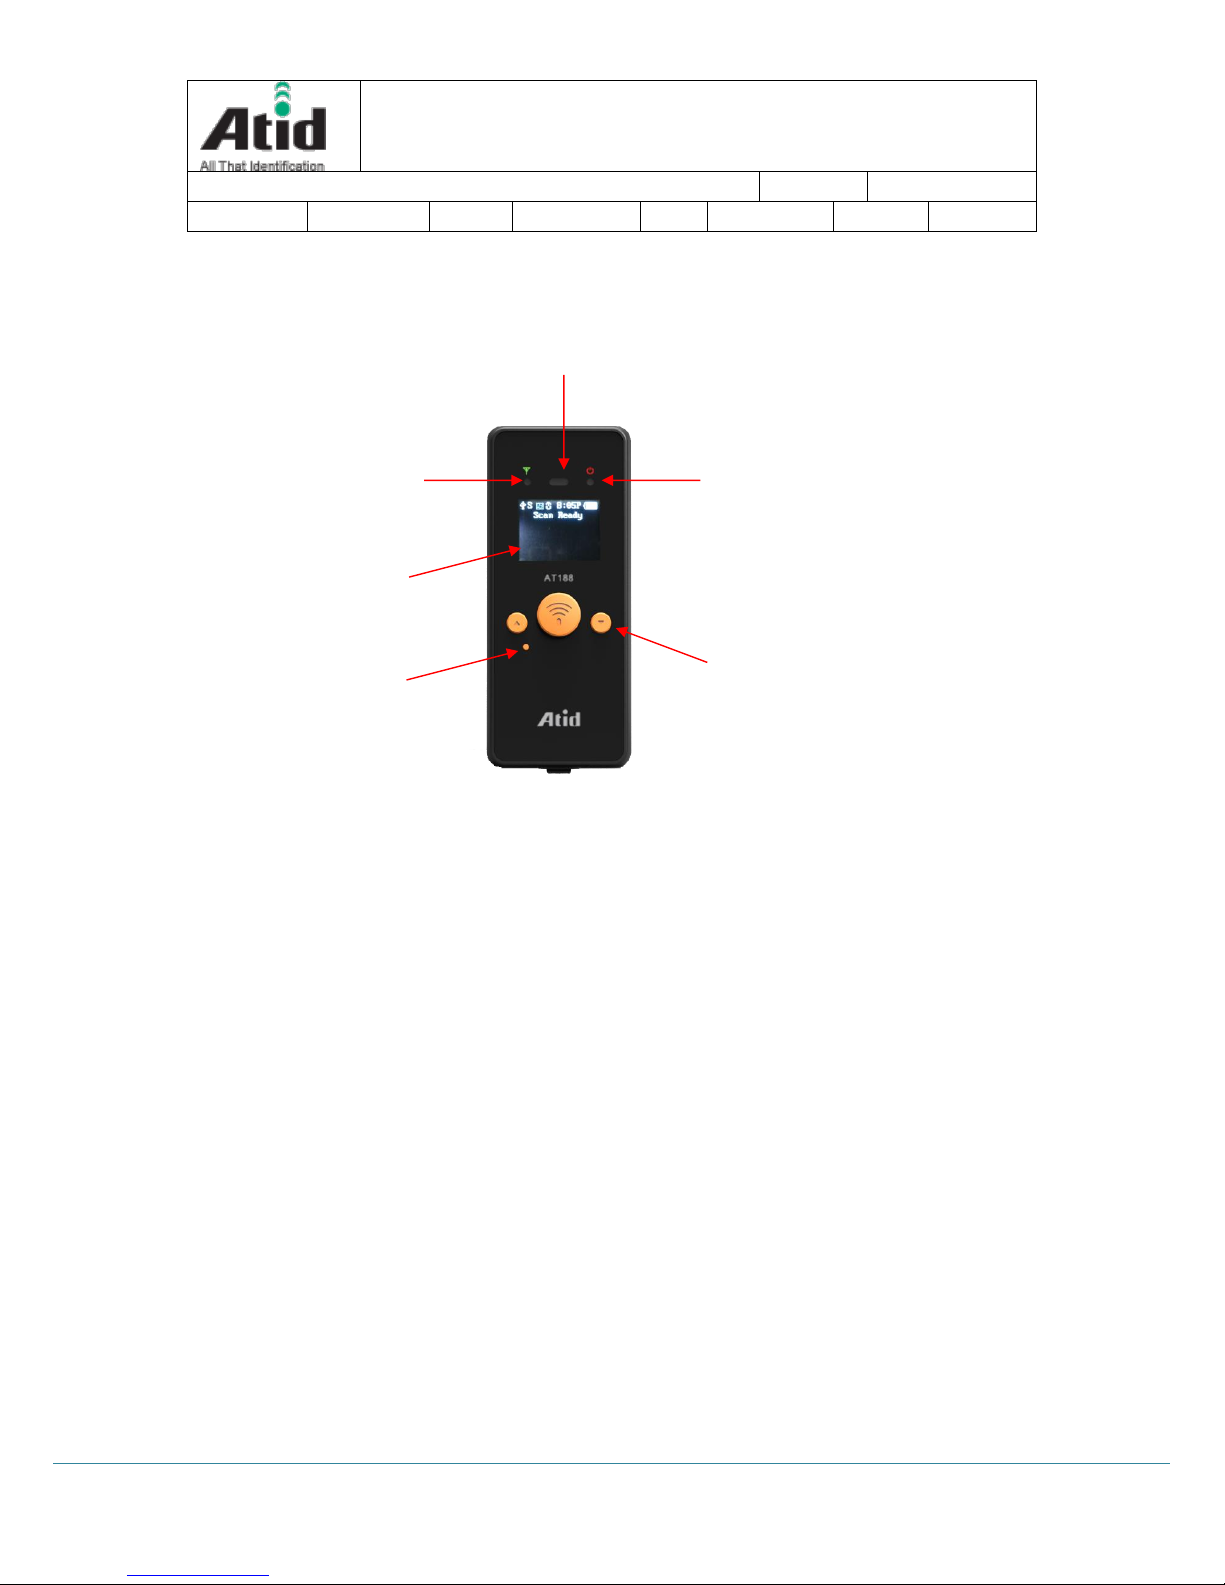
5.2 Composition of Each Product`s Part ........................................................................................................ 10
5.3 Function of Each Button ................................................................................................................................ 12
5.4 Screen ..................................................................................................................................................................... 12
5.4.1 State Display Section .................................................................................................................................. 13
5.4.2 Message Output Section .......................................................................................................................... 13
6 Basic Function of Device............................................................................................................................................. 14
6.1 Basic Function of Device................................................................................................................................ 14
6.1.1 Scan Mode....................................................................................................................................................... 14
6.1.2 Scan Configuration Menu......................................................................................................................... 14
6.1.3 System Configuration ................................................................................................................................. 14
6.2 Power ON and OFF .......................................................................................................................................... 15
6.2.1 Power ON......................................................................................................................................................... 15
6.2.2 Power OFF:....................................................................................................................................................... 15
6.3 Barcode Data Reading(Scan)........................................................................................................................ 15
6.4 RFID Tag Data Reading(Scan)...................................................................................................................... 16
6.5 Scan Configuration........................................................................................................................................... 16
6.6 System Configuration...................................................................................................................................... 17
7 Settings & Changes....................................................................................................................................................... 18
7.1 Scan Configuration........................................................................................................................................... 18
7.1.1 .”1. Scan data”................................................................................................................................................. 18
7.1.2 “2. View data”................................................................................................................................................. 18
7.1.3 “3. Upload data”............................................................................................................................................ 18
7.1.4 “4. Erase data”................................................................................................................................................ 18
7.1.5 “5. Data space”............................................................................................................................................... 18
7.1.6 “6. Comm & Mode”..................................................................................................................................... 18
7.1.7 “7. Bth Pairing”............................................................................................................................................... 19
7.1.8 “8. Power down”................................................................................................................................................... 19

AT188N User guide Page 4
AT188N User guide
AT188N Product User guide
Company
ATID Co., Ltd.
Doc Name
User guide
Writer
Won-Tak Choi
Date
2016-03-02
Ver.
v0.3
7.2 System Configuration...................................................................................................................................... 20
7.2.1 “1. Barcode”..................................................................................................................................................... 20
7.2.2 “2. UHF RFID” (UHF Only) ....................................................................................................................... 20
7.2.3 “2. HF RFID” (HF Only).............................................................................................................................. 21
7.2.4 “3. Scan time”................................................................................................................................................. 22
7.2.5 “4. Comm & Mode”..................................................................................................................................... 22
7.2.6 “5. Data”............................................................................................................................................................ 24
7.2.7 “6. System”....................................................................................................................................................... 25
7.2.8 “7. Default”....................................................................................................................................................... 27
7.2.9 “8. Exit” .............................................................................................................................................................. 27
8 Firmware Update ............................................................................................................................................................ 28
8.1 Preparation for Firmware............................................................................................................................... 28
8.2 Firmware Update Start.................................................................................................................................... 28
9 Warranty and Technical Supports........................................................................................................................... 32

AT188N User guide Page 5
AT188N User guide
AT188N Product User guide
Company
ATID Co., Ltd.
Doc Name
User guide
Writer
Won-Tak Choi
Date
2016-03-02
Ver.
v0.3
1Before Beginning,
The objective of user guide is to pass the basic contents related with AT188`s maintenance
and smooth uses.
User guide inclusive of text, images, logos, product name may not be distributed, modified,
displayed, reproduced (in whole or in part) without the prior written permission of ATID CO.LTD
Furthermore, the described contents in this document are subject to change without notice for
improving or maintaining the product and we inform the user that some material can be
different with the described contents due to the firmware changes of product.
Ownership of text, images, logos, product name in user guide is included in writer and some
parts of text, images, logos, product name in the user guide were borrowed for user`s
understanding at random. if there is a legal restriction such as a copyright law, it will be re-
distributed after adjustment
2Product Overview
AT188 is both subminiature barcode and RFID reader which can grasp with just one hand.
As the device that meets the basic function for industrial product such as IP54 in water & dust
test and 1.2 m drop specification, it can take an active as data collector in the various kinds of
part in medicine, stock and product management and logistics shipping/tracking, access control.
1D/2D Barcode, UHF/HF RFID Tag information and GPS information can be collected by just
one AT188 and collected data can transfer to Bluetooth and USB through real time process /
batch process mode. This device is designed to handle the data by the equipment which has
the windows, Android, iOS as an operating system.

AT188N User guide Page 6
AT188N User guide
AT188N Product User guide
Company
ATID Co., Ltd.
Doc Name
User guide
Writer
Won-Tak Choi
Date
2016-03-02
Ver.
v0.3
3Strength of Product
AT188 is the smallest product among the existing RFID Barcode Scanner-Reader product.
Its device as durable industrial PDA meets IP54 standard for the dust & water proof and
1.2m drop to concrete
UHF RFID Tag can be read and written quickly since Impinj R500 module is
installed in the product
In case of that HF RFID module is installed, Various HF RFID tag can be read
and written.
Its device equipped with GPS ANT can record the barcode data and collecting
site of RFID Tag data at the same time.
Mode of Batch Process and Real Time Process can work for device
It device can be connected with PC and charged up itself through USB Cable
It can be charged up without exclusive adapter through normal smartphone
charger
Read data through LCD Display can be directly checked
Battery changes is easily available and its device can change the battery in
case of battery shortage while using it.
Exclusive charging package for only battery charging will be offered
(Option: To be Offered in the near future)

AT188N User guide Page 7
AT188N User guide
AT188N Product User guide
Company
ATID Co., Ltd.
Doc Name
User guide
Writer
Won-Tak Choi
Date
2016-03-02
Ver.
v0.3
4H/W Specification
Performance Characteristics
Processor
ARM7 Core
Support Operating System
Windows, Android, iOS (BLE Only)
Memory
128Kbyte
Display
LCD & LED Indicator
Weight
160g (with Battery & UHF Option, without GPS)
Operation Temperature
-20~60℃
Storage Temperature
-30~70℃
Humidity
95% non-condensing
Drop specification
1.2M Drop to concrete
Dust & Water Proof
IP65
Physical Characteristics
Audio
Buzzer
Standard I/O Port
Bluetooth 3.0 or BLE, Micro USB
Notification
LED, Buzzer, LCD, vibrator
Dimensions(L x W x H)
115 x 50 x 35mm
Battery Supply
Main Battery
1,100mAH Li-Ion Rechargeable Battery
Power Adapter
Battery Charger(Option) & DC5V, 800mA
Network Characteristics
Bluetooth
Bluetooth 3.0 HID/SPP (BLE Option)
USB
USB 1.1 SPP/HID
GPS
Internal GPS (Option)
Barcode Data Processing Device
Barcode Engine
1D Laser or 2D Image Scanner
UHF 900MHz RFID Reader/Writer (Option)
Chips set
Impinj R500
Frequency
860~960MHz (Support Global Frequency)

AT188N User guide Page 8
AT188N User guide
AT188N Product User guide
Company
ATID Co., Ltd.
Doc Name
User guide
Writer
Won-Tak Choi
Date
2016-03-02
Ver.
v0.3
Reading Range
0M~1M (According to Tag & Environment)
Writing Range
0M~0.5M (According to Tag & Environment)
Max. RF output
26dBm, Circular
Protocol
EPC Gen2, ISO/IEC 18000-6C
Special Function
Anti-Collision
HF 13.56MHz RFID Reader/Writer (Option)
Frequency
13.56MHz
Reading/Write Range
0Cm ~ 5Cm (According to Tag & Environment)
Protocol
ISO 15693, MIFARE, ISO 14443A/B & etc.
Accessories
Basic Accessories
Neck strap, USB Cable
Optional Accessories
AC-DC Adapter, Battery Charger

AT188N User guide Page 9
AT188N User guide
AT188N Product User guide
Company
ATID Co., Ltd.
Doc Name
User guide
Writer
Won-Tak Choi
Date
2016-03-02
Ver.
v0.3
5Product Composition
5.1 Product Composition
The basic package for AT188 is shown as below
<Device Body>
<Micro USB Cable>
<Battery>
User Guide
<Hand strap or Neck strap>
<Adapter (Optional)>

AT188N User guide Page 10
AT188N User guide
AT188N Product User guide
Company
ATID Co., Ltd.
Doc Name
User guide
Writer
Won-Tak Choi
Date
2016-03-02
Ver.
v0.3
5.2 Composition of Each Product`s Part
i. Front Side
SCAN Lamp: blue lamp will be lit in case of reading the barcode and RFID Tag
information
Communication State Display Lamp: Show the connection state of GPS,
Bluetooth, USB
Power Lamp: Show the state-of-charge
(Red under charging battery, Green after charging battery at full)
LCD Display: Show the collected data and current state of device
Operation Button: Use its button in case of selecting the barcode and RFID
Tag reading and various menu
Reset Button: Restart the device by force.
Communication
Condition Display Lamp
SCAN Lamp
Power Lamp
LCD Display
Operation Button
Reset Button

AT188N User guide Page 11
AT188N User guide
AT188N Product User guide
Company
ATID Co., Ltd.
Doc Name
User guide
Writer
Won-Tak Choi
Date
2016-03-02
Ver.
v0.3
ii. Right and Left of Back Side
RFID Antenna: HF and UHF RFID Antenna are built in the device and, the radio
is emitted through RFID Antenna when reading the Tag
Battery Cover: Battery can be changed after getting rid of cover
Locking Part for Battery: Prevent the breakaway of battery by fixing the cover
iii. Up and Down Side of Device
GPS Antenna: GPS information can be collected by this device since the GPS
antenna is built in the device. This is optional one and it should be assembled
in the level of production.
Barcode Module: Barcode scanner is built in the device and 1D or 2D barcode
module will be selectively applied. Please note that it should be careful to use
since it is one of the most important part to read the barcode
USB Connector & Waterproof Cover: If the Waterproof Cover opens up, Micro
USB connector is located in it. User can charge the device through USB Cable
Battery Cover
RFID Antenna
Locking Part for Battery
GPS Antenna
(Built in, Optional)
Barcode Module
Strap Hole
USB Connector
& Waterproof cover
<Upper Side>
<Lower Side>

AT188N User guide Page 12
AT188N User guide
AT188N Product User guide
Company
ATID Co., Ltd.
Doc Name
User guide
Writer
Won-Tak Choi
Date
2016-03-02
Ver.
v0.3
and adapter or can transmit the saved data in the device to PC. Please do
lock the cover in case of keeping or using the device.
Strap Hole: The portability of device can be improved by connecting the Hand
Strap or Neck strap with strap hole
5.3 Function of Each Button
▲Button: Scroll the screen upward or select the next item. The function of
Barcode and UHF RFID will be converted each other whenever user pushes its
button in the scan ready
Scan Button: Collect the Barcode or RFID data and act a role to enter the
menu of selected item
▼Button: Scroll the screen downward or select the next item. If user
pushes this button for a long time, it will be turned off
Reset Button: Restart the device
5.4 Screen
AT188 shows the various kinds of item through compact LCD such as the current state
of device and read data
The screen is separated as state display section and message display section
Scan Button
Reset Button
<Operating Button>
10:00P
?
Scan Ready
Status Display
Section
Message Output
Section

AT188N User guide Page 13
AT188N User guide
AT188N Product User guide
Company
ATID Co., Ltd.
Doc Name
User guide
Writer
Won-Tak Choi
Date
2016-03-02
Ver.
v0.3
5.4.1 State Display Section
Its section shows the present time, battery remains and operating set-up state.
, Indication of connection mode: Show the USB connection mode
( ) or Bluetooth connection mode ( )
?, H, S : Show the connection state with the Host.
Disconnection State(?), HID Mode(H), Serial Mode(S)
, : Show the Scanner Mode and show the activated state of Barcode
() and RFID ( ) through the ICON
(Bright Condition: ON, Dark Condition: OFF)
10:00P: Show the set time. (There is a possibility to be different with the
present time) It can be reset up at the system configuration menu
Battery State: Show the battery remains as a four level
5.4.2 Message Output Section
Its section shows the read barcode and RFID Tag information

AT188N User guide Page 14
AT188N User guide
AT188N Product User guide
Company
ATID Co., Ltd.
Doc Name
User guide
Writer
Won-Tak Choi
Date
2016-03-02
Ver.
v0.3
6Basic Function of Device
AT188 supports the reading function for basic barcode and RFID without host after turning
on the device. Please acquire the basic function in accordance with the below step.
6.1 Basic Function of Device
AT188 is basically worked as three kinds of different mode
6.1.1 Scan Mode
This is the screen shown at the first when turning on the device and It acts a role in
collecting the barcode and RFID data
6.1.2 Scan Configuration Menu
User can adjust the basic setting of device through this menu such as confirmation of
read data, memory management, communication mode and setting the time to turn
off the device
6.1.3 System Configuration
User can adjust the relation settings with whole function of device, barcode symbol
settings, Barcode/RFID operation and communication
10:00P
?
Scan Ready
10:00P
?
1. Scan data
2. View data
3. Upload data
4. Erase data
5. Data space

AT188N User guide Page 15
AT188N User guide
AT188N Product User guide
Company
ATID Co., Ltd.
Doc Name
User guide
Writer
Won-Tak Choi
Date
2016-03-02
Ver.
v0.3
6.2 Power ON and OFF
6.2.1 Power ON
①Press the scan button for 2 seconds.
②After “Booting…” message is come out at the screen, please move the
hand from scan in case of that “Wait…” message is come out
③If the “Scan Ready” message is come out as below, device can read the
Barcode or RFID data
6.2.2 Power OFF:
①Press ▼button for 2 seconds in the Scan Ready
②Select the “Yes” through either ▲button or ▼button and then, turn
off the power by pressing the scan button
③If “No” is selected, user can return back to the scan mode
6.3 Barcode Data Reading(Scan)
①Convert to the barcode mode by pressing the ▲button and making
the barcode( ) ICON bright with device on
(Bright Condition: ON, Dark Condition: OFF)
10:00P
?
1. Run Program
2. Setup Param
3. Download App
10:00P
?
Scan Ready
10:00P
?
Power off
continue?
Yes No

AT188N User guide Page 16
AT188N User guide
AT188N Product User guide
Company
ATID Co., Ltd.
Doc Name
User guide
Writer
Won-Tak Choi
Date
2016-03-02
Ver.
v0.3
②User can read the barcode after “Scan Ready” message
6.4 RFID Tag Data Reading(Scan)
①Convert to the RFID mode by pressing the ▲button and making the
RFID( ) ICON bright with device on
(Bright Condition: ON, Dark Condition: OFF)
②User can read the RFID tag after “Scan Ready” message “Scan Ready”
6.5 Scan Configuration
Contents for reading history & operation of Barcode/RFID Tag, Auto Power Off might be
changed by the scan configuration
6.5.1 Entry for Scan Menu
Please refer to the chapter 7. Settings & Changes in regard to detailed information
on scan menu.
①Turn on the device
②The scan menu will be shown up after pressing the ▲button for a
second
③Select the preferred item by using either ▲button or ▼button and
then, press the Scan button to check the detailed information on
selected item
④Select the “1. Scan data” for returning back to Scan mode
10:00P
?
Scan Ready
10:00P
?
1837922
10:00P
?
Scan Ready
10:00P
?
300833B2DDD906C0
000000000

AT188N User guide Page 17
AT188N User guide
AT188N Product User guide
Company
ATID Co., Ltd.
Doc Name
User guide
Writer
Won-Tak Choi
Date
2016-03-02
Ver.
v0.3
6.6 System Configuration
It has to be controlled in the system configuration menu for changing the operating
direction of device, settings for communication function, settings of barcode symbol and
scan mode
6.6.1 Entry for System Configuration
①Turn on the device
②Show the system configuration menu if user press the ▲button and
Scan button for several seconds.
③Select the “2. Setup Param” by using either ▲button or ▼button and
then, enter the configuration menu through scan button
④If user does not want to change the settings, please go back to scan
mode with “1. Run Program”
⑤User can check the detailed information on selected item through the
scan button after selecting the preferred item with either ▲button or
▼button in the system configuration menu.
⑥For restarting it to scan mode after completing the whole settings and
storing the contents, user has to select the “Save & Exit” after selecting
the “8. Exit”. If user selects the “No Save & Exit”, it will be restarted to
scan mode without storage of adjusted contents.
Please refer to the chapter 7. Settings & Changes in regard to detailed information
on system configuration menu

AT188N User guide Page 18
AT188N User guide
AT188N Product User guide
Company
ATID Co., Ltd.
Doc Name
User guide
Writer
Won-Tak Choi
Date
2016-03-02
Ver.
v0.3
7Settings & Changes
7.1 Scan Configuration
7.1.1 .”1. Scan data”
After scan configuration, AT188 gets back to either barcode or RFID scan
7.1.2 “2. View data”
View Data shows the stored data located in the internal memory, in case of Batch
Process Mode.
Check the next or previous item through either ▲button or ▼button
7.1.3 “3. Upload data”
Stored data in the internal memory are transferred to Host`s USB or Bluetooth
Data of memory will be remained after transferring.
7.1.4 “4. Erase data”
Stored data in the internal memory can be wholly deleted
If user wants to erase the data, please select “Yes”
7.1.5 “5. Data space”
Show the amount used of internal memory
7.1.6 “6. Comm & Mode”
Comm & Mode is set up the communication measures and data transferring way
between device and host.
“*” is marked at the present settings.
①Realtime-BTH: Transfer the read data to device connected with
Bluetooth in real time.
10:00P
?
Data Space
900K bytes(100%)
Left
0 records
OK
10:00P
?
*Realtime–BTH
Realtime–USB
Batch–BTH
Batch–USB

AT188N User guide Page 19
AT188N User guide
AT188N Product User guide
Company
ATID Co., Ltd.
Doc Name
User guide
Writer
Won-Tak Choi
Date
2016-03-02
Ver.
v0.3
②Realtime-USB: transfer the read data to the equipment connected with
USB in real time
③Batch-BTH: Transfer the read data to equipment connected with
Bluetooth in a lump (Batch Process mode)
④Batch-USB: Transfer the read data to equipment connected with USB in
a lump (Batch Process mode)
7.1.7 “7. Bth Pairing”
If the connection mode is Bluetooth, it will offer the function for pairing with host
①“1. PinCode”: Check the Pincode
②“2. Pairing HID”: Show up the device name to host as a HID Service and
wait for the pairing establishment
③“3. Pairing SPP”: Show up the device name to host as a SPP Service and
wait for the pairing establishment
7.1.8 “8. Power down”
The time to automatically turn off the device can be selected as 1 minute, 2 minutes,
5 minutes, 10 minutes, 30 minutes, 60 minutes, 120 minutes, None. The device will be
10:00P
?
<Go back>
1. PinCode
2. Pairing HID
3. Pairing SPP
10:00P
?
PIN code
1234
OK
10:00P
?
Bth HID Pairing
wait for pairing
. . .
OK

AT188N User guide Page 20
AT188N User guide
AT188N Product User guide
Company
ATID Co., Ltd.
Doc Name
User guide
Writer
Won-Tak Choi
Date
2016-03-02
Ver.
v0.3
automatically turned off itself after designated time. “*” is marked at the present
settings
7.2 System Configuration
7.2.1 “1. Barcode”
User can choose to read the barcode symbol or not. The item that can be set will be
changed in accordance with the type and supportive function of module. The “*” is
marked at the Enable item.
7.2.2 “2. UHF RFID” (UHF Only)
Set up the operating order of RFID and Barcode Reader and basic function of RFID
Module
“1. READER”: Set up the barcode and RFID operating mode
“BARCODE “: Set up the exclusive barcode mode and, read the only barcode
when user pushes the scan button
“UHF RFID”: Set up the exclusive RFID mode, read the only UHF RFID Tag
when user pushes the scan button.
“BARCORDE–RFID”: Set up either barcode mode or RFID mode at the scan
ready. These two modes can be converted by pressing the ▲key.
“BARCORDE+RFID”: Set up the both barcode mode and RFID mode
“2. MODE”:
Set up the tag Reading Mode of RFID among Multi Tag / Single Tag / Multi
Repeat
10:00P
?
BARCODE
* UHF RFID
BARCODE–RFID
BARCODE+RFID
10:00P
?
None
* 1 minute
2 minutes
5 minutes
10 minutes
Table of contents
Other Atid Barcode Reader manuals
Popular Barcode Reader manuals by other brands

Hand Held Products
Hand Held Products HandHeld 3800 Linear Series quick start guide

Xenon
Xenon 1900 user guide

En-Vision America
En-Vision America i.d. mate user manual

Launch
Launch Creader V II+ quick start guide

Metrologic
Metrologic MS1890 Focus Installation and user guide

TouchStar
TouchStar PC898 Installation and maintenance guide