TOPMAQ FAAT2800 User manual

ATV Flail Mower
USER MANUAL
Before using the machine, please read the manual carefully, ask your local dear or
manufacturer if you still have something unclear after you read it. This manual is for only
user’s reference. If the product has some changes, please use it according to the exact
items.

Introduction
NOTICE:
This manual must be handed to the operator before use. The operator must understand
fully the content of this handbood before using the machine.For the first time.If the
implement is resold.this manual must accompany the machine.
Note:
The information contained in this manual is correct at the time of going to press. However,
in the course of development,changes inspecification are inevitable.
Using an ATV:
Read it and take note of the safety advice given;
Choose an ATV with enough power for the work you want it to do,four-wheel driver will
give better traction and mobility and may provide a margin of safety.
Choose a safe route.
Be aware that increased speed greatly increases the rish of instability and the risk of an
overture.
Important Safety Information
DEFINITIONS
The following definitions apply throughout this manual:
WARNING
An operating procedure, technique etc., which can result in personal injury or loss of life if
not observed carefully.
CAUTION
An operating procedure, technique etc., which can result in damage to either machine or
equipment if not observed carefully.
NOTE
An operating procedure, technique etc., which is considered essential to emphasis.
LEFT & RIGHT HAND
This term is applicable to the machine when attached to the towing vehicle and is viewed
from the rear-this also applies to tractorreferences.
Safety Information
--Do not operate this equipment unless you have studied this manual in full.
--Only use this machine for its designed task - improper use is both highly danger ous and
damaging to machine components.
--Both operators&maintenance fitters should be familiar with the machine and fully aware
of dangers surrounding improper use or incorrect repairs.
--Before starting, carry out a visual check on both machine&towing vehicle as regards
functionality,road safety&accident prevention rules.
--Even when using the machine correctly,foreign objects such as stones may be thrown a
considerable distance. It is imperative that nobody stand within the danger area.Ifworking
near roads, buildings or animals, special attention must be taken and ifrequired the rear
skirt should be fitted to minimize foreign object ejection.
--The condition of fails and of machine guards must be checked before beginning the

day’s work.Worn or damaged fails must be replaced before you use the machine. Flails
must be replaced in pairs to ensure rotor balance is maintained.
--During checks or repairs, ensure the machine can not be started by other persons by
mistake.
--Never wear loose clothing which could get caught in rotating equipment.
--Never carry passengers on the towing vehicle.
--Never approach the machine until the rotor has stopped rotating.
--Do not stand near the machine when operating.
--Damaged or missing safety decals must be replaced immediately.
--Before leaving the machine unattended, remove the starting key(if applicable) and/or
safety cut-out lanyard.
Transportation Safety
--When transporting, especially over rough ground,reduce speed to prevent damage to
machine.
--Ensure ignition keys are removed.
--This machine is not road legal. DO NOT tow on public highways.
--Never transport the machine with the rotor running,even for small distances.
Operating Safety
--Pay special attention when working with the machine not to touch fixed objects suchas
roaddrain,walls, shafts, kerbs, guardrails,tracksetc.This could cause the breakage of the
flails, which would be thrown out of the machine at very high speed.
--If wires,ropes or chains should become entangled in the rotor stop immediately
toprevent damage or dangerous situations; stop the rotor and the towing machine, take
out the starting key or safety cut-out. Put working gloves on; clear the rotor with the aid of
pliers or shears. Do not try to disentangle.
--Do not use the machine when excessive vibration is experienced, as this may cause
breakage and serious damage-find the cause of the vibration and eliminate it before using
the machine again.
Description
--The Range of Machines are designed as self-powered units to be towed behind a
suitable, ATV,UTV,compact tractor or lawn-mower.
--Designed to tackle anything from grass&weeds, to heavy rushes,
bracken&bram-bles,depending on machine specification &set-up. The tough construction,
combined withthe low mass allow the Flail Mowers to be used on rough,wet or even
sloped land conditions.
--The mower is available with a choice of engines, either side mounted or centrally
mounted, petrol or diesel.
--The wide choice of options&engines sizes available make the fail mowers ideal forsmall
holders,farmers&contractors alike, as each machine can be tailored to the user’s specific
requirements.
--These machines should however only be used to perform tasks for which they were
designed - use of the machine for any other function may be both dangerous to per-
sons,and potentially amaging to components.Use of the machine beyond the stated
usagemay invalidate any pplicable warranty, as well as being potential in breach of
applicable safety regulations.

Attachment
Before Attaching the Machine
Before attachment, always ensure the following:
--The machine is in good condition.
--All safety guards & decals are in good working order and correctly fitted
--All flails are correctly fitted, undamaged, and not worn to excess
--Lubrication points have been well greased
--The engine oil level is correct & has been maintained as per the handbook
--Drive belts are tensioned correctly and in good working condition
--The tyres are free of damage and inflated to the correct pressure
Attaching the Machine
NOTE: This machine is designed to attach to the towing vehicle through a 50mm diameter
ball itch.
1. Reverse the towing vehicle up to the machine.
2. Attach the machine onto the towing vehicle throupling. This is achived by lifting the
handle of the itch upwards (away from the drawbar) to disengage the safety lock and allow
attachment. Ensure he hitch is pressed firmly down onto the ball, and check that the
safety lock engages by pressing he handle downwards (towards the drawbar).
3. If fitted, attach the safety cut-out lanyard to the towing vehicle in a position where the
operator an reach it whilst driving. For electric start models position the electric controls
within reach of the perator.
4. With the engine OFF, adjust the working height to a suitable level by turning the height
djuster at the rear of the machine.
5. Level the machine to suit the drawbar & cutting height. This is achieved by twisting the
link onnector fitted to the drawbar. When on level ground, the top face of the mower deck
(where the ngine is mounted) should be approximately parallel to the ground.
Operation
Set-up & Adjustment
The height of cut depends greatly on the working conditions and volume of material.
--It is also affected by the forward speed of the towing vehicle, as cutting large
volumes of material ill require a slower forward speed in order to achieve a satisfactory cut
in a single pass. The larger he engine size, the greater the potential forward speed for a
given volume of material to be cut.
Drawbar Adjustment
The drawbar attachment height of the towing wehicle can vary.To accommodate
adjustment.a screw link is located beneath the drawbar,This should be lengthened or
shortened. So that the cutting deck is horizontal to level ground.(This ensures a better
cutting officiency).
To Adjust
1. Unlock the locking nut (A).
2. Lengthen the link to lower the front of the deck or shorten to raise the deck.
3. Once the deck is level,re-tighten locking nut (A).

Quick Offset Drawbar
Pull back the locking pin: slide the drawbar to the desired position,and release the locking
pin into the securing hole,as shown.
Cutting Height Adjustment;
The main cutting height adjustment is achieved by using the screw jack to raise or lower
the cutting deck as necessary.
Turn the handle to raise or lower as necessary.
Excess Crop Build Up
Remove all crop deposits from the deck,and engine area.Build up to crop deposits could
result in heat build and fires.
Disconnect the spark plug lead.
Remove any crop that is wrapped around the end of the rotor (A) or on the undeside of the
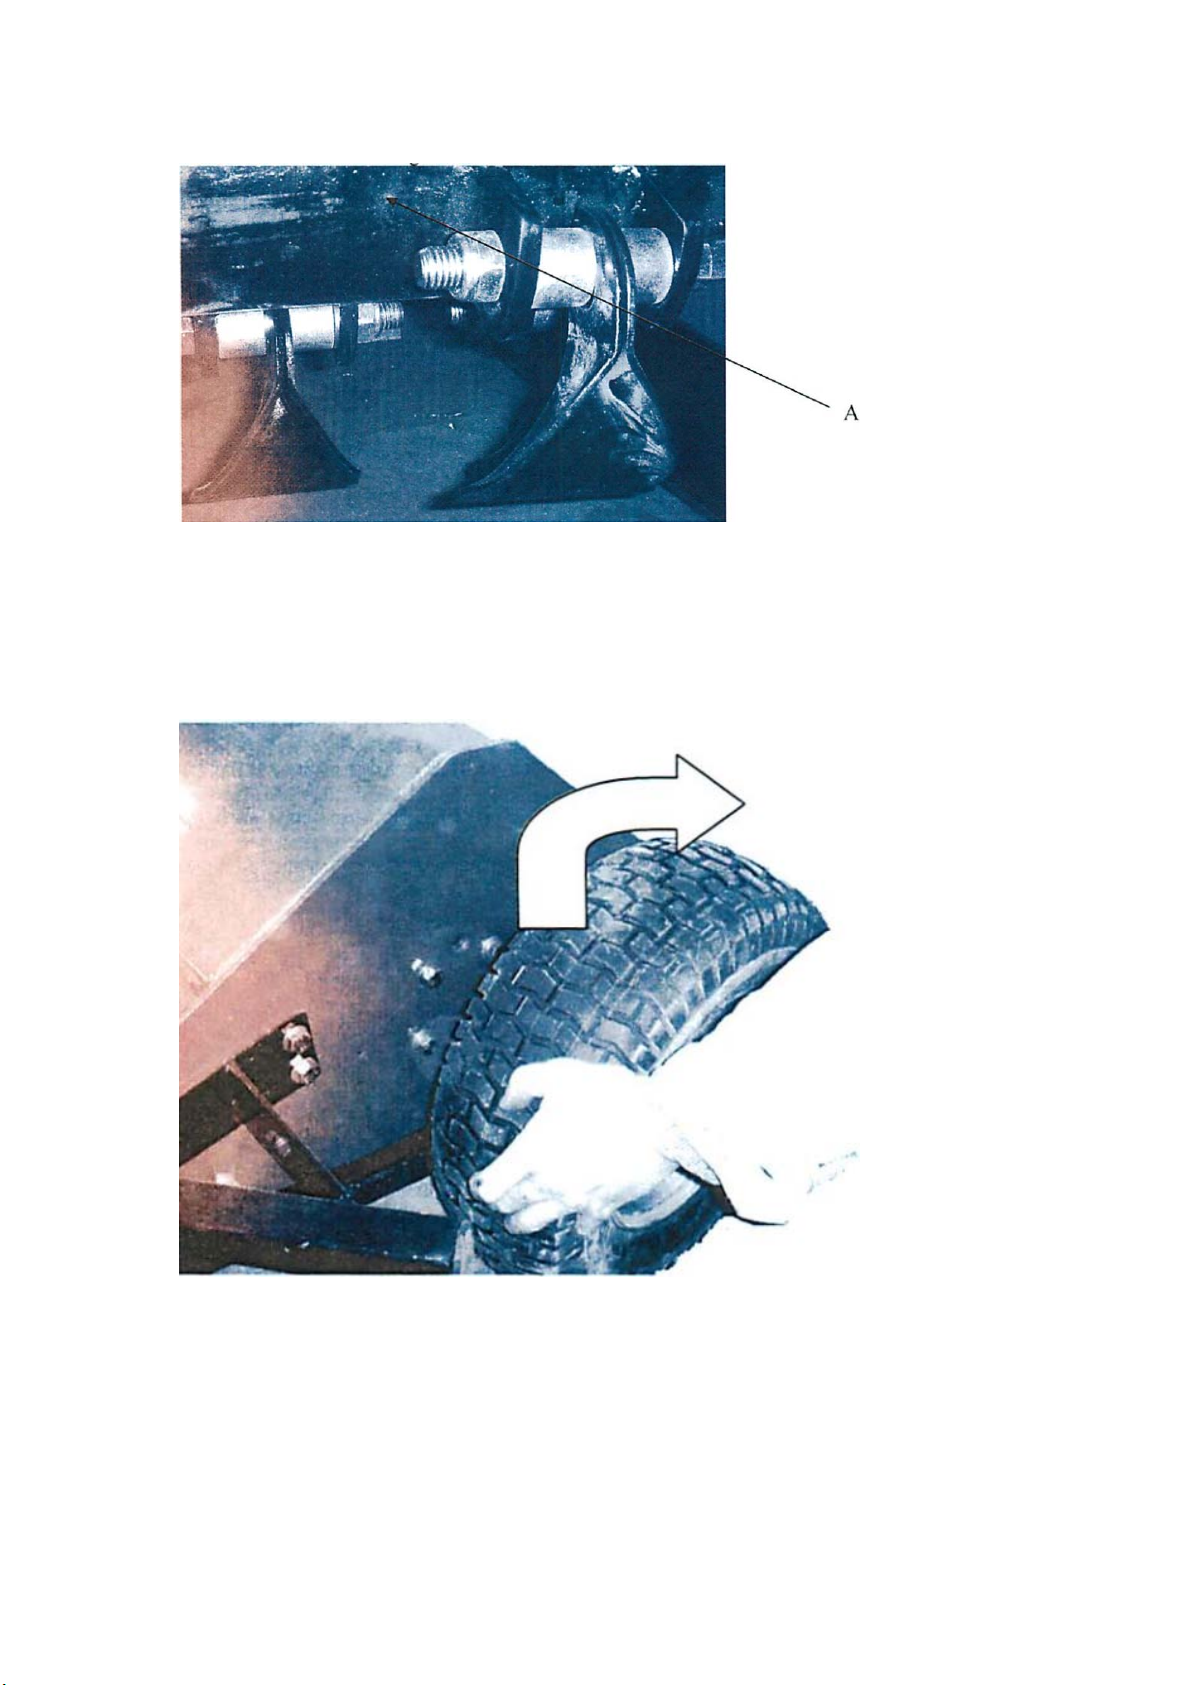
deck.
Raise the deck to its mas height to assist access to the rotor shaft.
Wheel Bearing Inspection
Jack one side of the mower body up,so the wheel is just off the ground.Rotate the wheel
by hand,and check the wheel alignment.To check the bearings.try to move the wheel from
left to right and feel for any play in the bearings (A). ensure the wheel-locating bolt is tight
before you start and follow and jacking porcedures.If any play is found remove the wheel
and inspect bearings.Replace any faulty bearings.
The minimum height of cut should be 1-3cm. Any lower than this and you risk
damaging the achine & flails, as well as increase the chance of stones being ejected at
speed from the machine.
NOTE:
The rear roller is factory fitted to ensure the rotor & blades do not contact the ground if one
wheel falls into a rut. It is imperative that the roll-er is set to the correct height to prevent
damage to the machine.
Anti-Scalping Roller
The anti-scalping roller should be set to run either on the ground, or slightly above the

ground. This llows the roller to prevent scalping of the surface, or damage to the blades &
rotor.For a fine turf finish with striping, the wheels can be lifted off the ground with the
machine weight earing on the rear roller. Please note: machine should not be trans-ported
in this condition over ough ground djust the roller by undoing & removing the 4 retaining
bolts, moving to the desired height, and eplacing the bolts. Tighten the bolts securely to fix
the roller in place.
Flails
-- Y-shaped Grass Flails for all-round cutting capability.
-- T-shaped Hammer Flails for heavy duty cutting of woody material.
Y Grass Flails T Crass Flails
The standard flails are Y-shaped grass flails and T-shaped hammer flails, designed for
all-round se on material such as grass, weeds and rushes.
For heavier duty cutting, especially on woody material, the machine can be fitted with
optional hammer lails. This are good for woody material, but do not work as well on heavy
grass or rushes, due to their endency to block when cutting wet material.The rotor unit
should be inspected on a daily basis prior to work to check for dam-aged or missing
flails¨C always replace damaged or missing flails immediately.If fitted in pairs, replace
both.Flail bolts should be checked for tightness on a regular basis and re-tightened as
re-quired before ttempting to use the machine.
WARNING: Checking of rotor components should only be carried out with the engine
switched off, tarting key removed and the towing vehicle switched off. Always ¡®prop up¡¯
the machine using uitable supports before attempting to inspect or work on components
underneath it.
NOTE: Flail bolts & bushes (if fitted) are a wearing part, and must be checked and
replaced as ecessary.
Offsetting
The flail mowers are towed from a central point, with offset towing permit-ted to either left
or right at a variety of angles, to allow cutting outside the towing machine width.The
machine is offset by unscrewing the t-bar as shown above. The drawbar can then be
moved to the desired location, and the t-bar replaced in a suitable hole. The t-bar must be
tightened firmly to prevent movement of the drawbar, and should be checked periodically
for tightness.The drawbar can offset both left and right to a number of angles. If some of

the offset holes are not to be used for a long period of time, it is worth adding a small
amount of grease to each threaded hole to prevent corrosion of the threads.
WARNING:
Changing the drawbar angle must be undertaken with the engine switched off & the
ignition keys removed. Failure to do so could result in injury or damage to the machine.
NOTE:
Ensure that the operator is suitably qualified to use a machine of this nature and that they
have fully read and understood this manual - they should be aware of all safety aspects
relating to the safe use of the machine.
It is advisable that all ®first time operators practice using the machine in a clear safe area
prior to work in order to familiarise themselves with its operation.
NOTE:
After approximately one hour of work with a new machine,all nuts,bolts and drive belts
should be checked for adjusted as necessary.
Prior to starting work the area to be cut should be checked for dangerous objects such as
large stones, wood, wire, glass etc. ¨C hazardous objects should be removed from the
area prior to operation with the machine. The location of unmovable or natural hazards
should be noted, or if necessary ®marked, to indicate to the operator that the area should
either be avoided or additional caution adopted whilst working around the hazard.
Starting Work
With the machine switched off, adjust the cutting height to the desired position, and alter
the drawbar so the mower deck is level at this height. Start the engine, and engage drive
by increasing the engine throttle to full power, allowing it to buildup to the correct working
speed before mowing off.
Forward Speed
The forward working speed will depend greatly on the working conditions and nature of
the material being cut. Optimal speed will be in the region of 3-8 km/h (2-5 mph).
Storage
For extended periods of storage it is advisable that the machine be kept in a clean dry
environment protected from the elements to avoid risk of corrosion.
The machine should be thoroughly cleaned and lubricated prior to storage. At this point it
is good practice to check the machine for worn or damaged components any parts that
require replacing should be ordered and fitted at the earliest opportunity so the machine is
fully prepared for the next seasons work.
Maintenance
All maintenance, cleaning and repair operations must be performed with the machine
suitably supported, the engine switched off (and cool), and the ignition keys re-moved.The
following maintenance tasks should be performed at the timescales stated to both
maximise efficiency and prolong the working life of the machine.
NOTE:
Unless fitted by the engine manufacturer, hour meters fitted to the
NOTE:
For commercial use, log hours of operation to determine proper main-tenance Intervals
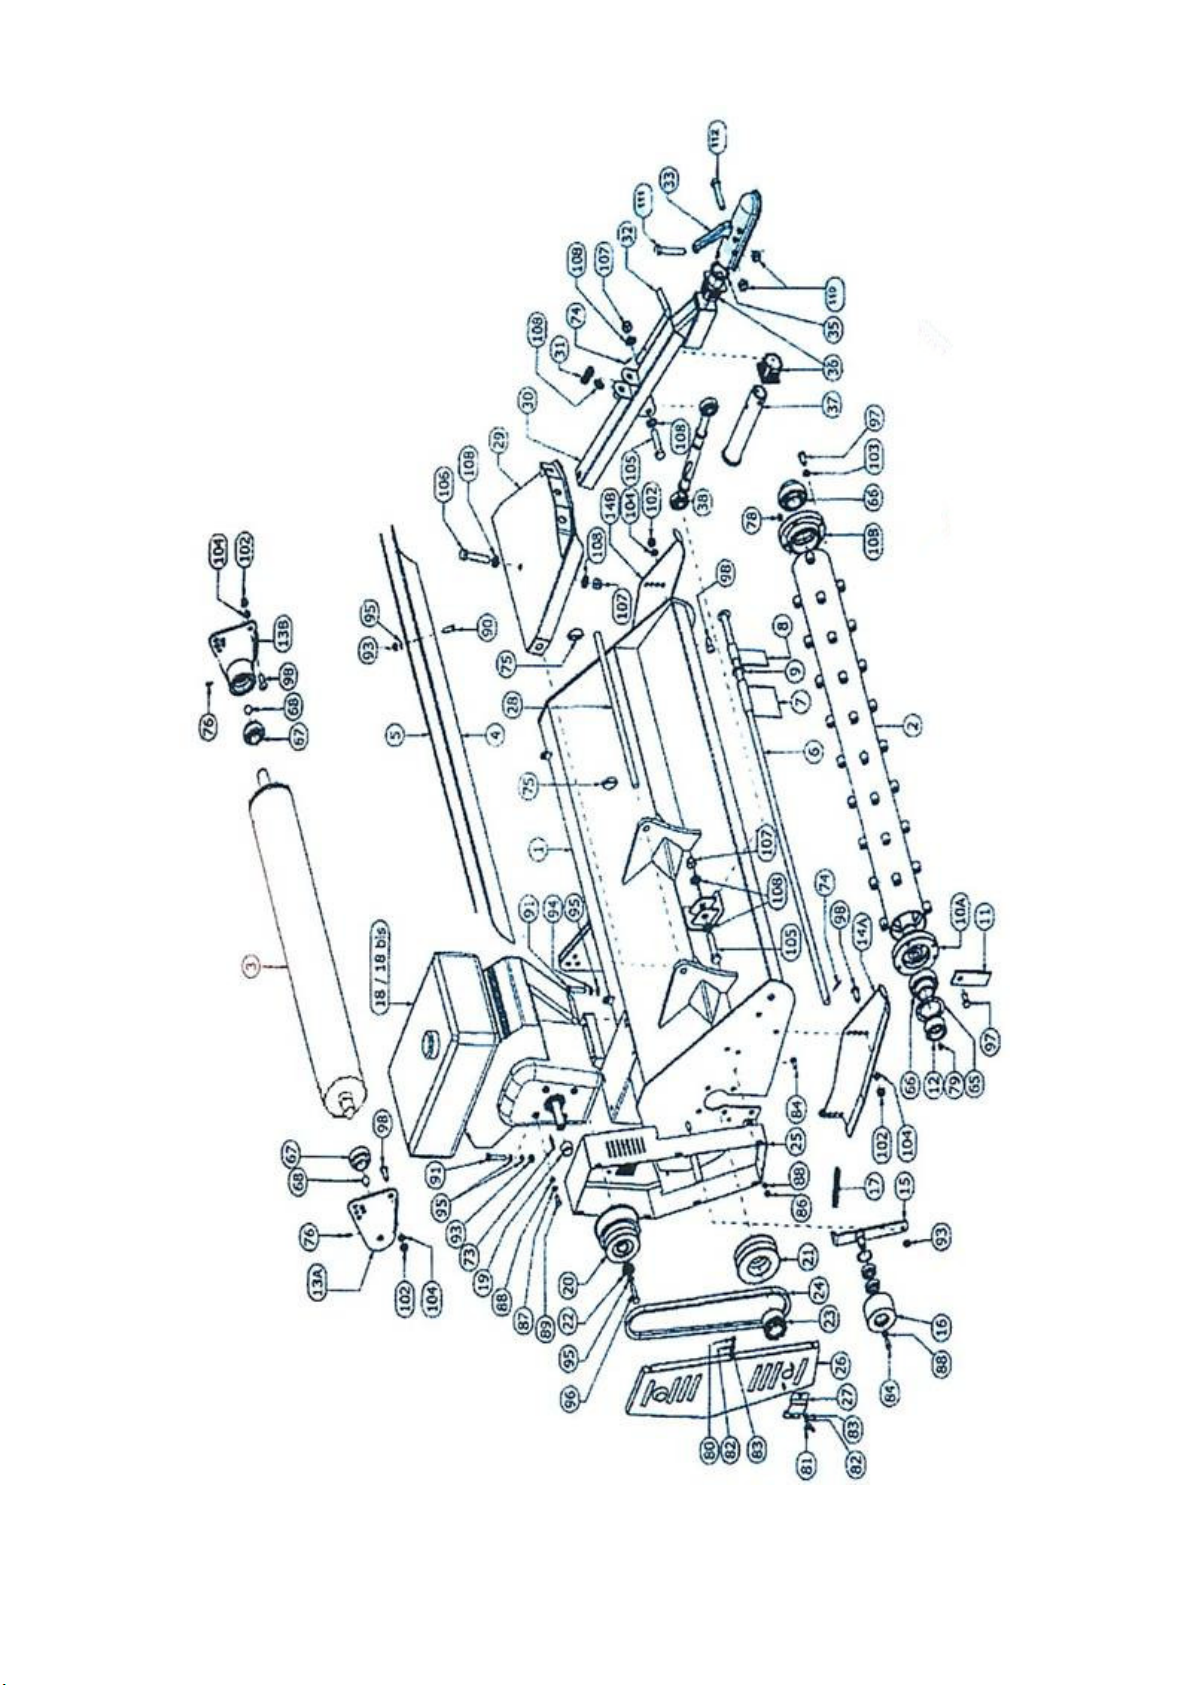
Parts List
No.
Discription
Qty.
No.
Discription
Qty.
1 Body 1 57
2 Rotor 1 58
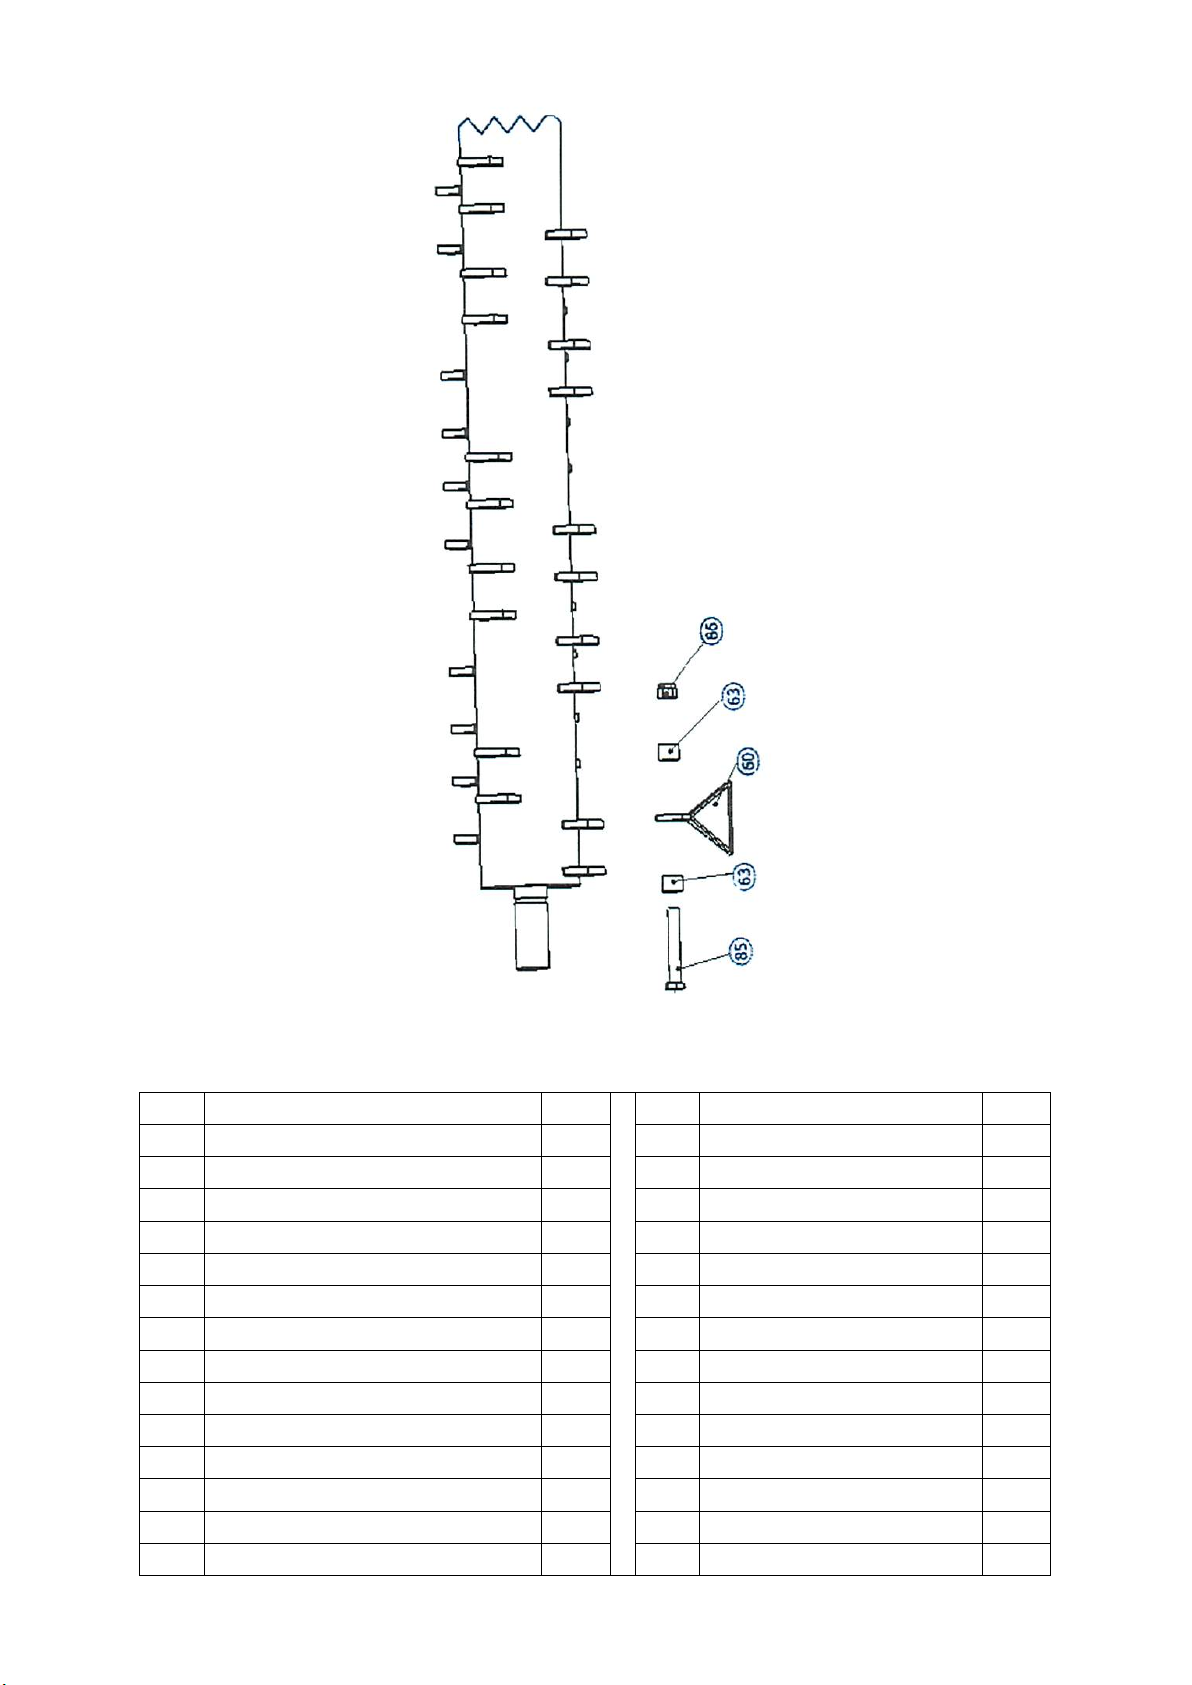
3 Rear roller 59
4 60 Finishing shovel
5 61
6 Stone guard rod 62
7 Short stone guard 63 Spacer
8 64
9 Washer flat 65 Oil seal
10 Rotor houshing 66 Bearing
11 Rotor fixing plate 67 Bearing
12 Oil baffle/spacer bushing 68 Washer spring
13 Roller attachment support plate 69
14 Skid 70

15 Belt tensioner complete 71
16 Belt tensioner wheel 72
17 Tensioner spring 73 Engine key
18 Engine 74 Roll pin
19 Centrifugal clutch pulley spacer 75 Split pin
20 Centrifugal clutch pulley 76 Grease nipple
21 Rotor drive pulley 77 Grease nipple
22 Top hat spacer 78 Grease nipple
23 Taper lock 79 Grease nipple
24 Toothed belt 80 Bolt hex head
25 Transmission guard 81 Nut
26 Transmission guard cover 82 Washer spring
27 Grease nipple guard 83 Washer flat
28 Bar 84 Bolt hex head
29 Drawbar housing assembly 85 Bolt hex head
30 Drawbar 86 Nut
31 Spring 87 Waher spring
32 Drawbar locking pin 88 Washer flat
33 Coupling 89 Bolt
34 90 Bolt hex head
35 Thrust washer 91 Bolt hex head
36 Bush nylon 92 Bolt hex head
37 Drawtube 93 Nut
38 Top link cat 94 Washer spring
39 Compltet height adjust handle 95 Washer flat
40 96 Bolt
41 97 Bolt hex head
42 98 Bolt hex head
43 99 Bolt hex head
44 100 Bolt hex head
45 101 Bolt hex head
46 102 Nut
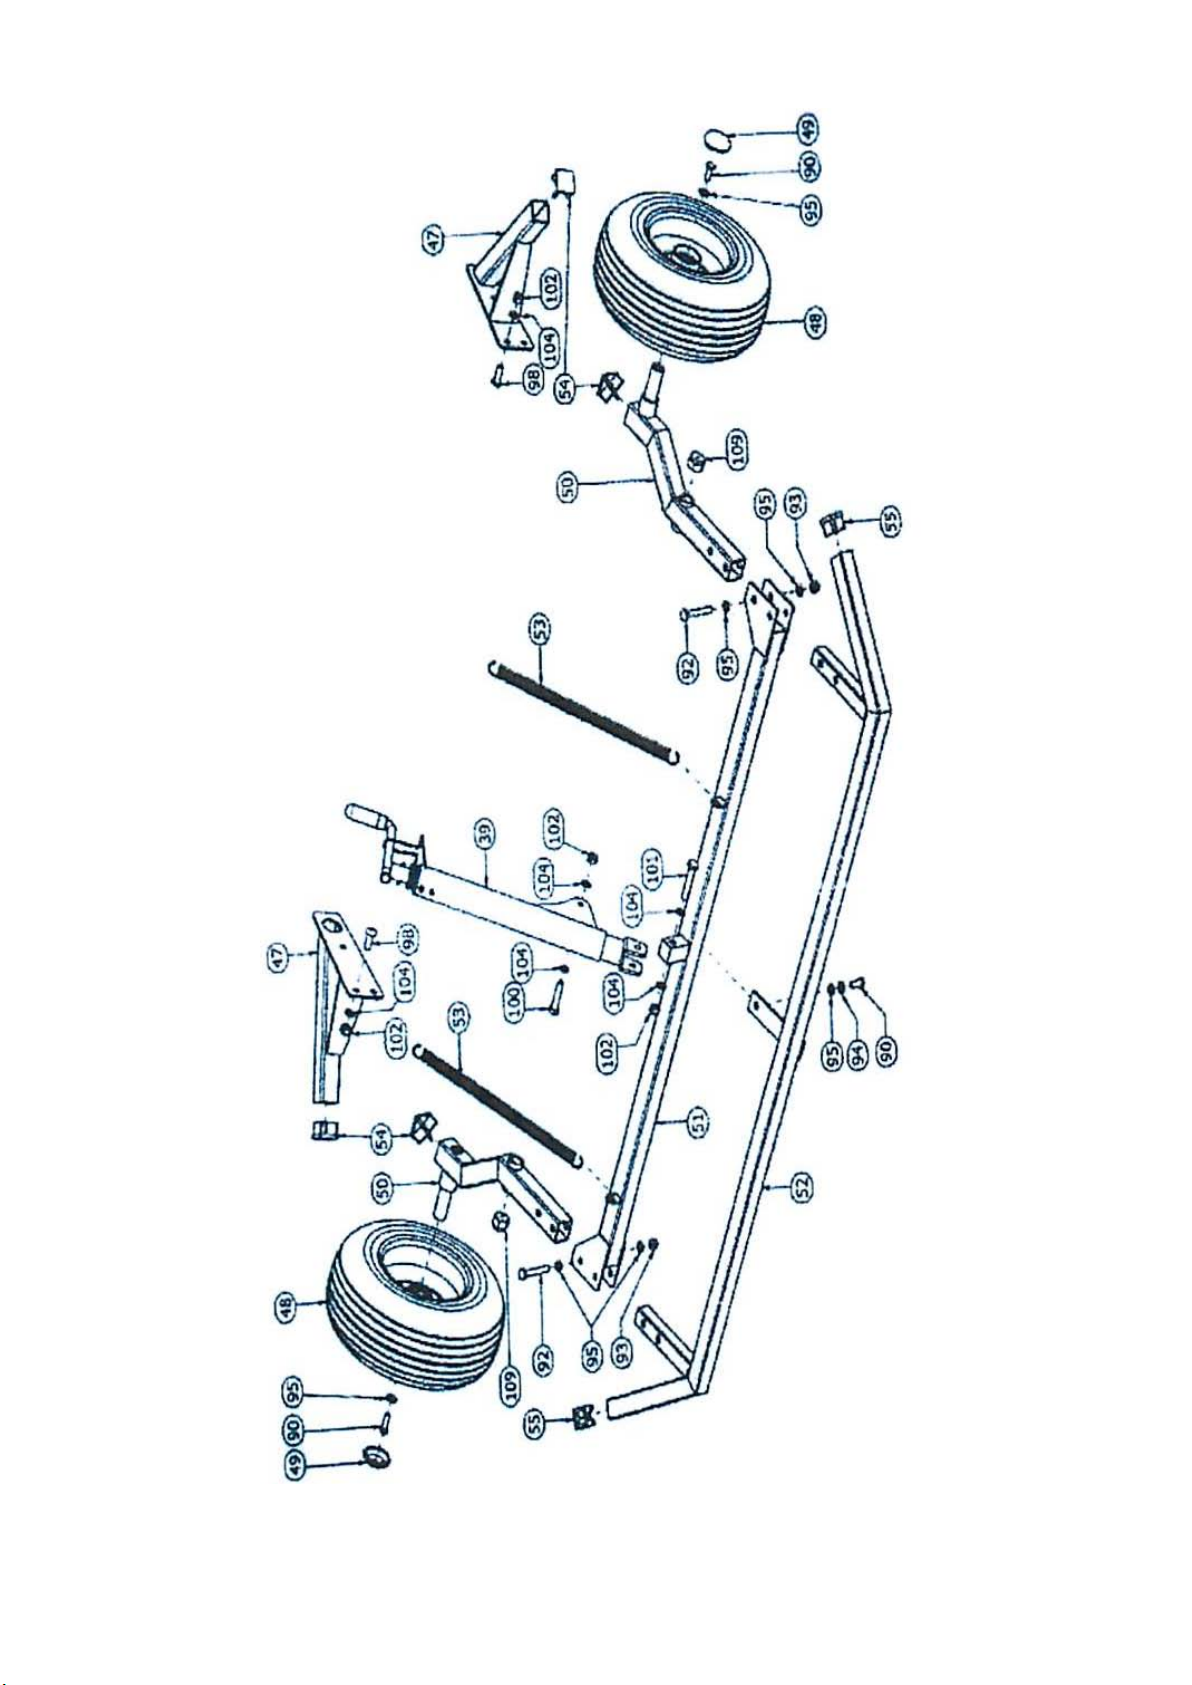
47 Side wheel guard 103 Washer spring
48 Tyre 16.5*6.5-8 104 Washer flat
49 Hub cap 105 Bolt hex head
50 Side wheel arm 106 Bolt hex head
51 Height adjust bar 107 Nut
52 Rear crash bar 108 Washer flat
53 Spring 109 Nut
54 Insert plastic 110 Nut
55 Insert plastic 111 Bolt hex head
56 112 Bolt hex head
Table of contents
Other TOPMAQ Lawn Mower manuals


Popular Lawn Mower manuals by other brands


Gravely
Gravely Promaster 252Z Owner's and operator's manual

Toro
Toro Z Master Professional 7500-DSeries Operator's manual

Craftsman
Craftsman 917.275685 owner's manual

Sovereign
Sovereign SV 40 S instruction manual

Craftsman
Craftsman EZ3 917.270721 owner's manual

EINHELL
EINHELL GC-PM 46/3 S Original operating instructions


