TOPMAQ 33909 User manual
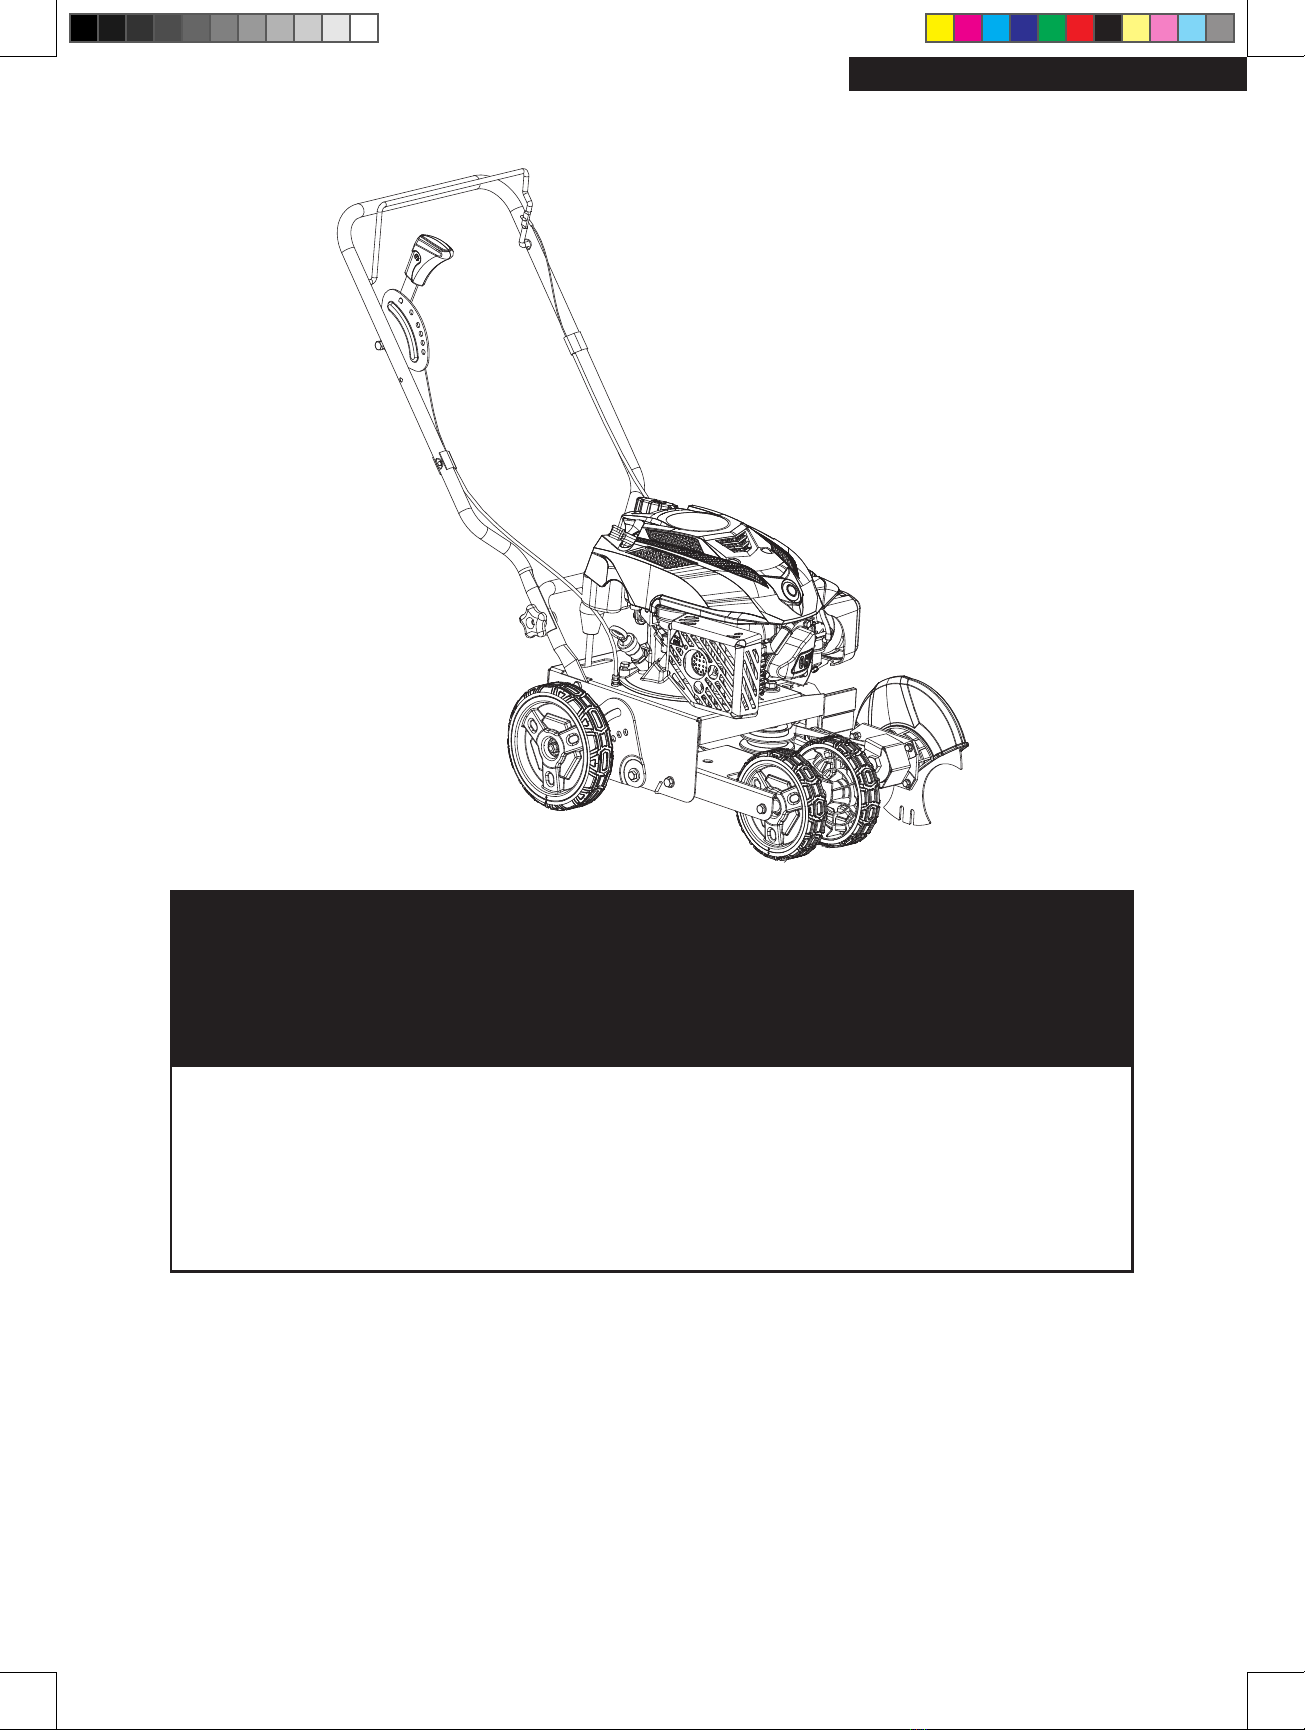
WALK-BEHIND LAWN EDGER
Operator’s Manual
MODEL NUMBER : 33909
SERIAL NUMBER :
Both model number and serial number may be found on the main label.
You should record both of them in a safe place for future use.
FOR YOUR SAFETY
READ AND UNDERSTAND THE ENTIRE MANUAL BEFORE
OPERATING MACHINE
Save This Manual for Future Reference
Original Instruction
Walk-Behind Lawn Edger
2
GB TABLE OF CONTENTS
Specifications
INTRODUCTION
Introduction 2
Recycling And Disposal 2
Symbols 3
Safety 4
General Safety Rules 4
Specific Safety Rules 5
Contents supplied 7
Assembly 8
Know your machine 10
Features & Controls 10
Operation 11
Maintenance 15
Storage 18
Trouble Shooting 18
Parts Schedule 20
Your new walk-behind lawn edger will more
than satisfy your expectations. It has been
manufactured under stringent quality standards
to meet superior performance criteria. You will
find it easy and safe to operate, and with proper
care, it will give you many years of dependable
service.
Carefully read through this entire
operator’s manual before using your
new walk-behind lawn edger. Take
special care to heed the cautions
and warnings.
Your walk-behind lawn edger has many features
that will make your job faster and easier. Safety,
performance, and dependability have been
given to top priority in the development of this
machine, making it easy to maintain and operate.
The Engine manufacturer is responsible
for all engine-related issues with regards to
performance, power rating, specifications,
warranty and service. Please refer to the Engine
Manufacturer’s owner’s/operator’s manual,
packed separately with your unit, for more
information.
RECYCLING AND DISPOSAL
This marking indicates that this
product should not be disposed with
other household wastes. To prevent
possible harm to the environment
or human health from uncontrolled
waste disposal, recycle it responsibly
to promote the sustainable reuse of
material resources. To return your
used device, please use the return
and collection systems or check with
your local authority or local stores
for advice of environmental safe
recycling.
Model Number 33909
Displacement 150cc
Max. Cutting Depth 57 mm
Blade Size 228 mm
Blade Thickness 2.5 mm
Cutting Height Options: 6-position
Weight 23 kg

Walk-Behind Lawn Edger 3
GB
MAX.15°
Shut off the engine, disconnect
spark plug wire, and make certain all
moving parts have stopped before
cleaning, repairing, or inspecting the
unit.
MAX.15°
Gasoline and its vapors are
extremely flammable and
explosive. Never fuel the machine
indoors or while the engine is hot
or running. Wipe up any gasoline
that spills. Keep away from any
inflammables when operating the
engine.
MAX.15°
Stop engine and remove ignition
key prior to leaving the operator's
position.
MAX.15°
Keep hands, feet and tools always
from all rotating parts.
MAX.15°
Be aware, objects may be thrown
while in use.
Thrown objects can result in
personal injury or property
damage
MAX.15°
Use extra caution on slopes. The
machine is heavy and can speed
up when going downhill. Be
prepared to maintain control of
the machine. When turning, turn
uphill, not down. Do not operate
on slopes greater than 15 degrees.
MAX.15°
Do not operate when children or
other are around.
SYMBOLS
The rating plate on your machine may
show symbols. These represent important
information about the product or instructions
on its use.
MAX.15°
STOP STOP
DANGER!
WARNING!
CAUTION!
MAX.15°
Read these instructions carefully.
MAX.15°
Wear approved hearing
protection.
MAX.15°
Wear eye protection with side
shields marked to comply with
ANSI Z87.1.
MAX.15°
Do not touch parts that are hot
from operation. Serious burns may
result.
Engine parts, especially the
muffler, become extremely hot
during operation. Allow engine and
muffler to cool before touching.
MAX.15°
Do not remove or tamper with the
protection and safety devices.
MAX.15°
To reduce the risk of injury, keep
hands and feet away from all
pinch points, especially the cutting
blades.
MAX.15°
Keep hands and feet away from
rotating blade.
MAX.15°
MAX.15°
Never start or run the engine
inside a closed area or in poorly
ventilated area. The engine exhaust
contains carbon monoxide, and
odorless and deadly gas.

Walk-Behind Lawn Edger
4
GB SAFETY
General Safety Rules
UNDERSTAND YOUR MACHINE
Read this manual and labels affixed to the machine
to understand its limitations and potential hazards
before attempting to assemble this machine. Read,
understand, and follow all instructions on the machine
and in the manuals before operation.
Be thoroughly familiar with the controls and their
proper operation. Know how to stop the machine and
disengage the controls quickly.
Make sure to read and understand all the instructions
and safety precautions as outlined in the Engine
Manufacturer’s manual packed separately with your
unit. Do not attempt to operate the machine until you
fully understand how to properly operate and maintain
the engine and how to avoid accidental injuries and/or
property damage.
Keep this manual and engine manual in a safe place
for future and regular reference.
If the unit is to be used by someone other than original
purchaser or loaned, rented, or sold, always provide
this manual and any needed safety training before
operation. The user can prevent and is responsible for
accidents or injuries that may occur to themselves,
other people, and property.
Do not force the machine. Use the correct machine for
your application. The correct machine will do the job
more efficiently and safely at the rate it was designed.
PERSONAL SAFETY
Do not permit children to operate this machine at any
time. Only responsible individuals who are familiar with
these rules of safe operation should be allowed to use
this machine.
To help avoid blade contact or a thrown object
injury, stay in operator zone behind handles and keep
children, pets, and other people not using the unit
away from the work area. Be alert and shut off the unit
if anyone enters work area. Keep children under the
watchful care of a responsible adult.
Do not operate the machine while under the influence
of drugs, alcohol, or any medication that could affect
your ability to use it properly.
Wear sturdy, rough-soled work shoes and close-fitting
slacks and shirts. Shirts and pants that cover the arms
and legs and steel-toed shoes are recommended.
Never operate this machine in bare feet, sandals,
slippery or lightweight (e.g. canvas) shoes
Protect eyes, face, and head from objects that may be
thrown from the unit. Always wear safety goggles or
safety glasses with side shields when operating and
while performing an adjustment or repair.
Always use approved ear protection while you operate
the product. Noise for a long period can cause noise-
induced hearing loss.
Always keep hands and feet away from all moving
parts during operation. Moving parts can cut or crush
body parts.
Always keep hands and feet away from all pinch
points.
Do not touch parts that might be hot from operation.
Allow parts to cool before attempting to maintain,
adjust, or service.
Stay alert, watch what you are doing, and use common
sense when operating the machine.
INSPECT YOUR MACHINE
Check your machine before starting it. Keep guards in
place and in working order. Make sure all nuts, bolts,
etc., are securely tightened.
Never operate the machine when it is in need of repair
or is in poor mechanical condition. Replace damaged,
missing, or failed parts before using it. Check for fuel
leaks. Keep the machine in safe working condition.
Do not use the machine if the engine’s switch does
not turn off the engine when running. Any gasoline
powered machine that can’t be controlled with the
engine switch is dangerous and must be replaced.
Regularly check to see that keys and adjusting
wrenches are removed from the machine area before
starting it. A wrench or a key that is left attached to
a rotating part of the machine may result in personal
injury.
Avoid accidental starting. Be sure the engine’s switch
is off before transporting the machine or performing
any maintenance or service on the unit. Transporting
or performing maintenance or service on a machine
with its switch on invites accidents.
If the machine should start to vibrate abnormally, stop
the engine (motor) and check immediately for the
cause. Vibration is generally a warning sign of trouble.
ENGINE SAFETY
If a spark arrestor is used, it should be maintained in
effective working order by the operator. In the State of
California the above is required by law (Section 4442
of the California Public Resources Code). Other states
may have similar laws. Federal laws apply on federal
lands.
Never start or run the engine inside a closed area.
The exhaust fumes are dangerous, containing carbon
monoxide, an odorless and deadly gas. Operate this
unit only in a well-ventilated outdoor area.
Do not tamper with the engine in an effort to get it to
run at excessive speeds. The maximum engine speed
is preset by the manufacturer and is within safety
limits. See engine manual.

Walk-Behind Lawn Edger 5
GB
Keep a Class B fire extinguisher on hand when
operating this machine in dry areas as a precautionary
measure.
The muffler keeps the noise levels to a minimum and
sends the exhaust fumes away from the operator.
Do not use the product if the muffler is missing or
defective. A defective muffler increases the noise
level and the risk of fire. Examine the muffler regularly
to make sure that it is attached correctly and not
damaged.
Muffler and engine become hot and can cause burns.
Do not touch.
Do not modify engine. To avoid serious injury or death,
do not modify engine in any way. Tampering with the
governor setting can lead to a runaway engine and
cause it to operate at unsafe speeds. Never tamper
with factory setting of engine governor.
FUEL SAFETY
Fuel is highly flammable, and its vapors can explode
if ignited. Take precautions when using to reduce the
chance of serious personal injury.
When refilling or draining the fuel tank, use an
approved fuel storage container while in a clean,
well-ventilated outdoor area. While adding fuel or
operating the unit, do not smoke, and stay away from
sparks, open flames, or other sources of ignition near
the area of operation. Never fill the fuel tank indoors.
To avoid sparking or arcing, keep grounded
conductive objects – such as tools – away from
exposed, live electrical parts and connections. These
events could ignite fumes or vapors.
Always stop the engine and allow it to cool before
filling the fuel tank. Never remove the cap of the fuel
tank or add fuel while the engine is running or when
the engine is hot. Do not operate the machine with
known leaks in the fuel system.
Loosen the fuel tank cap slowly to relieve any pressure
in the tank.
Never overfill the fuel tank. Because engine heat
can cause fuel to expand, never fill the tank to more
than 1/2” below the bottom of the filler neck. This will
provide space for fuel expansion.
Replace all fuel tank and container caps securely and
wipe up spilled fuel. Never operate the unit without
the fuel cap securely in place.
Avoid creating a source of ignition for spilled fuel.
If fuel is spilled, do not attempt to start the engine.
Instead, move the machine away from the area of
spillage and avoid creating any source of ignition until
fuel vapors have dissipated.
Do not start the product if there is fuel or engine oil on
the product. Remove the unwanted fuel/oil and let the
product dry.
When fuel is spilled on yourself or your clothes, wash
your skin and change clothes immediately.
Store fuel in containers specifically designed and
approved for fuel storage.
Store fuel in a cool, well-ventilated area, safely away
from sparks, open flames, or other sources of ignition.
Never store fuel – or a machine with fuel in the tank –
inside a building where fumes may reach a spark, open
flame, or any other source of ignition (such as a water
heater, furnace, or clothes dryer). Allow the engine to
cool before storing in any enclosure.
PRODUCT LIABILITY
As referred to in the product liability laws, we are not
liable for damages that our product causes if:
• the product is incorrectly repaired.
• the product is repaired with parts that are not
from the manufacturer or not approved by the
manufacturer.
• the product has an accessory that is not from the
manufacturer or not approved by the manufacturer.
• the product is not repaired at an approved service
center or by an approved authority.
SPECIFIC SAFETY RULES
Identify hazards and take preventive steps to avoid
accidents and minimize risk. Possible hazards include,
but are not limited to, moving parts, thrown objects,
weight of the machine and components, and the
operating environment.
PRIOR TO STARTING
Thoroughly inspect the area to be worked, and
remove all debris and hard or sharp objects such as
stones, sticks, glass, wire, bones, etc. Do not operate
the edger in lawns with large rocks and foreign objects
which can damage the machine. And thrown objects
can cause serious personal injury.
Do not use the product in bad weather, including fog,
rain, moist or wet locations, strong winds, intense
cold and risk of lightning. Doing work in bad weather
can cause fatigue and dangerous conditions, such as
slippery surfaces.
Do not operate the product on wet grass.
Before starting your lawn edger make sure the shields,
guards, and safety devices are properly affixed to
machine, check the oil level, and make sure all nuts and
bolts are tight.
Verify that the control lever is working properly. Make
sure that the cable is free and that the control lever is
not damaged.
Move the machine at least 10 feet away from the
refueling point before starting engine.

Walk-Behind Lawn Edger
6
GB OPERATION SAFETY
Do not force the machine. Use the correct machine for
your application. The correct machine will do the job
better and safer at the rate for which it is designed.
This equipment was designed specifically for the
purpose of edging or trimming lawns. Do not use this
equipment for any other purpose.
Operate the product in daylight or in good artificial
light. Walk, never run.
Stop the blade when crossing gravel drives, walks or
roads.
Stay alert, watch what you are doing, and use common
sense when operating the machine.
Do not overreach. Do not operate the machine
while barefoot or when wearing sandals or similar
lightweight footwear. Wear protective footwear that
will protect your feet and improve your footing on
slippery surfaces. Keep proper footing and balance at
all times. This enables better control of the machine in
unexpected situations.
Never place any part of your body where it would be
in danger if movement should occur during assembly,
installation, operation, maintenance, repair, or moving.
Keep all bystanders, children, and pets at least 50
feet (15m) away. If you are approached, stop the unit
immediately.
Edger will propel debris at high speed and can cause
damage. Avoid pushing your edger over any areas
with loose stones or gravel as they may become
projectiles.
Do not put hands or feet near rotating parts. Contact
with the rotating blade can amputate hands and feet.
Always operate the machine from behind, never pass
or stand in front of the machine when the engine is
running.
If the unit strikes a foreign objects, stop the engine,
disconnect the spark plug, thoroughly inspect the
machine for any damage, and repair the damage
before restarting and operating the machine.
Never attempt to clear material from the blade guard
while the engine is running. Shut the engine off,
disconnect the spark plug wire and ground against the
engine to prevent unintended starting.
Keep combustible substance away from the engine
when it is hot.
Do not tilt the machine while the engine is running.
The control bar is a safety device. Never bypass
its operation. Doing so makes the safety device
inoperative and may result in personal injury through
contact with the rotating blade. The control bar must
operate easily in both directions and automatically
return to the disengaged position when released.
Never operate the edger at high transport speeds on
slippery surfaces. Many injuries occur as a result of the
edger being pulled over the foot during a fall caused
by slipping or tripping. Do not hold on to the edger if
you are falling; release the handle immediately.
If the machine should start to make an unusual noise or
vibration, immediately shut off the engine, disconnect
the spark plug wire, and check for the cause. Unusual
noise or vibration is generally a warning of trouble.
Exercise extreme caution when operating on or
crossing gravel drives, walks, or roads. Stay alert for
hidden hazards or traffic.
Always stop the engine when the edging or trimming
is delayed or when transporting machine from one
location to another.
To reduce exposure to vibration, limit the hours
of operation and take periodic breaks to minimize
repetition and rest your hands. Reduce the speed and
force in which you do the repetitive movement. Try
to fill each day with jobs where operating hand-held
power equipment is not required.
Slope Operation
Slopes are a major factor related to slip and fall
accidents, which can result in severe injury. Operation
on slopes requires extra caution. The machine is heavy
and can speed up when going downhill. Be prepared
to maintain control of the machine. If you feel uneasy
on a slope, do not work on it. If the slope is greater
than 15 degrees, do not work on it.
Always be sure of your footing. A slip and fall can
cause serious personal injury. If you feel you are losing
your balance, release the control bar immediately and
the blade will stop rotating.
Exercise extreme caution when changing direction on
slopes.
Remove objects such as rocks, tree limbs, etc.
Watch for holes, ruts, rocks, hidden objects, or bumps
which can cause you to slip or trip. Tall grass can hide
obstacles.
Do not mow near drop-offs, ditches or embankments,
because you could lose your footing or balance.
Do not mow on wet grass. Unstable footing could
cause slipping.
This operator’s machine cannot include all situations
that can occur when you use the product. Be careful
and use your common sense. Do not operate the
product or do maintenance to the product if you
are not sure about the situation. Contact Customer
Support for assistance.
Machine Use And Care
Before cleaning, repairing, or inspecting the product,
stop the engine and make certain the blade and all
moving parts have stopped. Disconnect the spark
plug wire and ground against the engine and remove
Electric Start Push Key (if equipped) to prevent
unintended starting and personal injury.
Many components on your new edger can wear with

Walk-Behind Lawn Edger 7
GB
Your walk-behind lawn edger comes partially assembled and contains the following:
CONTENTS SUPPLIED
1. Main Machine
2. Wheel
3. Upper Handle
continued use. For safety protection, frequently check
all edger components and replace immediately with
original equipment manufacture’s parts only. Use
of parts which do not meet the original equipment
specifications may lead to improper performance and
compromise safety.
When servicing or repairing the edger do not tip the
machine over or up unless specifically instructed to do
so in this manual. Service and repair procedures can
be done with the edger in an upright position. Some
procedures will be easier if the machine is lifted on a
raised platform or working surface.
Do not change the engine governor settings or over-
speed the engine. The governor controls the maximum
safe operating speed of the engine.
Do not run the engine at high speed when you are not
working.
Lawn edger blades are sharp and can cut. Wrap the
blade or wear gloves, and use extra caution when
servicing them.
Do not touch parts that are hot from operation.
Allow parts to cool before attempting to maintain,
adjust, or service. Serious burns may result. Engine
parts, especially the muffler, become extremely hot
during operation. Allow engine and muffler to cool
before touching before doing maintenance or making
adjustments.
Keep the engine and muffler free of grass, leaves,
excessive grease of carbon build up to reduce the
chance of a fire hazard.
Never douse or squirt the unit with water or any other
liquid. Keep handles dry, clean and free from debris.
Clean after each use.
Observe proper disposal laws and regulations for gas,
oil, etc. to protect the environment.
When storing machine out of the reach of the children
and do not allow persons unfamiliar with the machine
or these instructions to operate it. This machine can
be dangerous when used by and untrained user.
Maintaining Your Machine
Some parts of this machine are made of plastic or
rubber and should be kept away from chemicals.
Never cover the machine while the muffler is still hot.
Do not alter or adjust any part of the lawn edger
or its engine that is sealed by the manufacturer or
distributor. Only a qualified service technician may
adjust parts that increase or decrease governed
engine speed.
To maintain your machine, check for any misalignment
of binding of any moving parts. Parts that are broken
or worn down that may affect the machine’s operation.
If damage or worn parts are identified, they should be
repaired before use. Many accidents are caused by
poorly maintained equipment.
4. Control Bar
5. Operator's Manual and Engine manual
1
3
4
5
2
Walk-Behind Lawn Edger
8
GB 1.
1.
2.
2.
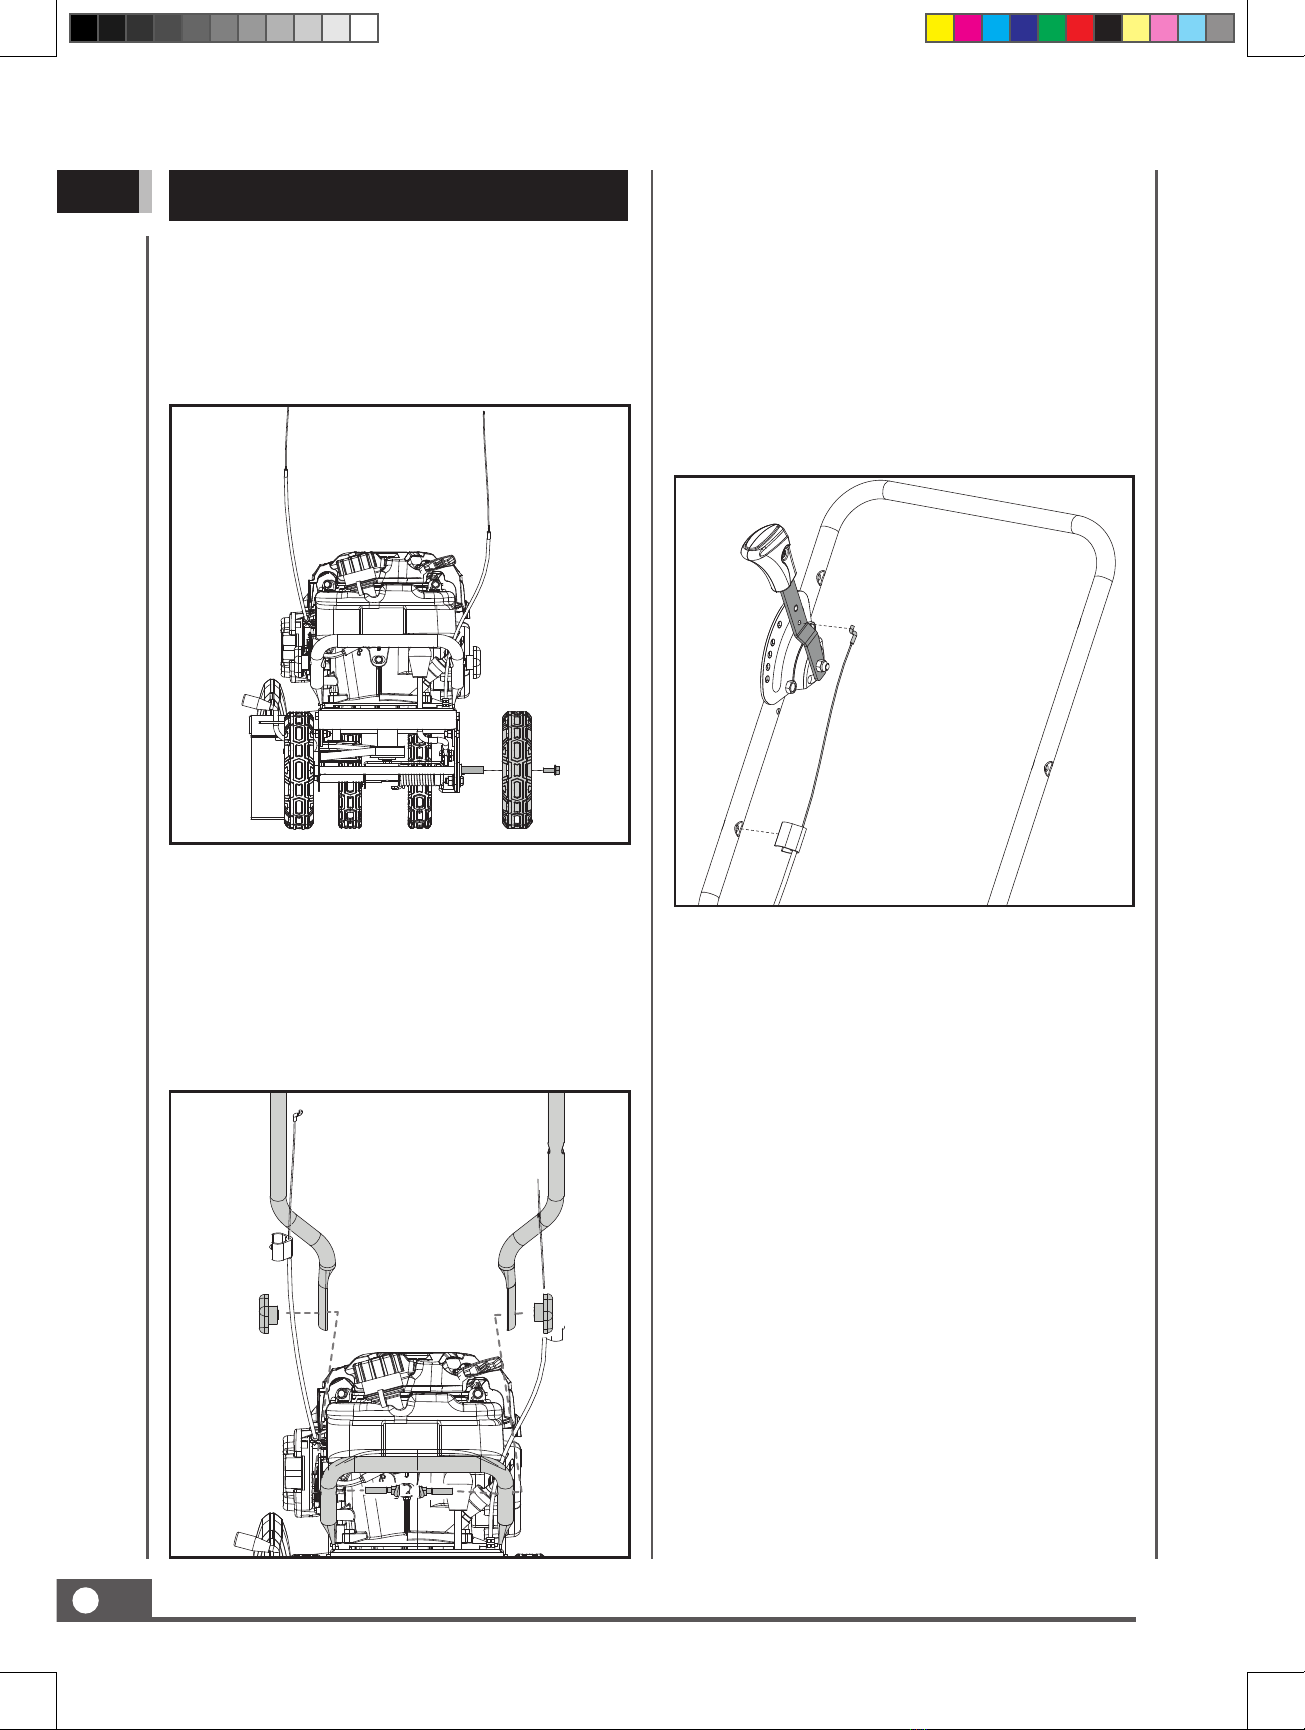
ASSEMBLY
UPPER HANDLE
Remove the bolts and wing knobs from the
handle.
Align the holes in the upper handle with
the holes in the lower handle, then secure
and tighten by using the bolts and wing
knobs.
Attach the Z type end of the cable into the
lever as shown.
Secure the buckle on the cable onto the
upper handle.
CUTTING DEPTH CONTROL CABEL
This walk-behind lawn edger was partially
assembled at the factory. To assemble your
machine follow the below instructions.
WHEEL
1.
2.
Remove the bolt from the wheel shaft.
Slide the wheel on the wheel shaft. Secure
it in place with the bolt.

Walk-Behind Lawn Edger 9
GB
1.
2.
3.
Hook the tabs of the control bar into the
holes on the upper handle.
Attach the Z type end of the cable into the
control bar from outside to inner side as
shown.
Secure the buckle on the cable onto the
upper handle.
CONTROL BAR AND CONTROL
CABLE

Walk-Behind Lawn Edger
10
GB KNOW YOUR MACHINE
Features and Controls
Control Bar
Primer Bulb
Adjustable Front Wheel
Edger Blade
Cutting Depth Control
Lever
Curb Wheel Height
Lock Plate
Blade Angle
Adjustment Lever
Curb Wheel
Adjustment Lever

Walk-Behind Lawn Edger 11
GB
Squeeze the control bar allows the engine to start
and run. Release the lever stops the engine. Once the
engine is started, the blade will start rotating.
Used to control the depth of the cut. The further
forward the lever is moved, the deeper into the soil the
edger blade will cut.
Injects fuel directly into the carburetor for faster starts.
This front wheel is adjustable from side to side for
balance.
Rotating cutting element.
The blade angle adjustment lever is located on the
front, left portion of the edger, behind the edger blade.
It is used to vary the angle of the edger blade between
one of three positions for edging/trenching or beveled
edging.
The curb height adjustment lever is found on the rear
portion of the edger. When placed in an applicable
notch, it aids in stabilizing the edger while edging
grass along a curb.
Control Bar
Cutting Depth Control Lever
Primer Bulb
Adjustable Front Wheel
Edger Blade
Blade Angle Adjustment Lever
Curb Wheel Adjustment Lever
1. Make sure the walk-behind lawn edger is on
a flat, level surface.
ADD OIL TO ENGINE
3. Using a funnel, add oil up to the FULL
mark on the dipstick. (See engine manual
for oil capacity, oil recommendation, and
location of fill cap.)
ADD GASOLINE TO ENGINE
2. Remove the oil fill
cap/dipstick to add
oil.
OPERATION
Keep all bystanders, especially
CHILDREN, away during operation.
Never start or run the engine inside
a closed area or in poorly ventilated
area. The engine exhaust contains
carbon monoxide, and odorless and
deadly gas.
The engine is shipped without oil.
Do not start the engine before
adding oil. Please refer to your
engine manual for the proper grade
of oil to add.
Gasoline is highly flammable and
explosive. You can be burned or
seriously injured when handling fuel.
Use extreme care when handling
gasoline.
DO NOT OVERFILL. Check engine
oil level daily and add as needed.
1. The engine must be off and allowed to cool
at least three minutes before adding fuel.
2. Remove the fuel filler cap and fill the tank.
(See engine manual for fuel capacity, fuel
recommendation, and location of fuel cap.)
Fill the fuel tank outdoors, never
indoors. Gasoline vapors can ignite
if they collect inside an enclosure.
Explosion can result.

Walk-Behind Lawn Edger
12
GB
3. Reinstall the fuel cap and tighten. Always
clean up spilled fuel.
The right rear wheel of the edger can be
lowered into one of the five positions to easy
the task of edging along a curb. To adjust the
height of curb wheel, proceed as follows:
3. Position the machine on the curb with the
left side rear wheel and both front wheels
on the curb.
4. Lower the right rear wheel by moving the
curb height adjustment lever slightly to the
left.
5. Pivot the right rear wheel into an applicable
position in relation to the height of the curb
to be edged along.
6. Release the curb height adjustment lever to
lock the wheel in position. Check and make
sure the lock pin goes through the hole in
the wheel lock plate.
1. Ensure the engine is turned off.
2. Reposition the front wheel to maximum the
stability. Remove the R pin from the axle,
slide the right side wheel over against the
left side wheel, and then reinstall the R pin.
IMPORTANT: DO NOT OVERFILL!
This equipment and/or its engine
may include evaporative emissions
control system components,
required to meet EPA and/
or CARB regulations, that will
only function properly when the
fuel tank has been filled to the
recommended level. Overfilling
may cause permanent damage
to evaporative emissions control
system components. Filling to
the recommended level ensures
a vapor gap required to allow for
fuel expansion. Pay close attention
while filling the fuel tank to ensure
that the recommended fuel level
inside the tank is not exceeded. Use
a portable gasoline container with
an appropriately sized dispensing
spout when filling the tank. Do not
use a funnel or other device that
obstructs the view of the tank filling
process.
EDGING ALONG A CURB
1 3
2
1
2
FRONT TRACK ADJUSTMENT
Walk-Behind Lawn Edger 13
GB
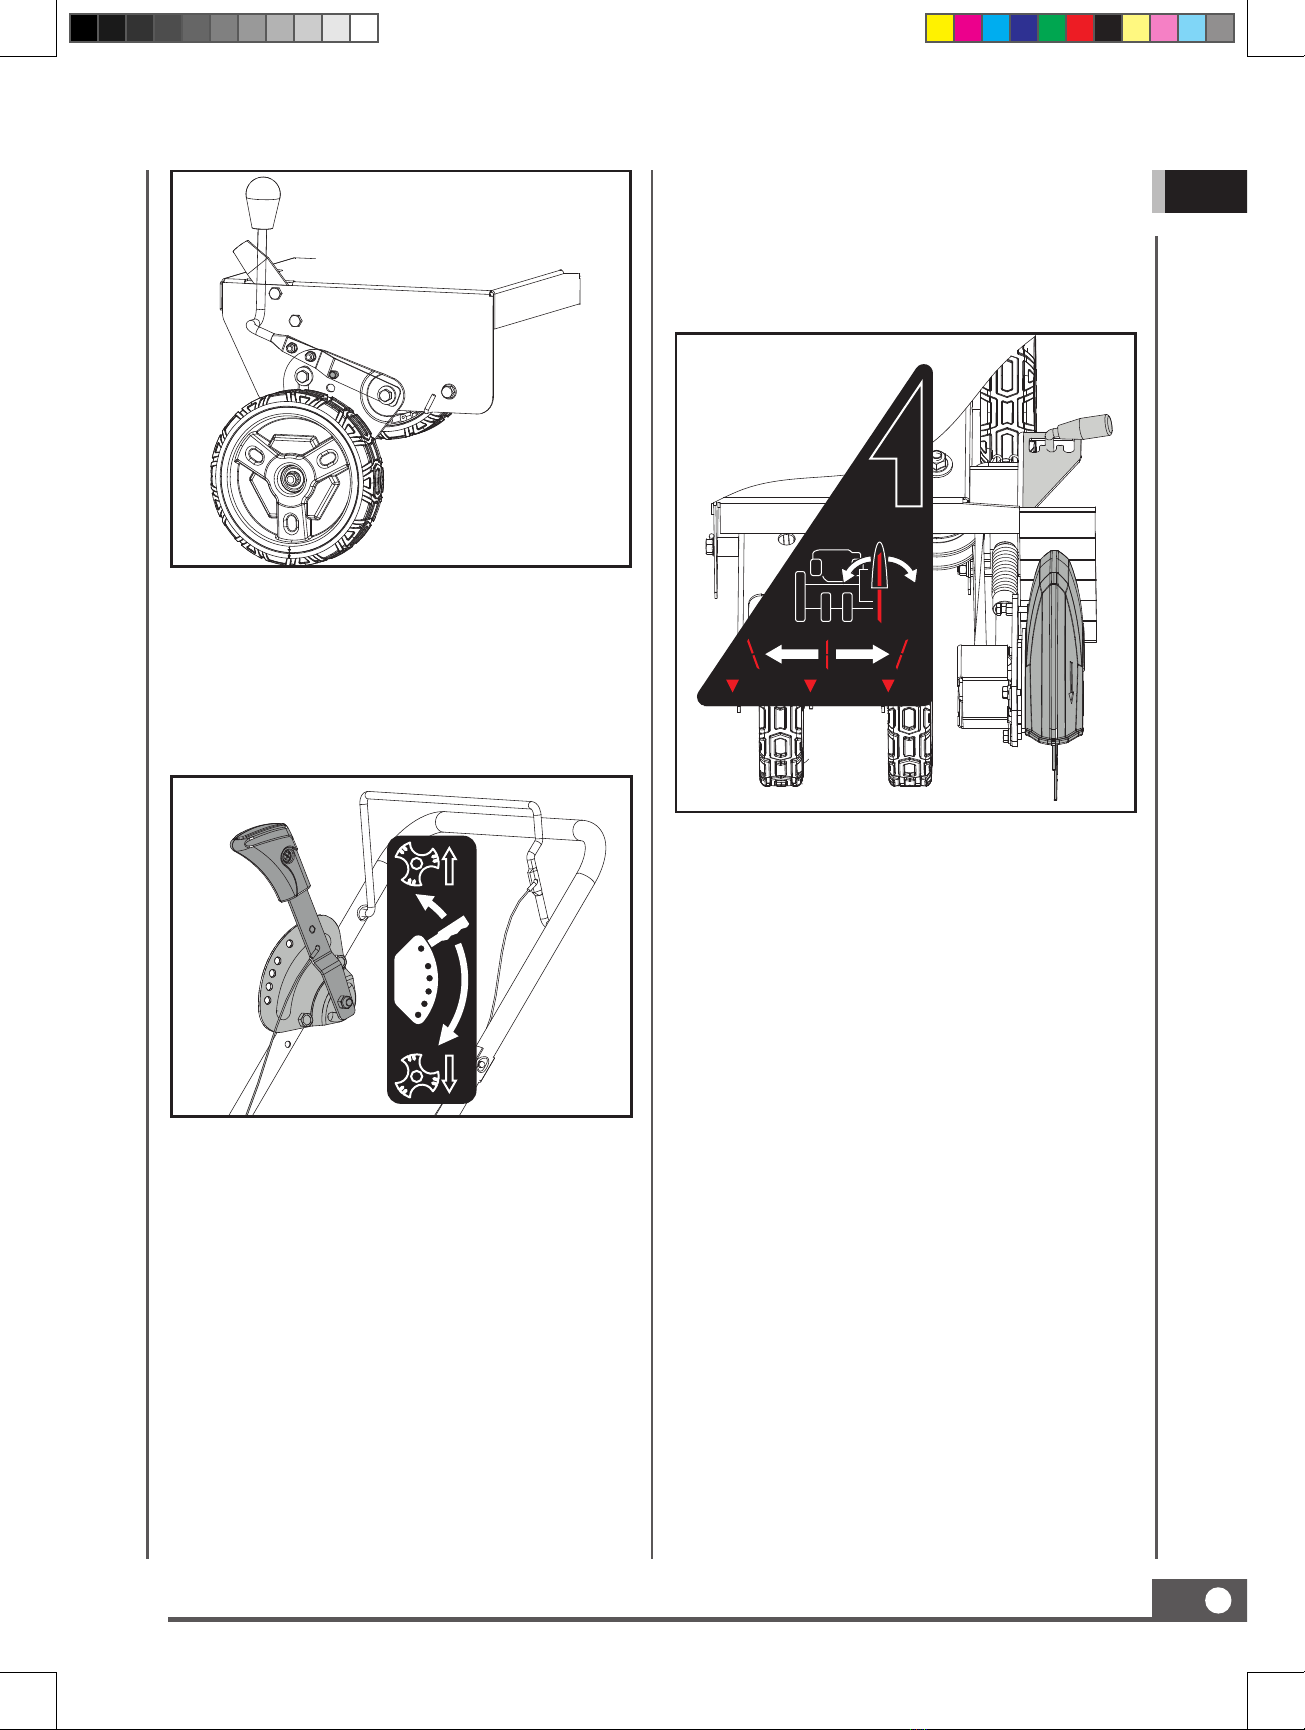
Move the depth control lever forward to
increase the depth.
When you have reached the end of the area to
be edged, move the depth control lever back
to its start position.
ADJUSTING CUTTING DEPTH
1 3
2
CHANGING THE CUTTING ANGLE
The blade can be adjusted 20 degrees from
vertical in either direction. This will allow you
to use the edger for beveled edging. Using the
beveled edge at a deep depth will cut a trench
into the ground.
20° 0° 20°

Walk-Behind Lawn Edger
14
GB EDGING LAWNS
1. Edging is best performed when conditions
are dry. If the soil is too wet, dirt may clog
up in the blade guard and cause splattering.
2. Move edger to a desired area to begin
edging, making sure that the left rear wheel
is on a hard surface and the blade is over
area to be cut.
3. Start the Engine as described in the
“Starting Engine” section.
4. Lower blade control lever to achieve depth
of cut desired. The further the forward
blade depth control lever is moved, the
deeper the blade will cut into the ground.
Several passes may be necessary to obtain
the desired depth of cut. Do not lower
blade more than one depth notch at a time
without making a pass.
4. Once you have finished edging selected
area, raise the blade depth control lever
back into the start position, move to the
next area to be edged, and proceed again
from step 1.
STARTING ENGINE
1. Push the primer bulb 3 times, waiting 2
seconds between each push.
2. Firmly grip the control bar against the
upper handle with our left hand, and firmly
grip the recoil starter with your right hand.
3. Pull the recoil starter slowly, until you feel
tension in the starter rope. Then quickly pull
the recoil starter handle to start engine. Do
not allow the starter rope to snap back. Let
the starter rope slowly rewind as you hold
the recoil starter handle.
4. If engine fails to start after three pulls, push
the primer bulb two times and pull the
recoil starter handle again.
5. If engine fails to start after 5 or 6
more tries, see the instructions in the
"Troubleshooting".
STOP ENGINE
To stop the engine simply release the control
bar.
Rapid retraction of the starter cord
(kickback) will pull your handand arm
toward the engine faster than you
can let go. Broken bones, fractures,
bruises, or sprains could result.
Do not use the primer bulb to restart a
warm engine after a short shutdown.
Be sure no one other than the
operator is standing near the edger
while starting engine or operating
the unit. Never run engine indoors or
in enclosed, poorly ventilated areas.
Engine exhaust contains carbon
monoxide, an odorless and deadly
gas. Keep hands, feet, hair and loose
clothing away from any moving parts
on engine and the edger.
Refer to the Engine Operator's Manual
for detailed instructions on starting
and stopping the engine.

Walk-Behind Lawn Edger 15
GB
MAINTENANCE
Always stop engine, allow engine
to cool, disconnect stark plug,
and ground against engine before
performing any type of maintenance
on your machine.
In the maintenance schedule you can see which
parts of your machine requires maintenance,
and at which intervals it should take place. The
intervals are calculated based on average use
of the machine, and may differ depending on
the rate of your personal use.
*Clean more often under dusty conditions or when airborne debris is present. Replace air cleaner if
very dirty.
Procedure Before
Each Use
After
Each Use
Every Month
or 10 Hours
of Operation
Every 25
Hours
or Every
Season
Every
100 Hours
Before
Storage
Check for Loose Fasteners x x
Clean Edger x x
Clean Under Engine Cover x x
Check Drive Belt / Pulleys x
Check / Replace Blade x x
Check / Change Engine Oil
Lever x x x x
Clean Air Filter* x
Inspect Muffler x
Clean or Replace Spark Plug x
Clean Spark Arrestor Screen
(If equipped) x
Replace Air Filter Paper
Cartridge x
Always observe safety rules when performing
any maintenance.
The warranty on this walk-behind lawn edger
does not cover items that have been subjected
to operator abuse or negligence. To receive full
value from warranty, operator must maintain
the unit as instructed here.
Changing of engine-governed speed will void
engine warranty.
All adjustments should be checked at least once
each season.
Periodically check all fasteners and make sure
these are tight.
Lightly lubricate all moving parts of the machine
at the end of the season or every 25 operating
hours.
GENERAL RECOMMENDATIONS GENERAL LUBRICATION

Walk-Behind Lawn Edger
16
GB
CHANGING THE ENGINE OIL
ENGINE CARE
BLADE CARE
Maintain oil level as instructed in Engine
Operator’s Manual.
Service air cleaner every 25 hours of use
under normal conditions. Clean every few
hours under extremely dusty conditions. Poor
engine performance and flooding usually
indicates that the air cleaner should be
serviced. To service the air cleaner, refer to
the Engine Operator’s Manual.
Clean spark plug and reset the gap once
a season. Spark plug replacement is
recommended at the start of each trimming
season. Check Engine Operator’s Manual for
correct plug type and gap specifications.
Clean engine regularly with a cloth or brush.
Keep the top of the engine clean to permit
proper air circulation. Remove all grass, dirt,
and combustible debris from muffler area.
Engines stored between 30 and 90 days need
to be treated with a gasoline stabilizer to
prevent deterioration and gum from forming
in fuel system or on essential carburetor parts.
•
•
•
•
•
See Maintenance schedule on page 15 for more
information about when to change the oil. To
change the oil, use the following procedure.
A list of key engine maintenance jobs required
for good performance by the edger are listed
below. Follow the Engine Operator’s Manual for
a detailed list and instructions.
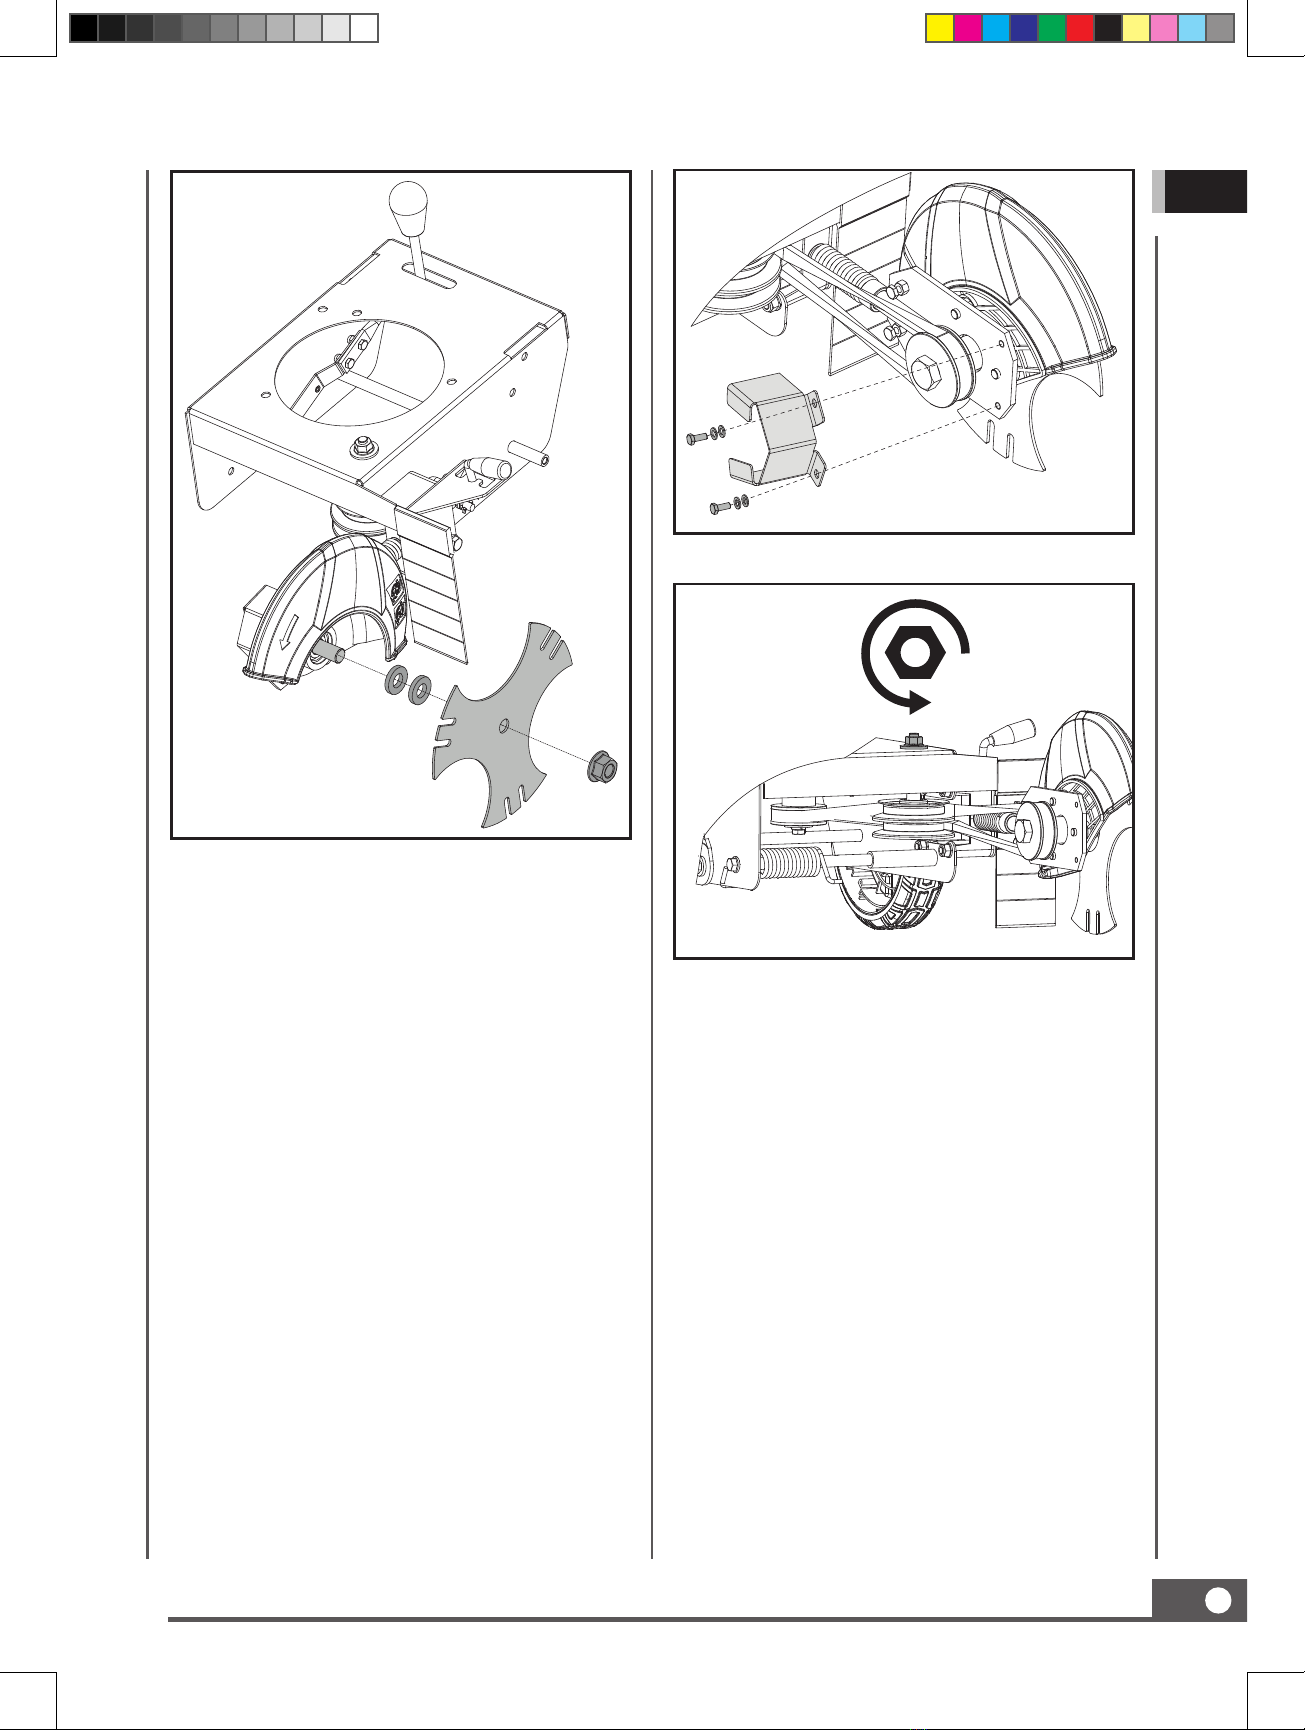
1. Disconnect spark plug wire from spark plug
and place wire where it cannot come in
contact with plug.
2. Examine the blade whenever you run out
of fuel. If the blade is damaged or cracked,
replace it immediately. If the blade edge
is dull or nicked, have it sharpened and
balanced, or replace it.
3. Move the height adjustment lever to the start
position to lift the spindle off the ground.
3. Use two wrenches, one Allen wrench to
prevent the inside hex bolt from spinning,
and one wrench to loosen and remove the
blade flange nut.
3. Remove the blade flange nut and the old
blade.
4. Install the new blade, tighten the flange nut
as tight as possible.
1. Move the machine to a level surface.
2. Refer to the maintenance safety section on
page 6 before doing oil change.
3. Remove the dipstick by rotating the cap
counterclockwise and pulling it out.
Run the engine for a few minutes
before changing the oil to warm it.
Warm oil flows better and carries
more contaminants. We recommend
that you use API SERVICE Category
SJ class or higher oil.
Refer to the engine manual packed
separately with your unit for
more detailed information and a
maintenance schedule for engine
maintenance.
Always stop the engine before you do
work on the blade. Make sure that the
blade is fully stopped and disconnect
the spark plug cap before you start
work.
The blade is sharp; contact with the
blade can result in serious personal
injury. Wear gloves when servicing
the blade.
Walk-Behind Lawn Edger 17
GB
BELT REPLACEMENT
The edger drive belt is subject to wear and
should be replaced if any signs of cracking,
shredding or rotting are present. To replace the
belt, proceed as follows:
1. Stop the engine. Wait for all moving parts
to stop. Disconnect the wire from the spark
plug.
2. Remove the bolts from the belt cover, then
remove the belt cover.
3. Loosen the nut on top of the frame, allowing
the idler pulley assembly to pivot slightly
out from the frame.
4. Carefully remove the belt from the pulleys.
5. To install a replacement belt from the
manufacturer, reverse the steps above.

Walk-Behind Lawn Edger
18
GB Do not use strong detergents or
petroleum based cleaners when
cleaning plastic parts. Chemicals can
damage plastics.
Do not store the machine with fuel
in a non-ventilated area where fuel
fumes may reach flame, sparks, pilot
lights or any ignition sources.
If the walk-behind lawn edger will not be used
for a period longer than 30 days, follow the
steps below to prepare your unit for storage.
1. Drain the fuel tank completely. Stored fuel
containing ethanol or MTBE can start to go
stale in 30 days. Stale fuel has high gum
content and can clog the carburetor and
restrict fuel flow.
2. Start the engine and run until it stops. This
helps prevent gum deposits from forming
inside the carburetor and possible engine
damage.
3. While the engine is still warm, drain the oil
from the engine. Refill with fresh oil of the
grade recommended in the Engine Manual.
4. Use clean cloths to clean off the outside of
the machine and to keep the air vents free
of obstructions.
5. Inspect for any loose or damaged parts.
Repair or replace damaged parts and
tighten loose screws, nuts or bolts.
6. Store your unit on flat ground in a clean,
dry building that has good ventilation.
STORAGE
TROUBLE SHOOTING
Problem Cause Remedy
Engine fails to start
1. Engine control lever is
disengaged.
2. Spark plug wire is
disconnected
3. Out of fuel or stale fuel
4. Blocked fuel line
5. Fouled spark plug
6. Engine flooding
7. Not enough oil in engine
1. Push the engine control lever
into the starting notch.
2. Attach spark plug wire
securely to spark plug
3. Fill with clean, fresh gasoline
4. Clean fuel line
5. Clean, adjust gap, or replace
6. Wait a few minutes to restart
the engine
7. Add oil more oil to engine

Walk-Behind Lawn Edger 19
GB
Engine runs
erratically
1. Spark plug wire is loose
2. Blocked fuel line or stale fuel
3. Vent plugged
4. Water or dirt in fuel system
5. Dirty air cleaner
6. Improper carburetor
adjustment
1. Connect and tighten spark
plug wire
2. Clean fuel line. Fill tank with
clean, fresh gasoline
3. Clear vent
4. Drain fuel tank. Refill with
fresh fuel
5. Clean or replace air cleaner
6. Refer to engine manual
Engine overheats
1. Engine oil level low
2. Dirty air cleaner
3. Air flow restricted
4. Carburetor not adjusted
properly
1. Fill crankcase with proper oil
2. Clean air cleaner
3. Remove housing and clean
4. Refer to engine manual
Excessive vibration
or noise
1. Edger blade bent or damaged.
2. Blade spindle bent or
damaged.
3. Loose parts
1. Replace blade.
2. Contact an authorized service
dealer
3. Tighten all fasteners
Drive-belt slips 1. Belt worn or stretched.
1. Replace drive belt. See Belt
Replacement in Service and
Maintenance section.
The Engine runs
well but the Blade
won’t move.
1. The blade Belt is off the pulleys
or broken.
2. Jammed, foreign object in
blade or pulleys area
3. Blade loose
1. Reinstall or change belt
2. Clear obstruction
3. Tighten blade nuts
Edger blade fails to
cut properly
1. Blade worn out
2. Blade wobbles
1. Replace blade
2. Replace clamp washer,
tighten nut
Walk-Behind Lawn Edger
20
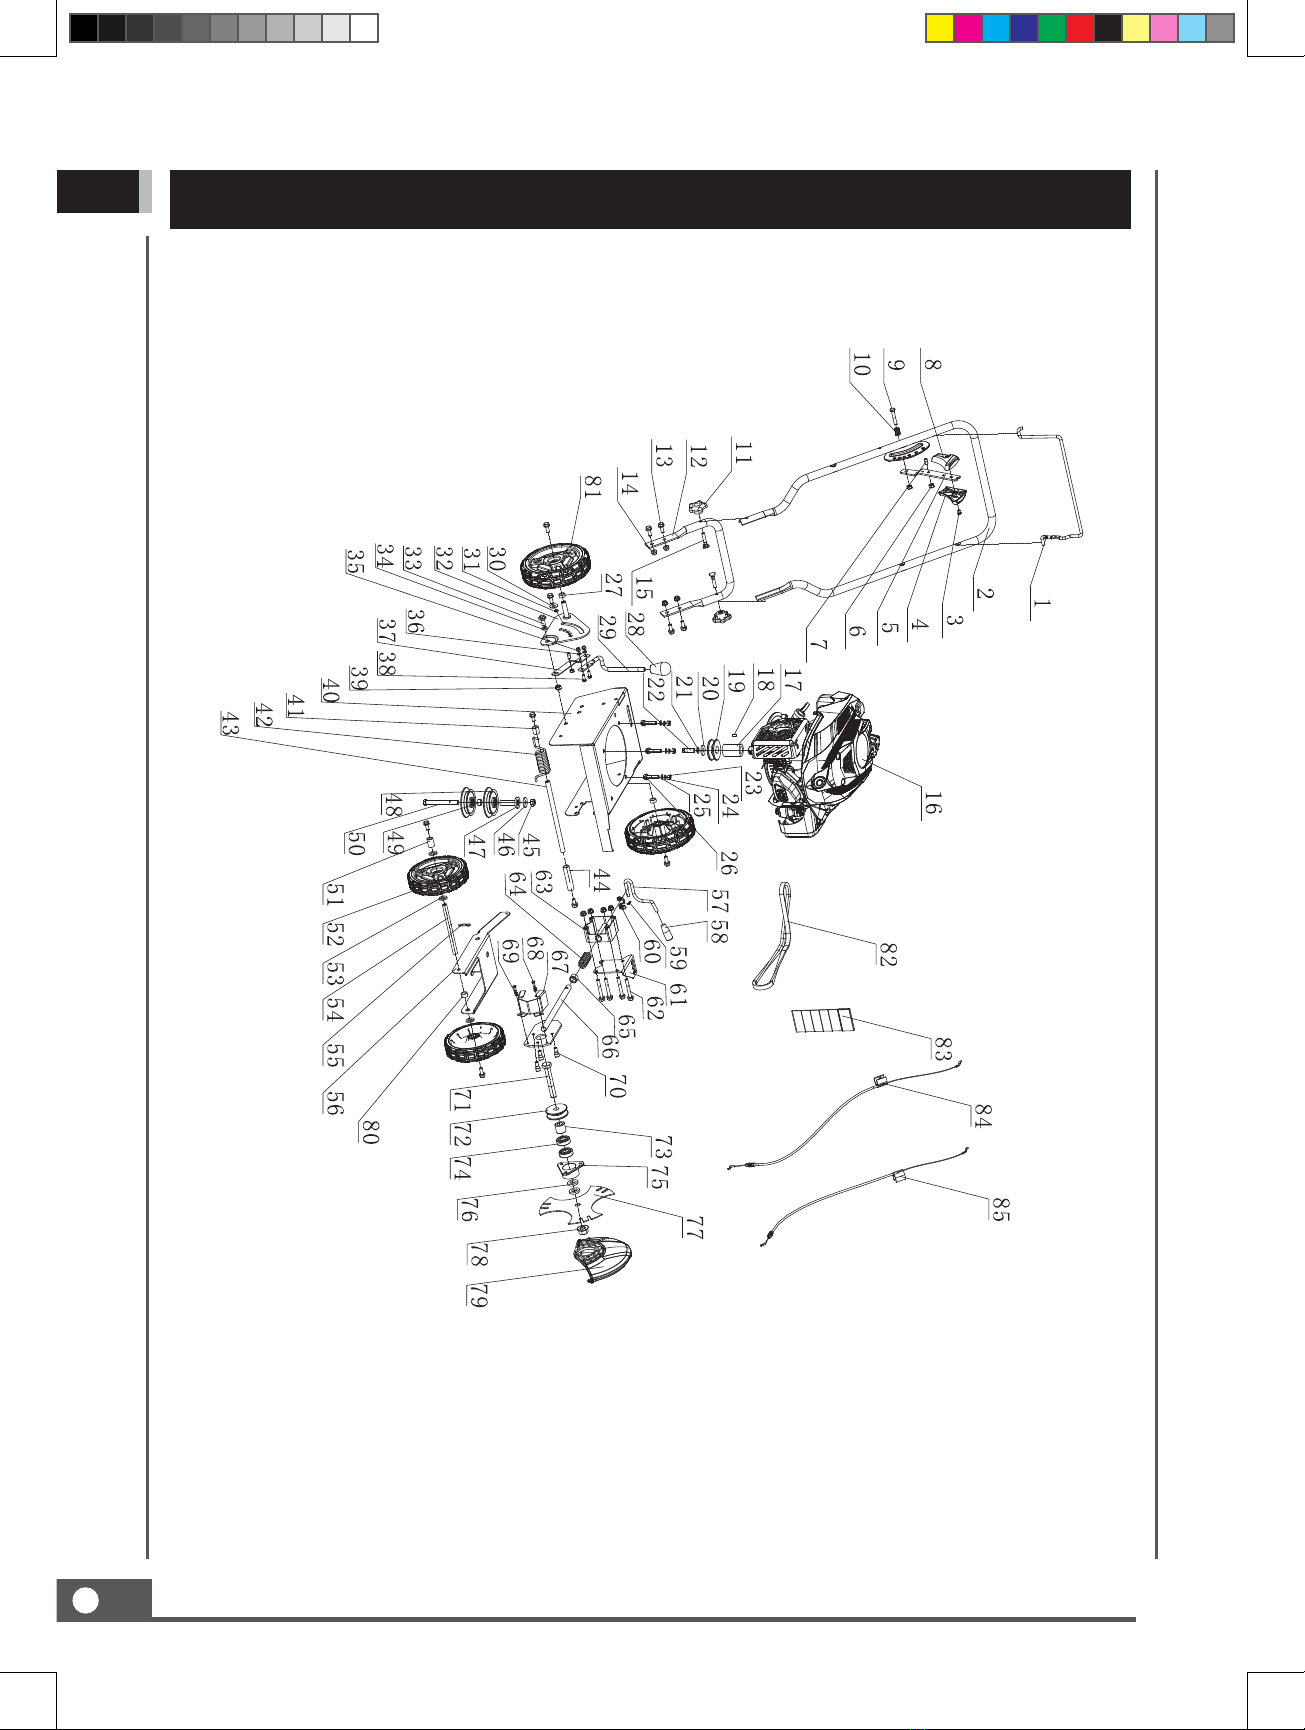
GB PARTS SCHEDULE
Table of contents
Other TOPMAQ Lawn Mower manuals


Popular Lawn Mower manuals by other brands


Amazone
Amazone Profihopper 1500 SmartLine operating instructions

Stiga
Stiga 8211-3417-03 user manual

McDonough Power Equipment
McDonough Power Equipment 265X Operator's manual

Columbia
Columbia Hydrostatic Lawn Tractor Operator's manual

Toro
Toro Recycler 20996 Operator's manual

WEIBANG
WEIBANG WB507SCV Operator's manual


 Quick setup guide")
