Tornador S-100C Maintenance and service guide

SAFETY & OPERATING
INSTRUCTION MANUAL
MODEL NO: S-100C
TM
CORDLESS HVLP SPRAY GUN
S-100C

2
SAFETY & OPERATING INSTRUCTION MANUAL
TECHNICAL DATA
TYPE
RATED POWER
RATED VOLTAGE
FREQUENCY
RATED SPEED
AIR FLOW
LIQUID FLOW
WEIGHT
BATTERY CAPACITY
SPRAYING DISTANCE
WIDTH
VISCOSITY
MATERIAL POT CAPACITY
S-100C CORDLESS HVLP SPRAY GUN
120W
18V (MAX 20V)
30,000rpm
160L/min
100-200ml/min
1.5kg
2000mAh
200-250mm
200-300mm
8-12s
800mL
TM
CORDLESS HVLP SPRAY GUN
S-100C
The values shown are based on a nominal voltage of 18V (max 20V). In the case of voltages and frequen-
cies of different power, values may vary. Refer to the label technical specifications to the nominal values of
the S-100C Cordless HVLP Spray Gun.
POWER TOOL SAFETY
WARNING: Before using your S-100C, it is critical that you read and understand these safety
rules. Failure to follow these rules could result in damage to the tool, serious injury to you or
even lead to death.
Good safety practices are a combination of common sense, staying alert and understanding how to
use your tool. To avoid mistakes that could cause serious injury, do not plug in your tool until you have
read and understood all safety rules.
READ and become familiar with this entire Owner’s Manual. LEARN the tool’s applications, limitations
and possible hazards.
WARNING:
Look for this symbol that identies important safety precautions. It means CAUTION! BE ALERT!
YOUR SAFETY IS INVOLVED!
• ALWAYS WEAR EYE PROTECTION.
• Any power tool can throw foreign objects into your eyes which could causepermanent eye dam-
age. ALWAYS wear safety goggles (not glasses) that comply with ANSI safety standard Z87.1.

3
Everyday glasses have only impact resistant lenses. They ARE NOT safety glasses.
• WARNING: Glasses or goggles not in compliance with ANSI Z87.1 could cause serious
injury when they break.
WORK AREA
• Keep your work area clean and well-lit. Cluttered benches and dark areas invite accidents.
• Do not operate power tools in environments where explosive elements, such as flamma-
ble liquids, gas or dust are present. Power tools create sparks which may ignite the dust or
fumes.
• Keep bystanders, children and visitors away while operating the tool. Distractions can
cause you to lose control.
PERSONAL SAFETY
• Stay alert, watch what you are doing and use common sense when operating a power
tool. Do not use the tool while tired or under the influence of drugs, alcohol or medication.
A moment of inattention while operating power tools may result in serious personal injury.
• Dress properly. Do not wear loose clothing or jewellery. Contain long hair. Keep your hair,
clothing and gloves away from moving parts. Loose clothing, jewellery or long hair can be
caught in moving parts.
• Avoid accidental starting. Be sure power switch is OFF before plugging in. Carrying tools
with your nger on the switch or plugging in tools that have the switch ON invites accidents.
• Do not overreach. Keep proper footing and balance at all times. Proper footing and balance
enables better control of the tool in unexpected situations.
• Use safety equipment. Always wear eye protection. Dust mask, non-skid safety shoes,
hard hat and/or hearing protection must be used in appropriate conditions.
TOOL USE AND CARE
• Detach the battery before making any adjustments, changing accessories or storing the
tool. Such preventative safety measures reduce the risk of the tool starting accidentally.
• Store idle tools out of reach of children and other untrained persons. Tools are dangerous
in the hands of untrained users.
• Maintain tools with care. Thoroughly clean tool and components after each use.
• Check for misalignment or binding of moving parts, breakage of parts and any other con-
dition that may affect the tool’s operation. If damaged, have the tool serviced before using.
Many accidents are caused by poorly maintained tools.
• Use only accessories that are recommended by the manufacturer for your model. Accessories
that may be suitable for one tool may become hazardous when used with another tool.
• Keep the tool and its handle dry, clean and free from oil and grease. Always use a clean
cloth when cleaning. Never use brake uids, gasoline, petroleum-based products or any strong
solvents to clean your tool. Following this rule will reduce the risk of re, loss of control and de-
terioration of the plastic components of the tool.
SERVICE
• Tool service must be performed only by qualified personnel. Service or maintenance per-
formed by unqualied personnel could result in risk of injury.
• When servicing a tool, use only identical replacement parts. Follow instructions in the
Maintenance section of this manual. Use of unauthorized parts or failure to follow Maintenance
instructions may create a risk of electric shock or injury.

4
SPECIFIC SAFETY RULES
• 1. Keep your workplace clean, never use the tool in hazardous areas that contain flamma-
ble liquids, gasses or dust.
• 2. Only use paints, solvents or other materials with a flash point of 73 °F(22C) or higher.
• 3. Never point the spray gun at another person or animal. In the event of an injury, seek
immediate medical attention.
• 4. Always read the paint manufacturer’s thinning instructions before use.
• 5. You must clean the spray gun thoroughly after each use.
BATTERY & CHARGER SAFETY
• Do not store or carry battery pack in a manner in which metal objects could contact ex-
posed metal end. Do not place battery in aprons, pockets, drawers, etc. with loose nails, screws,
keys etc. The battery could short circuit causing a re, personal injury or damage to the battery.
• Never attempt to open the battery pack for any reason. If the housing of the battery breaks or
cracks, immediately discontinue use and do not recharge.
• Do not charge the battery pack if it is wet or shows any evidence of corrosion.
• Do not incinerate the battery pack. It can explode in a re.
• Minor leakage from the battery pack may occur under extreme usage, charging or temperature
conditions. This does not indicate a failure. If, however, the outer seal is broken and this leakage
gets on your skin, follow these steps:
1. Wash immediately with soap and water.
2. Neutralize with a mild acid such as lemon juice or vinegar.
3. If liquid gets into your eyes, ush immediately with clean water for a minimum of 10 minutes
and seek medical attention.
NOTE: The battery uid is a 18–35% solution of potassium hydroxide.
• Do not use an extension cord. Plug the charger cord directly into an electrical outlet.
• Use the charger only in a standard 110–118 V/60 Hz electrical outlet.
• WARNING: The double-insulated charger is equipped with a polarized plug (one blade
is wider than the other). This plug will fit into a polarized outlet only one way. If the plug
does not fit fully into the outlet, reverse the plug. If it still does not fit, contact a qualified
electrician to install a polarized outlet. Do not alter the plug in any way. Double insulation
eliminates the need for the three-prong grounded power cord and grounded power supply
system.
• Charge the battery pack only with the charger supplied with the tool.
• Do not use the charger in wet or damp conditions. It is intended for indoor use only. Do not
use the charger near sinks or tubs. Do not immerse the charger in water.
• Do not allow the charger cord to hang over the edge of a table or counter or touch hot
surfaces. The charger should be placed away from sinks and hot surfaces.
• Do not use charger to charge any batteries other than the polisher/sander battery. Other
batteries may explode.
• Do not operate charger if cord or plug is damaged. Replace damaged cord and plug imme-
diately.
• Do not operate charger if it has received a sharp impact, been dropped or otherwise dam-
aged in any way. Have a qualied technician examine the charger and repair it if necessary. Do

5
not disassemble the charger.
• For best results, only charge the battery when the temperature range of the battery and work area
is between 10–40°C (50–105°F).
• Unplug the charger when not in use and before cleaning or maintenance.
• Do not abuse the cord. To reduce the risk of damage to the electric cord or plug, never carry the
charger by the cord or yank the cord to pull the plug. Always grasp the plug and pull to discon-
nect. Always keep the cord away from heat, oil and sharp edges.
Failure to adhere to these safety rules can greatly increase the chances of injury.
REMOVING & INSTALLING BATTERY
WARNING: Always make sure your ngers are away from the ON/OFF switch when removing or in-
stalling a battery.
1. To remove the battery from the tool, squeeze the locking buttons (C) on the top of the battery.
2. Slide the battery (C) completely out of the tool.
3. Slide the battery fully into the tool handle until you hear the locking latches “clicks” into place.
NOTE: The battery will not t into the tool if the negative polarity symbols are not aligned. If you en-
counter difculty inserting the battery into the tool, check to make sure the negative polarity symbols
are aligned.
Gently pull on the battery to ensure it is securely latched into the tool.
CHARGING THE BATTERY
Before beginning any polishing or sanding project, it is important that you fully charge the
battery. As it takes 2 to 3 hours to fully charge a rundown battery, it is recommended that the
battery be charged the day before being used.
WARNING: Use ONLY the 18 Volt charger supplied with this tool to charge the battery. Do not
charge any other batteries with the charger supplied with this tool. Mixing incompatible batter-
ies and charger may cause the battery to leak or burst causing personal injury.
BATTERY & CHARGER FACTS
1. The battery supplied with the tool is NOT fully charged when shipped. The battery must be
charged for at least 5 hours before being used in the spray gun.
2. There are two conditions under which a battery will not accept a full charge:
• when the battery is new
• when the battery has not been used for an extended period of time.
These are normal conditions and do not indicate a problem. After about four cycles of charging and
discharging through use, the battery will accept a full charge.
WARNING: Remove the battery before carrying out any work on the S-100C.
Before switching on the power tool. Unpack the spray gun and check that there are no missing
or damaged parts.
NOTE: The batteries are not fully charged on delivery. Prior to initial operation, charge the batteries
ffully. Refer to the charger operating manual.
6
Exploded View
KNOW YOUR SPRAY GUN
Fig. 01

7
1
2
3
4
5
6
7
8
9
10
11
12
13
14
15
16
17
No. No. No.Description Description Description
18
19
20
21
22
23
24
25
26
27
28
29
30
31
32
33
34
ST2.9*10SCRE
Rear Cover
Cotton Filter
Right Cover
Switch Plunger Spring
Switch Plunger
Right Side Cover
ST3.5*10SCRE
Big Nut
Spray Ball
Spray Nozzle
Barge Board
Nozzle Seal
Needle
Needle Insert
Needle Seat
Bowl Seals
O-Ring
22 Needle Spring
Needle Set
GUN
Pipette
Cup-Ring
Suction Pipe Splint
Cup
Φ3 Flat Gasket
Short Pin
Adjusting Knob
Trigger
Spray A Knob
Left Side Cover
O-Ring
Atomization Circle
Vent Spring
35
36
37
38
39
40
41
42
43
44
45
46
47
48
49
50
51
Lock Catch
Microswitch
Battery Pack
Battery Pack Pin
Left Cover
Gun-Ring
Stopper
Motor Cover
550 Motor
Wind Mill
M4*8 SCRE
Motor Gasket
Wind Leaf
Wind Cover
Damping Ring
Funnel
Pin
Function:
Suitable for disinfecting, sanitizing, deodorizing, cleaning, applying dressings, and other
automotive functions.
HOW TO USE:
Before using the S-100C, material preparation is the rst stage.
Please refer to the thinning chart and picture. Fig.02
1. Oil Enamel
2. Oil-Based Primer
3. Oil Stain
4. Clear Sealer
5. Polyurethane
6. Varnish
7. Lacquer Sanding Sealer
8. Lacquer
9. Automotive Finishes
10. Latex
25-60
30-60
No thinning required
No thinning required
No thinning required
20-60
25-35
25-35
20-40
45-90
Material Run out Time (Sec)
PARTS OF THE TOOL
8
1.
Unscrew the liquid container from the spray gun.
Fig.03
2. Adjust the suction tube.
a. If spraying in an upward direction, the angled end of the suction tube should be pointing
toward the rear of the gun.
Fig.04
SUCTION TUBE
SUCTION TUBE
b. If spray in a downward direction, the angled end of the suction tube should be pointing
towards the front of the gun.
Fig.05
9
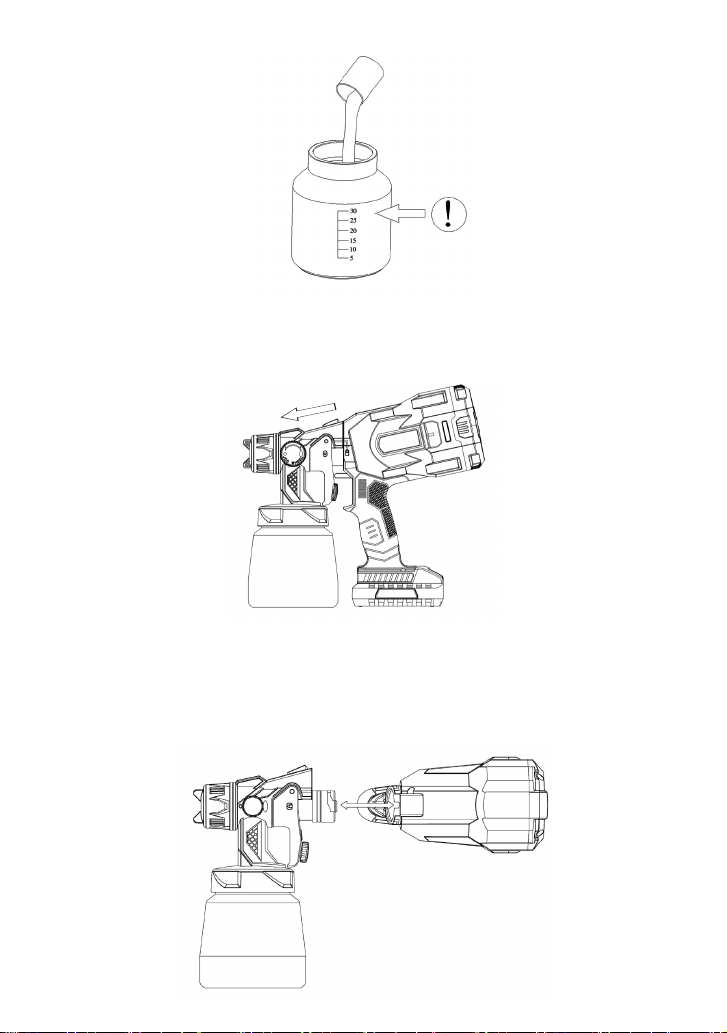
3. Pour material into container, make sure not to exceed 800ml
Fig.06
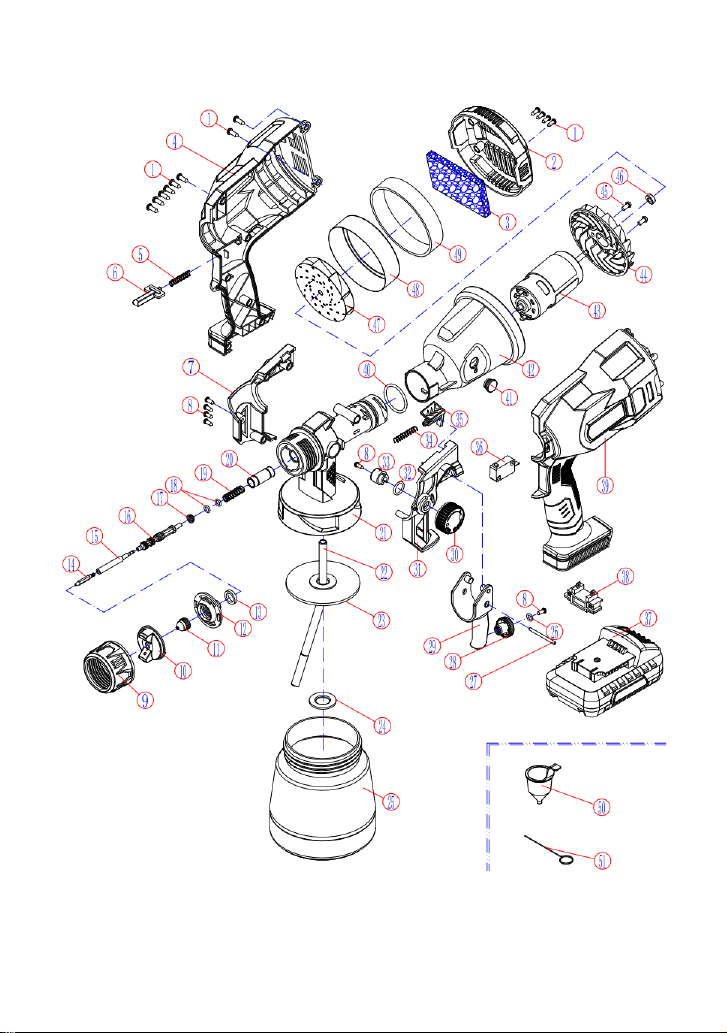
4. Remove the motor
a. Hold the gun with your hand and press the latch in the direction of the arrow.
b. At the same time hold the motor handle with your hand and rotate it counterclockwise 90°.
c. Pull out to remove the motor from the gun.
Fig. 07
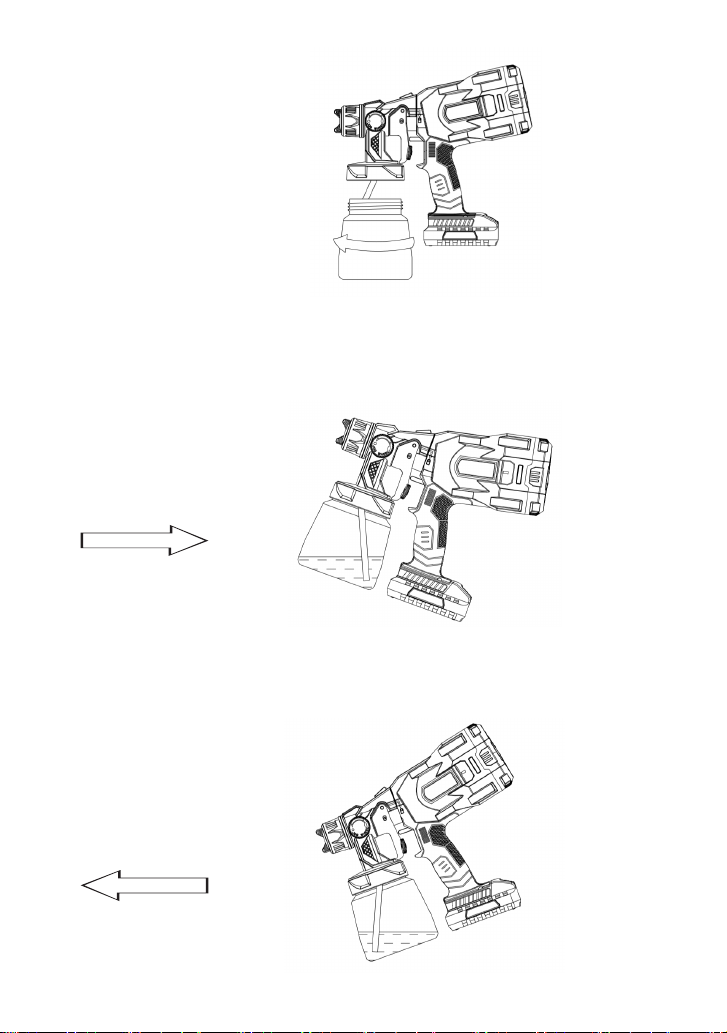
5.
Connect gun body with motor
a. Hold the gun with your hand to align the slot on the gun with the slot on the motor and insert
it (as shown in the gure).
b. Hold the motor handle with your hand, rotate the right hand clockwise 90°.
c. When the gun and host are parallel, it is locked.
Fig. 08

10
6.
Adjust the needle adjusting screw to meet your requirement.
a. Adjust the screw to left to decrease liquid volume, decreasing coverage
b. Adjust the screw to right to increase liquid volume, increasing coverage
Fig. 09
ADJUSTING SCREW
7.
Spray length adjustment: Turn this knob to adjust the round shape from vertical to hori-
zontal.Adjust the required length according to the spraying environment, reduce waste
and save material.
a. The counterclockwise rotation shortens the length, and when it rotates to the stop position,
it is sprayed with the largest circle (see g. 10).
b. Adjust the screw to right to increase paint volume, increasing coverage (see g. 11).
Fig. 10
F i g . 11
LENGTH CONTROL KNOB

11
CORRECT
8.
Adjusting spray patterns
a. The gun spray patterns can be changed from a horizontal oval fan pattern to a round
b. detailed pattern to a vertical fan pattern by adjusting the nozzle.
Fig. 12
VERTICAL POSITION
HORIZONTAL POSITION
Fig. 13
9.
Open the power switch, pull trigger, the liquid will spray from the nozzle.
HOW TO SPRAY PROPERLY:
Even coat throughout.
• Keep stroke smooth and at even speed.
Fig. 14

12
• Do not ex wrist while spraying.
Fig. 15
INCORRECT
REPLACE NOZZLE AND NEEDLE:
When disassembling the nozzle, please pull the trigger rst, then press and remove the nozzle.
a. As shown in the gure, rotate to remove the needle
b. As shown in the gure, rotate to set up the needle

13
Problem Cause(s) Solution(s)
Little or no material ow
Material leaking
Atomization is too coarse
Spray jet pulsates
Pattern runs or sags
Too much over-spray
Pattern is very light and splotchy
Large cloud of paint
TROUBLESHOOTING
1. nozzle clogged
2. suction tube clogged
3. material volume setting turn too far to
the right
4. suction tube loose
5. material is too thick
6. inconsistent paint
7. container is loose
1. nozzle loose
2. nozzle worn
3. nozzle seal worn
4. material build-up on spray pattern dial
and nozzle
1. viscosity of material too high
2. material volume too large
3. nozzle clogged
4. too little pressure build-up in container
1. material in container running out.
2. material is too thick
1. applying too much material
1. gun too far from spray object
2. too much material applied
1. moving the spray gun too fast
1. gun too close to surface
1. clean
2. clean
3. turn to the left
4. insert
5. check viscosity
6. strain paint
7. tighten the container
1. tighten
2. replace
3. replace
4. clean
1. thin the material
2. turn to the right
3. clean
4. tighten container
1. rell
2. check viscosity
1. adjust material ow or increase move-
ment of spray gun
1. reduce distance
2. turn material volume setting to right
1. adjust material ow or decrease
movement of spray gun
1. move gun away from surface and
reduce paint ow

14
Inserting/replacing the battery
• Press the charged battery ( C ) into the power tool until it clicks into place.
• To remove, press the release button 7 and pull out the battery.
CAUTION! When the device is not in use, protect the battery contacts. Loose metal parts may
short-circuit the contacts; explosion and re hazard!
Battery state of charge
• If the LED light turns green, this indicates that charging is complete. If the LED light is off, the
battery is faulty and must be replaced.
Attaching the tools
NOTE: Use original accessories on this model. Not using original accessories may lead to a poor
spraying result, increased vibrations and greater wear or even damage to the power tool.
Maintenance and Care
WARNING: Remove the battery before carrying out any work on the S-100C.
Cleaning
• Clean the S-100C and grille in front of the vent slots regularly. Frequency of cleaning is depen-
dent on the material and duration of use.
• Regularly blow out the housing interior and motor with dry compressed air.
DISPOSAL INFORMATION
WARNING! Render redundant power tools unusable: mains operated power tool by removing the
power cord, battery operated power tool by removing the battery.
EU countries only
Do not throw electric power tools into the household waste!
In accordance with the European Directive 1812/19/EU on Waste Electrical and Electronic Equipment
and transposition into national law used electric power tools must be collected separately and recy-
cled in an environmentally friendly manner.
Device, accessories and packaging should be recycled in an environmentally friendly manner. Plastic
parts are identied for recycling according to material type.
WARNING!
Do not throw batteries into the household waste, re or water. Do not open used batteries.
EU countries only:
In accordance with Directive 1806/66/EC defective or used batteries must be recycled.
NOTE: Contact your dealer about disposal options!

15
WARRANTY
1 year internal parts only, not wearable parts. Warranty starts from the date of sale to the end user.
End user or distributor sends the unit back to Tornador®at the end user/distributor’s expense. Include
the bill of sale to help with determining the 1 year as well as contact name, phone number and return
address. ALSO INCLUDE A BRIEF DESCRIPTION OF WHAT IS WRONG WITH THE UNIT.
If covered under warranty, it will be xed and returned freight prepaid.
If it is not covered under warranty, Tornador®will contact the end user/distributor with an estimate of
the repair cost. The end user/distributor is responsible for paying the repair charges if they authorize
the unit to be repaired. The unit will also be shipped back at the end user/distributors expense.
Please note that any prior attempt at a repair by the end user or unauthorized repair facility will void
the warranty.
Send to: Tornador®
Attn: Vehicle Care Repair Team
11210 Katherine’s Crossing
Suite 100
Woodridge, IL 60517

Phone: 1-972-380-2906
Toll Free: 1-844-472-0062
Fax: 1-972-248-8542
E-Mail: info@tornador.us
For Product Info: www.tornador.us
For Ordering Info: www.tornadortools.com
For Repair Info: www.tornador-repairs.com
Tornador®covered by one or more of the following: U.S. Patent Nos. 6,883,732; 8,480,011; 8,690,077;
9,475,071; 10,189,034; 10,182,696 and U.S. Patent Application Nos. 20150000705; 20150375272; and
Taiwan Application No. 103135808.
Tornador®is a registered trademark of ECP Incorporated ©2021
Thank you for the purchase of your new Tornador®S-100C Cordless HVLP
Spray Gun. We are very happy to welcome you into the Tornador®family!
Thank you for your support!
The S-100C uses High-Volume, Low-Pressure (HVLP) technology to evenly
disperse the ow of any liquid with less risk of overspray. The S-100C is de-
signed for the professional detailer and home enthusiast looking to disinfect,
sanitize, deodorize, and/or clean any vehicle, without having to worry about
cords. The S-100C can also handle viscous products like water-based dress-
ings to make applying dressings easy no matter on the interior or exterior sur-
faces. Do detail work in less time with the 3 selectable spray patterns: vertical,
round, and horizontal. The S-100C is ready to handle whatever the job entails!
Serving the automotive industry since 1969
Innovations in chemistry since 1935
Another fine brand by
TM
CORDLESS HVLP SPRAY GUN
S-100C
Table of contents
Other Tornador Paint Sprayer manuals


