Toro 74560 User manual

FormNo.3377-264RevA
DH140LawnTractor
ModelNo.74560—SerialNo.313000001andUp
G012435
Registeratwww.Toro.com.
OriginalInstructions(EN)*3377-264*A

Introduction
Thisrotary-blade,ridinglawnmowerisintendedtobeused
byresidentialhomeowners.Itisdesignedprimarilyforcutting
grassonwell-maintainedlawnsonresidentialproperties.Itis
notdesignedforcuttingbrushorforagriculturaluses.
Readthisinformationcarefullytolearnhowtooperateand
maintainyourproductproperlyandtoavoidinjuryand
productdamage.Youareresponsibleforoperatingthe
productproperlyandsafely.
YoumaycontactTorodirectlyatwww .Toro.comforproduct
andaccessoryinformation,helpndingadealer,ortoregister
yourproduct.
Wheneveryouneedservice,genuineToroparts,oradditional
information,contactanAuthorizedServiceDealerorToro
CustomerServiceandhavethemodelandserialnumbersof
yourproductready.Figure1identiesthelocationofthe
modelandserialnumbersontheproduct.Writethenumbers
inthespaceprovided.
G012436
1
Figure1
1.Modelandserialnumberlocation(undertheseat)
ModelNo.
SerialNo.
Thismanualidentiespotentialhazardsandhassafety
messagesidentiedbythesafetyalertsymbol(Figure2),
whichsignalsahazardthatmaycauseseriousinjuryordeath
ifyoudonotfollowtherecommendedprecautions.
Figure2
1.Safetyalertsymbol
Thismanualuses2otherwordstohighlightinformation.
Importantcallsattentiontospecialmechanicalinformation
andNoteemphasizesgeneralinformationworthyofspecial
attention.
ThisproductcomplieswithallrelevantEuropeandirectives.
Fordetails,seetheseparateproductspecicDeclarationof
Conformity(DOC)sheet.
©2012—TheToro®Company
8111LyndaleAvenueSouth
Bloomington,MN554202
Contactusatwww.Toro.com.
PrintedintheCzechRepublic
AllRightsReserved

Contents
Introduction..................................................................2
Safety...........................................................................4
SafeOperationPracticesforRidingRotaryLawn
Mowers..............................................................4
ToroRidingMowerSafety........................................5
SoundPressure.......................................................6
SoundPower..........................................................6
Hand-ArmVibration...............................................6
WholeBodyVibration.............................................6
SlopeIndicator.......................................................7
SafetyandInstructionalDecals.................................8
ProductOverview..........................................................9
Controls................................................................9
Specications.........................................................9
Operation....................................................................10
AddingFuel...........................................................10
UsingStabilizer/Conditioner...................................10
FillingtheFuelTank...............................................10
CheckingtheEngineOilLevel.................................10
UsingtheParkingBrake..........................................10
PositioningtheSeat................................................11
UsingtheBladeControl(PTO)................................11
SettingtheHeightofCut.........................................11
StartingtheEngine.................................................12
StoppingtheEngine...............................................13
UsingtheSafetyInterlockSystem.............................13
TestingtheSafetyInterlockSystem...........................14
PushingtheMachineManually.................................14
DrivingtheMachineForwardorBackward.................15
StoppingtheMachine.............................................15
EmptyingtheGrassCollector..................................16
MulchingtheGrass.................................................16
OptionalTowingHitch...........................................17
OperatingTips......................................................17
Maintenance.................................................................18
RecommendedMaintenanceSchedule(s)......................18
Lubrication...............................................................18
GreasingandLubricatingtheMachine.......................18
HowtoGreasetheMachine.....................................18
WheretoAddGrease.............................................20
EngineMaintenance..................................................20
ServicingtheAirCleaner.........................................20
ServicingtheEngineOil..........................................21
ServicingtheSparkPlug..........................................23
FuelSystemMaintenance...........................................24
DrainingtheFuelTank...........................................24
ReplacingtheFuelFilter..........................................24
ElectricalSystemMaintenance....................................25
ReplacingtheFuses................................................25
ServicingtheBattery...............................................25
DriveSystemMaintenance.........................................27
CheckingtheTirePressure......................................27
ServicingtheBrake.................................................27
ServicingtheGrassCollector.......................................28
RemovingtheGrassCollector..................................28
InstallingtheGrassCollector...................................28
CleaningtheGrassCollectorandTunnel....................28
MowerDeckMaintenance...........................................29
ServicingtheBlades................................................29
RemovingtheMower..............................................29
InstallingtheMower...............................................30
AdjustingtheFront-to-RearBladeSlope....................30
LevelingtheMowerfromSide-to-Side.......................31
CheckingandSettingtheCuttingHeight....................31
InstallingtheAdjustableLinks..................................32
Storage........................................................................33
Troubleshooting...........................................................35
Schematics...................................................................37
3

Safety
SafeOperationPracticesfor
RidingRotaryLawnMowers
Readandunderstandthecontentsofthismanualbefore
operatingthemachine.
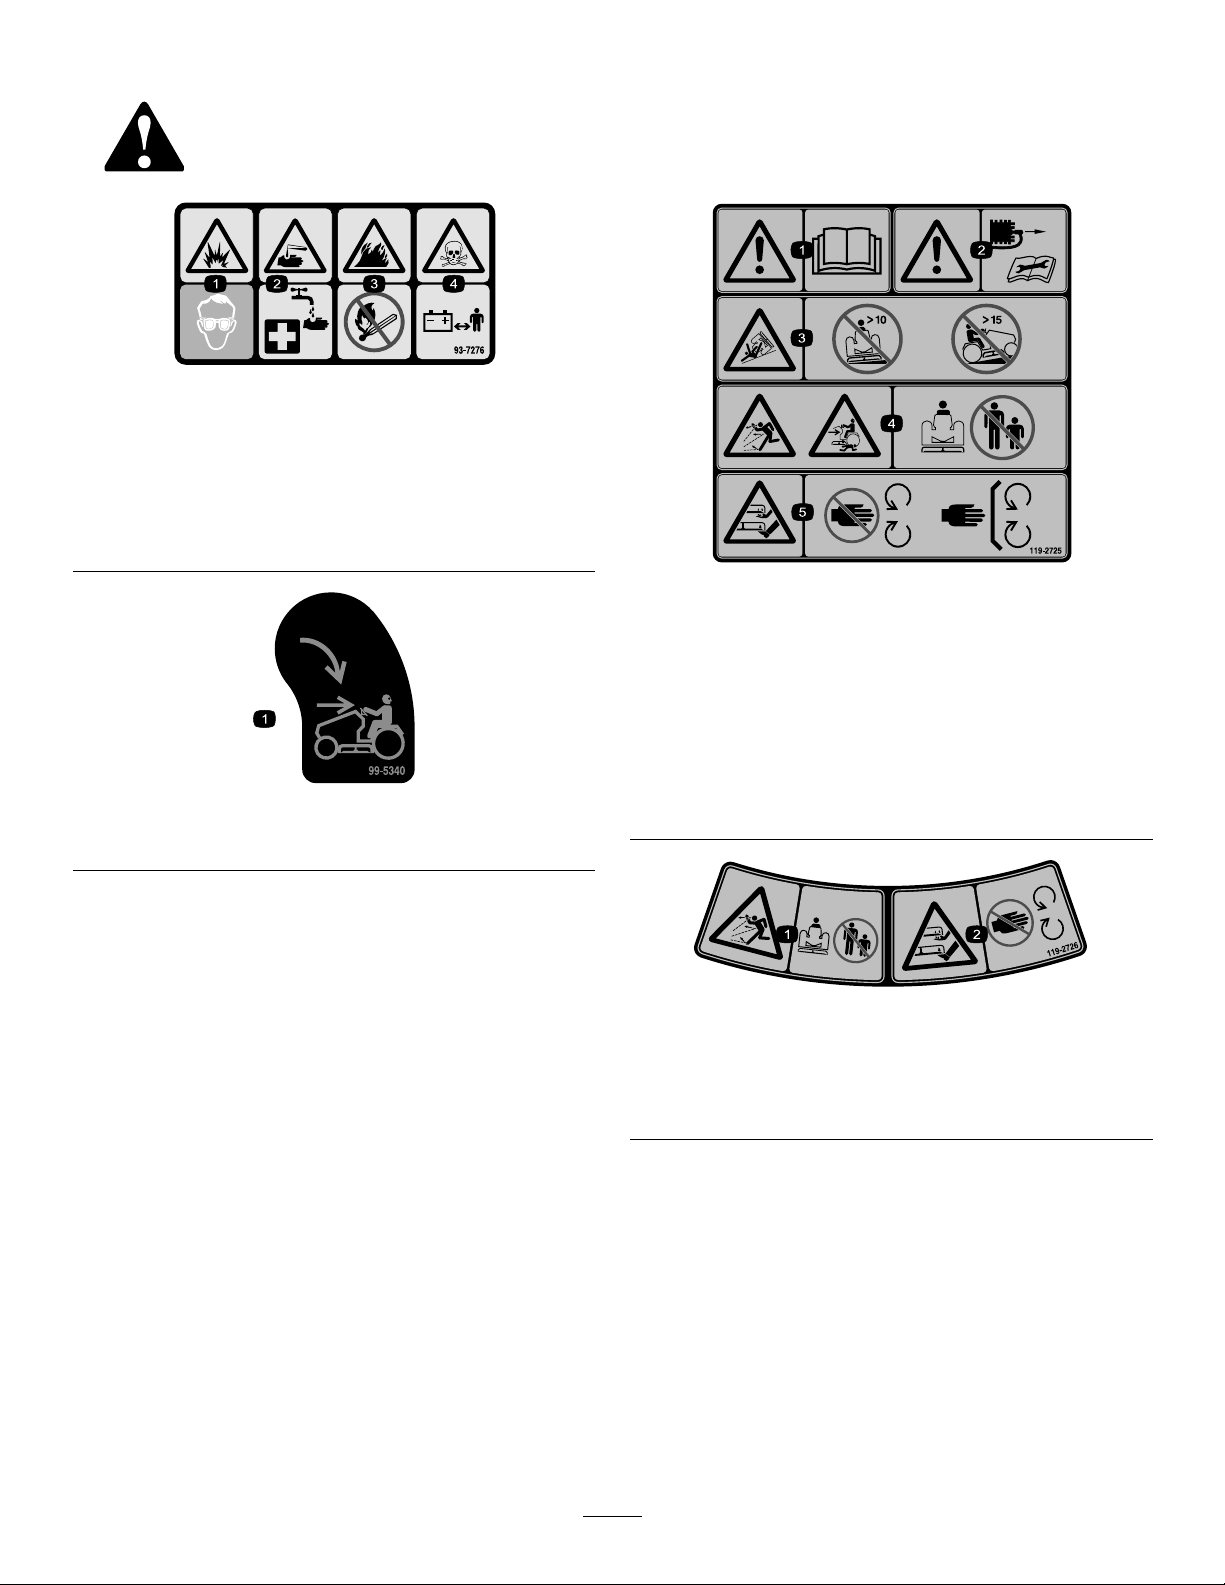
Thesafetyalertsymbol(Figure2)isusedtoalertyouto
potentialpersonalinjuryhazards.Obeyallsafetymessages
thatfollowthissymboltoavoidpossibleinjuryordeath.
ThefollowinginstructionsarefromtheCENstandardEN
836:1997.
Thisproductiscapableofamputatinghandsandfeetand
ofthrowingobjects.Alwaysfollowallsafetyinstructionsto
avoidseriousinjuryordeath.
Training
•Readtheinstructionscarefully.Befamiliarwiththe
controlsandtheproperuseoftheequipment.
•Neverallowchildrenorpeopleunfamiliarwiththese
instructionstousethelawnmower.Localregulationscan
restricttheageoftheoperator.
•Nevermowwhilepeople,especiallychildren,orpetsare
nearby.
•Keepinmindthattheoperatororuserisresponsiblefor
accidentsorhazardsoccurringtootherpeopleortheir
property.
•Donotcarrypassengers.
•Alldriversshouldseekandobtainprofessionaland
practicalinstruction.Suchinstructionshouldemphasize:
–theneedforcareandconcentrationwhenworking
withride-onmachines;
–controlofaride-onmachineslidingonaslopewill
notberegainedbytheapplicationofthebrake.The
mainreasonsforlossofcontrolare:
◊insufcientwheelgrip;
◊beingdriventoofast;
◊inadequatebraking;
◊thetypeofmachineisunsuitableforitstask;
◊lackofawarenessoftheeffectofground
conditions,especiallyslopes;
◊incorrecthitchingandloaddistribution.
Preparation
•Whilemowing,alwayswearsubstantialfootwearandlong
trousers.Donotoperatetheequipmentwhenbarefoot
orwearingopensandals.
•Thoroughlyinspecttheareawheretheequipmentisto
beusedandremoveallobjectswhichmaybethrownby
themachine.
•Warning—Fuelishighlyammable.
–Storefuelincontainersspecicallydesignedforthis
purpose.
–Refueloutdoorsonlyanddonotsmokewhile
refuelling.
–Addfuelbeforestartingtheengine.Neverremove
thecapofthefueltankoraddfuelwhiletheengineis
runningorwhentheengineishot.
–Iffuelisspilled,donotattempttostarttheengine
butmovethemachineawayfromtheareaofspillage
andavoidcreatinganysourceofignitionuntilfuel
vaporshavedissipated.
–Replaceallfueltanksandcontainercapssecurely.
•Replacefaultysilencers.
•Beforeusing,alwaysvisuallyinspecttoseethattheblades,
bladeboltsandcutterassemblyarenotwornordamaged.
Replacewornordamagedbladesandboltsinsetsto
preservebalance.
•Onmulti-bladedmachines,takecareasrotatingoneblade
cancauseotherbladestorotate.
Operation
•Donotoperatetheengineinaconnedspacewhere
dangerouscarbonmonoxidefumescancollect.
•Mowonlyindaylightoringoodarticiallight.
•Beforeattemptingtostarttheengine,disengageallblade
attachmentclutchesandshiftintoneutral.
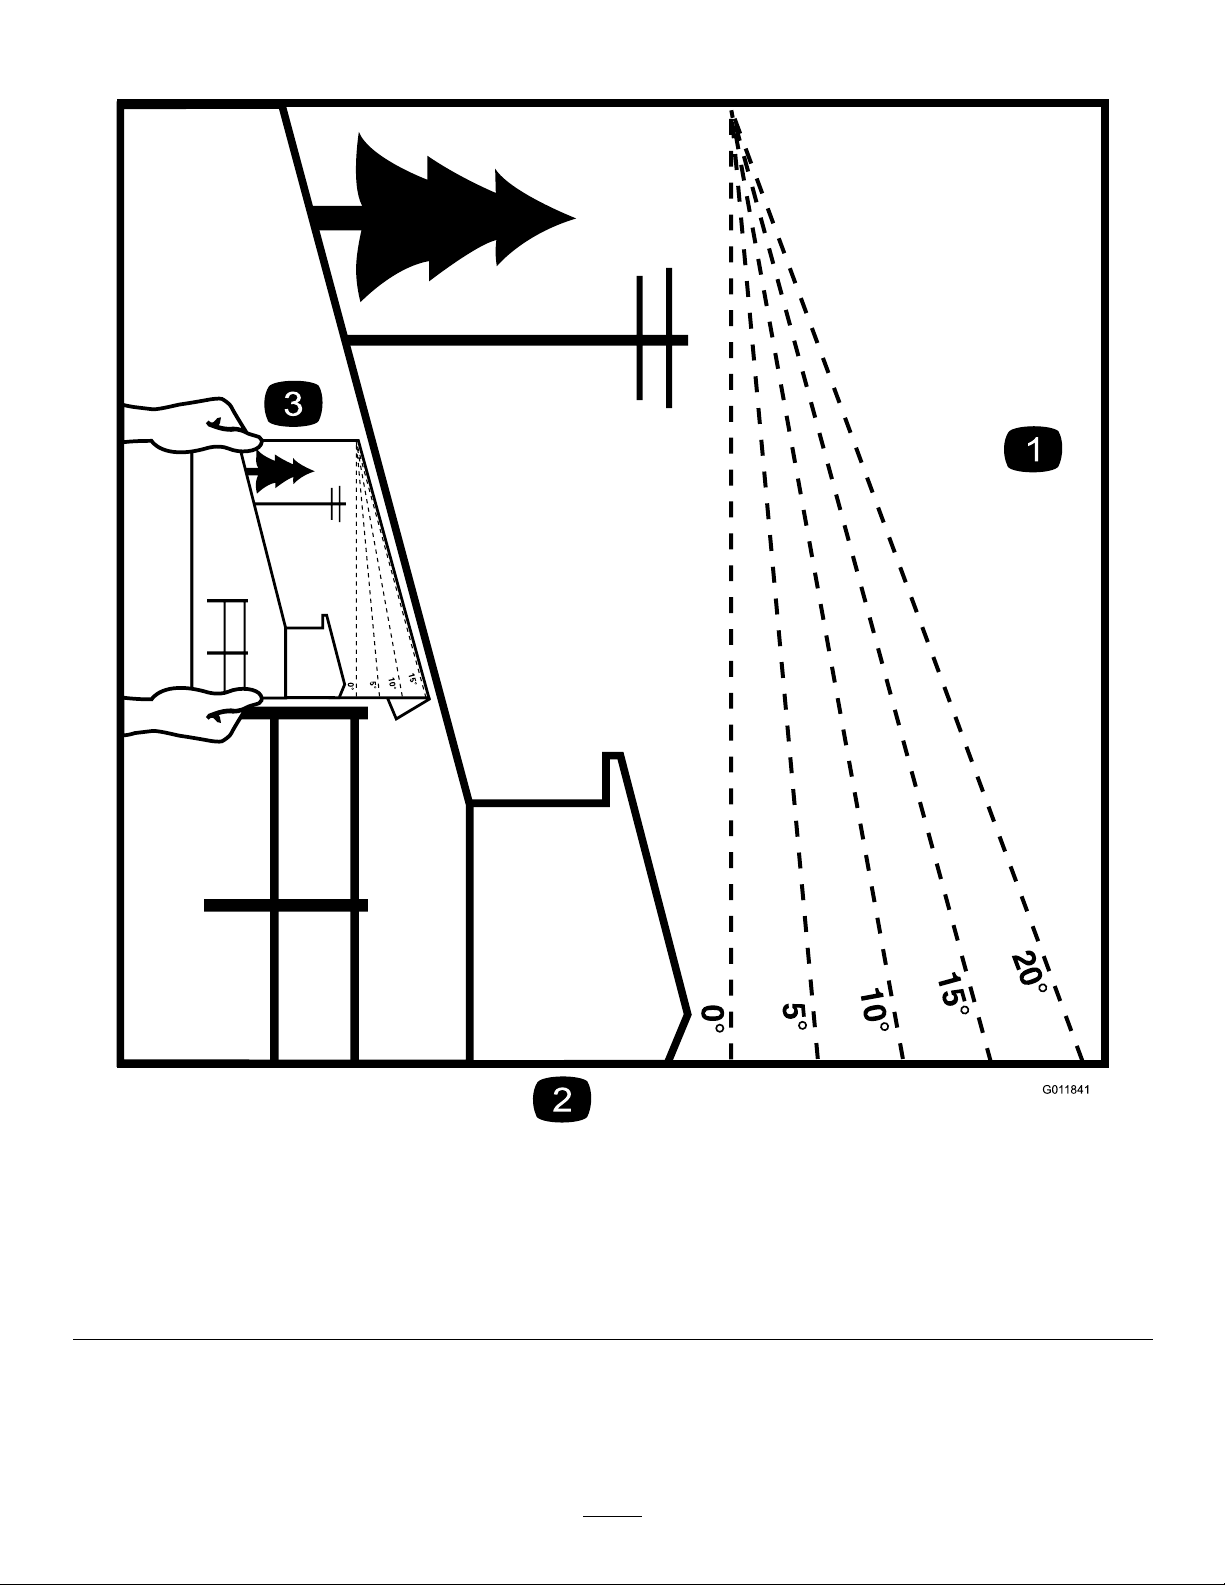
•Donotuseonslopesofmorethan
–10°whenmowingonsidehills;
–15°whenmowinguphillordownhill.
•Rememberthereisnosuchthingasasafeslope.Travel
ongrassslopesrequiresparticularcare.Toguardagainst
overturning:
–donotstoporstartsuddenlywhengoingupor
downhill;
–machinespeedsshouldbekeptlowonslopesand
duringtightturns;
–stayalertforhumpsandhollowsandotherhidden
hazards;
–nevermowacrossthefaceoftheslope,unlessthe
lawnmowerisdesignedforthispurpose.
•Usecarewhenpullingloadsorusingheavyequipment.
–Useonlyapproveddrawbarhitchpoints.
–Limitloadstothoseyoucansafelycontrol.
–Donotturnsharply.Usecarewhenreversing.
–Usecounterweight(s)orwheelweightswhen
suggestedintheinstructionhandbook.
•Lightningcancausesevereinjuryordeath.Ifyousee
lightningorhearthunderinthearea,donotoperatethe
machine;seekshelter.
•Watchoutfortrafcwhencrossingornearroadways.
•Stopthebladesrotatingbeforecrossingsurfacesother
thangrass.
4

•Whenusinganyattachments,neverdirectdischargeof
materialtowardbystandersnorallowanyonenearthe
machinewhileinoperation.
•Neveroperatethemachinewithdamagedguardsor
withoutsafetyprotectivedevicesinplace.
•Donotchangetheenginegovernorsettingsoroverspeed
theengine.Operatingtheengineatexcessivespeedcan
increasethehazardofpersonalinjury.
•Beforeleavingtheoperator’sposition:
–disengagethepowertake-offandlowerthe
attachments;
–changeintoneutralandsettheparkingbrake;
–stoptheengineandremovethekey.
•Disengagedrivetoattachments,stoptheengine,and
disconnectthesparkplugwire(s)orremovetheignition
key
–beforeclearingblockagesoruncloggingchute;
–beforechecking,cleaningorworkingonthelawn
mower;
–afterstrikingaforeignobject.Inspectthelawn
mowerfordamageandmakerepairsbeforerestarting
andoperatingtheequipment;
–ifthemachinestartstovibrateabnormally(check
immediately).
•Disengagedrivetoattachmentswhentransportingornot
inuse.
•Stoptheengineanddisengagedrivetoattachment
–beforerefuelling;
–beforeremovingthegrasscatcher;
–beforemakingheightadjustmentunlessadjustment
canbemadefromtheoperator’sposition.
MaintenanceandStorage
•Keepallnuts,boltsandscrewstighttobesurethe
equipmentisinsafeworkingcondition.
•Neverstoretheequipmentwithfuelinthetankinsidea
buildingwherefumescanreachanopenameorspark.
•Allowtheenginetocoolbeforestoringinanyenclosure.
•Toreducetherehazard,keeptheengine,silencer,
batterycompartmentandfuelstorageareafreeofgrass,
leaves,orexcessivegrease.
•Checkthegrasscatcherfrequentlyforwearor
deterioration.
•Replacewornordamagedpartsforsafety.
•Ifthefueltankhastobedrained,thisshouldbedone
outdoors.
•Onmulti-bladedmachines,takecareasrotatingoneblade
cancauseotherbladestorotate.
•Whenmachineistobeparked,storedorleftunattended,
lowerthecuttingmeansunlessapositivemechanicallock
isused.
ToroRidingMowerSafety
Thefollowingparagraphcontainssafetyinformationspecic
toToroproductsthatisnotincludedintheCENstandard.
UseonlyToro-approvedattachments.Thewarrantymaybe
voidedifyouusethemachinewithunapprovedattachments.
5

SoundPressure
Thisunithasasoundpressurelevelattheoperator’searof
85.8dBA,whichincludesanUncertaintyValue(K)of0.8
dBA.Thesoundpressurelevelwasdeterminedaccordingto
theproceduresoutlinedinEN836.
SoundPower
Thisunithasaguaranteedsoundpowerlevelof99.1
dBA,whichincludesanUncertaintyValue(K)of0.4dBA.
Thesoundpowerlevelwasdeterminedaccordingtothe
proceduresoutlinedinISO11094.
Hand-ArmVibration
Measuredvibrationlevelforlefthand=2.7m/s2
Measuredvibrationlevelforrighthand=3.5m/s2
UncertaintyValue(K)=1.2m/s2
Measuredvaluesweredeterminedaccordingtotheprocedures
outlinedinEN836.
WholeBodyVibration
Measuredvibrationlevel=1.6m/s2
UncertaintyValue(K)=0.44m/s2
Measuredvaluesweredeterminedaccordingtotheprocedures
outlinedinEN836.
6

SlopeIndicator
G01 1841
Figure3
Thispagemaybecopiedforpersonaluse.
1.Themaximumslopeyoucansafelyoperatethemachineonis10degreeswhenmowingonsidehillsand15degreeswhen
mowinguphillordownhill.Usetheslopecharttodeterminethedegreeofslopeofhillsbeforeoperating.Donotoperatethis
machineonaslopegreaterthan15degrees.Foldalongtheappropriatelinetomatchtherecommendedslope.
2.Alignthisedgewithaverticalsurface,atree,building,fencepole,etc.
3.Exampleofhowtocompareslopewithfoldededge.
7

SafetyandInstructionalDecals
Safetydecalsandinstructionsareeasilyvisibletotheoperatorandarelocatednearanyareaofpotential
danger.Replaceanydecalthatisdamagedorlost.
93-7276
1.Explosionhazard—weareyeprotection.
2.Causticliquid/chemicalburnhazard—toperformrstaid,
ushwithwater.
3.Firehazard—nore,openames,orsmoking.
4.Poisonhazard—keepchildrenasafedistancefromthe
battery.
99-5340
1.KeyChoice—turntoenablereversemowing.
119-2725
1.Warning—readtheOperator'sManual.
2.Warning—removethesparkplugwirebeforeperforming
anymaintenanceonthemachine.
3.Tippinghazard—donotoperateonslopesgreaterthan10
degrees.
4.Thrownobjecthazard;crushinghazard,bystanders—keep
bystandersasafedistancefromthemachine.
5.Cuttinghazardofhandorfoot—stayawaymovingparts,
keepallguardsandshieldsinplace.
119-2726
1.Thrownobjecthazard—keepbystandersasafedistance
fromthemachine.
2.Cuttinghazardofhandorfoot—stayawaymovingparts,
keepallguardsandshieldsinplace.
8

ProductOverview
Controls
Becomefamiliarwiththecontrols(Figure4andFigure5)
beforeyoustarttheengineandoperatethemachine.
G012437
1
23
Figure4
1.Height-of-cutlever3.Dashboardcontrols
2.Grasscollectordumplever
G012474
1
23
4
5
6
7
8
Figure5
1.Operating-in-reverse
indicatorlight
5.Brakepedal
2.Bladecontrol(PTO)knob6.Parkingbrake
3.Ignitionswitch7.Forwardspeedpedal
4.Throttlecontrollever8.Reversespeedpedal
Specications
ModelWeightLengthWidthHeight
74560262kg232cm95cm104cm
9

Operation
Note:Determinetheleftandrightsidesofthemachine
fromthenormaloperatingposition.
AddingFuel
Useunleadedregulargasolinesuitableforautomotiveuse
(95pumpoctaneminimum).Youmayuseleaded,regular
gasolineifunleadedgasolineisnotavailable.
Important:Neverusemethanol,gasolinecontaining
methanol,orgasoholcontainingmorethan10%ethanol
becausethefuelsystemcouldbedamaged.Donotmix
oilwithgasoline.
DANGER
Incertainconditions,gasolineisextremely
ammableandhighlyexplosive.Areorexplosion
fromgasolinecanburnyouandothersandcan
damageproperty.
•Fillthefueltankoutdoors,inanopenarea,
whentheengineiscold.Wipeupanygasoline
thatspills.
•Donotllthefueltankcompletelyfull.Add
gasolinetothefueltankuntilthelevelis1/4to
1/2inch(6to13mm)belowthebottomofthe
llerneck.Thisemptyspaceinthetankallows
gasolinetoexpand.
•Neversmokewhenhandlinggasoline,andstay
awayfromanopenameorwheregasoline
fumesmaybeignitedbyaspark.
•Storegasolineinanapprovedcontainerand
keepitoutofthereachofchildren.Neverbuy
morethana30-daysupplyofgasoline.
•Alwaysplacegasolinecontainersontheground
awayfromyourvehiclebeforelling.
•Donotllgasolinecontainersinsideavehicleor
onatruckortrailerbedbecauseinteriorcarpets
orplastictruckbedlinersmayinsulatethe
containerandslowthelossofanystaticcharge.
•Whenpractical,removegas-poweredequipment
fromthetruckortrailerandrefueltheequipment
withitswheelsontheground.
•Ifthisisnotpossible,refuelsuchequipmenton
atruckortrailerfromaportablecontainer,not
fromagasolinedispensernozzle.
•Ifyoumustuseagasolinedispenser,keepthe
nozzleincontactwiththerimofthefueltank
orcontaineropeningatalltimesuntilfuelingis
complete.
UsingStabilizer/Conditioner
Useafuelstabilizer/conditionerinthetractionunitto
providethefollowingbenets:
•Itkeepsgasolinefreshduringstorageof90daysorless.
Forlongerstorageitisrecommendedthatthefueltank
bedrained.
•Itcleanstheenginewhileitruns
•Iteliminatesgum-likevarnishbuildupinthefuelsystem,
whichcauseshardstarting
Important:Donotusefueladditivescontaining
methanolorethanol.
Addthecorrectamountofgasstabilizer/conditionertothe
gasoline.
Note:Afuelstabilizer/conditionerismosteffectivewhen
mixedwithfreshgasoline.Tominimizethechanceofvarnish
depositsinthefuelsystem,useafuelstabilizer/conditioner
atalltimes.
FillingtheFuelTank
1.Stoptheengineandwaitforallmovingpartstostop.
2.Cleanaroundthefueltankcapandremoveit.
3.Addunleadedregulargasolinetothefueltankuntil
thelevelis1/4to1/2inch(6to13mm)belowthe
bottomofthellerneck.Donotllthefueltank
completelyfull.
Note:Thisspaceinthetankallowsgasolineto
expand.
4.Installthefueltankcapsecurely.
5.Wipeupanygasolinethatmayhavespilled.
CheckingtheEngineOilLevel
Beforeyoustarttheengineandusethemachine,checktheoil
levelintheenginecrankcase;refertoCheckingtheEngineOil
LevelinServicingtheEngineOilintheMaintenancesection.
UsingtheParkingBrake
Alwayssettheparkingbrakewheneveryoustopthemachine
orleaveitunattended.
SettingtheParkingBrake
1.Pushthebrakepedal(Figure5)downandholdit.
2.Settheparkingbrake.
•Formachineswithaparkingbrakehandle:Turn
theparkingbrakehandle(Figure6)clockwiseand
graduallytakeyourfootoffthebrakepedal.
10

G015674
1
Figure6
1.Parkingbrakehandle
•Formachineswithaparkingbrakeswitch:Slidethe
parkingbrakeswitchover(Figure7)andgradually
takeyourfootoffthebrakepedal.
G015675
1
Figure7
1.Parkingbrakeswitch
Note:Theclutch/brakepedalshouldstayinthe
depressed(locked)position.
ReleasingtheParkingBrake
1.Pushdownonthebrakepedal(Figure5).
Note:Theparkingbrakelevershouldrelease.
2.Graduallyreleasethebrakepedal.
PositioningtheSeat
Theseatcanmoveforwardandbackward.Positiontheseat
whereyouhavethebestcontrolofthemachineandaremost
comfortable.
1.Raisetheseatandloosentheadjustmentknobs
(Figure8).
Figure8
1.Adjustmentknobs
2.Movetheseattothedesiredpositionandtightenthe
knobs.
UsingtheBladeControl(PTO)
Thebladecontrol(PTO)knobengagesanddisengagespower
totheblades.
EngagingtheBlades
1.Depressthebrakepedaltostopthemachine.
2.Pullthebladecontrol(PTO)knobouttotheEngaged
position(Figure5).
DisengagingtheBlades
1.Depressthebrakepedaltostopthemachine.
2.Pushthebladecontrol(PTO)knobintothe
Disengagedposition(Figure5).
SettingtheHeightofCut
Usetheheight-of-cutlevertoraiseandlowerthemowerto
thedesiredcuttingheight.Youcansetthecuttingheightto7
differentpositionsfromapproximately30to80mm(1-1/4
to3-1/8inches).
Important:Youmustsettheheight-of-cutlevertothe
highestposition(7)whenyoutransportthemachineoff
thelawntopreventdamagingtheblades.
1.Pushandholdinthebuttonontheheight-of-cutlever
(Figure9).
11

G012441
1
Figure9
1.Height-of-cutlever
2.Shifttheheight-of-cutlevertothedesiredposition.
3.Releasethebutton.
StartingtheEngine
1.Openthefuelshut-offvalvelocatedbetweenthefuel
tankandtheengine(Figure10).
Figure10
1.Fuelshut-offvalve
Note:Thevalvehandleshouldalignwiththefuel
hose.
2.Sitdownontheseat.
3.Settheparkingbrake;refertoUsingtheParkingBrake.
4.Disengagetheblades(PTO);refertoFigure5.
Note:Theenginewillnotstartiftheblades(PTO)
areengaged.
5.Whenstartingacoldengine,shiftthethrottlecontrol
levertotheChoke(allthewayup)position(Figure11).
G015676
1
Figure11
1.Throttlecontrollever
Note:Tostartawarmengine,shiftthethrottle
controllevertotheFast(rabbit)position.
6.ShiftthethrottlecontrollevertotheSlow(turtle)
position(Figure11).
7.TurntheignitionkeyclockwiseandholditintheStart
position(Figure12).
Note:Whentheenginestarts,releasethekey.
G012447
1
2
3
4
Figure12
1.Ignitionkey3.On
2.Start4.Off
Important:Iftheenginedoesnotstartafter15
secondsofcontinuouscranking,turntheignition
keytoOffandletthestartermotorcoolfor2
minutes;refertoTroubleshooting.
8.Aftertheenginestarts,slowlyshiftthethrottlecontrol
levertotheFast(rabbit)position.
12

StoppingtheEngine
1.MovethethrottlecontrollevertotheSlow(turtle)
position(Figure11).
Note:Iftheenginebackres,shiftthethrottlecontrol
levertotheFast(rabbit)positionbeforestoppingthe
engine.
2.TurntheignitionkeytotheOffposition(Figure12).
Note:Iftheenginehasbeenworkinghardorishot,
letitidleforaminutebeforeturningtheignitionkeyto
theOffposition.Thisallowstheenginetocoolbefore
youstopit.Youmaystoptheengineinanemergency
byturningtheignitionkeytotheOffposition.
UsingtheSafetyInterlock
System
ServiceInterval:Beforeeachuseordaily
CAUTION
Ifthesafetyinterlockswitchesaredisconnectedor
damaged,themachinecouldoperateunexpectedly,
causingpersonalinjury.
•Donottamperwiththeinterlockswitches.
•Checktheoperationoftheinterlockswitches
dailyandreplaceanydamagedswitchesbefore
operatingthemachine.
•Replaceswitchesevery2yearsregardlessof
whethertheyareoperatingproperlyornot.
UnderstandingtheSafetyInterlock
System
Thesafetyinterlocksystemisdesignedtopreventtheengine
fromstartingunless:
•Youaresittingontheseat.
•Thebrakepedalisdepressed.
•Thebladecontrol(PTO)knobisintheDisengaged
position.
•ThetractioncontrolpedalisinNeutral.
Thesafetyinterlocksystemstopstheengineifyourisefrom
theseatandthetractioncontrolpedalisnotintheNeutral
position,theparkingbrakeisnotset,orthebladecontrol
(PTO)knobisintheEngagedposition.
Thesafetyinterlocksystemisdesignedtostopthemowerif:
•YoushiftintoReversewiththeblades(PTO)engaged.
•Youremovethebagordumpthegrass.
SettingtheKeyChoice®Switchto
OperateinReverse
Theinterlockfeatureonthemachinepreventsthepower
take-off(PTO)fromoperatingwhenyoubackupthe
machine.Ifyouoperatethemachineinreversewiththe
blades(PTO)engaged(i.e.,withthemowerbladesorother
attachmentrunning),theenginewillstop.Donotmowin
reverseunlessitisabsolutelynecessary.
Ifyouneedtousetheblades(PTO)whilebackingup,turn
offtheinterlockfeatureusingtheKeyChoiceswitchlocated
neartheseatbracket(Figure13).
13

Figure13
1.KeyChoiceswitch
DANGER
Youcouldbackoverachildorbystanderwhilethe
mowerbladesorotherattachmentisengagedand
causeseriousinjuryordeath.
•Donotmowinreverseunlessitisabsolutely
necessary.
•DonotinserttheKeyChoicekeyunlessitis
absolutelynecessary.
•Alwayslookbackwardanddownbeforebacking
upthemachine.
•UsetheKeyChoiceswitchonlyifyouarecertain
thatnochildrenorotherbystanderswillenter
themowingarea.
•Beveryobservantafterdeactivatingtheinterlock
becausethesoundoftheenginemayprevent
youfromnoticingthatachildorbystanderhas
enteredtheworkarea.
•AlwaysremoveboththeignitionandKeyChoice
keysandputtheminasafeplaceoutofthe
reachofchildrenorunauthorizeduserswhen
youleavethemachineunattended.
1.Engagetheblades(PTO).
2.InserttheKeyChoicekeyintotheswitch(Figure13).
3.TurntheKeyChoicekey.
Aredlightonthefrontconsole(Figure5)turnson,
indicatingthattheinterlockisdisabled.
4.Operatethemachineinreverseandcompleteyourtask.
5.Disengagetheblades(PTO)toactivatetheinterlock.
6.RemovetheKeyChoicekeyandputitinasafeplace
outofthereachofchildren.
TestingtheSafetyInterlock
System
CAUTION
Ifthesafetyinterlockswitchesaredisconnectedor
damaged,themachinecouldoperateunexpectedly,
causingpersonalinjury.
•Donottamperwiththeinterlockswitches.
•Checktheoperationoftheinterlockswitches
dailyandreplaceanydamagedswitchesbefore
operatingthemachine.
Testthesafetyinterlocksystembeforeyouusethemachine
eachtime.Ifthesafetyinterlocksystemdoesnotoperateas
describedbelow,haveanAuthorizedServiceDealerrepairthe
safetyinterlocksystemimmediately.Whilesittingintheseat,
performthefollowingchecks:
1.Settheparkingbrake,shiftthebladecontrol(PTO)
knobtotheEngageposition,andturntheignitionkey
toStart:Theengineshouldnotcrank.
2.Shiftthebladecontrol(PTO)knobtotheDisengage
position,releasetheparkingbrake,andturntheignition
keytoStart:Theengineshouldnotcrank.
3.Settheparkingbrake,shiftthebladecontrol(PTO)
knobtoDisengage,andstarttheengine.Whilethe
engineisrunning,releasetheparkingbrakeandrise
slightlyfromtheseat:Theengineshouldstop.
4.Shiftthebladecontrol(PTO)knobintotheDisengage
position,putthetractioncontrolpedalinNeutral,and
starttheengine.Whiletheengineisrunning,shiftthe
bladecontrol(PTO)knobintotheEngageposition
andputthetractioncontrolpedalinReverse:The
engineshouldstop.
5.Shiftthebladecontrol(PTO)knobintotheDisengage
positionandputthetractioncontrolpedalinNeutral.
Starttheengine,shiftthebladecontrol(PTO)knob
intotheEngageposition,andturntheKeyChoicekey
andreleaseit:Theoperating-in-reversewarninglight
shouldilluminate.
6.Shiftthebladecontrol(PTO)knobtotheDisengage
position:Theoperating-in-reversewarninglightshould
turnoff.
PushingtheMachineManually
Important:Alwayspushthemachinemanually.Never
towthemachinebecauseitmaydamagethetransaxle.
ToPushtheMachine
1.Parkthemachineonalevelsurface.
14

2.Disengagetheblades(PTO).
3.Settheparkingbrake.
4.Stoptheengineandwaitforallmovingpartstostop.
5.Removetheignitionkey.
6.Removethegrasscollector;refertoRemovingthe
GrassCollector.
7.Pullthedrivecontrol(locatedattherearofthe
machine)outtothePushposition(Figure14).
Note:Thisdisengagesthedrivesystemandallows
thewheelstoturnfreely.
G012449
2
1
Figure14
1.Pushposition2.Operateposition
8.Releasetheparkingbrake.
ToOperatetheMachine
1.Settheparkingbrake.
2.PushthedrivecontrolintotheOperateposition
(Figure14)toengagethedrivesystem.
Note:Themachinewillnotdriveunlessthedrive
controlisintheOperateposition.
3.Installthegrasscollector;refertoInstallingtheGrass
Collector.
DrivingtheMachineForward
orBackward
Thethrottlecontrolregulatestheenginespeedasmeasured
inRPM(revolutionsperminute).Placethethrottlecontrolin
theFastpositionforbestperformance.
Togoforward:
1.Releasetheparkingbrake;refertoReleasingthe
ParkingBrake.
2.Placeyourfootonthetractioncontrolpedalandslowly
pressonthepedaltomoveforward(Figure15).
G015677
1
2
Figure15
1.Forwardcontrolpedal2.Reversespeedpedal
Note:Toincreasethespeed,pushthetractioncontrol
pedaldown.Todecreasethespeed,releasethepressure
onthetractioncontrolpedal.
Togobackward:
1.Releasetheparkingbrake;refertoReleasingthe
ParkingBrake.
2.Placeyourfootonthereversespeedpedalandslowly
pressonthepedaltomovebackward(Figure15).
Note:Toincreasethespeed,pushthereversespeed
pedaldown.Todecreasethespeed,releasethepressure
onthereversespeedpedal.
Important:Toavoidtransmissiondamage,always
releasetheparkingbrakebeforemovingthetraction
controlpedalorthereversespeedpedal.
Important:Topreventdamagetothemower,always
setthemowertothehighestcuttingpositionwhenyou
drivethemachineoffthelawn.
StoppingtheMachine
1.Releasethetractioncontrolpedalorthereversespeed
pedal.
2.Disengagetheblades(PTO).
TurntheignitionkeytotheOffposition.
3.Settheparkingbrakeifyouleavethemachine
unattended;refertoUsingtheParkingBrake.
Note:RemovethekeysfromtheignitionandKeyChoice
switches.
15

CAUTION
Childrenorbystandersmaybeinjuredifthey
moveorattempttooperatethemachinewhileitis
unattended.
AlwaysremovetheignitionandKeyChoicekeys
andsettheparkingbrakewhenleavingthemachine
unattended,evenifitisjustforafewminutes.
EmptyingtheGrassCollector
Whenthegrasscollectorisfull,abuzzersounds,andthe
grasscollectormustthenbeemptied.
Important:Topreventthedischargetunnelfrom
gettingclogged,disengagetheblades(PTO)whenthe
buzzersounds.
1.Ifthelockingpinisinthelockedposition,unlockit
(Figure16).
1
G012470
2
Figure16
1.Topsupportbar2.Lockingpin
2.Disengagetheblades(PTO)andmovethethrottleto
theSlowposition.
3.Pullthegrasscollectordumpleverforwardtotiltthe
grasscollector(Figure17).
G012451
1
2
Figure17
1.Pullthegrasscollectordumpleverforwardtoemptythe
grass.
4.Emptythegrasscollector.
5.Beforereturningthegrasscollectortotheoperating
position,movethemachineforwardtoclearthegrass
collectorofthedepositedgrass.
6.Slowlylowerthedumplevertoreturnthegrass
collectortotheoperatingposition.
MulchingtheGrass
Tomulchthegrassclippings,youmustinstallamulchplugin
themachine.
1.Disengagetheblades(PTO).
2.Settheparkingbrake.
3.Stoptheengineandwaitforallmovingpartstostop.
4.Removethegrasscollector;refertoRemovingthe
GrassCollector.
5.Insertthemulchplug(Figure18)intothedischarge
openingattherearofthemachine,andhookitintothe
holeinthedischargechute(Figure19).
Figure18
1.Mulchplug
16

Figure19
1.Mulchpluginstalledinthe
dischargechuteattherear
ofthemachine
2.Dischargechute
Important:Ensurethatthemulchplugisseated
properlysothatitwillnotcomeintocontactwith
theblades.
6.Installthegrasscollector;refertoInstallingtheGrass
Collector.
OptionalTowingHitch
Themachineiscapableoftowingnon-ground-engaging
attachmentswithamaximumweightof150kg(331lb).
1.Removethegrasscollector;refertoRemovingthe
GrassCollector.
2.Installtheattachmenttothetowinghitchlocatedatthe
lowerrearpartofthemachine(Figure20).
G012452
1
Figure20
1.Towinghitch
OperatingTips
•Forthebestperformance,operatetheengineatthe
maximumspeed.Themowerrequiresairtothoroughly
cutgrassclippings,sodonotsettheheight-of-cuttoo
loworcompletelysurroundthemowerinuncutgrass.
Alwaysleaveonesideofthemowerfreefromuncutgrass
toallowtheairtobedrawnintothemower.
•Cutthegrassslightlylongerthannormaltoensurethat
thecuttingheightofthemowerdoesnotscalpany
unevenground.Whencuttinggrasslongerthan6inches
(15cm)tall,cutthelawntwicetoensureanacceptable
appearance.
•Itisbesttocutonlyabout1/3ofthegrassbladewhen
mulching.Donotcutmorethanthatunlessthegrassis
sparseoritislatefallwhengrassgrowsmoreslowly.
•Alternatethemowingdirectiontokeepthegrassstanding
straight.Thisalsohelpsdisperseclippingsandenhances
decompositionandfertilization.
•Grassgrowsatdifferentratesatdifferenttimesofthe
season.Tomaintainthesamecuttingheight,whichis
agoodpractice,mowmoreofteninearlyspring.As
thegrassgrowthrateslowsinmidsummer,mowless
frequently.
•Ifthegrassislongerthannormal,orifitcontainsahigh
degreeofmoisture,raisethecuttingheighthigherthan
usual,cutthegrassatthatsetting,andthencutthegrass
againatthelower,normalsetting.
•Ifyoumuststopthemachinewhilemowing,youmay
leaveaclumpofgrassclippingsonyourlawn.Toavoid
this,dothefollowing:
–Engagethebladesandmovetoapreviouslycutarea.
–Dispersetheclippingsevenlybyraisingthemower1
or2height-of-cutsettingswhiledrivingforwardwith
thebladesengaged.
•Maintainsharpbladesthroughouttheseason.Sharp
bladescutgrasscleanlywithouttearingorshreddingthe
grassblades.Tearingandshreddingthegrassturnsit
brownattheedges,whichslowsitsgrowthandincreases
thechanceofdisease.Every30days,checkthebladesfor
sharpnessandledownanynicks.
17

Maintenance
Note:Determinetheleftandrightsidesofthemachinefromthenormaloperatingposition.
RecommendedMaintenanceSchedule(s)
MaintenanceService
IntervalMaintenanceProcedure
Aftertherst5hours•Changetheengineoil.
Beforeeachuseordaily
•Checkthesafetyinterlocksystem.
•Checktheengineoillevel.
•Checkthebatteryelectrolytelevel.
•Checkthebrake.
•Checktheblades.
•Cleanthemowerhousing.
Every25hours
•Greaseandlubricatethemachine.(Greaseandlubricateitmorefrequentlywhen
operatingitindustyorsandyconditions.)
•Servicetheaircleanerfoamelement.(Serviceitmorefrequentlywhenoperating
themachineindustyordirtyconditions.)
•Checkthesparkplug.
•Checkthetirepressure.
•Cleantheoutsideoftheengine.
Every50hours•Changetheengineoil.(Changeitmorefrequentlywhenoperatingthemachinein
dustyordirtyconditions.)
Every100hours
•Servicetheaircleanerpaperelement.(Serviceitmorefrequentlywhenoperating
themachineindustyordirtyconditions.)
•Changetheengineoillter.(Changeitmorefrequentlywhenoperatingthemachine
industyordirtyconditions.)
•Replacethesparkplug.
•Replacethefuellter.
•Checkthefront-to-rearbladeslope.(Alsocheckitwheneveryouinstallthemower.)
Yearlyorbeforestorage
•Performallthemaintenanceprocedureslistedabove.
•Checkthebeltsforwearandcracks.
•Drainthefueltank.
•Paintchippedsurfaces.
•Chargethebatteryanddisconnectthecables.
Important:Refertoyourengineoperator’smanualforadditionalmaintenanceprocedures.
CAUTION
Ifyouleavethekeyintheignitionswitch,someonecouldaccidentlystarttheengineandseriouslyinjure
youorotherbystanders.
Removethekeyfromtheignitionanddisconnectthewirefromthesparkplugbeforeyoudoany
maintenance.Setthewireasidesothatitdoesnotaccidentallycontactthesparkplug.
Lubrication
GreasingandLubricatingthe
Machine
ServiceInterval:Every25hours/Yearly(whichevercomes
rst)—Greaseandlubricatethemachine.
(Greaseandlubricateitmorefrequently
whenoperatingitindustyorsandy
conditions.)
HowtoGreasetheMachine
Greasethemachinewithageneral-purposegrease.
1.Disengagetheblades(PTO).
2.Settheparkingbrake.
18

3.Stoptheengineandwaitforallmovingpartstostop.
4.Removetheignitionkey.
5.Cleanthegreasettingswitharag.Scrapeanypaint
offthefrontofthettings.
6.Connectagreaseguntoeachttingandpumpgrease
intoit.
7.Wipeupanyexcessgrease.
19

WheretoAddGrease
Figure21
ItemNameQuantity
(pumps)
Interval(hours)Lubricant
1Frontwheel—greasettings225Grease
2Steeringballjoints450Oil
3Steeringsectorgear150Grease
4Steeringpiniongear125Grease
5Steeringshaftbearing150Oil
6Steeringshaftbearing150Oil
7Motionlever150Grease
8Shafthubforliftingthemowerhousing150Oil
9Motionlinkballjoints450Oil
10Tractionidlerpulleybelt—greasetting150Grease
11Brakepedalshaftpivotpoints250Oil
12Parkingbrakering150Oil
13Steeringbearing125Grease
14LeftandRightSpindle—greasettings225Grease
15Mowerhousinghingedpins6WhenremovedGrease
16Frontaxlepivotpins2WhenremovedGrease
EngineMaintenance
ServicingtheAirCleaner
ServiceInterval:Every25hours—Servicetheaircleaner
foamelement.(Serviceitmorefrequently
whenoperatingthemachineindustyor
dirtyconditions.)
Every100hours—Servicetheaircleanerpaper
element.(Serviceitmorefrequentlywhenoperating
themachineindustyordirtyconditions.)
1.Parkthemachineonalevelsurface.
2.Disengagetheblades(PTO).
3.Settheparkingbrake.
4.Stoptheengineandwaitforallmovingpartstostop.
5.Removetheignitionkey.
RemovingtheFoamandPaper
Elements
1.Cleanaroundtheaircleanertopreventdirtfrom
gettingintotheengineandcausingdamage.
20
Other manuals for 74560
1
This manual suits for next models
1
Table of contents
Other Toro Lawn Mower manuals

Toro
Toro Titan MR 4800 User manual

Toro
Toro Recycler 20073 User manual

Toro
Toro 407820000 User manual

Toro
Toro GT2100 User manual

Toro
Toro 22200TE User manual

Toro
Toro 30455TS User manual

Toro
Toro e-cycler 20360 User manual

Toro
Toro 21695 User manual

Toro
Toro Recycler 20954 User manual

Toro
Toro Z Master Professional 7000 Series User manual