Toro reelmaster 216 User manual

Part No. 92783SL,Rev.B
Service Manual
Reelmaster® 216/216-D
Preface
Thispublication provides the service technician with
information for troubleshooting, testing, and repair of
major systems and components on the Reelmaster 216
and Reelmaster216-D
REFER TO THE REELMASTER216 OR216-D
OPERATOR’S MANUALFOR OPERATING, MAIN-
TENANCE AND ADJUSTMENTINSTRUCTIONS.
Space isprovided at the end of Chapter2 in thispubli-
cation to insert the Operator’s Manuals and Parts
Catalogs for your machine. Replacement Operator’s
Manuals are available bysending complete Model and
Serial Number of traction unit and cutting unit to:
The Toro Company
8111 Lyndale Avenue South
Minneapolis, MN 55420
The ToroCompanyreservestherighttochangeproduct
specifications or this publication without notice.
see
This safety symbolmeans DANGER, WARN-
ING,or CAUTION, PERSONALSAFETY IN-
STRUCTION. When you this symbol,
carefully read the instructions that follow.
Failure to obey the instructions may result in
personal injury.
NOTE: ANOTE will give general information about the
correct operation, maintenance, service, testing or
repair of the machine.
IMPORTANT: The IMPORTANT notice will give im-
portant instructions which must befollowed to
preventdamage to systems or components on the
machine.
Reelmaster 216 Reelmaster216-D
© The Toro Company - 1991, 1994, 1996

This page is blank.

Table Of Contents
Chapter 1 - Safety
Safety Instructions . . . . . . . . . . . . . . . . . . . . . . . . 1 - 1
Chapter 2 - Product Records and Manuals
Product Records. . . . . . . . . . . . . . . . . . . . . . . . . . 2 - 1
Equivalents and Conversions. . . . . . . . . . . . . . . . 2 - 2
Torque Specifications . . . . . . . . . . . . . . . . . . . . . . 2 - 3
Maintenance Interval Charts. . . . . . . . . . . . . . . . . 2 - 4
Equipment Operational and
Service Historical Report Record
Chapter 3 - Kohler Gas Engine
Specifications . . . . . . . . . . . . . . . . . . . . . . . . . . . . 3 - 1
Adjustments . . . . . . . . . . . . . . . . . . . . . . . . . . . . . 3 - 2
KOHLER MAGNUM ENGINE SERVICE MANUAL
Chapter 4 - Perkins Diesel Engine
Specifications . . . . . . . . . . . . . . . . . . . . . . . . . . . . 4 - 1
General Information . . . . . . . . . . . . . . . . . . . . . . . 4 - 2
Adjustments . . . . . . . . . . . . . . . . . . . . . . . . . . . . . 4 - 3
PERKINS 100 SERIES WORKSHOP MANUAL
Chapter 5 - Hydraulic System
Specifications . . . . . . . . . . . . . . . . . . . . . . . . . . . . 5 - 2
General Information . . . . . . . . . . . . . . . . . . . . . . . 5 - 3
Hydraulic Schematics. . . . . . . . . . . . . . . . . . . . . . 5 - 6
Special Tools. . . . . . . . . . . . . . . . . . . . . . . . . . . . 5 - 10
Troubleshooting . . . . . . . . . . . . . . . . . . . . . . . . . 5 - 13
Testing . . . . . . . . . . . . . . . . . . . . . . . . . . . . . . . . 5 - 17
Adjustments . . . . . . . . . . . . . . . . . . . . . . . . . . . . 5 - 24
Repairs . . . . . . . . . . . . . . . . . . . . . . . . . . . . . . . . 5 - 29
Chapter 6 - Electrical System
Wiring Schematics . . . . . . . . . . . . . . . . . . . . . . . . 6 - 2
Special Tools. . . . . . . . . . . . . . . . . . . . . . . . . . . . . 6 - 6
Troubleshooting (Reelmaster 216). . . . . . . . . . . . . . . 6 - 8
Troubleshooting (Reelmaster 216-D) . . . . . . . . . . . . 6 - 14
Testing . . . . . . . . . . . . . . . . . . . . . . . . . . . . . . . . 6 - 20
Repairs . . . . . . . . . . . . . . . . . . . . . . . . . . . . . . . . 6 - 31
Chapter 7 - Wheels, Brakes and Steering
Specifications . . . . . . . . . . . . . . . . . . . . . . . . . . . . 7 - 2
Adjustments . . . . . . . . . . . . . . . . . . . . . . . . . . . . . 7 - 3
Repairs . . . . . . . . . . . . . . . . . . . . . . . . . . . . . . . . . 7 - 6
Chapter 8 - Cutting Unit Drive System
Adjustments . . . . . . . . . . . . . . . . . . . . . . . . . . . . . 8 - 2
Repairs . . . . . . . . . . . . . . . . . . . . . . . . . . . . . . . . . 8 - 4
Chapter 9 - Cutting Units
Specifications . . . . . . . . . . . . . . . . . . . . . . . . . . . . 9 - 2
Special Tools. . . . . . . . . . . . . . . . . . . . . . . . . . . . . 9 - 3
Troubleshooting . . . . . . . . . . . . . . . . . . . . . . . . . . 9 - 4
Set-up and Adjustments . . . . . . . . . . . . . . . . . . . . 9 - 6
Service and Repairs . . . . . . . . . . . . . . . . . . . . . . 9 - 12
Reelmaster®216/216-D

This page is blank.

Chapter 1
Safety
Table of Contents
SAFETY INSTRUCTIONS . . . . . . . . . . . . . . . . . . . . 1
Before Operating. . . . . . . . . . . . . . . . . . . . . . . . . 1
While Operating. . . . . . . . . . . . . . . . . . . . . . . . . . 2
Safety Instructions
The Reelmaster 216/216-D has been tested and veri-
fied for compliance with the B71.4-1984 specifications
of the American National Standards Institute (ANSI) for
riding mowers when equipped with rear ballast (see
Operator’s Manual). Although hazard control and acci-
dentpreventionarepartiallydependentuponthedesign
and configuration of the machine, these factors are also
dependent upon the awareness, concern, and proper
trainingofthepersonnelinvolvedintheoperation,trans-
port maintenance, and storage of the machine. Im-
proper use or maintenance of the machine can result in
injury or death.
While Doing Maintenance, Troubleshooting,
Testing, Adjustments or Repairs . . . . . . . . . . . . . 3
/
Obey the following safety instructions. Read
and understand these instructions before op-
erating the Reelmaster 216 216-D or doing
maintenance, troubleshooting, testing, ad-
justments or repairs. Failure to comply with
the safety instructions may result in personal
injury.
CAUTION
Before Operating
1. Read and understand the Operator’s Manual before
starting, operating, maintaining or repairing the ma-
chine. Become familiar with the controls and know how
to stop the machine and engine quickly. Replacement
Operator’s Manuals are available by sending complete
Model and Serial Number of traction unit and cutting
units to:
The Toro Company
8111 Lyndale Avenue South
Minneapolis, MN 55420
UsetheModelandSerialNumberwhenreferringtoyour
machine. If you havequestions about this Service Infor-
mation, please contact:
The Toro Company
Commercial Service Department
8111 Lyndale Avenue South
Minneapolis, MN 55420
2.Neverallow childrentooperatethemachine or adults
to operate it without proper instruction. Only trained
operators who have read this manual should operate
this machine.
3. Become familiar with the controls and know how to
stop the machine and engine quickly.
4. Never operate the machine while under the influence
of drugs or alcohol.
5. Keep all shields, safety devices and decals in place.
If a shield, safety device or decal is defective or dam-
aged, repair or replace it before operating the machine.
6. Always wear substantial shoes. Do not operate ma-
chine wearing sandals, tennis shoes, sneakers or when
barefoot. Donotwearloose fitting clothingthatcouldget
caught in moving parts and possibly cause personal
injury. Wearing safety glasses,safety shoes, long pants
and a helmet is advisable and required by some local
ordinances and insurance regulations.
Reelmaster® 216/216-D Page 1 - 1 Safety Instructions

7. Make sure interlock switches are adjusted correctly
so engine cannot be started unless traction pedal is in
NEUTRAL and cutting units are DISENGAGED.
8. Remove all debris or other objects that might be
picked up and thrown by the reels or fast moving com-
ponents from other attached implements. Keep all by-
standers away from operating area.
9. Since gasoline and diesel fuel is flammable, handle
it carefully:
A. Use an approved fuel container.
B. Do not remove fuel tank cap while engine is hot
or running.
C. Do not smoke while handling fuel.
D. Fill fuel tank outdoors and only to within an inch
(25 mm) from the top of the tank, not the filler neck.
Do not overfill.
E. Wipe up any spilled fuel.
While Operating
10. Sit on the seat when starting and operating the
machine.
11. Before starting the engine:
A. Engage the parking brake.
B. Make sure traction pedal is in NEUTRAL and
cutting units are DISENGAGED.
C. After engine is started, release parking brake and
keepfootofftractionpedal.Machinemustnotmove.
If movement is evident, the neutral return mecha-
nism is adjusted incorrectly; therefore, shut engine
off and adjust until machine does not move when
traction pedal is released.
12.Seatingcapacityisoneperson.Nevercarrypassen-
gers.
13. Do not run engine in a confined area without ade-
quate ventilation. Exhaust fumes are hazardous and
could possibly be deadly.
14. Check interlock switches daily for proper operation.
If a switch fails, replaceit before operating the machine.
Replace all four interlock switches in wiring system
every two years, regardless if they are working properly
or not..
15. Using the machine demands attention. To prevent
loss of control:
A. Operate only in daylight, or when there is good
artificial light.
B. Drive slowly.
C. Watch for holes or other hidden hazards.
D. Look behind machine before backing up.
E. Do not drive close to a sand trap, ditch, creek or
other hazard.
F. Reduce speed when making sharp turns and
turning on a hillside.
G. Avoid sudden stops and starts.
16. Keep hands, feet and clothing away from moving
parts and reel discharge area. If so equipped, grass
baskets must be in place during operation of reels for
maximum safety.
17. Traverse slopes carefully. Do not start or stop sud-
denly when traveling uphill or downhill.
18. Operator must be skilled and trained in how to drive
onhillsides.Failuretousecautiononslopesorhillsmay
cause loss of control and vehicle to tip or roll, possibly
resulting in personal injury or death.
19. If engine stalls or wheels loose traction and cannot
makeittothetopofaslope,donotturnmachinearound.
Always back slowly straight down the slope.
20.Raisecuttingunitsbeforedrivingfromoneworkarea
to another.
21. DON’T TAKE AN INJURY RISK! When a person or
pet appears unexpectedly in or near the mowing area,
STOP MOWING. Careless operation, combined with
terrain angles, ricochets, or improperly positioned
guardscanleadtothrownobjectinjuries.Donotresume
mowing until area is cleared.
22. Do not touch engine, muffler or exhaust pipe while
engineisrunningorsoonafteritisstopped.Theseareas
could be hot enough to cause burns.
23. If cuttingunit strikes asolid object or vibrates abnor-
mally, stop immediately, turn engine off, set parking
brakeandwaitforallmotiontostop.Inspectfordamage.
Ifreelor bedknifeis damaged,repairorreplaceitbefore
operating.
24. Before getting off of the seat:
A. Move traction pedal to neutral.
B. Set parking brake.
C. Disengage cutting units and wait for reels to stop.
D. Stop engine and remove key from switch.
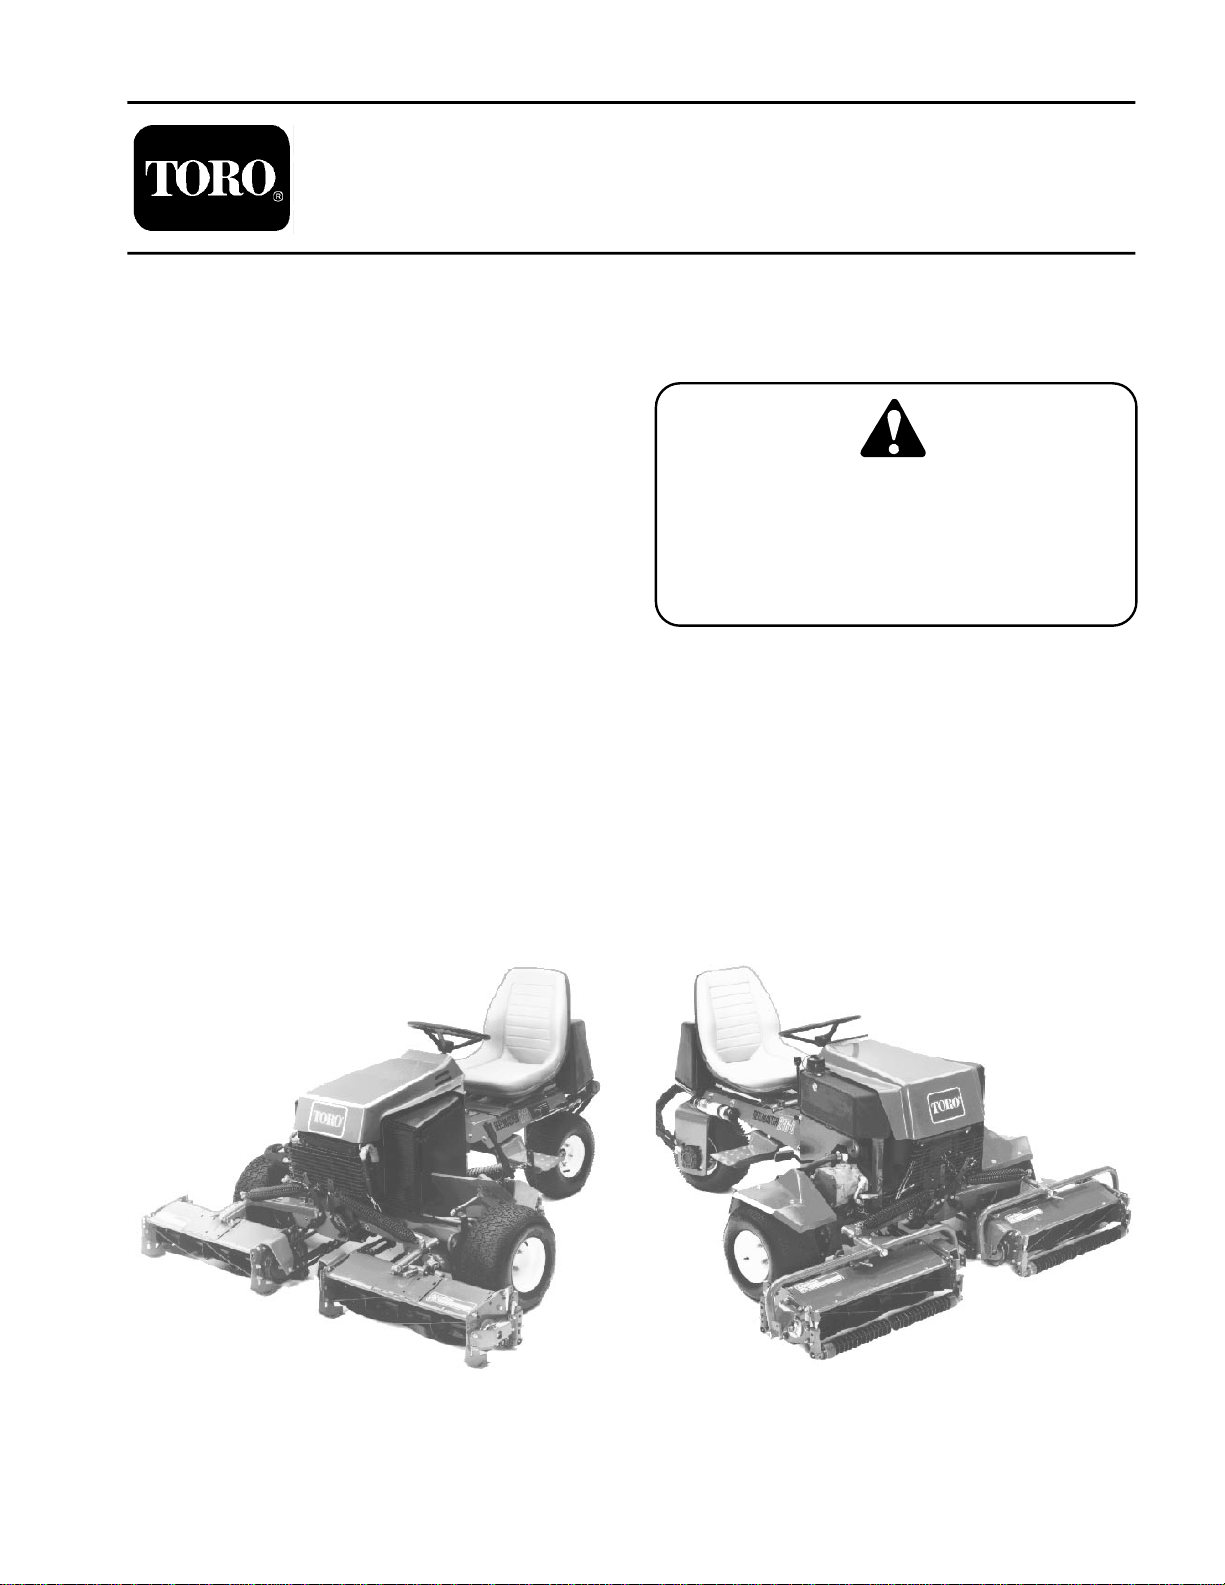
Safety Instructions Page 1 - 2 Reelmaster® 216/216-D

While Doing Maintenance, Troubleshooting, Testing, Adjustments or Repairs
25. Before servicing or making any adjustments, stop
engine and remove key from switch.
26. Make sure machine is in safe operating condition by
keeping all nuts, bolts and screws tight.
27. Make sure all hydraulic line connections are tight,
and all hydraulic hoses and lines are in good condition
before applying pressure to the system.
28. Keep body and hands away from pin hole leaks or
nozzles that eject high pressure hydraulic fluid. Use
cardboard or paper to find hydraulic leaks. Hydraulic
fluid escaping under pressure can penetrate skin and
cause injury. Fluid accidentally injected into the skin
must be surgically removed within a few hours by a
doctor familiar with this form of injury or gangrene may
result.
29. Before disconnecting or performing any work on the
hydraulic system, all pressure in system must be re-
lieved by lowering cutting units to the ground and stop-
ping the engine.
30. To reduce potential fire hazard, keep engine area
free of excessive grease, grass, leaves and dirt.
31. If engine must be running to perform maintenance
or an adjustment, keep hands, feet, clothing and other
parts of the body away from cutting units and other
moving parts. Keep all bystanders away.
32. Do not overspeed engine by changing governor
setting. To assure safety and accuracy, have anAuthor-
ized Toro Distributor check maximum engine speed.
33. Shut engine off before checking or adding oil to
engine crankcase.
34. Disconnect battery before checking or adding oil to
the crankcase.
35. At the time of manufacture, the machine conformed
to the safety standards for riding mowers. To assure
optimumperformanceandcontinuedsafetycertification
ofthemachine,usegenuineTororeplacementpartsand
accessories.Replacementpartsandaccessoriesmade
by other manufacturers may result in non-conformance
with the safety standards, and the warranty may be
voided.
Reelmaster® 216/216-D Page 1 - 3 Safety Instructions

Safety Instructions Page 1 - 4 Reelmaster® 216/216-D

Chapter 2
Table of Contents
PRODUCT RECORD FORM . . . . . . . . . . . . . . . . . . 1
EQUIVALENTS AND CONVERSIONS . . . . . . . . . . 2
Decimal and Millimeter Equivalents . . . . . . . . . . 2
U.S. to Metric Conversions . . . . . . . . . . . . . . . . . 2
TORQUE SPECIFICATIONS . . . . . . . . . . . . . . . . . . 3
Capscrew Markings and Torque Values - U.S. . . 3
Capscrew Markings and Torque Values - Metric . 3
Product Records
Record information about your Reelmaster 216/216-D
on the SERVICE HISTORY REPORT form. Use this
information when referring to your machine.
Product Records and Manuals
MAINTENANCE CHARTS . . . . . . . . . . . . . . . . . . . . 4
Reelmaster 216 . . . . . . . . . . . . . . . . . . . . . . . . . . 4
Reelmaster 216-D . . . . . . . . . . . . . . . . . . . . . . . . 5
Insert the Operator’s Manuals and Parts Catalogs for
your Reelmaster 216/216-D at the end of this section.
Reelmaster® 216/216-D Page 2 - 1 Rev. B Product Records

___________________________________________________________________________________________________
___________________________________________________________________________________________________
___________________________________________________________________________________________________
___________________________________________________________________________________________________
___________________________________________________________________________________________________
___________________________________________________________________________________________________
___________________________________________________________________________________________________
___________________________________________________________________________________________________
___________________________________________________________________________________________________
___________________________________________________________________________________________________
___________________________________________________________________________________________________
___________________________________________________________________________________________________
___________________________________________________________________________________________________
___________________________________________________________________________________________________
Equivalents and Conversions
Decimal and Millimeter Equivalents
Fractions Decimals mm Fractions Decimals mm
1/64 0.015625 — 0.397 33/64 0.515625 — 13.097
1/32 ––––– 0.03125 — 0.794 17/32 –––– 0.53125 — 13.494
3/64 0.046875 — 1.191 35/64 0.546875 — 13.891
1/16–––––––––––– 0.0625 — 1.588 9/16–––––––––––– 0.5625 — 14.288
5/64 0.078125 — 1.984 37/64 0.578125 — 14.684
3/32 ––––– 0.9375 — 2.381 19/32 –––– 0.59375 — 15.081
7/64 0.109275 — 2.778 39/64 0.609375 — 15.478
1/8––––––––––––– 0.1250 — 3.175 5/8 ––––––––––––– 0.6250 — 15.875
9/64 0.140625 — 3.572 41/64 0.640625 — 16.272
5/32 ––––– 0.15625 — 3.969 21/32 –––– 0.65625 — 16.669
11/64 0.171875 — 4.366 43/64 0.671875 — 17.066
3/16–––––––––––– 0.1875 — 4.762 11/16 ––––––––––– 0.6875 — 17.462
13/64 0.203125 — 5.159 45/64 0.703125 — 17.859
7/32 ––––– 0.21875 — 5.556 23/32 –––– 0.71875 — 18.256
15/64 0.234375 — 5.953 47/64 0.734375 — 18.653
1/4––––––––––––– 0.2500 — 6.350 3/4 ––––––––––––– 0.7500 — 19.050
17/64 0.265625 — 6.747 49/64 0.765625 — 19.447
9/32 ––––– 0.28125 — 7.144 25/32 –––– 0.78125 — 19.844
19/64 0.296875 — 7.541 51/64 0.796875 — 20.241
5/16–––––––––––– 0.3125 — 7.938 13/16––––––––––– 0.8125 — 20.638
21/64 0.328125 — 8.334 53/64 0.828125 — 21.034
11/32 –––– 0.34375 — 8.731 27/32 –––– 0.84375 — 21.431
23/64 0.359375 — 9.128 55/64 0.859375 — 21.828
3/8––––––––––––– 0.3750 — 9.525 7/8 ––––––––––––– 0.8750 — 22.225
25/64 0.390625 — 9.922 57/64 0.890625 — 22.622
13/32 –––– 0.40625 — 10.319 29/32 –––– 0.90625 — 23.019
27/64 0.421875 — 10.716 59/64 0.921875 — 23.416
7/16–––––––––––– 0.4375 — 11.112 15/16––––––––––– 0.9375 — 23.812
29/64 0.453125 — 11.509 61/64 0.953125 — 24.209
15/32 –––– 0.46875 — 11.906 31/32 –––– 0.96875 — 24.606
31/64 0.484375 — 12.303 63/64 0.984375 — 25.003
1/2––––––––––––– 0.5000 — 12.700 1 –––––––––––––– 1.000 — 25.400
1 mm = 0.03937 in. 0.001 in. = 0.0254 mm
U.S to Metric Conversions
To Convert Into Multiply By
Linear Miles Kilometers 1.609
Measurement Yards Meters 0.9144
Feet Meters 0.3048
Feet Centimeters 30.48
Inches Meters 0.0254
Inches Centimeters 2.54
Inches Millimeters 25.4
Area Square Miles
Square Feet
Square Inches
Acre
Square Kilometers 2.59
Square Meters 0.0929
Square Centimeters 6.452
Hectare 0.4047
Volume Cubic Yards
Cubic Feet
Cubic Inches
Cubic Meters 0.7646
Cubic Meters 0.02832
Cubic Centimeters 16.39
Weight Tons (Short)
Pounds
Ounces (Avdp.)
Metric Tons 0.9078
Kilograms 0.4536
Grams 28.3495
Pressure Pounds/Sq. In. Kilopascal 6.895
Work Foot-pounds
Foot-pounds
Inch-pounds
Newton-Meters 1.356
Kilogram-Meters 0.1383
Kilogram-Centimeters 1.152144
Liquid Volume Quarts Liters 0.9463
Gallons Liters 3.785
Liquid Flow Gallons/Minute Liters/Minute 3.785
Temperature Fahrenheit Celsius 1. Subract 32o
2. Multiply by 5/9
Equivalents and Conversions Page 2 - 2 Rev. A Reelmaster® 216/216-D

________________________________________________________________________________________________________________________________________________________
________________________________________________________________________________________________________________________________________________________
________________________________________________________________________________________________________________________________________________________
________________________________________________________________________________________________________________________________________________________
________________________________________________________________________________________________________________________________________________________
________________________________________________________________________________________________________________________________________________________
________________________________________________________________________________________________________________________________________________________
________________________________________________________________________________________________________________________________________________________
________________________________________________________________________________________________________________________________________________________
________________________________________________________________________________________________________________________________________________________
________________________________________________________________________________________________________________________________________________________
________________________________________________________________________________________________________________________________________________________
________________________________________________________________________________________________________________________________________________________
________________________________________________________________________________________________________________________________________________________
________________________________________________________________________________________________________________________________________________________
________________________________________________________________________________________________________________________________________________________
________________________________________________________________________________________________________________________________________________________
________________________________________________________________________________________________________________________________________________________
________________________________________________________________________________________________________________________________________________________
________________________________________________________________________________________________________________________________________________________
________________________________________________________________________________________________________________________________________________________
________________________________________________________________________________________________________________________________________________________
Torque Specifications
Use these torque values when specific torque values The torque values listed below are for lubricated
are not given. DO NOT use these values in place of threads. Plated threadsareconsideredtobe lubricated.
specified values.
Capscrew Markings and Torque Values - U.S. Customary
5 8
Nm Nm Nm Nm
1/ 7 9 6 8 9
9 7 9 13 18 10 14
5/
3/
7/
1/ 80 90
100 135 80
-18 150 85
135 180
-18 155 210 120
240 325 190
-16 270 365 210
360 490 280
-14 390 530 310
1-8 530 720 420
-14 590 800 480
SAE Grade Number
Capscrew Head Markings
Capscrew Torque - Grade 5 Capscrew Torque - Grade 8
Capscrew Body Size Cast Iron Aluminum Cast Iron Aluminum
ft-lb ft-lb ft-lb ft-lb
4-20 1115 12
-28 12
16-18 1520121622301824
-24 1723141924331925
8-16 3040202540553040
-24 3040253545603545
16-14 4560354565905065
-20 5065405570955575
2-13 709555759513075100
-20 75 100 60 110 150 120
9/16-12 110 140 190 110 150
110 115 155 210 125 170
5/8-11 110 150 190 255 150 205
160 215 290 170 230
3/4-10 255 340 460 270 365
285 380 515 300 410
7/8-9 380 550 745 440 600
420 610 825 490 660
570 820 1100 660 890
650 890 1200 710 960
Capscrew Markings and Torque Values – Metric
mm Nm Nm Nm Nm Nm Nm
6 5 9 4 7 9 7 9 7
7 9 7
8
10 30 40 25 30 45 60
12 55 70 40 55 75 105
14 85 120 160
16 130 180 100 140 175 240
18 170 230 135 180 240 320
Commercial Steel Class 8.8 10.9 12.9
Capscrew Head Markings
Thread Capscrew Torque - Class 8.8 Capscrew Torque - Class 10.9 Capscrew Torque - Class 12.9
Diameter Cast Iron Aluminum Cast Iron Aluminum Cast Iron Aluminum
ft-lb ft-lb ft-lb ft-lb ft-lb ft-lb
14 11 14 11
14 111418111418231418
182514182332182527362128
35 45 50 70 40 55
60 80 95 125 75 100
115 65 90 95 125 145 195 110 150
135 190 210 290 165 220
185 250 290 400 230 310
Reelmaster® 216/216-D Page 2 - 3 Torque Specifications

Torque Specifications Page 2 - 4 Rev. B Reelmaster® 216/216-D

____________________
____________________
____________________ __________________
____________________ __________________
____________________ __________________
EQUIPMENT OPERATION AND SERVICE HISTORY REPORT
for
REELMASTER®216
TORO Model and Serial Number:__________-__________
Engine Numbers: ____________________
Transmission Numbers: ____________________
Date Purchased: ____________________ Warranty Expires __________
Purchased From: ____________________
Contacts: Parts Phone
Service Phone
Sales Phone
See your TORODistributor/Dealer for other Publications, Manuals, and Videos from The TORO Company.

REELMASTER®216 Maintenance Schedule
Minimum Recommended Maintenance Intervals:
Maintenance Procedure Maintenance Interval & Service
Check Battery Fluid/Connections
Lubricate Grease Fittings Every
25hrs Every
50hrs Every
100hrs Every
200hrs Every
400hrs
Service Air Filter Pre-Cleaner A Level
† Change Engine Oil Service
† Check Traction Belt Tension B Level
Service Air Filter Paper Element Service
Service Spark Plug C Level
† Torque Wheel Lug Nuts Service
† Replace Hydraulic Filter
Adjust Electric Clutch D Level
Inspect Traction Linkage Movement Service
Change Hydraulic Fluid
Decarbon Combustion Chamber
Adjust Valves and Torque Head Bolts E Level
‡ Check Engine RPM (idle and full throttle) Service
† Initial break in at 5 hours
‡ Initial break in at 50 hours
Replace Moving Hoses
Replace Safety Switches
Fuel Tank - Drain/Flush
Annual Recommendations:
Items listed are recommended every 1000
hours or 2 years whichever occurs first.
Replace Fuel Filter
Hydraulic Tank - Drain/Flush
(See Operator's and Service Manual for specifications and procedures)

_____________
REELMASTER®216 Daily Maintenance Check List
Unit Designation: __________
Daily Maintenance: (duplicate this page for routine use) TORO ID#:_______-_______
Maintenance Check Item
Daily Maintenance Check For Week Of
MON
_______HRS
TUES
_______HRS
WED
_______HRS
THURS
_______HRS
FRI
_______HRS
SAT
_______HRS
SUN
_______HRS
Safety Interlock Operation
Brake Operation
Engine Oil Level
Air Filter Pre-Cleaner
Clean Engine Cooling Fins
Unusual Engine Noises
Unusual Operating Noises
Hydraulic System Oil Level
Hydraulic Hoses for Damage
Fluid Leaks
Fuel Level
Tire Pressure
Instrument Operation
Reel-to-Bedknife Adjustment
Height-of-Cut Adjustment
Cutting Unit Belt Adjustment
Lubricate All Grease Fittings
1
Touch-up damaged paint
1 = Immediatelyafter every washing, regardless of the interval listed.
Notation for areas of concern: Inspection performed by:________________
Item Date Information
1
2
3
4
5
6
7
(See Operator's and Service Manual for specifications and procedures)

_______________________________ _______________________________
______________________________ _______________________________ _______________________________
______________________________ _______________________________ _______________________________
_____________________________ _______________________________ _______________________________
______________________________ _______________________________ _______________________________
______________________________ _______________________________ _______________________________
______________________________
______________________________ _______________________________ _______________________________
______________________________ _______________________________ _______________________________
______________________________ _______________________________ _______________________________
______________________________ _______________________________ _______________________________
REELMASTER®Date:______________216 Supervisor Maintenance Work Order
(duplicate this page for routine use)
Unit Designation: TORO I.D. #: Remarks:
____________-____________
Service to perform (circle):
A B C D E Other
Technician:
A B C
Check Battery Fluid/Connections Check Traction Belt Tension Service Spark Plug
Lubricate Grease Fittings Service Air Filter Paper Element Torque Wheel Lug Nuts
Service Air Filter Pre-Cleaner A-Service required A and B Service required
Change Engine Oil
_
D E - Service (every 400 hours) Other
Replace Hydraulic Filter Change Hydraulic Fluid Replace Moving Hoses
Adjust Electric Clutch Decarbon Combustion Chamber Replace Safety Switches
Inspect Traction Linkage Movement Adjust Valves and Torque Head Bolts Fuel Tank - Drain/Flush
A, B, and C Service required Check Engine RPM (idle & full throttle) Replace Fuel Filter
A, B, C, and required Hydraulic Tank - Drain/Flush
Hours:
-Service (every 25 hours) -Service (every 50 hours) -Service (every 100 hours)
-Service (every 200 hours) - Annual Service and Specials
D Service
(See Operator's and Service Manual for specifications and procedures) Form No. 95-845-SL

____________________
____________________
____________________ __________________
____________________ __________________
____________________ __________________
EQUIPMENT OPERATION AND SERVICE HISTORY REPORT
for
REELMASTER®216-D
TORO Model and Serial Number:__________-__________
Engine Numbers: ____________________
Transmission Numbers: ____________________
Date Purchased: ____________________ Warranty Expires__________
Purchased From: ____________________
Contacts: Parts Phone
Service Phone
Sales Phone
See your TORODistributor/Dealer for other Publications, Manuals, and Videos from The TORO Company.

REELMASTER® 216-D Maintenance Schedule
Minimum Recommended Maintenance Intervals:
Maintenance Procedure Maintenance Interval & Service
Every
Every
Every
Inspect Air Filter, Dust Cup, and Baffle Every 400hrs
200hrs
100hrs
Lubricate All Grease Fittings 50hrs
† Change Engine Oil A Level
Service
† Check Fan and Alternator Belt Tension
† Change Engine Oil Filter B Level
† Check Traction Belt Tension Service
Service Air Filter
Replace Fuel Filter/Water Separator
† Replace Hydraulic Filter C Level
† Torque Wheel Lug Nuts Service
Replace Hydraulic Fluid
Check Battery Level/Connections
Inspect Traction Linkage Movement
‡ Torque Head Bolts and Adjust Valves D Level
‡ Check Engine RPM (idle and full throttle) Service
† Initial break in at 10 hours
‡ Initial break in at 50 hours
Replace Moving Hoses
Replace Safety Switches Annual Recommendations:
Items listed are recommended every
Cooling System - Flush / Replace Fluid 1000 hours or 2 years whichever occurs
Replace Thermostat first.
Fuel Tank - Drain/Flush
Hydraulic Tank - Drain/Flush
(See Operator's and Service Manual for specifications and procedures)

_____________
REELMASTER® 216-D Daily Maintenance Check List
Unit Designation:__________
Daily Maintenance:(duplicate this page for routine use) TORO ID#:_______-_______
Maintenance Check Item
Daily Maintenance Check For Week Of
MON
_______HRS
TUES
_______HRS
WED
_______HRS
THURS
_______HRS
FRI
_______HRS
SAT
_______HRS
SUN
_______HRS
Safety Interlock Operation
Brake Operation
Engine Oil Level
Cooling System Fluid Level
Drain Water/Fuel Separator
Air Filter, Dust Cup, Baffle
Radiator & Screen for Debris
Unusual Engine Noises1
Unusual Operating Noises
Hydraulic System Oil Level
Hydraulic Hoses for Damage
Fluid Leaks
Fuel Level
Tire Pressure
Instrument Operation
Reel-to-Bedknife Adjustment
Height-of-Cut Adjustment
Cutting Unit Belt Adjustment
Lubricate All Grease Fittings
2
Touch-up damaged paint
1 = Check glow plug and injector nozzles, if hard starting, excess smoke, or rough running is noted.
2 = Immediatelyafter every washing, regardless of the interval listed.
Inspection performed by:________________
Item Date Information
1
2
3
4
5
6
7
(See Operator's and Service Manual for specifications and procedures)

______________________________
______________________________ ______________________________
________________________________ ______________________________ _______________________________
________________________________ ______________________________ _______________________________
________________________________ ______________________________ _______________________________
________________________________ ______________________________ _______________________________
_______________________________
_______________________________
_______________________________
_______________________________
_______________________________
_______________________________
_______________________________ ______________________________ _______________________________
________________________________ ______________________________ _______________________________
________________________________ ______________________________ _______________________________
REELMASTER® 216-D Supervisor Maintenance Work Order Date:______________
(duplicate this page for routine use)
Unit Designation: TORO I.D. #: Remarks:
____________-____________
Service to perform (circle):
A B C D Other
Technician:
A -Service (every 50 hours) B -Service (every 100 hours) C -Service (every 200 hours)
Inspect Air Filter, Dust Cup, and Baffle Change Engine Oil Filter Service Air Filter
Lubricate All Grease Fittings Check Traction Belt Tension Replace Fuel Filter/Water Separator
Change Engine Oil A-Service required Replace Hydraulic Filter
Check Fan and Alternator Belt Tension Torque Wheel Lug Nuts
A and B Service required
D -Service (every 400 hours) Other Additional Service Items
Replace Hydraulic Fluid Replace Moving Hoses
Check Battery Level/Connections Replace Safety Switches
Inspect Traction Linkage Movement Cooling System - Flush/Replace Fluid
Torque Head Bolts and Adjust Valves Replace Thermostat
Fuel Tank - Drain/Flush
A, B, and C Service required Hydraulic Tank - Drain/Flush
Hours:
- Annual Service and Specials
Check Engine RPM (Idle & FullThrottle)
(See Operator's and Service Manual for specifications and procedures) Form No. 95-846-SL
This manual suits for next models
1
Table of contents
Other Toro Lawn Mower manuals

Toro
Toro Recycler 20339 User manual

Toro
Toro Z Master 74915 User manual

Toro
Toro TurfMaster 22205TE User manual

Toro
Toro 20319 User manual

Toro
Toro 20995 User manual

Toro
Toro 315-8 User manual

Toro
Toro 03681 User manual

Toro
Toro Recycler 20958 User manual

Toro
Toro 74923TE User manual

Toro
Toro 74959 User manual

Toro
Toro Z Master Professional 6000 Series User manual

Toro
Toro Reelmaster 5210 User manual

Toro
Toro 30373 User manual

Toro
Toro 74274 User manual

Toro
Toro 74901 Z Master 5000 User manual

Toro
Toro Recycler 20960 User manual

Toro
Toro 20052 User manual

Toro
Toro TimeCutter SW series Manual

Toro
Toro Air Cool Z Master 74090 User manual

Toro
Toro Groundsmaster 360 User manual