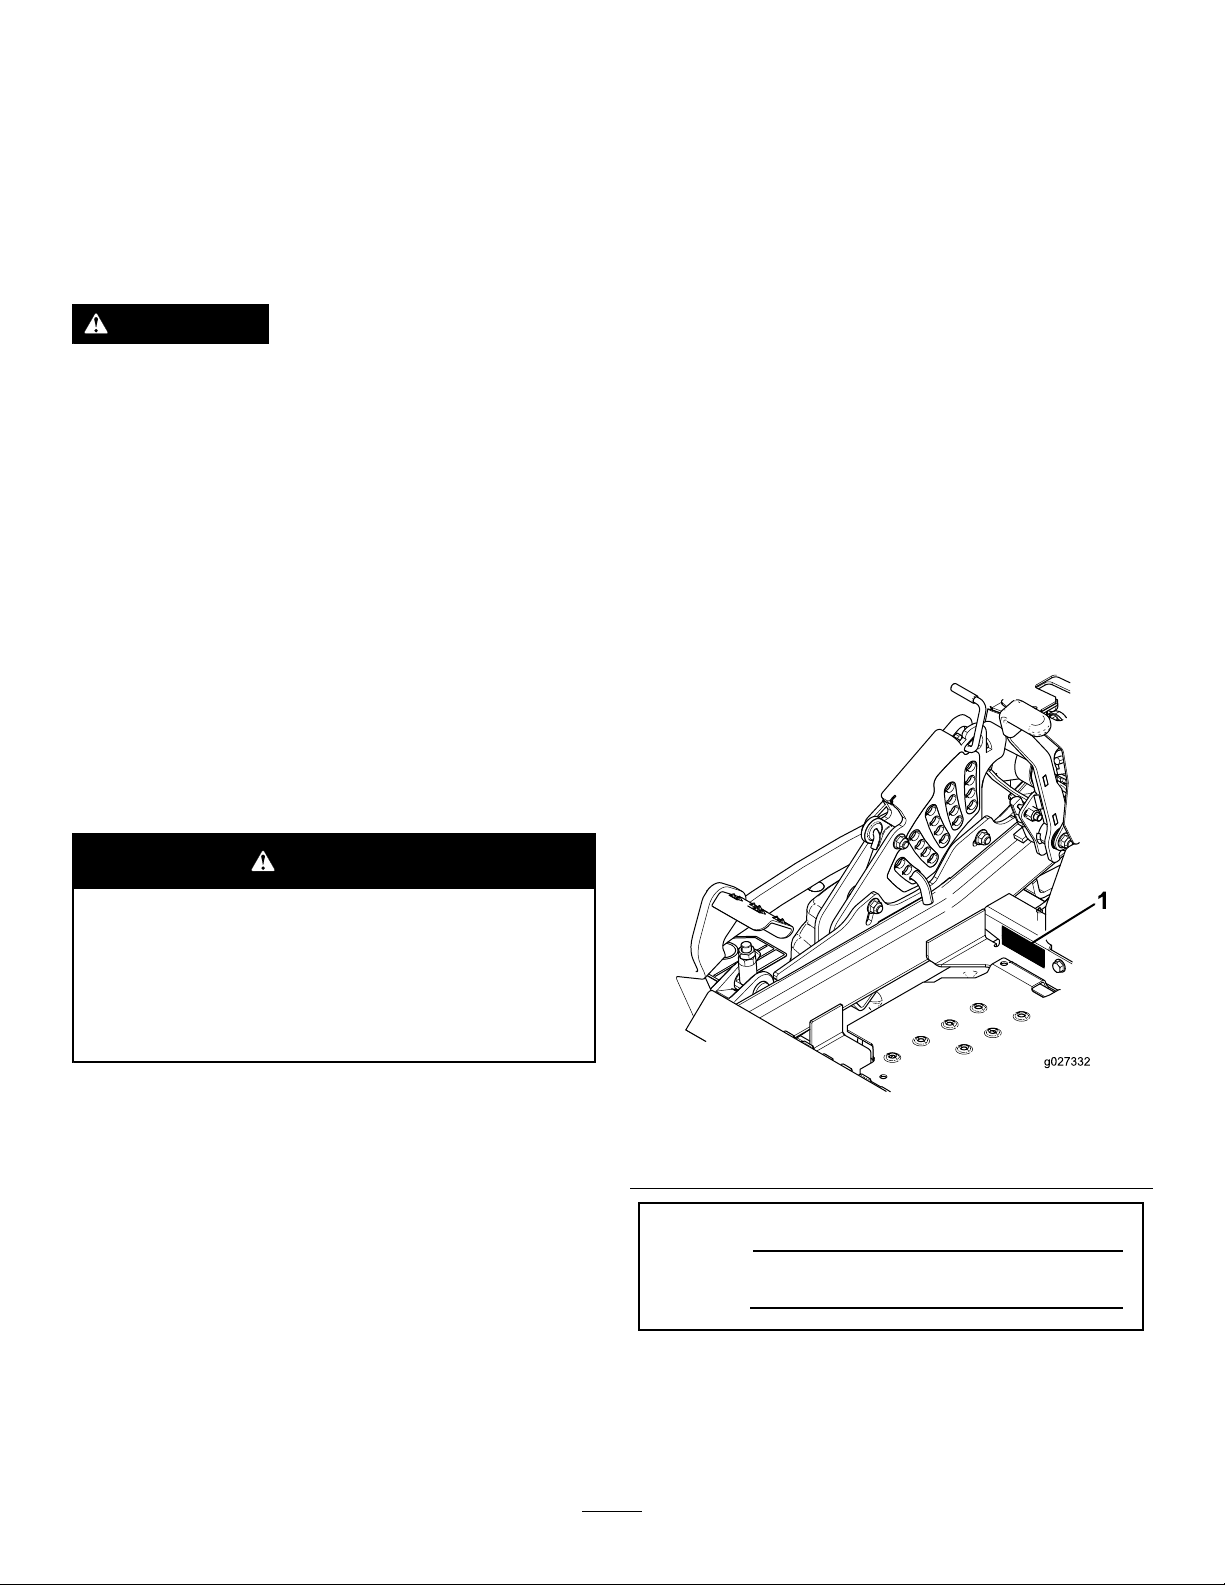
Toro Z Master 3000 SERIES User manual

FormNo.3400-947RevB
ZMaster®Commercial3000
SeriesRidingMower
with52inor72inTURBOFORCE®Side
DischargeMower
ModelNo.74955—SerialNo.316000001andUp
ModelNo.74959—SerialNo.316000001andUp
Registeratwww.Toro.com.
OriginalInstructions(EN)*3400-947*B

ThissparkignitionsystemcomplieswithCanadian
ICES-002
ItisaviolationofCaliforniaPublicResourceCode
Section4442or4443touseoroperatetheengineon
anyforest-covered,brush-covered,orgrass-covered
landunlesstheengineisequippedwithaspark
arrester,asdenedinSection4442,maintainedin
effectiveworkingorderortheengineisconstructed,
equipped,andmaintainedforthepreventionofre.
WARNING
Removingstandardoriginalequipmentparts
andaccessoriesmayalterthewarranty,
traction,andsafetyofthemachine.Failureto
useoriginalToropartscouldcauseserious
injuryordeath.Makingunauthorizedchanges
totheengine,fuelorventingsystem,may
violateEPAandCARBregulations.
Replaceallpartsincluding,butnotlimited
to,tires,belts,blades,andfuelsystem
componentswithoriginalToroparts.
TheenclosedEngineOwner'sManualis
suppliedforinformationregardingtheUS
EnvironmentalProtectionAgency(EPA)and
theCaliforniaEmissionControlRegulationof
emissionsystems,maintenance,andwarranty.
Replacementsmaybeorderedthroughtheengine
manufacturer.
WARNING
CALIFORNIA
Proposition65Warning
Theengineexhaustfromthisproduct
containschemicalsknowntotheStateof
Californiatocausecancer,birthdefects,
orotherreproductiveharm.
Introduction
Thisrotary-blade,ridinglawnmowerisintendedtobe
usedbyresidentialhomeownersorprofessional,hired
operators.Itisdesignedprimarilyforcuttinggrasson
well-maintainedlawnsonresidentialorcommercial
properties.Itisnotdesignedforcuttingbrushorfor
agriculturaluses.
Readthisinformationcarefullytolearnhowtooperate
andmaintainyourproductproperlyandtoavoid
injuryandproductdamage.Youareresponsiblefor
operatingtheproductproperlyandsafely.
YoumaycontactT orodirectlyatwww.Toro.com
forproductsafetyandoperationtrainingmaterials,
accessoryinformation,helpndingadealer,orto
registeryourproduct.
Wheneveryouneedservice,genuineT oroparts,or
additionalinformation,contactanAuthorizedService
DealerorToroCustomerServiceandhavethemodel
andserialnumbersofyourproductready.Figure1
identiesthelocationofthemodelandserialnumbers
ontheproduct.Writethenumbersinthespace
provided.
g027332
Figure1
1.Modelandserialnumberlocation
ModelNo.
SerialNo.
Thismanualidentiespotentialhazardsandhas
safetymessagesidentiedbythesafety-alertsymbol
(Figure2),whichsignalsahazardthatmaycause
seriousinjuryordeathifyoudonotfollowthe
recommendedprecautions.
©2018—TheToro®Company
8111LyndaleAvenueSouth
Bloomington,MN554202
Contactusatwww.Toro.com.
PrintedintheUSA
AllRightsReserved

g000502
Figure2
1.Safety-alertsymbol
Thismanualuses2wordstohighlightinformation.
Importantcallsattentiontospecialmechanical
informationandNoteemphasizesgeneralinformation
worthyofspecialattention.
Contents
Safety.......................................................................4
SafeOperatingPractices....................................4
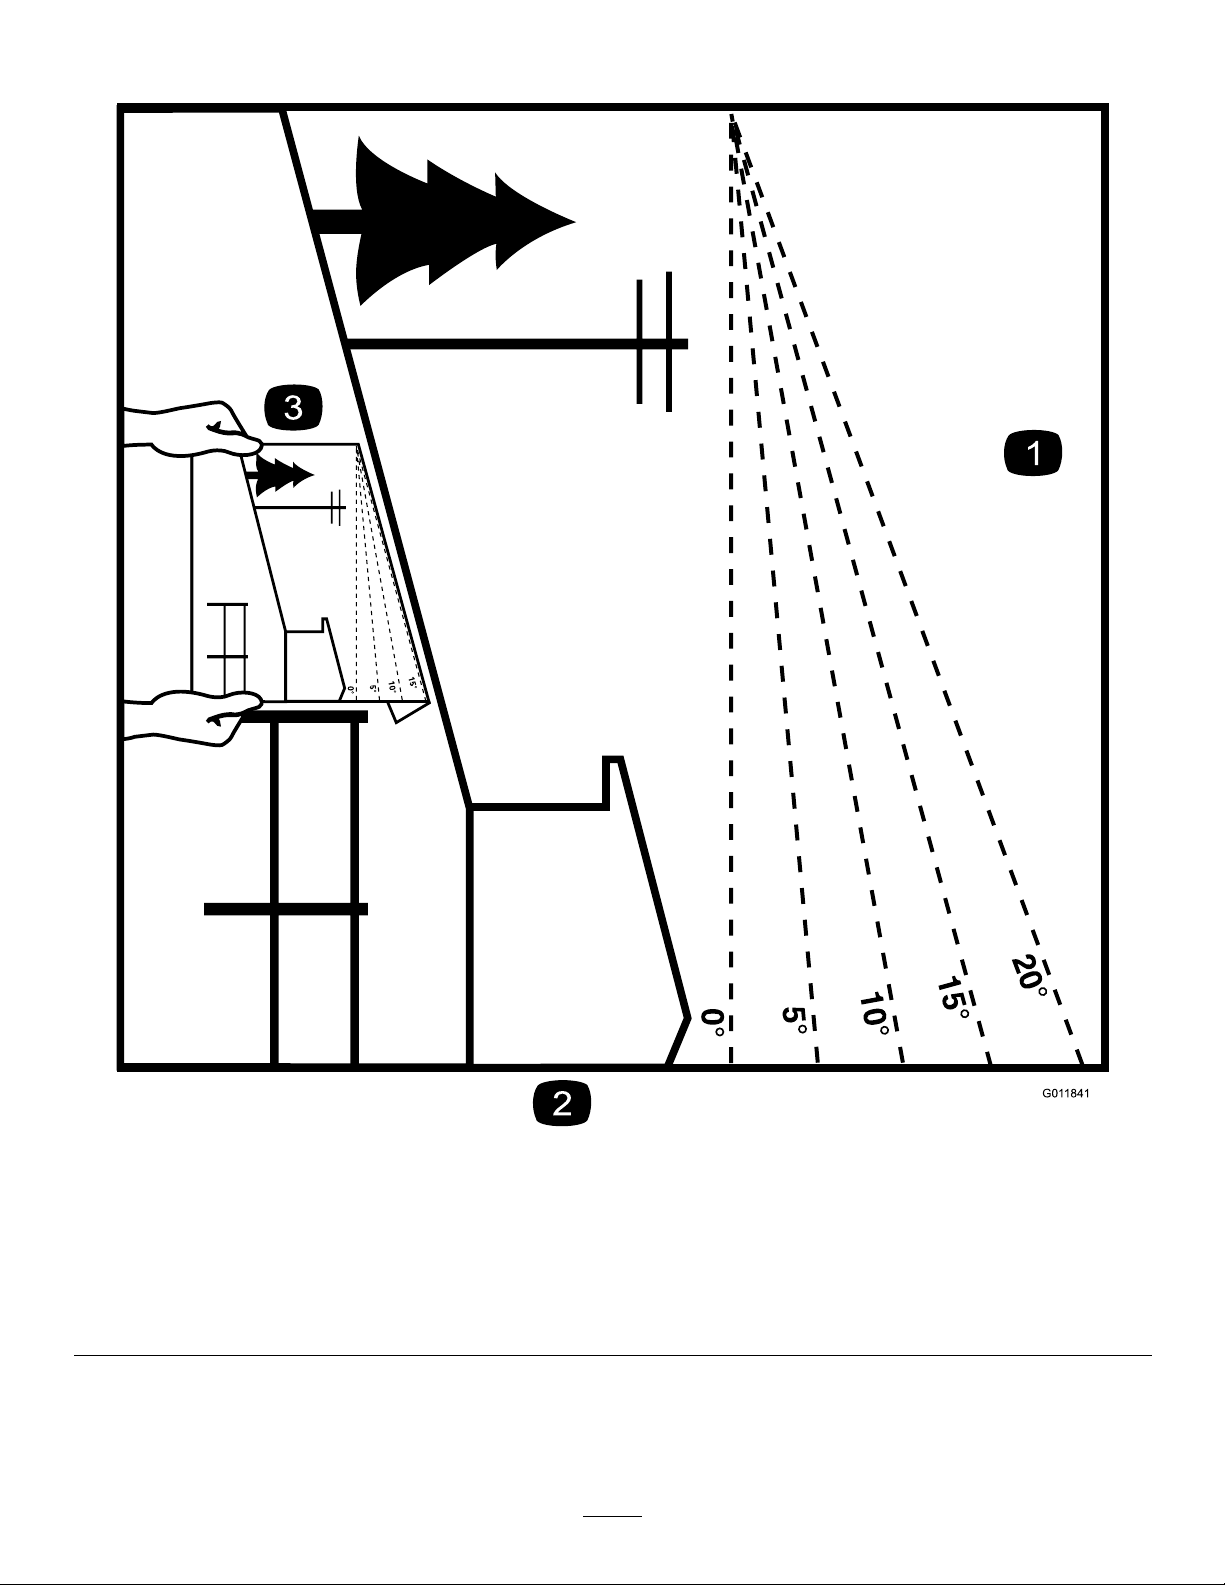
SlopeIndicator...................................................7
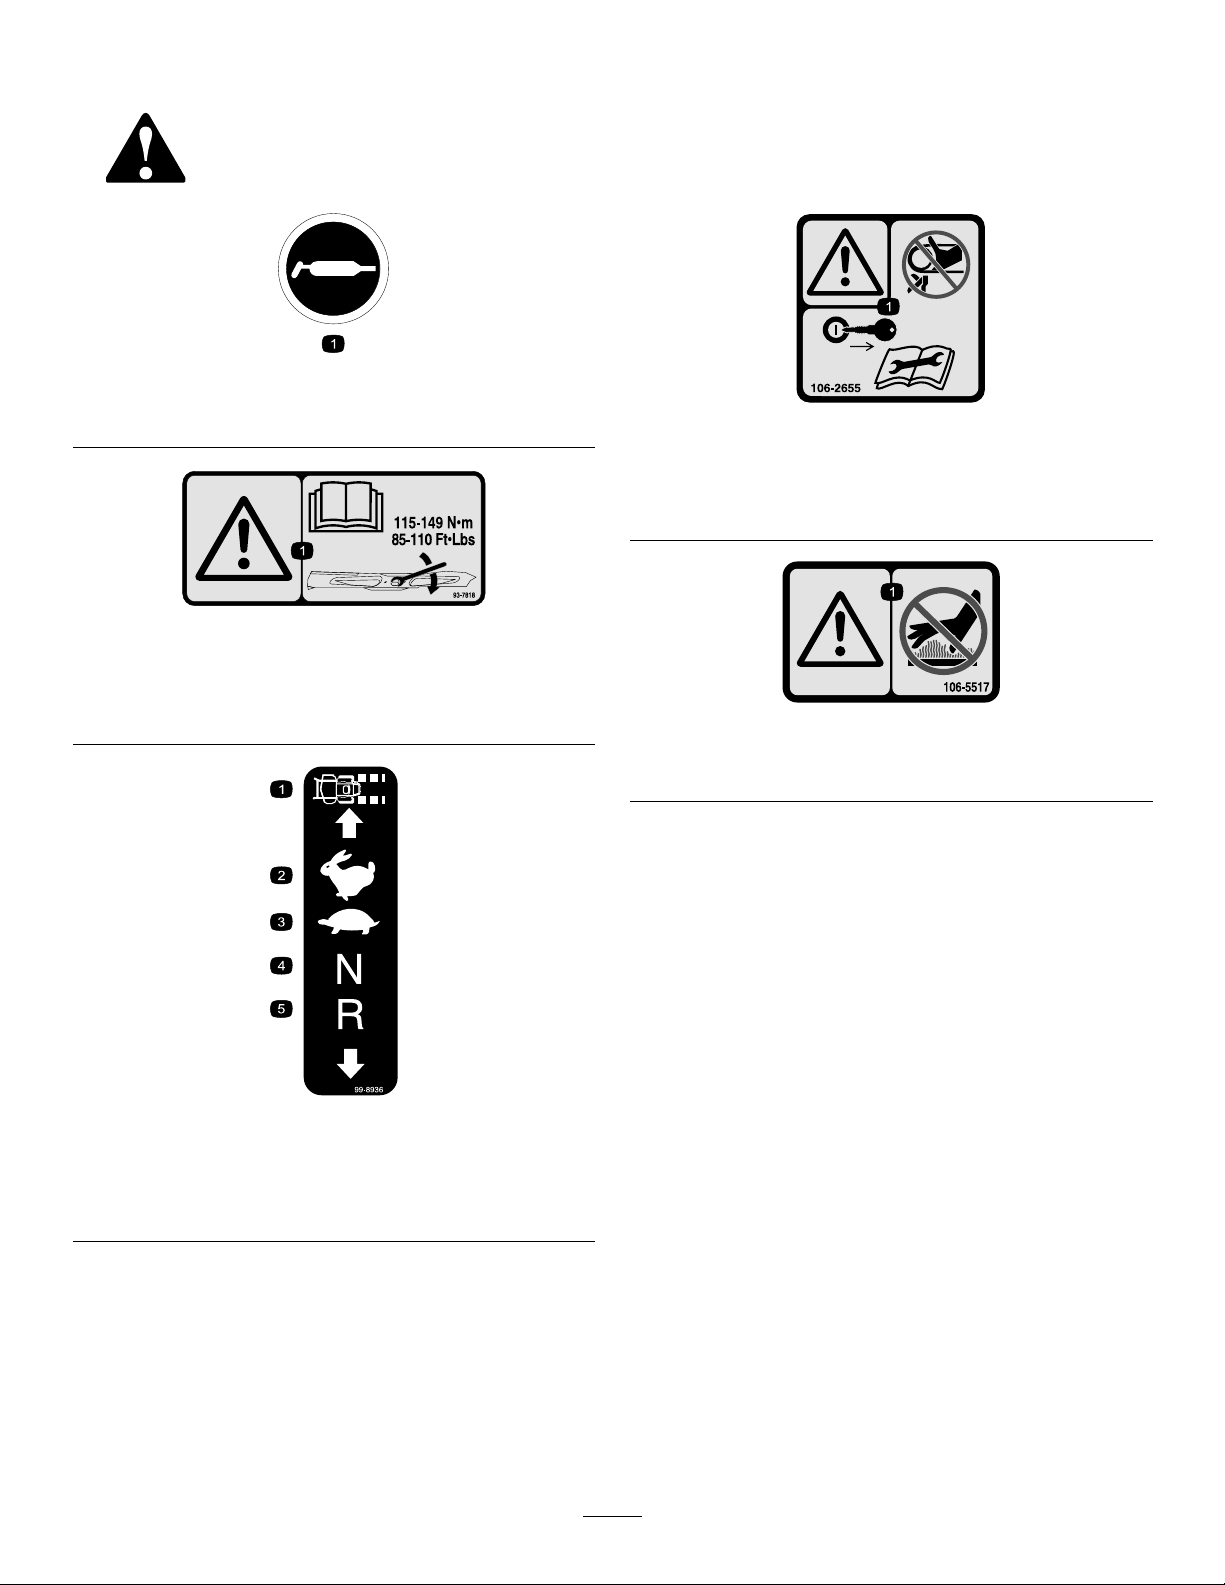
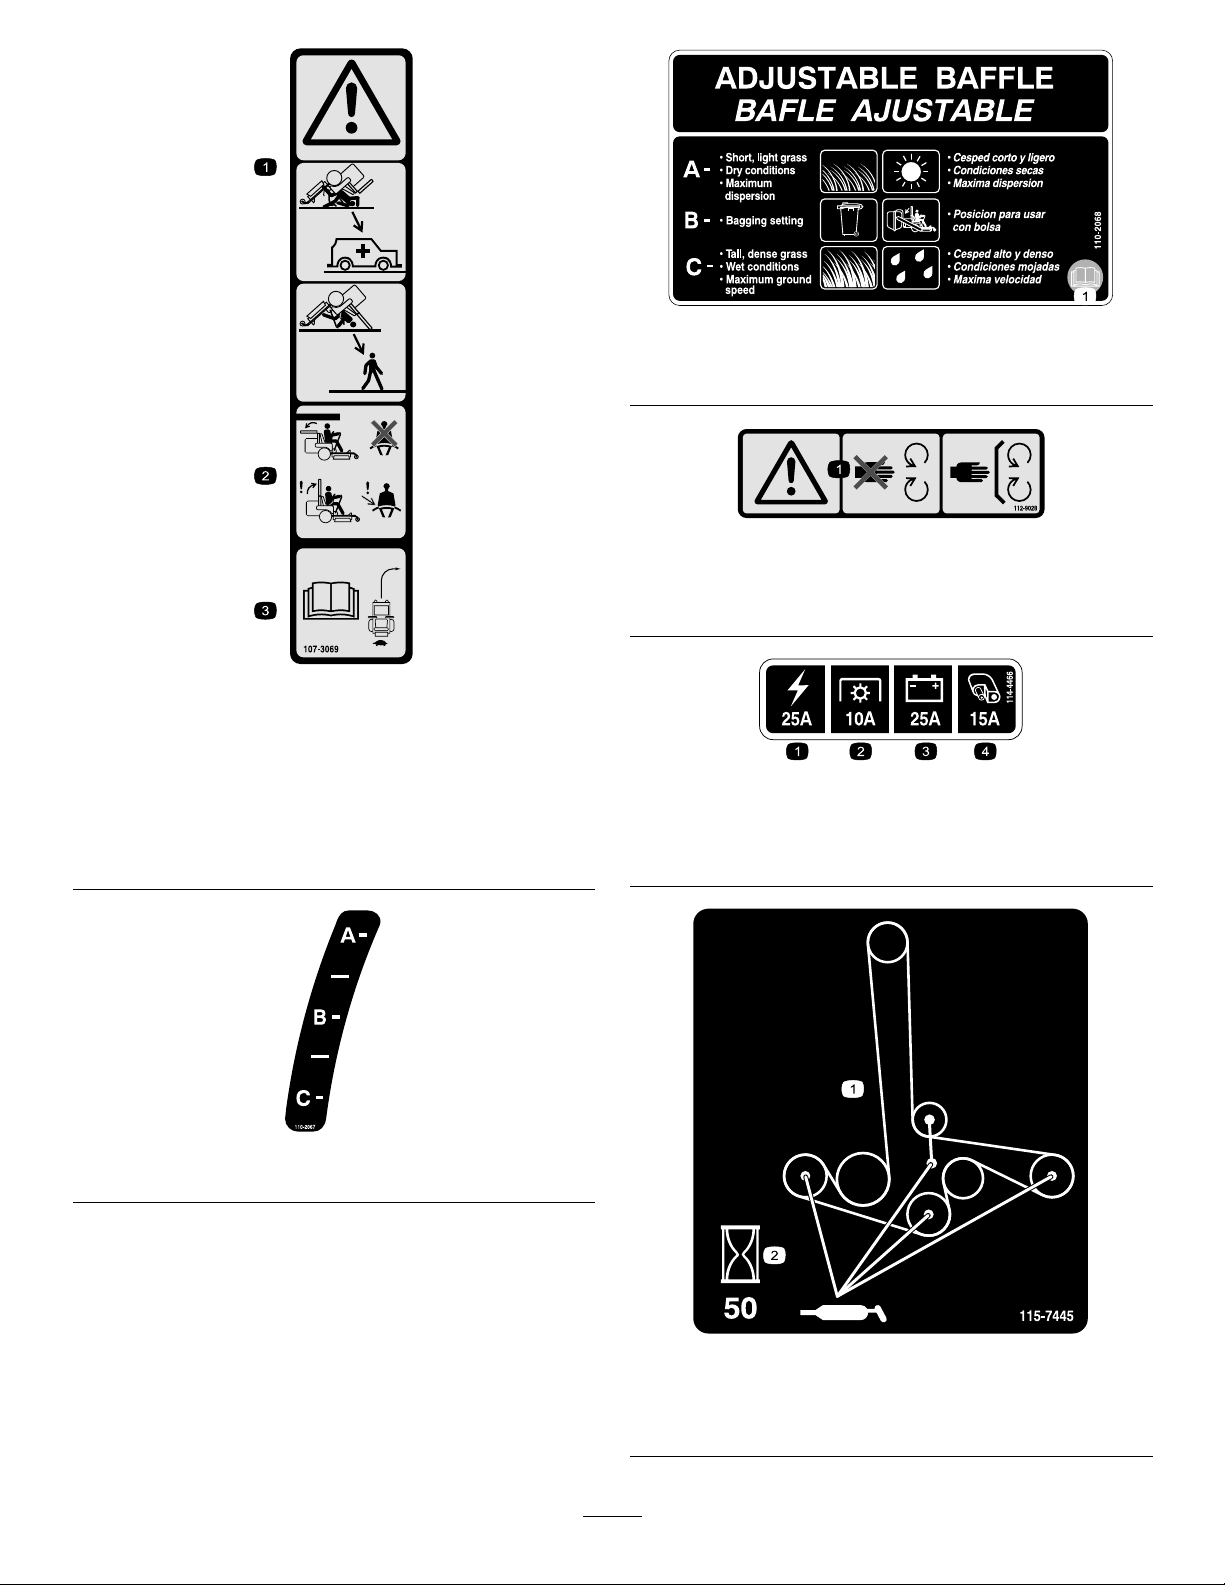
SafetyandInstructionalDecals..........................8
ProductOverview...................................................14
Controls...........................................................14
Specications..................................................16
Operation................................................................17
AddingFuel......................................................17
CheckingtheEngine-OilLevel..........................18
BreakinginaNewMachine..............................18
UsingtheRolloverProtectionSystem
(ROPS).........................................................18
ThinkSafetyFirst..............................................19
OperatingtheParkingBrake.............................20
StartingandStoppingtheEngine......................21
UsingtheSafety-InterlockSystem....................21
DrivingtheMachineForwardor
Backward......................................................22
StoppingtheMachine.......................................24
AdjustingtheHeightofCut...............................24
AdjustingtheAnti-ScalpRollers........................25
AdjustingtheFlow-Bafe-CamLocks...............26
PositioningtheFlowBafe................................26
PositioningtheSeat..........................................27
UsingtheDrive-Wheel-ReleaseValves............27
UsingtheSideDischarge.................................28
TransportingtheMachine.................................28
LoadingtheMachine........................................28
OperatingTips.................................................31
Maintenance...........................................................32
RecommendedMaintenanceSchedule(s)...........32
Lubrication..........................................................33
AddingLightOilorSprayLubrication................33
GreasingtheMower.........................................33
LubricatingtheCaster-WheelHubs..................34
EngineMaintenance...........................................35
ServicingtheAirCleaner..................................35
ServicingtheEngineOil....................................36
ServicingtheSparkPlug...................................39
CheckingtheSparkArrester.............................40
FuelSystemMaintenance...................................41
ReplacingtheFuelFilter...................................41
ServicingtheFuelT ank.....................................41
ElectricalSystemMaintenance...........................42
ServicingtheBattery.........................................42
ServicingtheFuses..........................................43
DriveSystemMaintenance..................................44
CheckingtheSeatBelt.....................................44
CheckingtheRolloverProtectionSystem
(ROPS)Knobs..............................................44
AdjustingtheTracking......................................44
CheckingtheTirePressure...............................45
CheckingtheWheelLugNuts...........................45
CheckingtheWheelHubSlottedNut................45
AdjustingtheCaster-PivotBearing...................46
UsingtheClutchShim......................................46
CoolingSystemMaintenance..............................48
CleaningtheEngineScreenandEngine-Oil
Cooler...........................................................48
CleaningtheEngine-CoolingFinsand
Shrouds........................................................48
CheckandCleantheHydraulicUnits................49
BrakeMaintenance.............................................50
AdjustingtheParkingBrake..............................50
BeltMaintenance................................................51
InspectingtheBelts..........................................51
ReplacingtheMowerBelt.................................51
ReplacingtheHydraulicPump-Drive
Belt................................................................52
ControlsSystemMaintenance.............................53
AdjustingtheControl-HandlePosition..............53
AdjustingtheMotion-ControlLinkage...............53
AdjustingtheMotion-ControlDamper...............54
AdjustingtheMotion-ControlNeutral-Lock
Pivot..............................................................54
HydraulicSystemMaintenance...........................55
ServicingtheHydraulicSystem........................55
MowerDeckMaintenance....................................57
LevelingtheMowerDeck..................................57
ServicingtheCuttingBlades.............................59
RemovingtheMowerDeck...............................62
ReplacingtheGrassDeector..........................63
Cleaning..............................................................64
CleaningundertheMower................................64
DisposingofWaste...........................................64
Storage...................................................................64
CleaningandStorage.......................................64
Troubleshooting......................................................66
Schematics.............................................................68
3

Safety
Thismachinehasbeendesinedinaccordancewith
ANSIB71.4-2012.
Improperuseormaintenancecanresultininjury.
Toreducethepotentialforinjury,complywiththese
safetyinstructionsandalwayspayattentionto
thesafety-alertsymbol,whichmeansCAUTION,
WARNING,orDANGER—personalsafetyinstruction.
Failuretocomplywiththeinstructionmayresultin
personalinjuryordeath.
Thismachinewasmanufacturedaccordingtothe
appropriateregulatorystandardsineffectatthetime
ofmanufacture.Modifyingthismachineinanyway
maycauseittobeoutofcompliancewiththose
standardsandwiththeinstructionsinthisOperator’s
Manual.Modicationstothismachineshouldonly
bemadebyeitherthemanufactureroranAuthorized
ToroDealer.
Thisproductiscapableofamputatinghandsand
feetandofthrowingobjects.Alwaysfollowallsafety
instructionstoavoidseriousinjuryordeath.
Thisproductisdesignedforcuttingandrecycling
grassor,whenequippedwithagrassbagger,for
catchingcutgrass.Anyuseforpurposesotherthan
thesecouldprovedangeroustouserandbystanders.
SafeOperatingPractices
Training
•ReadtheOperator'sManualandothertraining
material.Iftheoperator(s)ormechanic(s)
cannotreadmanuallanguage,itistheowner's
responsibilitytoexplainthismaterialtothem.
•Becomefamiliarwiththesafeoperationofthe
equipment,operatorcontrols,andsafetysigns.
•Alloperatorsandmechanicsshouldbetrained.
Theownerisresponsiblefortrainingtheusers.
•Neverletchildrenoruntrainedpeopleoperateor
servicetheequipment.Localregulationsmay
restricttheageoftheoperator.
•Theowner/usercanpreventandisresponsible
foraccidentsorinjuriesoccurringtopeopleor
damagetoproperty.
Preparation
•Evaluatetheterraintodeterminewhataccessories
andattachmentsareneededtoproperlyand
safelyperformthejob.Useonlyaccessoriesand
attachmentsapprovedbythemanufacturer.
•Wearappropriateclothingincludingeyeprotection
andhearingprotection.Tiebacklonghairanddo
notwearjewelry.
•Inspecttheareawhereyouwillusetheequipment
andremoveallobjectssuchasrocks,toysand
wire,whichthemachinecanthrow.
•Checkthatoperator-presencecontrols,safety
switchesandshieldsareattachedandfunctioning
properly.Donotoperateunlesstheyare
functioningproperly.
Operation
•Lightningcancausesevereinjuryordeath.If
lightningisseenorthunderisheardinthearea,do
notoperatethemachine;seekshelter.
•Neverrunanengineinanenclosedarea.
•Operatethemachineonlyingoodlight,keeping
awayfromholesandhiddenhazards.
•Besurethatalldrivesareinneutralandthat
theparkingbrakeisengagedbeforestarting
theengine.Starttheenginefromtheoperating
positiononly.
•Slowdownanduseextracareonhillsides.Be
suretotravelsidetosideonhillsides.Turf
conditionscanaffectthestabilityofthemachine.
Usecautionwhileoperatingneardrop-offs.
•Slowdownandusecautionwhenmakingturns
andwhenchangingdirectionsonslopes.
•Neverraisedeckwiththebladesrunning.
•NeveroperatethemachinewiththePTOshieldor
otherguardsnotsecurelyinplace.Ensurethat
allinterlocksareattached,adjustedproperly,and
functioningproperly.
•Neveroperatethemachinewiththedischarge
deectorraised,removedoraltered,unlessyou
areusingagrasscatcher.
•Donotchangetheenginegovernorsettingor
overspeedtheengine.
•Stopthemachineonlevelground,disengagethe
drives,engagetheparkingbrake(ifprovided),and
shutofftheenginebeforeleavingtheoperating
positionforanyreason,includingemptyingthe
catchersoruncloggingthechute.
•Stoptheequipmentandinspectbladesafter
strikingobjectsorifanabnormalvibration
occurs.Makenecessaryrepairsbeforeresuming
operation.
•Keepyourhandsandfeetawayfromthecutting
unit.
•Lookbehindanddownbeforebackingupthe
machinetobesureofaclearpath.
•Keeppetsandbystandersaway.
4

•Slowdownandusecautionwhenmakingturns
andcrossingroadsandsidewalks.Stopthe
bladesiftheyarenotmowing.
•Beawareofthemowerdischargedirectionand
donotpointitatanyone.
•Donotoperatethemowerwhiletiredorunderthe
inuenceofalcoholordrugs.
•Usecarewhenloadingorunloadingthemachine
intoorfromatrailerortruck.
•Usecarewhenapproachingblindcorners,shrubs,
trees,orotherobjectsthatmayobscurevision.
RolloverProtectionSystem
(ROPS)UseandMaintenance
•DonotremovetheROPS.
•TheROPSisanintegralandeffectivesafety
device.KeeptheROPSonthemachineanduse
theseatbeltwhenoperatingthemachine.
•Ensurethatyoucanreleasetheseatbeltquickly
intheeventofanemergency.
•Checktheareatobemowedwherethereare
slopes,drop-offs,orwater.
•Checkcarefullyforoverheadclearances(i.e.,
branches,doorways,electricalwires)before
drivingunderanyobjectsanddonotcontactthem.
•KeeptheROPSinsafeoperatingconditionby
periodicallythoroughlyinspectingfordamageand
keepingallmountingfastenerstight.
•ReplaceadamagedROPS.Donotrepairorrevise
aROPS.
•AnyalterationstoaROPSmustbeapprovedby
themanufacturer.
SafeHandlingofFuels
•Toavoidpersonalinjuryorpropertydamage,use
extremecareinhandlinggasoline.Gasolineis
extremelyammableandthevaporsareexplosive.
•Extinguishallcigarettes,cigars,pipes,andother
sourcesofignition.
•Useonlyanapprovedfuelcontainer.
•Neverremovethefuelcaporaddfuelwiththe
enginerunning.
•Allowtheenginetocoolbeforerefueling.
•Neverrefuelthemachineindoors.
•Neverstorethemachineorfuelcontainerwhere
thereisanopename,spark,orpilotlight,such
asonawaterheateroronotherappliances.
•Neverllcontainersinsideavehicleoronatruck
ortrailerbedwithaplasticliner.Alwaysplace
containersontheground,awayfromyourvehicle
beforelling.
•Removeequipmentfromthetruckortrailerand
refuelitontheground.Ifthisisnotpossible,then
refuelsuchequipmentwithaportablecontainer
ratherthanfromafueldispensernozzle.
•Keepthenozzleincontactwiththerimofthefuel
tankorcontaineropeningatalltimesuntilfueling
iscomplete.Donotuseanozzlelock-opendevice.
•Iffuelisspilledonyourclothing,changeclothing
immediately.
•Neveroverllthefueltank.Replacethefuelcap
andtightenitsecurely.
MaintenanceandStorage
•Disengagethedrives,settheparkingbrake,shut
offtheengine,andremovethekeyordisconnect
thespark-plugwire.Waitforallmovementto
stopbeforeadjusting,cleaningorrepairingthe
machine.
•Cleangrassanddebrisfromcuttingunit,drives,
mufers,andenginetohelppreventres.Clean
upoilorfuelspills.
•Lettheenginecoolbeforestoringthemachineand
donotstorenearame.
•Shutoffthefuelwhilestoringortransporting.Do
notstorefuelnearamesordrainindoors.
•Parkthemachineonlevelground.Settheparking
brake.Neverallowuntrainedpersonneltoservice
themachine.
•Usejackstandstosupportcomponentswhen
required.
•Carefullyreleasethepressurefromcomponents
withstoredenergy.
•Disconnectthebatteryorremovespark-plug
wirebeforemakinganyrepairs.Disconnect
thenegativeterminalrstandthepositivelast.
Connectthepositiverstandnegativelast.
•Usecarewhencheckingblades.Wrapthe
blade(s)orwearthickly-paddedgloves,anduse
cautionwhenservicingthem.Onlyreplaceblades.
Neverstraightenorweldthem.
•Keepyourhandsandfeetawayfrommoving
parts.Ifpossible,donotmakeadjustmentswith
theenginerunning.
•Keepallpartsingoodworkingconditionandall
hardwaretightened.Replaceallwornordamaged
decals.
Hauling
•Usecarewhenloadingorunloadingthemachine
intoatrailerortruck.
5

•Usefull-widthrampsforloadingmachineinto
trailerortruck.
•Tiethemachinedownsecurelyusingstraps,
chains,cable,orropes.Bothfrontandrearstraps
shouldbedirecteddownandoutwardfromthe
machine.
ToroMowerSafety
Thefollowinglistcontainssafetyinformationspecic
toT oroproductsandothersafetyinformationthatyou
mustknow.
Thisproductiscapableofamputatinghandsand
feet,andofthrowingobjects.Alwaysfollowallsafety
instructionstoavoidseriousinjuryordeath.
Thisproductisdesignedforcuttingandrecycling
grass,or,whenequippedwithagrassbagger,for
catchingcutgrass.Anyuseforpurposesother
thanthesecouldprovedangeroustotheuserand
bystanders.
UsingtheRollover-ProtectionSystem(ROPS)
•LowertheROPStemporarilyonlywhenabsolutely
necessary.Donotweartheseatbeltwhenthe
ROPSisfoldeddown.
•Beawarethereisnorolloverprotectionwhenthe
ROPSisinthedownposition.
•Donotmowslopesgreaterthan15degrees.
Service
•Donotstorethemachineorafuelcontainerinside
wherethereisanopename,suchasneara
waterheaterorfurnace.
•Keepthenutsandboltstight,especiallythe
blade-attachmentbolts.
•Neverinterferewiththeintendedfunctionofa
safetydeviceorreducetheprotectionprovided
byasafetydevice.Checktheirproperoperation
regularly.
•Toensureoptimumperformanceandcontinued
safetycerticationofthemachine,useonly
genuineTororeplacementpartsandaccessories.
Replacementpartsandaccessoriesmadeby
othermanufacturerscouldbedangerous,and
suchusecouldvoidtheproductwarranty.
•Checkthebrakeoperationfrequently.Adjustand
serviceasrequired.
6

SlopeIndicator
g011841
Figure3
Thispagemaybecopiedforpersonaluse.
1.Themaximumslopeyoucansafelyoperatethemachineonis15degrees.Usetheslopecharttodeterminethedegreeofslope
ofhillsbeforeoperating.Donotoperatethismachineonaslopegreaterthan15degrees.Foldalongtheappropriateline
tomatchtherecommendedslope.
2.Alignthisedgewithaverticalsurface,atree,building,fencepole,etc.
3.Exampleofhowtocompareslopewithfoldededge
7

SafetyandInstructionalDecals
Safetydecalsandinstructionsareeasilyvisibletotheoperatorandarelocatednearanyarea
ofpotentialdanger.Replaceanydecalthatisdamagedorlost.
decal58-6520
58-6520
1.Grease
decal93-7818
93-7818
1.Warning—readtheOperator'sManualforinstructionson
torquingthebladebolt/nutto115to149N∙m(85to110
ft-lb).
decal99-8936
99-8936
1.Machinespeed4.Neutral
2.Fast5.Reverse
3.Slow
decal106-2655
106-2655
1.Warning-donottouchorapproachmovingbelts;remove
theignitionkeyandreadtheinstructionsbeforeservicing
orperformingmaintenance.
decal106-5517
106-5517
1.Warning—donottouchthehotsurface.
8

decal107-3069
107-3069
1.Warning–thereisnorolloverprotectionwhentherollbaris
down.
2.Toavoidinjuryordeathfromarolloveraccident,keepthe
rollbarintheraisedandlockedpositionandweartheseat
belt.Lowertherollbaronlywhenabsolutelynecessary;do
notweartheseatbeltwhentherollbarisdown.
3.ReadtheOperator'sManual;driveslowlyandcarefully.
decal110-2067
110-2067
decal110-2068
110-2068
1.ReadtheOperator'sManual.
decal112-9028
112-9028
1.Warning—stayawayfrommovingparts;keepallguardsin
place.
decal114-4466
114-4466
1.Main,25A3.Charge,25A
2.PTO,10A4.Auxiliary,15A
decal115-7445
115-7445
1.Greasepulleysandspindles
2.Maintenanceinterval—50hours
9

decal116-1716
116-1716
1.Fuel6.Hourmeter
2.Empty7.PTO
3.Half8.Parkingbrake
4.Full9.Neutral
5.Battery10.Operator-presenceswitch
decal116-4858
116-4858
decal116-5988
116-5988
1.Parkingbrake—engaged2.Parking
brake—disengaged
decal116-8726
116-8726
1.ReadtheOperator’sManualfortherecommendedhyraulic
uid.
decal117-0346
117-0346
1.Fuelleakhazard—readtheOperator'sManual;donot
attempttoremovetherollbar;donotweld,drill,ormodify
therollbarinanyway.
decal117-3848
117-3848
1.Thrownobjecthazard—keepbystandersasafedistance
fromthemachine
2.Thrownobjecthazard,mower-donotoperatewithoutthe
deector,dischargecoverorgrasscollectionsystemin
place.
3.Cutting/dismembermentofhandorfoot—stayawayfrom
movingparts;keepallguardsandshieldsinplace.
10

decal117-3864
117-3864
1.ReadtheOperator’s
Manual.
2.Filltobottomofllerneck;
warning—donotoverll
thetank.
decal121-7551
121-7551
1.PowerTakeoff(PTO)4.Continuousvariable
setting
2.Choke5.Slow
3.Fast
decal126-2055
126-2055
1.Wheellugnuttorque95ft-lb(129N∙m)(4x)
2.Wheelhubnuttorque235ft-lb(319N∙m)
3.ReadandunderstandtheOperator’sManualbefore
performinganymaintenance,checktorqueafterrst100
hoursthenevery500hoursthereafter.
decal126-4398
126-4398
1.ReadtheOperator’s
Manual
3.Unlock
2.Lock
11

decal127-0326
127-0326
1.ReadtheOperator's
Manual.
3.Removethekeyfrom
theignitionandreadthe
Operator'sManualbefore
performingmaintenance
orservicingthemachine.
2.Height-of-cut
decal131-4036
131-4036
1.Maximumdrawbarpull36
kg(80lb)
2.ReadtheOperator's
Manual.
decalbatterysymbols
BatterySymbols
Someorallofthesesymbolsareonyourbattery
1.Explosionhazard6.Keepbystandersasafe
distancefromthebattery.
2.Nore,opename,or
smoking.
7.Weareyeprotection;
explosivegasescan
causeblindnessandother
injuries
3.Causticliquid/chemical
burnhazard
8.Batteryacidcancause
blindnessorsevereburns.
4.Weareyeprotection9.Flusheyesimmediately
withwaterandgetmedical
helpfast.
5.ReadtheOperator's
Manual.
10.Containslead;donot
discard.
decaloemmarkt
Manufacturer'sMark
1.Indicatesthebladeisidentiedasapartfromtheoriginal
machinemanufacturer.
decal125-9383
125–9383
1.Checkhydraulicuidevery50operatinghours.3.Checkthetirepressureevery50operatinghours.
2.ReadtheOperator’sManualforinformationonlubricating
themachine.
4.ReadtheOperator’sManualbeforeservicingorperforming
maintenance.
12

decal132-0871
132-0871
Note:Thismachinecomplieswiththeindustrystandardstabilitytestinthestaticlateralandlongitudinaltestswiththemaximum
recommendedslopeindicatedonthedecal.ReviewtheinstructionsforoperatingthemachineonslopesintheOperator’sManualas
wellastheconditionsinwhichyouwouldoperatethemachinetodeterminewhetheryoucanoperatethemachineinthoseconditions
onthatdayandatthatsite.Changesintheterraincanresultinachangeinslopeoperationforthemachine.Ifpossible,keepthe
cuttingunitsloweredtothegroundwhileoperatingthemachineonslopes.Raisingthecuttingunitswhileoperatingonslopescan
causethemachinetobecomeunstable.
1.Warning—readtheOperator’sManual;donotoperatethis
machineunlessyouaretrained;wearhearingprotection.
4.Ramphazard—whenloadingontoatrailer,donotusedual
ramps;onlyuseasingularrampwideenoughforthemachine
andthathasaninclinelessthan15°;backuptheramp(in
reverse)anddriveforwardofftheramp.
2.Cutting,dismembering,andentanglementhazard—keep
handsawayfrommovingparts;keepallguardsandshieldsin
place.
5.Bodilyharmhazard—donotcarrypassengers;lookbehind
youwhenmowinginreverse.
3.Thrownobjecthazard—keepbystandersaway.6.Tippinghazardonslopes—donotuseonslopesnearopen
water;donotuseonslopesgreaterthan15°.
13

ProductOverview
g027333
Figure4
1.Height-of-cutdeck-lift
pedal
6.Rollbar
2.Transportlock7.Seatbelt
3.Parking-brakelever8.Fuelcap
4.Controls9.Mowerdeck
5.Motion-controllevers10.Casterwheel
Controls
Becomefamiliarwithallthecontrolsbeforeyoustart
theengineandoperatethemachine(Figure4and
Figure5).
g008951
Figure5
1.PTOswitch4.Hour
meter/Safety-interlock
display
2.Choke5.Ignitionswitch
3.Throttlecontrol6.Fuses
HourMeter
Thehourmeterrecordsthenumberofhoursthe
enginehasoperated.Itoperateswhentheengine
isrunning.Usethesetimesforschedulingregular
maintenance(Figure6).
FuelGauge
Thefuelgaugeislocatedwiththehourmeterandthe
barslightupwhentheignitionswitchison(Figure6).
Theindicatorlightappearswhenthefuellevelislow
(approximatelyonegallonremaininginthefueltank).
Safety-InterlockIndicators
Therearesymbolsonthehourmeterandtheindicate
withablacktrianglethattheinterlockcomponentisin
thecorrectposition(Figure6).
BatteryIndicatorLight
IftheignitionkeyisturnedtotheONpositionforafew
seconds,thebatteryvoltagewillbedisplayedinthe
areawherethehoursarenormallydisplayed.
Thebatterylightturnsonwhentheignitionisturned
onandwhenthechargeisbelowthecorrectoperating
level(Figure6).
g008950
Figure6
1.Fuelgauge(bars)4.Safety-interlocksymbols
2.Batterylight5.Lowfuelindicatorlight
3.Hourmeter
ThrottleControl
ThethrottlecontrolisvariablebetweentheFASTand
SLOWpositions.
YoucanmovethethrottlecontrolbetweenFASTand
SLOWpositions(Figure7).
AlwaysusetheFASTpositionwhenturningonthe
mowerdeckwiththeblade-controlswitch(PTO).
14

g008946
Figure7
ChokeKnob
Usethechokeknobtostartacoldengine.
1.Pullupthechokeknobtoengagethechoke
beforeusingtheignitionswitch(Figure8).
2.Pushdownthechoketodisengagethechoke
afterstartingtheengine(Figure8).
g008959
Figure8
1.ONposition2.OFFposition
Blade-ControlSwitch(PTO)
Usetheblade-controlswitch(PTO)isusedtoengage
theelectricclutchanddrivethemowerblades.Pull
theswitchuptoengagethebladesandrelease.T o
disengagetheblades,pushtheblade-controlswitch
(PTO)downormoveamotion-controlleverintothe
NEUTRAL-LOCKposition.
1.TurntheignitionkeytotheSTARTposition
(Figure9).
Note:Whentheenginestarts,releasethekey.
Important:Donotengagethestarterfor
morethan5secondsatatime.Iftheengine
failstostart,wait15secondsbetween
attempts.Failuretofollowtheseinstructions
canburnoutthestartermotor.
Note:Youmayneedmultipleattemptstostart
theenginethersttimeafteraddingfueltoan
emptyfuelsystem.
g008947
Figure9
2.TurntheignitionkeytotheSTOPpositiontostop
theengine.
IgnitionSwitch
Usethisswitchtostartthemowerengineandhas3
positions:START,RUN,andOFF.
Motion-ControlLevers
Usethemotion-controlleverstodrivethemachine
forward,reverse,andturneitherdirection.
FuelShutoffValve
Thefuel-shutoffvalveislocatedundertheseat.Move
theseatforwardtoaccessit.
Closethefuelshutoffvalvewhentransporting,
maintaining,orstoringthemachine.
Ensurethatthefuel-shutoffvalveisopenwhen
startingtheengine.
15

g008948
Figure10
1.On2.Off
Attachments/Accessories
AselectionofT oroapprovedattachmentsand
accessoriesisavailableforusewiththemachineto
enhanceandexpanditscapabilities.Contactyour
AuthorizedServiceDealerorDistributororgoto
www.T oro.comforalistofallapprovedattachments
andaccessories.
Specications
Note:Specicationsanddesignaresubjectto
changewithoutnotice.
Width
52-inchDeck72-inchDeck
Withoutthedeck119cm(47inches)150cm(59inches)
Deectorup135cm(53inches)187cm(74inches)
Deectordown172cm(67inches)222cm(88inches)
Length
52-inchDeck72-inchDeck
Rollbarup202cm(79inches)219cm(86inches)
Rollbardown206cm(81inches)223cm(88inches)
Height
52-inchDeck72-inchDeck
Rollbarup178cm(70inches)179cm(71inches)
Rollbardown118cm(47inches)119cm(47inches)
Weight
ModelWeight
74955495kg(1,092lb)
74959588kg(1,296lb)
16

Operation
Note:Determinetheleftandrightsidesofthe
machinefromthenormaloperatingposition.
AddingFuel
•Forbestresults,useonlyclean,fresh(lessthan
30daysold),unleadedgasolinewithanoctane
ratingof87orhigher((R+M)/2ratingmethod).
•Ethanol:Gasolinewithupto10%ethanol
(gasohol)or15%MTBE(methyltertiarybutyl
ether)byvolumeisacceptable.Ethanoland
MTBEarenotthesame.Gasolinewith15%
ethanol(E15)byvolumeisnotapprovedforuse.
Neverusegasolinethatcontainsmorethan
10%ethanolbyvolume,suchasE15(contains
15%ethanol),E20(contains20%ethanol),orE85
(containsupto85%ethanol).Usingunapproved
gasolinemaycauseperformanceproblemsand/or
enginedamagewhichmaynotbecoveredunder
warranty.
•Donotusegasolinecontainingmethanol.
•Donotstorefueleitherinthefueltankorfuel
containersoverthewinterunlessyouuseafuel
stabilizer.
•Donotaddoiltogasoline.
DANGER
Incertainconditions,gasolineisextremely
ammableandhighlyexplosive.Areor
explosionfromgasolinecanburnyouand
othersandcandamageproperty.
•Fillthefueltankoutdoors,inanopenarea,
whentheengineiscold.Wipeupany
gasolinethatspills.
•Neverllthefueltankinsideanenclosed
trailer.
•Donotllthefueltankcompletelyfull.Add
gasolinetothefueltankuntilthelevelis6
to13mm(1/4to1/2inch)belowthebottom
ofthellerneck.Thisemptyspaceinthe
tankallowsgasolinetoexpand.
•Neversmokewhenhandlinggasoline,and
stayawayfromanopenameorwhere
gasolinefumesmaybeignitedbyaspark.
•Storegasolineinanapprovedcontainer
andkeepitoutofthereachofchildren.
Neverbuymorethana30-daysupplyof
gasoline.
•Donotoperatethemachinewithoutthe
entireexhaustsysteminplaceandin
properworkingcondition.
DANGER
Incertainconditionsduringfueling,static
electricitycanbereleased,causingaspark
whichcanignitethegasolinevapors.Are
orexplosionfromgasolinecanburnyouand
othersandcandamageproperty.
•Alwaysplacegasolinecontainersonthe
groundawayfromyourvehiclebefore
lling.
•Donotllgasolinecontainersinsidea
vehicleoronatruckortrailerbed,because
interiorcarpetsorplastictruckbedliners
mayinsulatethecontainerandslowthe
lossofanystaticcharge.
•Whenpractical,removegasoline-powered
equipmentfromthetruckortrailerand
refueltheequipmentwithitswheelsonthe
ground.
•Ifthisisnotpossible,thenrefuelsuch
equipmentonatruckortrailerfroma
portablecontainerratherthanfroma
gasoline-dispensernozzle.
•Ifyoumustuseagasoline-dispenser
nozzle,keepthenozzleincontactwiththe
rimofthefueltankorcontaineropeningat
alltimesuntilfuelingiscomplete.
WARNING
Gasolineisharmfulorfatalifswallowed.
Long-termexposuretovaporscancause
seriousinjuryandillness.
•Avoidprolongedbreathingofvapors.
•Keepfaceawayfromnozzleandfueltank
orconditionerbottleopening.
•Avoidcontactwithskin;washoffspills
withsoapandwater.
UsingStabilizer/Conditioner
Useafuelstabilizer/conditionerinthemachineto
providethefollowingbenets:
•Keepsgasolinefreshduringstorageof90daysor
less.Forlongerstorageitisrecommendedthat
thefueltankbedrained.
•Cleanstheenginewhileitruns
•Eliminatesgum-likevarnishbuildupinthefuel
system,whichcauseshardstarting
Important:Donotusefueladditives
containingmethanolorethanol.
17

Addthecorrectamountoffuelstabilizer/conditioner
tothefuel.
Note:Afuelstabilizer/conditionerismosteffective
whenmixedwithfreshgasoline.T ominimizethe
chanceofvarnishdepositsinthefuelsystem,use
fuelstabilizeratalltimes.
FillingtheFuelTank
1.Shutofftheengineandsettheparkingbrake.
2.Cleanaroundfueltankcapandremovethecap.
Addunleadedregulargasolinetofueltank,until
thelevelis6to13mm(1/4to1/2inch)below
thebottomofthellerneck.Thisspaceinthe
tankallowsgasolinetoexpand.Donotllthe
fueltankcompletelyfull.
3.Installfueltankcapsecurely.Wipeupany
spilledgasoline.
CheckingtheEngine-Oil
Level
Beforeyoustarttheengineandusethemachine,
checktheoillevelintheenginecrankcase;referto
CheckingtheEngine-OilLevel(page37).
BreakinginaNewMachine
Newenginestaketimetodevelopfullpower.Mower
decksanddrivesystemshavehigherfrictionwhen
new,placingadditionalloadontheengine.Allow
40to50hoursofbreak-intimefornewmachinesto
developfullpowerandbestperformance.
UsingtheRollover
ProtectionSystem(ROPS)
WARNING
NotusingtheROPSsystemproperlymay
resultinsevereinjuryordeath.
•Keeptherollbarinthefullyraisedlocked
position.
•Ensurethattheseatissecuredtothe
machine.
•Usetheseatbeltwiththerollbarlockedin
thefullyraisedposition.
WARNING
Youhavenorolloverprotectionwhentheroll
barisinthedownposition.
•Lowertherollbaronlywhenabsolutely
necessary.
•Donotweartheseatbeltwhentherollbar
isinthedownposition.
•Driveslowlyandcarefully.
•Raisetherollbarassoonasclearance
permits.
•Checkcarefullyforoverheadclearances
(i.e.,branches,doorways,electricalwires)
beforedrivingunderanyobjectsanddo
notcontactthem.
LoweringtheRollBar
1.Tolowertherollbar,applyforwardpressureto
theupperpartoftherollbar.
2.Pullbothknobsoutandrotatethem90°sothat
theyarenotengaged(Figure11).
3.Lowertherollbartothedownposition(Figure
11).
18

g008943
Figure11
1.ROPSknob3.Rollbarintheupright
position
2.PulltheROPSknobout
androtateit90degrees.
4.Rollbarinthefolded
position
RaisingtheRollBar
1.Toraisetherollbar,raisetherollbartothe
operateposition,rotatetheknobssothatthey
movepartiallyintothegrooves(Figure11).
2.Raisetherollbartothefulluprightpositionwhile
pushingontheupperrollbarandthepinswill
snapintopositionwhentheholesalignwiththe
pins(Figure11).
3.Pushtherollbarandensurethatbothpinsare
engaged.
ThinkSafetyFirst
Pleasereadallsafetyinstructionsandsymbolsinthe
safetysection.Knowingthisinformationcouldhelp
youorbystandersavoidinjury.
DANGER
Operatingthemachineonwetgrassorsteep
slopescancauseslidingandlossofcontrol.
•Donotoperateonslopesgreaterthan15
degrees.
•Reducespeedanduseextremecautionon
slopes.
•Donotoperatethemachinenearwater.
DANGER
Wheelsdroppingoveredgescancause
rollovers,whichmayresultinseriousinjury,
death,ordrowning.
Donotoperatethemachineneardrop-offs.
DANGER
Operatingthemachinewhiletherollbaris
downmayleadtoseriousinjuryordeathin
theeventofarollover.
Alwayskeeptherollbarinthefullyraisedand
lockedpositionandusetheseatbelt.
g000963
Figure12
1.SafeZone—usethe
ZMasterhereonslopes
lessthan15degreesor
atareas.
3.Water
2.DangerZone—usea
walk-behindmowerand/or
ahandtrimmeronslopes
greaterthan15degrees,
neardrop-offsandwater.
19

CAUTION
Thismachineproducessoundlevelsin
excessof85dBAattheoperator’searand
cancausehearinglossthroughextended
periodsofexposure.
Wearhearingprotectionwhenoperatingthis
machine.
g009027
Figure13
1.Weareyeprotection.2.Wearhearingprotection.
OperatingtheParking
Brake
Alwayssettheparkingbrakewhenyoustopthe
machineorleaveitunattended.
SettingtheParkingBrake
WARNING
Theparkingbrakemaynotholdthemachine
parkedonaslopeandcouldcausepersonal
injuryorpropertydamage.
Donotparkthemachineonslopesunlessthe
wheelsarechockedorblocked.
g027334
Figure14
ReleasingtheParkingBrake
g027335
Figure15
20
Other manuals for Z Master 3000 SERIES
2
Table of contents
Other Toro Lawn Mower manuals

Toro
Toro Reccycler User manual

Toro
Toro 04052 Greensmaster 1000 User manual

Toro
Toro 4021 User manual

Toro
Toro 21472 User manual

Toro
Toro LX426 User manual

Toro
Toro Recycler 20961 User manual

Toro
Toro 20040 User manual

Toro
Toro 71242 Wheel Horse 16-38HXLE User manual

Toro
Toro 22296 User manual

Toro
Toro Z Master 74028 Manual

Toro
Toro 74234 User manual

Toro
Toro Reelmaster 3555 User manual

Toro
Toro Reelmaster 5100-D User manual

Toro
Toro 20066 User manual

Toro
Toro Groundsmaster 3500 30807 User manual

Toro
Toro 74199 User manual

Toro
Toro Recycler 20954 User manual

Toro
Toro Titan 136-1654 User manual

Toro
Toro Greensmaster 1018 User manual

Toro
Toro 74390 User manual