Toro 30094 User manual

FormNo.3359-493RevA
CommercialWalk-BehindMower
FloatingDeck,T-Bar,Gearwith36in,40in,
48inor52inTURBOFORCE®CuttingUnit
ModelNo.30094—SerialNo.280000001andUp
ModelNo.30096—SerialNo.280000001andUp
ModelNo.30098—SerialNo.280000001andUp
ModelNo.30099—SerialNo.280000001andUp
Registeratwww.Toro.com.OriginalInstructions(EN)

Warning
CALIFORNIA
Proposition65Warning
Theengineexhaustfromthisproduct
containschemicalsknowntotheStateof
Californiatocausecancer,birthdefects,
orotherreproductiveharm.
ThissparkignitionsystemcomplieswithCanadian
ICES-002.
Important:Thisengineisnotequippedwitha
sparkarrestermufer.ItisaviolationofCalifornia
PublicResourceCodeSection4442touseoroperate
theengineonanyforest-covered,brush-covered,or
grass-coveredland.Otherstatesorfederalareas
mayhavesimilarlaws.
Theenclosed
Engine Owner’ s Man ual
issupplied
forinformationregardingtheUSEnvironmental
ProtectionAgency(EPA)andtheCalifornia
EmissionControlRegulationofemissionsystems,
maintenance,andwarranty.Replacementsmaybe
orderedthroughtheenginemanufacturer.
Introduction
Readthisinformationcarefullytolearnhowtooperate
andmaintainyourproductproperlyandtoavoidinjury
andproductdamage.Youareresponsibleforoperating
theproductproperlyandsafely.
YoumaycontactTorodirectlyatwww.Toro.comfor
productandaccessoryinformation,helpndinga
dealer,ortoregisteryourproduct.
Wheneveryouneedservice,genuineToroparts,or
additionalinformation,contactanAuthorizedService
DealerorToroCustomerServiceandhavethemodel
andserialnumbersofyourproductready.Figure1
identiesthelocationofthemodelandserialnumbers
ontheproduct.Writethenumbersinthespace
provided.
Figure1
1.Modelandserialnumberlocation
ModelNo.
SerialNo.
Thismanualidentiespotentialhazardsandhas
safetymessagesidentiedbythesafetyalertsymbol
(Figure2),whichsignalsahazardthatmaycauseserious
injuryordeathifyoudonotfollowtherecommended
precautions.
Figure2
1.Safetyalertsymbol
Thismanualuses2otherwordstohighlightinformation.
Importantcallsattentiontospecialmechanical
informationandNoteemphasizesgeneralinformation
worthyofspecialattention.
Contents
Introduction.................................................................2
Safety...........................................................................4
SafeOperatingPractices.......................................4
ToroMowerSafety...............................................5
SlopeChart..........................................................7
SafetyandInstructionalDecals.............................8
ProductOverview......................................................10
Controls.............................................................10
©2007—TheToro®Company
8111LyndaleAvenueSouth
Bloomington,MN554202
Contactusatwww.Toro.com.
PrintedintheUSA.
AllRightsReserved

Specications.....................................................11
Attachments/Accessories...................................11
Operation...................................................................12
AddingFuel.......................................................12
CheckingtheEngineOilLevel............................13
ThinkSafetyFirst...............................................13
UsingtheParkingBrake......................................13
StartingandStoppingtheEngine........................13
OperatingtheMowerPowerTakeOff
(PTO)............................................................14
TheSafetyInterlockSystem................................15
DrivingForwardorBackward.............................15
UsingtheLowerControlBar..............................15
StoppingtheMachine.........................................16
TransportingMachines.......................................16
SideDischargingorMulchingtheGrass..............17
AdjustingtheHeight-of-Cut...............................17
AdjustingtheAnti-ScalpRollers.........................17
AdjustingtheHandleHeight..............................18
AdjustingtheFlowBafe...................................19
PositioningtheFlowBafe.................................20
UsingtheMid-SizeWeight..................................21
Maintenance...............................................................22
RecommendedMaintenanceSchedule(s)................22
Lubrication.............................................................22
HowtoGrease...................................................22
LubricatingtheCasterandWheel
Bearings.........................................................23
GreasingtheTransmissionCouplers...................23
GreasingthePTODriveBeltIdlerandMower
DeckBeltIdler...............................................23
EngineMaintenance...............................................24
ServicingtheAirCleaner....................................24
ServicingtheEngineOil.....................................25
ServicingtheSparkPlugs....................................27
FuelSystemMaintenance.......................................28
DrainingtheFuelTank.......................................28
ReplacingtheFuelFilter.....................................29
ElectricalSystemMaintenance................................30
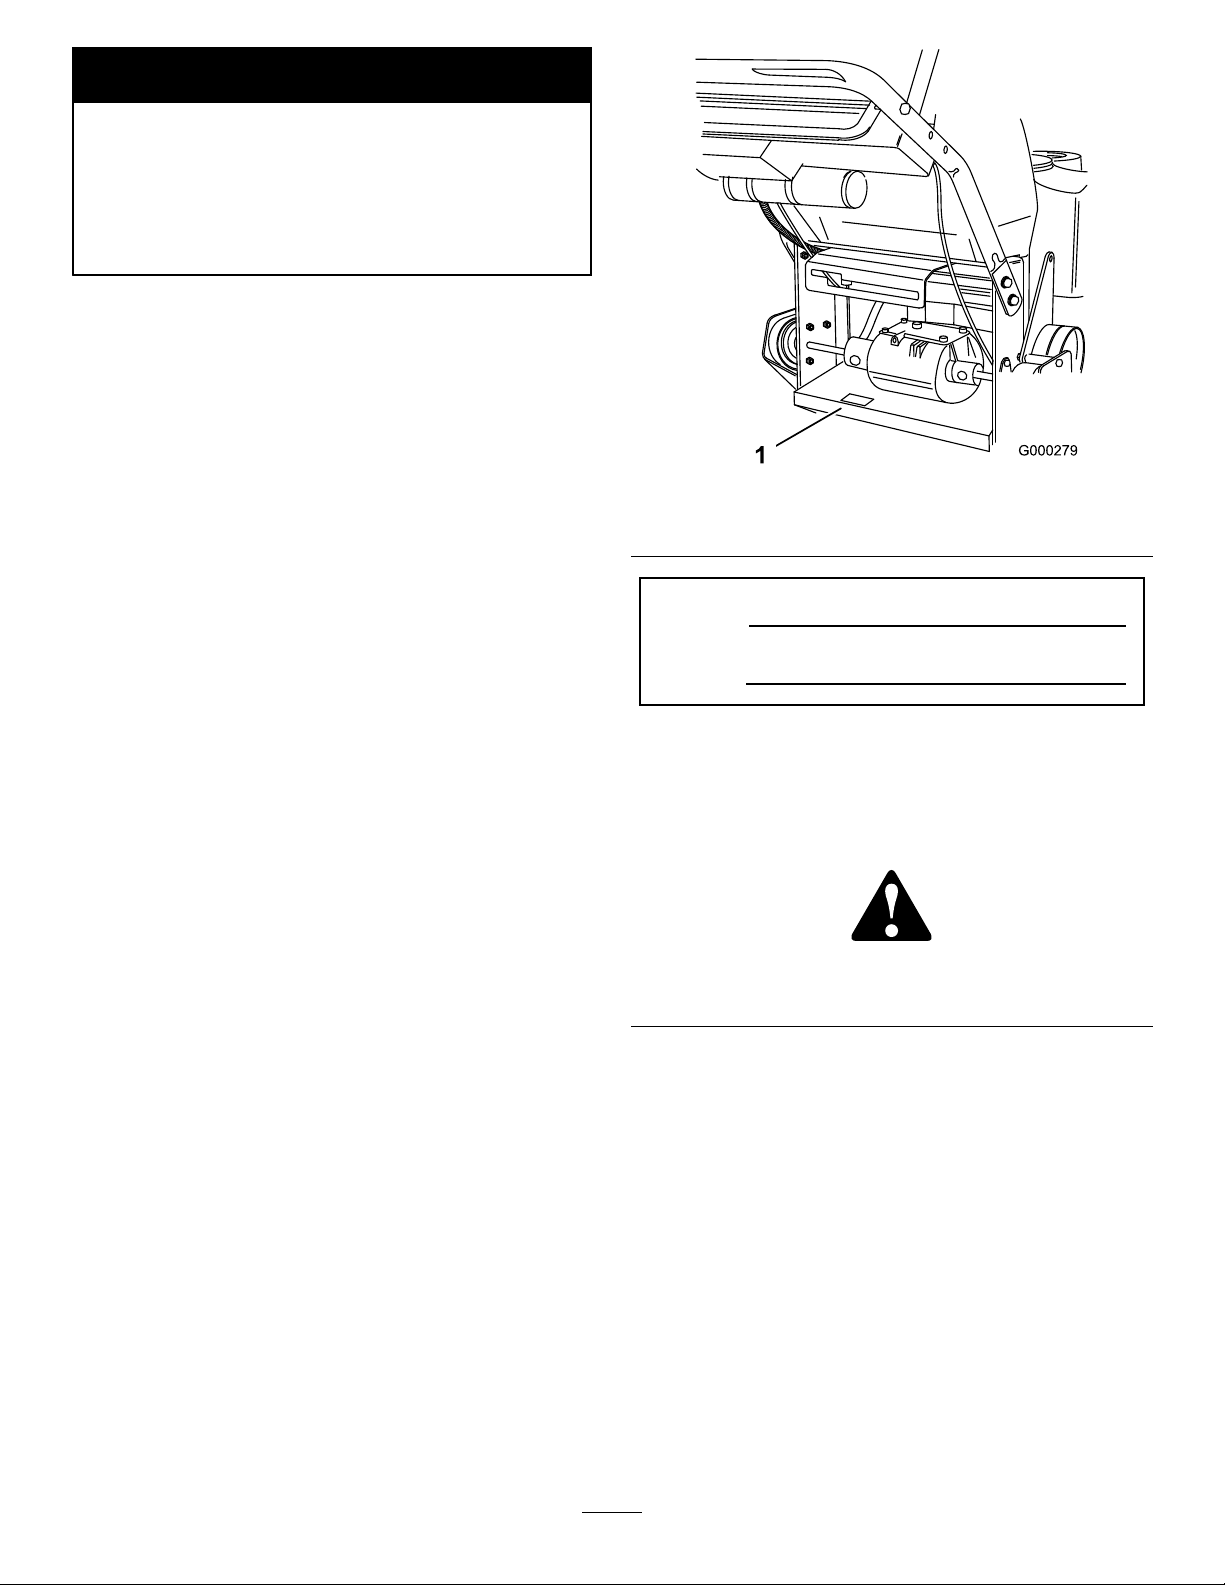
ServicingtheFuse..............................................30
DriveSystemMaintenance.....................................30
AdjustingtheControlBar...................................30
CheckingtheTirePressure.................................31
ReplacingtheCasterWheelFork
Bushings........................................................31
ServicingtheCasterWheelandBearings.............32
AdjustingtheElectricClutch..............................32
CoolingSystemMaintenance..................................33
CleaningtheAirIntakeScreen............................33
BrakeMaintenance.................................................34
ServicingtheBrakes...........................................34
BeltMaintenance....................................................35
ReplacingtheTractionDriveBelt........................35
ReplacingtheTransmissionBelt.........................35
ReplacingtheMowerBelt...................................35
ReplacingthePTODriveBelt.............................36
AdjustingthePTODriveBeltIdlerSpring
Anchor...........................................................37
MowerDeckMaintenance......................................38
ServicingtheCuttingBlades...............................38
CorrectingtheMowerQualityofCut..................40
FrameSetUp.....................................................40
CheckingtheMowerDeckFront-to-Rear
Pitch...............................................................42
ChangingtheMowerDeckFront-to-Rear
Pitch...............................................................42
CheckingtheMowerDeckSide-to-Side
Height............................................................43
ChangingtheMowerDeckSide-to-Side
Height............................................................43
MatchingHeightofCut......................................43
ReplacingtheGrassDeector.............................44
Storage.......................................................................45
CleaningandStorage..........................................45
Troubleshooting.........................................................46
Schematics.................................................................48
3

Safety
Note:Theadditionofattachmentsmadeby
othermanufacturersthatdonotmeetAmerican
NationalStandardsInstitutecerticationwillcause
noncomplianceofthismachine.
Improperuseormaintenancebytheoperatororowner
canresultininjury.Toreducethepotentialforinjury,
complywiththesesafetyinstructionsandalwayspay
attentiontothesafetyalertsymbol,whichmeans
CAUTION,WARNING,orDANGER-“personalsafety
instruction."Failuretocomplywiththeinstructionmay
resultinpersonalinjuryordeath.
SafeOperatingPractices
ThefollowinginstructionsarefromANSIstandard
B71.4-2004.
Training
•ReadtheOperator’sManualandothertraining
material.Iftheoperator(s)ormechanic(s)cannot
readEnglishitistheowner’sresponsibilitytoexplain
thismaterialtothem.
•Becomefamiliarwiththesafeoperationofthe
equipment,operatorcontrols,andsafetysigns.
•Alloperatorsandmechanicsshouldbetrained.The
ownerisresponsiblefortrainingtheusers.
•Neverletchildrenoruntrainedpeopleoperateor
servicetheequipment.Localregulationsmayrestrict
theageoftheoperator.
•Theowner/usercanpreventandisresponsiblefor
accidentsorinjuriesoccurringtohimselforherself,
otherpeopleorproperty.
Preparation
•Evaluatetheterraintodeterminewhataccessories
andattachmentsareneededtoproperlyand
safelyperformthejob.Onlyuseaccessoriesand
attachmentsapprovedbythemanufacturer.
•Wearappropriateclothingincludinghardhat,safety
glassesandhearingprotection.Longhair,loose
clothingorjewelrymaygettangledinmovingparts.
•Inspecttheareawheretheequipmentistobeused
andremoveallobjectssuchasrocks,toysandwire
whichcanbethrownbythemachine.
•Useextracarewhenhandlinggasolineandother
fuels.Theyareammableandvaporsareexplosive.
–Useonlyanapprovedcontainer
–Neverremovegascaporaddfuelwithengine
running.Allowenginetocoolbeforerefueling.
Donotsmoke.
–Neverrefuelordrainthemachineindoors.
•Checkthatoperator’spresencecontrols,safety
switchesandshieldsareattachedandfunctioning
properly.Donotoperateunlesstheyarefunctioning
properly.
Operation
•Neverrunanengineinanenclosedarea.
•Onlyoperateingoodlight,keepingawayfromholes
andhiddenhazards.
•Besurealldrivesareinneutralandparkingbrakeis
engagedbeforestartingengine.Onlystartengine
fromtheoperator’sposition.
•Besureofyourfootingwhileusingthismachine,
especiallywhenbackingup.Walk,don’trun.Never
operateonwetgrass.Reducedfootingcouldcause
slipping.
•Slowdownanduseextracareonhillsides.Besure
totravelsidetosideonhillsides.Turfconditions
canaffectthemachine’sstability.Usecautionwhile
operatingneardrop-offs.
•Slowdownandusecautionwhenmakingturnsand
whenchangingdirectionsonslopes.
•Neverraisedeckwiththebladesrunning.
•NeveroperatewiththePTOshield,orotherguards
notsecurelyinplace.Besureallinterlocksare
attached,adjustedproperly,andfunctioningproperly.
•Neveroperatewiththedischargedeectorraised,
removedoraltered,unlessusingagrasscatcher.
•Donotchangetheenginegovernorsettingor
overspeedtheengine.
•Stoponlevelground,disengagedrives,engage
parkingbrake,shutoffenginebeforeleavingthe
operator’spositionforanyreasonincludingemptying
thecatchersoruncloggingthechute.
•Stopequipmentandinspectbladesafterstriking
objectsorifanabnormalvibrationoccurs.Make
necessaryrepairsbeforeresumingoperations.
•Keephandsandfeetawayfromthecuttingunit.
•Lookbehindanddownbeforebackinguptobesure
ofaclearpath.
4

•Keeppetsandbystandersaway.
•Slowdownandusecautionwhenmakingturnsand
crossingroadsandsidewalks.Stopbladesifnot
mowing.
•Beawareofthemowerdischargedirectionanddo
notpointitatanyone.
•Donotoperatethemowerundertheinuenceof
alcoholordrugs.
•Usecarewhenloadingorunloadingthemachine
intoorfromatrailerortruck.
•Usecarewhenapproachingblindcorners,shrubs,
trees,orotherobjectsthatmayobscurevision.
Maintenanceandstorage
•Disengagedrives,setparkingbrake,stopengineand
removekeyordisconnectsparkplugwire.Waitfor
allmovementtostopbeforeadjusting,cleaningor
repairing.
•Cleangrassanddebrisfromcuttingunit,drives,
mufers,andenginetohelppreventres.Cleanup
oilorfuelspillage.
•Letenginecoolbeforestoringanddonotstorenear
ame.
•Shutofffuelwhilestoringortransporting.Donot
storefuelnearamesordrainindoors.
•Parkmachineonlevelground.Setparkingbrake.
Neverallowuntrainedpersonneltoservicemachine.
•Usejackstandstosupportcomponentswhen
required.
•Carefullyreleasepressurefromcomponentswith
storedenergy.
•Disconnectthebatteryorremovesparkplugwire
beforemakinganyrepairs.Disconnectthenegative
terminalrstandthepositivelast.Reconnectthe
positiverstandnegativelast.
•Usecarewhencheckingblades.Wraptheblade(s)or
weargloves,andusecautionwhenservicingthem.
Onlyreplaceblades.Neverstraightenorweldthem.
•Keephandsandfeetawayfrommovingparts.If
possible,donotmakeadjustmentswiththeengine
running.
•Keepallpartsingoodworkingconditionandall
hardwaretightened.Replaceallwornordamaged
decals.
ToroMowerSafety
Thefollowinglistcontainssafetyinformationspecic
toToroproductsandothersafetyinformationyoumust
know .
Thisproductiscapableofamputatinghandsand
feetandthrowingobjects.Alwaysfollowallsafety
instructionstoavoidseriousinjuryordeath.
Thisproductisdesignedforcuttingandrecyclinggrass
or,whenequippedwithagrassbagger,forcatching
cutgrass.Anyuseforpurposesotherthanthesecould
provedangeroustouserandbystanders.
GeneralOperation
•Besuretheareaisclearofotherpeoplebefore
mowing.Stopthemachineifanyoneentersthearea.
•Donottouchequipmentorattachmentpartswhich
maybehotfromoperation.Allowtocoolbefore
attemptingtomaintain,adjustorservice.
•UseonlyToroapprovedattachments.Warrantymay
bevoidedifusedwithunapprovedattachments.
•Checkcarefullyforoverheadclearances(i.e.
branches,doorways,electricalwires)before
operatingunderanyobjectsanddonotcontact
them.
SlopeOperation
Allslopesandrampsrequireextracaution.Ifyoufeel
uneasyonaslope,donotmowit.
•Removeobstaclessuchasrocks,treelimbs,etc.from
themowingarea.
•Watchforholes,rutsorbumps.Tallgrasscanhide
obstacles.
•Usecautionneardrop-offs,ditches,orembankments.
Themachinecouldsuddenlyturnoverifawheel
goesovertheedgeofaclifforditch,orifanedge
cavesin.
•Useextracarewithgrasscatchersorother
attachments.Thesecanchangethestabilityofthe
machine.
•Keepallmovementonslopesslowandgradual.Do
notmakesuddenchangesinspeedordirection.
•Mowslopessidetoside.
•Donotmowslopesgreaterthan15degrees.
Service
•Neverstorethemachineorfuelcontainerinside
wherethereisanopename,suchasnearawater
heaterorfurnace.
•Keepnutsandboltstight,especiallytheblade
attachmentbolts.Keepequipmentingood
condition.
•Nevertamperwithsafetydevices.Checksafety
systemsforproperoperationbeforeeachuse.
5

•Useonlygenuinereplacementpartstoensurethat
originalstandardsaremaintained.
•Checkbrakeoperationfrequently.Adjustandservice
asrequired.
6

SlopeChart
7

SafetyandInstructionalDecals
Safetydecalsandinstructionsareeasilyvisibletotheoperatorandarelocatednearanyareaof
potentialdanger.Replaceanydecalthatisdamagedorlost.
43-8480
52-2010
66-1340
68-8340
82 - 2280
REVERSE TRACT ION DRIVE
82-2280
82-2290
95-2814
98-0776
98-3256
98-4387
1.Warning—wearhearingprotection.
98-5954
8

104-8185
104-8186
104-8569
105-7798
106-0699
110-2067
110-2068
1.ReadtheOperator’sManual.
106-0635
9

105-0884
110-4971
1.Engine—stop2.Engine—Start3.EngagebalethenpulloutonthePTO
toengagetheblade.
ProductOverview
Figure3
1.Sidedischargechute5.Controls
2.Mowerdeck6.Handle
3.Recoilstarter7.Casterwheel
4.Gastank
Controls
Becomefamiliarwithallthecontrols(Figure4)before
youstarttheengineandoperatethemachine.
Figure4
1.Gearshiftlever7.Bladecontrolbail
2.Powertakeoffswitch
(PTO)
8.Uppercontrolbar
3.Chokecontrol9.Upperhandle
4.Lowerhandle10.Throttlecontrol
5.Lowercontrolbar11.Ignitionswitch
6.Parkingbrake
lever-releasedposition
12.Fuelshut-offvalve
ThrottleControl
Thethrottlecontrolhastwopositions:FastandSlow.
Choke
Usethechoketostartacoldengine.
10

BladeControlBail
Thebailisusedinconjunctionwiththepowertakeoff
switch(PTO)toengagetheclutchtodrivethemower
blades.Releasethemowercontrolbailtodisengagethe
mowerblades.
PowerTakeOffSwitch(PTO)
Thispullswitchisusedinconjunctionwiththeblade
controlbailtoengagetheclutchtodrivethemower
blades.
GearShiftLever
Thetransmissionhasveforwardspeeds,neutraland
reverse,andhasanin-lineshiftpattern.
Important:Donotshiftwhileunitismoving,as
transmissiondamagemayoccur.
UpperControlBar
Shifttothedesiredgearandpushforwardontheupper
controlbartoengageforwardtractionoperationand
pullbacktobrakeforwardmovement.Pullbackon
rightsideofuppercontrolbartoturnrightandleftside
toturnleft.
LowerControlBar
Shifttransmissiontoreverseandsqueezethelower
controlbarandhandletogethertoengagerearward
tractionassistoperation.
ParkingBrakeLever
Pullbackonuppercontrolbarandswingbrakeleverup
againsttheupperhandle(Figure4).
IgnitionSwitch
Thisswitchisusedinconjunctionwithrecoilstarterand
hastwopositions:RunandOff.
RecoilStarter
Pullrecoilstarterhandletostartengine(notshownin
Figure4).
FuelShut-offValve
Closethefuelshut-offvalvewhentransportingor
storingmower.
Specications
Note:Specicationsanddesignaresubjecttochange
withoutnotice.
36inchmowers:
Widthwithdeectordown51–1/8inches(130cm)
Length82–3/4inches(210cm)
Heightwithhandleinlowest
position
41–3/16inches(105cm)
Weight588lb(267kg)
40inchmowers:
Widthwithdeectordown55–1/2inches(141cm)
Length79–1/2inches(202cm)
Heightwithhandleinlowest
position
41–3/16inches(105cm)
Weight596lb(270kg)
48inchmowers:
Widthwithdeectordown63–1/2inches(161cm)
Length82inches(208cm)
Heightwithhandleinlowest
position
41–3/16inches(105cm)
Weight649lb(294kg)
52inchmowers:
Widthwithdeectordown67–5/8inches(171.7cm)
Length82inches(208cm)
Heightwithhandleinlowest
position
41–3/16inches(105cm)
Weight684lb(310kg)
Attachments/Accessories
AselectionofToroapprovedattachmentsand
accessoriesareavailableforusewiththemachineto
enhanceandexpanditscapabilities.Contactyour
AuthorizedServiceDealerorDistributororgoto
www.Toro.comforalistofallapprovedattachments
andaccessories.
11

Operation
Note:Determinetheleftandrightsidesofthe
machinefromthenormaloperatingposition.
AddingFuel
Useunleadedregulargasolinesuitableforautomotive
use(85pumpoctaneminimum).Leadedregular
gasolinemaybeusedifunleadedregularisnotavailable.
Important:Neverusemethanol,gasoline
containingmethanol,orgasoholcontainingmore
than10%ethanolbecausethefuelsystemcouldbe
damaged.Donotmixoilwithgasoline.
Incertainconditions,gasolineisextremely
ammableandhighlyexplosive.Areor
explosionfromgasolinecanburnyouand
othersandcandamageproperty.
•Fillthefueltankoutdoors,inanopenarea,
whentheengineiscold.Wipeupany
gasolinethatspills.
•Neverllthefueltankinsideanenclosed
trailer.
•Donotllthefueltankcompletelyfull.Add
gasolinetothefueltankuntilthelevelis1/4
to1/2inch(6to13mm)belowthebottomof
thellerneck.Thisemptyspaceinthetank
allowsgasolinetoexpand.
•Neversmokewhenhandlinggasoline,and
stayawayfromanopenameorwhere
gasolinefumesmaybeignitedbyaspark.
•Storegasolineinanapprovedcontainerand
keepitoutofthereachofchildren.Never
buymorethana30-daysupplyofgasoline.
•Donotoperatewithoutentireexhaust
systeminplaceandinproperworking
condition.
Incertainconditionsduringfueling,static
electricitycanbereleasedcausingaspark
whichcanignitethegasolinevapors.Are
orexplosionfromgasolinecanburnyouand
othersandcandamageproperty.
•Alwaysplacegasolinecontainersonthe
groundawayfromyourvehiclebeforelling.
•Donotllgasolinecontainersinsidea
vehicleoronatruckortrailerbedbecause
interiorcarpetsorplastictruckbedliners
mayinsulatethecontainerandslowtheloss
ofanystaticcharge.
•Whenpractical,removegas-powered
equipmentfromthetruckortrailerand
refueltheequipmentwithitswheelsonthe
ground.
•Ifthisisnotpossible,thenrefuelsuch
equipmentonatruckortrailerfroma
portablecontainer,ratherthanfroma
gasolinedispensernozzle.
•Ifagasolinedispensernozzlemustbeused,
keepthenozzleincontactwiththerimof
thefueltankorcontaineropeningatall
timesuntilfuelingiscomplete.
Gasolineisharmfulorfatalifswallowed.
Long-termexposuretovaporscancauseserious
injuryandillness.
•Avoidprolongedbreathingofvapors.
•Keepfaceawayfromnozzleandgastankor
conditioneropening.
•Keepgasawayfromeyesandskin.
UsingStabilizer/Conditioner
Useafuelstabilizer/conditionerinthemachineto
providethefollowingbenets:
•Keepsgasolinefreshduringstorageof90daysor
less.Forlongerstorageitisrecommendedthatthe
fueltankbedrained.
•Cleanstheenginewhileitruns
•Eliminatesgum-likevarnishbuildupinthefuel
system,whichcauseshardstarting
12

Important:Donotusefueladditivescontaining
methanolorethanol.
Addthecorrectamountofgasstabilizer/conditioner
tothegas.
Note:Afuelstabilizer/conditionerismosteffective
whenmixedwithfreshgasoline.Tominimizethe
chanceofvarnishdepositsinthefuelsystem,usefuel
stabilizeratalltimes.
FillingtheFuelTank
1.Shuttheengineoffandsettheparkingbrake.
2.Cleanaroundeachfueltankcapandremovethecap.
3.Addunleadedregulargasolinetobothfueltanks,
untilthelevelis1/4to1/2inch(6mmto13mm)
belowthebottomofthellerneck.
Thisspaceinthetankallowsgasolinetoexpand.
Donotllthefueltankscompletelyfull.
4.Installfueltankcapssecurely.
5.Wipeupanygasolinethatmayhavespilled.
CheckingtheEngineOilLevel
Beforeyoustarttheengineandusethemachine,check
theoillevelintheenginecrankcase;refertoChecking
OilLevelinEngineMaintenance,page24
Note:Determinetheleftandrightsidesofthe
machinefromthenormaloperatingposition.
ThinkSafetyFirst
Carefullyreadallthesafetyinstructionsanddecalsin
thesafetysection.Knowingthisinformationcould
helpyouoranybystandersavoidinjury.
Theuseofprotectiveequipmentforeyes,hearing,feet
andheadisrecommended.
Thismachineproducessoundlevelsinexcess
of85dBAattheoperator’searandcancause
hearinglossthroughextendedperiodsof
exposure.
Wearhearingprotectionwhenoperatingthis
machine.
Figure5
1.Warning—wearhearingprotection.
UsingtheParkingBrake
Stoponlevelground,disengagedrives,engageparking
brake,shutoffengineandremovekey.Alwayssetthe
parkingbrakewhenyoustopthemachineorleaveit
unattended.
SettingtheParkingBrake
1.Pulltheuppercontrolbar(Figure6)rearwardand
holditinthisposition.
2.Lifttheparkingbrakelock(Figure6)upand
graduallyreleasetheuppercontrolbar.Thebrake
lockshouldstayintheset(locked)position.
Figure6
1.Uppercontrolbar3.Fixedbar
2.Parkingbrakelever-set
position
ReleasingtheParkingBrake
1.Pullrearwardontheuppercontrolbar.Lowerthe
parkingbrakelocktothereleasedposition.
2.Graduallyreleasetheuppercontrolbar.
StartingandStoppingthe
Engine
StartingtheEngine
1.Makesuresparkplugwire(s)areinstalledonspark
plug(s)andfuelvalveisopen.
13

2.Movetheshiftlevertoneutral,settheparkingbrake
andturnignitionkeytorun.
3.Movethethrottlecontroltofastandmovethe
chokelevertotheonpositionbeforestartingacold
engine.
Note:Awarmorhotengineusuallydoesnot
requireanychoking.Tostartawarmengine,move
throttlecontroltothefastposition.
4.Grasprecoilstarterhandlermlyandpullout
untilpositiveengagementresults;thenpullhandle
vigorouslytostartengineandallowropetorecoil
slowly.
Important:Donotpullrecoilropetoitslimit
orletgoofthestarterhandlewhenropeis
pulledoutbecauseropemaybreakorrecoil
assemblymaybedamaged.
StoppingtheEngine
1.Movethethrottlelevertotheslowposition
(Figure7).
2.Letengineidlefor30to60secondsbeforeturning
theignitionkeytooff.
3.Turntheignitionkeytooff(Figure7).
Figure7
1.Throttlelever2.Ignitionkey
4.Settheparkingbrakeandremovekey.
5.Pullthewireoffsparkplug(s)topreventpossibility
ofaccidentalstartingbeforestoringmachine.
6.Closethefuelshutoffvalvebeforestoringmachine.
Important:Makesurethefuelshutoffvalveis
closedbeforetransportingorstoringmachine,
asfuelleakagemayoccur.
OperatingtheMowerPower
TakeOff(PTO)
Thepowertakeoffswitch(PTO)inconjunctionwith
thebladecontrolbailengagesanddisengagespowerto
theelectricclutchandmowerblades.
EngagingtheMowerBlades(PTO)
1.Releasetheuppercontrolbartostopthemachine
(Figure8).
2.Toengagetheblades,squeezebladecontrolbail
againsttheuppercontrolbar(Figure8).
3.Pullthepowertakeoffswitch(PTO)upand
release.Holdthebladecontrolbailagainstthe
uppercontrolbarwhileoperating.
4.Repeattheproceduretoengagethemowerbladesif
thebladecontrolbailisreleased.
Figure8
1.Uppercontrolbar3.Powertakeoffswitch
(PTO)
2.Bladecontrolbail
DisengagingtheMowerBlades(PTO)
Releasethebladecontrolbailtodisengagetheblades
(Figure8).
14

TheSafetyInterlockSystem
Ifthesafetyinterlockswitchesaredisconnected
ordamagedthemachinecouldoperate
unexpectedlycausingpersonalinjury.
•Donottamperwiththeinterlockswitches.
•Checktheoperationoftheinterlock
switchesdailyandreplaceanydamaged
switchesbeforeoperatingthemachine.
UnderstandingtheSafetyInterlock
System
Thesafetyinterlocksystemisdesignedtopreventthe
mowerbladesfromrotatingunless:
•Thecontrolbailispressedagainsttheuppercontrol
bar.
•Thepowertakeoffswitch(PTO)ispulledon.
Thesafetyinterlocksystemisdesignedtostopthe
mowerbladesifyoureleasethebladecontrolbail.
TestingtheSafetyInterlockSystem
ServiceInterval:Beforeeachuseordaily
Testthesafetyinterlocksystembeforeyouusethe
machineeachtime.
Note:Ifthesafetysystemdoesnotoperateas
describedbelow,haveanAuthorizedServiceDealer
repairthesafetysystemimmediately.
1.Settheparkingbrakeandstarttheengine;referto
StartingandStoppingtheEngine.
2.Squeezethebladecontrolbailagainstuppercontrol
bar.Thebladesshouldnotrotate.
3.Thencontinueholdingthebladecontrolbailand
pulluponthebladecontrolswitchandrelease.The
clutchshouldengageandthemowerbladesbegin
rotating.
4.Releasethebladecontrolbail.Thebladesshould
stoprotating.
5.Withtheenginerunning,pullupthepowertakeoff
switch(PTO)andreleasewithoutholdingtheblade
controlbail.Thebladesshouldnotrotate.
DrivingForwardorBackward
Thethrottlecontrolregulatestheenginespeedas
measuredinRPM(revolutionsperminute).Placethe
throttlecontrolinthefastpositionforbestmowing
performance.
DrivingForward
1.Togoforward,movetheshiftlevertoaforward
gear(Figure9).
2.Releasetheparkingbrake;refertoReleasingthe
ParkingBrakeinOperation.
3.Slowlypressontheuppercontrolbartomove
forward(Figure9).
Togostraight,applyequalpressuretobothendsof
theuppercontrolbar(Figure9).
Toturn,releasepressureontheuppercontrolbar
sideinthedirectionyouwanttoturn(Figure9).
Figure9
1.Uppercontrolbar3.Shiftlever
2.Lowercontrolbar
DrivingBackward
1.Togobackward,movetheshiftlevertoreversegear.
2.Releasetheparkingbrake;refertoReleasingthe
ParkingBrake.
3.Slowlysqueezethelowercontrolbarandlower
handletogethertomoverearward(Figure9).
UsingtheLowerControlBar
Thisprocedureisfordrivingupacurb.Thiscanbe
performedwhiledrivingforwardorbackward.
Note:Somecurbsdonotallowthereardrivetiresto
contactthecurb.Ifthishappens,drivethemachineup
thecurbatanangle.
15

Abladecanbebentordamagedwhendriving
upacurb.Piecesofbladethatmaybethrown
couldseriouslyinjureorkillyouorbystanders.
Donotrunbladeswhiledrivingupacurb
forwardorbackward.
DrivingForwardUpaCurb
1.Disengagethemowerblades.
2.Selectrstgeartodrivethemachine.
3.Drivemachineuntilthecastorwheelscontactthe
curb(Figure10).
4.Liftthefrontofthemachinebypushingdownon
thelowerhandle(Figure10).
5.Drivethemachineuntildrivewheelscontactthe
curb(Figure10).
6.Lowerthefrontofthemachine(Figure10).
Note:Bothdrivewheelsshouldcontactthecurb
andcasterwheelsstraight.
7.Atthesametime,engagethelowercontrolbarand
liftuponthelowerhandletodriveoverthecurb
(Figure9andFigure10).
Note:Liftinguponthelowerhandlewillassist
drivingthemachineupacurbandnotspinthe
drivewheels.
Figure10
1.LowerControlBar
engagedandmower
inreverse.
3.LowerControlBar
engagedandmower
goingforward.
2.Pulluptoassistmachine
DrivingBackwardUpaCurb
1.Disengagethemowerblades.
2.Selectreversetodrivemachine.
3.Drivethemachineuntildrivewheelscontactcurb
(Figure10).
Note:Bothdrivewheelsshouldcontactthecurb
andcasterwheelsstraight.
4.Atthesametimeengagelowercontrolbarandlift
uponthelowerhandle(Figure9andFigure10).
Note:Liftinguponthelowerhandlewillassist
drivingthemachineupacurbandnotspinthe
drivewheels.
StoppingtheMachine
Tostopthemachine,pullbackontheuppercontrol
bar,releasethebladecontrolbail,andturntheignition
keytooff.Alsosettheparkingbrakeifyouleavethe
machineunattended;refertoSettingtheParkingBrake
inOperation,page12.Remembertoremovethekey
fromtheignitionswitch.
Childrenorbystandersmaybeinjuredifthey
moveorattempttooperatethemachinewhile
itisunattended.
Alwaysremovetheignitionkeyandsetthe
parkingbrakewhenleavingthemachine
unattended,evenifjustforafewminutes.
TransportingMachines
Useaheavy-dutytrailerortrucktotransportthe
machine.Ensurethatthetrailerortruckhasall
necessarybrakes,lighting,andmarkingasrequiredby
law .Pleasecarefullyreadallthesafetyinstructions.
Knowingthisinformationcouldhelpyou,yourfamily,
petsorbystandersavoidinjury.
Totransportthemachine:
1.Ifusingatrailer,connectittothetowingvehicle
andconnectthesafetychains.
2.Ifapplicable,connectthetrailerbrakes.
3.Loadthemachineontothetrailerortruck.
4.Stoptheengine,removethekey,setthebrake,and
closethefuelvalve.
5.Usethemetaltiedownloopsonthemachineto
securelyfastenthemachinetothetrailerortruck
withstraps,chains,cable,orropes(Figure11).
16

Figure11
1.Tractionunittiedownloop
SideDischargingorMulching
theGrass
Thismowerhasahingedgrassdeectorthatdisperses
clippingstothesideanddowntowardtheturf.
Withoutthegrassdeector,dischargecover,
orcompletegrasscatcherassemblymounted
inplace,youandothersareexposedtoblade
contactandthrowndebris.Contactwith
rotatingmowerblade(s)andthrowndebriswill
causeinjuryordeath.
•Neverremovethegrassdeectorfrom
themowerbecausethegrassdeector
routesmaterialdowntowardtheturf.Ifthe
grassdeectoriseverdamaged,replaceit
immediately.
•Neverputyourhandsorfeetunderthe
mower.
•Nevertrytocleardischargeareaormower
bladesunlessyoureleasethebailandthe
powertakeoff(PTO)isoff.Rotatethe
ignitionkeytoOff.Alsoremovethekeyand
pullthewire(s)offthesparkplug(s).
AdjustingtheHeight-of-Cut
Theheight-of-cutcanbeadjustedfrom1to4-1/2
inches(25to114mm)in1/4inch(6mm)increments.
Adjustmentisdonebyrelocatingfourhairpincotter
pinsindifferentholelocationsandbyaddingor
removingspacers.
Note:Allheight-of-cutpinsneedatleastonespacer
ordamagecanoccurtothebushingifnoneareused.
Note:Allheight-of-cutpinscanusetwospacers
maximum.
1.Selectholeinheight-of-cutpostandnumberof
spacerscorrespondingtotheheight-of-cutdesired
(Figure12).
2.Usingthelifthandle,raisesideofdeckandremove
hairpincotter(Figure12).
3.Addorremovespacersifneededandthenalignthe
holesandinsertthehairpincotter(Figure12).
Note:Spareheight-of-cutspacersmaybestored
onpostsandretainedbyahairpincotter.
Important:Allfourhairpincotterpinsmustbe
inthesameholelocationandwiththecorrect
numberofspacersforalevelcut.
Figure12
1.CarrierFrame4.Spacers
2.HairpinCotter5.Frontheight-of-cutpost
3.Backheight-of-cutpost
AdjustingtheAnti-Scalp
Rollers
Theanti-scalprollersneedtobeadjustedintheproper
holelocationforeachheight-of-cutposition.There
needstobe3/8inch(10mm)minimumclearance
abovetheground.
Note:Iftheanit-scalprollersareadjustedtoolow,it
cancauseexcesswearoftherollers.
17

1.Afteradjustingtheheight-of-cut,checkthe
anti-scalprollerssothatthereisaminimumof
3/8inch(10mm)clearanceabovetheground
(Figure13,Figure14,Figure15).
2.Ifadjustmentisneeded,removethebolt,washers
andnut(Figure13,Figure14,Figure15).
3.Selectaholepositionsotheanti-scalprollersare
aminimumof3/8inch(10mm)offtheground
(Figure13,Figure14,Figure15).
4.Installtheboltandnut(Figure13,Figure14,
Figure15).
Figure13
40inch,48inch,and52inchMowerDecks
1.Mowerdeck4.Anti-scalprollers
2.Bolt5.Nut
3.Spacer
Figure14
40inch,48inch,and52inchMowerDecks
1.Mowerdeck4.Bushing
2.Bolt5.Anti-scalprollers
3.Spacer6.Nut
Figure15
36inchMowerDeck
1.Mowerdeck4.Anti-scalprollers
2.Bolt5.Nut
3.Spacer
5.Incertainmowingconditionsandterrain,a
mismatchofcuttingheightmaybeseen.Adjusting
theoutsideanti-scalprollerstotheminimumsetting
of3/8inch(10mm)willhelppreventthemower
deckcuttingtoolowontheoutsideandminimize
themismatch.
AdjustingtheHandleHeight
Thehandlepositioncanbeadjustedtomatchthe
operator’sheightpreference.
18

1.Removethehairpincotter,washerandclevispin
securingcontrolrodttingtotheidlerbracket
(Figure16).
Figure16
1.Controlrodandtting4.Washer
2.Idlerbracket5.Hairpincotter
3.Clevispin6.Rodtting
2.Loosentheupperangebolts(3/8x1inch)and
theangenutsecuringthehandletotherearframe
(Figure17).
Figure17
1.Upperhandle5.Uppermountinghole
2.Rearframe6.Lowermountingholes
3.Flangenut,(3/8inch)7.Lowposition
4.Flangebolt,(3/8x1inch)8.Highposition
3.Removethelowerangebolts(3/8x1inch)and
angenutssecuringthehandletotherearframe
(Figure17).
4.Pivotthehandletothedesiredoperatingposition
andinstallthelowerangebolts(3/8x1inch)and
theangenutsintothemountingholes.Tighten
allangebolts.
5.Checkthecontrolbarforcorrectadjustment.Refer
toAdjustingtheControlBarinthemaintenance
section.
6.Checktheparkingbrakeadjustment.Referto
CheckingtheBrakesinthemaintenancesection.
AdjustingtheFlowBafe
Themowerdischargeowcanbeadjustedfordifferent
typesofmowingconditions.Positionthecamlockand
bafetogivethebestqualityofcut.
1.DisengagethePTO,movethemotioncontrol
leverstotheneutrallockedpositionandsetthe
parkingbrake.
2.Stoptheengine,removethekey,andwaitforall
movingpartstostopbeforeleavingtheoperating
position.
3.Toadjustthecamlock,swingtheleveruptoloosen
thecamlock(Figure18).
4.Adjustthebafeandcamlockintheslottothe
desireddischargeow.
5.Swingtheleverbackovertotightenthebafeand
camlock(Figure18).
6.Ifthecamdoesnotlockthebafeintoplaceoritis
tootight,loosentheleverandthenrotatethecam
lock.Adjustthecamlockuntilthedesiredlocking
pressureisachieved.
Figure18
1.Camlock4.Slot
2.Lever5.Rotatethelevertorelease
orlockthecam
3.Rotatecamtoincreaseor
decreaselockingpressure
19

PositioningtheFlowBafe
Thefollowingguresareonlyrecommendationsfor
use.Adjustmentswillvarybygrasstype,moisture
content,andheightofgrass.
Note:Iftheenginepowerdrawsdownandthemower
groundspeedisthesame,openupthebafe.
PositionA
Thisisthefullrearposition(seeFigure19).The
suggesteduseforthispositionisafollows.
•Useforshort,lightgrassmowingconditions.
•Useindryconditions.
•Forsmallergrassclippings.
•Propelsgrassclippingsfartherawayfromthe
mower.
Figure19
PositionB
Usethispositionwhenbagging(Figure20).
Figure20
PositionC
Thisisthefullopenposition.Thesuggestedusefor
thispositionisasfollows(Figure21).
•Useintall,densegrassmowingconditions.
•Useinwetconditions.
•Lowerstheenginepowerconsumption.
•Allowsincreasedgroundspeedinheavyconditions.
•ThispositionissimilartothebenetsoftheToro
SFSmower.
Figure21
20
This manual suits for next models
3
Table of contents
Other Toro Mower manuals

Toro
Toro ProLine 30177 User manual

Toro
Toro 30250 User manual

Toro
Toro 74211 User manual

Toro
Toro 04060 Greensmaster 1600 User manual

Toro
Toro 39988 User manual

Toro
Toro 30338 User manual

Toro
Toro ProLine 30259 User manual

Toro
Toro ProLine 30334 User manual

Toro
Toro 74259 User manual

Toro
Toro 74171 User manual