manuals.online logo
Brands
  1. Home
  2. •
  3. Brands
  4. •
  5. Toshiba
  6. •
  7. Laptop
  8. •
  9. Toshiba T-Series T1200 User manual

Toshiba T-Series T1200 User manual

1.1
GENERAL
Toshiba
Personal
Computer
T1200
(hereinafter
referred
to
as
T1200)
is
a
portable
personal
computer
which
is
compatible
with
IBM
PC
situated
at
higher
rank
of
portable
computer
than
Toshiba
TllOO
PLUS.
It
provides
many
powerful
functions
in
spite
of
its
compact
size
and
internal
battery
pack
which
is
removal.
Hardware
of
the
T1200,
most
of
IC
chips
are
C-MOS
type
so
that
the
power
consumption
is
very
little
and
Gate
Array
chips
are
applied
so
that
it
is
very
compact
and
light
weight.
The
Tl200
is
composed
of
as
follows:
System
PCB
(Printed
curcuit
board)
3.5-inch
floppy
disk
drive
3.5-inch
hard
disk
drive
LCD
(Liquid
crystal
display)
Keyboard
Intelligent
power
supply
PCB
Built-in
modem
FIGURE
1-1
T1200
Personal
Computer
1-1
A
3.5-inch
Floppy
disk
drive
(FOO)
is
double-sided,
double-density,
double-track
with
storage
capacity
of
720
kilobytes
(formatted).
A
3.5-inch
hard
disk
drive
(HOD)
with
storage
capacity
of
20
megabytes
is
an
equipment
of
the
former.
The
high-resolution
liquid
crystal
display
(LCD)
with
pixels
of
640
in
columns
and
200
in
rows.
The
keyboard
has
82
keys.
For
most
applications
it
can
be
used
exactly
like
a
standard
typewriter
keyboard.
Intelligent
power
supply
apart
from
those
ordinary
power
serving
functions,
this
unit
contains
a
so-called
"one-chip
microcomputer",
and
it
controls
the
whole
system
PCB, FOO,
HOD
and
HOC.
The
built-in
modem
expands
the
capabilities
of
your
system.
The
built-in
modem
enables
the
system
to
communicate
with
an
asynchronous
communications
device
through
a
telephone
line.
The
modem
can
operate
communications
at
either
low
(300
bps)
or
high
(1200
bps)
speed.
The
T1200
provided
connecting
to
the
optional
devices
at
the
rear
panel
of
the
system.
There
are
six
connectors
such
as
a
parallel
printer,
an
RGB
direct
drive
CRT
display,
an
external
FOO,
an
external
key
pad
and
an
RS-232C
device.
1-2
1.2
SYSTEM PCB
System
PCB
is
composed
of
the
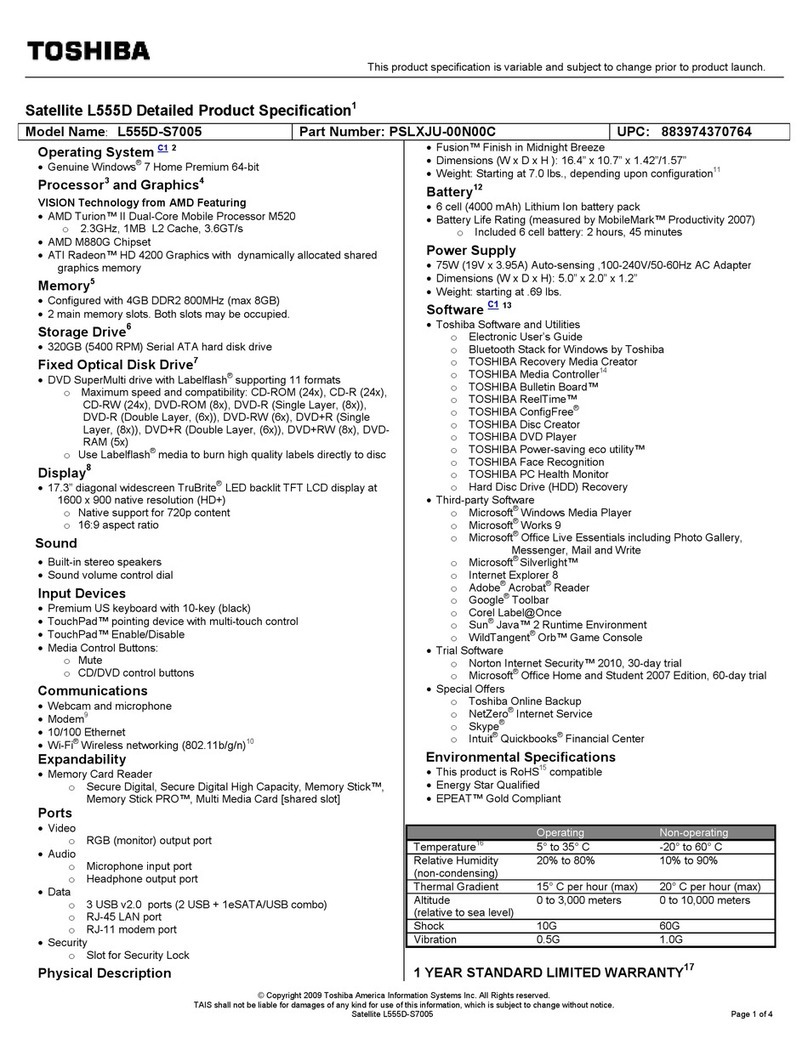
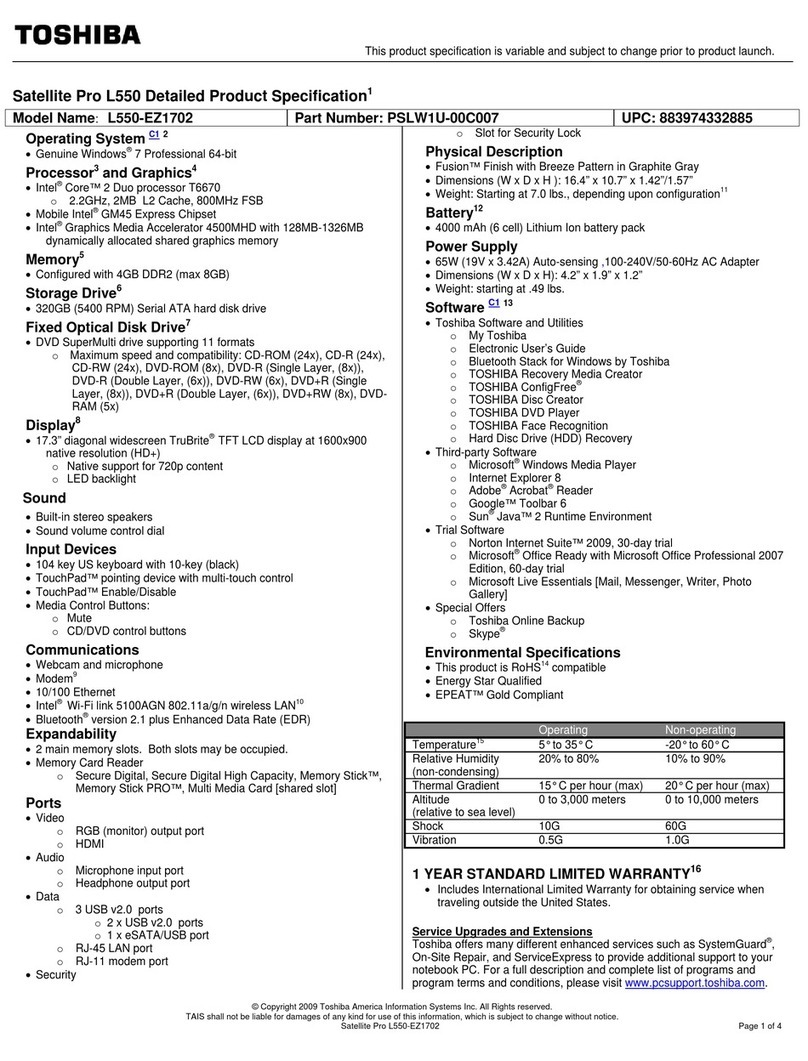
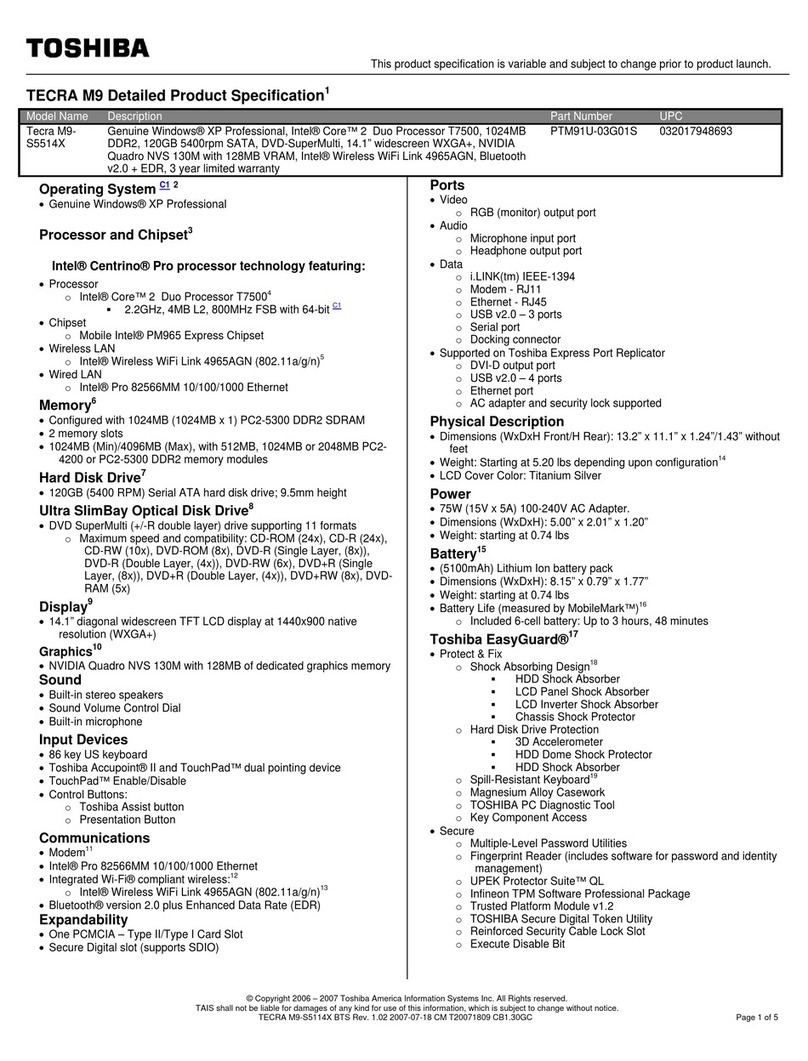
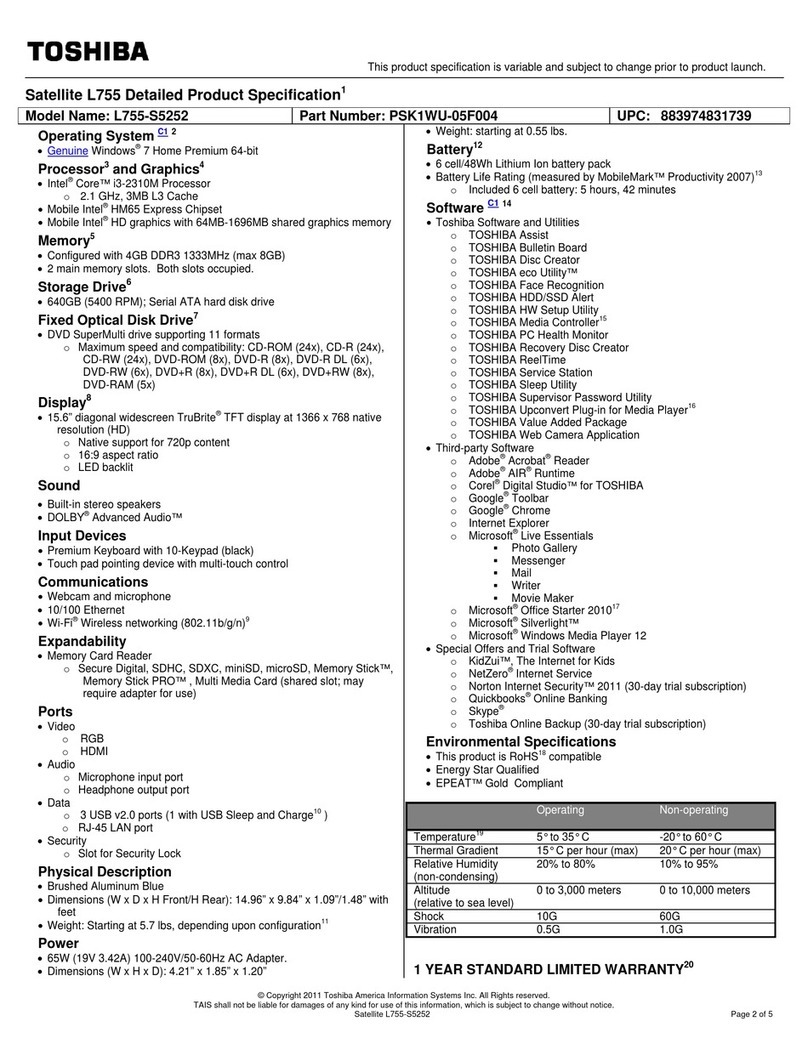
following
devices:
o
Central
processor:
CPU
(80C86-2)
(9.54
MHz/4.77
MHz)
o
Numeric
data
processor:
NPU
(8087,
optional)
o Memory
System
memory
Expanded
memory
BIOS
ROM
Video
RAM
640
kbytes
384
kbytes
32
kbytes
16
kbytes
o
System
support
elements
Direct
memory
access:
DMA
(82C37)
Timer
:
(82C53)
Programmable
interrupt
controller:
PIC
(82C59)
o
Floppy
disk
controller:
FDC
(8565)
o
Keyboard
controller:
KBC
(80C49)
o
Acynchronous
communication
element:
ACE
(8570)
o
Gate
array
Bus
driver
Bus
controller
EXP-MEM
controller
Display
controller
1-3
1.2.1
Jumper
straps
The
system
PCB
has
five
jumper
straps~
PJ17,
PJ18,
PJ19,
PJ20,
and
PJ2l.
The
following
figure
shows
location
of
the
jumper
straps.
I
PJ21
PJ18 PJ19
--
PJ20
I11III
PJ17
-
FIGURE
1-2
Jumper
Straps
Location
1-4
The
following
table
shows
function
of
the
jumper
straps.
TABLE
1-1
Jumper
Strap
Functions
Jumper Pins Description
D
F/F
type
PJ17
1 2
F/H
type
PJ18
D 3 Normal.
PJ18 PJ19 1 2
PJ19
PJ18
1 G When connect an
ICE
to
the
co-processor socket.
PJ19D
D Noco-processor.
PJ20
1 2 When connect a co-processor
to
the
co-
processor socket.
D Display a normal
font.
PJ21
1 2 Displays a
North
Europian (Denmark)
font.
1-5
1.3
3.5-rRCB
PLOPPY
DISK
DRIVE
The
floppy
disk
drive
(FDD)
used
in
the
T1200
is
high
performance,
high
reliable,
slim
sized
FDD
for
3.5-inch
floppy
disks
with
recording
capacity
of
1
Mbyte
(unformatted)
in
double-sided,
double
density
and
135
tracks
per
inch
operation.
The
specifications
are
as
following
table.
FIGURE
1-3
3.5-inch
FDD
T~BLE
1-2
3.5-inch
Floppy
Disk
Drive
Specifications
Item Specifications
Storage Capacity (kilobytes)
1000
(unformatted)
720
(formatted)
Number
of
Heads 2
Number
of
Track perSide
80
Track
to
Track
Access
(milliseconds) 6
Head Settling Time (milliseconds)
1S
Track Density (tracks persecond)
135
Motor
Start-up Time (milliseconds)
500
Data Transfer Rate (kilobits per second)
250
Rotational
Speed
(revolutions per minute)
300
Recording
Method
MFM
(Modified
frequency
modulation)
1-6
1.4
HARD
DISK
DRIVE
The
hard
disk
drive
(HDD)
is
random
access
storage,
having
recording
capacity
of
20
Mbytes.
This
is
equipped
with
the
storage
media
of
non-removable
3.S-inch
magnetic
disks
and
mini-winchester
type
magnetic
heads.
The
specifications
are
as
following
table.
FIGURE
1-4
3.5-inch
Hard
Disk
Drive
TABLE
1-3
3.5-inch
Hard
Disk
Drive
Specifications
Item Specifications
Storage Capacity (megabytes) 25.3
(unformatted)
21.4
(formatted)
Number
of
Heads 2
Number
of
Track perSide 615
Access
Time (milliseconds) (minimum) 24
(average) 78
(maximum) 130
Data Transfer Rate (megabits per second) 7.5
Rotational Speed (revolutions per minute) 2597
Recording
Method
2-7
RLL
(Run
length
limited)
1-7
1.5
BARD
DISK
COR~OL
PCB
Hard
disk
control
PCB
(HOC)
is
accompanied
by
hard
disk
drive
(HOD)
and
connects
to
the
system
PCB
through
a
cable.
This
HOC
can
interface
the
HOD
to
the
system
PCB.
The
specifications
are
as
following
table.
FIGURE
1-5
Hard
Disk
Control
PCB
TABLE
1-4
Hard
Disk
Control
PCB
Specifications
Item
Specifications
Encoding method 2-7
RLL
(Run Length Limited)
Data Transfer Rate (megabits per second) maximum
7.S
Write
Precompensation
time
(nanoseconds)
12
Sectorina Soft
1-8
1.6
KEYBOARD
The
keyboard
is
mounted
on
the
system
and
has
82
keys.
These
consist
of
48
standard
keys,
10
function
keys,
10
cursor
keys,
13
functional
keypads,
and
Fn
key.
The
keyboard
is
just
a
key
matrix
built
up
by
the
above
keys.
The
keyboard
is
connected
to
the
keyboard
controller
on
the
system
PCB
through
a
22-pin
flat
cable.
FIGURE
1-6
Keyboard
1-9
1.7
LIQUID
CRYS~AL
DISPLAY
The
liquid
crystal
display
(LCD)
is
a
graphics
type
display
unit
which
has
a
resolution
of
640
in
horizontal
(or
column)
by
200
in
vertical
(or
row)
directions.
This
unit
is
composed
of
the
display
panel,
power
supply
and
driver
circuits.
This
receives
timing
pulses,
four-bit
data
signals,
+5V
dc
and
-22V
dc
power
inputs
and
a
contrast
control
input
from
the
system
PCB.
All
timing
pulses
and
data
signals
are
TTL
level
compatible.
Specifications
are
as
following
table.
FIGURE
1-7
Liquid
Crystal
Display
TABLE
1-5
Liquid
Crystal
Display
Spesifications
Item Specification
Outline
Dimension (mm) 275.0 (W) x 126.0 (H) x 15.8(D)
Number
of
Dots 640 x 200
dots
Number
of
characters
80
x
25
(2000) Characters
(8 x 8
dot
format,
alpha-numeric)
Clear Viewing Area (mm) 231.0 (W) x 105.0 (H)
Dot
Size
(mm) 0.32 (W)
,0.46
(H)
Dot
Pitch (mm) 0.35 (W)
,0.49
(H)
Weight
(gram) Max.
500
1-10
1.
8Pt:MBk
SUPPLY PCB
The
power
supply
PCB
supplies
de
5,
12,
-22,
and
-9
volts
to
all
the
components
in
the
system.
It
is
an
intellegent
power
supply
using
a
I-chip
micro-computer
and
it
contains
the
following
functions.
Control
and
monitoring
of
the
stored
main
battery.
This
performs
recharge
control,
detection
of
the
available
capacity,
and
that
of
the
low
battery.
1.
Monitering
of
AC
adapter
2.
Monitering
of
DC
output
voltage
3.
Power
on/off
control
of
the
system
unit
4.
Self-diagnosis
of
the
power
supply
5.
Pays
a
role
of
interface
with
the
CPU
Communication
control
Reset
signal
generation
Low-battery
signal
generation
6.
Display
control
AC
adapter
connection
Battery
recharge
Abnormal
power
supply
Output
rating
is
as
following
table.
FIGURE
1-8
Power
Suplly
PCB
TABLE
1-6
Power
Supply
PCB
Output
Rating
FUNCTION
DC
VOLTAGE REGULATION
TOLERANCE
(%)
SYSTEM LOGIC, FDD
MOTOR
5 5
HOC,
HOD (LOGIC) 5 5
HOD (MOTOR) 5 10
CMOS, DRAM,
V-RAM,
B-RAM 5 5
RS-232C, I/O SLOT
12
5
HOD 12 5
LCD
-22 5
RS-232C BUILT IN
MODEM
OR
I/O SLOT -9 15
1-11
MAX.
CURRENT
0.7A
O.3A
1.3A
80mA
30mA
lOrnA
lOrnA
30mA
1.
9
BOILT-
IR
MOD!II
The
built-in
modem
is
connected
to
the
connector
that
is
used
exclusively
for
this
system
PCB.
Note
that
the
system
PCB
is
originally
provided
with
this
modem.
This
modem
can
operate
in
only
one
communication
mode,
the
BELL
103/212
communication.
T~e
specifications
are
as
following
table.
FIGURE
1-9
Built-in
Modem
TABLE
1-7
Built-in
Modem
Specifications
Item Specification
Data Format
Low Speed (300
BPS)
7
or
8 bits, 1
or
2stop bits
odd,
even
or
no
parity.
High Speed (1200
BPS)
7 bits,
no
parity, 2stop bits
7 bits,
e/o
parity, 1stop
bit
8 bits,
no
parity, 1stop
bit
Dialing Capability Tone
Diall
Pulse
Dial
Audio
Monitor
Speaker
Receive Sensitivity -4SdBm
1-12
1.9.1
Jumper
straps
The
built-in
modem
has
four
jumper
straps;
PJ3,
PJ4,
PJ5
and
PJ6.
The
following
table
shows
functions
of
the
jumper
straps.
TABLE
1-8
Jumper
Straps
Functions
Jumper Pins Description
D 3 Always set
joining
pins 1and
2.
PJ3
,..--..,
For adjustment
when
Modem
card
is
shipped.
1 12 3 1
L.
__
..I Never
use
these pins.
D 3 Alwaysset
joining
pins 1and
2.
PJ4
r--..,
For adjustment
when
Modem
card
is
shipped.
1 12 3 1
L.
__
..I Never
use
these pi
ns.
Joining pins 1and 2
is
the
same
as
setting a
D 3 Smartmodem 1200's
configuration
switch 1
UP.
This
is
the
setting required
for
most
applications. This setting enables data terminal
PJS
ready
(DTR).
r--.,
Joining pins 2 and 3
is
the
same
as
setting a
1 12 3 1 Smartmodem 1200's
configuration
switch 1
1..--..1
DOWN. This setting
sets
DTR
alwayus
TRUE.
Joining pins 1and 2
is
the
same
as
setting a
D Smartmodem 1200's
configuration
switch 6
UP.
3 This setting enables
the
computer
to
determine
if
a carrier signal
is
coming
from
a
distant
modem.
PJ6
Joining pins 2 and 3
is
the
same
as
setting a
,..--..,
Smartmodem 1200's
configuration
switch 6
1 12 3 1 DOWN. This setting means carrier
detect
is
L.
__
..I always
TRU
Eeven
if
there's
no
carrier coming
from
the
remote system.
1-13
2.1
GBRBRAL
These
problem
isolation
procedures
are
used
to
isolate
defective
FRUs
(field
replaceable
units)
to
be
replaced.
FRUs
consist
of
the
following:
1.
Power
supply
PCB
2.
System
PCB
3.
FDD
4 •
HDD
and
HOC
5.
Keyboard
6.
LCD
See
PART
4
for
detailed
replacement
procedures
instructions.
Test
program
operations.are
described
in
PART
3.
The
following
items
are
necessary
for
carrying
out
the
problem
isolation
procedures.
1.
T1200
Diagnostics
disk
2.
Flatbladed
screwdriver
3.
Work
disk
(for
FDD
testing)
4.
Cleaning
disk
kit
(for
FDD
testing)
5.
Multimeter
6.
Printer
port
LED
The
problem
isolation
flowchart
described
in
part
2.2
can
be
used
to
determine
the
necessary
isolation
procedures
to
be
followed
when
there
is
a
problem
with
the
T1200.
2.2
PROBLEM
ISOLA"l'IOR
~BAR-r
This
flowchart
is
used
as
a
guide
for
determining
which
FRU
is
defective.
Please
confirm
the
following
before
performing
the
flowchart
procedures.
1.
No
disk
is
in
the
FDD.
2.
The
HDD
switch
is
off.
3.
The
ac
adapter
is
disconnected.
4.
All
optional
equipment
is
disconnected.
See
next·
page.
2-1
Turn the
POWER
switch
off.
Perform
power
supply problem
:>..:.;N.;:.o_.lholat1on procedures
in
part
2.3.
Yes
Perfor.
system
PCB
problem
=>----!
..
,
isolation
procedures
in
part
2.4.
No
Perform
LCD
problem
isolation
~
__
~
procedures 1n
part
2.7.
Perform
syste.
PCB
proble.
~..:.;No~_,holat1on
procedures
in
part
2.4.
Perform system
PCB
proble.
~_N_o_~,
holat1on
procedures
in
part
2.4.
FIGURE
2-1
Problem
Isolation
Flowchart
2-2
Insert the diagnostics disk into the
FOO
and
press
any
key.
No
Perform
FOO
problem
isolation
=>'-;;"--!~Iprocedures
in part 2.5.
After confirming
which
diagnostic
test
caused
an
error
to
be
">---i~lgenerated.
Perform
the relevant
Yes
problem
isolation procedures. as
indicated
below.
1.
If
an
error
is
generated
on
the
system
test,
memory
test,
display
test
and
real
time
test,
go
to
system
PCB
isolation
procedures
in
part
2.4.
2.
If
an
error
is
generated
on
the
keyboard
test,
go
to
keyboard
isolation
procedures
in
part
2.8.
3.
If
an
error
is
generated
on
the
floppy
disk
test,
go
to
FDD
isolation
procedures
in
part
2.5.
2-3
2.3
POWBR
SUPPLY PCB lSOLA1'IOR
PROCEDURBS
This
section
describes
how
to
determine
whether
the
power
supply
PCB
is
defective
or
not.
The
procedures
below
are
outlined
in
the
following
pages.
They
should
be
performed
in
the
order
indicated.
PROCEDURE
1:
Battery
Check
PROCEDURE
2:
Power
Supply
Indicator
Check
PROCEDURE
3:
Connector
Check
PROCEDURE
4:
Output
Voltage
Check
PROCEDURE
5:
Power
Supply
PCB
Replacement
2-4
PROCEDURE 1
Battery
Check
1.
Turn
the
POWER
switch
off.
2.
Disconnect
the
ac
adapter.
3.
Turn
the
POWER
switch
on.
If
the
Low
Battery
indicator
lights,
plug
the
ac
adapter
into
the
DC
IN
l2V
jack.
If
the
indicator
then
goes
out,
the
battery
is
normal
and
you
should
go
to
PROCEDURE
3;
if
it
remains
lit,
go
to
PROCEDURE
2.
FIGURE
2-2
Battery
Check
2-5
PROCBDURB
2
Power
Supply
Indicator
Check
1.
Turn
the
POWER
switch
on.
2.
Plug
the
ac
adapter
into
an
electrical
outlet
and
the
DC
IN
l2V
jack.
3.
If
the
Power
Supply
indicator
lights,
its
meaning
depends
on
its
color
and
whether
it
blinks
or
not,
as
described
below.
RED/CONTINUOUSLY
LIT:
Current
is
flowing;
the
ac
adapter
is
normal.
GREEN/CONTINUOUSLY
LIT:
Either
the
main
disconnected,
or
current
flow
has
stopped
complete);
the
ac
adapter
is
normal.
battery
(charging
is
is
RED/BLINKING:
Current
is
not
being
supplied
by
the
ac
adapter;
the
adapter
must
be
replaced.
If
the
indicator
still
blinks
after
replacing
the
ac
adapter,
replace
the
power
supply
PCB.
(See
part
4.8)
4.
If
the
indicator
does
not
light
the
ac
adapter
must
be
replaced.
POWER
SUPPLY
INDICATOR
FIGURE
2-3
Power
Supply
Indicator
2-6
PROCEDURE 3
Connector
Check
1.
Turn
the
POWER
switch
off
and
disconnect
the
ac
adapter.
7.
Remove
the
top
cover
assembly.
(Refer
to
part
4.2.)
3.
If
the
three
power
supply
PCB
connectors
(PJ
2,
3,
and
4)
and
the
two
system
PCB
connectors
(PJ
9
and
12)
are
connected
properly,
go
to
PROCEDURE
4:
if
they
are
not
connected
properly,
reconnect
them.
FIGURE
2-4
Power
Supply
and
System
PCB
Connectors
2-7

Other manuals for T-Series T1200

2

Other Toshiba Laptop manuals

Toshiba M45-S2693 User manual

Toshiba

Toshiba M45-S2693 User manual

Toshiba Satellite L630 Series User manual

Toshiba

Toshiba Satellite L630 Series User manual

Toshiba 1130-S155 User manual

Toshiba

Toshiba 1130-S155 User manual

Toshiba M115 S1061 - Satellite - Celeron M 1.6 GHz User manual

Toshiba

Toshiba M115 S1061 - Satellite - Celeron M 1.6 GHz User manual

Toshiba Satellite A500 Series User manual

Toshiba

Toshiba Satellite A500 Series User manual

Toshiba P100-ST9612 User manual

Toshiba

Toshiba P100-ST9612 User manual

Toshiba A215-S4767 - Satellite - Turion 64 X2 2.2... User manual

Toshiba

Toshiba A215-S4767 - Satellite - Turion 64 X2 2.2... User manual

Toshiba Tecra A50 A Series User manual

Toshiba

Toshiba Tecra A50 A Series User manual

Toshiba Satellite C655 User manual

Toshiba

Toshiba Satellite C655 User manual

Toshiba A665D-S6096 User manual

Toshiba

Toshiba A665D-S6096 User manual

Toshiba Portege R835-P50 User manual

Toshiba

Toshiba Portege R835-P50 User manual

Toshiba F25Series User manual

Toshiba

Toshiba F25Series User manual

Toshiba Satellite Pro 425CDS User manual

Toshiba

Toshiba Satellite Pro 425CDS User manual

Toshiba X305-Q711 User manual

Toshiba

Toshiba X305-Q711 User manual

Toshiba Satellite 1100 User manual

Toshiba

Toshiba Satellite 1100 User manual

Toshiba M305DS4831 - Satellite - Turion X2 2 GHz User manual

Toshiba

Toshiba M305DS4831 - Satellite - Turion X2 2 GHz User manual

Toshiba Satellite 2100CDS User manual

Toshiba

Toshiba Satellite 2100CDS User manual

Toshiba A205-S4607 User manual

Toshiba

Toshiba A205-S4607 User manual

Toshiba Satellite P305-S8997E User manual

Toshiba

Toshiba Satellite P305-S8997E User manual

Toshiba A205-S4777 - Satellite - Core 2 Duo 1.66 GHz User manual

Toshiba

Toshiba A205-S4777 - Satellite - Core 2 Duo 1.66 GHz User manual

Toshiba SATELLITE 2610 Series User manual

Toshiba

Toshiba SATELLITE 2610 Series User manual

Toshiba A105-S2001 User manual

Toshiba

Toshiba A105-S2001 User manual

Toshiba A665-3DV6 User manual

Toshiba

Toshiba A665-3DV6 User manual

Toshiba L655-S5117 User manual

Toshiba

Toshiba L655-S5117 User manual

Popular Laptop manuals by other brands

Alienware Area-51m 766 user manual

Alienware

Alienware Area-51m 766 user manual

Dell Latitude 3379 owner's manual

Dell

Dell Latitude 3379 owner's manual

RM NB3000 user manual

RM

RM NB3000 user manual

Sony VAIO VPCEE22FX/WI Specifications

Sony

Sony VAIO VPCEE22FX/WI Specifications

Sony PCG-R505EL VAIO User Guide  (primary manual) user guide

Sony

Sony PCG-R505EL VAIO User Guide (primary manual) user guide

dynabook Portege X40L-K Series user manual

dynabook

dynabook Portege X40L-K Series user manual

Asus BX31LA E-manual

Asus

Asus BX31LA E-manual

Sony VGN-FE550G - VAIO - Core Duo 1.66 GHz Specifications

Sony

Sony VGN-FE550G - VAIO - Core Duo 1.66 GHz Specifications

Ctl Chromebook VX11 user manual

Ctl

Ctl Chromebook VX11 user manual

Sony VAIO VGN-CR540E/R Specifications

Sony

Sony VAIO VGN-CR540E/R Specifications

Lenovo ThinkPad Edge E220s user guide

Lenovo

Lenovo ThinkPad Edge E220s user guide

Alienware 17 R4 Service manual

Alienware

Alienware 17 R4 Service manual

Lenovo THINKPAD T41 Installationsanleitung

Lenovo

Lenovo THINKPAD T41 Installationsanleitung

Acer AN515-57-72SA user manual

Acer

Acer AN515-57-72SA user manual

LG 14ZB90Q Series owner's manual

LG

LG 14ZB90Q Series owner's manual

Dell Inspiron X200 user guide

Dell

Dell Inspiron X200 user guide

Samsung NP300u1a user guide

Samsung

Samsung NP300u1a user guide

Sony VAIO VGN-GS Series User guide and instruction manual

Sony

Sony VAIO VGN-GS Series User guide and instruction manual

manuals.online logo
manuals.online logoBrands
  • About & Mission
  • Contact us
  • Privacy Policy
  • Terms and Conditions

Copyright 2025 Manuals.Online. All Rights Reserved.