Toxic TXA-400 User manual

© TOXIC 2007
Page 1
Active
Subwoofersystem
Bedienungsanleitung
Owner´s manual
Mode d´emploi
TXA-400
Active 10" (200mm)
Subwoofer
800 W max

© TOXIC 2007
Page 2
Herzlichen Glückwunsch zum Erwerb dieses Produkts!
Der aktive Toxic Subwoofer ist eine Erweiterung Ihres Car Audio Systems.
Er ist leicht zu installieren und liefert einen druckvollen Bass im Ihrem Fahr-
zeug.
Sie sind jetzt stolzer Besitzer eines qualitativ hochwertigen activen subwoo-
fersystems der Ihnen über Jahre viel Freude bereiten wird.
Ihr neuer Subwoofer..........
..... ist die "ultimative" Sound Erweiterung Ihres Systems.Er ist konstruiert
um dem Basssound in Ihrem Auto kraftvoll und dynamisch zu verbessern.
FEATURES
* Chinch Eingang / Lautsprecher Eingang
* P.W.M MOSFET Schaltnetzteiltechnik
* Soft Remote Einschaltelektronik
* 2-farbige L.E.D (Power/grün & Protection/rot)
* Fernbedienung für Subwoofer Level
* Einstellungen: Empfindlichkeit, Phasenlage, Tiefpass, Bass-Boost
* Schutzschaltungen: Überhitzung, Kurzschluß, Überlast
WARNUNG
Aktive Hochleistungsverstärker sind in der Lage extrem hohe Lautstärkepe-
gel in Ihrem Fahrzeug zu erzeugen.Über einen längeren Zeitraum können
diese extremen Lautstärken Ihr Gehör nachhaltig schädigen. Während der
Fahrt kann extrem hohe Lautstärke dazu führen, das die Geräusche aus-
serhalbe des Fahrzeuges nicht wahrgenommen werden. Dadurch können
Warnsignale wie Hupen oder Sirenen von Polizei oder Notfalldiensten nicht
gehört werden. Dies kann zu kritischen Situationen im Verkehr führen. Wir
empfehlen daher die Lautstärke während der Fahrt zu reduzieren.

© TOXIC 2007
Page 3
SUBWOOFER EINBAU
Einbau im Fahrgastraum
Für den Fall, das Sie den aktiven Subwoofer im Fahrgastraum installieren
wollen müssen Sie für ausreichende Belüftung und sichere Befestigung
sorgen.
Einbau im Kofferraum
Wir empfehlen den Einbau im Kofferraum. Er sichert einen einwandfreien
Betrieb und bestmögliche Sicherheit bei excellentem Sound. Auch hier ist
einen einwandfreie Belüftung des Subwoofers nötig.
WICHTIG:
Stellen Sie sicher das der Subwoofer auf einer glatten Ebene befestigt wird.
INSTALLATION DER REMOTE FERNBEDIENUNG
Wählen Sie eine Position von der Sie die Fernbedienung ohne Probleme
erreichen können. Benutzen Sie die Ferbedienung als Schablone, markie-
ren Sie die Löcher und kontrliieren Sie vor dem Bohren auf evt. Kabel an
der Rückseite.
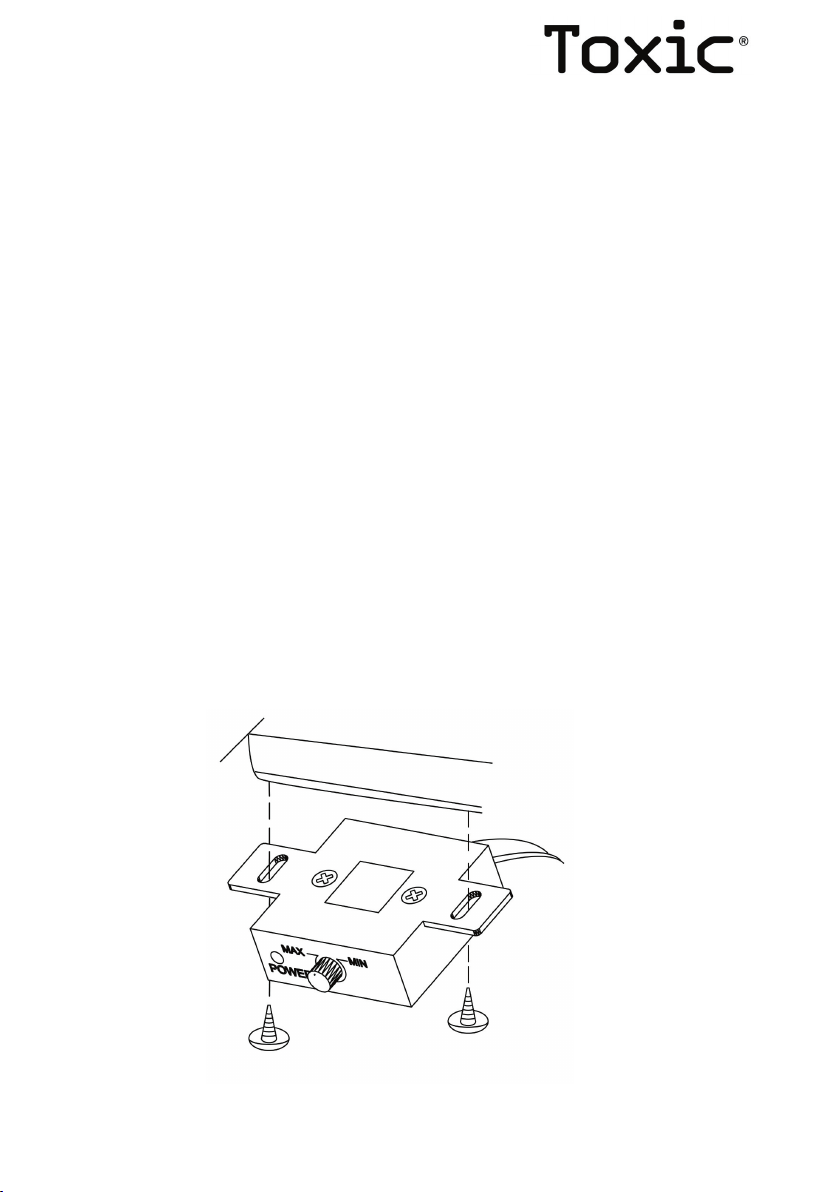
MONTAGE UNTER DER KONSOLE (Empfohlene Plazierung)

© TOXIC 2007
Page 4
ANSCHLÜSSE UND BETRIEB
A) STROMVERSORGUNG (ANSCHLUß GEMÄß AUFDRUCK)
WICHTIG:
Sicherheitshalber sollte immer die Batterie vom KFZ Boardnetz getrennt
werden bevor arbeiten an der Versorgungsspannung ausgeführt werden.
Ein Kabel mit 16qmm sollte für die Plus - und Masseleitung verwendet
werden um eine ausreichende Stromversorgung zu sichern. Für die Remo-
teleitung sollte eine 2,5sqmm Leitung ausreichend sein.
(1) Ground: Anschluß and die Fahrzeugkarroserie
Um Motor- oder Zündgeräusche zu vermeiden muss ein einwandfreier
Massepunkt gewählt werden.
WICHTIG:
Die Masseleitung sollte nicht länger als 1 M sein.
(2) +12 Volt(abgesicherte) Zuleitung: Zur Batterie (+)
Um eine ausreichende Stromversorgung für den aktiven Subwoofer zu
bekommen, sollte dieser Anschluß direkt am Pluspol der Batterie erfolgen.
Zur Sicherheit empfehlen wir ein zusätzliche Sicherung in der Plusleitung
möglichst nahe an der Batterie (nicht im Lieferumpfang).
3) Remote Anschluss: Zum Autoradio-Anschluß für die automatische Anten-
ne
Der Verstärker wird automatisch mit dem Radio eingeschaltet.

© TOXIC 2007
Page 5
AUTO TURN-ON:
Wenn Sie den High-Level Eingang des Gerätes benutzen, können Sie mit
dieser Funktion auf ein zusätzliches Kabel für den remoteanschluß (am
Anschlußblock Ground remote +12V) verzichten.
Bei der Stellung auf ON wird die TXA-400 dann durch das Signal an den
HIgh-Level Anschlüssen automatsich ein- und ausgeschaltet.
Bei der Stellung auf OFF ist ein zusätzliches Kabel für den Remotean-
schluß notwendig (zB wenn die Cinch-Eingänge benutzt werden.)
ANSCHLUßPLAN STROMVERSORGUNG
Der Verstärker ist mit eine Stecksicherung ausgestattet zum Schutz für ei-
nen internen Defekt. Ersetzen Sie diese nie mit einer Sicherung mit einem
höheren Wert da ansonsten die Garantie erlischt.
L.E.D
Der Verstärker zeigt seinen Betrieb über eine 2-farbige LED an. Bei An-
schluß von +12V und Remote leuchtet die LED grün und das Gerät arbeitet
einwandfrei.
Falls die LED rot leuchtet liegt eine Störung durch Überlast oder Überhit-
zung vor. Kontrollieren sie die Einstellung und schalten Sie das Radio aus
und wieder ein.

© TOXIC 2007
Page 6
REMOTE ANSCHLUß
Schließen Sie das Remotekabel am aktiven Subwoofer an. Sie können
damit den Level des Subwoofer über die Ferbedienung regeln.
Fig. 2 Anschluß der Remote Control
CHINCH EINGANG

© TOXIC 2007
Page 7
HI INPUT( LAUTSPRECHER EINGANG)
WICHTIG:
Der aktive Subwoofer kann mit Chinch oder Lautsprecher Eingängen be-
trieben werden. Wir empfehlen den Chinch Eingang für beste Qualität und
Performance. Bitte benutzen Sie nie beide Eingänge gleichzeitig.
PHASE
Mit dem PHASE-Schalter wird die Phasenlage des Signals um 180 Grad
gedreht. Position: „0 „ oder „180 „.
LPF (TIEFPASS)
Der Tiefpass ist stufenlos einstellbar von 50Hz to 150Hz.
BASS BOOST
Anhebung der Bassfrequenzen mit stufenlose Regelung von 0dB bis12dB.
EMPFINDLICHKEIT
Mit dem „GAIN“-Regler wird die Eingangsempfindlichkeit des Verstärker
eingestellt. Die Einstelllung sollte mit dem Ausgangslevel des Verstärkers
überein stimmen. Nach der Installation des Verstärker stellen Sie den
Regler auf MIN. Schalten Sie das Radio ein und erhöhen Sie die Lautstär-
ke langsam bis der Klang verzerrt kling. Danach regeln Sie die Lautstärke
etwas zurück und drehen den "GAIN Regler an Subwoofer langsam auf bis
Sie eine Verzerrung hören. Jetzt wieder etwas zurück drehen und danach
sind die Gerät eingestellt.
ZUBEHÖR
1. Remote......................................................1 Stk.
2. Remote Kabel............................................5m
3. High level/ Lautsprecher-Anschlußkabel...1 Stk.
4. Montageblech+Schrauben........................1 Set
5. Anleitung.......................................................1pc

© TOXIC 2007
Page 8
Modell TXA-400
Max Ausgangsleistung 800W
THD <0,4%
S/N >90%
Frequenzgang 20Hz - 150Hz
Eingangsempfindlichkeit min. 110mV
Eingangsempfindlichkeit max. 0,5V
Tiefpass 50Hz - 150Hz regelbar
Bass Boost 0dB - 12dB
Sicherung 25A
Basslautsprecher 10" (200mm)
Abmessungen 400x240x310mm
Gewicht 8,8Kg
Fehler Bitte prüfen Abhilfe
Kein Ausgangs-
signal
Leuchtet die LED grün? Prüfen Sie die Sicherung und den
Remote-Anschluß
Kein Eingangssignal Prüfen Sie das Chinchkabel auf
korrekten Anschluß.
Ist die Lautstärke auf
min ?
Erhöhen Sie die Lautstärke am
Radio
Verstärker
schaltet nicht ein
Keine Spannung am
Remote Anschluß?
Prüfen Sie die Anschlüsse am
Radio
Sicherung defekt ? Prüfen und ersetzten der Siche-
rung
Klang verzerrt Empfindlichekeit zu hoch Regeln Sie die Empfindlichkeit
herunter
TECHNISCHE DATEN
TROUBLE SHOOTING

© TOXIC 2007
Page 9

© TOXIC 2007
Page 10
Congratulations on your purchase!
Toxic car powered subwoofer will enhance your car audio system, They are
easy to connect and designed to deliver powerful bass.
You are now the proud owner of a top high-quality car audio appliance,
which we hope will give you many years of enjoyment.
YOUR NEW SUBWOOFER..........
..... is the ultimate extension to your car stereo system. it is designed to
reproduce the bass range right down to the lowest frequencies as dynami-
cally as possible.
FEATURES
* RCA INPUT / HIGH LEVEL INPUT
* P.W.M MOSFET POWER SUPPLY
* SOFT DELYED REMOTE TURN-ON
* DUAL COLOR L.E.D (POWER/GREEN & PROTECTION/
RED)
* REMOTE CONTROL FOR SUBWOOFER LEVEL
* CONTROL: GAIN, PHASE, LPF, BASS BOOST
* PROTECTION CIRCUIT: THERMAL PROTECTION CIRCUIT
SHORT PROTECTION CIRCUIT
OVERLOAD PROTECTION CIRCUIT
WARNING
High powered audio systems in a vehicle are capable of generating extre-
mely high levels of sound pressure. continued exposure to excessive sound
pressure levels may cause hearing damage or hearing loss. Operation of a
motor vehicle while listening to audio equipment at sound pressure levels
may impair your ability to hear external sounds such as horns, warning
signals, or emergency vehicles. This constitutes a potential traffic hazard.
In the interest of safety, We recommend listening at lower volume levels
while driving

© TOXIC 2007
Page 11
SUBWOOFER MOUNTING LOCATION
PASSENGER COMPARTMENT MOUNTING
If you are going to mount the subwoofer in the passenger compartment,
make sure you leave adequate room for subwoofer ventilation.
This active subwoofers rely on ventilation for proper cooling.
TRUNK COMPARTMENT MOUNTING
We recommend mounting the subwoofer in the trunk. It provides excellent
performance as long as you do not restrict the airflow around the subwoo-
fer.
CAUTION:
Ensure that the subwoofer cabinet rests on an even surface.
INSTALLING THE REMOTE
Select a mounting location that allows easy access to the control while
driving.
Using the subwoofer level control(remote) as a template, mark and drill
holes
in the mounting surface.
UNDER DECK MOUNTING (Suggestion of the remote placement)

© TOXIC 2007
Page 12
CONNECTION AND OPERATION
A) POWER INPUT TERMINAL (CONNECTING THE POWER Fig. 1)
CAUTION:
AS A PRECAUTION, IT IS ADVISABLE TO DISCONNECT THE
VEHICLE’S BATTERY BEFORE MAKING CONNECTION TO THE +12
VOLT SUPPLY WIRING.
4/8 GAUGE wire is recommended for both the power and ground wires. 12
Gauge, for the remote turn-on wire. Both types are available at most Mobile
Audio Dealers or Installation Shops.
(1) Ground: To Vehicle’s Chassis
To avoid unwanted ignition noise caused by ground loops, it is essne-
tial that the Amplifier is grounded to a clean, bare, metal surface of the
vehicle’s Chassis.
NOTE:
GROUND WIRE SHOULD NOT BE EXTENDED MORE THAN (1 METER).
(2) +12 Volt(fused) Constant Power: To Battery (+)
Due to the power requirements of the Amplifier, this connection should be
made directly to the positive (+) terminal of battery. For safety measures,
install all in-line Fuse Holder (not supplied) as close as possible to the
battery positive (+) terminal with an ampere rating, not to exceed total value
of fuses in AMP.
(3) Remote Turn-on Input: To Power Antenna output of Car Stereo
This Amplifier is turned “ON” remotely when the vehicle’s stereo is turned
“ON”.

© TOXIC 2007
Page 13
AUTO TURMN-ON:
For High-Level connections, use this switch to activate (or deactivate) TXA-
400 automatic turn-on circuit. For most speaker-level applications, slide the
switch to the AUTO position. If you prefer to use the remote (REM) connec-
tion, slide the switch to the OFF position.
CONNECTING THE POWER (Fig.1)
The amplifier is equipped with a plug-in auto fuse protecting set against
fault conditions. Do not use a fuse with a higher value and never bridge
the fuse over.
L.E.D
The L.E.D is a dual color indicator, when the +12v and REM +12 volt
power both switch on, The L.E.D illuminated green. this means that
the amplifier begins to work. if L.E.D illuminated red colour, this means
the amplifier is shut down from protecting circuit(thermal protection
& short protection & overload protection).

© TOXIC 2007
Page 14
REMOTE (CONNECTING THE SUBWOOFER TO THE REMOTE Fig.2)
User remote wire (accessory) connect “REMOTE SOCKET” to the remote
(accessory), the remote is for subwoofer level control.
Fig. 2 Connecting the subwoofer to remote
LINE IN (LOW LEVEL INPUT)

© TOXIC 2007
Page 15
HI INPUT( HIGH LEVEL INPUT)
IMPORTANT:
Inputs may be high level (from the receiver‘s speaker) or low level (from
special low level outputs). Low level is preferred for best performance. Use
only the low level or high level input, do not use both at one time.
PHASE
The PHASE switch is used for changing woofer phase, set switch from
„0 „ to „180 „, a phase shift of 180 degrees.
LPF
The low-pass crossover is continuously variable from 50Hz to 150Hz
BASS BOOST
Varies from 0dB to 12dB of boost. Frequency adjustment control for
bass control filter.
GAIN
The „GAIN“ control is subwoofer input level control, the input level control
should match the output of your radio. After the instaltion is complete, make
sure the input level control is turned down all the way(MIN). Play a tape
or CD and turn volume up slowly until you just start to hear distortion, now
back the volume down just a bit. On the subwoofer, slowly turn up the input
level control(clockwise) until you start to hear distortion and back it down a
bit, Now your radio and subwoofer leves are matched.
ACESSORY LIST PER CARTON BOX
1. Remote......................................................1pc
2. Remote wire...............................................5m
3. High level input connector with wire..........1pc
4. Mountint bracket & Screw..........................1 set
5. manual.......................................................1pc

© TOXIC 2007
Page 16
Modell TXA-400
Max Power 800W
THD <0,4%
S/N >90%
Frquency Response 20Hz - 150Hz
Input Sensitivity Low 110mV
Input Sensitivity High 0,5V
LPF 50Hz - 150Hz adjustable
Bass Boost 0dB - 12dB
Fuse 25A
Woofer 10" (200mm)
Dimensions 400x240x310mm
Net weight 8,8Kg
Symptoms Check Points Cure
No sound
Is the powe LED illumi-
nated
Check fuse in the amplifier. Be
sure remote lead is connected
No signal input Check audio cable is connected,
radio turned on
Is volume minimum Slowly turn the level control to the
right (clockerwise)
Amp not swit-
ching on
No power to "REM" termi-
nal when the radio is on Check connections to the radio
Fuse broken Check fuse and replace
Sound distorted Input level control adjus-
ted too high Adjust input level
SPECIFICATIONS
TROUBLE SHOOTING GUIDE

© TOXIC 2007
Page 17

© TOXIC 2007
Page 18
Nous vous félicitons pour l'achat de ce produit!
Le subwoofer actif de TOXIC va enrichir votre système Car Audio de votre
véhicule. Il est simple à installer et vous offre des sons de graves profonds.
Vous êtes l'heureux propriétaire d'un système actif de haute qualité qui
vous réjouira pendant de longues années, félicitations!
Votre nouveau subwoofer..........
..... est l'ultime élargissement de votre système. Il est construit pour amé-
liorer avec dynamisme et puissance les sons de graves (bass) dans votre
véhicule.
Caractéristiques:
* Entrée RCA / Entrée Haut-parleur
* Alimentation controlée P.W.M MOSFET
* Soft Remote
* L.E.D bicolor (Marche/vert & Protection/rouge)
* Télécommande pour niveau de son du Subwoofer
* Installation: Sensibilité, Régulation de phase, passe-bas, Bass-Boost
* Protection contre les courts-ciruits, les surcharges et protection ther-
mique.
ATTENTION
Les amplificateurs actifs sont capables de produire un niveau de son extré-
mement élevé dans votre véhicule. Sur une longue durée ces sons peuvent
nuire à votre système auditif. Un son trop élevé peut géner pendant la
route et vous amener à ne pas prendre conscience des bruits provenant de
l'extérieur. Les sirènes de la police et / ou des services secours pourraient
ne pas être entendus, ce qui peut engendrer une situation critique et des
problèmes grâves. Nous conseillons donc de baisser le son pendant la
route.
© TOXIC 2007
Page 19
Installation du subwoofer
Installation dans l'habitacle du véhicule
Dans le cas où vous désirez installer le subwoofer dans l'habitacle de votre
véhicule vous devez vous assurer qu'il y ait une bonne ventilation et que
l'appareil soit bien fixé.
Installation dans le coffre
Nous vous conseillons une installation dans le coffre. Il vous assure une
qualité de son de haut niveau et une meilleure sécurité. Lá aussi il est né-
cessaire de veiller à une bonne aération.
IMPORTANT:
Veiller à ce que l'appareil soit installé sur une surface plate.
INSTALLATION DE LA TÉLÉCOMMANDE:
Choisisser un emplacement facile d'accès. Utiliser la télécommande pour
marquer l'emplacement, marquer les emplacements des trous et vérifier
avant de percer qu'aucun câble ne gène.
MONTAGE SOUS LA CONSOLE (Emplacement conseillé)

© TOXIC 2007
Page 20
CONNECTION ET MISE EN MARCHE
A) COURANT (CONNECTION SELON LE SCHÉMA)
IMPORTANT:
Nous vous conseillons de débrancher la batterie avant toute installation.
Un câble de 16 mm² doit être utilisé pour le plus et la masse afin d'assurer
un flux suffisant. Pour la télécommande un fil de 2,5 mm² est suffisant.
(1) Masse: Branchement à la carrosserie
Pour éviter les bruits de moteur et de démarrage, il est nécessaire de choi-
sir un emplacement impeccable.
IMPORTANT:
Le fil à la masse ne doit pas être plus long que 1m.
(2) +12 Volt(séurisé) connection vers la batterie (+)
Pour obtenir une alimentation en courant suffisante pour le subwoofer actif,
il est nécessaire d'effectuer le branchement directement au pol Plus de la
batterie. Pour plus de sécurité nous vous conseillons d'utiliser un fusible
supplémentaire le plus près possible de la batterie dans le fil plus. (N'est
pas livré avec).
(3)Connection remote: Pour le branchement de la radio pour l'antenne
automatique.
L'amplificateur se mettra automatiquement en marche avec la radio.
Table of contents
Languages:


