Toyo SOT-ES100 Series User manual

DS4-2511C
- 1 -
Optical Transmitter
SOT-ES100 Series
Operation Manual
TOYO ELECTRIC CORP.

DS4-2511C
- 2 -
Contents
1. Introduction 3
2. Outline 3
3. Configuration 3
4. Major Specifications 4
5. Names and Functions of Components 5
6. Installation 6
7. Electric Connections and Wiring 8
8. Setting Switches 10
9. Adjustment of the Optical Axis 11
10. Operation 12
11. Signal Interface 13
12. Maintenance and Inspection 14
13. Cautions in Use 14
14. Outside Dimensions 15
15. Guarantee 16
16. For Contact 16
17. Revision History 17

DS4-2511C
- 3 -
1. Introduction
Thank you for choosing our SOT-ES100 Series transmitter.
For correct operation of the product, this manual must be read carefully before use.
2. Outline
This equipment transmits data utilizing the light transmitted through the space.
It can handle serial data through a full-duplex, bi-directional 10BASE-T.
Since connection with external devices is made by means of a connector, maintenance can be performed
easily.
This equipment is specified for use in DC24V power.
3.Configuration
(1) Model
SOT-ES 100□□
Option
Combination of transmit carrier frequencies
A: Type A (31.0 MHz)
B: Type B (45.0 MHz)
Transmission distance
100: 0.2 - 100 m
Series
(2) Combination
1) Use this equipment in the combination with Type A or B.
2) ES100 Series is not compatible with other SOT or Clean Net in optical communication side.
Power
Auxiliary output
10BASE-T I/O Power
Auxiliary output
10BASE-T I/O
Type A Type B

DS4-2511C
- 4 -
4. Major Specifications
Item Specification
Model SOT-ES100A SOT-ES100B
Environment IEEE802.3(Ethernet)
Transmission rate Cable side 10 Mbps
Power voltage Rated voltage: 24VDC Power ripples 10% or less
Voltage: 18 - 30VDC Peak voltage including ripples: Within 30V
Consumption current Less than 150 mA (at 24 VDC input)
Interface
10BASE-T (Auto negotiation, AutoMDIX compatible)
Transmission method Full-duplex, bi-directional
Communication control
method
Bitforward
Connected to: Network card or switching hub
Transmission distance 0.2-100m
Directivity 1.2 degrees
Modulation method FSK
Lighting element Near infrared light emitting diode (light emitting wavelength 870 nm)
Receiving element Photo diode
Auxiliary output DL: “ON” when communication is permitted
ALM: “OFF” when the reception level is low
Photo coupler insulated NPN open collector outputs
Outputrating:30VDC50mAMAX
Connection For signal: RJ-45 modular jack
Up to category 3 or more twist pair cable 100 m
Automatic switching between straight/crossing cables by means of
AutoMDIX
For power/aux. output: 5-polar connector terminal block (Phoenix MSTB2.5/5-GF-5.08)
Indicators POW: Power indicator lamp (red); Shows red when power supply is on
LINK: Link indicator lamp (green); Shows green when Ethernet is connected normally
SD: Sending data indicator lamp (red); Shows red when sending data input is on.
RD: Receiving data indicator lamp (green); Shows green when received data output is
on.
FDX: Full-duplex indicator lamp (red); Shows red in full-duplex connection.
Own unit CD: Clear data indicator lamp (red); Shows red at a sufficient reception level
of own station for communication.
Own unit LEVEL: Reception level indicator lamp (4 points) (green); Shows green
according to own station reception level.
Receiving unit CD: Clear data indicator lamp (red); Shows red at a sufficient reception
level of receiving unit for communication.
Receiving unit LEVEL: Reception level indicator lamp (4 points) (green); Shows green
according to receiving unit reception level.
Check terminals DC voltage corresponding to the reception level is provided.
(Use the DC voltage range with a 10kΩ/V or higher tester.)
Setting switches 4-pin dip switch
SW1: Auto negotiation ON/OFF
SW2: Communication mode full-duplex/half duplex
SW3: 10BASE-T link ON/OFF in light shielding
SW4: Not used
Operating ambient
illumination Solar beam: 10,000 lx or less
Fluorescent, incandescent lamps: 3,000 lx or less
No externally disturbed light shall directly enter the receiver.
Operating ambient
temperature
–10 - +55°C No freezing allowed
Operating ambient
humidity
10 - 85% RH No condensation allowed
Resistance to vibration Frequency: 10 - 55 Hz, complex amplitude: 1.5 mm, sweep: 5 min X・Y・Z
20 cycles in each of X, Y and Z directions (per JIS C0040)
Resistance to impact 500 m/s210 times in each of 3 directions X・Y・Z (per JIS C0041)
Protection class IP40
Outside dimensions
(weight)
See Outside Drawing (weight 350 g).
Accessories Fixture (1 set), screws for fixture (4 pcs), power/aux. output plug (1 pc)
DS4-2511C
- 5 -
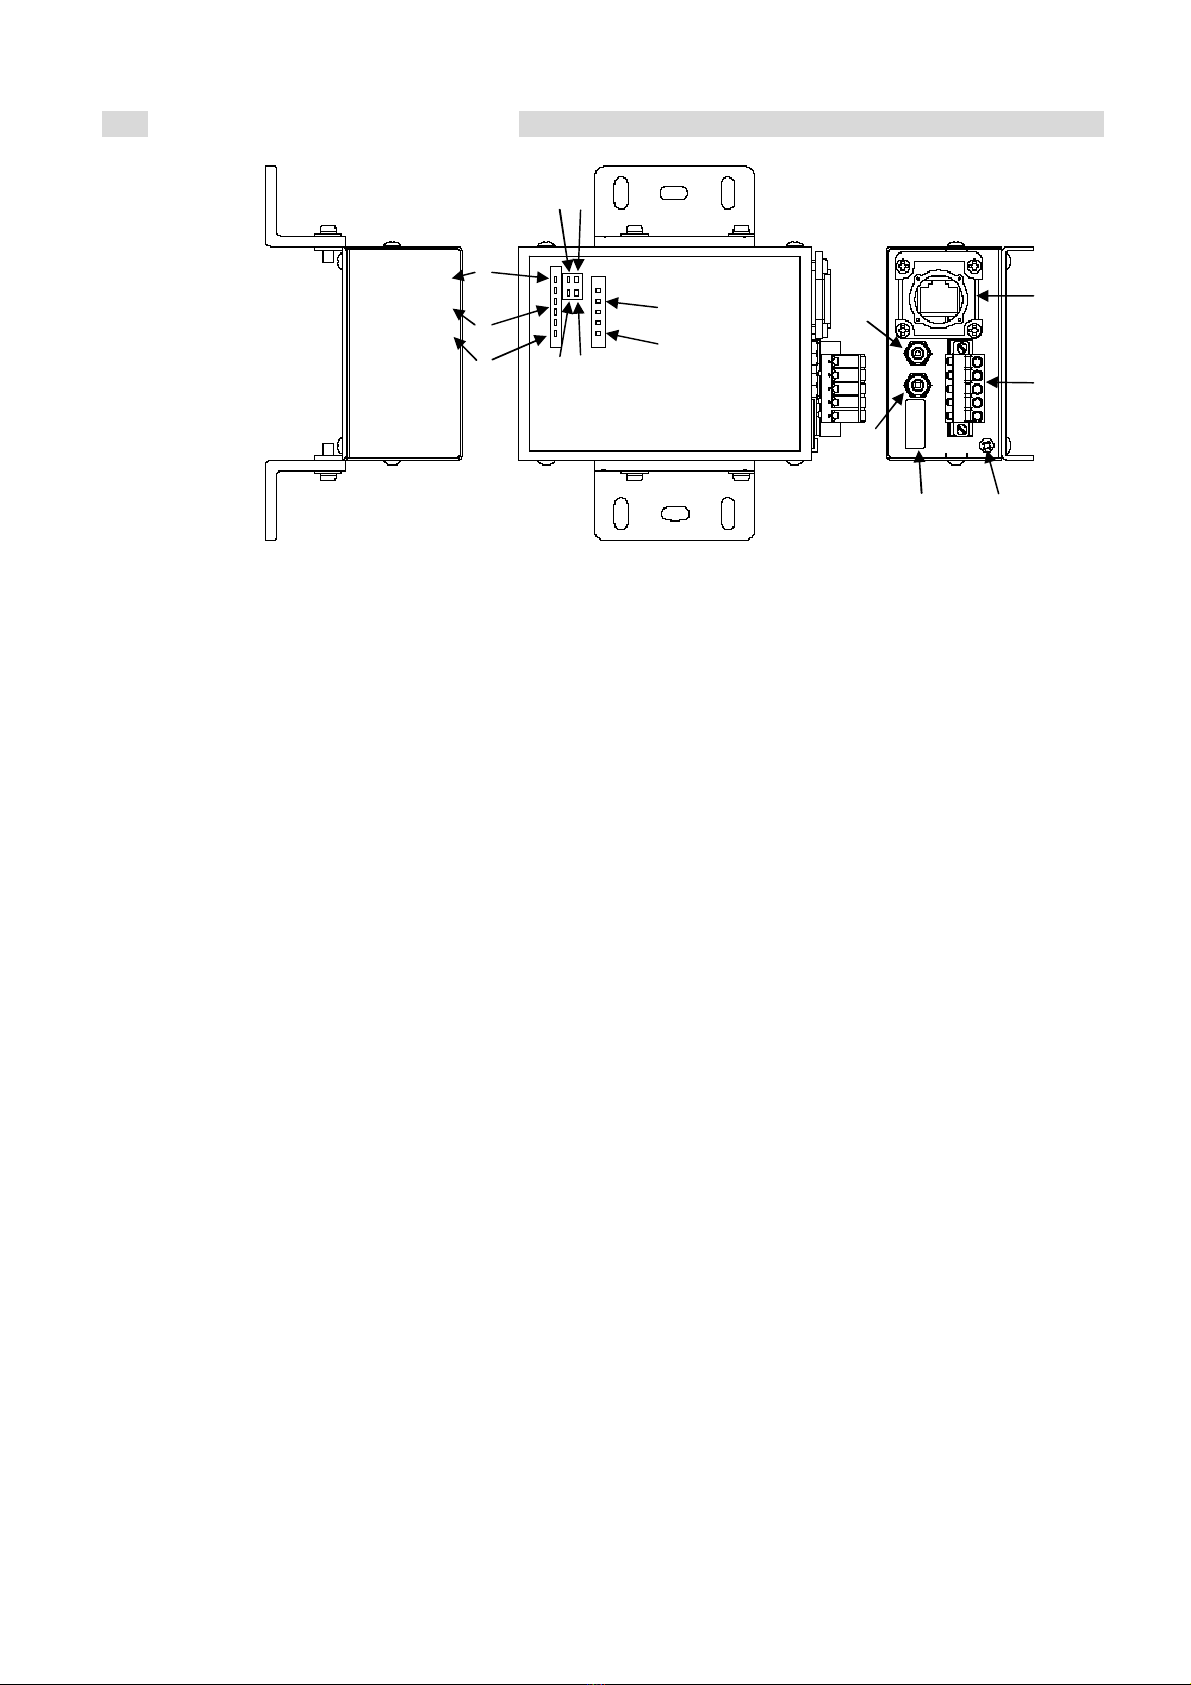
5. Names and Functions of Components
(1) Power indicator lamp (POW)
Shows red when power is supplied to the main unit.
(2) Own unit clear data indicator lamp (CD)
Shows red when the transmitter becomes able to receive data.
(3) Own unit reception level indicator lamps (LEVELS 1〜4)
Shows green according to reception level.
(4) Receiving unit clear data indicator lamp (CD)
Shows red when the transmitter installed in the receiving side becomes able
to receive data, and works only when own unit clear data indicator lamp is ON.
(5) Receiving unit reception level indicator lamps (LEVELS 1〜4)
Shows green according to the reception level in the receiving side, and works
only when own unit clear data indicator lamp is ON.
(6) Sending data indicator lamp (SD)
Blinks red when sending data input is ON.
(7) Receiving data indicator lamp (RD)
Blinks green when the received data output is ON.
(8) Link indicator lamp (LINK)
Shows green when 10BASE-T link is established.
(9) Full-duplex indicator lamp (FDX)
Shows green when 10BASE-T link is in full-duplex operation.
(10) + check terminal (length 10 mm or less for Φ2-pin terminal)
Used when measuring light reception level by optical axis adjustment or others.
Use DC voltmeter of input resistance of 10KΩ/V or more.
(11) - check terminal (length 10 mm or less for Φ2-pin terminal)
(12) Power/aux. output connector
Power supply/aux. output signal and grounding wires are connected.
Applicable connectors: FKCT 2.5/5-STF-5.08 mfd by Phoenix Contact or equivalent items
(13) Signal (Ethernet) connector
Used to communicate with 10BASE-T compatible equipment.
Applicable connectors: RJ45 plug (category 3 or more)
(14) Setting switches
Used to set the 10BASE-T side and switch the transmit/receive frequencies.
(15) FG terminals
(1)
(2)
(3)
⑥ ⑧
(7)(8) (4)
(5)
(11)
(10)
(12)
(13)
(14) (15)
(1)
①
(2)
(3)
(6)
⑥
(8)
⑧
(7)
⑦
(8) (4)
(5)
⑤
(11)
(10)
⑩
(
(
(14)
⑭
(15)

DS4-2511C
- 6 -
6. Installation
(1) Mounting hole dimensions
Use the mounting fixture provided to avoid the effect of inductive noise.
(2) Caution in choosing the installation place
Do not use the transmitter in any of the following places to keep the performance.
1) A place where water, oils, particles, dust and/or chemicals may scatter.
2) A place where aqueous vapor, fumes and/or corrosive gases may cause optical signal
attenuation.
Do not use any thinner type solvent for cleaning since the spotlight and acceptance surfaces
consist of plastics.
3) A place where the equipment may be exposed to a temperature, humidity, vibration or impact
out of the rated range.
Anti-vibration measures are required if the equipment is continuously exposed to vibration or
impact even within the rated range.
4) A place near a magnet, motor or other devices that generate a strong magnetic field or an
inverter or another devices or electric wire that generate a strong noise.
5) A place where the sunlight or candescent light containing strong infrared rays enters the
receiver section within an angle not larger than 10 degrees from the center of the optical axis of
the equipment. Use this equipment indoors.
6) A place where a person or an obstacle possibly interrupts optical path, or where aqueous vapor
or fumes may be generated in the optical path between the transmitter and the receiver to
dampens the optical signals.
7) A place where any reflected beam or light beam from another photoelectric switch is on the
optical path of the transmitter, thus causing optical interference on this equipment.
8) A place where the optical axis may deviate 1.5 degrees or more by the meandering, vibration or
impact of a moving body during communication with the moving body.
Light axis direction
M4screwmountinghole
DS4-2511C
- 7 -
Aタイプ Bタイプ
Bタイプ Aタイプ
Aタイプ Bタイプ
Bタイプ Aタイプ
Aタイプ Bタイプ
Aタイプ Bタイプ
例1.
例2.
例3.
※2.反射物等がなければ干渉しません。
※1.データの干渉は起きませんが、受光量表示には互いに影響が出ます。
(光軸調整・光量確認時には、調整しない対の電源を切ってください。)
1.5m以上
3m以上
※2
対向するAタイプ間の距離が近い場合には、
受光量表示に影響が出る場合があります。
その場合には、調整しない対の電源を切って調整してください。
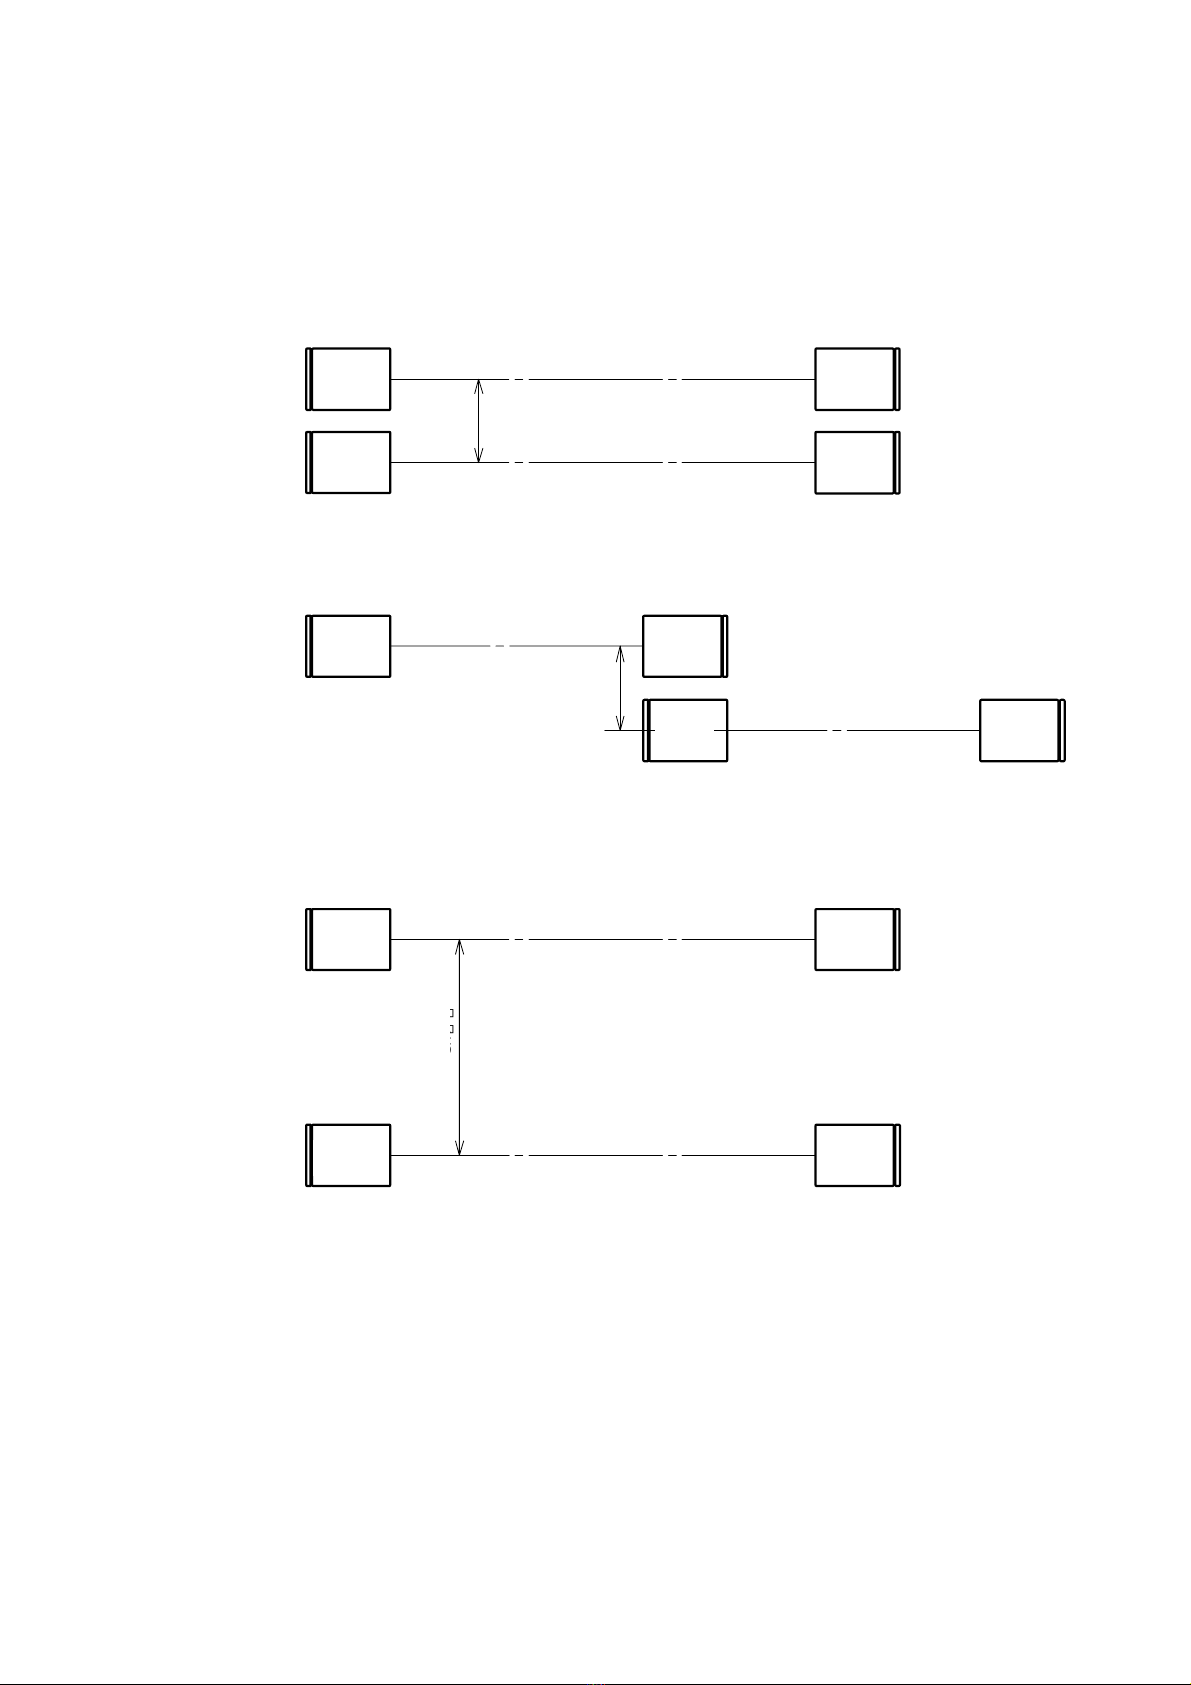
(3) Installation intervals
When plural transmitters are to be installed or a transmitter is used near another photoelectric
sensor, they shall be installed at sufficient intervals to prevent optical interference.
Note:
The optical axis deviation due to optical axis adjustment, vibration, impact, etc.
may affect the optical interference. When installing the equipment on a moving
carrier, check before use that the equipment can normally communicate throughout
the communication area after adjustment of the optical axis according to section 9
“Adjustment of the Optical Axis.”
Example 1
Type A
Type A
Type B
Type B
1.5 m or
more
3 m or more
Type A
Type A
Type A
Type A
Type B
Type B
Type B
Type B
*1. Though data interference does not occur, the display of light reception level may be affected mutually.
(In time of optical axis adjustment/optical level check, turn off the power of unadjusted couple.)
Example 2.
*2. If no reflecting object exists, no interference occurs.
If distance is short between the opposing two of type A, the display of reception level may be affected.
In such a case, turn off the power of unadjusted couple and make an adjustment.
Example 3.
DS4-2511C
- 8 -
7. Electric Connections and Wiring
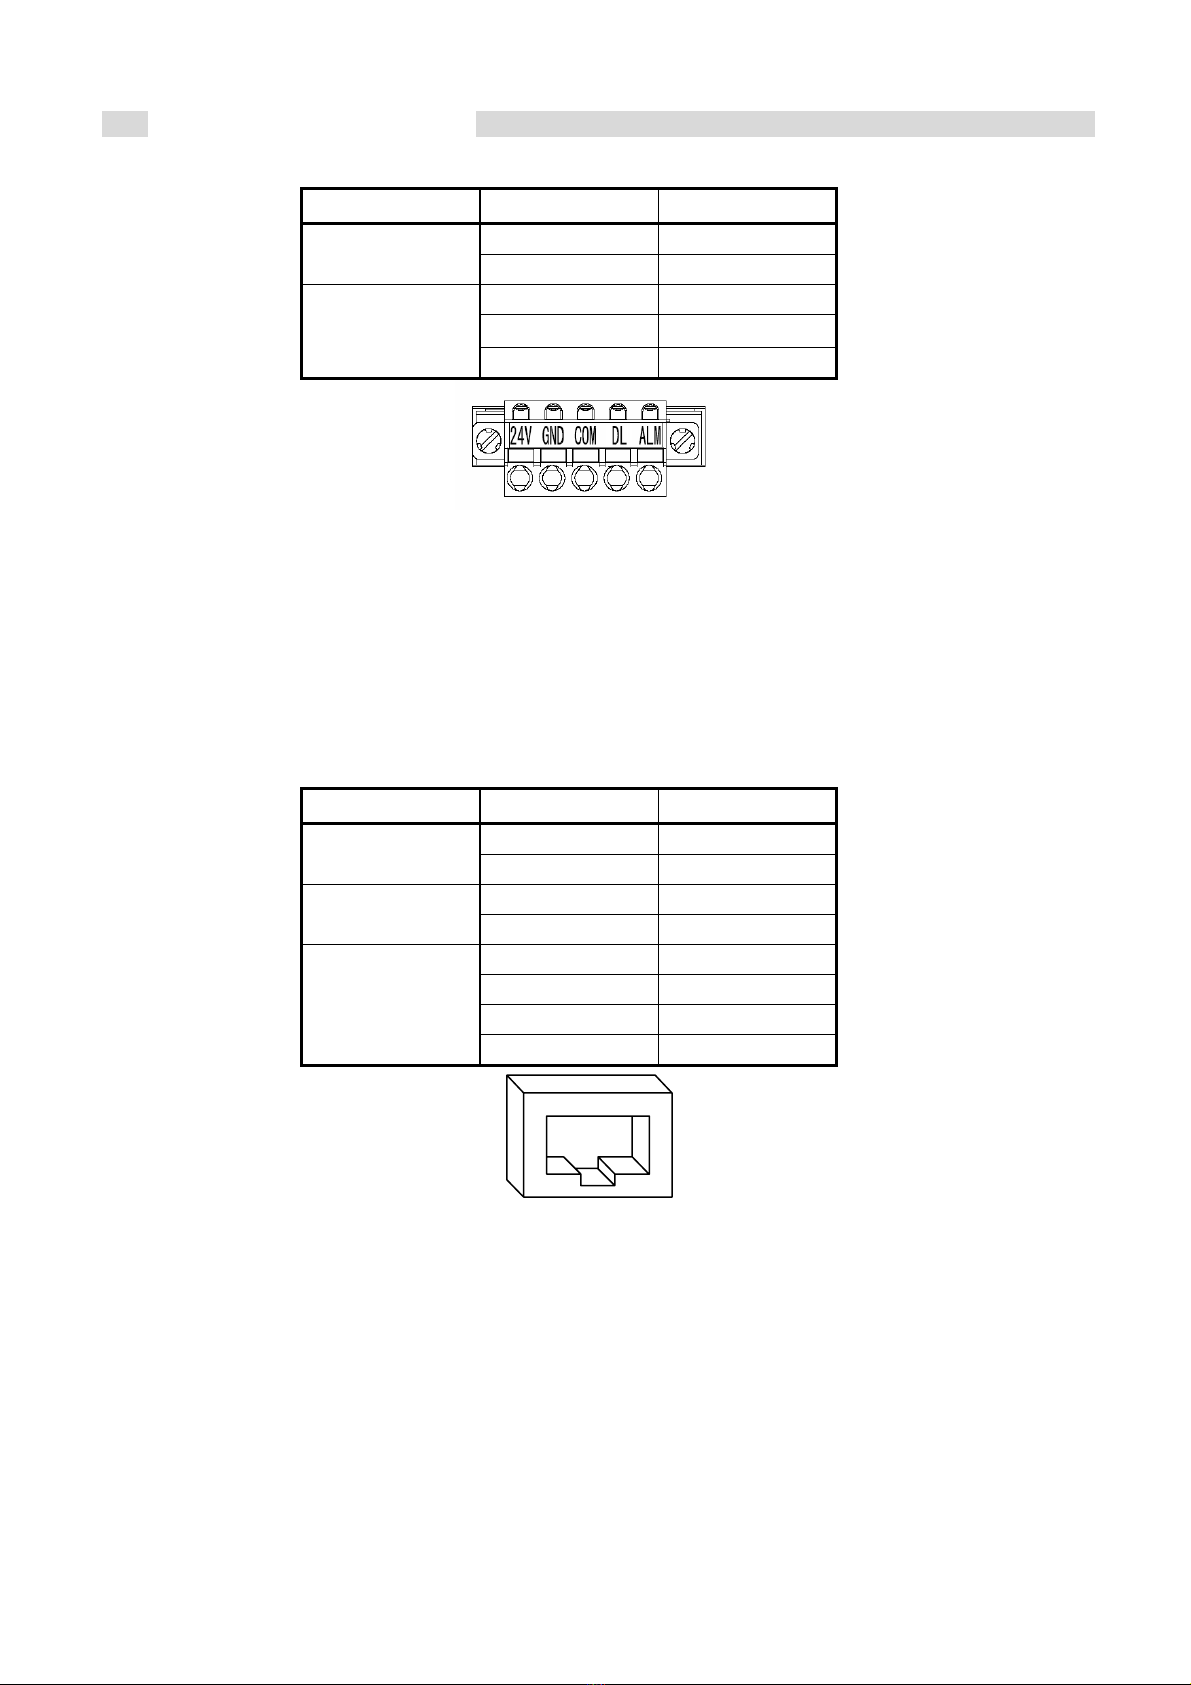
(1) Power/aux. output connectors
Signal name Brevity code Terminal No.
24V 1Power supply
GND 2
DL 4
ALM 5
Aux. output
COM 3
1) Conforming connector (enclosed in package)
a. Plug FKCT 2,5/5-STF-5,08 (1902330) mfd by Phoenix Contact or equivalent items
2) Recommended cable
For power/aux. output cables, any cable of 0.3 mm2or more must be used.
(Check the voltage drop, and then use within the total length of 50 m.)
(2) Signal (Ethernet) connectors
Signal name Brevity code Terminal No.
TD+ 1Transmission
output TD- 2
RD+ 3Reception input
RD- 6
- 4
- 5
- 7
Not connected
- 8
Transmission output and reception input may be exchanged according to the connected cable
(AutoMDIX function). Polarity of reception input may be exchanged according to the
connected signal (polarity detection function).
1) Conforming connectors
Plug: Category 3 or more RJ-45 plug or
VS-08-ST-RJ45 (1688573) manufactured by Phoenix Contact or equivalent items
Shell: VS-08-T-RJ45/IP67 (1688696) manufactured by Phoenix Contact or equivalent items
When using this equipment under the environment where there is a lot of vibration,
use a plug and a shell manufactured by Phoenix Contact.
2) Recommended cables
Twist pair cable (UTP) cable of category 3 or more without shield or twist pair (STP) cable with
shield shall be used. (Total length within 100 m)
1
2
3
4
5
Cable insertion
12345678

DS4-2511C
- 9 -
(3) Connector arrangement (on the rear panel)
1) Power/aux. output connector
Pin terminal
2) Check terminal
The Check terminal on the rear panel shall be checked on the DC range of a tester of 10 kΩ/V or
more.
The Check terminal is used to insert a tester bar of Φ2.
Pin terminal length: 8 - 10 mm recommended
Note: The output voltage may also be triggered by an external disturbance or
reflected light. If the output voltage remains high with the projector
shaded, the system must have been affected by an external disturbance
or reflected light.
3) Signal (Ethernet) connector
4)Settingswitch
Rubber cover shall be opened from the check terminal side.
5)FGterminal
(4) Notes
1) When using a shield cable, connect it (braided) to FG terminal in either the
machine (optical transmitter) or external device.
2) For power supply, use one conforming to the specification of this machine.
3) For the load of aux. output, connect one within the output rating (30VDC, 50mA)
of this machine. When connecting any inductive load including aux. relay, attach a
diode to protect reverse voltage.
4) As for the cables, pay attention to the following points to prevent noises or surging induction.
a. Do not bring the cable near any of the main circuit, high-tension power supply and load wires
or bundle it together with any of them. Keep it away from any of them by 100 m or more and
wire it separately.
b. The same applies to intermediate cables.
c. The power and signal wires shall not be extended by more than 50 m within the same cable.
5) As associated with the transmission through space, loss or damage of data frame could occur. For
the communication protocol in the network, use TCP, etc. applicable to re-transmission.
6) When connecting to a hub, a switching hub is recommended.
(2)
(3)
(4)
(5)
(1)

DS4-2511C
- 10 -
8. Setting Switches
(1) Ethernet settings
Auto negotiation Effective
Factory setting
Ineffective
SW1 OFF ON
Full-duplex/half duplex Full-duplex
Factory setting
Half-duplex
SW2 OFF ON
10BASE-T link when
optical axis is shielded
Connection
continued
Factory setting
Disconnected
SW3 OFF ON
Set items so that the communication mode of Full-duplex/Half-duplex may conform to the device
connected in the receiving side across the optical transmitter.
Special care must be taken when connecting to the device not compatible with auto negotiation
or when set to invalid.
If the mode is not the same, loss of data frame could occur.
* If any setting has been changed, turn off the power once, and then restart.
(2) An extra
An extraFactory setting
SW4OFF
Please use an extra switch in OFF.

DS4-2511C
- 11 -
9. Adjusting of the Optical Axis
During the adjustment of optical axis, damaged data could come out of signal (Ethernet) connector.
Remove the cable from the connector, or make sure that there will be no problem if any damaged data
flows to the network, then start adjustment.
(1) After checking that wires have been correctly connected, turn on the power supply to the main unit.
The power indicator lamp (POW) shows red.
(2) Loosen the main unit mounting screws and move the main unit in the vertical and horizontal directions
until the clear data indicator lamp (CD) on the receiving unit shows red.
<Note> Reception levels at the receiving unit on the main unit will not be displayed if the own unit
reception level fails to be CD or more. First, adjust by referring to the display of reception
level on the receiving unit.
(3) Make further fine adjustment until the reception level indicator lamps on the receiving unit show green
up to LEVEL 3 or higher.
Detailed reception levels are checked by the tester connected to the check terminal of receiving unit.
Reception levels are measured by a tester (input resistance being 10 kΩ/V or higher in DC voltage
range 10V or so). Tester bars of Φ2 shall be inserted into (+) and (-) of check terminal.
(4) Max value of check terminal voltage is 4.2V or so.
In operation, fix at the position of max voltage by referring to 2.2V or higher in the case of the max
transmission distance.
(5) Adjust the receiving unit in the same manner.
(6) When installing either unit on a moving body such as a stacker crane, check that the reception level
indicator lamps up to LEVEL 3 or higher show green at both moving and fixed units across the moving
areas.

DS4-2511C
- 12 -
10. Operation
(1) The data frame to be transmitted to the receiving unit is sent as soon as it is input to this equipment
from an external device. Data equivalent to 1 frame is not accumulated inside the equipment.
(2) Data frame sent from the receiving unit is sent to an external device as soon as it is received.
(3) Functions of sending data indicator lamp (SD) and receiving data indicator lamp (RD)
Sending data indicator lamp (SD) blinks in red when sending input is active.
Receiving data indicator lamp (RD) blinks in green when receiving input is active.
(4)When optical path is shielded, the receive indicator lamp goes off, and no data can be
sent any longer. Reception level is not displayed, either, at the receiving unit.
(5)Functions of link indicator lamp (LINK) and full-duplex indicator lamp (FDX)
Link indicator lamp (LINK) shows green when the network connection with the external device
connected to the signal connector is normal.
Full-duplex indicator lamp (FDX) shows green when the network connection with the external
device connected to signal connector is in full-duplex mode.
(6) Aux. output operates as shown below.
1) DL: Transistor turns on when the data ling is normal.
2) ALM: Transistor turns off when the reception level indicator lamp (LEVEL 1) is off.
(7) The statuses of indicators and subsidiary outputs change as shown below when the beam is received
or interrupted.
Unit 1 Unit 2
Condition
Light intensity
received by
this unit
Light intensity
received by the
other unit
DL
output
ALM
output
Light intensity
received by
this unit
Normal L1 or more L1 or more ON ON The same with
(1)
Insufficient light
intensity (cleaning or
beam adjustment
required)
CD only CD or more ON OFF The same with
(1)
Interrupted (cleaning or
beam adjustment
required)
Off Off OFF OFF Off
CD or more Off OFF OFF CD or moreAffected by external
disturbance or reflected
light
L1 or more Off OFF OFF CD or more
Note: If the system is affected by an external disturbance or reflected light, different
values will be indicated by units 1 and 2 to represent the light intensity received
by unit 2.

DS4-2511C
- 13 -
11. Signal Interface
*Note 1: For signal wires, use UTP (Unshielded twist pair) or STP (Shielded twist pair) cable of
category 3 or higher. Extension of cable shall be within 100 m.
*Note 2: For power wire, use electric wire of 0.3 mm2or more.
Extension of power wire shall be within 50 m if power voltage is 24VDC.
*Note 3: Voltage between DL – COM or ALM – COM shall be 30VDC or lower in OFF, and the
residual voltage in ON shall be 2V or so.
(2)
(1)
GND
24V
DL
(1)TD+
(2)
(3)
(6)
(4)
FG
ALM(5)
(3)COM
Terminal No. Brevity code
Signal connector
TD−
RD+
RD−
端子番号 略 号
電源・補助出力用コネクタ
Connector shared by power and aux. output
Terminal No. Brevity code

DS4-2511C
- 14 -
12. Maintenance and Inspection
(1) Check for any stain on the front cover periodically.
The equipment optically transmits data, and stain on the front cover may cause a
communication error. Wipe off the cover with dry cloth or such if stained heavily.
The spotlight and acceptance surfaces consist of plastics. Do not use any toluene-containing
solvent for cleaning it.
(2) Check for any loose or chattering mounting screws. Re-tighten mounting screws if
necessary.
13. Caution in Use
(1)Protection from voltage ripples
Use a power supply unit that satisfies the power supply specifications for the equipment.
When supplying power from a power supply unit for PC (sequencer or such), check that the
equipment functions normally.
(2)Caution in resetting the power
Data cannot be transferred for about 500 ms after supplying power to the equipment.
(Data cannot be transferred for further 2 sec or so because of auto negotiation when such auto
negotiation is effective.)
(3)Optical axis adjustments
Do not fail to adjust optical axis after installing the equipment.
Data can be transferred as far as the clear data indicator lamp (CD) is lit and the data link output
(DL) is on. While the reception level indicator lamp (LEVEL 1) is not lit, the low reception level
signal (ALM) is issued (OFF).
(4) Power wiring
The power cable shall be 50 m or shorter.
Electric noises are induced into the power cable in various ways from electric devices along the
power cable and from power cables to other devices.
The power cable may cause a malfunction even if it is shorter than 50 m.
If any source of such a disturbance exists along the power cable, preventive actions shall be taken
including the following:
1) Keep the power unit for the equipment nearby.
2) Reduce the length of the power cable or separately install it.
3) Change the cable to an electromagnetically shielded one.
DS4-2511C
- 15 -
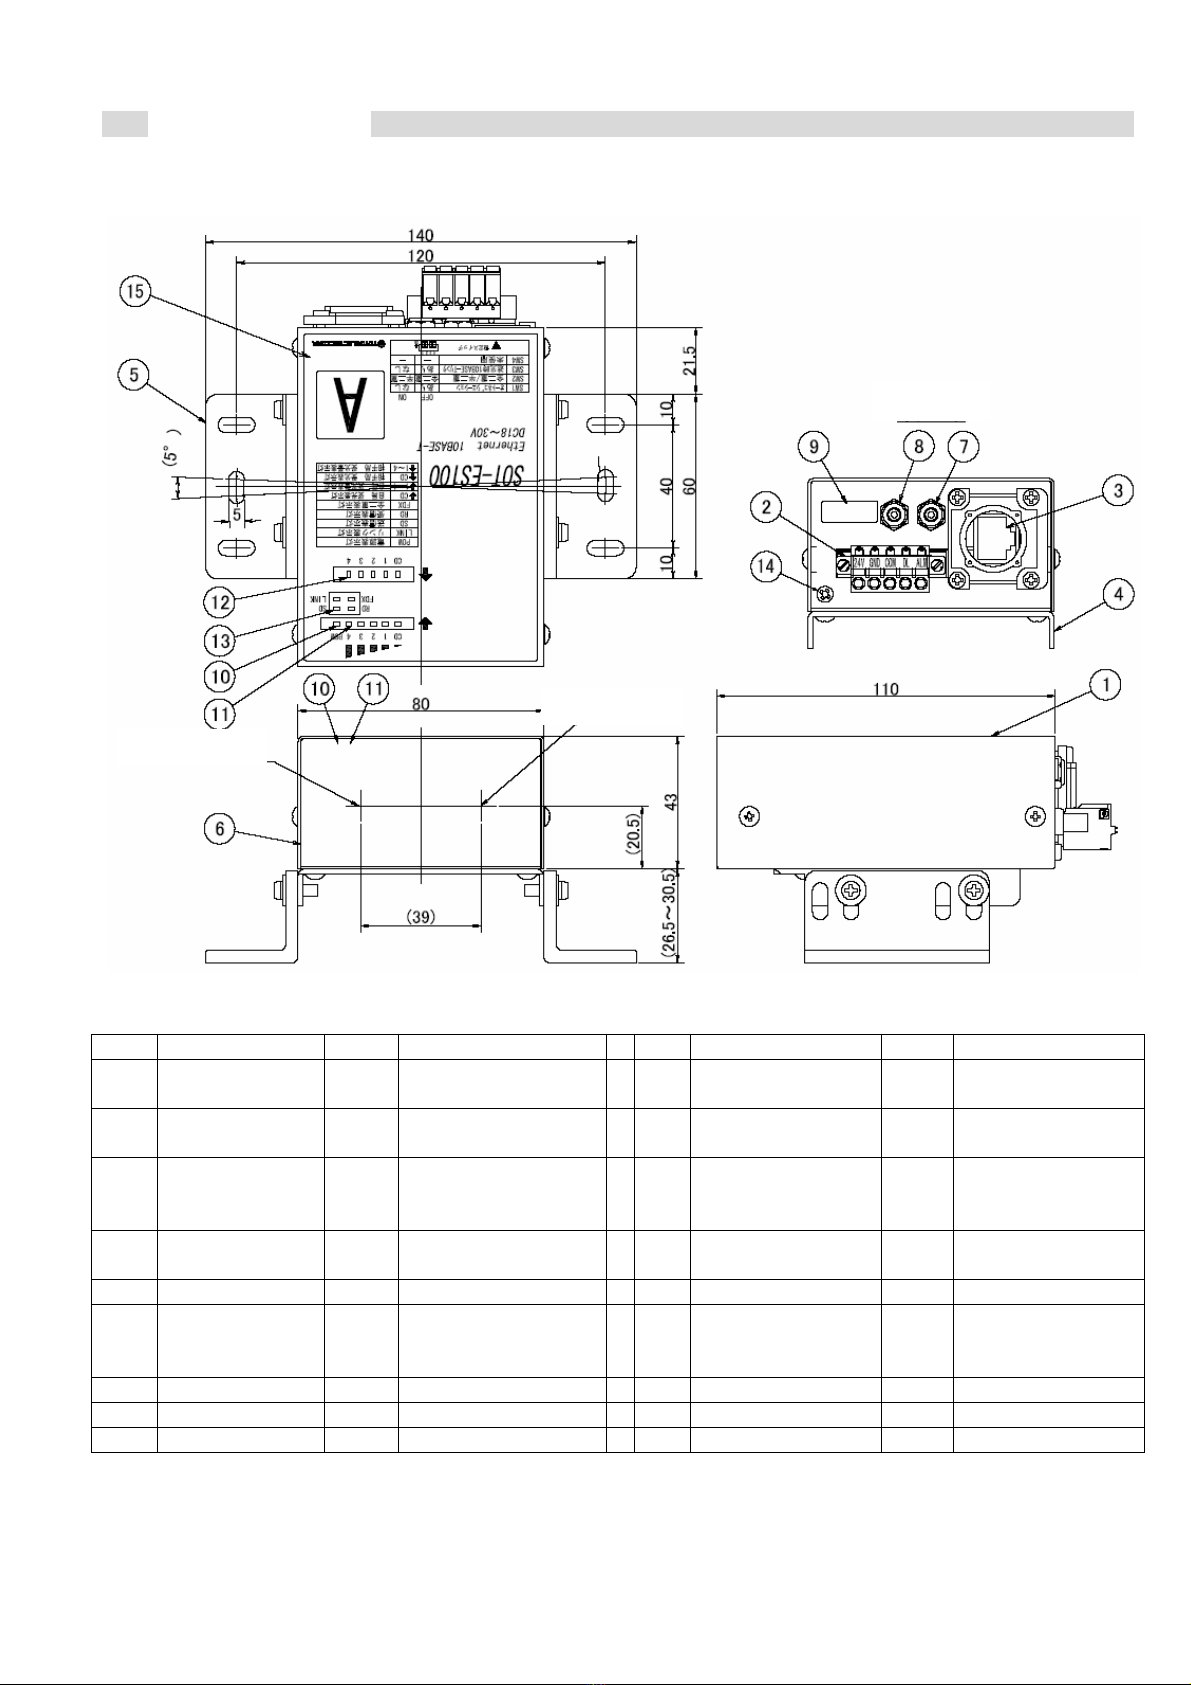
14. Outside Dimensions
No. Name or function Quantity Remark No. Name or function Quantity Remark
① Case 1 Aluminum, alumite
processing
⑩ Power indicator
lamp
1
② Power/aux.
output connector
1 ⑪ Clear data indicator
lamp (own unit)
5 CD, LEVEL1-4
③ Ethernet
connector
1 RJ45 ⑫ Clear data indicator
lamp (receiving
unit)
5 CD, LEVEL1-4
④ Mounting seat 1 ⑬ Communication
indicator lamp
4 SD, RD, LINK, FDX
⑤ Mounting fixture 2 ABS resin, black ⑭ FG terminal 1 M3
⑥ Optical
communication
unit cover
1 Acryl resin, blue
smoke
⑮ Nameplate 1
⑦ Check terminal + 1 Φ2 pin terminal, red
⑧ Check terminal - 1 Φ2 pin terminal, black
⑨ Setting switch 1 4P
Li
g
ht receivin
g
unit
Light receiving unit
Light emitting unit

DS4-2511C
- 16 -

DS4-2511C
- 17 -
15. Guarantee
(1) Guarantee period
One (1) year after delivery to the specified place.
(2) Scope of guarantee
If the equipment is found to have a fault attributable to us during the guarantee period specified
above, the faulty part will be replaced or repaired on our risk. This does not apply to:
1) the faults resulting from the incorrect handling or misuse by the user
2) those resulting from a cause not related with the equipment
3) those resulting from the modification or repair by parties other than us, and
4) those resulting from a natural disaster or accident beyond our control.
For the purpose of this document, the guarantee applies to the equipment itself and does not apply
to the secondary damage caused by the malfunction of the equipment.
16. For Contact
For further information about the product, please contact our sales office nearby or the Machinery
Division, Kamiya Factory.
TOYO ELECTRIC CORP., Electric Machinery Div.
Head Office Hikisawa 1-39, Kamiya-cho, Kasugai, Aichi, Japan 480-0393
/Kamiya Plant TEL <0568> 88-1181 FAX <0568> 88-3086
Tokyo Office (Uchikanda 282 Blg, No. 95) 15-9, Uchikanda 2-chome, Chiyoda-ku, Tokyo
101-0047
TEL <03> 3256-6665 FAX <03> 3254-3650
Kanagawa Office (City Mason, No. 203) Miyata-cho 1-4-17, Hodogaya-ku, Yokohama City,
Kanagawa 240-0002
TEL <045> 340-1766 FAX <045> 340-1767
Nagoya Office156, Ajimi-cho 2-chome, Kasugai City, Aichi 450-0002
TEL <0568> 35-3456 FAX <0568> 34-4666
Toyota Office 1-15-8, Kosaka-honmachi, Toyota City, Aichi 471-0034
TEL <0565> 37-8830 FAX <0565> 37-8832
Osaka Office(Osaka Godo Blg, No. 805) 1-5, Doyama-cho, Kita-ku, Osaka City 530-0027
TEL <06> 6361-1626 FAX <06> 6312-6762
Nishi-Nihon Office(Abundant 90, No. 301) Hakata Eki Higashi 3-11-4, Hakata-ku, Fukuoka City,
Fukuoka 812-0013
TEL <092> 413-2300 FAX <092> 413-2312
Website: URL http://www.toyo-elec.co.jp
* Specifications, dimensions, etc. shown in this operation manual may be changed to reflect the
performance improvement without notice.

DS4-2511C
- 18 -
17. Revision History
Date Content of revision Remark
2006.12.06 First edition Development
2007.02.13
Addition of consumption current, correction of directivity
angle from 1.5 to 1.2, correction of pin number of aux.
output
Development
2007.04.20
A power supply / an assistance output connector model
change, an error in writing correction, an address change
Development
2007.11.30 Change CDO output to DL output. Development
2008.07.24
A note regarding the check output added. The light
received/interrupted and indicator/output statuses
added.
Development
1
Space to be filled
This manual suits for next models
2
Table of contents
Other Toyo Transmitter manuals

Popular Transmitter manuals by other brands


SPRIANO
SPRIANO SST7 Series operating manual

Hoffer Flow Controls
Hoffer Flow Controls CAT3 user manual

Eaton
Eaton xComfort CAEE-02/01 Assembly instructions

Michell Instruments
Michell Instruments SF72 user manual

ARTEX
ARTEX C406-1 Series Description, operation, installation and maintenance manual

Hytera
Hytera Transmitter user manual