TPCAST RX001 Instruction Manual

1
User Guide on installation of
TPCAST Wireless Adaptor for VIVE
CE-01H-UG-EU-010

1
Client software installation
1
What's in the box
2
Components description
3
Connection instructions
4
Operation instructions
5
Positioning the PC transmitter
6
Safety precautions
7
Frequently asked questions
8
CONTENTS
2
Scan the code to view installation video of
Wireless Adaptor for VIVE
The TPCAST wireless adaptor for Head-Mounted Display (HMD)
has no cable attached, and it provides full motion and freedom.
Please pay attention to safety in the play area during gaming,
and take care to not run into objects. Alternatively, you can play
under the supervision of somebody else.
TPCAST Wireless Adaptor for VIVE and portable power bank
will get warm in the normal usage, if the partial temperature
reached 120 F, please stop using, in order to avoid burning people
or other hazards.

3
1.Download the software client
1. CLIENT SOFTWARE INSTALLATION
www.tpcastvr.com/support
Visit the TPCAST official website www.tpcastvr.com, browse
to the page of TPCAST wireless adaptor for VIVE, and click to
download the connection assistant for wireless adaptor for VIVE.
The current version of the client is compatible with Windows 7,
Windows 8 and Windows 10.
①Double click the icon to run the downloaded the installation
.exe file. If you have already installed any other versions of
the client, please uninstall and restart the PC according to the
prompt.
2.Install the connection assistant software
②Following the system instructions, select the installation
path and finish the client installation. A shortcut icon of the
connection assistant will be generated on the desktop.
TPCAST
Setup.exe

4
2. WHAT'S IN THE BOX
910 11
②PC transmitter
③Power Box
⑦Use instructions and warranty card
④power bank, 20100mAh
⑤Dedicated cable for long distance connection
⑥HDMI cable for short distance connection
⑧Nylon mesh bag
①HMD receiver
⑨Router
⑩Router power supply
1 2 3
57 8
4
6
Network cable
11
Belt strap
12
12
5
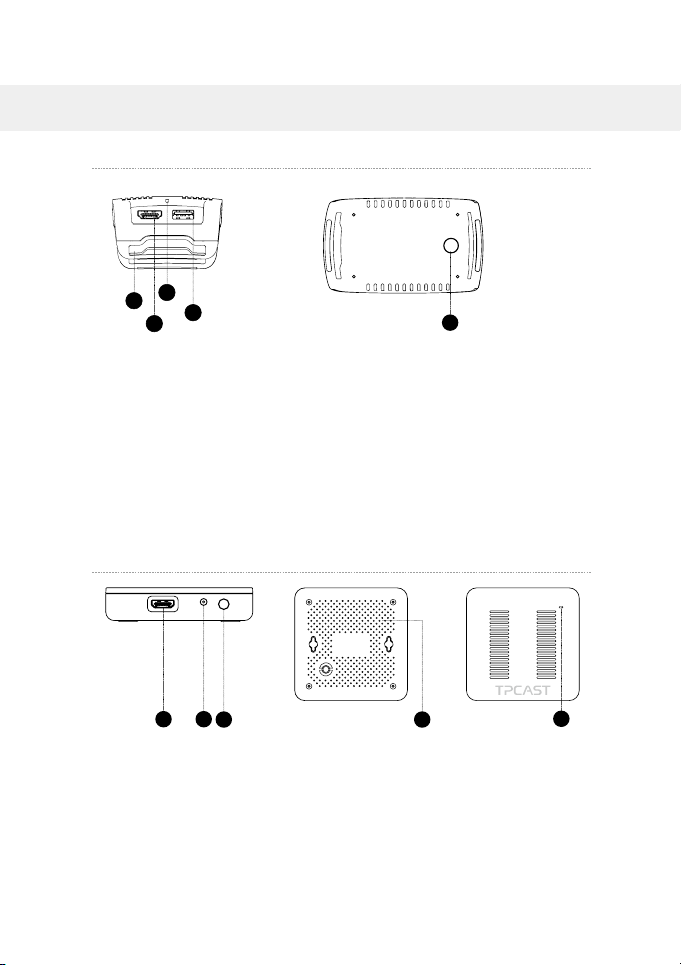
3. COMPONENTS DESCRIPTION
1.HMD receiver
2.PC transmitter
①HDMI connection port
②DCIN power port
③Video link pairing button
④Port for fixing the platform
⑤Indicator for video signal connection
1 2 3 4 5
①HMD strap and cable port
②HDMI short connection port
③Indicator for video signal connection
④USB port
⑤Video link pairing button
5
1
2
3
4
6
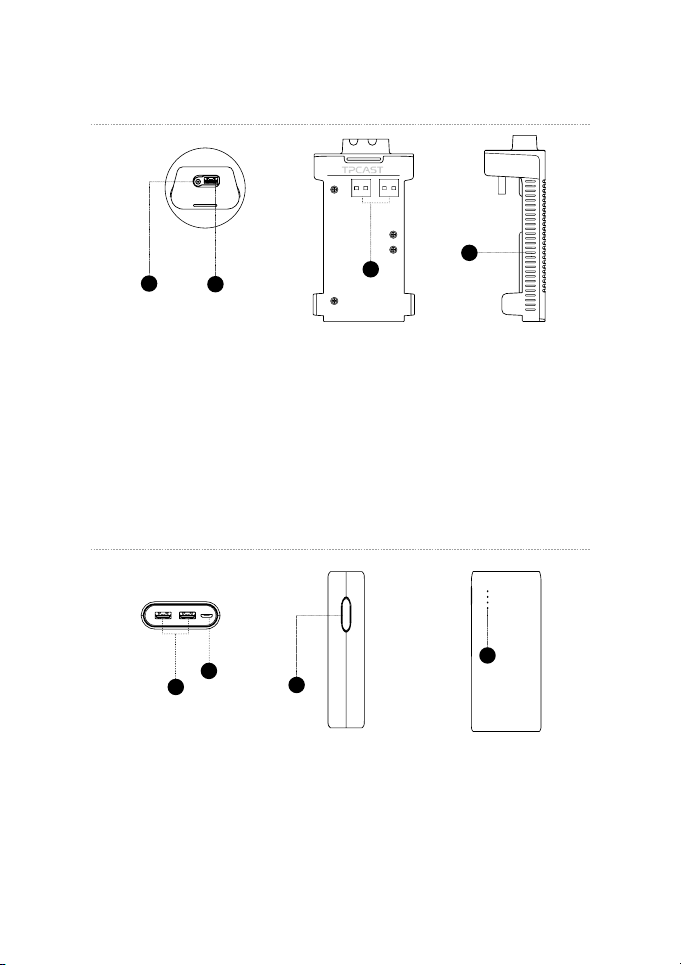
3.Power box
4.Portable power bank
①DCIN power port for dedicated long distance connection cable
②USB port for dedicated long distance connection cable
③Battery connector, USB port
④Indicator light
12
3
4
①USB power output port
②Micro USB charging port
③Battery indicator button
④Battery indicator
1
2
4
3
7
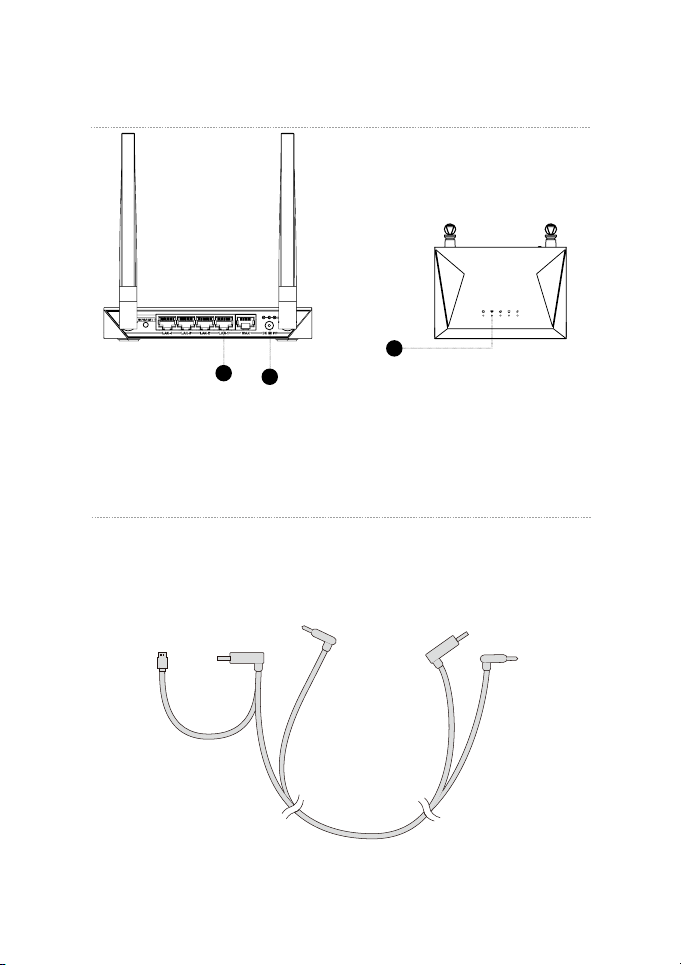
5.Router
①Network cable port
②Router power adapter port
③Router status light
6.Cable
Dedicated cable for long distance connection
1-A
1-C
1-B 1-D
1-E
USB
USB
DC
DC
2
3
1
8
4. CONNECTION INSTRUCTIONS
HDMI cable for short distance connection
2-A
2-B
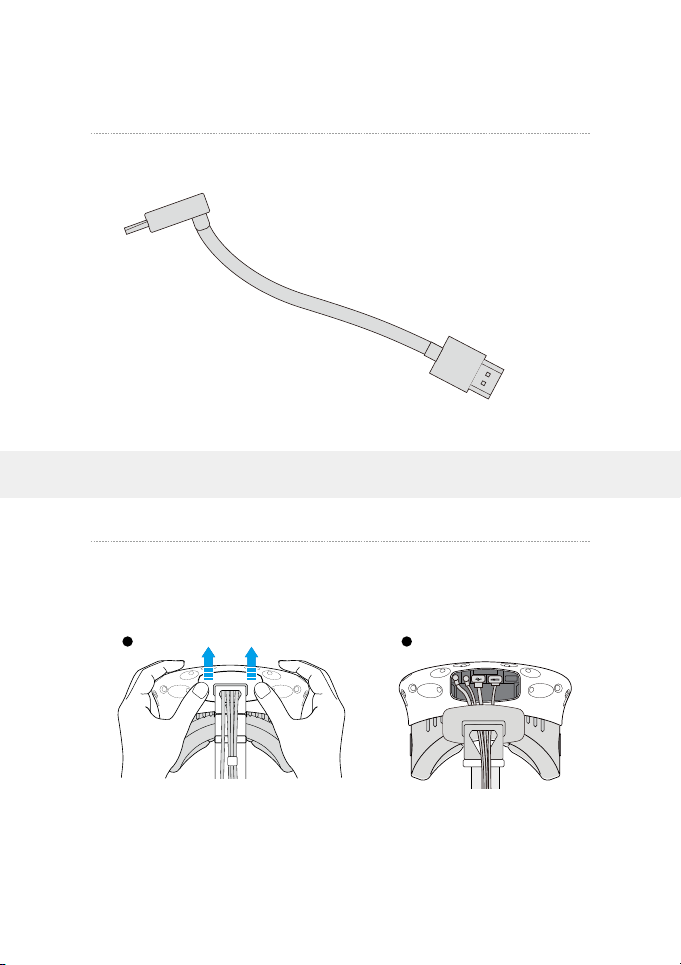
Step one: Unplug the connected cables
①As shown in the figure, open the compartment cover.
1.Connecting the HMD receiver
1 2
HDMI
HDMI
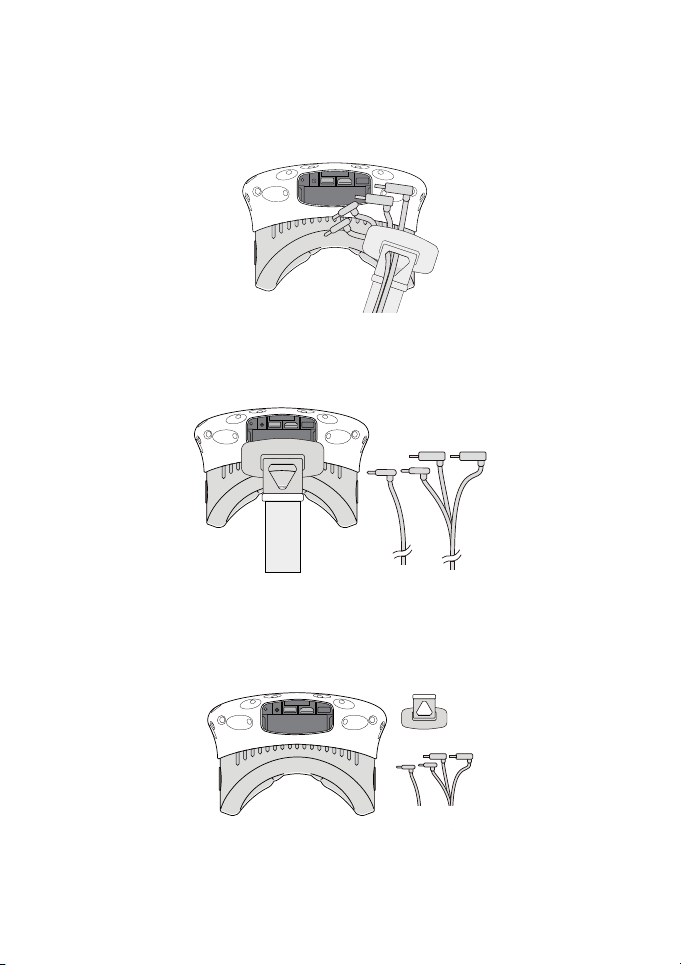
9
②Disconnect the three plugs of the 3-in-1 cable and the audio plug (a total of 4
plugs).
③Pull the 3-in-1 cable and audio cable out of the compartment
and the strap to completely separate from the HMD.
④Separate the strap from the compartment.

10
Step two: Fix the HMD Receiver
①As shown in the figure, thread in all three interfaces (1-a, 1-b
and 1-c) of the dedicated long distance connection cable and
audio cable from the HMD receiver with TPCAST side and out of
the other side.
Note: The curved USB plug (1-A) requires some pressure to pass
it through the threaded hole.
Step three: Cable connection
①Plug the 1-C USB plug of the dedicated long-distance connection cable
and the 2-B of the short distance connection cable into the USB port and
the HDMI port of the receiver respectively.
②Thread the separated strap through the HMD cable ports in
turn and routed under the dedicated long connection cable, then
the receiver end will be fixed on the HMD strap.
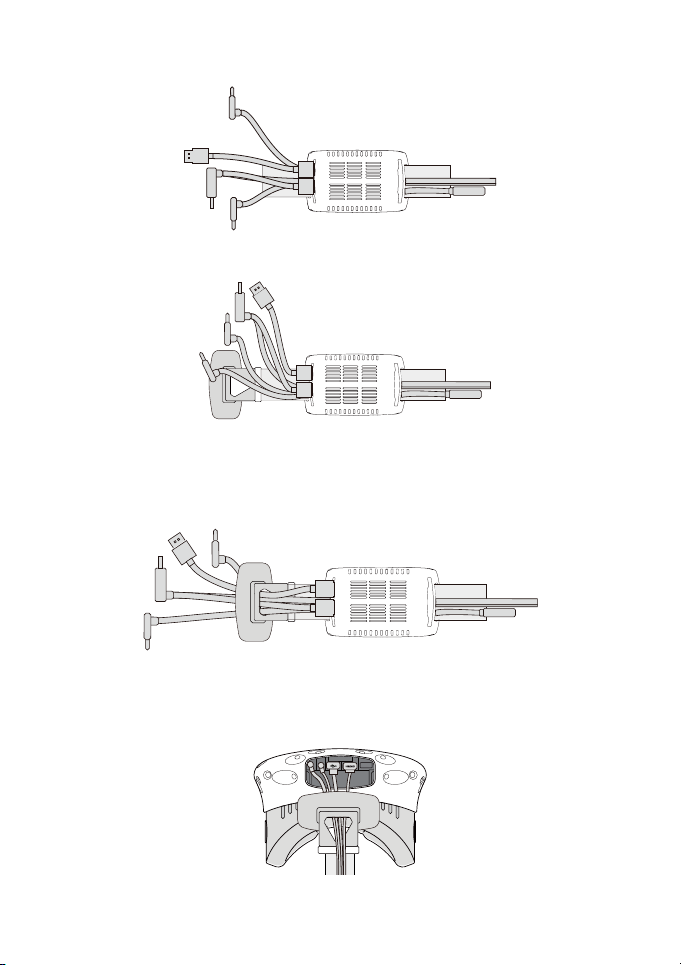
11
②Reconnect strap to the compartment cover.
③Thread the 1-a and 1-b interfaces of long connection cable
through the compartment cover cable port, and the 2-a interface
of short connection cable as well.
④In turn plug in the four interfaces into the VIVE HMD power port, USB port,
HDMI port and audio connector port.

12
⑤ Straighten out the cable, and put the compartment cover back.
It is recommended to adjust the length of the strap in a manner
that, when the HMD receiver reaches the end of strap,the cable
will not be tight.
Step four: Overall adjustment
①Slide the 1-D plug of the long-distance connection cable, the
1-E plug, and the audio cable through the two sleeves at the
back of HMD and hang on the back.
② Slide the receiver to the end of the strap, and sort out the
cables properly.

13
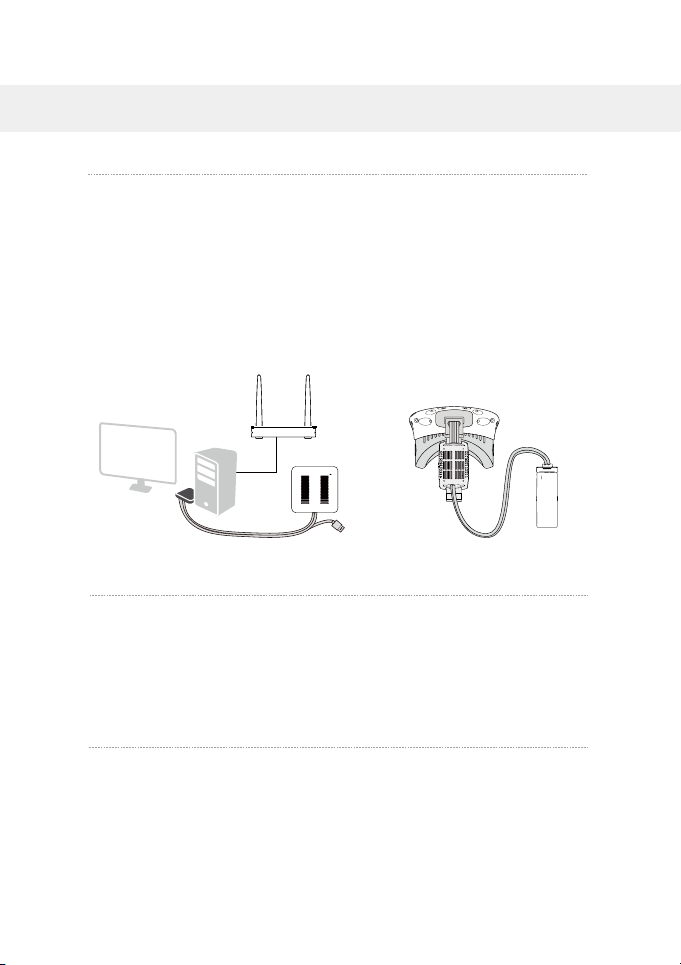
Step one: Connecting the power box
As shown in the figure, respectively connect the 1-D and 1-E
plugs of the long-distance connection cable to the USB and power
supply port of the power box.
Step two:Connecting the power bank
As shown in the figure, plug in the power bank to the power box.
The blue battery light on the power bank turns on to indicate the
remaining level. To improve the utilization rate of power bank
capacity, please only connect to the power bank before operation
of the product. After the operation, remove the power bank.
Step three:Securing the power box
Put the installed power bank and the power box in a portable
pack and string the pack to ensure the power box, does not fall
during motion.
2.Power box connection instructions
1 2 3
Step one:Disconnecting the power
Disconnect power supply for VIVE streaming box.
Step two:Connecting the transmitter
As for the existing VIVE 3-in-1 cable detach it from the
3.PC transmitter connection instructions

14
4.Router connection instructions
Step one: Connect the router power adapter and confirm that the
power indicator at the front of the panel is on.
Step two:If the PC is connected to the network via the Ethernet
port, disconnect the Cable and connect it to the router’s WAN
port. Connect the LAN port of the router to the PC through the
supplied network cable, as shown in the figure.
Step three:In the PC’s network connection Settings in a Windows
system, select “Local connection” to connect the router, and
change the connection of the TCP/IP Settings to automatically
obtain an IP address and DNS server address.
Note:Use the router as is, DO NOT modify the router’s settings.
DO NOT restore the factory default settings. To optimize the
user experience, it is recommended to place the router in an
open location without obstacles, with a 90-degree antenna. Avoid
putting the router under a desk, behind a computer case, or in
any other enclosure environment.
HMD, plug in the DCIN power plug and the HDMI plug to the
corresponding port on the PC transmitter (the USB plug is not
required to be attached).
Step three:Connecting the power
Connect back the power supply to the VIVE streaming box.
LAN Port
WAN Port
15
1.Connection verification
Verify that the TPCAST wireless adapter connections are secure
and tight including:
Make sure that the battery is fully charged.
o The HMD receiver,
o The PC transmitter,
o The power box,
o The power bank
o The router
5. OPERATION INSTRUCTIONS
2.Positioning the PC transmitter
The PC transmitter position is crucial to get the right
performance and high-quality VR experience. Appropriately
Position the PC transmitter needs to be based on the site
topology for optimal outcome. Refer to the “Instructions on PC
transmitter setup” for details.
3.Run wireless adaptor connection assistant
Double-click the PC desktop client icon, and then click “Start”
after the client started. It will automatically test the wireless
adaptor working environment, in turn, when the wireless
connection starts, please launch the VIVE Port and Steam VR
software.
16
4.Enjoy wireless VR
In normal operation of the wireless adaptor, the indicators of
both transmitter and receiver will change from fast blinking to
normal light mode. The HMD display and control should function
normally.
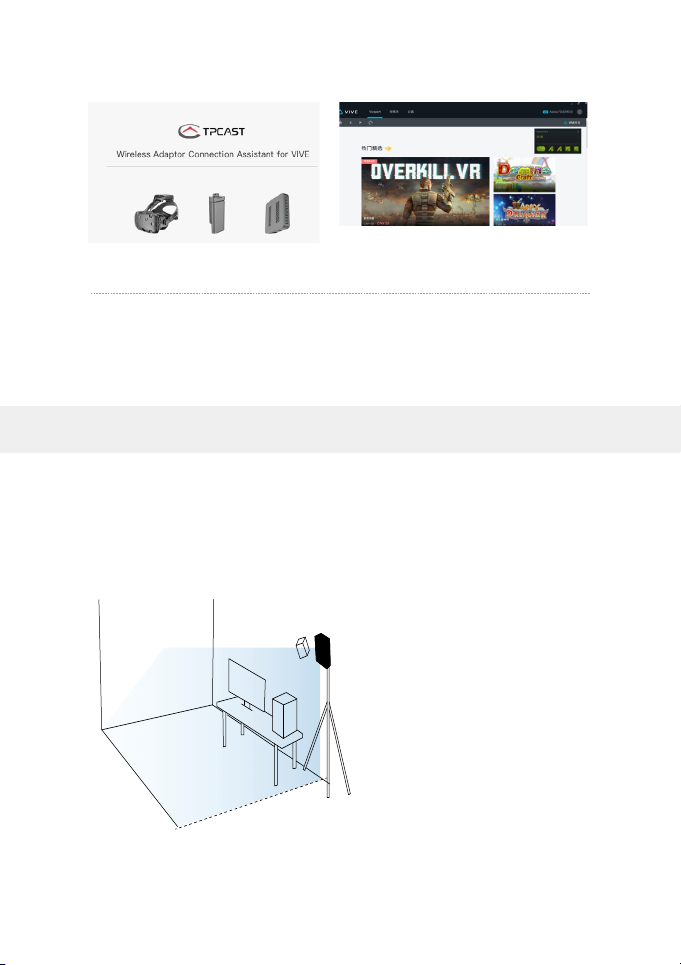
Positioning the PC transmitter is subject to the location and
topology of the site, different setup plans will be applied
accordingly. It is recommended to place the PC transmitter close
to the VIVE laser locator (lighthouse) and point it towards the
playing area. As shown below:
6. POSITIONING THE PC TRANSMITTER
PC transmitter
17
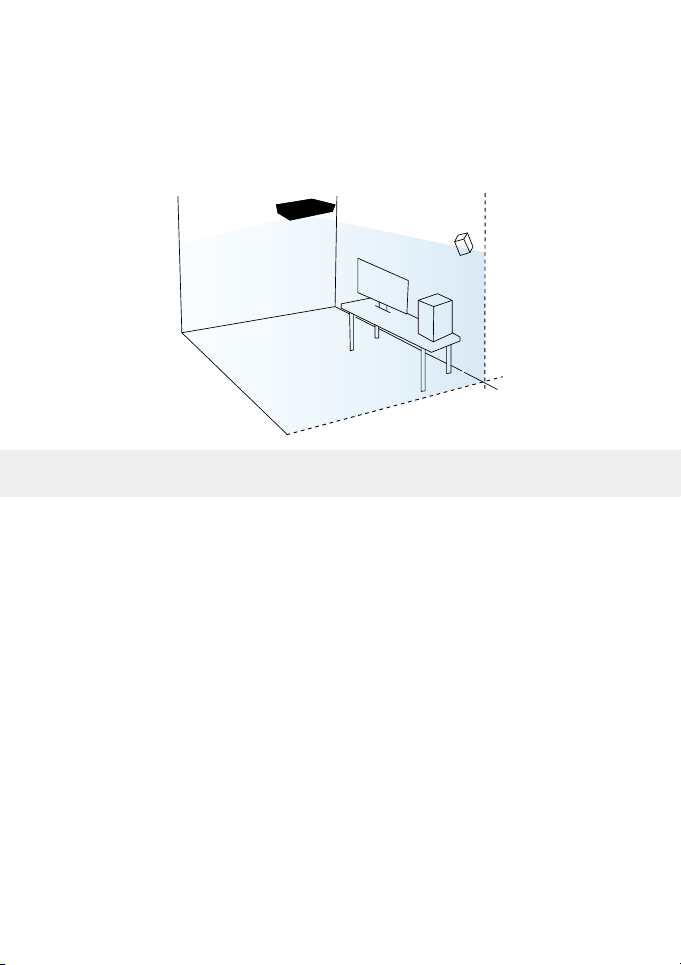
If after following the above instructions connectivity is
lost, or you are experiencing unpredicted video events, it is
recommended to place the PC transmitter above the play area, as
shown below:
Safety: The TPCAST wireless adaptor for Head-Mounted Display
(HMD) has no cable attached, and it provides full motion and
freedom. Please pay attention to security and safety in the
play area during gaming, and take care to not run into objects.
Alternatively, you can play under the supervision of another
person.
Cable:to prevent damage to the cables it is suggested not to pull
the cable to fetch the devices. If there is a need to unplug the
cables, pull lightly from the connector.
Heat dissipation:The wireless adapter generates heat during
normal operation, and the temperature may rise. If abnormal
temperature occurs, stop activity immediately and contact TPCAST
customer support.
Battery safety:
The battery supplied by TPCAST is dedicated for this product only.
You should
7. SAFETY PRECAUTIONS
PC transmitter

18
not replace it with a non-TPCAST battery. Any damage caused
accordingly willwaive the warranty of the adaptor. In order to
mitigate the risk of fire hazard or combustion hazard, please do
not disassemble, squeeze the portable power bank and shall not
expose the power supply to environment exceeding 60℃, or toss
into the fire or water.
Children use: Children are not allowed to use this product. Please
keep this product in appropriate locations beyond the reach of
children, and do not grant access to children. If elder children are
allowed to use this product, please do proceed under the close
watch of adults.
Recharging:The battery can be recharged with a regular cellular
phone charger, and a charger of 2A is recommended to reduce the
charging period. 9~12 hours will be needed to complete a single
full charge. A charger of the capacity of more than 2.4A shall not
be used for recharging.
Service and maintenance:The adaptor is non-waterproof;
therefore, attention should be paid to adequately protect it,
including a blower, air duct, etc. should not be used to dry the
product in the case it gets wet as the product may get damaged.
• Do not drop or disassemble the adapter, as it can cause an
electrical shock or re.
• Operate and maintain the product in an environment of 14 to 104
degrees Fahrenheit.
• Use the product as directed only and do not connect to any
incompatible products.
• Refer to the local regulations on disposal of electronic waste for
proper waste management.
• Avoid inserting small objects into the products through the vent
openings.
• Do not clean this product with any irritating chemical, detergent,
liquid soap or aerosol.

19
Why do the VR control connection tests always fail?
1. Check that the router is plugged correctly into the power
supply
2. If the tests still fail after several trials perform the following
steps:
a) Unplug the battery
b) Unplug the router power supply
c) Connect back the battery
d) Connect back the router to the power supply
e) Reboot the PC
f) Restart the wireless adaptor for VIVE connection assistant and
retry.
3. Please contact the customer service if the problem is still not
solved.
How do you pair the HMD receiver and the PC transmitter?
1. Check to ensure that the HMD receiver and the PC transmitter
have been connected and powered. Check that there is no
obstruction between the two, and the connection requirements
are met.
2. Follow the "Usage Steps" in the User manual for pairing
operation. After the devices are powered ON, the indicators
on the HMD receiver and the PC transmitter will blink slowly;
after about 15 seconds, the connection lights will flash quickly,
indicating a successful pairing.
3. If you fail after a couple of trials by following the steps in the
User Manual, please contact the customer service.
Note: If the VR is not in use for more than 2 minutes, after
the indicators on the HMD receiver and the PC transmitter
blink quickly, the signal connection indicators will turn off
automatically. The adaptor will enter into a standby state to save
power, and it will be activated automatically when the wireless
connection is on.
1.Connection issues
8. FREQUENTLY ASKED QUESTIONS
Table of contents


