Tracksolid AT1 User manual

AT1 Magnetic GPS Tracker
(User Manual)
Tracking Website: Tracksolid.com
Tracking App

Content
Appearance ............................................................................... 3
Accessories ................................................................................ 4
Quick Setup ............................................................................... 5
Charging ........................................................................................................ 5
Insert SIM card.............................................................................................. 6
Power ON / OFF ............................................................................................ 7
Download Tracksolid App ............................................................................. 8
Sign up & Login ............................................................................................. 8
Bind Device ................................................................................................... 9
Ensure Device Online ............................................................... 11
Status Indicator ........................................................................................... 11
Device Inactive............................................................................................ 11
Device Offline ............................................................................................. 11
Set SOS number .......................................................................................... 12
Troubleshooting ....................................................................... 13
LED Indicators ............................................................................................. 13
Set up APN .................................................................................................. 14
Get Help ...................................................................................................... 15
Install Magnetic Base ............................................................... 16
Double check before install ........................................................................ 16
Install the magnetic base ............................................................................ 16
Remove the magnetic base ........................................................................ 17
Main Functions ........................................................................ 18
Bottom Menu ............................................................................................. 18
Console Menu ............................................................................................. 18
Real Time Tracking ...................................................................................... 19
History Playback ......................................................................................... 20
Geo Fence ................................................................................................... 21
Set Work Mode ........................................................................................... 22
Voice Monitor ............................................................................................. 23
Command List ............................................................................................. 23
Specifications .............................................................................................. 24

3
Appearance
Tamper Alarm Button
Notch
Waterproof Mic
Charging Port
Charging Contact
Magnetic Connector
GSM LED
Power LED
GPS LED
On/Off Button

4
Accessories
Magnetic
Cover
5V/2A USB
Adaptor
Magnetic
Cable
Screws Screwdriver User Manual
* Note: A 2G SIM card is necessary to use the GPS locator. Please prepare a SIM
card that supports the following frequency bands before starting to configure the
device:
Quad-band 850/900/1800/1900 MHz
IMEI Number

5
Quick Setup
Charging
Charging the device with original adapter and cable before use.
The red LED is always on when charging, and it flashes slowly when
it is full.
A full charge usually takes about 3 hours.
Charging LED
Charging Insert SIM Power on
Download App
Sign up & Login Bind Device

6
Insert SIM Card
Unscrew the existing screws from the back cover using the
screwdriver.
(To simplify the steps, only two screws installed during production)
Insert Nano SIM Card in correct direction.
SIM Card Slot

7
What SIM Card should I to Choose?
Frequency Band Quad-band 850/900/1800/1900 MHz
Network 2G (GSM)
2G Data Required (At least 20-30Mb/Month)
2G SMS Required
2G Voice Call Optional (For Voice Monitor)
SIM Type Nano Size
Power ON / OFF
1. Power ON/OFF: Long press the power button for 3sec.
2. After power on, wait for the blue led to flickering slowly (on for 1sec,
off for 3sec), indicates the device has connected to the network
successfully.
3. After confirming that the SIM card is working properly, restore the back
cover and fix it with some screws.
*If the green led keeps flashing quickly (Lights up 3 times in 1sec), means the device
may not recognize the APN of the SIM card. Please refer to Set up APN to set the
APN manually.
*For troubleshooting, please refer to LED Indicator.

8
Download Tracksolid App
Search “Tracksolid” in App Store or Google Play to download.
Scan the QR down below to download.
Sign up & Login
① Input your email
② Click ‘->’ to get verification code
③ Type in the code you find in email
④ Set up and confirm Password
⑤ Agree the Terms
⑥ Click on Submit
⑦ Login with the email and password
①
②
③
④
⑤
⑥
⑦

9
Bind Device
1. Click the ‘+’ on the top right to add device.
2. Scan or type in the IMEI barcode on the package or device body.
3. Click ‘Add Device’ to confirm binding.
Find the IMEI barcode
on package or device
Add Device
Scan
Barcode

10
Edit basic info about this device, or click on ‘Save’ directly to skip this
step.
You can come back and edit the info anytime in the ‘Detail’ Page.
Edit

11
Ensure Device Online
1. Go to ‘List’, you will see the AT1 you just bind.
2. You can tell the status of the device via the color of the icons.
3. To get a location or send any command, the device must be online.
Device Inactive
Usually inactive is because the device cannot match the APN. Please
refer to Set up APN.
Contact us with your IMEI number attached to get a technical support.
Device Offline
Check whether the battery need to be charged.
Check whether the SIM card got sufficient balance.
If the power is on, check the LED indicator to find reasons.
Contact us with your IMEI number attached to get a technical support.
OFFLINE
Status Indicator

12
Set SOS number
After device is online, you can set an SOS number to receive SMS
alert or trigger a voice monitor call.
1. Find your device in the list page, click on the icon.
2. Go to ‘Command’ page to set the SOS number.
Set SOS number
① Type in your number
② Click ‘Send’
Delete SOS number
① Choose corresponding number
to delete
② Click ‘Send’

13
Troubleshooting
LED Indicators
LED Status Meaning Quick Solution
Red
Always On Charging Recharge the
device.
Or try charging
with another
charging cable
OFF No Battery / Malfunction
Flicker Quickly
(Every 0.3 seconds)
Low Battery
Flicker Slowly
(1s on; 3s off)
Fully Charged / Device
Working
Blue
Flicker Quickly
(Every 0.3 seconds)
GPS Signal is poor Bring the device
to open sky and
send command:
GPSON#
Flicker Slowly
(1s on; 3s off)
Fetching Location
OFF GPS working steady
Green
Always On Calling Bring the device
to a place with a
better network
signal. Or send
the correct APN
command
Flicker Quickly
(every 0.3 seconds)
GSM signal is poor or the
APN is incorrect
Flicker Slowly
(1s on; 3s off)
GSM signal is normal or
GPRS online
OFF No GSM signal or No SIM
* Describing the LED status when contacting us will help locate the
problem.
14
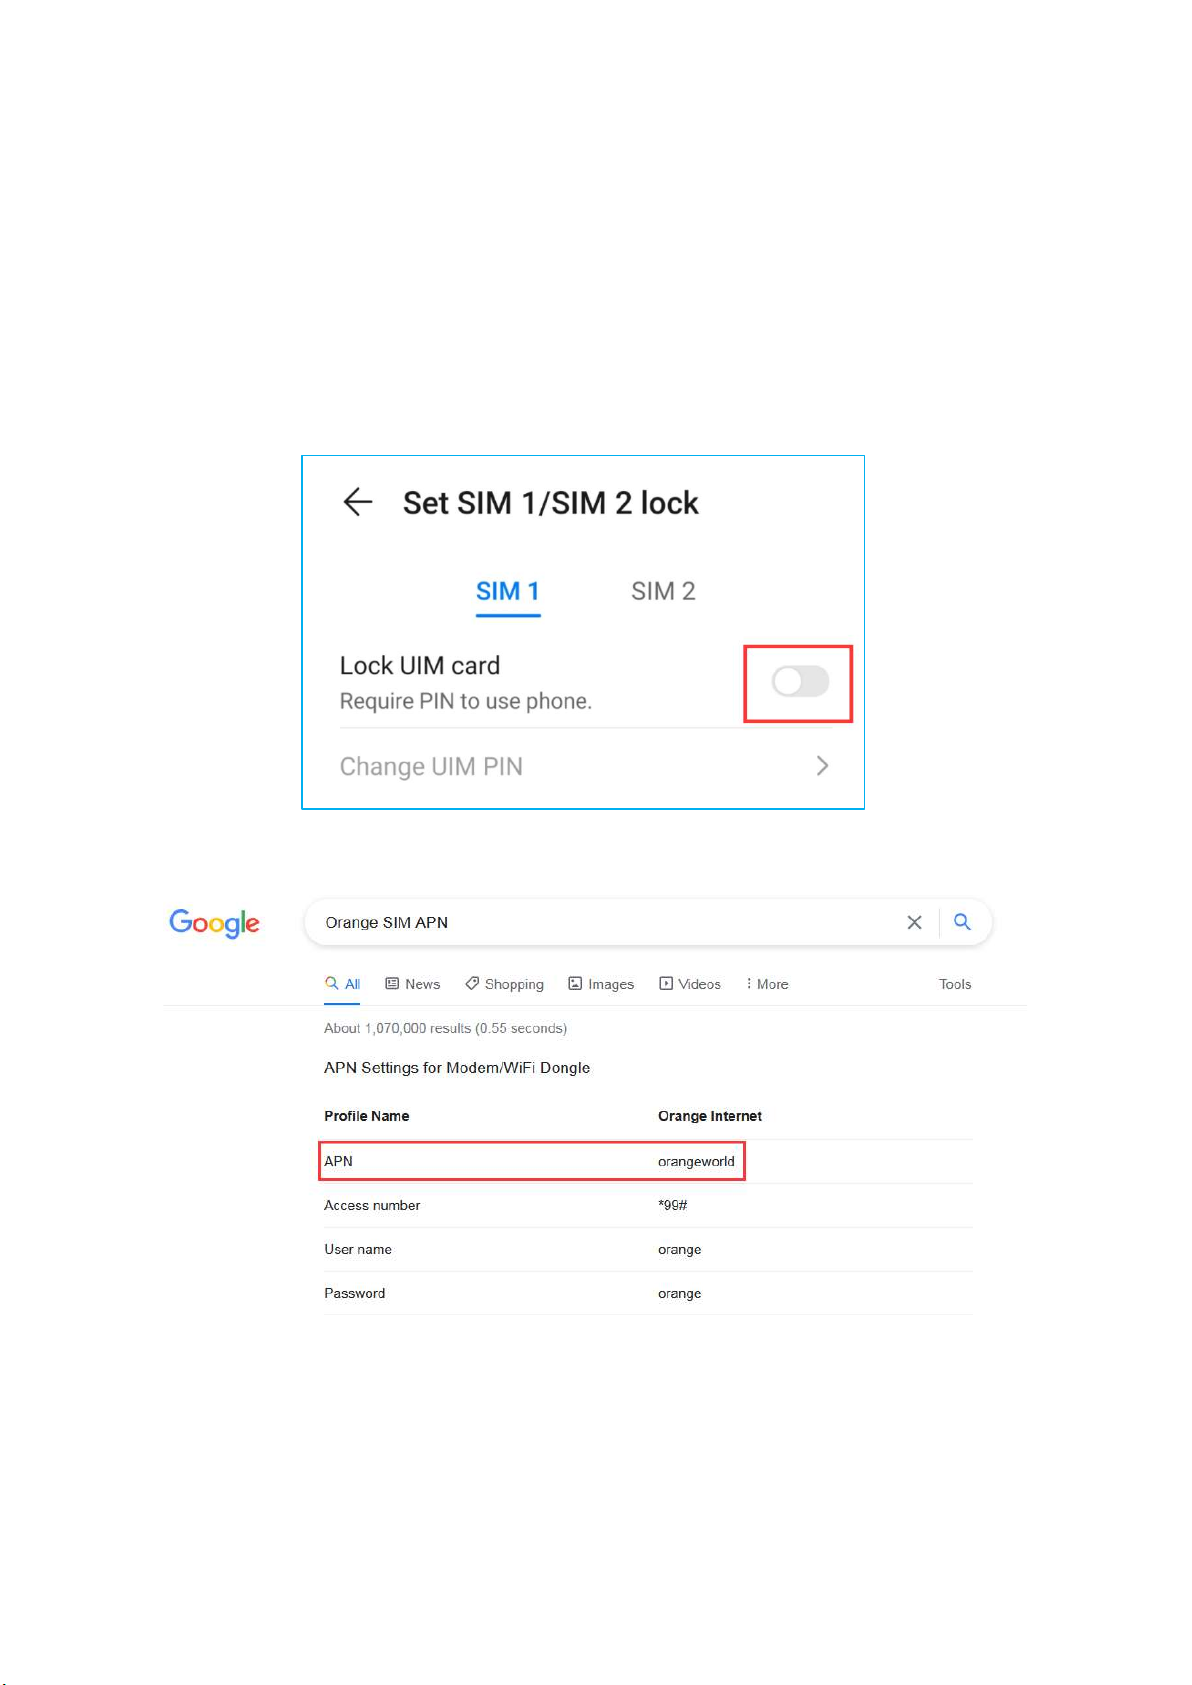
Set up APN
If your device is unable to activate, you may need to set up APN when
first time use.
Step 1 - Confirm the SIM card frequency band compatible with AT1
(850/900/1800/1900MHz).
Step 2 - Insert the SIM card into your smartphone and disable the PIN code.
Step 3 - Get the APN name from carrier or Google it.
Step 4 - Insert SIM back into the device and power on AT1, then send an
SMS command (APN,APNname#) to the SIM card.
e.g.:

15
APN name: mobilenet
Then send the command:
APN,mobilenet#
(No spaces between the commands)
Step 5 – Reboot the device and find it online.
Get Help
Email us: [email protected]
Messenger us on Facebook: M.Me/FosinTrust
Live chat via WhatsApp: +86 13423860204

16
Install Magnetic Base
Double Check before Install
Check if the device can work normally before installing the magnetic base.
Make sure the SIM card is insert correctly
Check whether the device is online in the Tracksolid. Please contact
us and get help if the device is inactive or offline.
Install the Magnetic Base
Align the magnetic base hole with the tamper detector on the back of
AT1. Put the base over the device.
Insert the magnetic base from the side with tamper detector.
Push in to make the base parallel to the device, and then push it back
to lock in.
Tamper Detector
Push to the end
Push back to lock in
①
② ③
Tamper Detector

17
Remove the Magnetic Base
Pull out the buckle and pushing the base from bottom to top
simultaneously to remove the magnetic base.
Push
Lift the buckle outward

18
Main Functions
Bottom Menu
Console Menu
1. Tapping the icon to check the device.
2. Tapping the button to expand the menu.
Device Status
Last Location
Console Menu
Map Page
Device List Alerts Report Account Setting
Note:
If there is no map display, please install Google Maps app.

19
Real Time Tracking
Tapping on ‘Tracking’ to enter tracking page.
Map Type
Show Traffic
Street View
Locate AT1
Device Status
Show the Address
Share Location

20
History Playback
Click ‘Playback’ to search the track among the past 6 months.
Select the time period and click "OK"
AT1
v
Calendar Report
Play & Pause
Speed up
Hide & Show the line
Choose another period
Table of contents


