Tradgardsteknik L600 User manual
ROBOT MOWER
USER MANUAL
www.ttshop.se

INDEX
WARNING
Keep this user manual handy, refer to it at any time.
This User manual is a permanent part of the robot mower
and should remain with the robot mower if resold.
However, to discontinue or change specifications or
design at any time without notice and without incurring any
obligation whatever, No part of this publication may be
reproduced without written permission.
WARNING:
THE ROBOT MOWER IS DANGEROUS
IF INCORRECTLY USED!
CHAPTER ONE SAFETY AND PRECAUTION
1.1 Brief Introduction
1.2 Safety Marks
1.3 Precaution
1.4 Package and transportation
CHAPTER TWO INFORMATION SUMMARY
2.1 Main Parts
2.1.1 Machine Body
2.1.2 Charging Station
2.1.3 Boundary line and Adapter
2.1.4 Remote Control
2.2 Technical Parameters
2.2.1 Machine body technical parameters
2.2.2 Power Adaptor technical parameter
2.2.3 Charging station technical parameter
2.2.4 Remote control technical parameter
2.3 Mowing Path
2.3.1 Random linear mode
2.3.2 Involutes mode
2.4 The Mower's Main Function
2.4.1 Mowing schedule
2.4.2 Automatic charging
2.4.3 Automatic shelter rain
2.4.4 Remote control
2.4.5 Automatic obstacle slow down
2.4.6 Slope over 30 degrees alarm
2.4.7 Fall alarm
2.4.8 Collision detection
2.4.9 Mower start alarm
2.4.10 Unexpected shut down alarm
2.4.11 Password protection
CHAPTER THREE OPERATION INTRODUCTION
3.1 Check all the parts
3.2 lawn clear
3.3 Installation of charging station
3.3.1 Choose a suitable location
3.3.2 Place the changing station
3.4 layout the boundary line
3.4.1 Layout the boundary line
3.4.2 Fix the boundary line
3.5 Debugging the charging station
3.6 Installation of the fuse
3.7 Battery change
3.8 Setting
3.9 Start the mower
3.10 Remote control
CHAPTER FOUR MAINTENANCE GUIDE
4.1 Replacement of the blade
4.2 Replacement of the battery
4.3 Clean-up mowing cutter cover
4.4 Clean-up the front and rear wheels
CHAPTER FIVE TROUBLESHOOTING
CHAPTER SIX SERVICE
3.11 Cartion for daily use
01
01
01
02
02
03
03
03
03
04
04
05
05
05
05
05
06
06
06
07
07
07
07
07
07
07
07
07
07
07
07
08
08
08
09
10
11
12
13
13
14
22
23
24
25
25
25
25
25
26
10
09
09
28

Chapter One Safety and Precaution
1.1 Brief Introduction
Thank you for choosing our high quality product. Before use the robot mower, please
read the operating manual to guide your operation of this machine.
1.2 Safety Marks
1.3 Precaution
Please read through all the following marks on the mower.
Please read through this
User manual before usage
Please follow all the safety and
caution signs in operating manual
Never ride on this mower
Wear protective gloves when
repair chassis of mower
Authorized people only
Don’t disassemble
Rotating
keep hands away
CE approved Keep hands clear of
moving parts
Keep hands and feet away
from the rotating blades.
1.4 Package and transportation
01
1、Let children or pets be away from mower .
2、Clear up all the debris on your lawn before start the mower.
3、Make sure that people who are not familiar with the mower are staying away from
this machine while it is working.
4、Never repair or adjust this machine while it is working.
5、Never inspect blades or lift the mower while the machine is working.
6、Never let this mower work on the slope over 30°
7、Never use this machine when any safety part damaged.
8、Wear safety gloves when inspect blades.
9、Wear goggles and gloves when install boundary line and fix bolt.
10、Turn off the machine when charge it from the rear socket.
when it is working
1、
2、
3、
Lithium
4、
5、
6、
Use the factory package to protect the machine in transportation.
Turn off the machine and remove the fuse in transportation.
Turn the machine’s power off when it will not use for a long time, and charge the
battery every 2 months(charge the Lead-Acid battery every 2 weeks) to
guarantee the performance of the battery.
Remove the fuse when it is finished charging to ensure safety.
During rain season, it is recommended to place the mower in the place absence of
rain, turn the power off and remove the fuse.
During snow season, move the machine to the room, turn off the power, and
suggested to remove the fuse.
Chapter One Safety and Precaution
02
Note:
Take good care of children, remove the fuse of the machine when there is no
adult in the home to avoid error starting, for children's curiosity might resulting
accidental injury.

Chapter Two Information Summary
2.1 Main Parts
There are 4 main parts in this robot mower: 1. Machine body, 2. Charging station, 3.
Boundary line and Power adapter, 4. Remote control.
2.1.1 Machine Body
This robot mower is powered by battery.
2.1.2 Charging Station
There are 3 functions:
To limit working area of mower by boundary line
Alarm and instructions
To charge the battery of mower
Chapter Two Information Summary
2.1.3 Boundary line and Power adapter
Boundary line is layout along the boundary of lawn and other obstacles.
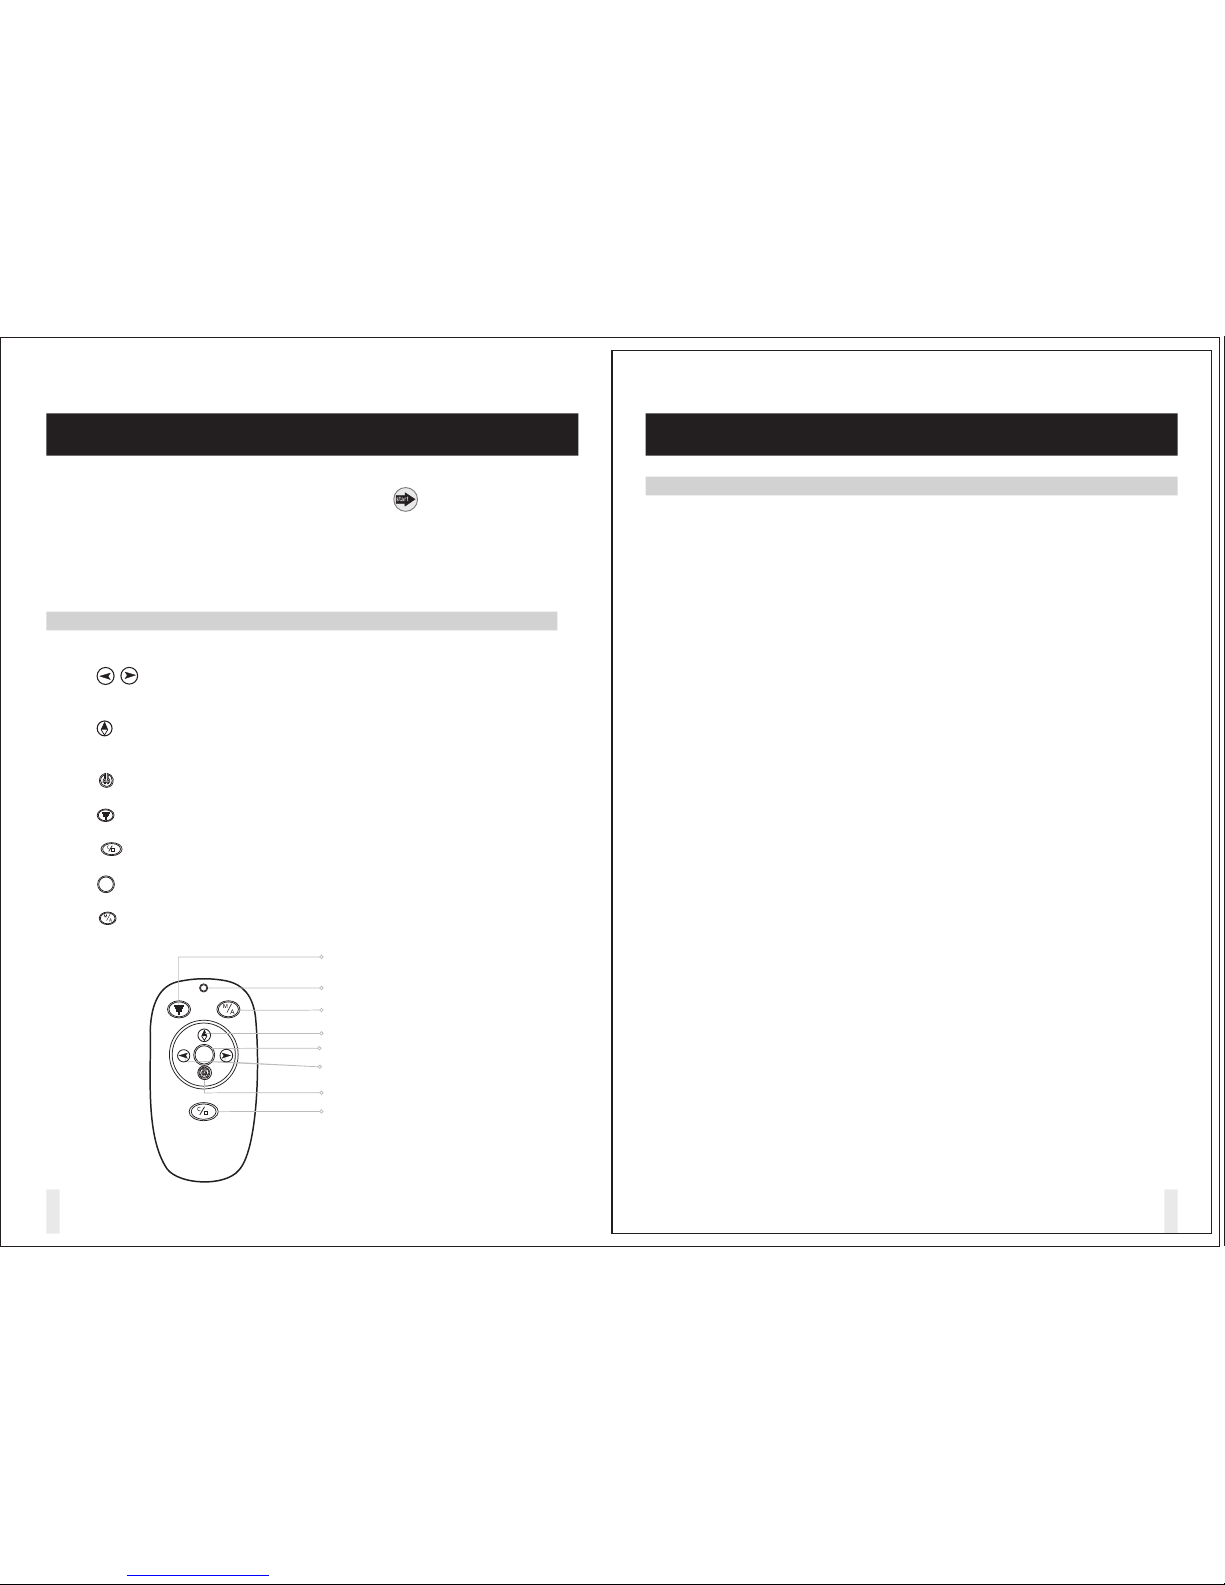
2.1.4 Remote Control
Boundary Line
Power Adaptor
03 0 4
Infrared Detection Switch
Lock the mowing mode
Start /Stop mowing motor
Mowing Mode Selecting
Left or Right Direction Key
Key for Returning Charge Station
Pause Key
Remote Indicator
mode

Chapter Two Information Summary
2.3 Mowing Path
90°
90°
Chapter Two Information Summary
The mower works with a position as a starting point to begin walking 0.3m radius
arc, the arc radius gradually become larger, to achieve the involutes pattern mowing.
This mode is suitable for mowing a small area under manual remote control.
2.2 Technical Parameters
In the random linear mode, when the mower detects the boundary line, it will
turn 90-degree to another direction, then it walks a straight line, continue mowing
until the next encounter the boundary line, and automatically turns 90-degrees, then
mow along a straight line, followed by repeated, so that the machine will not walk in
the same straight line to avoid duplication path as far as possible, so it will achieve
maximum mowing efficiency.
Usually, the mowing capacity is 130 square meters per hour.
2.3.1 Random linear mode
2.3.2 Involutes mode
05 0 6
L600
L600s
L600-Plus
C600
2.2.1
Machine body Technical Parameters
Daily Mowing Area
2
≤700m
2
≤400m
2
≤1000m
2
≤500m
Cover Area
2
≤2500m
2
≤2500m
2
≤2500m
2
≤2500m
Lawn remain height
3cm~6cm
3cm~6cm
3cm~6cm
3cm~6cm
Mowing width
24cm
24cm
24cm
24cm
Climbing inclination
≤30°±10°
≤30°±10°
≤30°±10°
≤30°±10°
Charging time
5-6 hours
2-3 hours
9-10 hours
8-9 hours
Average working time
3-4 hours
1.5-2 hours
6-7 hours
2-3 hours
Battery
Lithium,
24V,8Ah
Lithium,
24V,4Ah
Lithium,
24V,16Ah
Lead-acid,
24V,7Ah
Mowing Motor Rotate
Speed
3200 rpm
3200 rpm
3200 rpm
3200 rpm
Mowing Motor Power
60W
60W
60W
60W
Max speed
1.2 km/h
1.2 km/h
1.2 km/h
1.2 km/h
2.2.2
Adaptor technology
Parameter
Input Voltage
AC 100V-240V
50/60Hz
AC 100V-240V
50/60Hz
AC 100V-240V
50/60Hz
AC 100V-240V
50/60Hz
Input Current
1.8A
1.8A
1.8A
1.5A
Output Voltage
DC 29.4V
DC 29.4V
DC 29.4V
DC 29.6V
Output Current
2A
2A
2A
1.5A
2.2.3
Charging
station
Input Voltage
DC 29.4V
DC 29.4V
DC 29.4V
DC 29.6V
Output Voltage
DC 29.4V
DC 29.4V
DC 29.4V
DC 29.6V
2.2.4
Remote
Control
Power voltage
12V
12V
12V
12V
Effective range for
remote control
<15m
<15m
<15m
<15m

3.1 Check all the parts
Chapter Three Operation Introduce
3.2 lawn clear
This chapter introduces how to install this mower. Please install as followings.
When the weeds of your lawn are too high( ) or too thick, use the
traditional mower to mow the lawn and clear up the lawn to ensure there are no hard
foreign matters such as stones, dry pruning on the lawn, stone will damage the blade.
We advice you installing strong fence around the Trees, shrubs, etc, so mower will not
hit them.
Note:
Before using the mower for the first time, it is necessary to clean up the lawn,
and mow with traditional lawn mower.
This is very important, if not follow the above instruction, the mower parts may
be damaged.
more than 15 cm high
Chapter Two Information Summary
2.4 The mower’s Main function
2.4.1 Scheduled mowing
The mowing schedule can be set 24 hours a day and 7 days a week. (be noticed: the
scheduled starting time must be earlier than stopping time). The machine will automatically
go out to mow at starting time, and automatically stop mowing, and then return to the
charging station at the stopping time.
The machine has a built-in rain sensor, when it detects the rain within several seconds,
the machine will automatically stop mowing and return to charging station, it will not go out to
work until the next appointment or manual operation.
2.4.2 Automatic charging
The mower will turn off the mowing motor and go back to the charging station to re-
charge when the battery is flat during mowing.
2.4.3 Automatic shelter rain
2.4.4 Remote control
A remote control is provided to allow users to switch the machine mowing
mode(Auto/Manual) and control the direction of the machine to make it easier to use.
2.4.5 Automatic obstacle slow down
The machine has a built-in infrared detection system, it will automatically slow down the
walking speed when it detects obstacles in front of it, to protect the machine from violent
collision.
2.4.6 Slope over 30 degree alarm
When the machine body's tilt is greater than 30 degrees, the machine will turn off the
mowing motor in 2 seconds, and starts an alarm; the display will show "ERROR 5".
2.4.7 Fall alarm
The machine will shut down and alarm and the display will show "ERROR 4" when both
front wheels fall into a hole or gap at the same time lasts longer than 2 seconds to remind users.
2.4.8 Collision detection
There are collision sensor in the front of the machine, it will change the walk
direction when it detects obstacles (such as trees, fences, etc.) to avoid the machine
from violent collision.
2.4.9 Mower start alarm
The machine will give 3 short beeps to alarm people nearby before the motor starts
mowing.
2.4.10 Unexpected alarm
The machine will automatically stop and show "ERROR 7", when it fails to detect the
boundary line signal at going alone the boundary line or charging in the charging station , It
can protect the mower to avoid going out of the lawn and broken.
2.4.11 Password protection
The robot has a password protect function. If a password is set and activated, the
robot will not work until input the right password. (This function is deactivated by default).
07 0 8
NO.
1
2
3
4
5
6
7
8
9
10
11
12
Item Quantity Remarks
Boundary line plug
5pcs
4set
1pcs
1pcs
1pcs
1pair
4pcs
1bag
1pcs
1pcs
1pcs
1pcs
16 pcs
Mower
Charging station
Plastic nail for charging station
Power Adaptor with cable
Boundary line
Plastic nails for boundary line
Remote control
Remote control battery
Fuse
Extra mowing blade
User Manual
Black and Red
Standard 50 pcs
Standard 100m
F20A /250V 30 x 5 mm
23A 12V

≤200m
Clockwise
Counterclockwise
Note:
1) The space between the boundary line and the edge must be more than 30cm;
2) One end of the boundary line should be put through the middle of the charging
station's base, there must be minimum 2 meters distance in the front of the
charging station to ensure the mower can returns to the charging station;
3) If there is an obstacle on the edge of the lawn, the boundary line should be
layout to bypass it, and the space between the boundary line and obstacle
should be more than 30cm.
Figure 3.4-1
3.3 Install charging station
3.4 Install the boundary line
Note:
1) The place must be firm and flat. It should not be placed in the low-lying position on
the lawn. The low-lying position may be flooded and damage the charging station or
machine.
2) No obstacles in front of the charging station.
3) No magnetic interference. It should not be placed near the magnetic field
source because the robot mower may be interfered and can't work properly.
Note:
1) The front boundary line should put through the bottom of charging station.
2) Please put the four plastic nail fix into the charging station and the nail should
put vertically and firmly.
Chapter Three Operation Introduce Chapter Three Operation Introduce
09 1 0
Note:
The interface surface (with 2 copper bar) of charging station should be placed
towards to the counterclockwise ( see figure 3.3-2), because the mower will go along
the line by clockwise direction, otherwise, the mower will not charge properly.
Figure 3.3-2
3.3.1 Choose a suitable location:
3.3.2 Place the charging station:
Figure 3.3-1
3.3.3 Fix the charging station
Figure 3.3-3
3.4.1 Layout the boundary line:
>30cm
>100°
>100°
>100°>100°
>30cm
>30cm
>30cm
>100°
>100°
>100°
>2m
Chapter Three Operation Introduce
<100°Obstacles
>2m
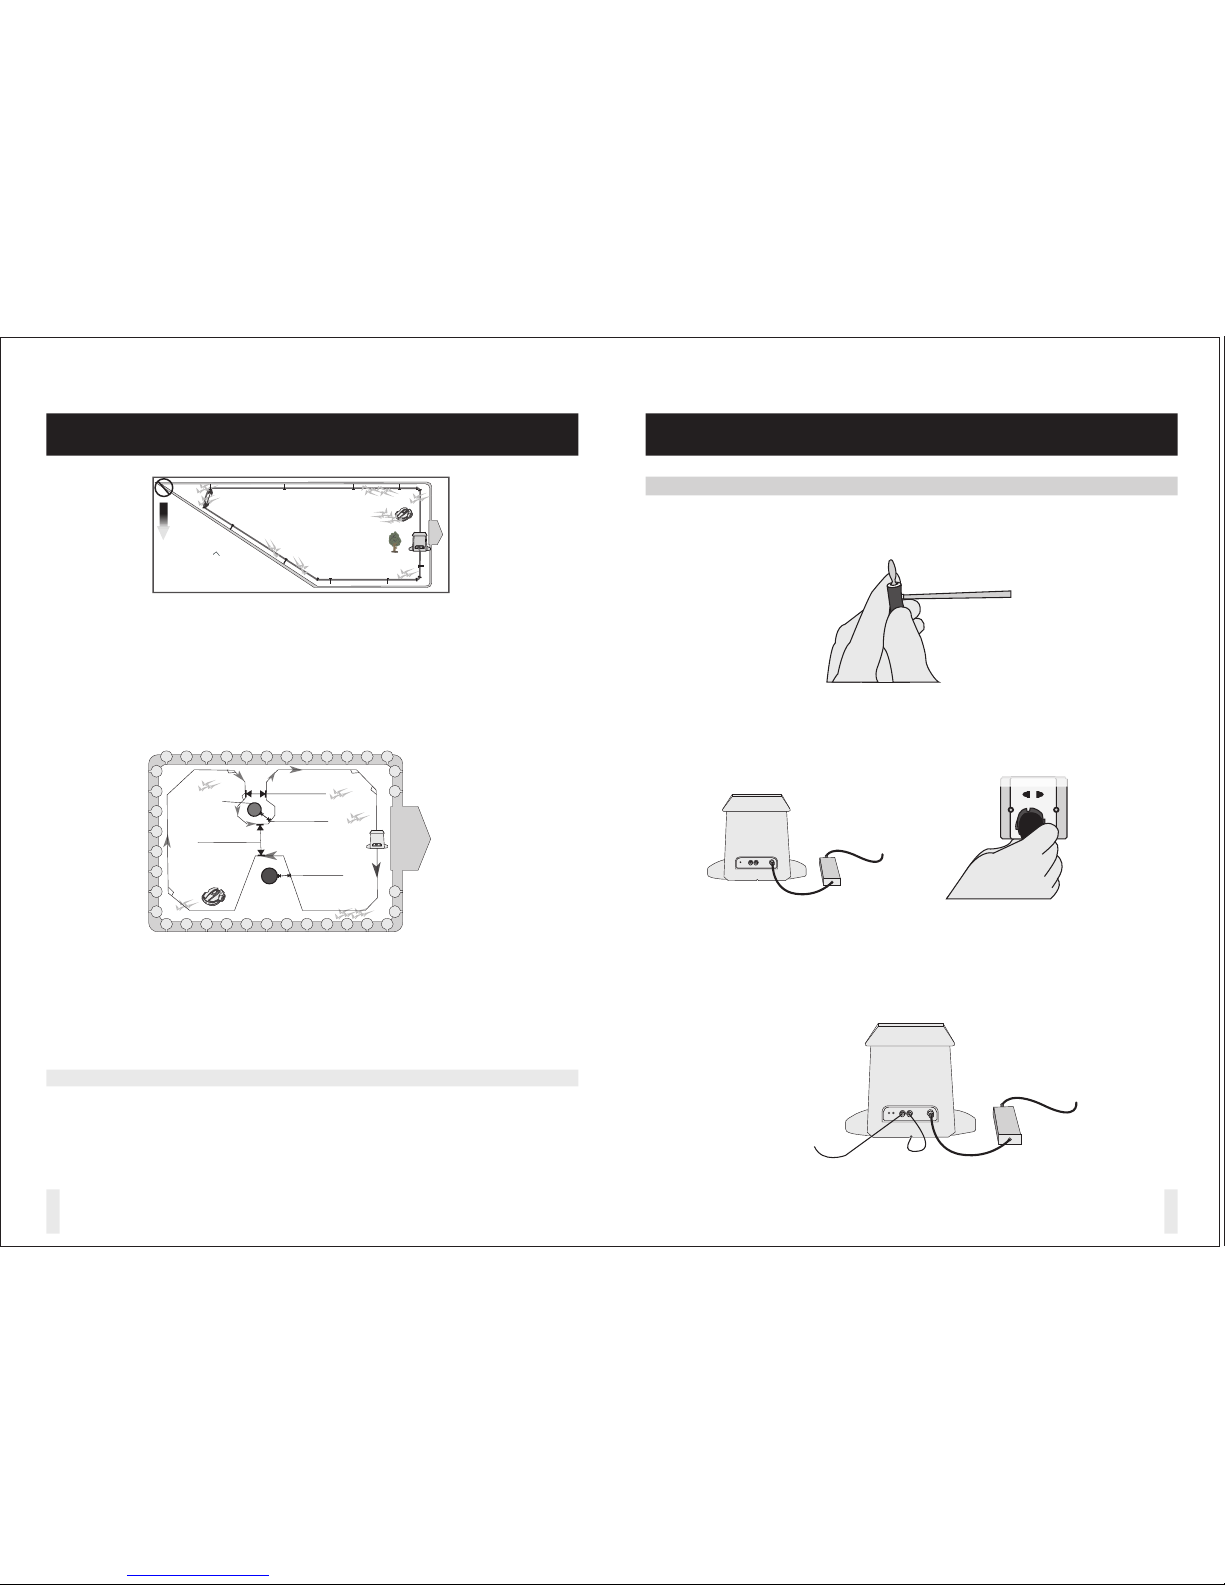
2. Note: first, plug the adaptor to the charging station, second, plug the power cable
to the main power .Don’t reverse the step.
1. Connect the boundary line to the plug, then plug into the charging station.
Note:
1) When there has a pool or other obstacle in the middle of the lawn, the
boundary line should be laid at least 30cm from the obstacle.
2) The space between two boundary lines must be more than 50cm.
Note:
Each angle of the boundary line layout on the corner of lawn should be more than
100 degrees (recommended 135 degrees), if the angle is less than 100-degree, it
might cause malfunction. Refer to the Figure3.4-3.
If the lawn have two zones like the Figure3.4-3.The width of the passageway
between ZONE1 and ZONE2 must be greater than 1.5m.
3. Check the charging station's indicator's status.
The right side indicator is green, it means the charging station is ready.
Then plug out one boundary line, the left side indicator turns yellow, and flashes,
and beeps, then plug in the boundary line again, the flash and beep stops.
The debugging is finished.
Note:
1) The boundary line should be fixed by a plastic nail every 2-3 meters according
the lawn's actual situation.
2) Layout the boundary line to the root of grass as close as possible to avoid the
robot to cut it off and cause problem.
3) The boundary line(default 0.75 ) is suggested to be less than 200 meters.
And if upgraded to 1.0 diameter, keep it less than 300 meters.
2
m
2
m
Figure 3.4-3
Figure 3.4-2
Figure 3.5-2
Figure 3.5-3
Figure 3.5-1
3.4.2 Fix the boundary line
3.5 Debugging the charging station
Chapter Three Operation Introduce
Clockwise
obstacles
>30cm
>50cm
>100°
>100°
>30cm
>1.5m
>100°
>100°
>100°
ZONE2 ZONE1
11 12

loosen the fuse tube cover, insert the fuse first, . before start the robot
fuse tube cover
direct charging socket
Figure 3.6-1
Use “Mowing height adjusting knob” to adjust the height of the grass,the
adjustable range is 3cm-6cm
Start Recharge
Set Pause
Mowing height
adjusting knob
Main Power switch
If the machine is stored for a long time (more than one month), the battery needs recharge.
Plug the adapter’s connector to the robot’s direct charging socket.
Under automatic mode, the robot will return to the charging station for recharge
automatically.
Set the parameters through the setting panel.
Press “ ” to enter operation interface
ROBOT MOWER
WELCOME
3.6 Installation of the fuse
3.7 Battery charge
3.8 Setting
Chapter Three Operation Introduce Chapter Three Operation Introduce
13 1 4
4. Let the mower's charging copper head connect to the copper bar of the
charging station, the indicator (in the left of the charging station) is red, and all
above means the charging station is ok.
Figure 3.5-4
UP DOWN
LEFT RIGHT
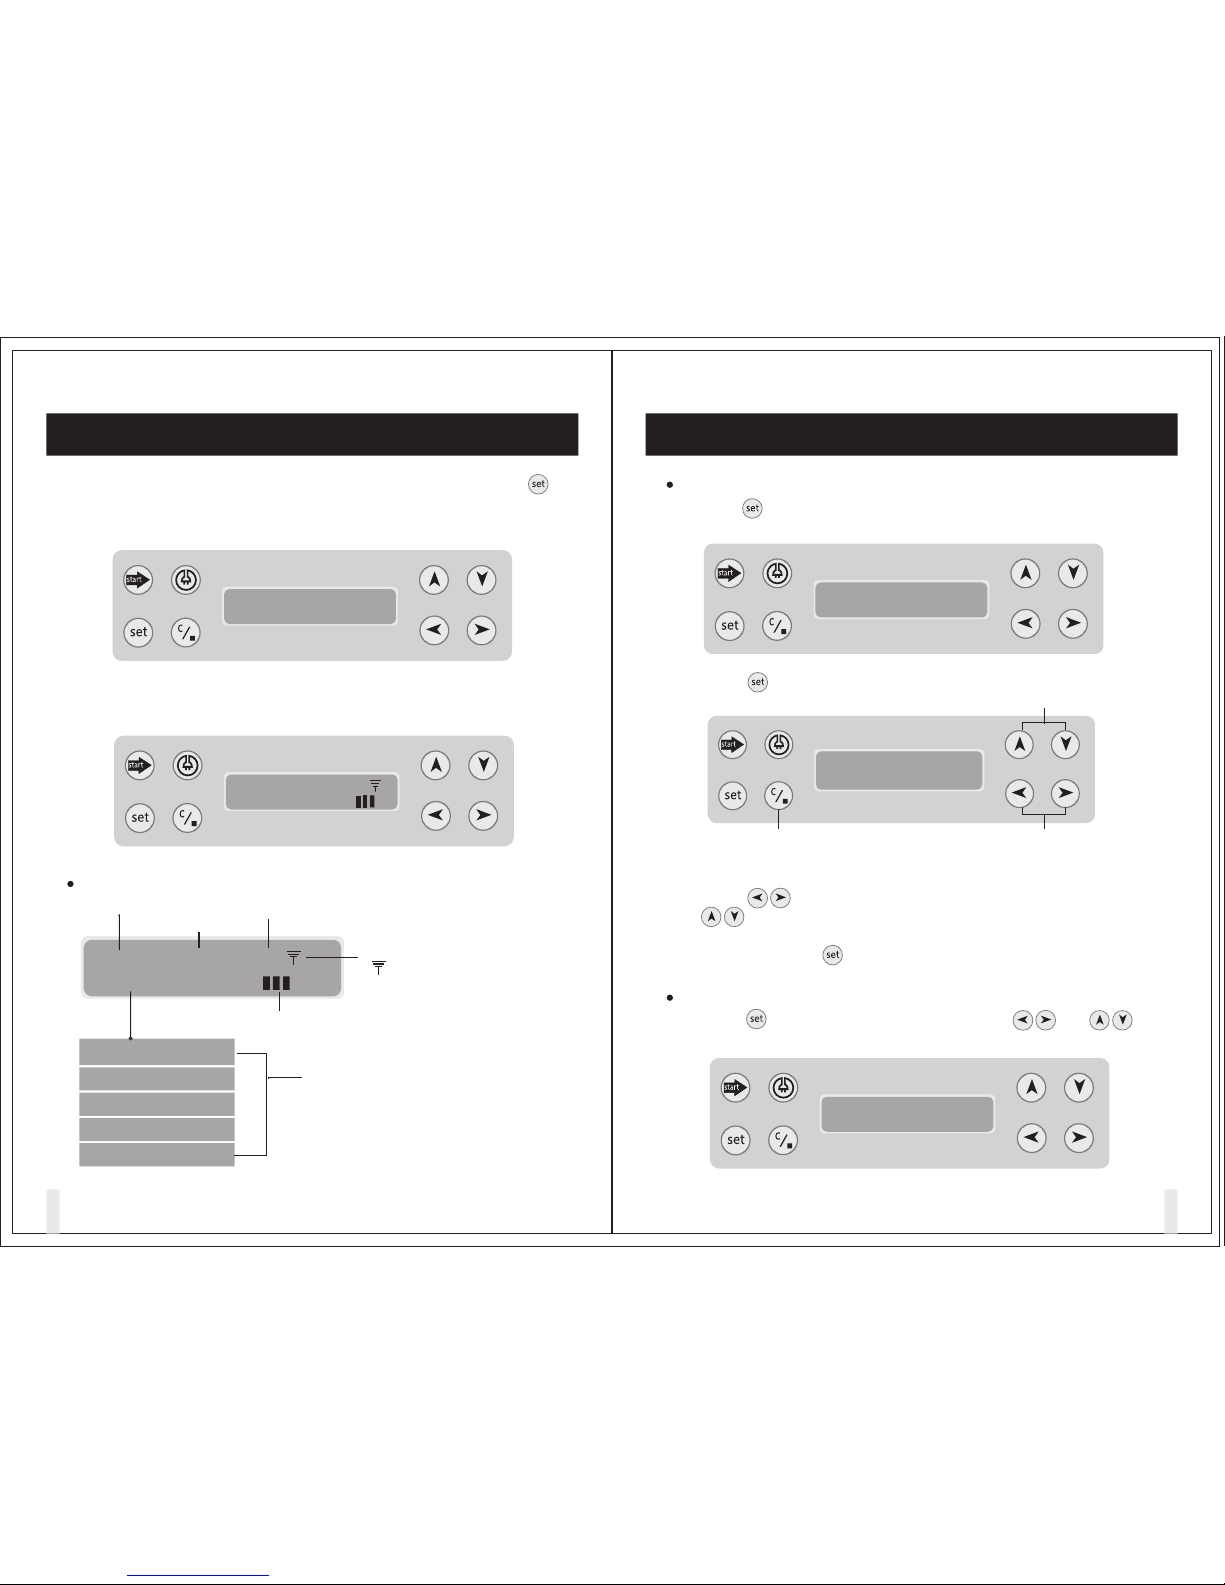
Then need to input the password (the function is deactivated by default, press “ ”
to pass it), if the password is wrong, it shows “ERROR” prompt, and return back to
password input interface.
ROBOT MOWER
Password ERROR!
Operation Interface Description
08-24 16 : 00 2
Mode_Idle
Mode_Idle
Auto_Mode_L
User_Mode_L
User_Mode_C
Auto_Mode_C
Current time of system
Schedule days in a week
Infrared obstacle detection mark.
the function is
disable.
” ” means the function is enable.
No mark means
Battery power display
Working Condition:
Automatic Mode-L: Random Linear Mode
Automatic Mode-C: Involute mode
Manual Mode-L: Straight line manual mowing
Manual Mode-C: Involute mowing
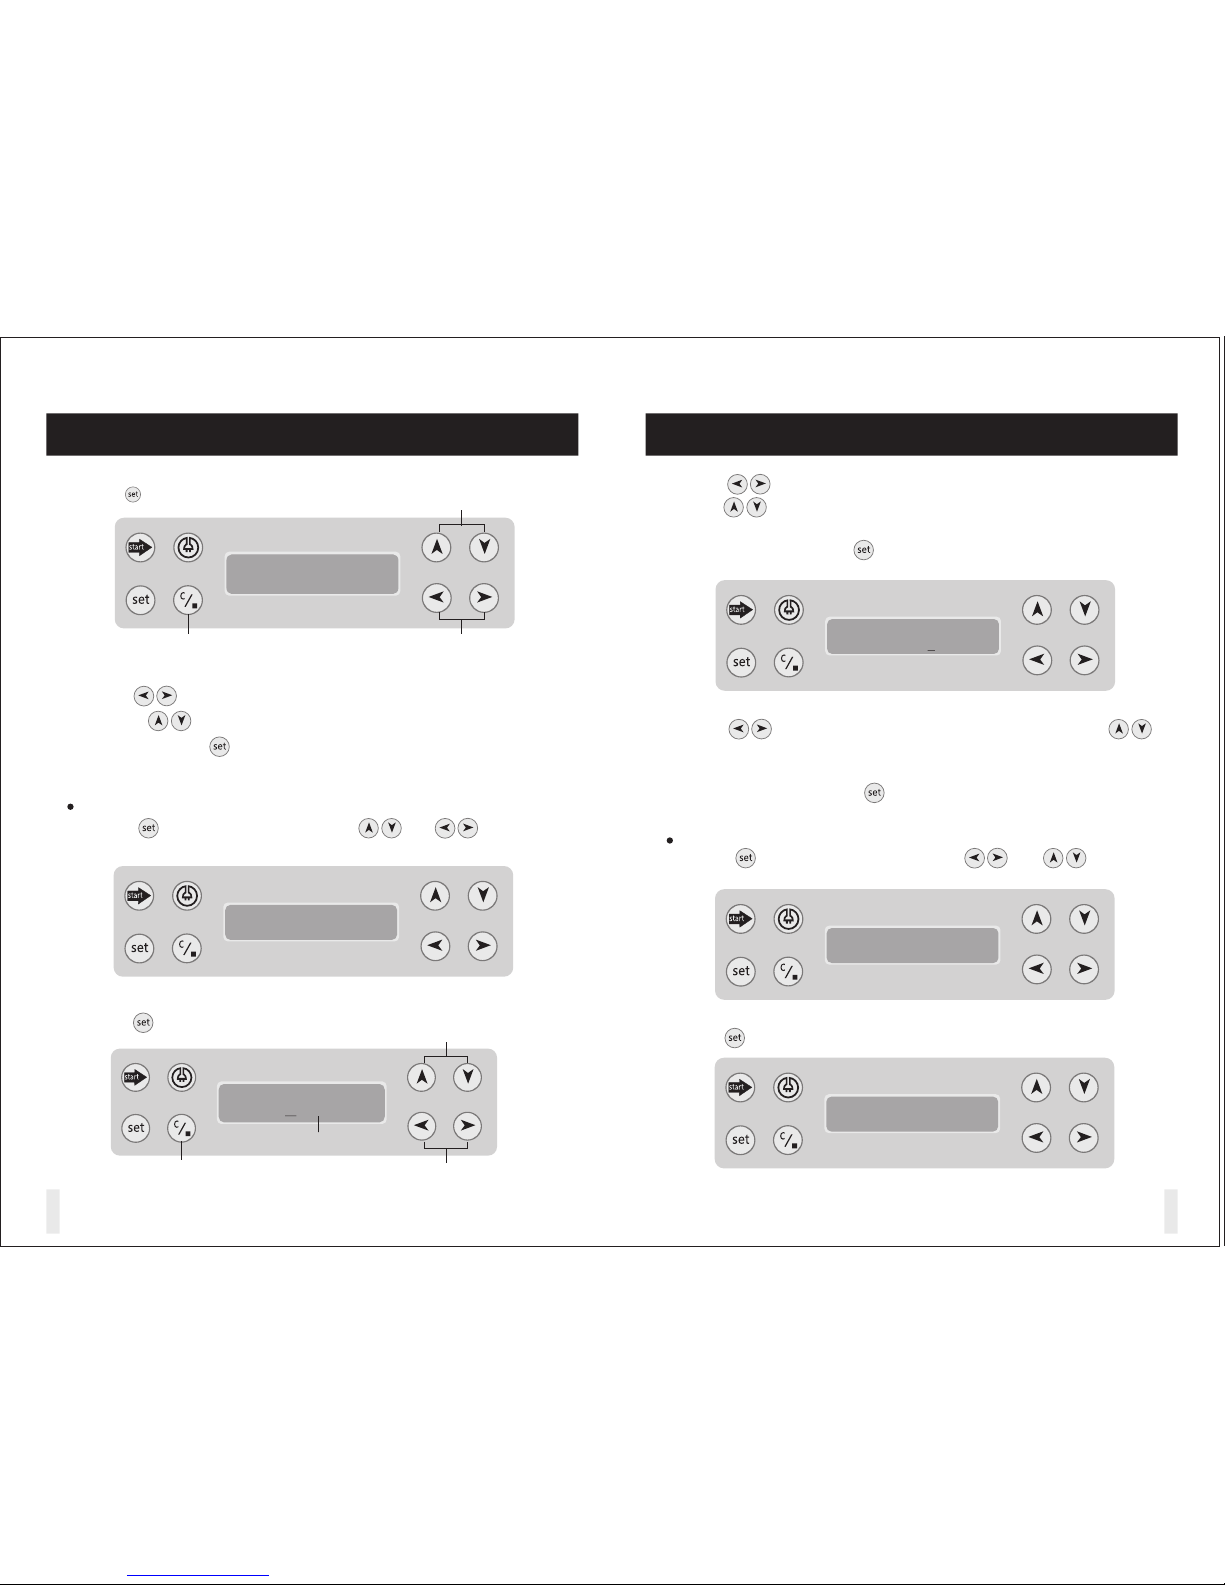
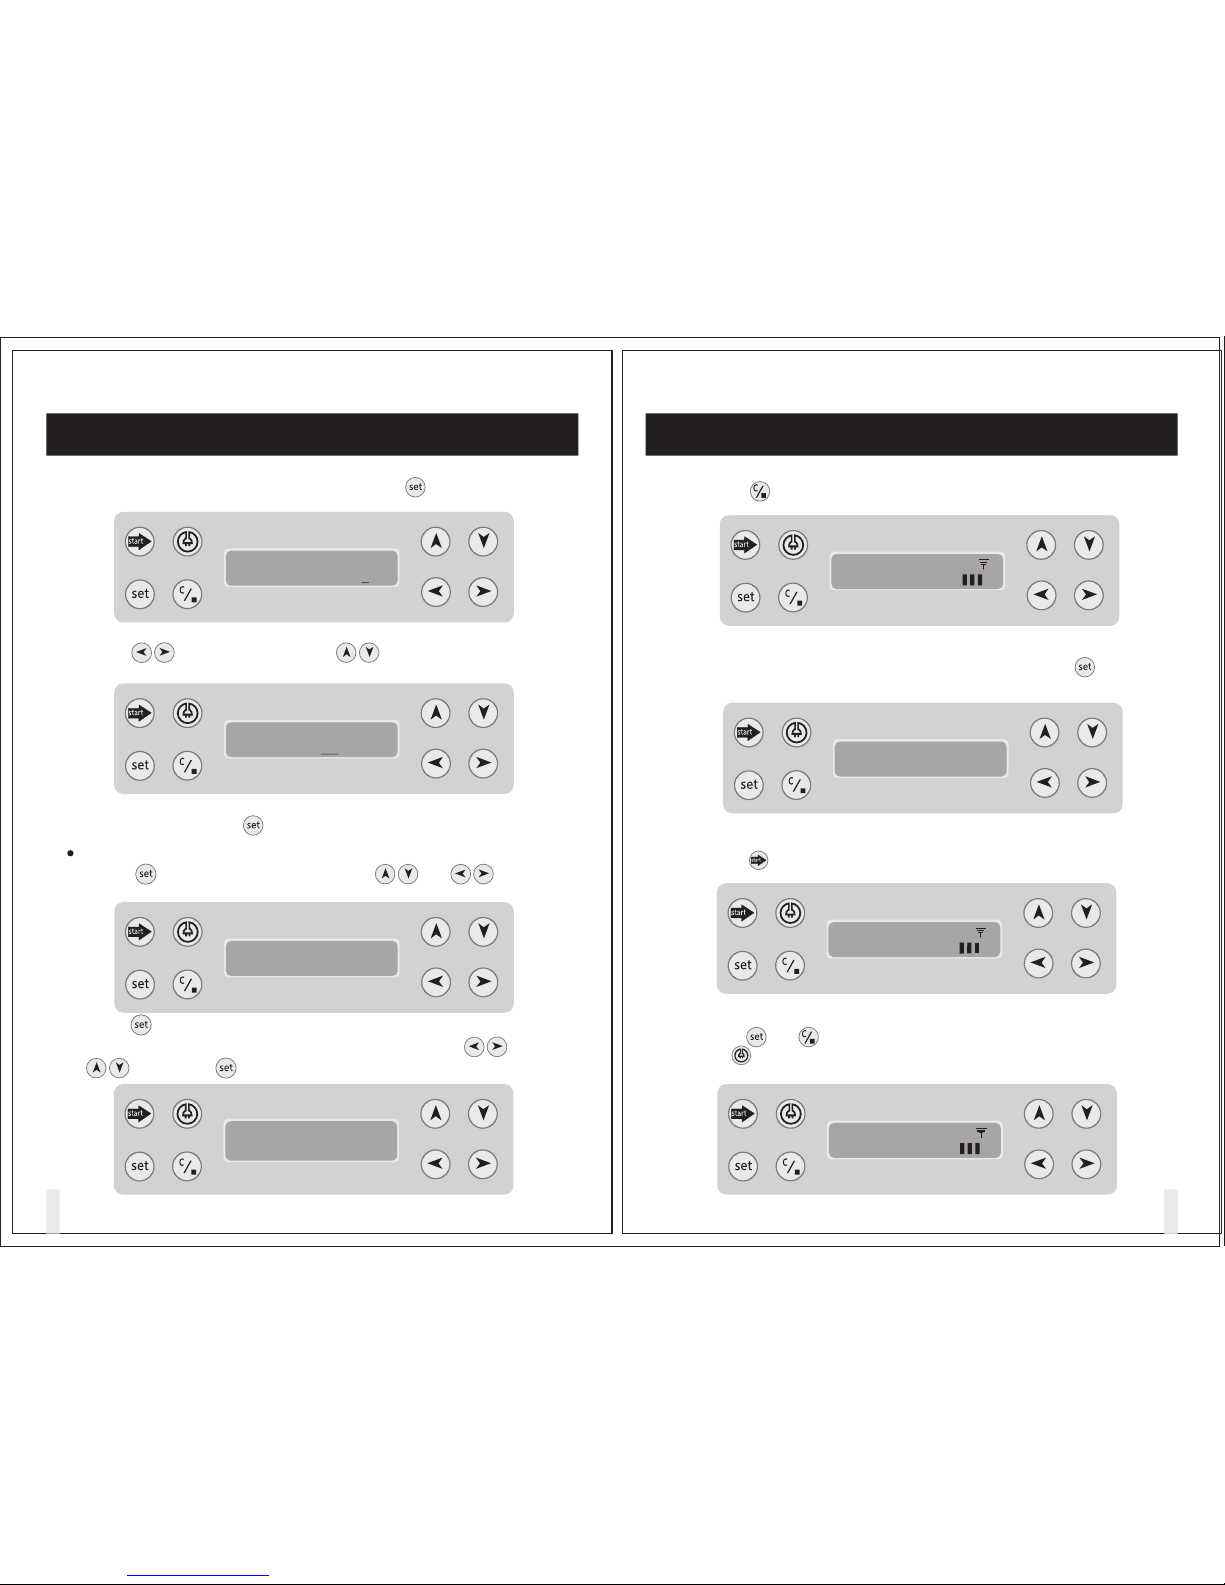
Time setting
1. Press “ ” to enter setting interface,then the screen will display “Time Set” as
the following picture.
TIME SET WEEK
09:00 6
Press to set the time
After setting, return to operation
interface directly
Press key to move cursor to set
“ hour/minute/week”
Chapter Three Operation Introduce Chapter Three Operation Introduce
Current date of system
08-24 16:00 2
Mode_Idle
Input the right password,you will see following interface
Set Choose
Time Set
2. Press “ ” again to enter time setting.
3. Press “ ” to move cursor to set the hour, time and week. Then press
“ ” to select the specific number.
4. After setting, press “ ” to finish.
Date setting
1. Press “ ” to enter date setting up interface. Press “ ” or “ ” to
select “DATE set”.
Set Choose
Date Set
15 1 6
Chapter Three Operation Introduce Chapter Three Operation Introduce
DATE SET DDMMYY
09/11/12
Set the date
After setting, return to operation
interface directly
Press key to move cursor to set
“ Day/Month/Year”
2. Press “ ” again to enter the date setting
3. Press “ ” to move cursor to set the Day/Month/Year.
Then press “ ” to select the specific number.
4. After setting, press “ ” to finish.
Work Schedule setting
1. Press “ ” to enter
.
setting interface, press “ ” or “ ” select “work
schedule”
WEEK : MTWTFSS
1 0 0 0 0 1 0
Press key to set appointment
‘1’ indicates activated
‘0’ indicates deactivated
After setting return to operating
interface directly
Press key to move cursor to choose the
bit to be abandoned, from left to right
Set Choose
Work Schedule
2. Press “ ” again to enter work day setting interface
3. Press “ ” to move cursor to choose from Monday to Sunday.
4. Press “ ” to set “1”or “0”. “1” indicates activated, “0” indicate deactivated.
Set the work day of the week.
5. After work day setting , press “ ” to enter work time setting interface.
Work Schedule
15:40->17:50
6. Press “ ” to move cursor to set work hour and minute, then press “ ”
to select the specific number. The front time in screen is start time, the other is end
time.
7. After work time setting , press “ ” to finish.
Set Choose
Password Set
Password setting
1. Press “ ” to enter setting interface, press “ ” or “ ” select
“password set”.
Password Set
old:0000
2. Press “ ” again to enter password setting interface.
17 1 8
3. The old password “0000” should input first, then press “ ” to enter new
password interface.
Chapter Three Operation Introduce Chapter Three Operation Introduce
16
Password Set
off:0000
Password Set
On:0000
English German
language
Set Choose
Language Choose
3. Press “ ” to return default interface directly.
Robot mower
Password: 0000
5. Press “ ” , the mower gives 3 beeps and begins to work.
08-24 16:00 2
Mode_Idle
08-24 16:00 2
Go Home
08-24 16:00 2
Mode_Idle
19 2 0
4. Press “ ” to select cursor . Press “ ” to activate password
protection and set new password.
5. After setting over, press “ ” to finish.
Language setting
1. Press “ ” to enter
the setting interface, Press“ ” or “ ” to select
“language choose”.
2.Press“ ” again to enter language select interface.
English, German, Italian and French are available for selection by “ ” and
“ ”, then press “ ” to finish.
4.if the password function is ON, input the right password, press “ ” to enter
the default interface.
6. Press “ ” or “ ” to stop the mower.
Press “ ”, the mowing motor stops and go back to the charging station.

In automatic mode, the mower will automatically go out to work and go back to charging
station as following pre-set schedule.
1. When charging ,“ ” button is invalid.
When the appointment time arrived, the machine beeps twice and go backwards to exit
from the charging station, then turned into the lawn, and then gives 3 short beeps before
mowing, and then go to the back side of charging station and ride on the boundary line,
mowing along on the boundary line, when it completes the circle and contacts the
charging station’s copper bar again, it will move backwards and go into the lawn and
mow by a random straight line "AUTO L" mode.
2. Under automatic mode, the robot will turn off the mowing motor and find the boundary
line, then go back along the boundary line to the charging station because of flat battery,
the working time’s up or rain.
3. After fully charged, the robot will move backwards 2-3cm from the charging station’s
copper bar. (This can reduces the battery recharged cycle, lengthen the battery’s life.)
3.9 Start the mower
Chapter Three Operation Introduce Chapter Three Operation Introduce
7. Under the mower will switch from“Auto_mode_L”
to “Auto_mode_C” automatically.Press “ ” on remote control can also switch
the mode.
automatic mode,
8. Press “ ” on remote control to change “Auto mode” to “User mode” .
Set the work schedule first.
08-24 16:00 2
Auto_mode_L
08-24 16:00 2
Auto_mode_C
08-24 16:00 2
User_mode_L
08-24 16:00 2
User_mode_C
21 2 2
mode
For manual operation, refer to the following instructions:
1、Manual operation: put the machine in the lawn, press “ ” to start the mower, it will
work directly in the lawn and will not mow along on the boundary line.
2、When the robot works in the lawn , it can be controlled its mowing direction and the
mowing mode by the remote control according to the actual situation to achieve the
desired effect .
You can control the machine to start/pause, turn left/right, switch mowing modes,
infrared switch on/off, and start/stop mowing motor by the remote control.
“ ”key ------------Left/Right control, press the button until the machine turn
left/right to reach the desired angle and release the button, more time more turning
angle
“ ” key ------------Start, stop mowing motor control; the mowing motor is working,
press the button, the motor stops mowing, the mowing motor is stopped, press the
button, the motor start mowing
“ ” key -------------press the key, the machine will be in the go home state and stop
the mowing motor to go back to the charging station for charging
“
” key ------------ Infrared sensor is on by default, this key can control the infrared
detect system’s on and off
“ ”key ---------------- Start / Pause, press this key the mower will switch from
working to pause or pause to working
“ ” key -----------mowing mode switch button press this key, the mower will switch
its random linear mode to involutes mode
“ ” key ------------ This key is used to lock the mowing mode
1. Before the first time using the mower, the lawn should be cleaned up and mow the
lawn with the traditional lawn mower.
2. Do not layout the boundary line parallel with the power line of the lawn landscape
lamp, it should be as far away as possible. These equipment supply lines may
influence the boundary line of the signal.
3. The best way to layout boundary line is “layout the line to the root of grass as close
as possible” according to our own test practice.
5. Don't let the robot front hit the ground, because it is easy to cause the robot front-
end collision detection sensor damage when you raise the robot though the end
handle.
6. Regular cleaning and maintenance can reduce the probability of malfunction, and
improve the machine's work efficiency.
7. Clean the cutter cover regularly. Wet lawn will stick the grass stain in the cutter
cover and reduce the mowing efficiency.
8. Don't recommend to mow on very wet lawn in order to protect the lawn and the
machine.
9. In the rainy or snowy season, turn off the machine, remove the fuse, and place it in
room.
10.When the robot works, it may affect the hearing aid device.
11.Some wireless remote control (such as car keys remote control) may affect the
Robot's work, cause malfunction.
4. Turn off the power when carrying the robot.
3.11 Caution for daily use
3.10 Remote control
Chapter Three Operation Introduce Chapter Three Operation Introduce
mode
Note:
Stop the mower immediately once the charging station’s power fails.
Infrared Detection Switch
Lock the mowing mode
Start /Stop mowing motor
Mowing Mode Selecting
Left or Right Direction Key
Key for Returning to be Charged
Pause Key
Remote indicator
mode
23 2 4

Check and clean the lawn mower regularly, replace the old parts to ensure reliability
and longer use life if necessary.
Note:
Turn off the power, remove the fuse.
Step 1. remove the “blade disc fix
screw”;
Step2. remove the 8 screws (2 for
each) fixed blades ;
Step 3. replace the new blades,
and fix the blade.
Be sure to fix the screws firmly.
blade fix screw
blade disc fix screw
Open the semi-transparent cover ,find 4 screws ,release them with a cross
screwdriver, then turn over the machine, you will find 2 screws in the deep
hole in the front of the base, and release them to open the upper cover.
Remove the screw on the battery hold-down clamp, and replace the battery.
The replacement is completed, and then test machine if it is working properly.
Cover the upper cover, and tighten the 6 screws (2 screws in the bottom, 4
screws in the upper cover).
Chapter Five TroubleshootingChapter four Maintenance guide
4.1 Replace the blade
4.2 Replace the battery
Note:
Authorized battery only ;
The replacement of battery is suggested to be done by the vendor or authorized
person.
Problem Cause Solution
1, check the fuse is installed or not for the new
machine ;
2, the long-term use of the machine, check the
fuse is broken for used machine ;
3,the battery is over life;
4,the grass is too thick
Mower doesn’t work
Insert the fuse
Change the fuse
Replace the battery
Restart mower in
other position
1, the power of charging station is failure;
2, caused by unforeseen circumstances;
3,the boundary line is layouted unreasonably
Mower goes out of the
boundary line
Check the power and debug
the charging station
Ask help from vendors if
necessary
Improve line to meet the
requirements
1、the protective rubber in the front is offset
and push the collision sensor
2、the collision sensor in the front of mower
is failed ;
Try to flap the rubber to
reset the collision sensor
Ask help from vendors
if necessary
The mower goes
backward always
and can't go forward
1、the boundary line has no signal ;
2、the charging station works anomaly ;
3、layout the boundary line unreasonably or
install the charging station unreasonably .
4, the mower is broken
Debug the charging station
Debug the charging station
Layout the boundary line
and install the charging
station according the
introduce above
Ask help from vendors if
necessary
Note:
Be sure to wear gloves when you do any maintenance to the mower, be careful
of the blade. Be sure to turn off the machine at first, remove the fuse second if
necessary.
Step 1 ,
Step 2 ,
Step 3 ,
Step 4 ,
Turn off the mower‘s power, remove the fuse, clean the cutter cover by brush with
gloves.
4.3 Clean-up mowing cutter cover
Clean out the mud and grass cutted on the front and rear wheels regularly (recommended
clean-up once a month).
Lubricating the metal axis (it is for the front wheel’s up and down movement) every
month.
Note:
Be sure to wear gloves when you do any maintenance to the mower, be
careful of the blades.
4.4 Clean-up the front and rear wheels
Mower can’t go
back to the
charging station
1,the charging station is installed incorrectly
2, the charging copper head is covered by
foreign matter.
Reinstall the charging
station
Remove/Clean the foreign
matter
the mower does not
charge in the
charging station
Clean up the lawn and
ask help from vendors
The lawn is not clean-up
the cutter cover is
broken
1,the infrared detect system is failed
2,battery flat;
3,go back to the charging station on the
boundary line
ask help from vendors
recharge
It is normal
the machine walks slowly
the back-end rain detection sensor is blocked
by foreign matter adhesion Clean up the sensor
The mower can’t
detect the rain
Solution: We advice the customer use an obstacle in the lawn side of the
charging station, so the mower detect the obstacle, it will change
its direction.
the mower hit the
charging station
1, the grass is too thick and high on the lawn
2, the battery is not fully charged;
3, the battery is used for a long time, its
performance degradation.
Mow the lawn with
traditional lawn mower
recharge
Change the battery
The working time is
too short
25 2 6

Chapter Six Service
The mower’s service has been delegated to the local dealer, please contact to the
local dealer.
Chapter Five Troubleshooting
1, front wheel axis stuck;
2, fall detection sensor is failed ;
Clean the axis
Ask help from vendors
Mower can not detect
the fall protection
1, no power ;
2, unforeseen circumstances, please
operate according to this manual if the
display show an error.
Recharge manual
Ask help from vendors
Suddenly stop
working when mowing
Solution: The mower's wheels are designed for lawn ,the wheel structure
is not suitable for walking on slippery ground, not recommended
for use in a smooth surface;
The display can’t
show anything Ask help from vendors
The max slope degree is less than 30 degrees
Climbing weak
The boundary line is disconnected or the
connection is bad
Debug the charging
station, ask help from
vendors if necessary
The charging
station beeps and
don’t stop
Reconnect the power wire
Replace the adaptor
Ask help from the vendors
1, the power wire connection is bad;
2, power adapter is failed;
3, the charging station is failed;
the charging station’s
power indicator does
not light
The battery of the remote control is flat Replace the battery
the remote control
distance is short
1, the battery is no power, need to be
changed;
2, the remote control is accidentally
damaged (such as falling into the water,
etc.), need to be replaced.
Replace the battery
Ask help from the vendors
Remote indicator
does not light
Check the blade, and fix
the blade disc screws
with screwdriver.
The blade disc may be loose for
long time rotating, or the blades are broken
Mowing noise is louder
Display error
description
ERROR1 Battery voltage is too low. Charge the battery.
Adjust the blade height,
and then restart the
machine.
Mowing motor over-current.
ERROR2
ERROR3 Walking motor over-current. Remove and restart.
Automatically restore in
5s, need to restart the
machine if the last time
is more than 5s.
Uplift risk, safety alarm.
ERROR4
Automatically restore in
5s, need to restart the
machine if the last time
is more than 5s.
ERROR5
Slope angle is more than 30 degree;
there are safety risks, safety alarm.
The time that the machine is not sensitive
of the boundary line signal is more than 4
minutes.
Restart
ERROR6
1,
loose ;
2,the customer’s wrong operation (such as
open the semi-transparent black cover
when the machine is running in the sun );
3,the circuit in the machine is failed
the display board’s connection wire is
27 2 8
ERROR7
The robot doesn’t detect the signal for wrong layout
boundary line, no charging station power, unknown
interference.
Restart
Mower can not walk
on a smooth surface
This manual suits for next models
3
Table of contents
Popular Lawn Mower manuals by other brands


Toro
Toro TurfMaster 22205TE Operator's manual

Lawn-Boy
Lawn-Boy 10900 Operator's manual

HUSTLER
HUSTLER FasTrak Super Duty 48 Specification sheet

Poulan Pro
Poulan Pro PD24PH48ST Operator's manual

Scag Power Equipment
Scag Power Equipment SW32-14FS Operator's manual

Murray
Murray 48G24G60X8A Operator's manual


