Traid OnWall Nano LCR 3.0 User manual

Triad OnWall Nano LCR 3.0 w/ EasyMount Bracket - Quick Start Guide 2014.7.23
Specifications
Applicable Models Dimensions
Inches / cm
OnWall Nano LCR 3.0 44x3.25x1.6; 111.7x8.2x4.1
Frequency Response
+/-3dB, 2pi**
150 Hz - 20 kHz
Sensitivity Rec Amp Pwr
2.83v, 1m Per Channel
84 dB 75 - 125Watts
Rec Sub Xover
175Hz / 200Hz**
Weight lbs/kg
8.0/ 3.6
*2 pi Frequency Response shows performance when mounted on or against a wall or other large surface. When mounted in free air (4pi), e.g. on a swing arm TV bracket pulled out from the wall,
the bass will be less extended and Sub Crossover frequencies should be raised at least 10 Hz (to 200Hz for Nano).
Additional Info
Triad's EasyMount wall bracket, included with each speaker, is quick & easy to install, adds no depth, and allows up to .5 inch (12.7mm) horizontal and vertical adjustments for
leveling or aligning.
North American Limited Warranty
Triad speakers are warranted to be free from defects in manufacturing and workmanship (10) years when operated under normal conditions. Should any such defects occur within
the warranty period call Triad Service at 1-877-264-6315 for an RA (Return Authorization) number. Return the product in intact factory packaging with RA number clearly visible on
outside of box and proof & date of purchase inside to:
Triad Speakers Inc., 15835 NE Cameron Blvd., Portland, Oregon 97230 USA
Triad is not responsible for any shipping damage coming in to Triad. If you do not have intact factory packaging, contact your dealer or Triad Service for purchase. At our discretion
we will repair or replace the product and return it free of charge. International customers should contact their dealer for service. This limited warranty is extended only to Triad
products and is expressly in lieu of all other warranties expressed or implied.
Unpacking / Contents
Speaker
(OnWall Nano LCR 3.0)
Template
Grill
EasyMount Bracket and Hardware
(anchors & key, screws, mounting posts, and knobs).
TriadSpeakers.com • Sales: 1800-666-6316
OnWall Speaker - Product Info & Warranty - Page 1
Hanger B (x1)
1.125" OD x 0.26"ID
Plastic Spacer (x14)
5/32 Hex Key (x1)
Hanger A (x1)
1/4-20 screw 1.25" long (x2)
1/4-20 screw 0.75" long (x2)
1/4-20 screw0.50" long (x2)
1.0" OD X 0.28" ID
Metal Flat Washer (x2)
1.125" OD x 0.32"
Metal Oset Spacer (x2)
1/4-20 screw 1.00" long (x2)
OnWall Nano Specific Parts with TV Brackets
TV Brackets (X2)
Level & pin template to wall. Outline
wire hole and screw holes for 2 mounting
posts - or 4 with streched sound-bars
longer than 66"/1676.4 mm. Always
orient posts vertically.
Cut wire hole; install anchors if there
are no studs; once anchors are in the
drywall, pop them open with the
included key. Then screw mounting
posts to wall using all the anchors &
screws provided. Mounting posts
should always be mounted vertically
(portrait) for strength.
A Pull speaker wire through wire hole;
Connect all 3 pairs of speaker wires to the
Phoenix connector. Check for shorts &
correct polarity. Tighten screws; then
insert Phoenix male into the speaker
enclosure’s Phoenix female.
Mount speaker on posts; loosely
tighten knobs. Level or align +/- 1/4”
(6.35mm), then tighten.
To attach the grille, start at one end:
1): With grille overlapping the speaker
by approx 1 inch, seat this end of the
grille onto the enclosure.
2): Slide the near end of the grille inward
so its endcap butts up to the enclosure.
3): Snug the grille along top & bottom edges
of the enclosure until the far end snaps in.
C
BDE
Horizontal Installation
On Stud
Off Stud
Connector (X1) 1) 2)
1)
2)
3)
Overhead View
Anchor
Key x1
* For safety, superstretched models longer than 66 inches
(1676.4mm) include 4 sets of EasyMount Brackets &
Hardware. If your speaker includes 4 sets, use them
all as per instructions on page 2.
x2* x2*
Nominal
Impedance
6 ohms
EZ Bracket
Post length
1 inch
OnWall speakers
stretched larger
than 66” require
4 EZ Mounts
5/16"
8mm
Triad OnWall Nano LCR 3.0 w/ EasyMount Bracket - Quick Start Guide 2014.7.23
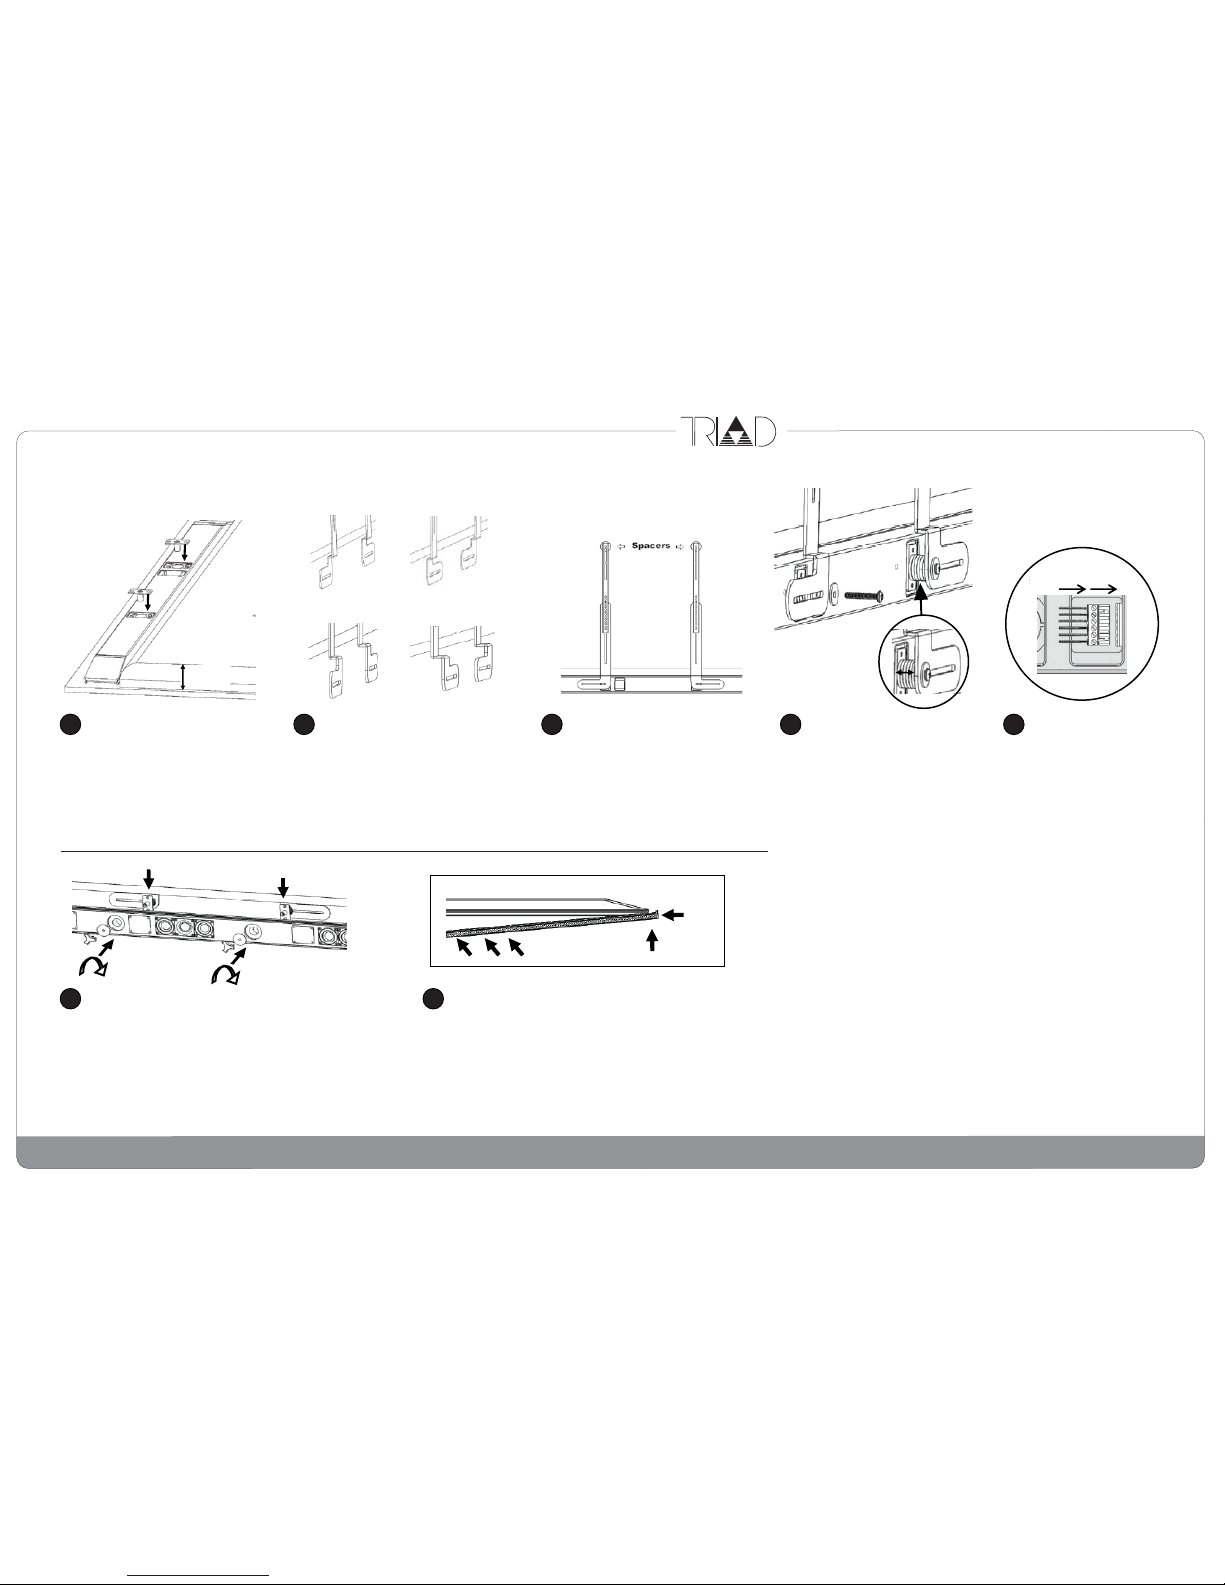
With TV and Nano laid face down on
flat surface and speaker correctly
positioned, insert 2 EZ Mount Bracket posts
into the 2 holes on the back of the Nano.
Determine whether Nano TV Brackets’ offset
should face forward or backward depending on
Nano depth vs TV depth; determine bracket
direction (hockey stick blades facing in to TV
center or out to TV sides) depending on VESA
mounting hole spacing. The right way leaves a
gap of 7/8 inch (22.2mm) or less between the
forward face of the Nano TV Bracket and the back
of the EZ Mount BracketPost (SeeD.).
A Install TV’s mounting bracket(s) over
Nano TV Brackets. Place the 2 Offset
Spacers between the TV’s mounting
brackets and the back of the TV over the
top VESA holes to keep the TV flat when
hung.
Determine how many 1/8” spacers fill
the gap between the forward face of the
Nano TV Brackets and the back of the EZ
Mount Bracket Posts.
Maximum is 7 spacers; if gap is greater
than 7/8 inch, reverse TV Brackets offset.
With a flat washer on the Nano TV
Bracket’s back face, determine which
screw has the right length for the stack
(if screw is too long, it interferes with
tightening the knob at the front in (F).
Tighten with Hex Key. Nano TV bracket is
now attached to TV but not to the speaker.
Leaving the speaker on the flat
surface, install the TV as usual; make
sure there is enough speaker wire
beneath the TV to connect to the
speaker.
1): Connect 3 pairs of speaker wires
to the Nano Phoenix connecter
preserving correct channel assign-
ment and polarity.
2): Plug the now-wired male Phoenix
connector into the Nano’s female
Phoenix connector. The speaker is
now wired.
C
BDE
OnWall Nano LCR 3.0 Installation with EasyMount & TV Brackets OnWall Speaker - Installation Instructions - Page 2
Narrow VESA holes;
deep speaker
Narrow VESA holes;
shallower speaker
Wide VESA holes;
deep speaker
Wide VESA holes;
shallower speaker
1) 2)
Max: 7/8” (22.2mm)
Hang the Nano speaker onto the EZ Mount Bracket posts
through the speaker’s two (inner 2 if more than 1 set for large
Nanos) passthrough holes. Attach and loosely tighten the two
EZ Mount Knobs from the front of the speaker. Using the +/- ¼”
play provided, set the speaker in its final position leaving 1/8 inch
(3.1mm) gap to TV for the grill. Tighten the two EZ Mount Knobs.
F To attach the grill, start at one end:
1): With the grill overlapping the speaker by approx 1 inch, seat
this end of the grill onto the enclosure.
2): Slide the near end of the grill inward so its endcap butts up to
the enclosure.
3): Snug the grill along top & bottom edges of the enclosure until
the far end snaps in. Your Nano installation is nowcomplete.
G
1)
2)
3)
Overhead View
MAX: 3 in
76 mm
Back of TV
Table of contents


