Traveler DV-5000 User manual

1
CONTENTS
02 INTRODUCTION AND PARTS LIST
03 GENERAL INFORMATION AND SAFETY INSTRUCTIONS
07 GETTING TO KNOW YOUR CAMERA
10 GETTING STARTED
12 RECORD MODE
40 PLAYBACK MODE
52 LISTENING TO MP3 MUSIC
54 VIEWING MOVIES ON A PC
55 VIEWING PICTURES AND MOVIES ON A TV
57 VIDEO FILE CONVERTER
60 BURNING A RECORDED CLIP ONTO A DVD
63 UPLOADING VIDEO FILES TO YOUTUBE
67 TRANSFERRING DATA TO A COMPUTER
69 SPECIFICATIONS AND SYSTEM REQUIREMENTS
71 TROUBLE SHOOTING
73 WARRANTY CARD

2
INTRODUCTION AND PARTS LIST
1
Congratulations on choosing to buy a Traveler product.
All products brought to you by Traveler are manufactured to the
highest standards of performance and safety, and, as part of our
philosophy of customer service and satisfaction, are backed
by our comprehensive 3 Year Warranty.
Please ll in and return the Warranty Card to the address provided.
We hope you will enjoy using your purchase for many years to come.
Parts List
Carefully unpack your camera box and ensure that you have the following items:
1 x HD Digital Video Camera
1 x USB Cable
1 x AV Cable
1 x HDMI Cable
1 x AC Adaptor
1 x Lithium-ion Rechargeable Battery
1 x Quick Guide
1 x Users Manual
1 x Warranty Card
1 x CD-ROM (Driver, Arcsoft Software and User Manual)
1 x Earphones
1 x Camera Strap
1 x Camera Pouch

3
GENERAL INFORMATION AND
SAFETY INSTRUCTIONS
2
Trademark Information
Microsoft® and Windows® are U.S. registered trademarks of the Microsoft Corporation.1.
Pentium® is a registered trademark of the Intel Corporation.2.
Macintosh is a trademark of Apple Inc.3.
SD4. TM is a trademark.
Photo Explorer and Photo Express are trademarks.5.
Other names and products may be trademarks or registered trademarks of their respective6.
owners.
Product Information
Product design and specications are subject to change without notice. This product includes 1.
primary product specications, software, software drivers and a user’s manual.
This User’s Manual is a general reference guide for this product. Illustrations contained in 2.
this manual are for explanation purpose only and may differ from the actual design of your
HD digital camera.
The manufacturer assumes no liability for any errors or discrepancies in this user manual3.

4
GENERAL INFORMATION AND
SAFETY INSTRUCTIONS
2
SAFETY INSTRUCTIONS
Please read and understand all Warnings and Cautions before using this product.
Warnings
If foreign objects or water has entered the camera, immediately turn the power OFF and1.
remove the batteries, as continued use in this state may result in re or electric shock.
If the camera has been dropped or its case has been damaged, turn the power OFF and2.
remove the batteries, as continued use in this state may result in re or electric shock.
Do not disassemble, change or repair the camera, as this may cause re or electric shock.3.
Do not disassemble, change or attempt to repair this camera on your own, as it will result4.
in voidance of your warranty.
Keep batteries out of the reach of small children to avoid accidental swallowing. If this occurs5.
immediately contact a physician as it may result in poisoning.
Do not use the camera while driving or riding a motorcycle, as this may result in an6.
accident.

5
GENERAL INFORMATION AND
SAFETY INSTRUCTIONS
2
Cautions
Insert batteries into camera paying careful attention to polarity (+ or -) of the battery terminals.1.
Inserting batteries with polarity inverted may cause re and injury, or damage to surrounding
area due to rupture and leakage.
Do not ignite ash close to eyes, or closer than prescribed minimum distances as this may 2.
result in damage to vision.
Do not subject LCD/TFT monitor to impact, as this may result in permanent damage to the3.
glass screen and uid leakage. If uid comes in contact with your clothes, skin or eyes rinse
with cold water. For eye contact immediately contact a physician for treatment.
A camera is a precision instrument. Avoid dropping, impact, or excessive force when handling4.
as it may result in permanent damage to the camera.
Do not immediately remove and handle the battery after long periods of use in the camera,5.
as it may be too hot and cause burns.
Do not expose camera to intense heat or cold for long periods of time, as this may result in6.
permanent damage to the camera. Excessive heat may result in re, therefore store and use
camera in well-ventilated areas.
Disconnect all cords and cables prior to moving camera. Failure to do so, may result in their7.
damage over time resulting in re or electric shock.

6
GENERAL INFORMATION AND
SAFETY INSTRUCTIONS
2
Battery Usage
Carefully read and strictly observe the Safety Instructions and notes described below:
Different battery types and surrounding temperatures may affect the battery performance.1.
Avoid using the batteries in extremely cold environments, as low temperatures can shorten2.
battery life and reduce the camera’s performance.
Batteries may feel warm after long periods of continuous use of the camera, or ash which 3.
is normal and not a malfunction.
The camera may feel warm after long periods of continuous use which is normal and not a4.
malfunction.
Avoid storing batteries in a fully charged state if they are not used for long periods of time,5.
as this may impair their performance.
Always check battery terminals to ensure they are clean and free from corrosion as this may6.
result in damage to the camera and limit its performance.
There is a risk of explosion if the batteries are replaced with an incorrect type.7.
Dispose of used batteries according to the instructions.8.

7
GETTING TO KNOW YOUR CAMERA
3
Overview
This video camera features high quality audio and High Dention (HD) movie recording with
clarity at 1280 x 720 resolution.
Recorded video clips can be played back on the built-in 2.4 inch bright color swivel screen or
directly onto a HD television using the provided HDMI cable for ultra fast transfer of HD images
and audio data.
The camera uses a 5 mega-pixel image sensor, which can enhance still images up to 11 mega-
pixels(interpolated). The camera’s exposure and color balance can be set manually if required,
or for your convenience use the optimally pre-adjusted automatic settings.
This video camera can be used as a mass storage media device for easy storage and data
transfer, or as a PC web camera (PC/Webcam). This camera is easy to use and almost all of
it’s buttons have self-explanatory functions.
Additional options include extended memory capability with an SD card, MP3 music player,
and a movie player. With so many wonderful options, it may take you a bit of time to orient
yourself with the camera. We recommend that you nd a relaxing spot and rst read through
the complete manual in order to fully enjoy all of the benets of your new video camera. This
camera will become your universal personal player while you are on the move!
Note
Some of the camera’s internal built-in memory has been permanently taken up to allow
storage for a rmware code.
8
GETTING TO KNOW YOUR CAMERA
3
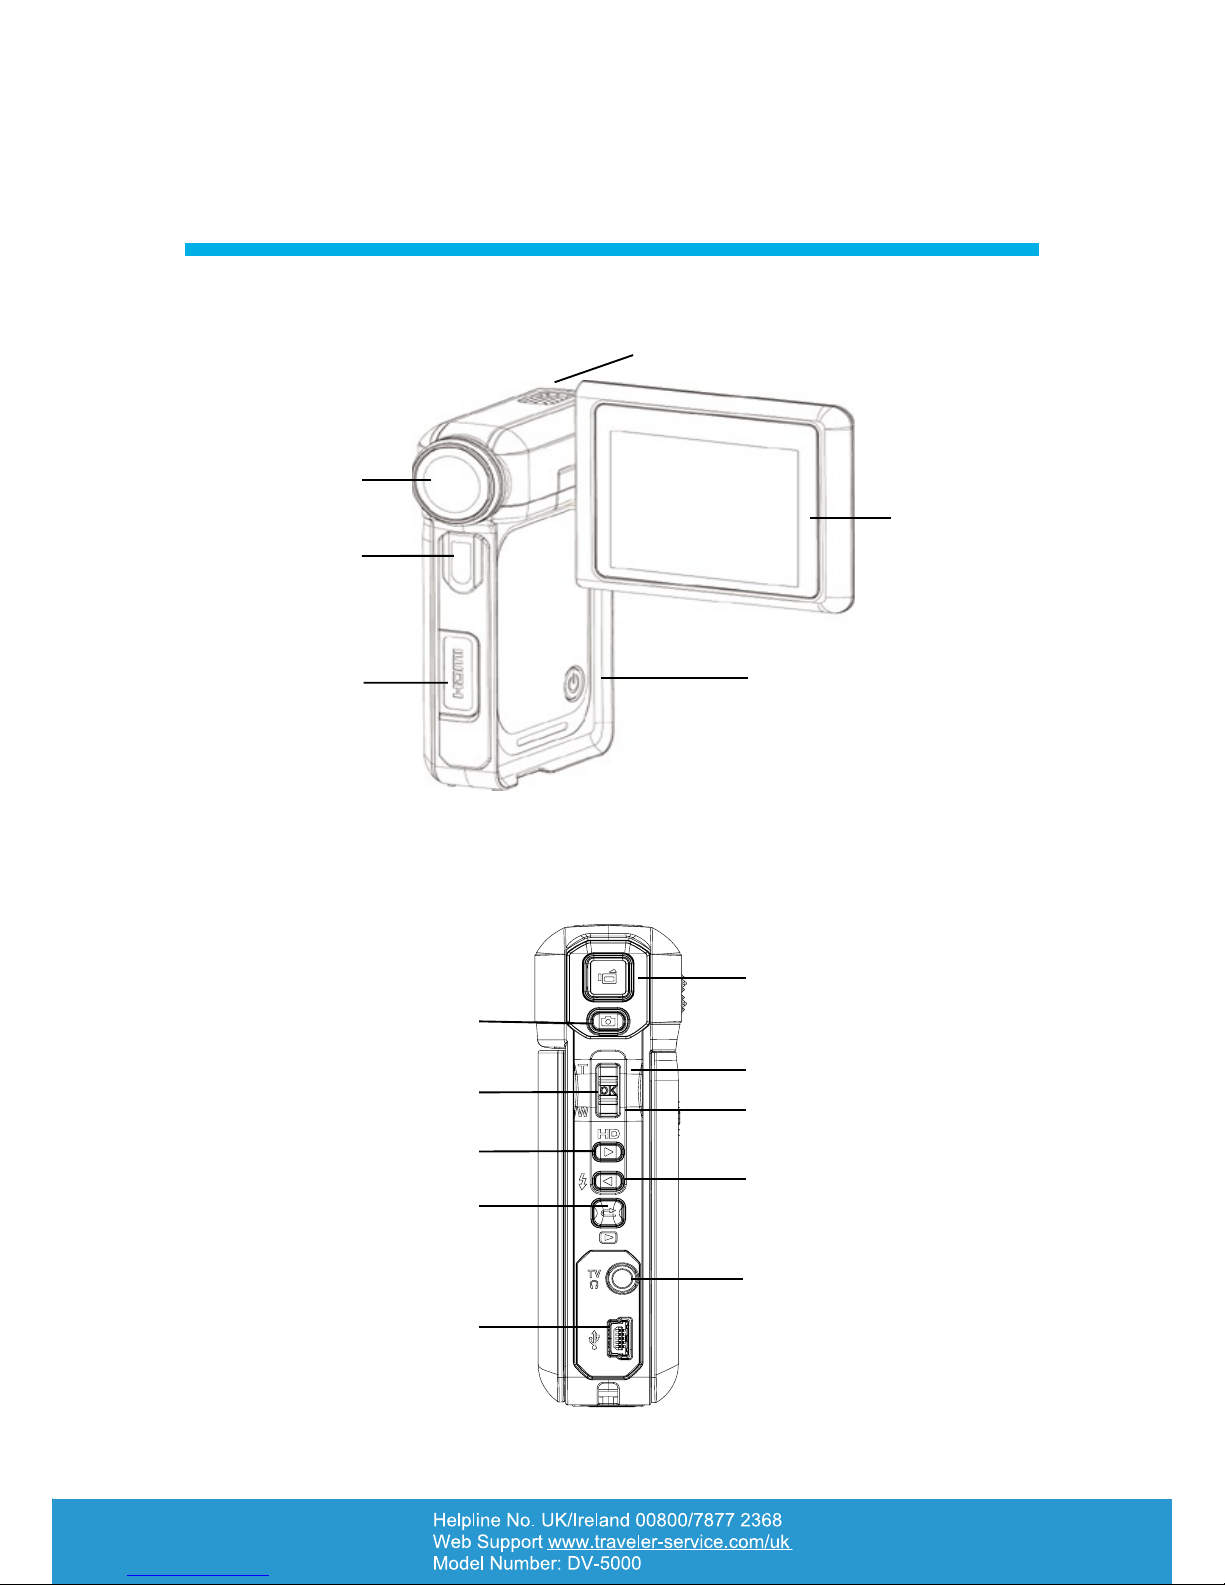
Front View
LCD Panel
Microphone
Power Button
Lens
LED
Rear View
Movie Shutter Button
Tele Button (Up Button)
Wide Button (Down Button)
Left Button
TV/Earphone Port
OK Button
Picture Shutter Button
Right Button
Record/Play Button
Mini USB 2.0 port
HDMI Port
9
GETTING TO KNOW YOUR CAMERA
3
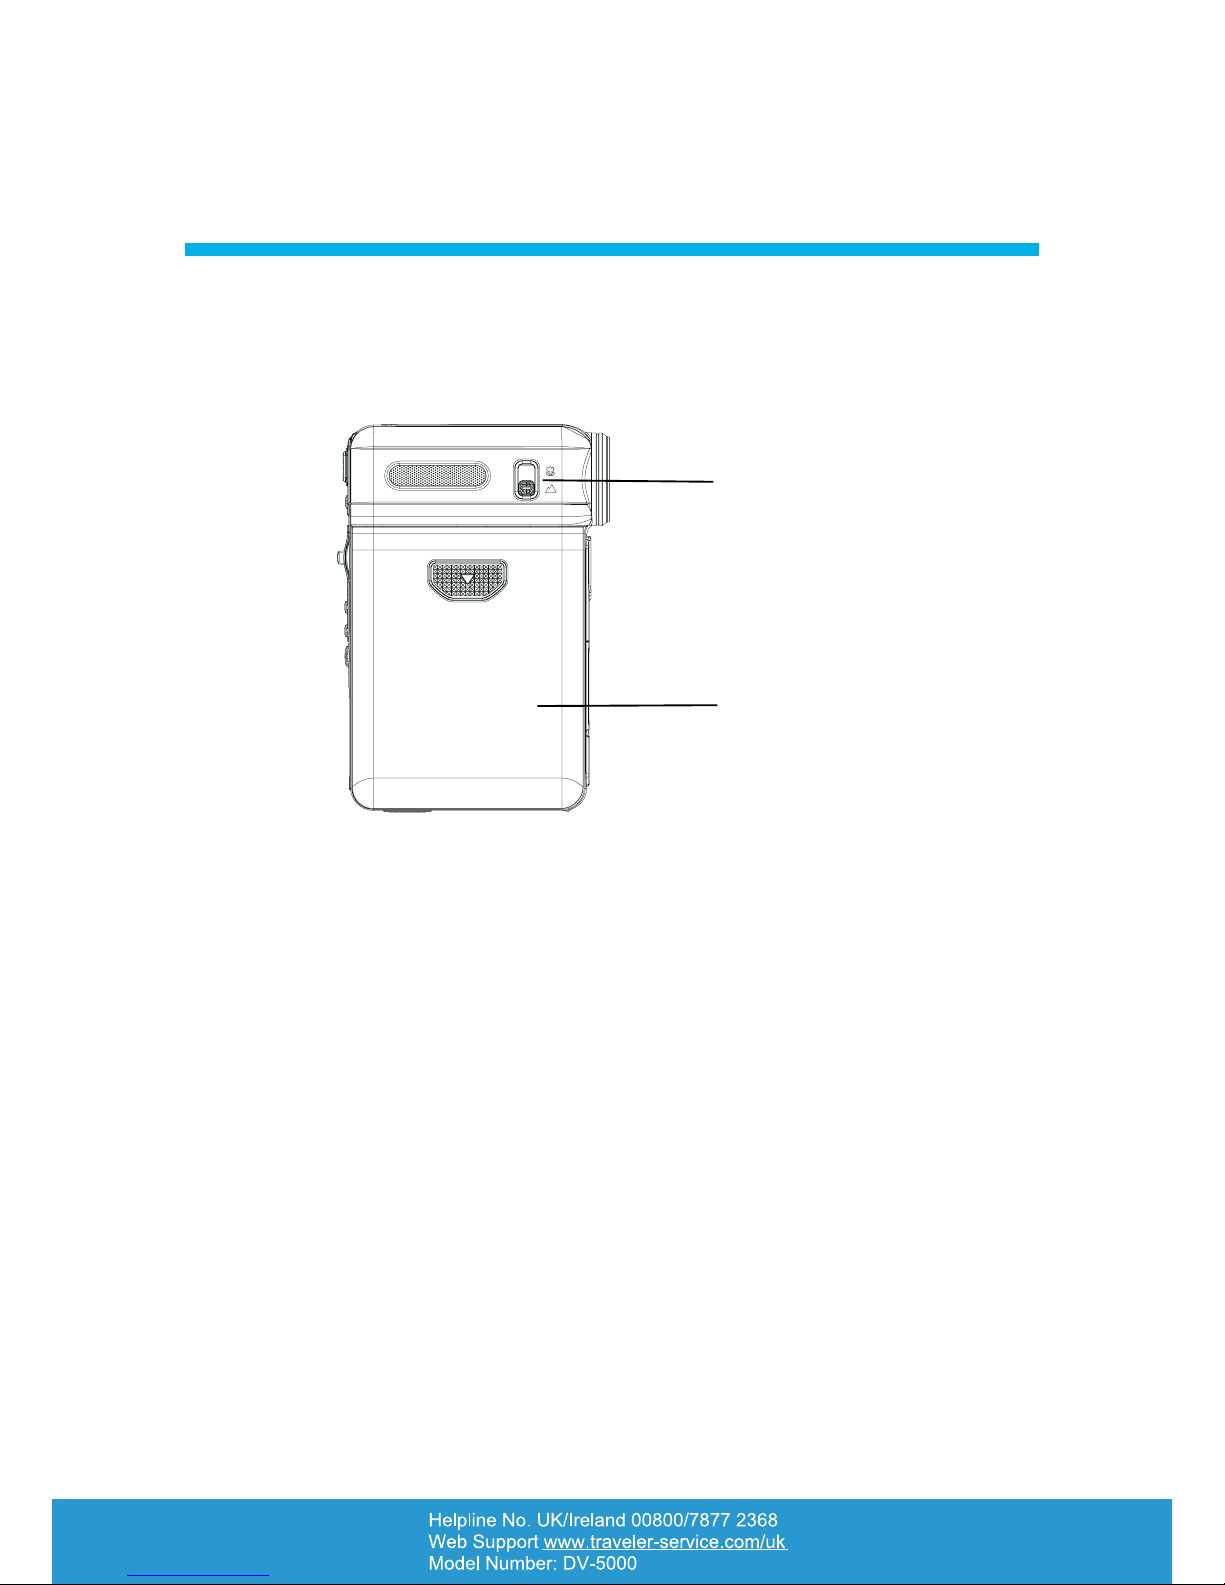
Side View
Macro Switch
Battery Cover
10
GETTING STARTED
4
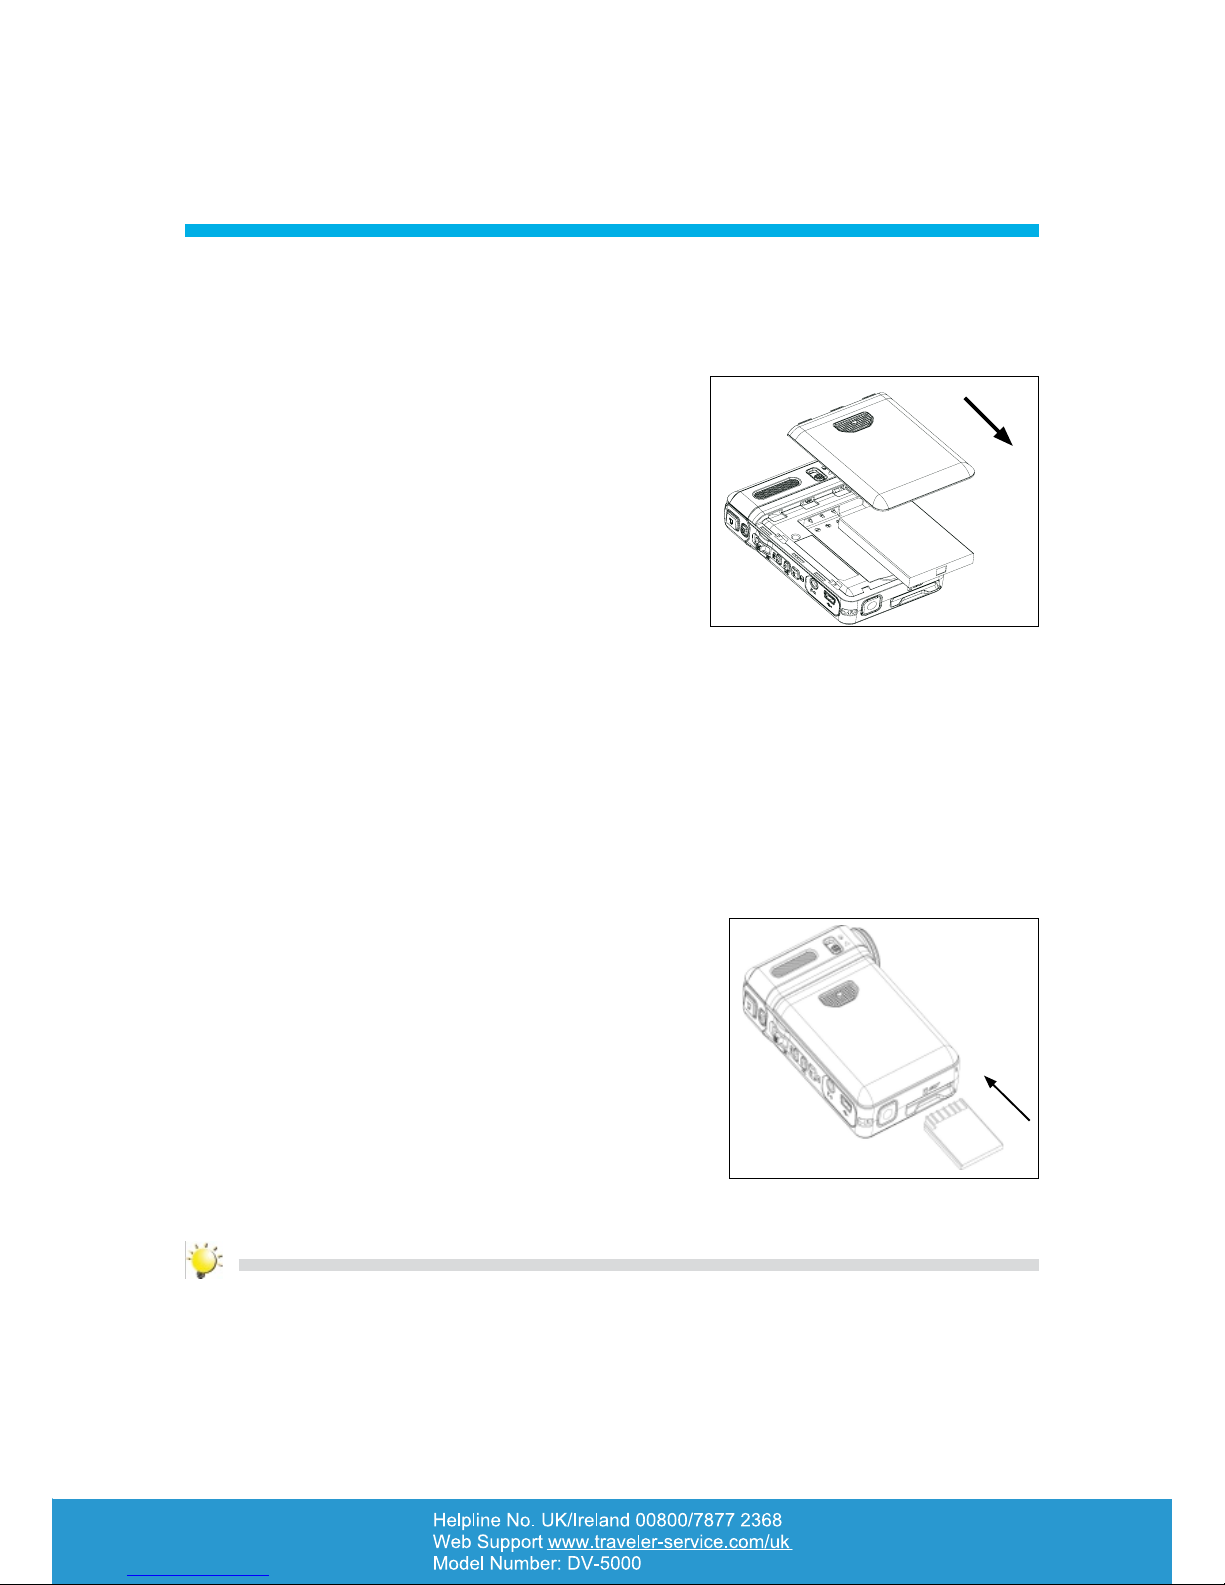
Inserting the Battery
Before using the camera, please insert the provided NP 60 battery into the battery compartment
following steps 1-3 below.
Slide the battery compartment door in the direction1.
of the arrow to open.
Insert the battery according to the correct (+/-)2.
polarity.
Close the battery cover rmly.3.
Inserting and Removing an SD Card (Optional)
The camera comes with limited internal memory which allows you to store pictures, movies,
voice recordings and music. You can expand the memory capacity by using an optional SD or
MMC memory card. To insert a memory card follow steps 1-3 below.
Insert the memory card into the correct position as shown in the gure below.1.
To remove an installed SD card, press the card inwards to release it.2.
When the card pops out, gently remove it from its3.
slot.
Note
When a SD memory card is inserted, movies and pictures will be stored to the memory
card only.
Eject

11
GETTING STARTED
4
Protecting Data on an SD Card
An SD card is “read only” when it is placed in the locked position. In the locked position, no
pictures, movies or voice can be recorded onto the SD card. In order to take pictures, or
record voice and movies, make sure the SD card is in the
“writeable” position as shown in the gure to the right.
Turning the Camera On and Getting Started
To turn on the camera either ip out the LCD panel (see gure below) which turns the camera
on automatically, or press the power button down and hold it for one second.
To record a movie, press the Movie Shutter Button (1. ).
To take a picture, press the Picture Shutter Button (2. ).
To record voice, press the OK Button (3. ) to enter Record Menu. Use the Direction
Buttons to choose Voice Pen Option, and press Movie Shutter Button ( ) to start voice
recording.
To record a movie at HD resolution, press the Right Button to switch to HD mode, and then4.
press the Movie Shutter Button ( ).
To view stored movies, pictures, MP3s and voice recordings press the Record/Play Button5.
( ) once to switch to Playback Mode.
Turning the Camera Off
To turn the camera off you can either press and hold the Power Button down for one second,
or simply close the LCD panel.
Writeable
Position
Write-Protected/
Read Only Posi-
12
RECORD MODE
5
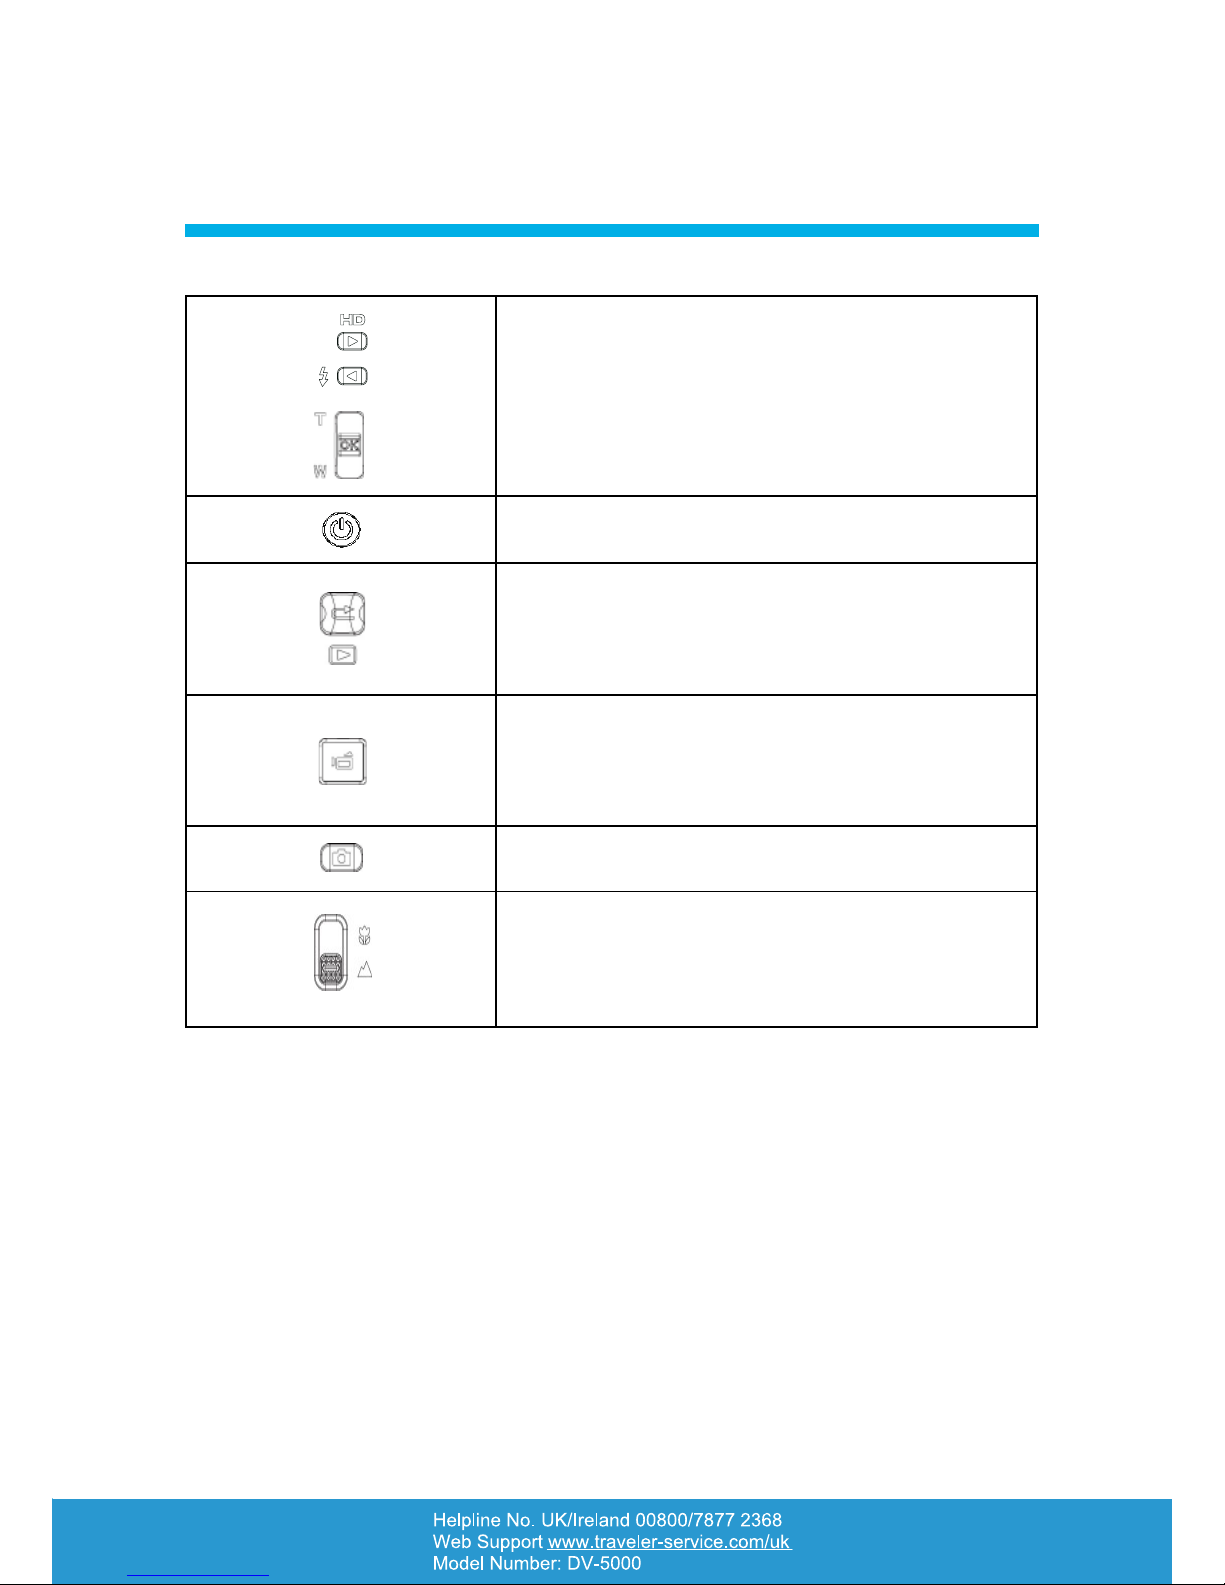
Button Functions
Right Button: HD Mode
Left Button: Flash Auto/ ON/ Off /Red Eye Reduction/
Light ON
Tele Button (Up Button): Digital Zoom In
Wide Button (Down Button): Digital Zoom out
OK Button: Menu ON
Power Button: Press button down for one second to turn
the camera on or off.
Record/Play Button functions:
Use button to switch between the Record/Playback1.
mode.
Returns you to the previous page.2.
Movie Shutter Button:
Use this button to start recording (movies/voice).1.
To stop recording (movie/voice), press this button2.
again.
Picture Shutter Button: Use this button to take a
picture.
Macro switch: Use this button to switch between Macro
Mode and Normal Mode.

13
RECORD MODE
5
LCD Monitor Information
The following icons (see below) may appear on your LCD monitor when recording movies
and taking pictures.
Record Mode
Movie Record Mode
Picture Record Mode
Voice Record Mode
Motion Stabilization
Two in One Mode
Photo Frame
Multi-Snap Mode
Night Mode
Backlight Mode
(1)
Resolution
Movie: HD / D1 / VGA / QVGA
Picture: High / Standard/ Low
(2) Indicates the number of images or recording time of a movie which can be taken at
the current resolution.
(3) Indicates that an SD card has been inserted into the camera.
(4) Indicates that the Macro function has been initiated.
(5) White Balance

14
(6) Battery indicator: full power / medium power / low power / power empty
(7)
Auto Flash
Flash On
Flash Off
Red Eye Reduction
Light on
(8) Self-timer enabled
(9) 8X digital zoom
(10) Date/Time: YYYY/MM/DD HH: MM
(11) Motion Detection
Movie Recording
Press the Movie Shutter button ( ) to start recording. When a movie is recording, a time
indicator will be displayed on the LCD Monitor. To stop recording, press the Movie Shutter
Button ( ) again. Press the Record/Play Button to view the recorded movie.
4 resolution/quality settings are available:
Resolution/Quality Settings
HD
D1
VGA
QVGA
Picture Taking
Press the Picture Shutter Button ( ) to take a picture, and then press the Record/Play
button to view it.
3 Resolution/Image Quality settings are available.
Resolution/Image Quality
Settings
High Quality
Standard Quality
Low Quality

15
RECORD MODE
5
Voice Recording
Press the OK Button to activate Record Menu while in1.
Record Mode. Use the Right/Left Buttons
( ) to choose the Voice Pen Option.
Press the Up/Down Buttons (2. ) to choose “Enter”
Option and press the OK button to enter Voice Record
Mode.
Press the Movie Shutter Button (3. ) to record voice.
Press the Movie Shutter Button (4. ) again to stop.
Press the Record/Play Button (5. ) to hear the
recording.
Taking Close up Pictures
The Macro Mode ( ) should be used when taking pictures of objects 8 inches or closer to
the camera.
To activate,slide the switch to Macro ( ) and the macro icon ( ) will appear on the LCD monitor
allowing you to then, take a macro photo by pressing the Picture Shutter Button ( ).
Note
Remember to turn the macro switch back to the normal mode( ) when you are not
taking close-up pictures.
Using The Digital Zoom
This digital video camera is equipped with an 8x digital zoom. You may enlarge the subjects
by pressing the Tele button. While digital zoom can be a useful feature, the more
an image is enlarged (zoomed), the grainier the image will appear.

16
Options for Record Menu
Movie Mode Camera Mode Voice Pen Effect Setting
Resolution
Exposure
Light
Sharpness
White
Balance
Stabilization
Motion Detect
Night Mode
Exit
Resolution
Exposure
Two in One
Photo Frame
Flash
Self-timer
Sharpness
White
Balance
Multi-snap
Backlight
Date printing
Night Mode
Exit
Enter
Exit
Normal
B/W
Classic
Negative
Exit
Sound
Time Setting
Format
Memory
TV System
Language
Default
Setting
Exit
Operations for Record Mode
Operation Screen
Press the OK Button when in Movie/Picture Record1.
Mode.
Use the Right/Left Buttons to move between the2.
main menu options: Movie Mode, Camera Mode,
Voice Pen, Effect, and Setting. Sub-menus will pop
up when moving to each main option.
In order to select and validate the sub-menu3.
function chosen press the OK button.
Select Exit option to exit the submenu.4.
Enter Button
17
RECORD MODE
5
Default Setting and Validation
The following table indicates the camera’s default settings as well as the length of time changed
settings remain valid.
Innite:1. A changed setting always remains valid.
One Time:2. A changed setting is only valid as long as the camera is switched on.
Validation Default Factory Setting
Resolution Innite High for Movie
Standard for Picture
Exposure One Time 0EV
Light One Time OFF
Sharpness One Time Level 5
White Balance One Time Auto
Motion Stabilization Innite Off
Motion Detect One Time Off
Two in One One Time Off
Photo Frame One Time Off
Flash Innite Off
Self-Timer One Time Off
Multi-Snap One Time Off
Backlight Mode One Time Off
Date Printing Innite Off
Night Mode One Time Off
Effect One Time Normal
Sound Innite On
Format Card One Time Off
TV System Innite PAL
Language Innite English
Volume Innite Level 6

18
RECORD MODE
5
Movie Mode submenu setting
The main record menu includes camera setting and other advanced settings. You can use the
Right/Left Buttons to move between options and press the OK Button to validate the setting.
Movie Resolution■
To change the Movie Resolution:
In the Movie/Picture Record Mode, press the OK Button to switch to the record menu1.
screen.
Use the Right/Left Buttons to select Movie Mode. A submenu of the Movie Mode will pop up2.
on the screen for further options.
Use the Up/Down Buttons (Tele-Wide Buttons) (3. ) to select Resolution then press the
OK Button to switch to the Resolution submenu.
Use the Up/Down Buttons to move between the 4 resolution submenu settings.4.
Press the OK Button to validate the setting and exit.5.
Display Screen Video Resolution Option
OK Button
19
RECORD MODE
5
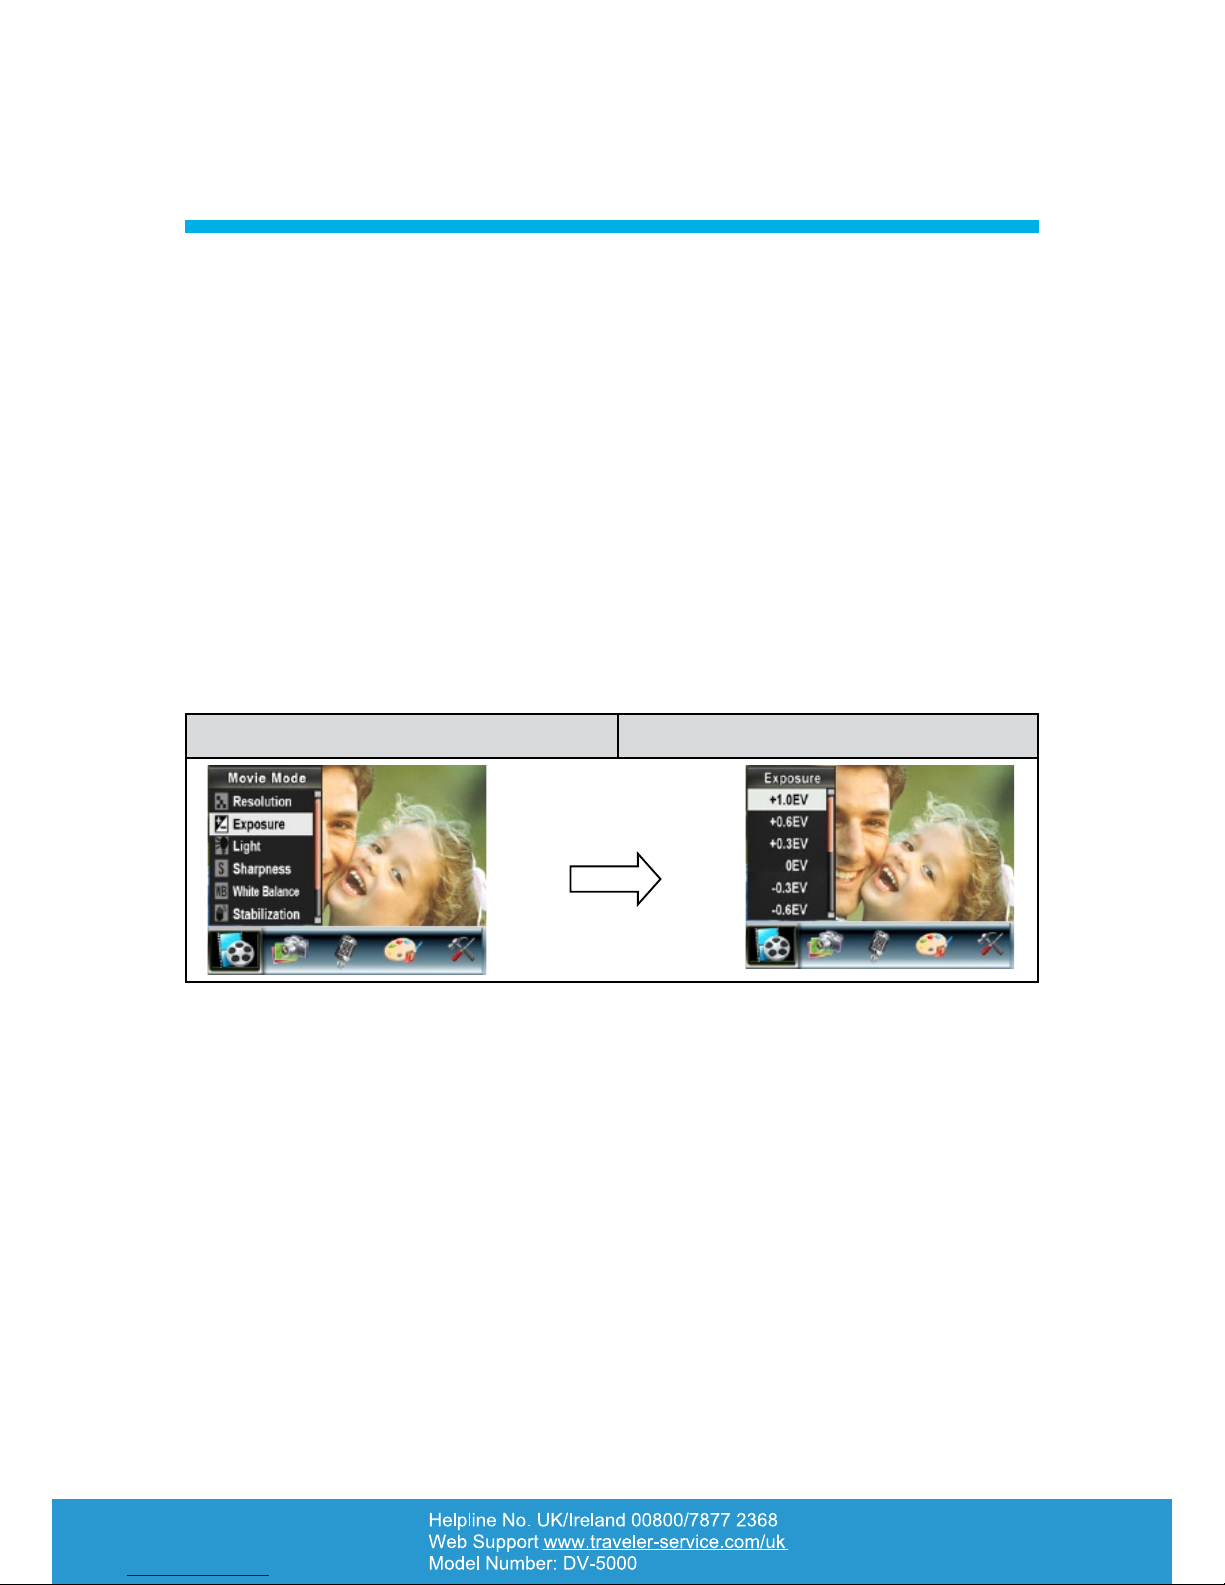
Exposure■
The camera comes pre-set and will automatically adjust the image exposure value unless
manually changed by you. In certain circumstances you may wish to change/adjust the
exposure compensation setting.
To change the exposure setting:
In the Movie/Picture Record Mode, press OK Button to switch to the record menu screen.1.
Use the Right/Left Buttons to select Movie Mode. A submenu of the Movie menu will appear2.
on the screen.
Use the Up/Down Buttons to move to Exposure Option. Press the OK Button and then3.
Exposure Submenu will appear on the screen.
Use the Up/Down Buttons to choose the preferred EV value. The change can be previewed4.
immediately.
Press the OK Button to validate the setting and exit.5.
Display Screen Exposure Option
OK Button

20
RECORD MODE
5
Light■
The camera provides an LED light which can be used for recording movie clips in low light
conditions.
Light On
Light Off
To change the light setting:
In the Movie/Picture Record Mode, press the OK Button to switch to the record menu1.
screen.
Use the Right/Left Buttons to select Movie Mode. A submenu of the Movie Mode will appear2.
on the LCD screen.
Use the Up/Down Buttons to move to Light Option. Press the OK Button and then a light3.
submenu will appear on the screen.
Use the Up/Down Buttons to choose ON or OFF.4.
Press the OK Button to validate the setting and exit.5.
Display Screen Light Option
OK Button
Table of contents


