TrekStor i.Gear agent User manual


INDEX
DE ………………………………………………………………………………………… 4
EN ………………………………………………………………………………………… 10
IT ………………………………………………………………………………………… 16
ES ………………………………………………………………………………………… 22
PL ………………………………………………………………………………………… 28
NL ………………………………………………………………………………………… 34
SE ………………………………………………………………………………………… 40

DE 4
bBEDIENUNGSANLEITUNG
Wir gratulieren Ihnen zum Kauf des TrekStor i.Gear agent Bluetooth® Keyboard for iPad® 2
und sind sicher, dass Sie viel Freude mit diesem Produkt haben werden. Bitte lesen Sie die
folgenden Abschnitte aufmerksam durch, damit Sie die Funktionen dieses Produkts und
seine Bedienung kennenlernen.
Aktuelle Produktinformationen können Sie der TrekStor Website www.trekstor.de entnehmen.
Haben Sie Fragen zur Bedienung oder den Funktionen von diesem Produkt? Auf der TrekStor
Website unter "Service"+"FAQ" finden Sie Antworten auf die häufigsten Fragen.
iSelbstverständlich steht Ihnen auch unser Support bei allen Fragen rund um dieses Gerät gerne
zur Verfügung. Am besten ist es, wenn Sie uns über das Support-Formular auf unserer Website
www.trekstor.de unter “Service” +“Support” kontaktieren oder unseren Support anrufen. Je
ausführlicher die Beschreibung Ihres Anliegens ist, desto schneller und zielgerichteter können
wir Ihnen helfen!
1) Lieferumfang
• TrekStor i.Gear agent Bluetooth® Keyboard for iPad® 2
• 4 Gummifüße
• USB 2.0-Kabel
• Bedienungsanleitung
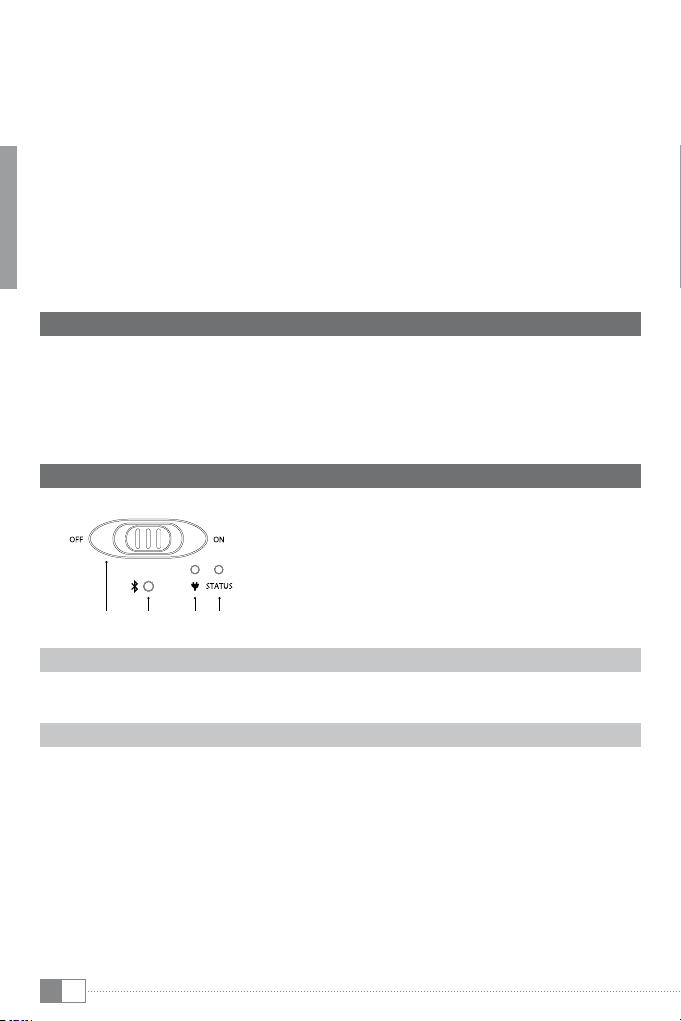
2) LEDs und Knöpfe
A) w-Schieber
B) Bluetooth®-Verbindungs-Knopf
C) Batterie-LED
D) Status-LED
Batterie-LED
Die Batterie-LED leuchtet, wenn der Akku des i.Gear agent geladen wird.
Status-LED
1) Leuchtet nach dem Einschalten des i.Gear agent für ca. 3 Sekunden, danach erlischt sie
wieder, um Energie zu sparen.
2) Blinkt während des Bluetooth® Verbindungsvorgangs.
3) Blinkt, wenn der Ladestand der Batterie niedrig ist.
C DBA

DE
5
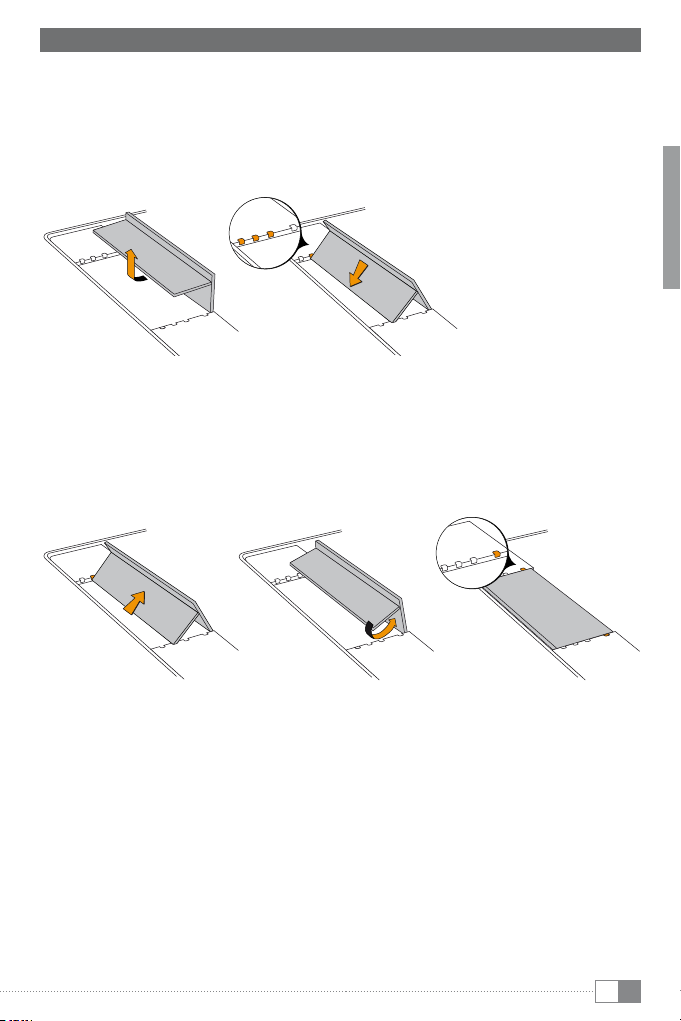
3) Aufstellen des iPad® 2 in ihrem i.Gear agent
Ihr i.Gear agent verfügt über eine Halterung, die ein Aufstellen des iPad®2 im Hoch- und
Querformat sowie in drei verschiedenen Winkeln ermöglicht. Gehen Sie dabei wie folgt vor:
1) a) Heben Sie den Aufsteller an.
b) Platzieren Sie den hinteren Teil des Aufstellers in einer der drei vorgegebenen
Halterungspositionen. Je nach Wahl der Position, steht Ihr iPad® 2 steiler oder
flacher in der Tastatur.
2) Zusammenklappen der Halterung zum Transport
a) Lösen Sie den Aufsteller aus seiner Position und heben Sie ihn an.
b) Klappen Sie den Aufsteller zusammen.
c) Haken Sie ihn in der vordersten Halterung ein.
a)
b)
b)
a) c)
a)
b)
b)
a) c)

DE 6
4) Verbinden des i.Gear agent mit Ihrem iPad® 2
iHinweis: Diesen Schritt müssen Sie nur ausführen, wenn Sie den i.Gear agent zum ersten Mal
mit Ihrem iPad® 2 verbinden.
a) Schalten Sie das iPad® 2 ein und wählen Sie "einStellungen" +"Allgemein" +"Bluetooth®"
b) Schieben Sie den Power-Schalter am i.Gear agent auf "on" und drücken Sie den
Bluetooth®-Verbindungs-Knopf.
c) Sobald die Statusleuchte blinkt, ist das Gerät bereit, sich mit Ihrem iPad® 2 zu verbinden.
Das iPad® 2 zeigt nun "KeyBoArd For iPAd®" als verfügbares Gerät an.
d) Wählen Sie "KeyBoArd For iPAd®" aus den verfügbaren Geräten aus. Ihnen wird nun ein
Passwort auf dem iPad® 2 angezeigt.
e) Geben Sie das angezeigte Passwort über die Tatstatur des i.Gear agent ein und bestätigen
Sie die Eingabe mit der "return" Taste. Jetzt wird die Verbindung zwischen Ihrem iPad® 2 und
dem i.Gear agent hergestellt.
DE
7
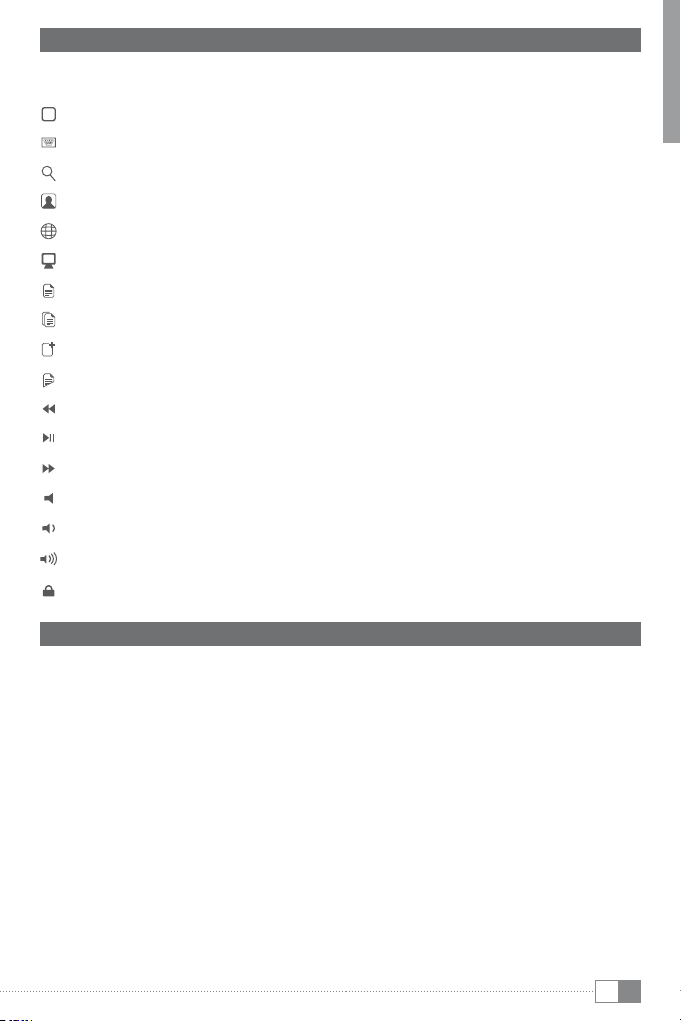
5) iPad® 2 Funktionstasten
Der i.Gear agent ist mit speziellen Tasten ausgestattet, mit denen Sie unterschiedliche
Funktionen auf Ihrem iPad® 2 steuern können:
Die Home-Taste ruft die Startseite des iPad® 2 auf
Bildschirmtastatur auf dem iPad® 2 anzeigen oder ausblenden
Die Search-Taste öffnet die iPad® 2 Such-Seite
Gibt Ihre Bildersammlung wieder
Wechsel zwischen den Sprachen
Verdunkelt den Bildschirm und hellt ihn bei erneutem Druck wieder auf
Alles auswählen – wählt alle Elemente aus
Kopieren – kopiert ausgewählte Elemente
Einfügen – fügt ausgewählte Elemente ein
Ausschneiden – schneidet ausgewählte Elemente aus
Schaltet zum vorherigen Titel auf der aktuellen Wiedergabeliste um
Play/Pause – startet oder pausiert die Wiedergabe der aktuellen Titelliste
Schaltet zum nächsten Titel auf der aktuellen Wiedergabeliste um
Schaltet die Lautstärke des iPad® 2 auf stumm
Verringert die Lautstärke Ihres iPad® 2
Erhöht die Lautstärke des iPad® 2
Sperrt den Bildschirm
6) Batterie
iIm Standby-Modus bleibt die Batterie der Tastatur für mehrere Tage aufgeladen.
iSchalten Sie den i.Gear agent ab, wenn Sie ihn nicht benötigen. Auf diese Weise verlängern Sie
die Lebensdauer des Akkus.
Der i.Gear agent wechselt automatisch in den Standby-Modus, wenn die Tastatur längere
Zeit nicht verwendet wurde. Drücken Sie eine Taste und warten Sie 1 bis 2 Sekunden bis die
Tastatur reaktiviert wurde.
DE 8
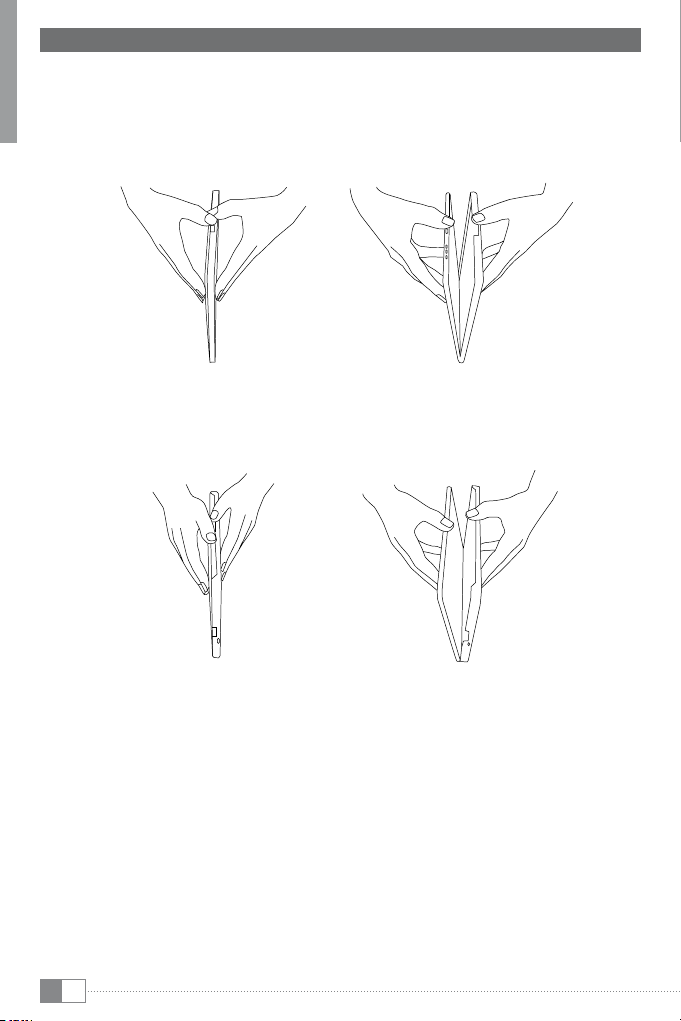
7) Teilen der Geräte
Stellen Sie den i.Gear agent hochkant quer auf eine rutschfeste Unterlage.
1) a) Halten Sie den i.Gear agent mit beiden Händen fest und platzieren Sie die Daumen
in Höhe des Anschlusses für das Ladekabel.
b) Sichern Sie den i.Gear agent und das iPad® 2 mit den Daumen und drücken Sie das
iPad® 2 vorsichtig aus der Tastatur.
a) b)
a) b)
2) a) Halten Sie den i.Gear agent mit beiden Händen fest und platzieren Sie die Daumen
am Ausschnitt für die Tastatur.
b) Sichern Sie den i.Gear agent und das iPad® 2 mit den Daumen und drücken Sie das
iPad® 2 vorsichtig aus der Tastatur.
a) b)
a) b)

DE
9
Sicherheits- und Verwendungshinweise:
dTechnische Arbeiten an dem Produkt dürfen nur von entsprechend qualifizierten Personen durchgeführt
werden. Das Produkt darf weder geöffnet werden noch dürfen Änderungen daran vorgenommen werden.
Die Komponenten können nicht vom Nutzer gewartet werden.
eSetzen Sie das Gerät niemals Feuchtigkeit, Kondenswasser und Nässe aus.
jSchützen Sie das Gerät vor extrem hohen und niedrigen Temperaturen und Temperaturschwankungen.
Betreiben Sie es nur bei einer Umgebungstemperatur innerhalb des Bereichs von 10º C und 40º C.
mStellen Sie das Gerät nicht in der Nähe einer Wärmequelle auf und schützen Sie es vor direkter
Sonneneinstrahlung.
hAchten Sie bei der Verwendung und Lagerung des Geräts auf eine möglichst staubfreie Umgebung.
gDie Reinigung der Oberfläche des Geräts darf niemals mit Lösungsmitteln, Farbverdünnern, Reinigungsmitteln
oder anderen chemischen Produkten erfolgen, nutzen Sie stattdessen ein weiches, trockenes Tuch bzw. einen
weichen Pinsel.
Hinweise:
pSollten Sie das Gerät einer elektrostatischen Entladung aussetzen, können Funktionen des Geräts gestört
werden. Schalten Sie das Gerät aus bzw. wieder ein.
aBeachten Sie bitte, dass bei einem Ausbau des Akkus Ihr Gerät eventuell zerstört wird. Sie sollten den Akku nur
ausbauen, wenn Ihr Gerät ausgedient hat und zur Entsorgung geben werden soll.
Der Hersteller behält sich das Recht vor, das Produkt ständig weiter zu entwickeln. Diese Änderungen können
ohne direkte Beschreibung in dieser Bedienungsanleitung vorgenommen werden. Informationen in dieser
Bedienungsanleitung müssen somit nicht den Stand der technischen Ausführung widerspiegeln.
Der Hersteller garantiert nur die Eignung für die eigentliche Bestimmung dieses Produktes. Weiter ist der Hersteller
nicht für Beschädigungen oder Verlust von Daten und deren Folgeschäden verantwortlich.
Copyright © 2011 TrekStor GmbH. Alle Rechte vorbehalten. Bei weiteren erwähnten Produkt- oder Firmenbezeichnungen
handelt es sich möglicherweise um Warenzeichen oder Markennamen der jeweiligen Inhaber.
Mac OS and iPad® is a registered trademark of Apple Inc. in the United States and/or other countries.
Bluetooth is a registered trademark of Bluetooth® SIG, Inc.
EN 10
bQUICK GUIDE
Thank you for buying the TrekStor i.Gear agent Bluetooth® Keyboard for iPad® 2. We are confident
that this product will be the source of much enjoyment. Please read the following instructions
carefully so that you can become acquainted with the functions of this product and its use.
Current product information as well a detailed user manual can be found at the TrekStor
Website www.trekstor.de.
Have you got questions about the operation or the functions of this product? On the TrekStor
website you can find answers to the most frequently asked questions under "Service" +"FAQ".
iYou can also get quick assistance by contacting our support. If you want to contact our
support, it is best to visit our website, www.trekstor.de, and fill out the support form that can
be found under “Service” +“Support”. You can of course also contact us directly by e-mail or
telephone. The more detailed your support request is, the quicker and better we will be able
to help you!
1) Package contents
• TrekStor i.Gear agent Bluetooth® Keyboard for iPad® 2
• 4 rubber feet
• USB 2.0 cable
• Operating instructions
2) Lights and buttons
A) wswitch
B) Bluetooth® Button
C) Charging light
D) Status Light
Charging light
Charging light: turns on when charging
Status light
1) Lights briefly when you turn on the keyboard. Then turns of to save battery.
2) Flashes when pairing.
3) Flashes when battery is low.2.)Positioning
C DBA
EN
11
3) Placing the iPad® 2 into your i.Gear agent
Your i.Gear agent has a retainer, which enables the placement of the iPad® 2 in high and
landscape format as well as in three different angles. Please proceed as follows:
1) a) Lift the hinge.
b) Place the back part of the hinge into one of the three predefined positions.
Depending on the choice of that position, your iPad® 2 stands steeper or flatter
inside the keyboard.
2) Folding the retainer for transporting
a) Loosen the hinge off the retainer and lift it.
b) Fold the hinge.
c) Hook it into the foremost retainer.
a)
b)
b)
a) c)
a)
b)
b)
a) c)

EN 12
4) Pair your i.Gear agent to your iPad® 2
iNote: This step is only needed when you pair your TrekStor i.Gear agent to your iPad® 2 for
the first time.
a) Turn on your iPad® 2 and select "SettingS" +"generAl" +"Bluetooth®".
b) On the Keyboard: Slide the power Button "on" and press the Bluetooth® button.
c) The status light will flash on i.Gear agent and the iPad® 2 will display "KeyBoArd For iPAd®"
as an available device.
d) Select "KeyBoArd For iPAd®" on the iPad® 2; the iPad® 2 will display a code
e) Type the code on the TrekStor i.Gear agent and press enter. The TrekStor i.Gear agent will
now be paired to the iPad® 2.

EN
13
5) Special function keys
The i.Gear agent has been designed with special function keys to give you more control
of your iPad® 2:
Home button – brings you to the iPad® 2 home screen
Keyboard hide/show – allows to show or hide the iPad® 2 onscreen keyboard
Search – brings up the iPad® 2 search screen
Slideshow – shows your picture selection
Language – changing the language
Black screen – makes the iPad® 2 screen go dark and come back when press again
Select All – selects all elements
Copy – copies selected elements
Paste – pastes selected elements
Cut – cuts out selected elements
Previous track – skips to previous track on current playlist
Play/Pause – starts or pauses the current playlist
Next Track – slips to next track on current playlist
Mute – mutes audio on iPad® 2
Volume down – decreases the volume on your iPad® 2
Volume up – increases volume on iPad® 2
Screen lock
6) Battery
iThe i.Gear agent´s longlife battery can stay for a couple of days in standby.
iWhen not in use, turn off the i.Gear agent to lengthen battery life.
The i.Gear agent will go into standby mode if left on and not being used; press a key and wait
a second or two to bring it out of the sleep mode.

EN 14
7) Separating
Place the i.Gear agent vertically on a non-slip surface.
1) a) Using two hands, place one hand on each side of the i.Gear agent with thumbs just
above the 30-Pin Charging Port.
b) Secure the i.Gear agent with one thumb and the iPad® 2 with your other thumb.
Apply slight downward pressure to iPad® 2 and separate.
a) b)
a) b)
2) a) Using two hands, place one hand on each side of the i.Gear agent with thumbs just
above the side with keyboard cutout.
b) Secure the i.Gear agent with one thumb and the iPad® 2 with your other thumb.
Apply slight downward pressure to iPad® 2 and separate.
a) b)
a) b)

EN
15
Instructions for safety and use:
dOnly qualified persons may perform technical work on the product. The product may not be opened or
changed. The components cannot be serviced by the user.
eNever expose the device to moisture, condensation and liquids.
jProtect the device from extremely high and low temperatures and temperature fluctuations. Use the device
within an ambient temperature of 10ºC to 40ºC.
mNever place the device close to a source of heat, and protect it from direct sunlight.
hMake sure that the surroundings are as dust-free as possible when you use and store the device.
gNever clean the surface of the device with solvents, paint thinners, cleansers or other chemical products.
Instead, use a soft, dry cloth or soft brush.
Notes:
pIf this device is exposed to electrostatic discharge, the functionality of it could be affected. Please restart
your device.
a
Please keep in mind, that through a battery detaching your device will eventually get broken. You should
remove the battery only, if your device is disused and shall be forwarded to the disposal.
The manufacturer retains the right to continually improve the product. These changes may be made without being
directly described in these operating instructions. For this reason, the information provided in these operating
instructions may not reflect the current state of the art.
The manufacturer only guarantees suitability for the product’s intended purpose. In addition, the manufacturer is
not responsible for damages or loss of data and subsequent consequences.
Copyright © 2011 TrekStor GmbH. All rights reserved. Other cited product or company names may be trademarks
or brand names of the respective owner.
Mac OS and iPad® is a registered trademark of Apple Inc. in the United States and/or other countries.
Bluetooth is a registered trademark of Bluetooth® SIG, Inc.

IT 16
bGUIDA RAPIDA
Congratulazioni per l’acquisto di TrekStor i.Gear agent Bluetooth® Keyboard for iPad® 2 e siamo
sicuri che vi divertirete a usare questo prodotto. Si prega di leggere attentamente le seguenti
sezioni in modo da conoscere le funzioni di questo prodotto ed il suo uso.
Sul sito web di TrekStor www.trekstor.de troverete informazioni aggiornate sul prodotto e un
manuale di istruzioni.
Avete domande sull’uso o le funzioni di questo prodotto? Nel sito web TrekStor in "ASSiStenzA" +
"FAQ" trovate le risposte alle domande più frequenti.
iNaturalmente anche il nostro supporto è a vostra disposizione per tutte le domande relative
a questo dispositivo. È meglio se ci contattate tramite il modulo di supporto sul nostro sito
www.trekstor.de nella sezione “Servizio” +“Supporto” o chiamate il nostro supporto. Più dettagliata
è la descrizione della vostra richiesta, più veloce e più mirato può essere il nostro aiuto!
1) Contenuto della confezione
• TrekStor i.Gear agent Bluetooth® Keyboard for iPad® 2
• 4 piedini in gomma
• Cavo USB 2.0
• Istruzioni per l'uso
2) Spie e pulsanti
A) Levetta w
B) Pulsante Bluetooth®
C) Spia ricarica batteria
D) Spia di stat
Spia di ricarica
Spia di ricarica: si accende mentre la batteria si sta caricando.
Stato della spia
1) Si accende brevemente quando si accende la tastiera. Poi si spegne per risparmiare
energia.
2) Lampeggia durante l’accoppiamento Bluetooth®.
3) Lampeggia quando la batteria è bassa.
C DBA

IT
17
3) Posizionamento dell’iPad nel vostro i.Gear agent
Il vostro i.Gear agent ha un supporto, che permette il posizionamento dell’iPad® 2 in verticale
o in orizzontale, in tre diverse angolazioni. Si prega di procedere come segue:
1) a) Sollevare il suporto.
b) Posizionare la parte posteriore del supporto in una delle tre posizioni predefinite.
A seconda della posizione scelta, il vostro iPad®2 starà più o meno inclinato rispetto
alla tastiera.
2) Ripiegare il supporto per il trasporto
a) Sganciare la cerniera dal blocco e sollevarla.
b) Piegare la cerniera.
c) Aganciarla all’interno del blocco.
a)
b)
b)
a) c)
a)
b)
b)
a) c)

IT 18
4) Collegare l'i.Gear agent al vostro iPad® 2 tramite Bluetooth®
iNota: accoppiamento va eseguito solo la prima volta che l’i.Gear agent viene collegata
all’iPad® 2.
a) Accendere iPad® 2 e selezionare: "imPoStAzioni" +"generAle" +"Bluetooth®"
b) Sull'i.Gear agent spostare l’interruttore di accensione su "on" e premere il pulsante
Bluetooth®.
c) La spia di stato lampeggia e viene mostrata la tastiera come dispositivo disponibile.
d) Selezionare "KeyBoArd For iPAd®" tra i dispositivi. Sull’iPad® 2 viene visualizzata una password.
e) Digitare la password visualizzata sulla tastiera. Ora l’accoppiamento tra tastiera e iPad® 2
è eseguito.

IT
19
5) Tasti Funzione iPad® 2
L'i.Gear agent è stata progettata con tasti funzione speciali per avere un maggiore
controllo sul vostro iPad® 2:
Pulsante Home – vi riporta alla schermata iniziale dell’iPad® 2
Mostra/Nasconde la tastiera virtuale sullo schermo dell’iPad® 2
Pulsante Search – vi manda alla schermata di ricerca dell’iPad® 2
Diapositive – visualizza le immagini selezionate
Cambiare la lingua
Spegne lo schermo e torna dov’era quando viene ripremuto
Seleziona tutti gli elementi
Copia gli elementi selezionati
Incolla gli elementi selezionati
Taglia gli elementi selezionati
Precedente – rimanda al brano precedente nella corrente playlist
Play/ Pause – avvia/mette in pausa l’attuale playlist
Prossimo – va al prossimo brano nella corrente playlist
Mute – azzera istantaneamente il volume sull’iPad® 2
Diminuisce il volume
Aumenta il volume
Blocca lo schermo
6) Batteria
iLa batteria a lunga durata dell'i.Gear agent può rimanere per diversi giorni in standby.
iQuando non viene usato, spegnete l'i.Gear agent, per risparmiare e prolungare la vita della
batteria.
L'i.Gear agent va automaticamente in modalità Standby, quando rimane acceso e non
utilizzato. Premere un tasto qualunque e dopo un secondo esce dalla modalità Sleep.

IT 20
7) Separazione della tasiera
Posizionare l'i.Gear agent in verticale su una superficie non sdrucciolevole.
1) a) Usando due mani, mettere una mano su ogni lato dell'i.Gear agent con il pollice
appena sopra i 30 contatti di ricarica.
b) Tenere fermi l'i.Gear agent con un pollice e l’iPad® 2 con l’altro. Applicare una
leggera pressione verso il basso e separarli.
a) b)
a) b)
2) a) Usando due mani, mettere una mano su ogni lato dell'i.Gear agent con il pollice
appena sopra sul lato con il taglio della tastiera.
b) Tenere fermi l'i.Gear agent con un pollice e l’iPad® 2 con l’altro. Applicare una
leggera pressione verso il basso e separarli.
a) b)
a) b)
Table of contents
Languages:
Other TrekStor Keyboard manuals


