Triad TS-PAMP1-200 User manual

TRIAD INSTALLATION GUIDE - 1-ZONE HIGH-POWER AMPLIFIER
www.control4.com | 1-888-400-4072 | 200-00464-A 2018-03-08 DH
INTRODUCTION
The Triad 1-Zone High-Power Amplifer delivers high-performance,
reliability, and robust amplification in a compact form factor—providing the
perfect solution for distributed audio systems. Fast wake-from-standby
time and high-resolution audio quality output make this amplifier worthy
of any audio solution. Seamless integration with the Triad Audio Matrix
Switches and other Triad Power Amplifiers provides you with an easily
configurable, fully featured audio distribution solution for any size home.
SUPPORTED MODELS
• TS-PAMP1-200 Triad 1-Zone High-Power Amplifier
BOX CONTENTS
• 1-Zone High-Power Amplifier
• IEC power cable
• Phoenix-style speaker connector
• Rack-mount kit (supports mounting 1 or 2 amplifiers)
• Mono 3.5 mm 12V trigger cable
FEATURES
• Powerful, Class-D amplification driven by ICEpower modules delivers a
dynamic, high-resolution audio experience
• With a half-rack space form factor, two amplifiers can be mounted
side-by-side in a standard equipment rack.
• Fast wake from standby using 12V trigger from Triad Audio Matrix
Switches—ideal for time-sensitive audio announcements and quick
audio zone turn on
• Standby mode saves energy by muting audio when not in use
• Three power control options—12V trigger, audio sensing, or always on
• Loop output allows you to chain multiple amplifiers together to create
large audio zones
• Over-current protection prevents amplifier channels from overloading
due to short circuits or incorrect wiring
• Thermal protection shuts down amplifier channels if thermal limits are
exceeded, preventing damage
WARNINGS
WARNING! Do not expose the apparatus to dripping or splashing.
Do not place objects filled with liquids near the apparatus.
AVERTISSEMENT ! N’exposez pas l’appareil à l’égoutture ou à
l’éclaboussement. Ne placez pas les objets remplis de liquides près
de l’appareil.
WARNING! To reduce the risk of fire or electrical shock, do not
expose this apparatus to rain or moisture.
AVERTISSEMENT ! Pour réduire le risque du feu ou de choc
électrique, n’exposez pas cet appareil à la pluie ou à l’humidité.
IMPORTANT! Using this product in a manner other than outlined
in this document voids your warranty. Further, Control4 is NOT
liable for any damage incurred with the misuse of this product. See
“Warranty.”
IMPORTANT ! Employer ce produit en quelque sorte autre que
décrit dans ce document vide votre garantie. De plus, Control4
n’est pas responsable d’aucun dommage encouru avec l’abus de ce
produit. Voyez que « garantie. »
IMPORTANT! Do not defeat the safety purpose of the polarized
or grounding-type plug. The wide blade or the third prong are
provided for your safety. If the provided plug does not fit into your
outlet, consult an electrician for replacement of the obsolete outlet.
WARNING! To reduce the risk of fire, do not install this device in
a cabinet that is smaller than 20” (50.8 cm) wide × 20” (50.8 cm)
deep × 12” (30.5 cm) high. If you do, the device may overheat.
AVERTISSEMENT ! Pour réduire les risques d’incendie, ne pas
installer cet appareil dans une armoire qui est plus petit que 20”
(50.8cm) de large × 20” (50.8 cm) de profondeur × 12” (30.5 cm)
de haut. Si vous le faites, l’appareil peut surchauer.
FRONT AND REAR PANEL DESCRIPTIONS
FRONT PANEL 1-ZONE HIGH-POWER AMPLIFIER
A Zone Status LED—Lights blue when an amplifier zone is on, red if in
overcurrent protection, and orange if in thermal shutdown
• Power LED—Lights blue when amplifier powers on.
BACK PANEL 1-ZONE HIGH-POWER AMPLIFIER
• Power connector—Use the supplied power cord to connect power.
• LINE IN—RCA connectors for stereo line in.
• LOOP OUT—RCA connectors for a line-level stereo audio out. Loops out
whatever audio device is plugged into LINE IN.
• 12V TRIGGER IN/OUT— Trigger input for 12V control of amplifier power.
Connects to trigger output of audio matrix or other 12V trigger device.
Trigger output can be used to chain 12V control to another amplifier
trigger input.
• POWER MODE—Set to ON/12V/AUDIO to configure the amplifier’s
power setting.
• MONO/STEREO switch—Sets the amplifier in stereo (2 channel) or
mono (2 channels mono-summed) mode.
• CLIP LED—LED turns red when input gain is too high, causing the
amplifier zone to clip. Adjust the GAIN down when clipping occurs.
• GAIN—Dial is used to adjust input level. The recommended starting gain
level is 6.
• ZONE OUTPUT—1 zone output using a Phoenix-style connector for
speaker wiring connections.
A
B
A
B
C
D
E
F
G
H
I
AB
A B C D
E
F
G
H
I
TRIAD INSTALLATION GUIDE - 1-ZONE HIGH-POWER AMPLIFIER
www.control4.com | 1-888-400-4072 | 200-00464-A 2018-03-08 DH
INSTALLING THE AMPLIFIER
The 1-Zone High-Power Amplifier comes with rack-mounting hardware and
can be installed by itself in a 1U rack space or side-by-side with another
1-Zone High-Power Amplifier in a 1U rack space.
PLANNING FOR PROPER VENTILATION
While the 1-Zone High-Power Amplifier features cool-running Class-D
amplification, it still requires adequate ventilation. For optimal performance
in a rack, Triad recommends leaving at least 1U open rack space above
the amplifier. While it is possible to mount two amplifiers side by side with
components directly above and below, this does increase the possibility
of the unit overheating, especially if the equipment below it generates
substantial heat. If the 1-Zone High-Power Amplifier must be installed
between components with no open rack space, place the unit between
components that normally run cool. If the amplifier is experiencing thermal
shutdown, avoid high volume levels or lower the amplifier’s input gain to
reduce the possibility of overheating.
CAUTION! To prevent damage, maintain adequate ventilation space
to the sides of the amplifier. Do not place the sides of the amplifier
next to other components or against a cabinet. Doing so will block
ventilation openings.
ATTENTION ! Pour éviter tout dommage, maintenir un espace
de ventilation adéquate sur les côtés de l’amplificateur. Les
amplificateurs peuvent être empilés verticalement, mais veillez à ne
pas placer l’amplificateur à côté d’autres composants ou sur le côté
d’une armoire. Cela évitera de bloquer les ouvertures de ventilation.
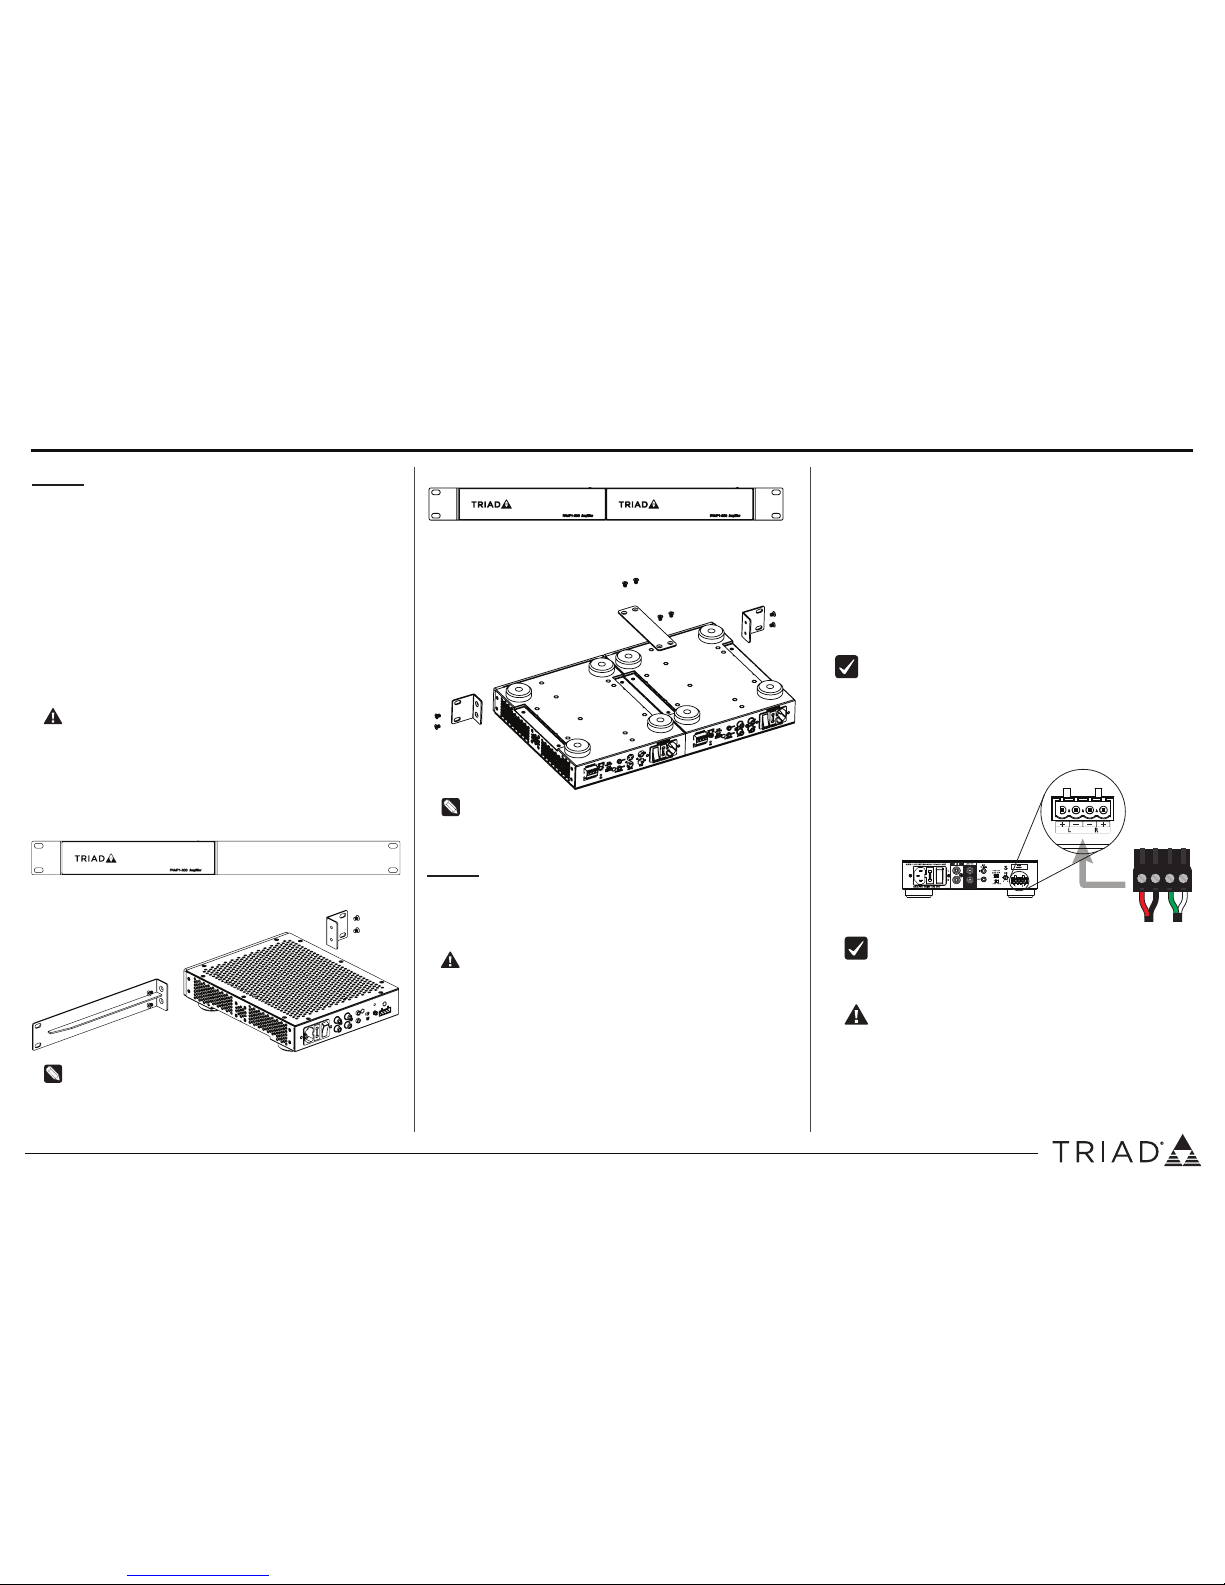
Installing a single 1-Zone High-Power Amplifier in a rack:
1 Attach one short rack ear and the long rack ear to the sides of the
amplifier using the provided screws.
Note: Rack ears can be installed to the front or the back of the
amplifier as needed. In addition, the long and short rack ears can be
swapped, enabling the amplifier to be positioned to the left or the
right when mounted in the rack.
2 Install into rack and connect cabling.
Installing two 1-Zone High-Power Amplifiers in a rack:
1 Place the amplifiers side by side. Attach one short rack ear to each
amplifier. Attach the joining plate to the bottom of the two amplifiers
to connect them together.
Note: Rack ears can be installed to the front or the back of the
amplifier as needed.
2 Install into rack and connect cabling.
CONNECTING THE AMPLIFIER
This device is designed to operate as part of the Control4® home system
which requires physical audio connections and connections in Composer
Pro to function as designed. This section describes how to set up the
physical connections required for the amplifier and some of the devices
associated with it.
WARNING! Connecting speaker wires or input cables while the
amplifier is powered may cause electrical shock and could damage
the amplifier. Unplug the power cord before making connections.
AVERTISSEMENT ! Les fils se reliants de haut-parleur ou les câbles
entrés tandis que l’amplificateur est actionné, peuvent causer le
choc et pourraient endommager l’amplificateur. Débranchez le
cordon de secteur avant d’établir des rapports.
CONNECTING AUDIO INPUTS
The 1-Zone High-Power Amplifier accepts a mono or stereo line-level audio
connection to the input jacks. The input will pass amplified audio to the
speaker output.
1 Connect the audio cables to the audio input jack (LINE IN).
2 (Optional) Connect an audio cable to the LOOP OUT to duplicate the
audio source connected to the LINE IN and pass that audio to another
amplifier.
CONNECTING SPEAKERS
The 1-Zone High-Power Amplifier can power one stereo or mono audio
zone and has a Phoenix-style terminal block for speaker connections.
Important! The speaker/zone output cannot be bridged.
To connect stereo speakers:
1 Move the MONO/STEREO switch to the STEREO position.
2 Remove the speaker connector.
3 Use 14-18 gauge stranded loudspeaker wire, and strip away 1/4inch of
insulation from each conductor.
4 Connect speaker wire to the
speaker connector following the
polarity printed on the back of the
amplifer below the connector and
re-insert the speaker connector
into the amplifier.
IMPORTANT! The common signal of the speaker output must
not be connected together or to any other common signal. Do
not connect the L– and R – (negative) terminals together. Doing
so will result in a fault condition and the amplifier will either shut
down or not work properly.
CAUTION! Check the polarity of the speakers and wires before
connecting to the amplifier.
ATTENTION ! Vérifiez la polarité des enceintes et des câbles
avant de brancher à l’amplificateur.
In mono mode, both amplifier channels will output the same audio. A
stereo source can be connected to the input to create a mono-summed
output, or a mono source can be connected to one channel of the input
which will drive both speaker outputs with the same mono input signal.

TRIAD INSTALLATION GUIDE - 1-ZONE HIGH-POWER AMPLIFIER
www.control4.com | 1-888-400-4072 | 200-00464-A 2018-03-08 DH
To connect a mono speaker or passive subwoofer:
1 Move the MONO/STEREO switch to the MONO position.
2 Remove the speaker connector.
3 Use 14-18 gauge stranded two-conductor loudspeaker wire, and strip
away 1/4inch of insulation from each conductor.
4 Connect speaker wire to the speaker connector following the polarity
printed on the back of the amplifer below the connector and re-insert
the speaker connector into the amplifier. The speaker output cannot be
bridged.
SETTING UP THE AMPLIFIER POWER MODE
The 1-Zone High-Power Amplifier can be set up to automatically power
on when needed. The POWER MODE switch allows the amplifier to be
powered on at all times, turned on with a 12V trigger, or turned on when an
audio signal is present at the audio input.
To set up the amplifier to be always on:
1 Slide the POWER MODE switch to ON.
In this mode, the amplifier will be always on unless the power cord is
unplugged or the power switch by the power cord is toggled o.
To set up the amplifier to be controlled by a 12V trigger:
1 Slide the POWER MODE switch to 12V.
2 Connect the 12V trigger cable from the trigger device to 12V TRIGGER
IN.
3 (Optional) Connect 12V TRIGGER OUT to another amplifier to link their
power control together.
In this mode, the amplifier will turn on when a 12V signal is present on
the 12V Trigger Input jack. This 12V trigger input can be wired to the 12V
trigger output of a Triad audio matrix switch or a relay and contact on a
Control4 controller. See the Control4 Knowledgebase for more details.
To set up the amplifier to be turned on by the audio sensing:
1 Slide the POWER MODE switch to AUDIO.
In this mode, the amplifier will turn on when an audio signal is sensed on
the audio input.
TROUBLESHOOTING
RESETTING THE AMPLIFIER
• Power reset—Remove the power cord and replace the power cord to
power cycle the device.
NOTE: If the amplifier will not turn on, check the Power Mode
switch. Try changing the Power Mode switch to ON.
LED TROUBLESHOOTING GUIDE
Zone Status LED Power LED
Amplifier is powered on, in standby
Amplifier zone(s) are on
Zone(s) are in over-current protection
Zone(s) are in thermal shutdown
SPECIFICATIONS
GENERAL
Triad Power Amplifier TS-PAMP1-200
Audio inputs 1 stereo, RCA style
Global audio output 1 stereo, RCA style
Zone speaker outputs 1 stereo outputs
Mono/Stereo mode 1 × 2-position switch
12V trigger control 1 × 3.5 mm (in)
1 × 3.5 mm (out)
Power mode switch 1 × 3-position switch—always on, 12V, or audio sense
Wake from standby <2 seconds with 12V trigger
~3 seconds with audio sense
Standby power consumption Less than 0.50W
RATED WATTAGE
2 channels driven 200W per channel @ 4 Ω
100W per channel @ 8 Ω
1 channel driven 300W @ 4 Ω(NOTE: Do not bridge the amplifier.)
150W @ 8 Ω
Minimum impedance Stable to 2.5 Ω
AUDIO
Frequency response ±0.4 dB, 10 Hz - 20 kHz,
all loads
Dynamic range 110 dBA
Idle noise 100uV, A-weighted, 20 Hz - 20 kHz.
Upper bandwidth, -3 dB > 50 kHz 4 or 8 Ω
Input impedance 47 kΩ, f=1 kHz
THD 0.008%, 4 Ω, f=100 Hz, Po=1W
POWER
AC mains power Universal mains 100 - 240VAC 50 - 60 Hz
Fuse rating 4A
Power connection IEC 320 C13 power connector with 3-pole detachable power
cord
THERMAL
Operating temperature 32 °F ~ 113 °F (0 °C ~ 45 °C)
Humidity 5% to 95% non-condensing
Storage -4 °F ~ 158 °F (-20 °C ~ 70 °C)
Thermal dissipation Passive cooling, side vented
Thermal dissipation (heat losses) 0.23W / 0.8 BTU/hr, standby
11W / 38 BTU/hr, idle all channels
180W / 615 BTU/hr, max continuous power
550W / 1876 BTU/hr, max peak power
MISCELLANEOUS
Mains switch w/ changeable fuse Ye s
Speaker output 1 × 4-position Phoenix-style connector
Input gain potentiometer 1
Clip Indicator LED 1
H × W × D (with feet) 2.08 × 7.87 × 10.12"
(53 × 200 × 257 mm)
H × W × D (without feet) 1.73 × 7.87 × 10.12"
(44 × 200 × 257 mm)
Front panel power LED 1 × blue LED
Front panel zone status LED 1 × RGB LED
REGULATORY/SAFETY INFORMATION
To review regulatory information for your particular Triad products, see the
information located on the Triad website at triadspkrs.co/reg.
WARRANTY
Limited 2-year Warranty. Go to triadspkrs.co/warranty for details.
12V
Copyright ©2018, Control4 Corporation. All rights reserved. Control4, the Control4 logo, the 4-ball logo, Triad, and
the Triad logo are registered trademarks or trademarks of Control4 Corporation or its subsidiaries in the United
States and/or other countries. All other names and brands may be claimed as the property of their respective
owners. All specifications subject to change without notice.
Other Triad Amplifier manuals


