Trifecte TRI-RS3175E1 User manual

WALL MOUNTED RANGE HOOD

TECHNICAL CHARACTERISTICS
Dear consumer,
Thanks for your purchase of our range hood and we hope we can fully
satisfy all of your needs. Please read the entire instructions carefully
before proceeding to obtain the best results of operation the range hood.
Model No.: TRI-RS3175E1 TRI-RS-5175E1
Total power: 204W
Motor power: 200W
Led Light: 2x2W
Voltage: 120V
Frequency: 60Hz
Filter: Aluminum filter
Control: Touch Control
Steel Baffle filter
TRI-RS3175F1 TRI-RS-5175F1
Please note that this product is marked with symbol:
According to Waste of Electrical Electron Equipment
(WEEE) directive, WEEE should be separately collected
and treated. If at any time in future you need to dispose of
this product, please do NOT dispose of this product with
household waste. Please send this product to WEEE
collecting points where available.
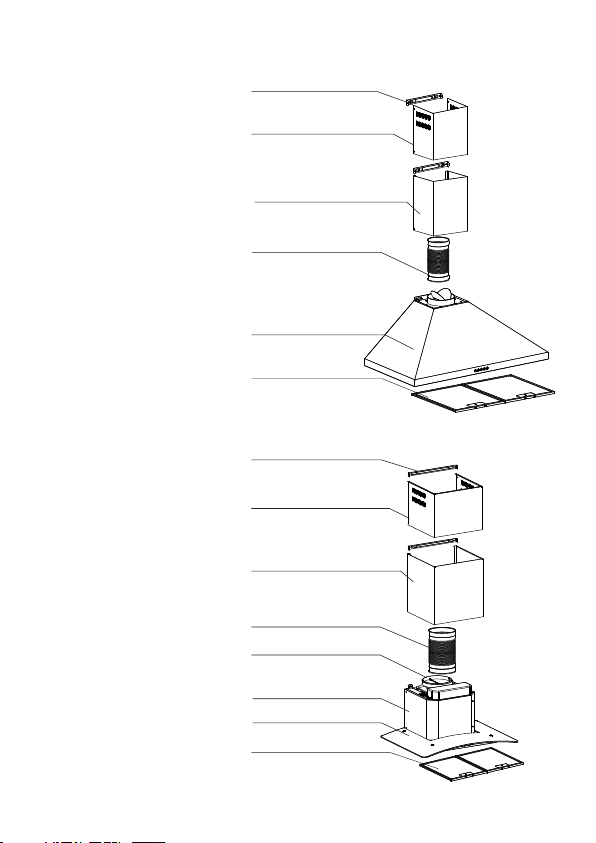
MAIN PARTS NAME
Hook
Inner duct cover
Outer duct cover
Exhaust pipe
Blower box
Filter
Hook
Inner duct cover
Outer duct cover
Exhaust pipe
Blower box
Air outlet
Glass
Filter
TRR-RS-3175F1
TRR-RS-5175F1


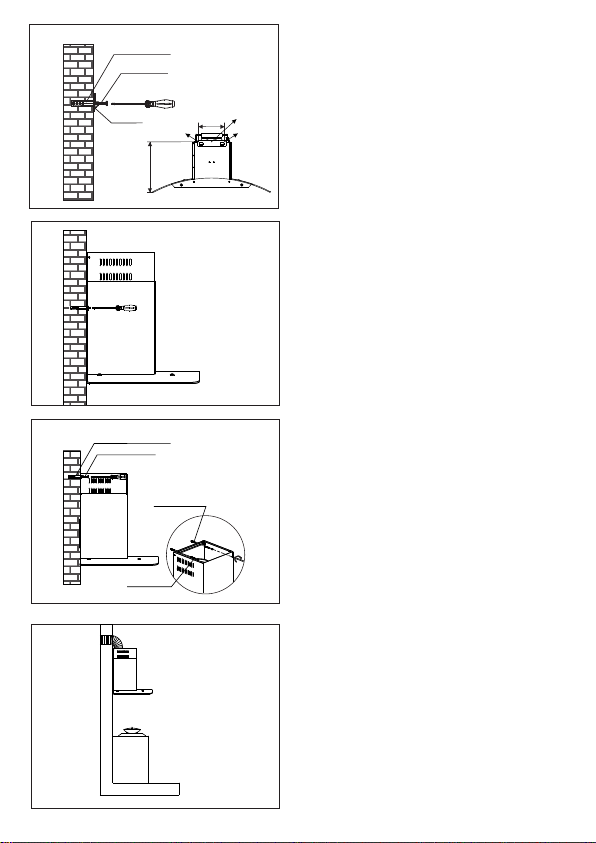
Step5:
A ccording to the size of hook key holes.
Drill 3 holes in level in the wall with
10mm in diameter and 75~85mm in depth.
Press the 3 expanding tube provided into
the holes. Fix the hook using the 5x50
metal screw provided.
Then insert three M5X50 screws to A and B
And C holes to fix the hook on the wall steadily.
Step 6:
Hang the entire hood onto the hook,
ensure the hood is level and vertical.
Step 7:
1. Draw the inner duct cover up to the
suitable height, mark on the wall two
keyhole of the outer duct cover bracket
with pen .
2. Put down the inner duct cover gently,
drill the keyholes in 75-85 mm depth on
the horizontal level using 10mm drill.
3. Press the expanding tube provided into
the holes.
4. Matching the inner duct cover with the
holes, tighten the inner duct cover with
two 5x50 metal screw provided.
Step 8:
Extend the air outlet of the exhaust pipe
out-of-door. Try to make the bend of the
exhaust pipe is no more than 120°.
5x50
Metal Screw
Expanding Tube
5x50
Wood Screw
Expanding Tube
Metal Screw
5x50
Expanding Tube
Hook
A
B
200
367
C
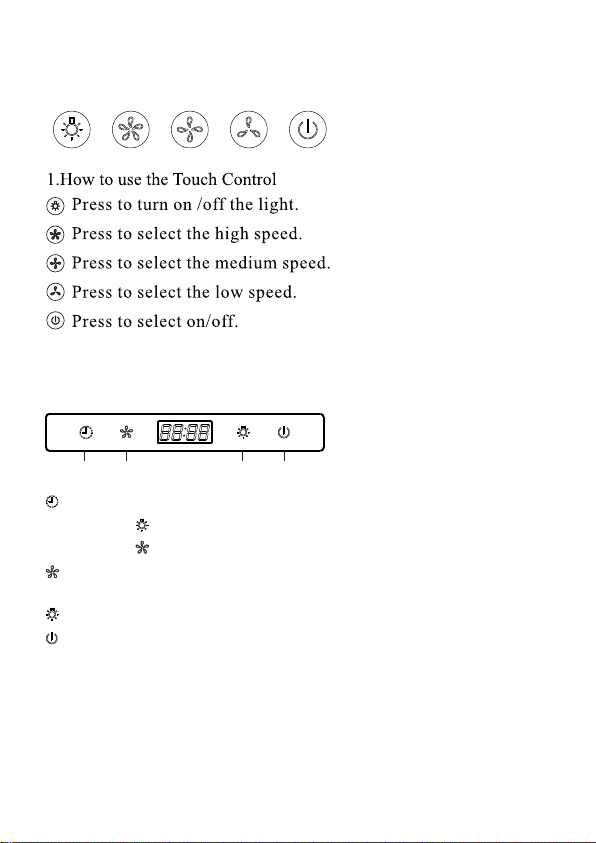
OPERATING INSTRUCTION
1).Electronic Switch
Timer Speeds Light On/off
Time setting: Press approximately 3 seconds to set time.
Touch (Light) to set minute.
Touch (Speed) to set hour.
Press once to get high speed, 2nd to get middle speed and
3rd to get low speed, and recycle.
Touch to turn on/off the light.
In standby mode, press to get the hood on.
In working mode, press once to get one minute delay to
turn off the hood, press again to turn off immediately.
2).Touch control


WARNING – TO REDUCE THE RISK OF A RANGE TOP GREASE FIRE:
a) Never leave surface units unattended at high settings. Boilovers cause smoking and greasy
spillovers that may ignite. Heat oils slowly on low or medium settings.
b) Always turn hood ON when cooking at high heat or when flambeing food (i.e.Crepes Suzette,
Cherries Jubilee, Peppercorn Beef Flambe’).
c) Clean ventilating fans frequently. Grease should not be allowed to accumulate on fan or filter.
d) Use proper pan size. Always use cookware appropriate for the size of the surface element.
WARNING – TO REDUCE THE RISK OF INJURY TO PERSONS IN THE EVENT OF A RANGE
TOP GREASE FIRE, OBSERVE THE FOLLOWING: SMOTHER FLAMES with a close-fitting lid,
cookie sheet, or metal tray, then turn off the burner. BE CAREFUL TO PREVENT BURNS.
If the flames do not go out immediately, EVACUATE AND CALL THE FIRE DEPARTMENT.
b) NEVER PICK UP A FLAMING PAN – You may be burned.
c) DO NOT USE WATER, including wet dishcloths or towels – a violent steam explosion will result.
d) Use an extinguisher ONLY if:
1) You know you have a Class ABC extinguisher, and you already know how to operate it.
2) The fire is small and contained in the area where it started.
3) The fire department is being called.
4) You can fight the fire with your back to an exit.
WARNING: TO PROVIDE PROTECTION AGAINST ELECTRIC SHOCK, CONNECT TO
PROPERLY GROUNDED OUTLETS ONLY.
A UTILISER SEULEMENT AVEC UNE TROUSSE DE RACCORDEMENT DE CORDON DE
HOTTE VÉRIFIÉE ET APPROUVÉE POUR EMPLOI AVEC CE MODÈLE DE HOTTE.
WARNING - To Reduce The Risk Of Fire Or Electric Shock, Do Not Use This Fan With Any
Solid-State Speed Control Device. AVERTISSEMENT : NE CONVIENT PAS A DES
REGULATEURS DE VITESSE A SEMI-CONDUCTEURS.
GROUNDING INSTRUCTIONS
This appliance must be grounded. In the event of an electrical short circuit, grounding
reduces the risk of electric shock by providing an escape wire for the electric current. This
appliance is equipped with a cord having a grounding wire with a grounding plug. The plug
must be plugged into an outlet that is properly installed and grounded.
WARNING – Improper grounding can result in a risk of electric shock.
Consult a qualified electrician if the grounding instructions are not completely understood,
or if doubt exists as to whether the appliance is properly grounded.
Do not use an extension cord. If the power supply cord is too short, have a qualified electrician
install an outlet near the appliance
CONSIGNES DE MISE A LA TERRE
Cet appareil doit être mis à la terre. En cas de court-circuit, le fil de mise à la terre limite le
risqué de choc électrique parce qu’il assure le retour du courant à la terre. L’appareil est
livré avec un cordon muni d’un fil de terre et d’une fiche de mise à la terre, qui doit être
branchée sur une prise mise à la terre correctement installée.
AVERTISSEMENT — Une mise à la terre incorrecte peut entraîner des risques de choc
électrique. Consulter un électricien compétent en cas de doute sur ces consignes de mise
à la terre ou en cas d’incertitude concernant la mise à la terre correcte du circuit sur lequel
l’appareil est branché.
Ne pas utiliser de cordon de rallonge. Si le cordon d’alimentation est trop court, faire installer
une prise par un électricien compétent à proximité de l’appareil.
WARNING - TO REDUCE THE RISK OF FIRE, USE ONLY METAL DUCT WORK.

TROUBLE SHOTTINGS
CAUTION: Disconnect the power supply before servicing.
STATUS CAUSE & METHOD OF REPAIRING TOOL
The power
supply is
damaged
If the power supply is damaged, please call
the technician to repair. Screwdriver
The motor
does not run
A). The fan was blocked, check the fan make
sure it is in the correct place.
B). The motor was blocked, check the motor
and make sure it’s in the correct place.
C). The motor was broken, replace a new one.
D). The switch was broken, replace a new one.
E). The capacitor was broken, replace a new one.
Screwdriver
The unit
body shake
A). The installation is not firm enough.
Check it and make sure the hood is firm enough.
B). The fan is broken, so it’s no balance.
Replace a new one.
C). The installation of the blower is not correct.
Check it and install it correctly.
D). The motor does not firm enough.
Check it and install it firmly enough.
Screwdriver
Screwdriver
Screwdriver
Screwdriver
Big noise
A). The blower is no in balance. Adjust the fan fix
screws to balance or replace a new one.
B). Some other things drop to the blower.
Check and clean it.
Suction not
so powerful
A). The distance from the range hood to the gas
cooker is too big, make sure the distance is
about 600-700mm.
B). There are many windows or doors in the
kitchen, the air convection is too big. Close
some doors or windows to make the air
convection smaller.
C). There is some other pour wind to the
exhaust pipe. Make the exhaust pipe’s exit
to downwards.
D). The run rate of motor decrease obviously.
Replace a new motor or capacitor.
Because of the range hood is set upon one
board on the back of the range hood for
covering the hollow of the window.
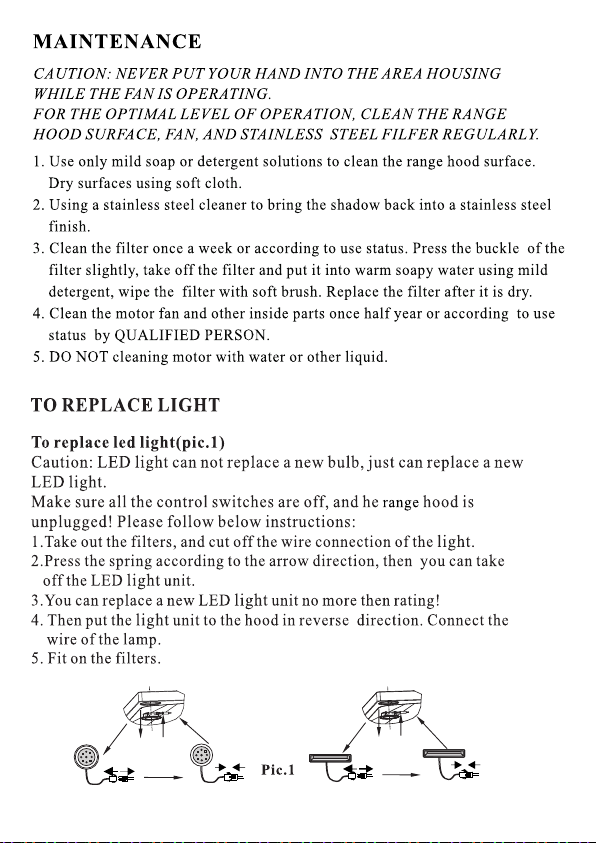
Led light
does not work Replace a new LED light assembly.
This manual suits for next models
3
Table of contents
Other Trifecte Ventilation Hood manuals


Popular Ventilation Hood manuals by other brands


Belion
Belion LWG16095R1 instruction manual

Franke
Franke FCO 304 XS Installation instructions use and care guide

Hoover
Hoover HHV67SLX Service manual

Wolf
Wolf PW362418 Planning information

Signature Hardware
Signature Hardware 198 Series Installation guide and user's manual

Siemens
Siemens LC56KA670 instruction manual

Thermador
Thermador CVS2 Series installation manual

Broan
Broan Best K210A Series installation instructions

Bosch
Bosch DHU SERIES operating instructions

Broan
Broan BCDJ1 Installation use and care manual

Miele
Miele DA 399 Operating and installation instructions

KitchenAid
KitchenAid 36" Installation Instructions and Use & Care Guide