TrimmerPlus PS720r User manual

P/N 769-03340A (09/07)
For service call 1-800-345-8746, or 1-800-668-1238 in Canada to
obtain a list of authorized service dealers near you.
DO NOT RETURN THE UNIT TO THE RETAILER. PROOF OF
PURCHASE WILL BE REQUIRED FOR WARRANTY SERVICE.
THIS PRODUCT IS COVERED BY ONE OR MORE U.S. PATENTS.
OTHER PATENTS PENDING.
Service on this unit both within and after the warranty period should be
performed only by an authorized and approved service dealer.
Copy the serial number here:
Copy the model and parent part number here:
All information, illustrations, and specifications in this manual are based on
the latest product information available at the time of printing. We reserve
the right to make changes at any time without notice.
Copyright© 2007 MTD SOUTHWEST INC, All Rights Reserved.
TABLE OF CONTENTS
Service Information . . . . . . . . . . . . . . . . . . . . . . . . . . . . . . . . . . . .1
Rules for Safe Operation . . . . . . . . . . . . . . . . . . . . . . . . . . . . . . . .2
Know Your Unit . . . . . . . . . . . . . . . . . . . . . . . . . . . . . . . . . . . . . . .5
Assembly Instructions . . . . . . . . . . . . . . . . . . . . . . . . . . . . . . . . . .6
Operating Instructions . . . . . . . . . . . . . . . . . . . . . . . . . . . . . . . . . .7
Maintenance and Repair Instructions . . . . . . . . . . . . . . . . . . . . . .9
Replacing Saw Chain . . . . . . . . . . . . . . . . . . . . . . . . . . . . . . . . . . .9
Oiling the Chain . . . . . . . . . . . . . . . . . . . . . . . . . . . . . . . . . . . . . .10
Cleaning and Storage . . . . . . . . . . . . . . . . . . . . . . . . . . . . . . . . . .11
Specifications . . . . . . . . . . . . . . . . . . . . . . . . . . . . . . . . . . . . . . . .11
Warranty Information . . . . . . . . . . . . . . . . . . . . . . . . . . . . . . . . . .12
Parts List . . . . . . . . . . . . . . . . . . . . . . . . . . . . . . . . . . . . . . . . . .E15
SAVE THESE INSTRUCTIONS
S/N : ITEM :
MODEL :
Before beginning, locate the unit’s model plate. It lists the model and
serial numbers of your unit. Refer to the sample plate below and
copy the information for future reference.
Pole Saw
OPERATOR'S MANUAL
PS720r
2
this unit. Wear a face or dust mask if the operation is dusty.
• Wear heavy, long pants, boots, gloves and a long sleeve shirt. Do
not wear loose clothing, jewelry, short pants, sandals or go
barefoot. Secure hair above shoulder level.
• Use the unit only in daylight or good artificial light.
• Use the right tool. Only use this tool for the purpose intended.
• Always stop the engine/motor when operation is delayed or when
walking from one location to another.
• Use only genuine factory replacement parts and accessories for
this unit. These are available from your authorized service dealer.
Use of any unauthorized parts or accessories could lead to serious
injury to the user or damage to the unit, and void your warranty.
KICKBACK SAFETY PRECAUTIONS
• With a basic understanding of kickback, you can reduce or eliminate
the element of surprise. Sudden surprise contributes to accidents.
• Grip saw firmly. Hold the pole saw firmly with both hands when the
motor is running. Keep a good firm grip on the saw with both hands,
the right hand on the rear handle, and the left hand on the front handle.
• Do not let the nose of the guide bar contact a log, branch, ground
or other obstruction.
• Always cut with the engine running at full speed. Fully squeeze
the throttle trigger and maintain a steady cutting speed.
• Do not over reach.
• Follow the manufacturer’s sharpening and maintenance instructions
for the saw chain.
• Use only replacement bars and chains specified by the manufacturer
or the equivalent.
OTHER SAFETY PRECAUTIONS
• DO NOT operate a pole saw with one hand! Serious injury to the
operator, helpers, or bystanders may result from one-handed
operation. A pole saw is intended for two-handed use.
• Do not operate a pole saw if you are fatigued.
READ ALL INSTRUCTIONS
BEFORE OPERATING
• Carefully read and understand the operator's manual of the unit
that powers this attachment.
• Read this operating instruction manual carefully. Be thoroughly
familiar with the controls and the proper use of the equipment.
Know how to stop the unit and disengage the controls quickly.
• Do not operate this unit when tired, ill, or under the influence of
alcohol, drugs, or medication.
• Never allow children to operate the equipment. Never allow
adults unfamiliar with the instructions to use the unit. Never allow
adults to operate the equipment without proper instruction.
• All guards and safety attachments must be installed properly
before operating the unit.
SPECIAL SAFETY WARNINGS FOR GAS POWERHEADS
• Store fuel only in containers specifically designed and approved
for the storage of such materials.
• Always stop the engine and allow it to cool before filling the fuel tank.
Never remove the cap of the fuel tank, or add fuel, when the engine
is hot. Never operate the unit without the fuel cap securely in place.
Loosen the fuel tank cap slowly to relieve any pressure in the tank.
• Mix and add fuel in a clean, well-ventilated area outdoors where
there are no sparks or flames. Slowly remove the fuel cap only
after stopping engine. Do not smoke while fueling or mixing fuel.
Wipe up any spilled fuel from the unit immediately.
• Avoid creating a source of ignition for spilled fuel. Do not start
the engine until fuel vapors dissipate.
• Move the unit at least 30 feet (9.1 m) from the fueling source and site
before starting the engine. Do not smoke. Keep sparks and open
flames away from the area while adding fuel or operating the unit.
• Never start or run the unit inside a closed room or building.
Breathing exhaust fumes can kill. Operate this unit only in a well
ventilated area outdoors.
POLE SAW OPERATING PROCEDURES
• Keep bystanders, especially children and pets, at least 50 ft (15
m) away.
• Wear safety glasses or goggles that are marked as meeting ANSI
Z87.1-1989 standards, and ear/hearing protection when operating
• IMPORTANT SAFETY INSTRUCTIONS •
Read the Operator’s Manual and follow all warnings and safety
instructions. Failure to do so can result in serious injury to the
operator and/or bystanders.
FOR QUESTIONS, CALL 1-800-345-8746 IN U.S. OR
1-800-668-1238 in CANADA
The purpose of safety symbols is to attract your attention to possible dangers. The safety symbols, and their explanations, deserve your
careful attention and understanding. The safety warnings do not by themselves eliminate any danger. The instructions or warnings they give
are not substitutes for proper accident prevention measures.
NOTE: Advises you of information or instructions vital to the
operation or maintenance of the equipment.
SYMBOL MEANING
SAFETY ALERT: Indicates danger, warning or
caution. Attention is required in order to avoid serious
personal injury. May be used in conjunction with other
symbols or pictographs.
DANGER: Failure to obey a safety warning will result
in serious injury to yourself or to others. Always follow
the safety precautions to reduce the risk of fire, electric
shock and personal injury.
WARNING: Failure to obey a safety warning can
result in injury to yourself and others. Always follow the
safety precautions to reduce the risk of fire, electric
shock and personal injury.
CAUTION: Failure to obey a safety warning may
result in property damage or personal injury to yourself
or to others. Always follow the safety precautions to
reduce the risk of fire, electric shock and personal injury.
RULES FOR SAFE OPERATION
SYMBOL MEANING
WARNING: When using the unit, you must follow the
safety rules. Please read these instructions before operating
the unit in order to ensure the safety of the operator and any
bystanders. Please keep these instructions for later use.
WARNING: Gasoline is highly flammable, and its
vapors can explode if ignited. Take the following
precautions:
WARNING: Kickback may occur when the nose or
tip of the guide bar touches an object, or when the
wood closes in and pinches the saw chain in the cut.
Tip contact in some cases may cause a lightning-fast
reverse action, kicking the guide bar rapidly back
towards the operator. Pinching the saw chain along the
top of the guide bar may push the guide bar rapidly
back towards the operator. Either of these reactions
may cause you to lose control of the saw, which could
result in serious injury to the user.
Do not rely exclusively upon the safety devices built
into your saw. As a pole saw user, you should take
several steps to keep your cutting jobs free from
accident or injury.

3
RULES FOR SAFE OPERATION
• Do not wear loose clothing or jewelry, as they can get caught in
moving parts. Non-skid footwear is recommended when working
outdoors. Wear protective hair covering to contain long hair.
• Use safety glasses, safety footwear, snug fitting clothing,
protective gloves, and protective hearing and head gear.
• Use caution when handling fuel. Move the pole saw at lest 30
feet (9.1 m) from the fueling point before starting the engine.
• Keep the work area clean. Cluttered areas invite injuries. Do not
start cutting until you have a clear work area, secure footing, and
a planned retreat path from the falling branches.
• Stay Alert. Watch what you are doing. Use common sense. Do
not operate the pole saw when you are tired. Keep all parts of
your body away from the saw chain when the motor is operating.
Before you start the saw, make sure the saw chain is not
contacting anything.
• Disconnect the pole saw when not in use, before servicing, and
when changing accessories and attachments such as saw chain
and guard.
• Check damaged parts. Before further use of the pole saw, a
guard or other part that is damaged should be carefully checked
to determine that it will operate properly and perform its intended
function. Check for alignment of moving parts, binding of moving
parts, breakage of parts, mounting, and any other conditions that
may affect its operation. A guard or other part that is damaged
should be properly repaired or replaced by an authorized service
center, unless otherwise indicated in this instruction manual.
• Use extreme caution when cutting small sized brush and sapling,
as slender material may catch the saw chain and be whipped
toward you or pull you off balance.
• Do not operate a pole saw in a tree unless you are specifically
trained to do so. When cutting a limb that is under tension, be
alert for spring back so that you will not be struck when the
tension in the wood fibers is released.
• Do not expose the pole saw to rain. Do not use the pole saw in
damp or wet locations.
• Do not use the pole saw in the presence of flammable liquids or
gases.
• All pole saw service, other than the items listed in the user
manual safety and maintenance instructions, should be
performed by competent pole saw personnel. Do not attempt to
repair it yourself; there are no user serviceable parts inside.
• The pole saw will do a better and safer job when used at the rate
for which it was intended.
• Use the right tool. Cut wood only. Do not use the pole saw for
purposes for which it was not intended. For example, do not use
the pole saw for cutting plastic, masonry, or non-building materials.
• Use devices, such as low-kickback chain, guide bar nose
guards, chain brakes and special guide bars, which reduce the
risks associated with kickback.
• There are no other replacement components for achieving
kickback protection in accordance with CSA Z62.3.
• Do not operate a pole saw that is damaged, improperly adjusted,
or not completely and securely assembled. Be sure that the saw
chain stops moving when the trigger is released.
• Do not attempt operations beyond your capacity or experience.
• Never remove, modify or make inoperative any safety device
furnished with your unit.
• This saw is classified by CSA as a Class 2C saw. It is intended for
infrequent use by homeowner’s, cottagers and campers, and for
such general applications such as clearing, pruning, cutting
firewood, etc. It is not intended for prolonged use. If the intended
use involves prolonged periods of operation, this may cause
circulatory problems in the user’s hands due to vibration. It may
be appropriate to use a saw having an anti-vibration feature.
• Safety clothing required by your safety organizations, government
regulations, or your employer should be used; otherwise, snug
fitting clothing, safety footwear, and hand and ear protection
should be worn.
• Low-kickback saw chain is chain that has met the kickback
performance requirements of ANSI B175.1-1991 and is in
accordance with CSA Z62.3. Do not use other replacement chain
unless it has met these requirements for your specific model.
• Do not use any other cutting attachment or accessories. Use only
original equipment manufacturer replacement parts and accessories,
which are designed specifically to enhance the performance and
maximize the safe operation of our products. Failure to do so may
cause poor performance and possible injury. Use only the chain and
bar supplied with this product. Do not use any other cutting
attachment. Use of such attachments will void your factory warranty
and could result in serious bodily injury.
• Never touch the chain or attempt to service the saw while the
engine is running. Make sure all moving parts have stopped.
Allow the chain to cool, as the chain can be hot.
• Check the bar and chain at frequent intervals for proper
adjustment. Make sure the bar and chain are properly tightened
and sharpened. Visually inspect for damage. Repair any damage
before restarting or operating the pole saw.
• Do not cut near electrical cables or power lines.
• Do not use the pole saw to fell a tree. Use a standard chain saw
for this application.
MAINTENANCE AND STORAGE
• Allow the unit to cool before storing or transporting. Be sure to
secure the unit while transporting.
• Always use the transport guard on the bar and chain during
transportation and storage.
• Store the unit in a locked up and dry or high and dry place to
prevent unauthorized use or damage, out of the reach of
children.
• Never douse or squirt the unit with water or any other liquid. Keep
handles dry, clean and free from debris. Clean after each use.
• Keep these instructions. Refer to them often and use them to
instruct other users. If you loan someone this unit, also loan
them these instructions.
• Only qualified personnel should perform any repairs or
maintenance procedures that are not described in this manual.
SAVE THESE INSTRUCTIONS

4
SAFETY AND INTERNATIONAL SYMBOLS
This operator's manual describes safety and international symbols and pictographs that may appear on this product.
Read the operator's manual for complete safety, assembly, operating, maintenance, and repair information.
RULES FOR SAFE OPERATION
•WARNING: READ OPERATOR'S MANUAL
R
ead the operator’s manual(s) and follow all warnings
and safety instructions. Failure to do so can result in
serious injury to the operator and/or bystanders.
•GUIDE BAR WARNING
Contact of the guide bar tip with any object should be
avoided. Tip contact may cause the guide bar to move
suddenly upward and backward, which may cause
serious injury.
SYMBOL MEANING
•WEAR EYE AND HEARING PROTECTION
WARNING: Thrown objects and loud noise can
cause severe eye injury and hearing loss. Wear eye
protection meeting ANSI Z87.1 standards and ear
protection when operating this unit. Use a full face
shield when needed.
• HOT SURFACE WARNING
Do not touch a hot surface. You may get burned.
These parts get extremely hot from operation. They
remain hot for a short time after the unit is turned off.
•KEEP BYSTANDERS AWAY
WARNING: Keep all bystanders, especially
children and pets, at least 50 feet (15 m) from the
operating area.
•POWER LINES CAN CAUSE SEVERE
INJURY
WARNING: Do not operate unit near power lines.
Contact with a power line may cause serious injury
or damage to the unit. Maintain a clearance of at
least 50 ft (15 m) between the pole saw (including
any branches it is contacting) and any electrical line.
•USE BOTH HANDS
Always use both hands while operating the chain
saw. Never use only one hand to operate the saw.
•SAFETY ALERT SYMBOL
Indicates danger, warning or caution. May be used in
conjunction with other symbols or pictographs.
SYMBOL MEANING
•CHAIN OIL ADJUSTMENT INDICATOR
The chain must be continously coated with oil to
function properly. Make sure to set the Oil
Adjustment Screw to allow a sufficient amount of oil
to flow continuously onto the chain.
Use a 3/32-inch Allen wrench to adjust the Oil
Adjustment Screw.

5
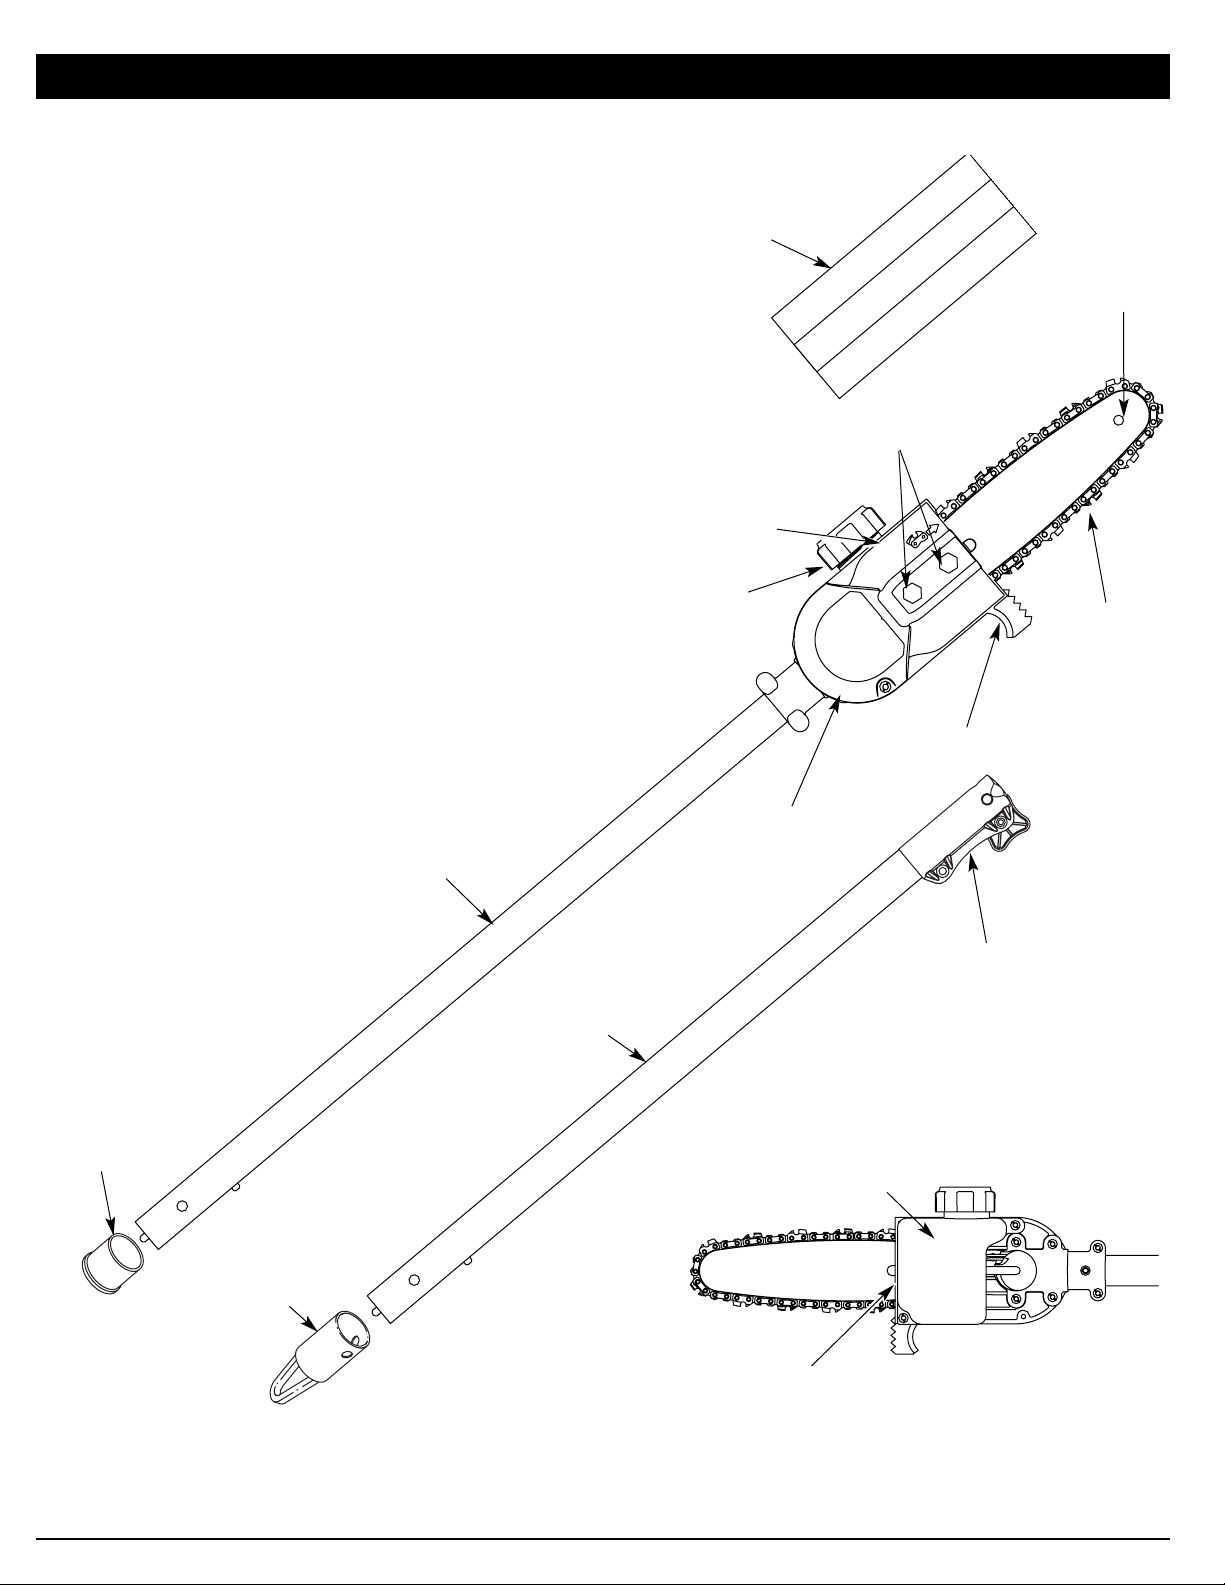
Guide Bar
Saw Chain
Drive Shaft
Guide Bar
Nose
Chain
Guard
Hook
Bar Retaining Nuts
KNOW YOUR UNIT
Extension
Boom
Tension
Adjustment Screw
Oil Adjustment Screw
Oil Reservoir
Chain Transport
Guard
Hanger
Coupler
Oil Tank Cap
Shipping
Cap
6
The add-on should be installed with the release button in the
primary hole.
Check Flex Shaft Engagement Prior to Using
1. Start the unit.
2. Briefly engage and release the trigger.
3. Check that add-on is operating.
4. If the add-on is not operating, remove add-on and repeat steps
for installing the add-on.
5. Recheck operation of add-on attachment.
4. Turn the knob clockwise to tighten (Fig. 3).
ASSEMBLING THE COUPLER
The Trimmer Plus add-on may be mounted to different power tools.
The instruction manuals for the basic power tool and the
attachment contain the information necessary for operation of the
power tool combination. Therefore, aways read BOTH instruction
manuals before using the power tool for the first time. Keep the
manuals in a safe place for future reference.
NOTE: To make installing or removing the add-on easier, place the
unit on the ground or on a work bench.
Removing the Add-On or Extension Boom
1. Turn the knob counterclockwise to loosen (Fig. 1).
Fig. 1
Coupler Release Button Guide Recess
Knob
Primary Hole
Upper Shaft
Housing
Coupler
2. Press and hold the release button (Fig. 1).
3. While firmly holding the upper shaft housing, pull the add-on or
extension boom out of the coupler (Fig. 2).
Fig. 2
Fig. 3
Knob
Lower Shaft
Housing
Release Button
Knob
Clockwise
Counterclockwise
ASSEMBLY INSTRUCTIONS
WARNING: Prior to operation, read and understand
the operator’s manual for unit to be used with this add-
on.
WARNING: To avoid serious personal injury and
damage to the unit, shut the unit off before removing or
installing add-ons.
CAUTION: The add-ons with the coupler system is
to be used in the primary hole only. Using the wrong
hole could lead to personal injury or damage to the unit.
CAUTION: Lock the release button in the primary
hole (Fig. 2) and securely tighten the knob before
operating this unit.
WARNING: To avoid serious personal injury and
damage to the unit, NEVER install more than one
extension boom to a power tool.
Installing the Add-On or Extension Boom
1. Remove the hanger or shipping cap from the top of the shaft
housing.
2. Turn knob counterclockwise to loosen (Fig. 1).
3. While firmly holding the add-on or extension boom, push it
straight into the coupler (Fig. 2).
NOTE: Aligning the release button with the guide recess will help
installation (Fig. 1).
FILLING THE OIL RESERVOIR
Follow the following steps to fill the oil reservoir:
1. Place the unit on a flat surface.
2. Remove the Oil Tank Cap.
3. Open the oil bottle provided with your unit.
4. Pour oil into the reservoir until filled (7 oz.).
NOTE: The oil reservoir may be filled to the lip of the fill opening without
damaging the unit.
DANGER: Failure to fill the oil reservoir will cause
irreparable damage to the unit. Make sure the oil
reservoir is always filled.
WARNING: Oil constantly flows from the oil
reservoir to oil the chain. Check the oil level constantly
so that the oil level does not drop below half full.
5. Repeat steps 1–4 for the add-on or extension boom.

7
Fig. 4
Fig. 5
Fig. 6
OPERATING PRECAUTIONS
1. Keep bystanders 50 feet (15 meters) away when operating the
saw.
2. Do not use the pole saw to cut down trees. Use a chain saw
without a pole attachment.
3. Make sure the oil tank is full and oil is lubricating the chain
prior to starting.
4. Grip pole saw securely—one hand on the grip, the other on
the handle.
5. Keep finger off the trigger until ready to make cut.
6. Before starting the pole saw, make sure the chain is not
touching anything.
7. Keep all parts of your body away from the chain when the saw
is running.
8. Do not force the chain saw while cutting. Apply light pressure.
It will do the job better and safer at the rate for which it was
intended.
9. When cutting limbs or branches that are under tension, use
extreme caution. Be alert for wood springing back. When
wood tension is released, the limb could spring back and
strike operator causing severe injury or death.
10. When carrying pole saw from one place to another:
• hold pole at balance point
• keep guide bar and chain to the rear
11. Do not cut small brush and saplings with the pole saw.
Slender matter may catch in the chain and be whipped toward
you. This could also pull you off balance.
12. Never stand directly under the limb you are trimming. Always
position yourself out of the path of falling debris (Fig. 4).
13. Never stand on a ladder or other type of unstable support
while using the pole saw.
14. Always use both hands to operate pole saw. Keep a firm,
steady pressure on the pole saw while cutting, but do not try
to force the saw through the wood.
15. Do not use the pole saw to cut limbs larger than 4” (10 cm)
in diameter.
16. Keep other persons away from cutting end of pole saw and at
a safe distance from work area. (Fig. 5).
17. Do not use the pole saw near cable, electric power or
telephone lines. Maintain a minimum clearance of 50 feet (15
m) from all power lines (Fig. 6).
STARTING INSTRUCTIONS
Start and operate your pole saw without assistance. For specific
starting instructions, see the appropriate section of your powerhead
manual. Proper starting methods reduce the risk of injury.
1. Place the pole saw on firm ground or other solid surface in an
open area.
2. Maintain good balance and secure footing.
OPERATING INSTRUCTIONS
WARNING: Dress properly to reduce the risk of
injury when operating this unit. Do not wear loose
clothing or jewelry. Wear eye and ear/hearing protection.
Wear heavy long pants, boots and gloves. Wear a hard
hat. Use a full face shield when needed.
WARNING: To reduce the risk of fire and burn
injuries, start the engine at least 30 ft. (9.1 m) from the
fueling spot, outdoors only.

8
OPERATING TIPS
• Avoid kickback. Kickback can result in severe injury or death.
• Do not operate the pole saw while in a tree, on a ladder or any
other unstable work surface, or in any awkward position. You
may lose control of the pole saw causing severe injury.
• Do not extend your arms above shoulders when using the pole
saw.
• Seek professional help if you are facing conditions beyond your
ability.
• Trimming a tree is the process of cutting limbs from a living tree.
Make sure your footing is firm. Keep your feet apart. Divide your
weight evenly on both feet.
• Before starting unit, always check the chain lubrication and oil
tank level.
NOTE: The chain must be continously coated with oil to function
properly. Make sure that the oil adjustment screw is set
appropriately.
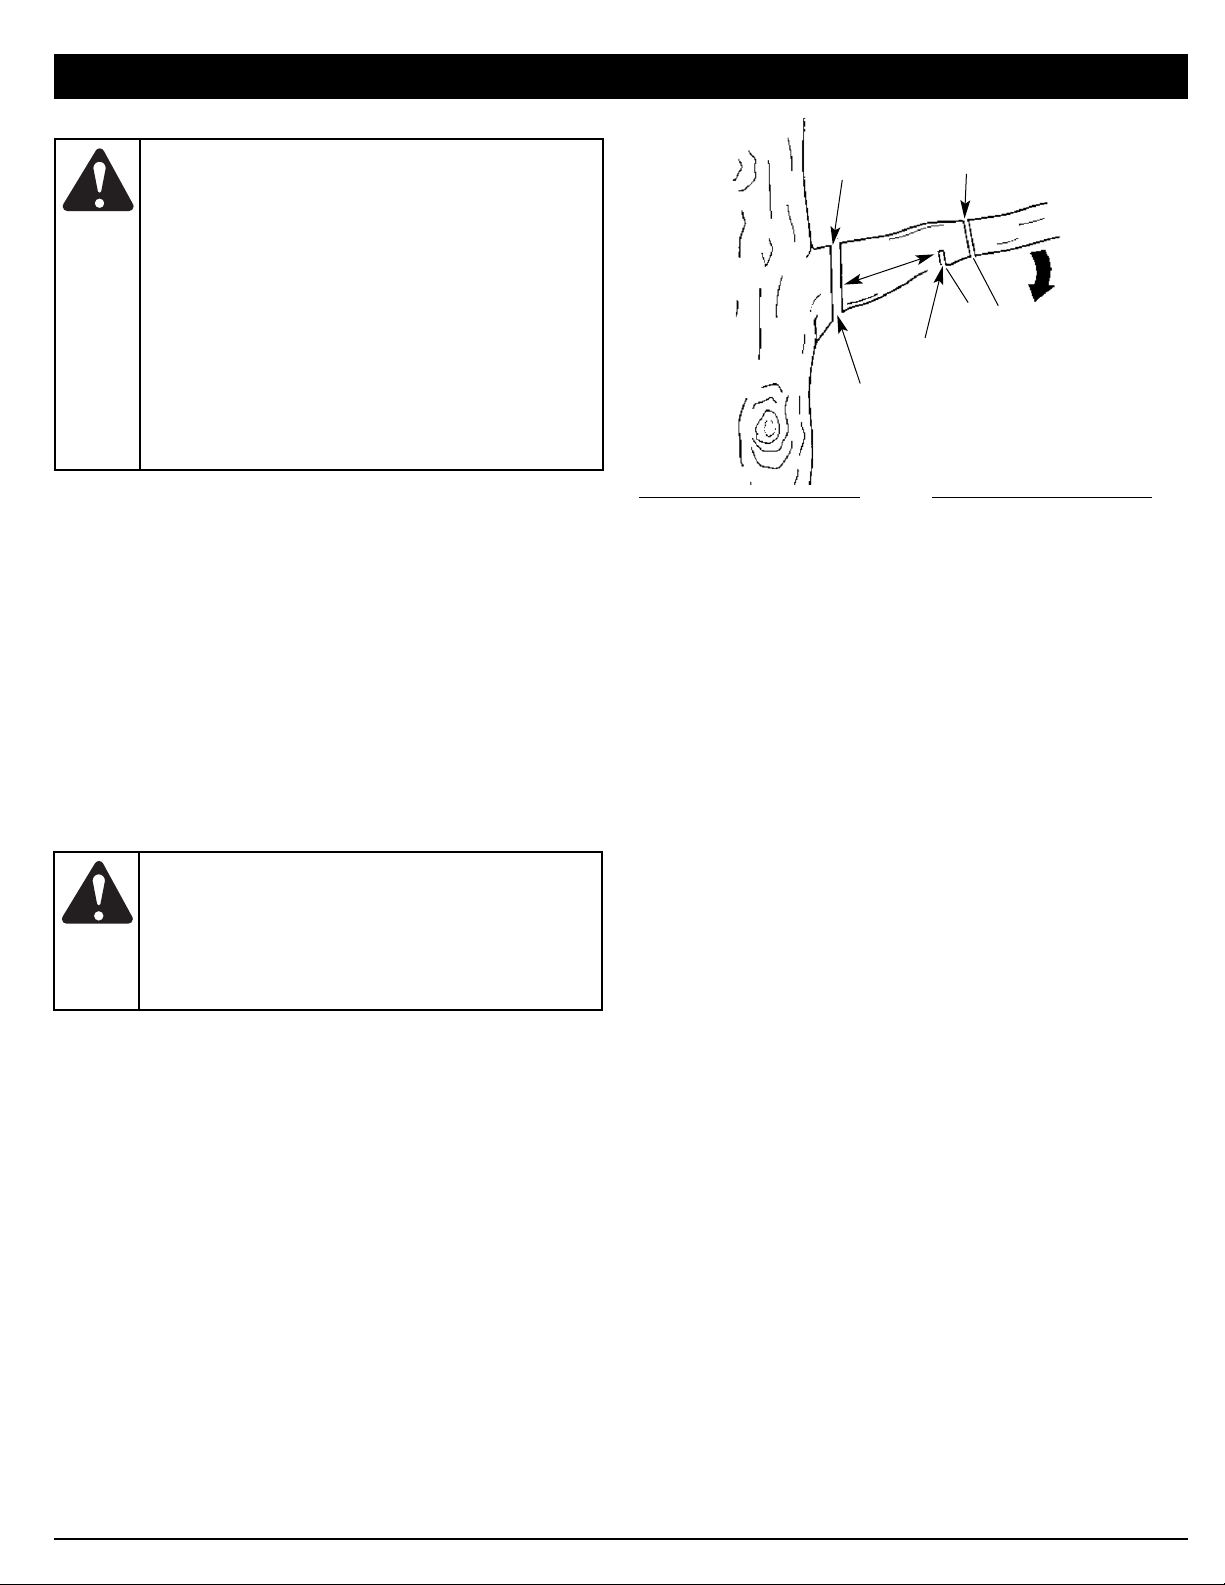
Fig. 7
Cut 2
Cut 4
Cut 3
Cut 1
6”
2 - 4”
To trim a limb (pruning):
1. Make the first cut six inches from tree trunk on the underside
of the limb. Use the top of the guide bar to make this cut. Cut
a third of the way through the diameter of the limb (Fig. 7).
2. Move two to four inches farther out on the limb. Make the
second cut from above the limb. Continue the cut until you cut
the limb off.
3. Make the third cut as close to the tree trunk as possible on
underside of limb stub. Use the top of the guide bar to make
this cut. Cut a third through the diameter of stub.
4. Make the fourth cut directly above the third cut. Cut down to
meet the third cut. This will remove the limb stub.
OPERATING INSTRUCTIONS
WARNING: Kickback may occur when the nose or
tip of the guide bar touches an object, or when the
wood closes in and pinches the saw chain in the cut.
Tip contact in some cases may cause a lightning-fast
reverse action, kicking the guide bar rapidly back
towards the operator. Pinching the saw chain along the
top of the guide bar may push the guide bar rapidly
back towards the operator. Either of these reactions
may cause you to lose control of the saw, which could
result in serious injury to the user.
Do not rely exclusively upon the safety devices built
into your saw. As a chain saw user, you should take
several steps to keep your cutting jobs free from
accident or injury.
WARNING: If the oil tank runs out, the oil ajustment
screw hole becomes clogged, or the chain fails to get
proper lubrication in any fashion, the chain will overheat
and cause irreversible damage to the unit and may
result in severe injury. Excessive heat from friction can
lead the chain to catastrophically fail and come off the
bar while operating.
9
SAW CHAIN REPLACEMENT/INSTALLATION
1. Using a straight screwdriver turn tension adjustment screw
counterclockwise (Fig. 8, A) 4 turns.
2. Remove the bar retaining nuts and screw. Then take off the
chain guard (Fig. 8, B).
Fig. 8
B
A
Bar Retaining Nuts
Chain
Guard
Screw
Tension
Adjustment
Screw
Fig. 9
3. Take off the chain and bar.
4. Prepare new chain and/or bar, and fit the chain into the groove
in the bar.
5. Loop the saw chain over the drive sprocket with the cutting
edges of the chain pointing in the direction of rotation (Fig. 9).
Fig. 10
Fig. 11
SAW CHAIN TENSION ADJUSTMENT
Proper tension of the saw chain is extremely important and must
be checked before starting, as well as during, any cutting
operation. Taking the time to make needed adjustments to the saw
chain will result in improved cutting performance and prolonged
chain life.
NOTE: A new chain and bar will need readjustment after as few
as 5 cuts. This is normal during the break-in period, and
the interval between future adjustments will lengthen
quickly (Fig. 11).
AC
B
To adjust the saw chain tension:
1. Loosen the bar retaining nuts so they are hand tight (Fig. 8, B).
2. Holding the nose of the bar up, use the screwdriver to turn the
guide bar adjustment screw clockwise to tighten the chain
(Fig. 8, A). Turning the screw counterclockwise loosens the
chain on the guide bar.
3. While wearing heavy duty work gloves (after you’ve made the
adjustment), move the saw chain back and forth on the guide
bar to be sure the chain moves freely and is in proper mesh
with the sprocket. Never move the chain with your bare hands.
NOTE: If the chain is difficult to rotate or if it binds on the guide
bar, there is too much tension applied and it must be
adjusted. To decrease tension, turn the adjustment screw
counterclockwise, slowly. Move the chain back and forth
until it moves freely.
4. Holding the nose in upper position, securely tighten the bar
retaining nuts.
MAINTENANCE AND REPAIR INSTRUCTIONS
WARNING: Whenever handling the saw chain,
always wear work gloves for protection against sharp
cutting edges.
CAUTION: If a chain is too loose or too tight, the
bar chain and saw bearings will wear more rapidly.
Refer to Figure 11 for information concerning correct
cold tension (A), correct warm tension (B), and a chain
in need of adjustment (C).
6. Adjust the tension adjustment screw (Fig. 8, A) to allow
insertion of the bar (Fig. 10). Make sure the chain follows the
slot in the guide bar and adjust the tension adjustment screw
to make the chain fit snugly on the underside of the bar.
7. Install the chain guard and tighten bar retaining nuts and
screw (Fig. 8, B).

10
OILING THE CHAIN
The pole saw chain is self-lubricating. Oil is dispersed onto the
chain as the unit is used. Keep an adequate amount of oil in the
oil tank. Use the bar-chain oil provided in the hardware pack.
Always use bar-chain and sprocket oil or similar chain saw oil.
Setting the Oil Adjustment Screw
The Oil Adjustment Screw is located on top of the gearbox
assembly (Fig. 12).
1. Insert a 3/32-inch Allen wrench into the oil adjustment screw.
2. Turn the screw counterclockwise to increase oil flow to the chain, or
3. Turn the screw clockwise to restrict the oil flow to the chain.
GUIDE BAR MAINTENANCE
NOTE: Proper maintenance of the guide bar is essential to the
performance of your pole saw. Proper guide bar
maintenance will keep your saw in good working order.
Most guide bar problems can be prevented merely by keeping the
chain saw well maintained.
Incorrect filing and non-uniform cutter and depth gauge settings
cause most guide bar problems, primarily resulting in uneven bar
wear. As the bar wears unevenly, the rails widen, which may cause
chain clatter and difficulty in making straight cuts.
Insufficient guide bar lubrication and operating the saw with a
chain that is too tight will contribute to rapid bar wear. Refer to
Saw Chain Tension Adjustment and Oiling the Chain.
To help minimize bar wear, the following guide bar maintenance is
recommended:
Bar Wear
Turn guide bar frequently at regular intervals (for example, after 5
hours of use), to ensure even wear on top and bottom of bar.
Bar Grooves
Bar grooves (or rails which support and carry the chain) should be
cleaned if the saw has been heavily used or if the saw chain
appears dirty. Rails should always be cleaned every time the saw
chain is removed.
To clean guide bar rails:
1. Remove chain guard, bar, and chain. Refer to Saw Chain
Replacement / Installation.
2. Using a screwdriver, putty knife, wire brush or other similar
instrument, clear residue from the rails on the guide bar (Fig. 13).
This will keep the oil passages open to provide proper
lubrication to the bar and chain.
3. Ensure the sprocket in the bar turns freely during cleaning.
4. Reinstall the bar, chain, chainguard, screw, and bar retaining
nuts. Refer to Saw Chain Replacement / Installation.
Oil Passages
Oil passages at the bar pad should be cleaned to ensure proper
lubrication of the bar and chain during operation. This can be done
using a soft wire small enough to insert into the oil discharge hole.
MAINTENANCE AND REPAIR INSTRUCTIONS
WARNING: Ensure that the unit is off and the spark
plug is disconnected (gas powerheads) before
performing any maintenance on your saw.
Fig. 12
Oil
Adjustment
Screw
Gearbox Assembly
Fig. 13
WARNING: If the oil tank runs out, the oil ajustment
screw hole becomes clogged, or the chain fails to get
proper lubrication in any fashion, the chain will overheat
and cause irreversible damage to the unit and may
result in severe injury. Excessive heat from friction can
lead the chain to catastrophically fail and come off the
bar while operating.
11
CHAIN MAINTENANCE
A low-kickback saw chain should always be used in conjunction
with other kickback protection devices such as the hand guard,
which is furnished with your unit.
Always use a replacement saw chain designed as “low-kickback”
or a saw chain which meets the low-kickback performance.
A standard saw chain (a chain which does not have the kickback
reducing guard links) should only be used by an experienced
professional chain saw operator.
Low-Kickback Saw Chain
A low-kickback saw chain is a chain which has met the kickback
performance requirements of ANSI B175.1. Do not use other
replacement chain unless it has met these requirements for your
specific model.
By keeping the saw chain in good working condition and correctly
serviced as recommended in this manual, you will be able to
maintain the safety system of your polesaw over the life of the
product.
Chain Tension
Check the chain tension frequently and adjust as often as
necessary to keep the chain snug on the bar, but loose enough to
be pulled around by hand. Refer to Saw Chain Tension Adjustment.
Breaking in a New Saw Chain
A new chain and bar will need readjustment after as few as 5 cuts.
This is normal during the break-in period, and the interval between
future adjustments will begin to lengthen quickly.
Over a period of time, however, the moving parts of the saw chain
will become worn, resulting in what is called chain stretch. This is
normal. When it is no longer possible to obtain correct chain
tension adjustment, a link will have to be removed to shorten the
chain. See your MTD Authorized Service Center to have this repair
performed.
CLEANING AND STORAGE
• Slacken the chain if you have retensioned it at operating
temperature during cutting work.
• The chain contracts as it cools down. If it is not slackened, it
may damage the gearbox and bearings.
Storing the Machine for a Short Period
Wait for the engine to cool down. Drain the fuel tank and store the
machine in a dry place well away from sources of ignition until you
need it again.
• Attach the transport guard to the bar/chain before storing the
unit.
• Store the unit in a dry, high and/or locked location, out of the
reach of children and other unauthorized persons.
Long-Term Storage
• Remove the saw chain and guide bar, clean them, and spray
them with corrosion inhibiting oil.
• Attach the transport guard to the bar/chain before storing.
POLE SAW ADD-ON
Approximate Operating Weight of Attachment . . . . . . . . . . . . . . . . . . . . . . . . . . . . . . . . . . . . . . . . . . . . . . . . . . . . . . . . . . . . . . . 3.3 lbs. (1.5 kg)
Drive Shaft Length . . . . . . . . . . . . . . . . . . . . . . . . . . . . . . . . . . . . . . . . . . . . . . . . . . . . . . . . . . . . . . . . . . . . . . . . . . . . . . . . . . . 26 inches (66 cm)
Cutting Width . . . . . . . . . . . . . . . . . . . . . . . . . . . . . . . . . . . . . . . . . . . . . . . . . . . . . . . . . . . . . . . . . . . . . . . . . . . . . . . . . . . . 10 inches (254 mm)
MAINTENANCE AND REPAIR INSTRUCTIONS
SPECIFICATIONS
WARNING: Unless you have experience and
specialized training for dealing with kickback (see
Important Safety Instructions), always use a low-
kickback saw chain, which significantly reduces the
danger of kickback. Low-kickback saw chain does not
completely eliminate kickback. A low-kickback or
“safety chain,” should never be regarded as total
protection against injury.
WARNING: Never remove, modify or make
inoperative any safety device furnished with your unit.
The hand guard and low-kickback saw chain are major
safety features provided for your protection.
WARNING: Never use a loop of chain that has more
than 3 links removed from it. This could damage the
sprocket.
WARNING: Ensure that the unit is off and the spark
plug is disconnected (for gas powerheads) when
working on the saw chain. Wear heavy duty gloves too.

MANUFACTURER’S LIMITED WARRANTY FOR:
No implied warranty, including any implied warranty of
merchantability or fitness for a particular purpose, applies after
the applicable period of express written warranty above as to
the parts as identified. No other express warranty or guaranty,
whether written or oral, except as mentioned above, given by
any person or entity, including a dealer or retailer, with respect
to any product shall bind MTD. During the period of the
Warranty, the exclusive remedy is repair or replacement of the
product as set forth above. (Some states do not allow limitations
on how long an implied warranty lasts, so the above limitation may
not apply to you.)
The provisions as set forth in this Warranty provide the sole and
exclusive remedy arising from the sales. MTD shall not be liable
for incidental or consequential loss or damages including,
without limitation, expenses incurred for substitute or
replacement lawn care services, for transportation or for
related expenses, or for rental expenses to temporarily replace
a warranted product. (Some states do not allow limitations on how
long an implied warranty lasts, so the above limitation may not
apply to you.)
In no event shall recovery of any kind be greater than the amount of
the purchase price of the product sold. Alteration of the safety
features of the product shall void this Warranty. You assume the risk
and liability for loss, damage, or injury to you and your property
and/or to others and their property arising out of the use or misuse or
inability to use the product.
This limited warranty shall not extend to anyone other than the
original purchaser, original lessee or the person for whom it was
purchased as a gift.
How State Law Relates to this Warranty: This warranty gives you
specific legal rights, and you may also have other rights which vary
from state to state.
To locate your nearest service dealer dial 1-800-345-8746 in the
United States or 1-800-668-1238 in Canada.
MTD LLC
P. O. Box 361131
Cleveland, OH 44136-0019
The limited warranty set forth below is given by MTD
LLC (“MTD”) with respect with new merchandise purchased and used
in the United States, its possessions and territories.
MTD warrants this product against defects in material and
workmanship for a period of two (2) years commencing on the date of
original purchase and will, at its option, repair or replace, free of
charge, any part found to be defective in material or workmanship.
This limited warranty shall only apply if this product has been operated
and maintained in accordance with the Operator’s Manual furnished
with the product, and has not been subject to misuse, abuse,
commercial use, neglect, accident, improper maintenance, alteration,
vandalism, theft, fire, water, or damage because of other peril or
natural disaster. Damage resulting from the installation or use of any
accessory or attachment not approved by MTD for use with the
product(s) covered by this manual will void your warranty as to any
resulting damage.
This warranty is limited to ninety (90) days from the date of original
retail purchase for any MTD product that is used for rental or
commercial purposes, or any other income-producing purpose.
HOW TO OBTAIN SERVICE: Warranty service is available, WITH
PROOF OF PURCHASE THROUGH YOUR LOCAL AUTHORIZED
SERVICE DEALER. To locate the dealer in your area, please check for
a listing in the Yellow Pages or contact the Customer Service
Department of MTD by calling 1-800-345-8746 or writing to P. O. Box
361131, Cleveland, OH 44136-0019 or if in Canada call 1-800-668-
1238. No product returned directly to the factory will be accepted
unless prior written permission has been extended by the Customer
Service Department of MTD.
This limited warranty does not provide coverage in the
following cases:
A. Wear items - Bump Knobs, Outer Spools, Cutting Line, Inner
Reels, Starter Pulley, Starter Ropes, Drive Belts
B. MTD does not extend any warranty for products sold or
exported outside of the United States of America, its
possessions and territories, except those sold through MTD’s
authorized channels of export distribution
MTD reserves the right to change or improve the design of any
TrimmerPlus® Product without assuming any obligation to modify
any product previously manufactured.

P/N 769-03340A (09/07)
Copiez le numéro de série ici :
Copiez le numéro de modèle / pièce mère ici :
TABLE DES MATIÈRES
Service technique . . . . . . . . . . . . . . . . . . . . . . . . . . . . . . . . . . . . .F1
Consignes de sécurité . . . . . . . . . . . . . . . . . . . . . . . . . . . . . . . . .F2
Familiarisez-vous avec votre appareil . . . . . . . . . . . . . . . . . . . . .F5
Instructions de montage . . . . . . . . . . . . . . . . . . . . . . . . . . . . . . .F6
Mode d’emploi . . . . . . . . . . . . . . . . . . . . . . . . . . . . . . . . . . . . . . .F7
Entretien et réparations . . . . . . . . . . . . . . . . . . . . . . . . . . . . . . . .F9
Chainion replacement . . . . . . . . . . . . . . . . . . . . . . . . . . . . . . . . .F9
Huiler la chaine . . . . . . . . . . . . . . . . . . . . . . . . . . . . . . . . . . . . . .F10
Nettoyage et entreposage . . . . . . . . . . . . . . . . . . . . . . . . . . . . .F11
Caractéristiques . . . . . . . . . . . . . . . . . . . . . . . . . . . . . . . . . . . . .F11
Garantie . . . . . . . . . . . . . . . . . . . . . . . . . . . . . . . . . . . . . . . . . . .F12
Liste des pièces . . . . . . . . . . . . . . . . . . . . . . . . . . . . . . . . . . . . .E15
S/N : ITEM :
MODEL :
Toutes les informations, illustrations et spécifications contenues dans
ce manuel tiennent compte des dernières informations techniques
disponibles au moment de mettre sous presse. Nous nous réservons
le droit d'y apporter des modifications à tout moment, sans préavis.
Copyright© 2007 MTD SOUTHWEST INC., Tous droits réservés.
Obtenez la liste des concessionnaires agréés appelez le 1-800-345-
8746 aux États-Unis ou le 1-800-668-1238 au Canada.
NE RETOURNEZ PAS L'APPAREIL AU DÉTAILLANT CHEZ QUI
VOUS L'AVEZ ACHETÉ. TOUT SERVICE SOUS GARANTIE
NÉCESSITE UNE PREUVE D'ACHAT.
CE PRODUIT EST COUVERT PAR UN OU PLUSIEURS BREVETS
AMÉRICAINS, ET D’AUTRES SONT EN INSTANCE.
Tout entretien effectué sur cet appareil pendant et après la période
de garantie doit être fait par un concess- ionnaire agréé uniquement.
Avant d'assembler votre nouvel équipement, repérez la plaque
signalétique de l'appareil et copiez ses informations dans l'espace ci-
dessous. Ces informations sont essentielles si vous désirez obtenir de
l'aide auprès de notre service technique ou d'un distributeur agréé. Un
exemple de plaque signalétique est présenté ci-dessous.
CONSERVER CES INSTRUCTIONS
MANUEL DE L'UTILISATEUR
PS720r
Sie de Pole

F2
• IMPORTANTES CONSIGNES DE SÉCURITÉ •
PROCÉDURES D’OPÉRATION DE LA TRONÇONNEUSE
• Tenez les visiteurs, surtout les enfants et les animaux ft familiers
à une distance d'au moins 15 m (50 pi).
• Portez des lunettes de sécurité conformes aux normes ANSI
Z87.1 ainsi que des protège-oreilles durant l'utilisation de
l'appareil. Portez un masque facial ou antipoussières si vous
travaillez dans un lieu poussiéreux.
• Portez des pantalons épais et longs, des bottes, des gants et
une chemise à manches longues. Ne marchez pas pieds nus et
évitez les vêtements lâches, bijoux, pantalons courts et
sandales. Relevez les cheveux au-dessus des épaules.
• N'utilisez l'appareil qu'en plein jour ou avec un bon éclairage artificiel.
• Utilisez les outils appropriés. N'employez l’outil que pour son
usage prévu.
• Arrêtez toujours l’appareil si vous suspendez la coupe ou si vous
vous déplacez d'un lieu de travail vers un autre.
• N’utilisez que des pièces de rechange et accessoires d’usine pour cet
appareil. Ils sont disponibles auprès de votre concessionnaire agréé.
L’utilisation de toutes pièces ou de tous accessoires non-autorisés
peut entraîner des blessures graves ou des dommages à l’appareil et
l’annulation de votre garantie.
ATTENTION AUX REBONDS
• Comprendre ce qui cause les rebonds peut réduire ou éliminer
l’élément de surprise. L’effet de surprise contribue aux accidents.
• Agarre la sierra firmemente: Sostenga la sierra firmemente con
ambas manos cuando el motor esté en marcha. Mantengo un
buen agarre en la sierra con ambas manos, la mano derecha en
la manija posterior, y la mano izquierda en la manija frontal,
cuando el motor este en marcha. Utilice un agarre firme con los
dedos y el pulgar al rededor de las manijas de la sierra.
• No permita que la nariz de la barra guía tenga contacto con un
tronco, rama, el suelo u otra obstrucción.
LISEZ TOUTES LES INSTRUCTIONS AVANT L'UTILISATION
• Prenez soin de bien lire et comprendre le manuel de l'appareil qui
alimente cet accessoire.
• Veuillez lire le manuel de l'utilisateur attentivement. Familiarisez-vous avec
les commandes et l'utilisation correcte de l’appareil. Sachez comment
arrêter l’appareil et désactiver les commandes rapidement.
• N'utilisez pas l'appareil si vous êtes fatigué, malade ou sous
l'effet de l'alcool, de drogues ou de médicaments.
• Ne laissez pas les enfants faire fonctionner l’appareil. Ne laissez jamais
des adultes qui ne se sont pas familiarisés avec les instructions utiliser
l’appareil. Ne laissez jamais des adultes n'ayant jamais reçu les
instructions nécessaires faire fonctionner l’appareil.
• Tous les accessoires de sécurité et protections doivent être
correctement installés avant d'utiliser cet appareil.
AVERTISSEMENTS DE SÉCURITÉ SPÉCIAUX POUR TÊTES
D’ENTRAÎNEMENT À ESSENCE
• Ne stockez le carburant que dans des contenants conçus et
homologués pour stocker ces matières.
• Arrêtez toujours le moteur et laissez-le refroidir avant de remplir le
réservoir. N'enlevez jamais le bouchon du réservoir et n'ajoutez jamais
de carburant alors que le moteur est chaud. Ne faites jamais marcher
l'appareil sans que le bouchon soit bien mis. Desserrez celui-ci
lentement afin de réduire la pression du réservoir.
• Mélangez et ajoutez le carburant dans un endroit aéré et propre, en
plein air, à l'abri des étincelles ou des flammes. N'enlevez lentement le
bouchon du réservoir d'essence qu'après avoir arrêté le moteur. Ne
fumez pas pendant le remplissage ou le mélange de carburant.
Essuyez immédiatement tout déversement.
• Évitez de mettre le feu au carburant déversé. Ne démarrez pas le
moteur avant que les vapeurs de carburant ne se soient dissipées.
• Éloignez l'appareil d'au moins 9,1 m (30 pi) de la source et du site de
ravitaillement en carburant avant de démarrer le moteur. Ne fumez
pas et éloignez toute source d'étincelles ou de flammes vives du lieu
de ravitaillement ou de fonctionnement de l'appareil.
• Évitez de démarrer ou de faire marcher l'appareil à l'intérieur
d'une pièce ou d'un bâtiment fermé. La respiration de fumées
d'échappement peut tuer. Ne faites marcher l’appareil qu'à
l'extérieur, dans un lieu aéré.
Lisez le(s) manuel(s) de l'utilisateur et suivez tous les
avertissements et consignes de sécurité. Vous pourriez à défaut
entraîner des blessures graves pour vous ou d'autres personnes.
SI VOUS AVEZ DES QUESTIONS, APPELEZ LE
1-800-345-8746
AUX ÉTATS-UNIS, OU LE 1-800-668-1238 AU CANADA
Les symboles de sécurité attirent votre attention sur des dangers potentiels. Ces symboles et leurs détails explicatifs méritent que vous
les lisiez et compreniez bien. Les avertissements de sécurité ne peuvent éviter les dangers de par eux-mêmes. Les consignes ou mises
en garde qu'ils donnent ne remplacent pas des mesures préventives appropriées contre les accidents.
REMARQUE: donne des informations ou des instructions
vitales pour le fonctionnement ou l'entretien de l'équipement.
SYMBOLE SIGNIFICATION
ALERTE DE SÉCURITÉ : Indique un danger, un
avertissement ou une mise en garde. Soyez vigilant afin
d'éviter toute blessure grave. Ce symbole peut être
combiné à d'autres symboles ou pictogrammes.
DANGER : le non-respect d’un avertissement peut
causer dommages matériels ou blessures graves pour
tous. Respectez les consignes de sécurité afin de réduire
les risques d'incendie, d'électrocution et de blessures.
AVERTISSEMENT : le non-respect d’un avertissement
peut causer dommages matériels ou blessures graves pour
tous. Respectez les consignes de sécurité afin de réduire les
risques d'incendie, d'électrocution et de blessures.
MISE EN GARDE : le non-respect d’un avertissement
peut causer dommages matériels ou blessures graves pour
tous. Respectez toujours les consignes de sécurité afin de
réduire les risques d'incendie, d'électrocution et de
blessures.
CONSIGNES DE SÉCURITÉ
SYMBOLE SIGNIFICATION
AVERTISSEMENT : suivez soig-neusement les
consignes de sécurité lorsque vous utilisez cet appareil.
Dans l'intérêt de votre sécurité et de celle des personnes
à proximité, prenez soin de lire ces instructions avant de
faire fonctionner la machine. Veuillez garder les
instructions en lieu sûr pour usage ultérieur.
AVERTISSEMENT : l'essence est extrêmement
inflammable et ses vapeurs peuvent exploser si on y
met le feu. Veuillez prendre les précautions suivantes.
AVERTISSEMENT : Les rebonds peuvent se
produire si la tête du guide-chaîne touche un objet, ou si le
bois se resserre sur la chaîne de la tronçonneuse dans la
coupe. Si un contact a lieu avec la tête du guide-chaîne, la
tronçonneuse peut, en l’espace d’une seconde, être projetée
de manière incontrôlée dans un mouvement en arc, en
direction de l’opérateur. Coincer la chaîne le long de la partie
supérieure du guide-chaîne peut pousser le guide-chaîne
peut pousser le guide-chaîne vers l’arrière, vers l’opérateur.
Chacune de ces réactions peut vous faire perdre contrôle de
la tronçonneuse et peut entraîner de sérieuses blessures.
Ne comptez pas exclusivement sur les dispositifs de sécurité
qui équipent votre tronçonneuse. Vous devriez prendre
plusieurs mesures pour éviter tout accident ou toute blessure
lorsque vous vous servez de votre tronçonneuse.

F3
CONSIGNES DE SÉCURITÉ
• Scier, le moteur à vitesse maxima.
• No sobrepase su alcance.
• Follow the manufacturer’s sharpening and maintenance
instructions for the saw chain.
• Utiliser uniquement les guides-chaînes et chaînes spécifiés par
le fabricant ou leur équivalent.
AUTRES PRÉCAUTIONS DE SÉCURITÉ
• Ne pas utiliser la tronçonneuse d’une seule main! De graves blessures à
l’opérateur, toute personne l’aidant ou spectateurs pourraient en résulter. Un
tronçonneuse est conçue pour être utilisée des deux mains.
• Ne vous servez pas d’une tronçonneuse si vous êtes fatigué.
• S’habiller de maniere appropriee: Ne pas porter de vêtements trop
amples ou de bijoux cars ils risquent de vous gêner et de se faire
prendre dans une partie mobile de l’appareil. L’utilisation des
élastiques et des semelles antidérapantes est recommandée pour
tout travail à l’extérieur. Les cheveux longs doivent être protégés par
un casque ou autre protection.
• Vetements et equipement recommandes: Porter des chaussures,
gants et lunettes de protection, des habits moulants, des
protecteurs d’oreilles et un casque.
• Faites attention lorsque vous manipulez le carburant. Déplacez
la tronçonneuse à au moins 9.1 m (30 pieds) de l’endroit où vous
l’avez ravitaillée avant de lancer le moteur.
• Garder le secteur de travail net: Un lieu de travail encombré est propice
aux blessures. Ne pas commencer de coupe avant d’avoir un lieu de
travail dégagé, une position stable et une voie de retraite plannifiée.
• Rester vigilant: Attention à ce que vous faites. Utiliser votre sens
commun. Ne pas manier la tronçonneuse par moments de fatigue.
Rester à l’écart de la chaîne quand le moteur est en marche. Avant de
mettre le moteur en marche, s’assurer que la chaîne ne touche rien.
• Débrancher la tronçonneuse quand non utilisée, avant tout
service, et pour tout changement de pièces et accessoires tels le
guide-chaîne et la chaîne.
• Examiner les pieces: Avant toute autre utilisation de la tronçonneuse, un
guide-chaîne ou toute autre pièce endommagée devrait être examinée
soigneusement afin de pouvoir déterminer si son fonctionnement sera
adéquat à sa fonction prévue. Vérifier le montage, l’alignement et la fixation
de toute pièce mobile; vérifier qu’il n’y a pas de piéces cassées ou tout
autre problème qui affecteraient son fonctionnement. Un guide-chaîne ou
toute pièce endommagée devrait être réparée correctement ou remplacée
par un centre de réparations agréé, sauf indication contraire dans ce
manuel d’instructions.
• Observer les alentours de votre secteur de travail: Etre vigilant lors de la
coupe de petits buissons et arbustres car les matériaux plus fins peuvent
«s’attraper» dans la chaîne et être projetés dans votre direction ou vous
faire perdre l’équilibre.
• Ne jamais se servir de la tronçonneuse en se tentant dans un arbre à
moins d’avoir reçu une formation spéciale. Faire attention à ne pas étre
heurté par les branches sous tension qui se relâchent lors de leur coupe.
• N’utilisez pas l'appareil sous la pluie. Ne l’utilisez pas à proximité
de l’eau.
• Ne pas utiliser la tronçonneuse en présence de produits (liquides ou gaz)
combustibles.
• Tous les services d’entretien de la tronçonneuse, à l’exception de ceux
mentionnés dans le manuel d’utilisation et d’entretien, doivent être
effectués par un personnel compétent. Ne pas essayer de faire les
réparations soi-même ; il n’y a pas de pièces internes réparables.
• Ne pas forcer la tronconconneuse: La tronçonneuse aura une
meilleure performance, et une plus sûre, si elle est utilisée au
rythme pour lequel elle a été conçue.
• Utiliser le bon outil: Ne couper que du bois. Ne pas utiliser la
tronçonneuse à des fins pour lesquelles ellen n’apas été conçue. Ne
jamais utilser la tronçonneuse pour couper plastique, maçonnerie, ou
tout autre matériel n’étant pas pour la construction.
• Utilice mecanismos tales como cadenas de contragolpe bajo,
protectores para la nariz de la barra guía, chain brakes y barras
guías especiales, los cuales reducen los peligros relacionados
con el contragolpe.
• Il n’y aucune autre pièce de rechange qui permet d’obtenir une
protection contre les rebonds selon la norme de I’ACNOR Z62-3.
• Ne jamais utiliser une tronçonneuse endommagée, mal ajustée,
non complètement ou incorrectement montée. S’assurer qu’il y a
arrêt de la chaîne quand la gâchette est relâchée.
• Ne pas utiliser la tronçonneuse au delà de vos capacités ou expérience.
• Ne jamais en lever, modifier ou paralyser un dispositif de sécurité
fourni avec l’appareil.
• Cette tronçonneuse est classifiée tronçonneuse catégorie 2C par
ACNOR. Elle est conçue pour des usages infréquents de travaux tels
que dégager, tailler ou couper du bois… par des propriétaires de
maison ou résidences secondaires ou par des campeurs. Elle n’est
pas conçue pour une utilisation prolongée. Si le travail prévu demande
de longues périodes d’utilisation, la vibration risque de causer des
problèmes de circulation aux mains de l’opérateur. Il serait approprié
d’utiliser une tronçonneuse pourvue d’un dispositif anti-vibration.
• Les vêtements de protection éxigés par vos organisations /
syndicats de travail, par les règlementations gouvernementales ou
par votre employeur doivent être utilisés ; sinon, des habits
moulants, des chaussures de sécurité et un protection pour les
oreilles et les mains doivent être portés.
• Une chaîne à «rebonds réduits» répond aux normes de performance
pour «rebonds réduits» exigées par ANSI B175.1-1991 et correspond
aux critères de la norme ACNOR Z62.3. Ne pas utiliser d'autre chaîne
de rechange à moins qu'elle ne réponde aux exigences de votre
modèle en particulier.
• N'utiliser aucun autre accessoire ou accessoire de coupe. Utilisez
exclusivement les accessoires et pièces de rechange d’origine du fabrican,
qui ont été spécifiquement concus pour des performances et pour une
sécurité optimales lors de l'utilisation de nos produits. Faute de quoi, vous
risquez d'obtenir des performances réduites, voire de vous mettre en
danger. Utilisez exclusivement la chaine et la barre fournies avec ce
produit. Ne pas utiliser d'autre accessoire de coupe. L'utilisation de ce type
d'accessoires provoquera l'annulation de votre garantie fabricant et risque
de vous exposer à des accidents graves.
• Ne touchez jamais la chaîne et n’essayez jamais de travailler à la
tronçonneuse lorsque le moteur tourne. Assurez-vous que toutes
les pièces mobiles soient bien arrêtées. Laissez la tronçonneuse
refroidir car la chaîne peut être chaude.
• Vérifiez le guide-chaîne et la chaîne régulièrement et ajustez si
nécessaire. Assurez-vous que le guide-chaîne et la chaîne soient
bien serrés et que la chaîne soit bien aiguisée. Inspectez
visuellement pour tout dommage. Réparez tout dommage avant
d’utiliser ou de remettre la tronçonneuse en marche.
• Ne pas vous en servir près de câbles électriques ou de lignes à
haute tension.
• Ne pas utiliser la perche élagueuse pour abattre un arbre.
Utilisez une tronçonneuse normale pour ce faire.
ENTRETIEN ET ENTREPOSAGE
• Laissez le moteur refroidir avant de l'entreposer ou de le
transporter. Attachez bien l'appareil pendant le transport.
• Toujours utiliser la sécurité de la barre et de la chaîne lors des
transports et du rangement de l’appareil.
• Rangez l'appareil dans un endroit verrouillé et sec, ou élevé et
sec, hors de portée des enfants, pour éviter une utilisation
indésirable ou un accident.
• Ne trempez et n'arrosez jamais l'appareil avec de l'eau ou tout
autre liquide. Gardez les poignées sèches, propres et exemptes
de débris. Nettoyez après chaque usage.
• Conservez ces instructions. Consultez-les souvent et servez-
vous en pour instruire d'autres usagers. Si vous prêtez l'appareil
à quelqu'un, prêtez-lui également ces instructions.
• Les réparations ou les procédures d'entretien qui ne sont pas
décrites dans le manuel doivent être strictement confiées à des
techniciens qualifiés.
CONSERVEZ CES INSTRUCTIONS

F4
• SYMBOLES DE SÉCURITÉ ET INTERNATIONAUX •
Ce manuel de l'utilisateur décrit les symboles et pictogrammes de sécurité et internationaux pouvant apparaître sur ce produit. Consultez le
manuel de l'utilisateur pour les informations concernant la sécurité, le montage, le fonctionnement, l'entretien et les réparations.
CONSIGNES DE SÉCURITÉ
•AVERTISSEMENT : LISEZ LE MANUEL
DE L'UTILISATEUR
Lisez le manuel de l'utilisateur et suivez tous les
avertissements et consignes de sécurité. Vous
pourriez à défaut entraîner des blessures graves pour
vous ou d'autres personnes.
•AVERTISSEMENT SUR LE GUIDE-
CHAÎNE
Évitez tout contact de l’extrémité du guide-chaîne
avec tout objet. Le contact de l’extrémité peut
entraîner un mouvement brusque du guide-chaîne
vers le haut et en arrière, ce qui entraîner de
sérieuses blessures.
SYMBOL MEANING
•PORTEZ DES PROTECTIONS (TÊTE,
YEUX ET OREILLES)
AVERTISSEMENT : les objets projetés et les
bruits forts peuvent endommager la vue et l’ouïe.
Portez une visière de norme ANSI Z87.1-1989 et des
protège-oreilles pendant l'utilisation. la chute d’objets
peut causer des blessures graves à la tête. Protégez-
vous la tête pendant l'utilisation de l'appareil.
•AVERTISSEMENT SURFACE CHAUDE
Ne pas toucher aux surfaces chaudes. Vous pourriez
vous brûler. Ces pièces deviennent très chaudes à
l'utilisation. Elles restes chaudes brièvement après
l'arrêt.
•ÉLOIGNEZ LES SPECTATEURS
AVERTISSEMENT : éloignez les spectateurs, les
enfants et les animaux domestiques en particulier,
d'au moins 15 m (50 pi) de la zone de coupe.
•LES LIGNES ELECTRIQUES PEUVENT
ENTRAINER DE GRAVES BLESSURES
AVERTISSEMENT : Ne pas utiliser l’appareil à
proximité des lignes électriques. Tout contact avec
une ligne électrique peut entraîner de graves
blessures ou endommager l’appareil. Maintenir une
distance d’au moins 50 pieds (15 m) entre la scie à
long manche (incluant les branches avec lesquelles
elle entre en contact) et toute ligne électrique.
•TENEZ À DEUX MAINS
Tenez toujours la tronçonneuse à deux mains lors de
son utilisation. Ne la tenez jamais à une main.
•SYMBOLE ALERTE DE SÉCURITÉ
Indique un danger, un avertissement ou une mise en
garde. Ce symbole peut être combiné à d'autres
symboles ou pictogrammes.
SYMBOL MEANING
•INDICATEUR D’AJUSTEMENT DE
L’HUILE POUR LA CHAÎNE
La chaîne doit constamment être enduit d’une
couche d’huile pour fonctionner correctement.
Assurez-vous de régler la vis d’ajustement de l’huile
pour permettre à une quantité suffisante d’huile
d’imbiber la chaîne continuellement.
Utiliser une clef Allen de 3/32 pouces pour régler la
vis d’ajustement de l’huile.
F5
FAMILIARISEZ-VOUS AVEC VOTRE APPAREIL
Guide-
chaîne
Chaîne
Bouchon du
réservoir a huile
Arbre de
Transmission
Tête du
guide-chaîne
Couvercle
du pignon
Capteur de
chaîne
Ecrous du guide-chaîne
Bras
d’extension
Vis de réglage
de tension
Vis d’ajustement de l’huile
Reservoir d’huile
Garde à chaînes de
transport
Crochet de
rangement
Coupleur
Couvercle
pour
transport

F6
L’accessoire doit être installé avec le bouton de déclenchement dans
le trou principal.
Vérifiez que le bras flexible est bien engagé avant l’utilisation
1. Démarrez l’appareil.
2. Appuyez brièvement sur la détente, puis relâchez-la.
3. Vérifiez le fonctionnement de l’accessoire.
4. S’il ne fonctionne pas, retirez-le et répétez la
procédure d’installation.
5. Vérifiez de nouveau le fonctionnement de l’accessoire.
2. Appuyez sur le bouton de déclenchement et maintenez-le
enfoncé (Fig. 1).
3. En tenant fermement le logement de l’arbre supérieur, retirez
l’accessoire du couplage (Fig. 2).
Coupleur Bouton de
déclenchement Renfoncement-
guide
Bouton
À droiteÀ gauche
Trou principal
Corps de l'arbre
supérieur
Coupleur
Corps de l'arbre
inférieur
Bouton de déclenchement
Bouton
MONTAGE DU COUPLEUR
L’ajout Trimmer Plus peut être monté de différentes manières sur les
outils électriques. Les manuels d’utilisation de l’outil électrique de
base et de l’attache comprennent des informations nécessaires pour
l’utilisation de l’outil électrique combiné. Ainsi, il est nécessaire de lire
toujours les DEUX manuels d’utilisation avant d’utiliser l’outil
électrique pour la première fois. Conserver les manuels en lieu sûr
pour référence future.
REMARQUE : pour faciliter l'installation ou le retrait d'accessoires,
placez l'appareil au sol ou sur un établi.
Retrait de l'accessoire
1. Dévissez le bouton vers la gauche (Fig. 1).
Fig. 1
Fig. 2
Fig. 3
Bouton
INSTRUCTIONS DE MONTAGE
AVERTISSEMENT : veuillez bien assimiler le
manuel des accessoires avant utilisation.
MISE EN GARDE : l'accessoire de coupe et autres
ajouts du système EZ-LinkMD doivent utiliser le trou
principal sauf indication contraire de leurs manuels.
L'utilisation du mauvais trou pourrait causer des
blessures graves ou endommager l'appareil.
AVERTISSEMENT : pour éviter des blessures
graves, éteignez l'appareil avant d'enlever ou d'installer
des accessoires.
REMPLIR LE RESERVOIR D’HUILE
Suivez les étapes suivantes pour remplir le réservoir d’huile :
1. Installer l’appareil sur une surface plane.
2. Retirer le bouchon du réservoir d’huile.
3. Ouvrir le bidon d’huile fourni avec l’appareil.
4. Verser l’huile dans le réservoir jusqu’à ce qu’il soit plein.
REMARQUE : Le réservoir d’huile peut être rempli jusqu’au bord de
l’ouverture du réservoir sans pour autant endommager l’appareil.
DANGER : Le fait de ne pas remplir le réservoir
d’huile endommagera l’appareil de manière irréversible.
Assurez-vous que le réservoir d’huile est toujours plein.
AVERTISSEMENT : L’huile coule en continu du
réservoir d’huile sur la chaîne. Vérifiez constamment
que le niveau d’huile ne descend pas en dessous de la
moitié du réservoir.
5. Répétez les étapes 1-4 pour suivants ou le bras d’extension.
Installation de l'accessoire
1. Enlevez le crochet ou le couvercle pour transport de la partie
supérieure du corps de l'arbre.
2. Dévissez le bouton vers la gauche (Fig. 1).
3. Tenez fermement l'accessoire et enfoncez-le tout droit dans le
coupleur (Fig. 2).
REMARQUE : alignez le bouton de déclenchement avec le
renfoncement-guide pour faciliter l'installation (Fig. 1).
4. Serrez le bouton en le tournant à droite (Fig. 3).
MISE EN GARDE : verrouillez le bouton de
déclenchement dans le trou principal et vissez bien le
bouton avant de faire marcher l'appareil.
AVERTISSEMENT: Pour éviter des blessures
graves et des dégâts à l’unité, ne raccordez JAMAIS
plus d’une rallonge à un outil électrique.

F7
Fig. 4
Fig. 5
Fig. 6
PRECAUTIONS D’UTILISATION
1. Éloigner les spectateurs à une distance de 15 mètres (50
pieds) quand la scie est em marche.
2. Ne pas utiliser la perche élagueuse pour abattre un arbre; A
cet effet, utiliser la tronçonneuse sans la perche
3. S’assurer que le réservoir d’huile est plein et que l’huile lubrifie
la chaîne avant utilisation.
4. Tenir la perche élagueuse fermement, une main sur la canne,
l’autre sur la poignée.
5. Ne mettre le doigt sur l’interrupteur qu’au moment de couper.
6. S’assurer que la chaîne ne touche rien, avant de mettre
l’appareil en marche.
7. Rester à l’écart de la chaîne lorsque le moteur est en marche.
8. Ne pas forcer l’appareil pendant la coupe. Une légère pression
est suffisante et vous obtiendrez une meilleure performance et
une plus s˚re en l’utilisant à la puissance pour laquelle il a été
conçu.
9. Rester vigilant en coupant petites ou grosses branches sous
tension, car au moment où la tension se relâche, le bois peut
avoir un mouvement ressort et heurter l’utilisateur pouvant
ainsi causer de sérieuses blessures parfois mortelles.
10. Avant de déplacer la perche élagueuse:
• tenir l’appareil à son point d’équilibre (vers le bout de la
tronçonneuse)
• garder chaîne et guide chaîne vers l’arrière.
11. Ne pas couper de petits buissons ou jeunes arbres avec la
perche élagueuse. Les fines branches peuvent se coincer
dans la chaîne et être projetées vers vous, ce qui peut vous
faire perdre votre équilibre.
12. Ne jamais se tenir sous la branche que vous coupez. Rester
toujours à l’écart des chutes de débris (Fig. 4).
13. Ne jamais se mettre sur une échelle ou autre support instable
pendant l’utilisation de la perche élagueuse.
14. Toujours utiliser les deux mains pour utiliser l’appareil. Garder
une pression constante et ferme pendant la coupe sans forcer
dans le bois
15. Ne pas utiliser la scie à poteau pour couper des branches
d'un diamètre supérieur à 10 cm (4 po).
16. Garder tout le monde à l’écart de la partie coupante de la
perche élagueuse et à une bonne distance de la zone de
travail (Fig. 5).
17. Ne pas utiliser la perche élagueuse près de câbles, fils
téléphoniques ou électriques. Garder une distance d’au moins
10 pieds (Fig. 6).
CONSIGNES DE DEMARRAGE
Démarrer et utiliser votre scie à long manche sans aucune
assistance. Pour des consignes de démarrage spécifiques,
consulter la section appropriée du manuel. Les méthodes de
démarrage appropriées réduisent les risques de blessures.
1. Disposer la scie à long manche sur un sol ferme ou une autre
surface dure, sans une zone à ciel ouvert.
2. Maintenir un bon équilibre et une bonne assise.
MODE D’EMPLOI
AVERTISSEMENT : Portez des vêtements
appropriés pour diminuer les risques de blessures durant
l'utilisation de l'appareil. Ne portez pas de vêtements
amples ni de bijoux. Portez des lunettes de sécurité et
des protège-oreilles. Portez des pantalons épais et longs,
des bottes et des gants. Ne marchez pas pieds nus et
évitez les pantalons courts et les sandales.
AVERTISSEMENT : Afin de réduire les risques
d’incendie et de brûlures, démarrer le moteur à au
moins 30 pieds (9,1 m) du point d’essence, à l’extérieur
uniquement.
F8
TAILLER UN ARBRE (ELAGUAR)
• Eviter les rebonds. Ils peuvent causer de graves blessures
parfois mortelles.
• Ne pas utiliser la perche élagueuse en étant sur un arbre, une
échelle ou autre endroit en position instable. Vous risquez de
perdre le contrôle de la perche élagueuse, ce qui pourrait causer
de sérieuses blessures.
• Ne pas allonger les bras au-dessus des épaules pendant
l’utilisation de la perche élagueuse.
• Veuillez consulter un professionnel si les conditions de travail
sont au-delà de vos capacités
• Tailler un arbre signifie couper des branches d’un arbre vivant.
S’assurer de votre bon équilibre. Garder les pieds écartés.
Répartir votre poids.
• Avant de démarrer l’appareil, toujours vérifier la lubrification de
la chaîne et le niveau d’huile du réservoir.
REMARQUE : La chaîne doit être constamment imbibée d’huile
pour fonctionner correctement. S’assurer que la vis
d’ajustement de l’huile est réglée de manière appropriée.
Fig. 7
2
4
3
1
6 po
2-4 po
Pour tailler une branche (élagage) :
1. Faire la première coupe à 6 pouces du tronc du dessous de la
branche. Utiliser le haut du guide-chaîne pour cette coupe.
Couper 1/3 du diamètre de la branche (Fig. 7).
2. Faire la seconde coupe mais du dessus à deux ou quatre
pouces plus loin sur la branche. Continuer à couper jusqu’à ce
que la branche tombe.
3. Faire la troisième coupe le plus près possible du tronc par le
dessous de la souche de la branche. Utiliser la partie
supérieure du guide-chaîne pour faire cette coupe. Couper 1/3
du diamètre de la souche.
4. La quatrième coupe se fait directement au-dessus de la
troisième. Couper pour atteindre l’autre côté et faire tomber la
souche de la branche.
MODE D’EMPLOI
AVERTISSEMENT : Les rebonds peuvent se
produire si la tête du guide-chaîne touche un objet, ou
si le bois se resserre sur la chaîne de la tronçonneuse
dans la coupe. Si un contact a lieu avec la tête du
guide-chaîne, la tronçonneuse peut, en l’espace d’une
seconde, être projetée de manière incontrôlée dans un
mouvement en arc, en direction de l’opérateur. Coincer
la chaîne le long de la partie supérieure du guide-
chaîne peut pousser le guide-chaîne peut pousser le
guide-chaîne vers l’arrière, vers l’opérateur. Chacune de
ces réactions peut vous faire perdre contrôle de la
tronçonneuse et peut entraîner de sérieuses blessures.
Ne comptez pas exclusivement sur les dispositifs de
sécurité qui équipent votre tronçonneuse. Vous devriez
prendre plusieurs mesures pour éviter tout accident ou
toute blessure lorsque vous vous servez de votre
tronçonneuse.
AVERTISSEMENT : Si le réservoir d’huile est vide,
le trou de la vis d’ajustement de l’huile se colmate, ou
la chaîne n’est plus lubrifiée ; par conséquent la chaîne
sera en surchauffe est endommagera l’appareil de
manière irréversible jusqu’à pouvoir entraîner de graves
blessures. La chaleur excessive due à la friction peut
entraîner la sortie catastrophique de la chaîne sur l’axe
de la barre en pleine utilisation.
Other manuals for PS720r
1
Table of contents
Languages:
Other TrimmerPlus Pole Saw manuals


