Tristan Auron BT2D7011 User manual

LIVE ENTERTAINMENT
src
BT2D7011
av in
BT2D7011
1. HANDLING COMPACT DISCS
MOISTURE CONDENSATION
NOTES ON CDs
P. 2
P. 3
P. 4
P. 1 P. 6
P. 7
1.
2.
3.
4.
5.
Stickers that are beginning
to peel away leave a
sticky residue (P.6).
Labels are attached (P.7).
On a rainy day or in a very damp area, moisture may condense on the lenses inside the unit. Should this
occur, the unit will not operate properly. In such a case, remove the disc and wait for about an hour until the
moisture has evaporated.
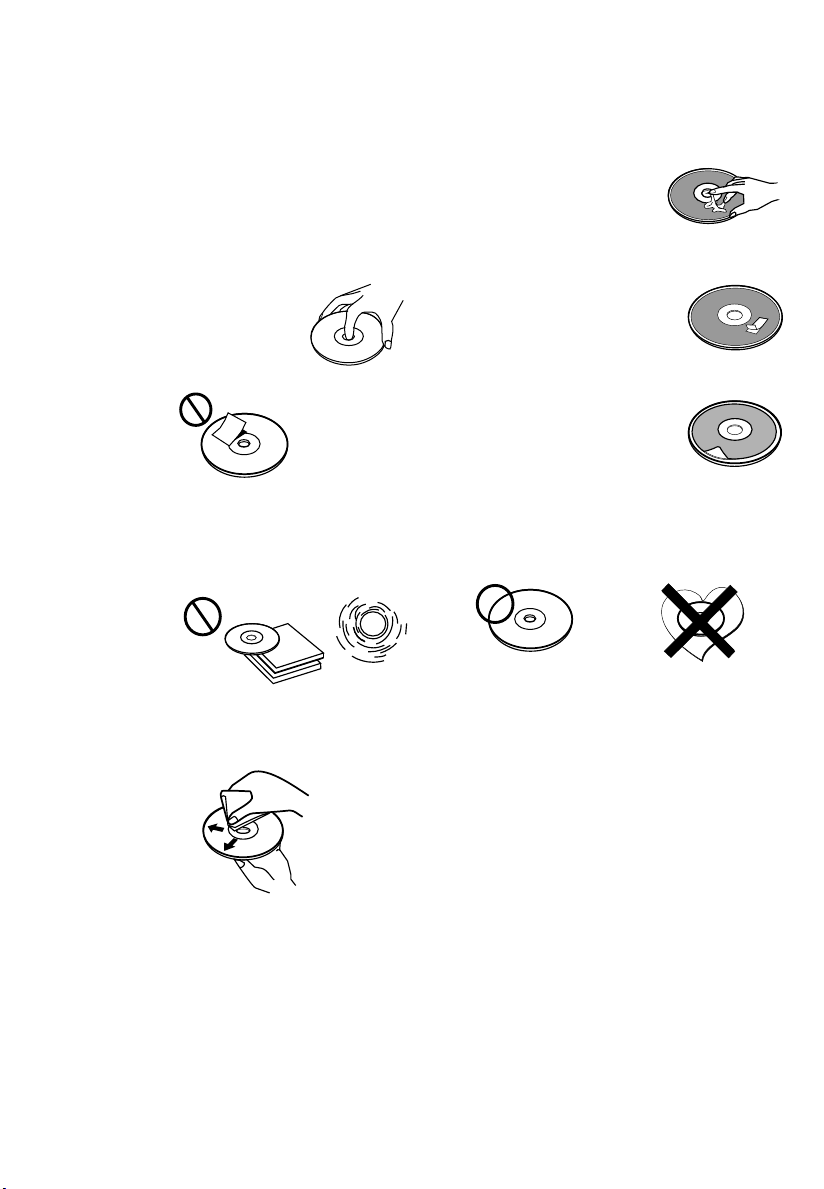
A dirty or defective disc may cause sound
dropouts while playing. To enjoy optimum sound,
handle the disc as follows.
Handle the disc by its edge. To keep the disc
clean, do not touch the surface (P.1).
Do not stick paper or tape on the disc (P.2).
Before playing, clean the discs with an optional
cleaning cloth. Wipe each disc from the centre out
(P.4).
Do not use solvents such as benzine,
thinner,commercially available cleaners, or
antistatic spray intended for analog discs.
Do not expose the discs to direct sunlight or heat
sources such as hot air-ducts, or leave them in a
car parked in direct sunlight where there can be a
considerable rise in temperature inside the car
(P.3).
Do not use CDs with old labels that are
beginning to peel off.
Do not use CDs with labels or stickers
attached.
**************
*******
*******
*******
*******
*******
*******
*******
*******
Do Not Use Special Shape CDs
Be sure to use round shape CDs only. Do not
use any special shape CDs. Use of special
sha p e CDs m a y ca u s e th e u nit t o
malfunction.(P.8).
P. 8
CD-Rs and CD-RWs which have not undergone
finalization processing cannot be played. (For
more information on finalization processing, refer
to the manual for your CD-R/CD-RW writing
software or CD-R/CD-RW recorder.) Additionally,
depending on the recording status, it may prove
impossible to play certain CDs recorded on CD-R
or CD-RW.
E - 1
P. 5
NOTES ON DISCS
If you use the discs explained below, the sticky
residue can cause the CD to stop spinning and may
cause malfunction or ruin your discs.
Do not use CDs that have a sticky residue on the
surface (for example, from peeled-off stickers or
from ink, or glue leaking from under the stickers).
****
*******
******* *******
*******
Paste or sticky residue.

E - 2
2. INSTALLATION
Before finally installing the unit, connect the wiring temporarily and make sure it is all
connected up properly and the unit and system work properly.
Use only the parts included with the unit to ensure proper installation. The use of
unauthorized parts can cause malfunctions.
Consult with your nearest dealer if installation requires the drilling of holes or other
modifications of the vehicle.
Install the unit where it does not get in the driver's way and cannot injure the passenger if
there is a sudden stop, like an emergency stop.
If installation angle exceeds 30 from horizontal, the unit might not give its optimum
performance.
Avoid installing the unit where it would be subject to high temperature, such as from direct
sunlight, or from hot air, from heater, or where it would be subject to dust dirt or excessive
vibration.
Be sure to remove the front panel before installing the unit.
DIN FRONT/REAR-MOUNT
30
DIN FRONT-MOUNT (Method A)
Installation the unit 1. Dashboard
2. Screw
1. Dashboard
2. Nut (5mm)
3. Spring washer
4. Screw (5x15mm)
5. Screw
6. Support Strap
Be sure to use the support strap to secure the
back of the unit in place. The strap can be bent by
hand to the desired angle.
7. Plain washer
Trim Plate Installation:
Push the trim plate against the chassis until it is fitted.
You must do this before you install the front panel, otherwise it can't be attached.
1
7
4
23
5
6
178
100
1
2
This unit can be property installed either from Front (conventional DIN Front-mount) or Rear (DIN Rear-
mount installation, utilizing threaded screw holes at the sides of the unit chassis). For details, refer to the
following illustrated installation methods A and B.
OE SWC AD LEARN
(White)
(White)
(Purple)
(Grey-GND)
REVERSE CAMERA
USB CABL E
PARKING BRAKE
(Pink)
(Black)
RADIO
ANTENNA
VIDE O OUT1 VI DEO IN CAME RA INVIDE O OUT2 ANT
R
L
R
L
R
LSUB- W
REAR AV IN
FRON T
E - 3
3. ELECTRICAL CONNECTION
a. Make sure your car battery is a 12 volt (6 filler caps) negative ground system (if not, a
converter will be necessary).
b. Before starting wiring connections, disconnect the power supply by removing the fuse from
the fuse box.
c. Connect the power wire to one of the extra terminals of the fuse box.
d. Connect the black ground wire to a metal part of the car. It is important to make good
contact.
e. Make other wiring connections as shown.
f. If your car does not have ISO connector, you can purchase it from car accessory shops.
Notes: INCORRECT WIRING OR OPERATION WILL VOID THE WARRANTY OF THIS UNIT.
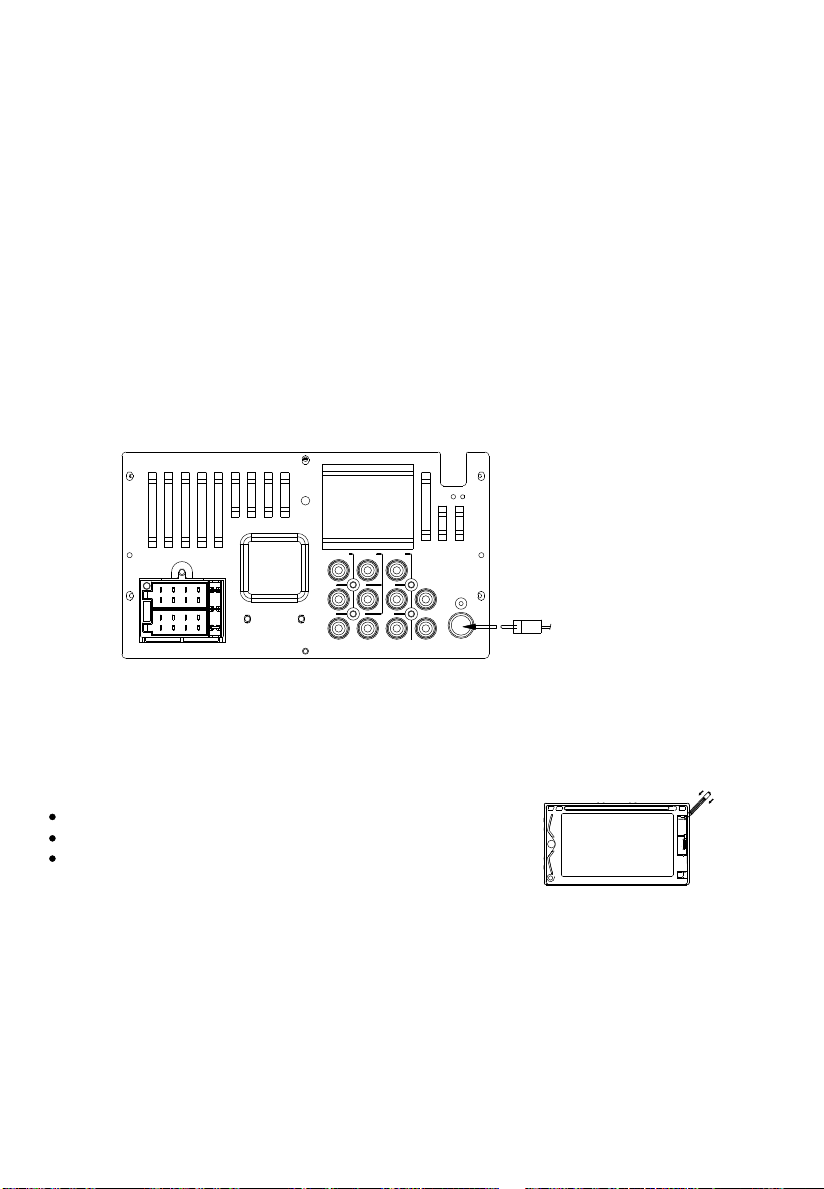
(CAR UNIT BACK SIDE)
The RESET button is located on the main unit (as shown on the diagram). To press it vertically
with a ballpoint pen or metal object to activate it. The reset button should be activated for the
following reasons:
Initial installation of the unit when all wiring is completed.
All the function buttons do not operate.
Error symbol on the display.
RESET BUTTON
Note: If you press the RESET button, and the unit still cannot function normally, please use a cotton
swab soaked in isopropyl alcohol to clean the socket on the back of the control panel.
RADIO
ANTENNA
VI DE O OU T1 V ID E O IN C A ME RA INVI DE O OU T2 AN T
R
L
R
L
R
LSU B- W
RE AR AV IN
FR ON T
Fuse Replacement:
To replace the fuse, pull out the blown fuse
from the socket. Insert a new one with same
rating

4
EJECT
BUTTON
SHORT PRESS:
MUTE
BUTTON
LONG PRESS:
VOL,BAS,TRE,FAD
BUTTON
REMOTE
SENSOR
BAND SWITCH:
BUTTON
E - 4
SHORT PRESS/
MODE
LONG PRESS:
POWER

33
66
99
SLOWSLOW
GOTOGOTO
MODEMODE
OSDOSD
DVDDVD
MENUMENU
OKOK
ANGLEANGLE
PBC
TITLE
PBC
TITLE
L/R
AUDIO
L/R
AUDIO
ZOOMZOOM
SUBTITLESUBTITLE
22
4455
7788
RPT RPT
0010+10+
11
SET UPSET UP
A-BA-B
PROGPROG
TUNINGTUNING
MUTEMUTE
CLEARCLEAR
BANDBAND
E -5
PHONE
/PUT UP PHONE
17

E - 6
5. BASIC OPERATION
POWER BUTTON
Short press power button to turn on/off the unit
MUTE BUTTON ( MUTE)
Short press volume button to mute the sound quickly. the display is flashing Press it again to restore the
previous sound level. When mute is on, the Mute indicator on the LCD will light up.
MODE BUTTON
(MODE)
SELECT BUTTON (SEL)
press SEL button for less than 1 second to open the Audio menu.
press SEL repeatedly to navigate through the following functions:
VOLUME (VOL) LONG PRESS -> BASS (BAS) -> TREBLE (TRE) -> BALANCE (BAL) ->
FADER (FAD)
Use Volume Up/Down to adjust desired level within 5 seconds.
NOTE: BASS AND TREBLE WILL BE SKIPPED IF DSP MODE IS ACTIVATED
ENCODER VOLUME KNOB
Turn this knob to adjust desired volume level.
FRONT PANEL A/V IN JACK
NOTE:The unit is only support the 3.5mm A/V Jack Pin Assignment shown as the diagram remove extra.
3.5mm A/V Cable ( not included )
Video
Right Audio
Left Audio
Ground
1
2
3
4
The unit is allowed to connect with external Audio/Video
system such like digital Camera or Game Console, You can
connect the external A/V system thru the A/V in jack on front
panel. After connecting the external A/V system, press mode to
A/V IN FRONT to enjoy this external A/V system on this unit.
Press this button to select radio,CD/MP3/VCD/DVD/TV/USB/SD/MMC/A/V- IN FRONT /AV-IN REAR.
EJECT BUTTON
Press to eject the disc.
E - 7
6. SYSTEM SETUP
Users can operate ”touch rectification” if the touch character deviates.
Users must Touch+in the center rectification or else it will affect precision.
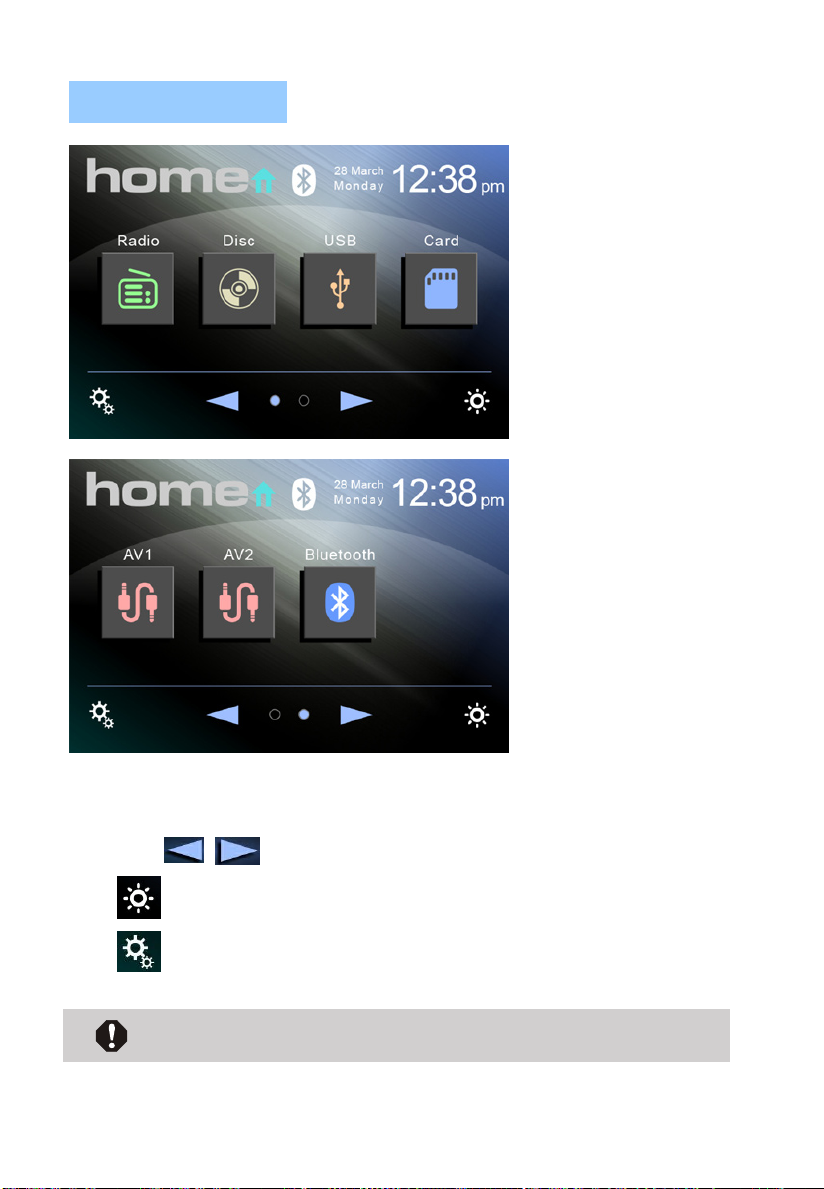
Home Menu
Click the source button for example RADIO to select
desired mode.
click to change the page.
Click to set TFT backlight On/Off.
Click to enter Setting menu.

E - 8
7. RADIO OPERATION
Radio mode
Home menu button.
BAND button(FM1/2/3/AM1/2).
AF/PTY/TA buttons, available for RDS version.
LOC/DX button.
Mute on/off button.
Audio effect setup button.
Seek-Up/Down button.
Manual-Up/Down button.
Preset Scan/Auto Store button ,
Short press preset scan, hold pressing auto store.
Preset stations buttons.
-
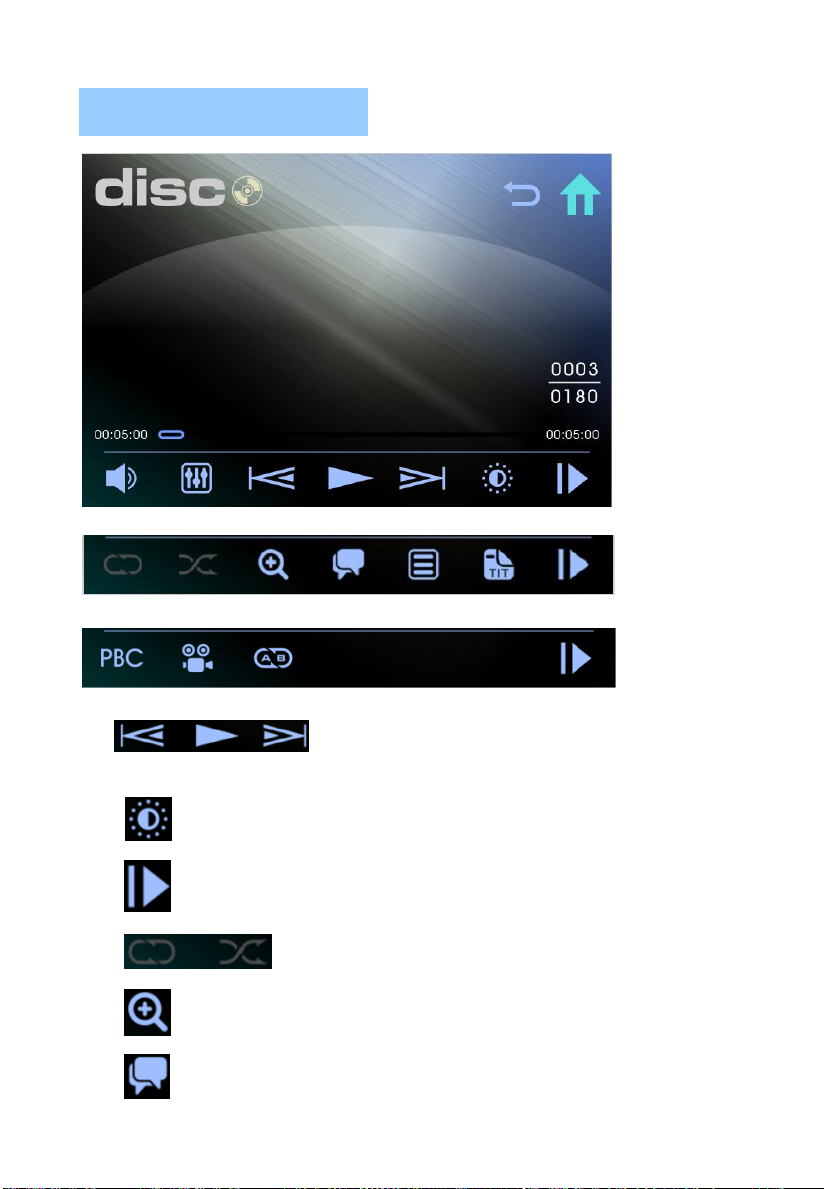
DISC mode
Track-Down, Play/Pause,
Track-Up button
Color/Brightness/Contrast set button.
Next page buttons.
Repeat, Random button.
Zoom+ button.
Audio language button.
8. DISC/USB/SD/ OPERATIONS
E - 9
AV IN

Sub-title button.
Title button.
PBC on/off button(available only for VCD)
Angle button.
Repeat A-B button.
Track-Down, Play/Pause, Track -Up
button.
Repeat button.
Random button.
File select menu button.
USB/SD mode
E - 10

Mute on/off button.
Audio effect setup button.
Brightness/Contrast/Color set button, it’s available only when watch the video.
AV IN mode
E - 11
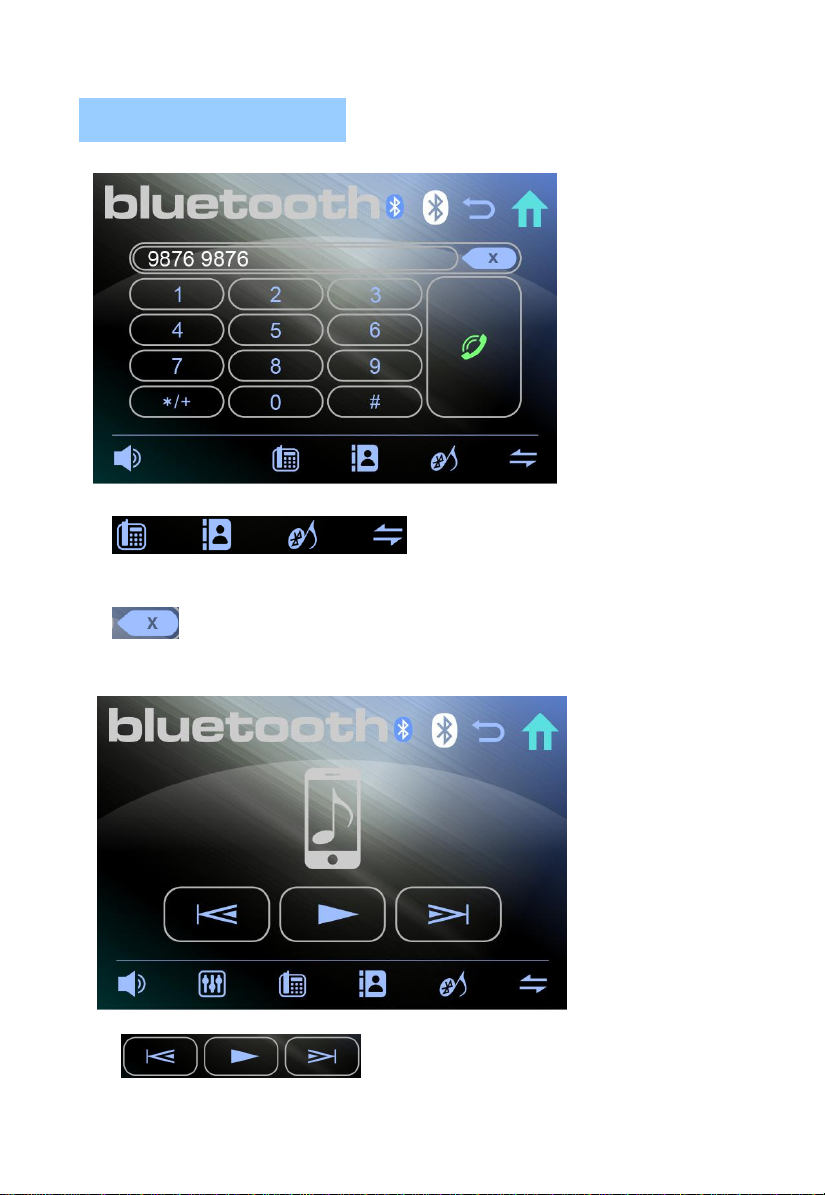
Bluetooth-Modus
Bluetooth mode
Dial/Phone record/Mu
sic Play/Connection status buttons.
Delete button. Press it once delete the last
digit, hold pressing it to delete all digits input.
Track-Down,Play/Pause,
Track- Up button.
9.
E - 12
E - 1
2

10.
E - 13
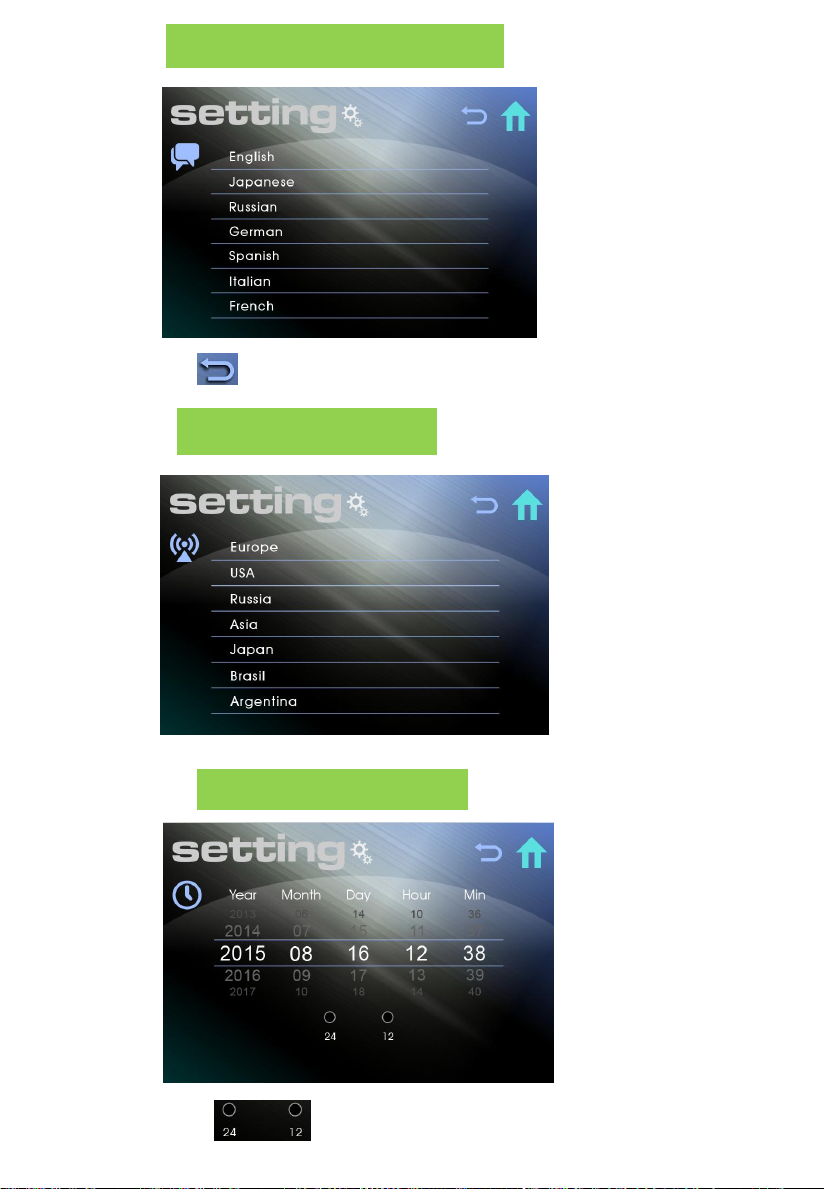
SET UP MENU OPERATION
Setting menu mode
System Language/Radio Area/Time/Audio/Wallpaper
/Wheel/Other/Sys Info set buttons.
Click or to change the page.
E - 14
System language setting
Return button.
Radio Area setting
Time setting
Set 24/12Hours format.

E - 15
Audio setting
Audio, Fader/Balance, Sub-W set buttons.
Fader/Balance setting

E - 16
Sub-W setting (Optional)
Wheel Control setting

E - 17
Others setting
LED Light setting

E - 18
MMC/SD CARD & USB DEVICE OPERATIONS
START THE USB DEVICE MODE
1.The USB mini socket is accessible as indicated in picture
1.(P.1)
2.Plug in the USB drive / device completely and display will
show “USB” to indicate that the USB drive / device is being
plugged in correctly & the download has begun.
3.Does not matter what mode the unit is in, once a USB drive /
device is being plugged into the unit, unit will automatically
switch to USB mode.
4.All the USB files playback function is same as normal disc
playback.
1.Always unplugg the USB gently from the unit,
excessive force used will cause permanent & serious
damage to the unit & the USB drive / device.
TO STOP USB PLAYBACK
1.If the USB drive / device is unplugged, the unit will automatically switch to radio mode.
Or user can use mode button to switch to other modes.
2.The user can use the mode button to choose USB mode (only if USB drive / device is
inserted in the unit ) or any other modes, when they are in any mode.
CAUTION
COMPATIBILITY
Due to the fast changing technology world, this unit may or
may not be compatible to all the USB drive / device available
with all the future technology, especially those USB drive /
device which require to install a driver. Always choose a
compatible USB drive / device which is compatible with this
unit.
Warning: Excessive weight or size USB drive/device may cause
permanent & serious damage to the unit and may cause access
to the buttons on the front panel impossible. User must use an
extension cable (provide by USB device manufacturer) to
connect with USB socket to prevent any damage cause.
P.1
USB SPECIFICATION
* SUPPORT MAX IG USB FLASH MEMORY
* SUPPORT MAX 999 SONGS
* USB 1.1 DEVICE SUPPORT
* USB 2.0 DEVICE SUPPORT
(TRANSFER SPEED SAME AS VER 1.1)
* FILE MANAGER: FAT12/FAT16/FAT32
USB SOCKET
P.2
11.

E -19
E -19
START THE SD/MMC MODE
CAUTION
2.Please make sure to insert the SD or MMC card
in the correct direction / orientation as indicated in
picture 7(P.7). Wrong insert will cause permanent
& serious damage to the unit & the SD or MMC
card.
TO STOP SD/MMC CARD PLAYBACK
1.Push on the end of the SD or MMC card to eject the SD or MMC card. Once the SD or MMC
card is taken out, the unit will automatically switch to previous mode.
2.User can use the mode button to choose SD / MMC mode (only if SD or MMC is inserted in the unit
) or any other modes, when they are in any mode.
SD/MMC SPECIFICATION
* SUPPORT MAX 4G SD/MMC CARD
* SUPPORT MAX 999 SONGS
Back side
Front side
P.6
P.5
P.4 1.Press panel release button to release the front panel.(P.4)
2.The SD/MMC card slot is located on top of the front panel as
indicated in (P.5).
3. Insert the SD/MMC card into the card slot in the correct direction
until a “CLICK” sound is heard.
4.Close the front panel.
5. The display will show “CARD” to indicate that the SD or
MMC card is correctly inserted. Once the SD or MMC card is
inserted, the file will automatically loaded & playback will also
start.
6. Does not matter what mode the unit is in, once a SD or MMC card is
being inserted in the unit, unit will automatically switch to SD / MMC
mode.
7. All the SD / MMC files playback function is same as normal CD or
Multi-Media disc playback.
D.C.P.
Table of contents
Popular Car Stereo System manuals by other brands

Pioneer
Pioneer AVM-P9000R brochure

Sony
Sony CDX-M9905X operating instructions

Jieshengda Intelligent Technology
Jieshengda Intelligent Technology T832D user manual

Philips
Philips CEM5100X/78 user manual

JVC
JVC KD-HDR40 Installation & connection manual

Sony
Sony CDX-GT630UI - Cd Receiver Mp3/wma/aac Player Installation/connections

Discount Car Stereo
Discount Car Stereo AAI-SONY installation guide

Crunch
Crunch Titan Series Installation

Sony
Sony CDX-M20 operating instructions

Blaupunkt
Blaupunkt New Orleans MD70 installation instructions

Stealthbox
Stealthbox SB-J-GCHWK2/10W3v3 installation guide

Philips
Philips CEM3000/00 quick start guide


