Tristan Auron LED65UHD User manual
65” LED TV
LED65UHD


Contents
Front / Right Side View and Controls
Rear View and Sockets
Main Menu
1
Installing Batteries in the Remote Control
. Channel Menu
2. Picture Menu
3. Sound Menu
4. Time Menu
1
2
7-23
6Installation Guide
7-15
16
17
18
19
22-23
24
Remote Control 3-4
5
Remote Control Operation Range 5
5. Setup Menu
Media Player
Specification
25
Stand installation guide
6. Lock Menu 20-21
The manual is for reference only.If there is inconsistency between the
manual and the actual product, the actual product shall govern.

STANDBY
INPUT
1

2
DVB-S2
VGA
COAX
To connect the Satellite signal.
Connecting to the PC output jack a personal computer.
Digital output to AV receiver.
HDMI3 DVB-S2 TV MINI
YPbPr MINI
AV
USB
Common Interface
COAXSCARTVGA
PC AUDIO
HDMI2
HDMI1EARPHONE
Remote Control
3
PICTURE
S
SOURCE
OUND
REC T-SHIFT
4. : Stop (in USB mode).
3. : Play / Pause (in USB mode).
-/--
17. : Press button to toggle between the current and
the previous programme you were viewing.
-/--
ASPECT
EPG
♥
1
3
5
4
2
6
7
8
9
11
12
13
14
16
17 18
19
20
23
24
25
26
27
28
21
15
10
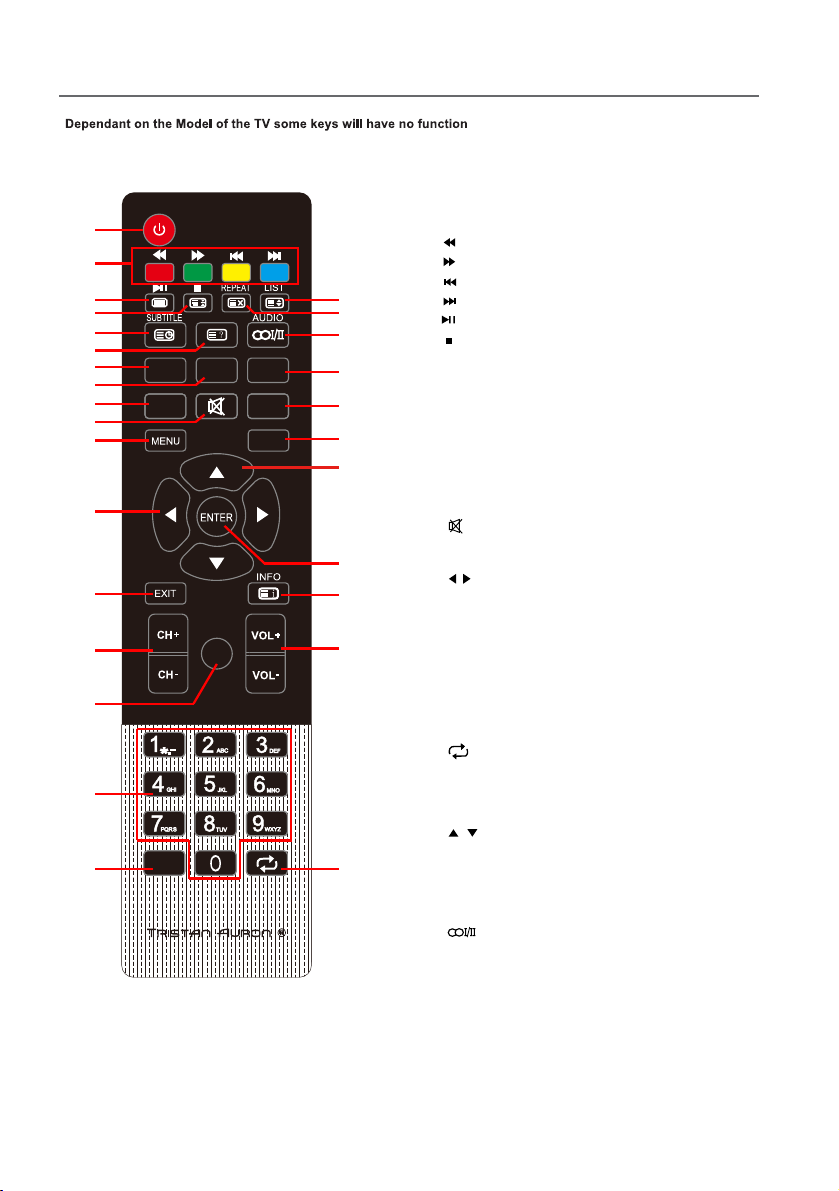
NOTE:
♦All pictures in this manual are examples, only for reference, actual product may differ
from the pictures.
♦The buttons not mentioned here are not used.
Definition of the buttons on remote control:
1. POWER: Enter or quit the standby mode.
9. PICTURE: Select the picture mode.
11. MENU: Press to display / disappear the on screen
menus or to quit some operations.
16. NUMBER BUTTONS: Use to choose channels.
(in TV mode)
13. EXIT: Quit the current interface.
27. REPEAT: Press to select the repeat play mode.
(in USB mode)
14. CH+/CH-: Scroll to next / previous channel.
19. VOL+/VOL-: Increase / Decrease audio volume.
20. INFO: Show info of current program.
21. ENTER: Select or confirm menu item.
23. SOURCE: Select signal source.
24. SOUND:Select the sound mode.
28. LIST: Press to call Channel List.(TV mode)
25. ASPECT:Press repeatedly to cycle through the
available aspect picture modes.
7. REC: To start recording.
15. EPG: Electronic Program Guide Display. Press
button to display Program Informations (DTV mode).
2. COLOR BUTTONS
8. T-SHIFT: Press to start TIME SHIFT function.
For more Info, please check chepter "TIME SHIFT"
Fast reverse (in USB mode)
Fast forward (in USB mode)
Previous (in USB mode)
Next (in USB mode)
Red/green/yellow/blue key navigation link.
5. SUBTITLE:Press button to display available
subtitle.(DTV mode)
6. : Press to display the Favourites program in
TV mode.(You should setup your favourite
channels in Program Edit menu)
♥
10. : Mute or restore sound.
12. / : Select direction.
22. / : Select direction.
18. : Return to last viewed program / signal source.
26. : The button can be used to switch among
DUAL Ⅰ/ DUALⅡ/ DUALⅠ+Ⅱ/ MONO / stereo.
22
Remote Control
4
PICTURE
S
SOURCE
OUND
REC T-SHIFT
-/--
ASPECT
EPG
♥
1
3
5
4
2
6
7
8
9
11
12
13
14
16
17 18
19
20
23
22
24
25
26
27
28
21
15
10
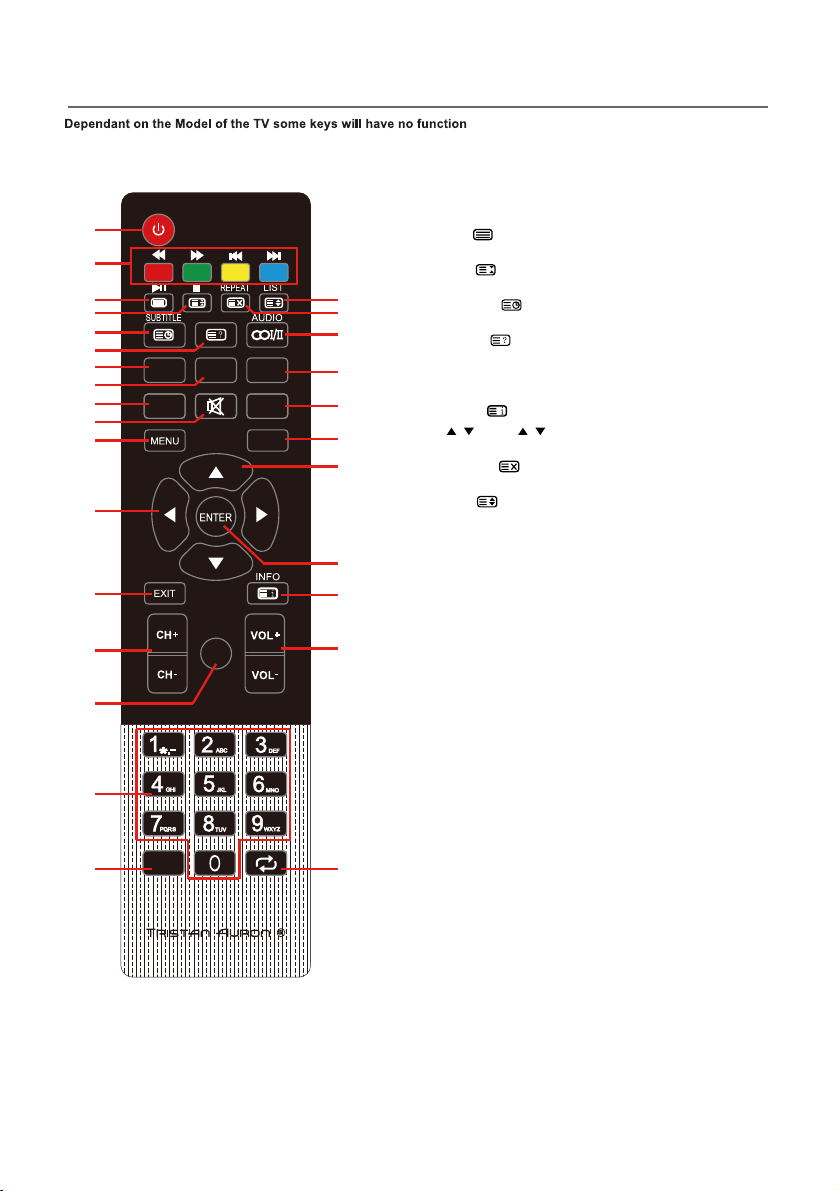
NOTE:
♦All pictures in this manual are examples, only for reference, actual product may differ
from the pictures.
♦The buttons not mentioned here are not used.
Definition of the buttons on remote control:
Teletext Function:
20. INDEX :Go to the index page.
6. REVEAL : Reveal or conceal hidden text for
quizzes etc.
4. HOLD : Retain the current teletext page and
again to cancel the function.
3. TEXT : Switch between teletext on,
mix and teletext off.
28 SIZE : Switch between zooming to the upper
half, lower half and in full.
5. SUBTITLE : Switch between secondary
pages by entering the four digit number.
27. CANCEL :Cancel the teletext but not to exit
teletext, press again to show teletext.
16. NUMBER BUTTONS: Key in the alphanumeric
digits to go to the designated page directly.
22. / : Press / to scroll to the next / previous
page.
2. COLOR BUTTONS: Teletext Button.

5
PICTU RE
S
SOURCE
OUND
REC T-SHIFT
-/--
ASPECT
EPG
♥
6
blue
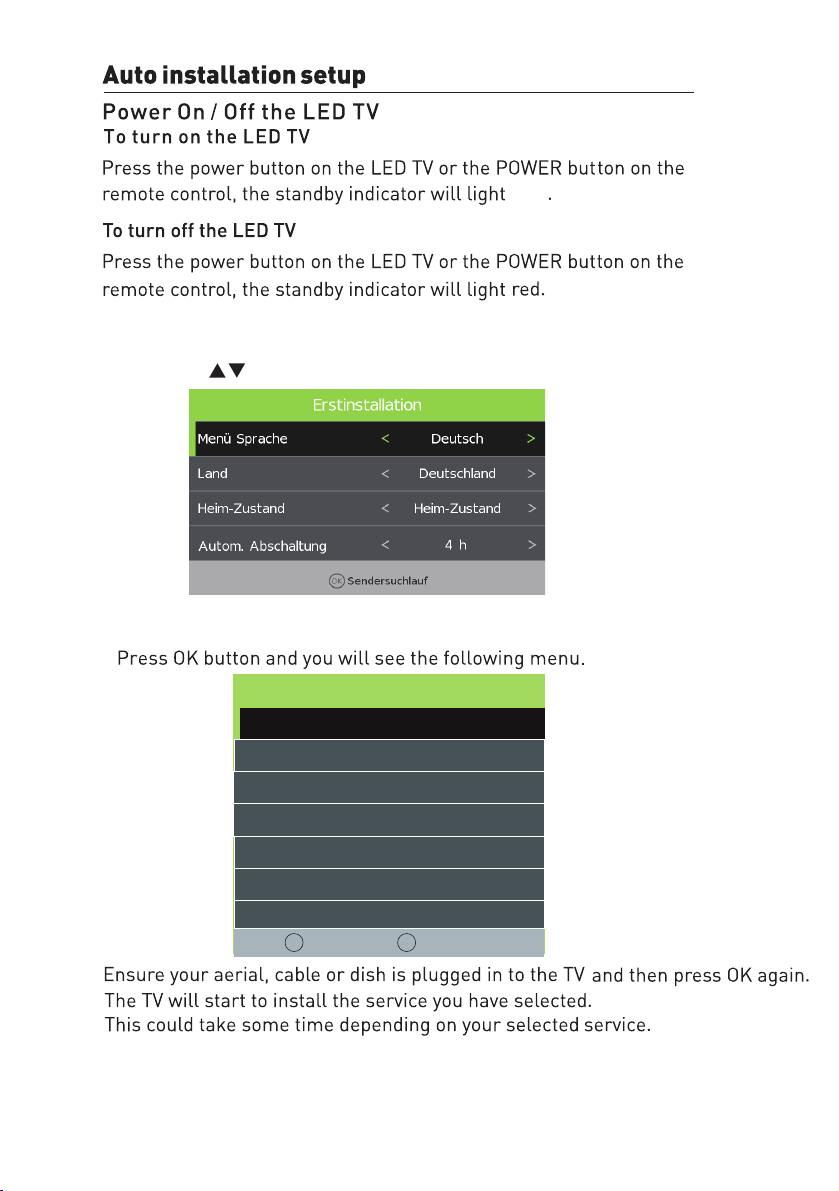
Use the Left/Right/Down keys to select your Language, Country,Energy Model and
Tune Type < DTV+ATV >
Tuning Setup
MENU Back OK Start
Digital Type < DVB-C >
Scan Type <Network Scan >
Network ID < Auto >
Frequency < Auto >
Sysmbol Rate < Auto >
Sorting by LCN < Off >
1.Press the Menu button on the remote control on your LED TV
to select the Setup menu.
2.Press the buttons to select the Reset.
Auto Standby.

7
Channel Setting
Antenna
1.Press the Menu button on the remote control on your LED TV to select the Channel menu.
2.Press the buttons to select the Antenna menu.Press OK to select it.
3.Press the buttons to select DVB-T or DVB-C.
Auto Tuning
Tuning SetupTuning Setup
Digital Type < DVB-C >
Scan Type <Network Scan >
Network ID < Auto >
Frequency < Auto >
Sysmbol Rate < Auto >
Sorting by LCN < Off >
Tune Type < DTV+ATV >
Country < Germany >
Tuning Setup
MENU BackOK Start
Scan Type <Network Scan >
Network ID < Auto >
Frequency < Auto >
Sysmbol Rate < Auto >
Sorting by LCN < Off >
In the Auto Tuning menu there are 3 options for you to select from:Country,Tune Type and
Press to select Country,Tune Type and Sorting by LCN.
If you select DTV+ATV,the first 50% of the processing is for ATV tuning,while the second 50%
ATV tuning,you can press MENU to Skip ATV tuning and start DTV
tuning or press EXIT to exit tuning.
Sorting by LCN.
represent DTV tuning.When
Auto Tuning Status
TV : 2 Programme
DTV : 0 Programme
Radio : 0 Programme
Dats : 0 Programme
During the channel search apreview of the already-found channels is displayed.
Unlike QUICKSTART the satellite search will search the whole satellite for channels and will not be instant.
Also the channels will appear in the order on the satellite and not the pre-set order.
Auto search replaces any previous searched channels with those of the new search.To add an extra
satellite if you have a suitable Dish/LNB/Switch you must use the Dish Installation menu.
8
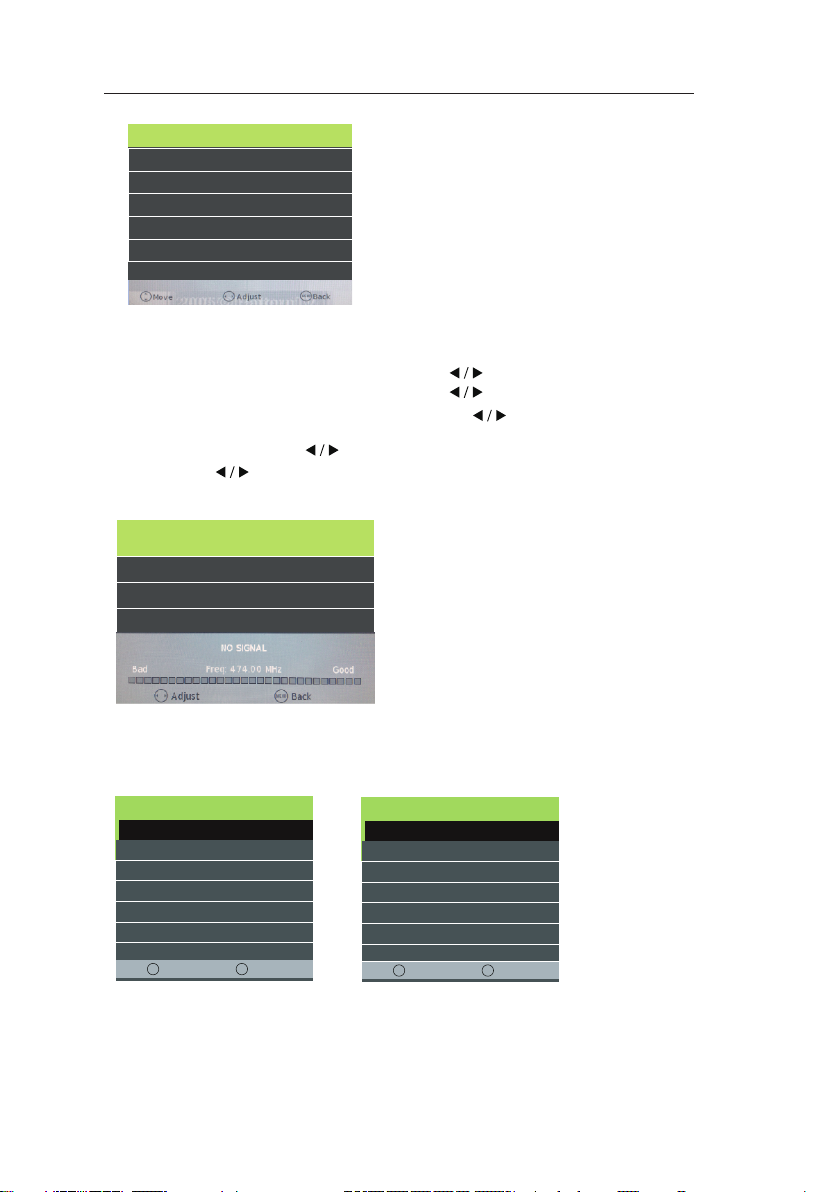
ATV Manual Tuning
You can manually tune ATV Manual Tuning in the CHANNEL Menu.
1.Current CH:Dispaly the current channel number,press the buttons to choose the channel you wish
2.Colour System:Select the Colour System using the buttons.
3.Sound System:Select the Sound System using the buttons.
4.Fine Tune:In case of bad reception,you can press the buttons to make fine adjustments to the
5.AFC:Select the AFC using the buttons.
6.Search:Press the buttons to scan through the frequencies to find new channels.
ATV Manual Tuning
< - Current CH 1 +>
Colour System PAL
Sound System BG
Fine-Tune 48.25 MHz
AFC On
Search
to modify.
tuning.
DTV Manual Tuning
You can manually tune DTV Manual Tuning in the CHANNAL Menu.
Press the Left/Right arrow buttons to select the channel you wish to tune,then press OK button to
DTV Manual Tuning
< - UHF CH 21 +>
scan for the channel.
DVB-C Tuning
When you choose “Cable” under TV connections, There are 2 options for Cable scan model:
1.Full Search: Choose FULL SEARCH and choose “OK” to start Auto Search for the channels.
Tuning Setup
Digital Type < DVB-C >
Scan Type <Network Scan >
Network ID < Auto >
Frequency < Auto >
Sysmbol Rate < Auto >
Sorting by LCN < Off >
Tune Type < DTV+ATV >
Country < Germany >
Tuning Setup
MENU BackOK Start
Digital Type < DVB-C >
Scan Type <Network Scan >
Network ID < Auto >
Frequency < Auto >
Symbol(ks/s) < Auto >
Sorting by LCN < Off >
Tune Type < DTV+ATV >
Country < UK >
Tuning Setup
Digital Type < DVB-C >
Scan Type <Network Scan >
Network ID < Auto >
Frequency < Auto >
Sysmbol Rate < Auto >
Sorting by LCN < Off >
Tune Type < DTV+ATV >
Country < Germany >
Tuning Setup
MENU BackOK Start
Digital Type < DVB-C >
Scan Type < full >
Network ID < Auto >
Frequency < Auto >
Symbol(ks/s) < Auto >
Sorting by LCN < Off >
Tune Type < DTV+ATV >
Country < UK >
2. Network Search: Input the number of the Network ID + input start Frequency, Symbolrate and set
you need to know the network ID, start frequency &
your TV provider)
“sorting by LCN” to ON. (please notice,
Symbolrate from
9
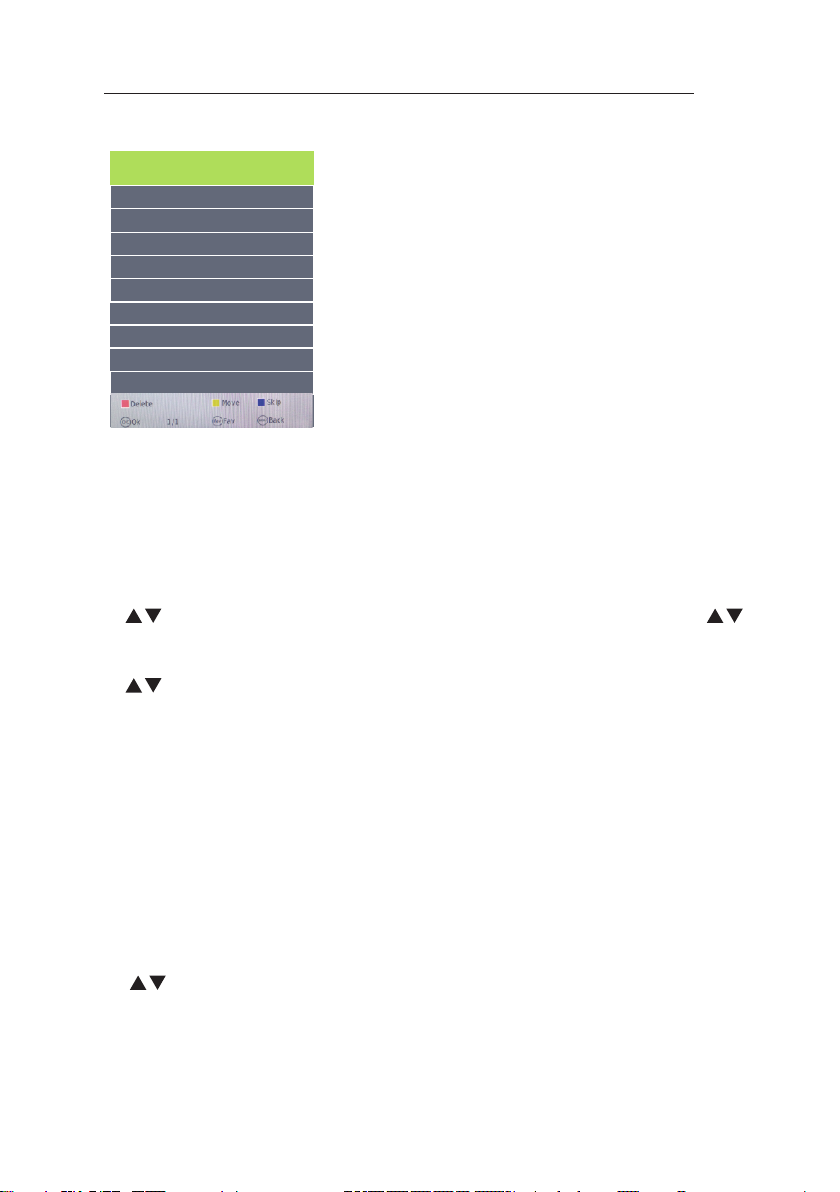
Programme Edit
Use up/down keys to select program edit.Press OK or Rght button to enter the menu.Use up/down
buttons to navigate through the menu.
1.Delete:
Press the RED button to delete the highlighted channel,a red circle will appear next to the channel name.
Press the RED button again to confirm delete.
Press the MENU to return to the main menu.
2.Move:
Press to select the channel,press yellow button to enter the move mode,then press to move
the channel location,press yellow button again or press OK to confirm.
3.Skip:
Press to select the channel you wish to skip.
Press the BLUE button,a logo will appear next to the channel name and the channel will be skipped
you scroll through the channels.
Press the BLUE button again on the highlighted channel to disable the skip function.Press MENU
to return to the main menu.
Programme Edit
Signal Information
Only available in DTV mode,Signal Information includes:channel/network/modulation/quality/strength.
CI Information
When insert CI Module,display CI Information.
Note:The following reception combinations are possible:ATV,DVB-C,DVB-T channels is not possible.
5V antenna power
Press button to turn on or off.
10
Software Update{USB}
1.Download the software to the usb device,then insert the usb device to the unit.
2.Press the Menu button to select the CHANNEL menu.
3.Press the buttons to select Software Update{USB} and then press the OK button to update software.
4.when the updating is completed,the unit will be reset to standby mode.
Power-Off-No-Signal-Down
If no valid input signal is detected,the TV set will toggle to standby mode automatically after
Auto-Power-Down
4 hours maximum after the last user interaction and/or the last channel switching,the TV set will
automatically toggle from On to standby mode.Prior to this autonatic toggling,a message will
be displayed allowing you to extend the delay time for another 4 hours.
approx.10 minutes.
Guide{EPG-Electronic Program Guide}
Press the GUIDE button on the remote control to open the Electronic Program Guide.EPG contains
a 7-day programme preview as long as the selected channel asupports this function.If there is more
information about a programme,press the and buttons to scroll through the pages.
Please note that the maximum viewable number of characters is limited.

11
Key
Stroke Action
KEY_UP use cursor to up
KEY_DOW
N use cursor to down
KEY_LEFT
switch operation to satellite system parameters setting
list
KEY_RIGHT switch operation to Transponder list
KEY_MENU Back to Main Menu.
KEY_EXIT Exit Main Menu.
KEY_GREEN Enter satellite edit menu
KEY_BLUE Enter satellite scan menu
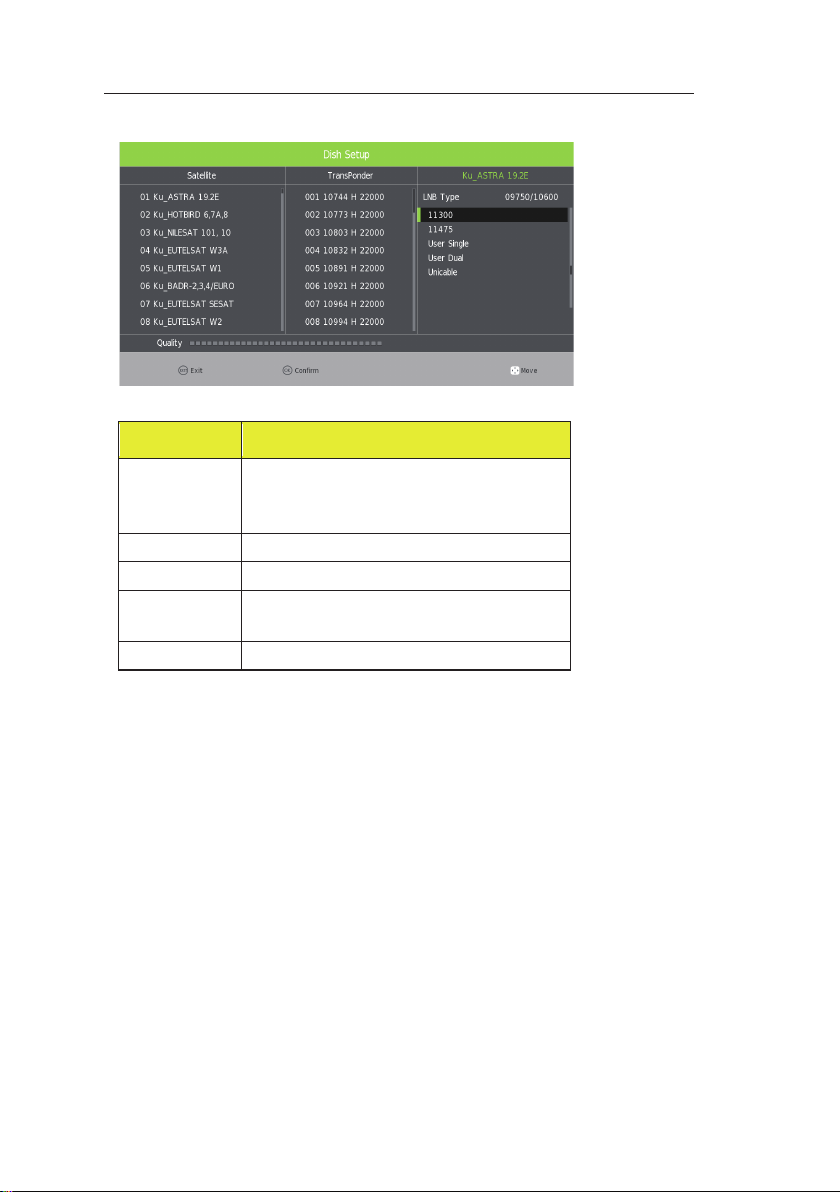
Satellite Tuning
Select “Dish Setup” item to enter the satellite system setting menu and the user
operation interface as following:
Satellite List
Operations in Satellite List Menu are shown in the following table:

12
Option
Value
Satellite Enter Satellite Rename edit menu
Longitude
Direction East ,West
Longitude
Angle Press num key to set the Angle
Band C,Ku band choose
Option
Value
Scan Mode Default,Network Search,Full Search
Channel Type All,TV only
Service Type All Services,Free Service
Satellite edit menu
Operations in satellite edit menu are shown in the following table:
satellite Seach menu
Operations in satellite scan menu are shown in the following table:

13
Key Stroke Action
KEY_UP use cursor to up
KEY_DOWN use cursor to down
KEY_LEFT switch operation to Satellite list
KEY_RIGHT switch operation to satellite system parameters setting list
KEY_ENTER Select/unselect cursor item Transponder.
KEY_MENU Back to Satellite list.
KEY_EXIT Exit Main Menu.
KEY_RED Enter Transponder Add menu
KEY_GREEN Enter Transponder Edit menu
KEY_YELLOW Enter Transponder Delete confirm menu
KEY_BLUE Enter Transponder scan menu
Option
Value
Transponder Can’t edit .Auto addition
Frequency Press num key to edit
Symbol(ks/s) Press num key to edit
Polarity H,V
Transponder List
Operations Transponder List Menu are shown in the following table:
Transponder Add menu
Operations in Transponder Add menu are shown in the following table:

14
Option
Value
Transponder Current edit item.Auto select
Frequency Press num key to edit
Symbol(ks/s) Press num key to edit
Polarity H,V
Key
Stroke Action
KEY_UP use cursor to up
KEY_DOW
N use cursor to down
KEY_MENU Back to Transponder list.
KEY_EXIT Exit Main Menu.
Transponder Edit menu
Operations in Transponder Edit menu are shown in the following table:
Setting
Operations in Setting Menu are shown in the following table:
15
Option
Value
LNB Type 9750/10600,9750/10750,05150,05750,
5150/5750,09750,10600,10750,11300,1
1475,User Single,User Dual
LNB Power On,Off
22KHz Auto,off,on
DisEqC Mode Off,LNB1,LNB2,LNB3,LNB4,Burst A,Burst
B
Motor None,DisEqC1.2,DisEqC1.3
Operations in Setting item menu are shown in the following table:

16
PICTURE
Picture Mode < Standard >
Contrast 50
Brightness 50
Colour 50
Tint 50
Sharpness 50
Colour Temp < Normal >
Menu Settings
Picture menu
Picture Mode: Choose from Standard,Dynamic,Personal and Mild.
Note: Contrast,Brightness,Colour and sharpness are only available and can be
adjusted in the User mode option in the Picture Mode Settings.
Contrst: Controls the difference between the brightest and darkest regions of
the picture.
Brightness: Controls the overall brightness of the picture.
Color: Control the color.
Sharpness: Increase this setting to see crisp edges in the picture;decrease it
for soft edges.
Tint: Controls the tint(NTSC mode only).
Color Temp: Choose from Warm,Personal,Cold and Normal.
Noise Reduction: Choose interference noise modes from Off,Low,
Mediumand High.
SCREEN: (Only available in PC) Press the OK button to select main menu to
adjust the screen.
Dynamic CR: Available options:On or Off.
Face Color: Control the Face Color of the picture.
Mocon: Press the right button to select On or Off.
Aspect Ration: Press up / down buttons to cycle among aspect ratio:4:3 /
16:9 / Auto / Zoom1 / Zoom2 and then press the OK button to confirm.
Blue Screen: Turn on / off blue screen.

17
SOUND
Sound Mode < Standard >
Treble 50
Bass 50
Balance < 0 >
Auto Volume < On >
Surround Sound < Off >
SPDIF Mode Auto
SOUND
AD Switch >
Bluetooth >
SOUND menu
Sound Mode: Allows you to select among: Standard,Music,Movie,Sports and
Personal.
Treble(Can be adjusted when the sound mode is set to User): Controls the
relative intensity of higher piched sounds.
Bass(Can be adjusted when the sound mode is set to User): Controls the relative
intensity of lower pitched sounds.
Balance: To adjust the balance of the left and right speakers audio output,or turn
off the volume of the left or right speaker.
Auto Volume: This feature automatically adjusts the audio level when the TV is
turned on.This function is activated by selecting “On”.
Surround Sound: Turn on / off the surround sound function by selecting “On” or
“ Off ”.
SPDIF Mode: Select the SPDIF Mode for the TV from off,PCM,Auto.
AD Switch: Turn on / off the AD Switch function by selecting “ On ” or “ Off ”.
Bluetooth: Turn on / off the bluetooth function by selecting “ On ” or “ Off ”.
Table of contents
Other Tristan Auron LED TV manuals


