Tritan Business Lite User manual

TWO WAY RADIO
BUSINESS
LITE

THANK YOU!
Thank you very much for choosing our transceiver.
transceiver provides you with reliable, clear and efficient
communication service. Our LITE introduces innovative DSP (Digital
Signal Processing) baseband technique to achieve high-fidelity
voice processing .
LITE is a compact transceiver that allows you to enjoy instant
communication at ease. The features like , high power (5 WATTS),
make the LITE a cost-effective professional transceiver. It has unique
and innovative functions, such as battery capacity, flashlight and
optional high-delity earphones .

SAFETY INFORMATION FOR USER
transceiver is excellently designed with advanced
technology. Please observe the following precautions to prevent
personal injury and ensure the safety of transceiver usage.
1.Keep the transceiver and accessories away from children.
2.Please do not try to open or modify the transceiver without
permission, This may also cause damage.
3.Please use genuine battery and charger to avoid damage.
4.Please use genuine antenna to ensure the communication distance.
5.Please do not expose the transceiver to along period of direct
sunlight, nor place it close to heat appliances.
6.Please do not put the transceiver in excessively dusty or humid
areas.
7.Do not use harsh chemicals, cleaning solvents to clean the
transceiver.
8.Do not transmit without antenna.
9.When using this transceiver, we recommend transmitting for 1 minute
then receiving for 4 minutes. Continuous transmitting for long time
or working in high power will heat the back of the transceiver. Do not
place the transceiver’s hot back close to any plastic surface .
10.If any abnormal odor or smoke is detected coming from the
transceiver, turn off the power and take off the battery pack and its
case.
User Manual Applied to: TRITAN LITE UHF FM Transceiver

CONTENTS
UNPACKING ....................................................................................... 01
Supplied Accessories........................................................................ 01
STANDARD ACCESSORIES/OPTIONAL ACCESSORIES ............... 02
Standard Accessories ....................................................................... 02
BATTERY INFORMATION .................................................................. 03
Charging the Battery Pack ................................................................ 03
Charger Applied ................................................................................ 03
NOTES.............................................................................................. 03
How to Store the Battery................................................................... 04
In Car Charging................................................................................. 05
PREPARATION ................................................................................... 06
Installing / Removing the Battery ...................................................... 06
Installing / Removing the Antenna ................................................. 06
Installing / Removing the Belt Clip .................................................... 07
Installing the Additional Speaker/ Microphone (Optional) ................. 07
Installing/ Removing the Hand Strap (Optional)................................ 07
GETTING ACQUAINTED.................................................................... 08
LCD Display Screen.......................................................................... 08
Backlight Status ............................................................................... 11
[PF1] & [PF2] Key ............................................................................ 11
BASIC OPERATIONS ......................................................................... 12
Switch on / off the Transceiver.......................................................... 12
Switch on/off the Flashlight ............................................................... 12
Volume Control ................................................................................ 12
Current Channel Enquiry .................................................................. 12
Channels Selection ........................................................................... 12
Receiving .......................................................................................... 13
Transmitting ...................................................................................... 13
Keypad Lockout ................................................................................ 14

CONTENTS
FUNCTIONS SETUP........................................................................... 15
Basic Functions Setup ...................................................................... 15
FM Radio ......................................................................................... 15
Beep Prompt .................................................................................... 15
ADVANCE OPERATIONS .................................................................. 16
Squelch off/on ................................................................................... 16
Hi/Low Power Switch ........................................................................ 16
BACKGROUND OPERATIONS.......................................................... 17
Time-out Timer .................................................................................. 17
Time-Out Timer Pre-Alarm ............................................................... 17
Battery Save .................................................................................... 17
Maintaining and Cleaning ................................................................17
TECHNICAL SPECIFICATIONS......................................................... 18
TROUBLE SHOOTING GUIDE
............................................................... 20

01
UNPACKING
Carefully unpack the transceiver. We recommend you identify the
items listed in the table bellow before discarding the packing material. If
any items are missing or have been damaged during shipment, please
contact local dealers immediately.
Supplied Accessories
Item Quantity
Antenna stubby 1
Antenna long 1
Li-ion Battery 2
Desktop Charger 1
Mains PSU 1
Car Charger 1
Earpiece 1
Magnetic mount Antenna 1
Metal Belt Clip 1
Instruction Manual 1
Licence Application 1
Hand strap 1

02
Standard Accessories
STANDARD ACCESSORIES/
OPTIONAL ACCESSORIES
Antenna *
QA07U(400-470MHZ)
Li-ion Battery
Pack)1300mAh
QB-33L
Charger
QBC-33L
Mains PSU
(12V/500mA)
QPS-05
Belt Clip BC06 Instruction Manual Earpiece HS03 Car Charger CPL-02
For optional Audio accessories
Tritan Highly Recommends Synetix Radio Accessories

03
BATTERY INFORMATION
Charging the Battery Pack
The battery pack is not charged at the factory; please charge it
before use.
Charging the battery pack for the first time after purchase
or extended storage (more than 2 months) may not bring the
battery pack to its normal operating capacity. After fully charging/
discharging cycle for two or three times, the operating capacity
will reach its best performance. The battery pack life is over when
its operating time decreases even though it is fully and correctly
charged. Change to a new battery pack.
Charger Applied
Please use the specic charger appointed by our company. Other
models may cause explosion and personal injury. After installing the
battery pack, if the radio displays low battery , please charge the
battery.
NOTES
Do not short the battery terminals or throw the battery into fire.•
Never attempt to remove the casing from the battery pack. We
bear no responsibility on any results caused by modifying the
battery without permission of our factory.
The ambient temperature should be between 15•℃and 35℃while
charging is in progress. Charging outside this range may not fully
charge the battery.
Always switch OFF the transceiver equipped with a battery pack•
before charging. Otherwise, it will interfere with correct charging.
To avoid interfering the charging, please do not cut off the power•
or take out the battery during charging.
Do not recharge the battery pack if it is already fully charged. This•
may shorten the life of the battery pack or damage the battery
pack.

04
Do not charge the battery or transceiver if it is damp. Dry it before•
charging to avoid danger.
BATTERY INFORMATION
WARNING:
When keys, ornamental chain or other metals contact with
the battery terminal, it may cause damage or Injury. If the
battery terminal short circuit it will generate a lot of heat,
please be careful when you carry or use the battery, please put
battery or radio into insulated container. Do not put it into
metal container.
How to Store the Battery
If the battery needs to be stored, keep it in status of1. 50% charged.
It should be kept in2. alow temperature and dry environment.
Keep it away from hot places and direct sunlight.3.
WARNING:
· Do not short circuit the battery terminals.
· Never attempt to remove the casing from the battery pack.
· Never assemble the battery in dangerous surroundings, spark
may cause explosion.
· Do not put the battery in hot environment or throw it into
fire, it may cause explosion.
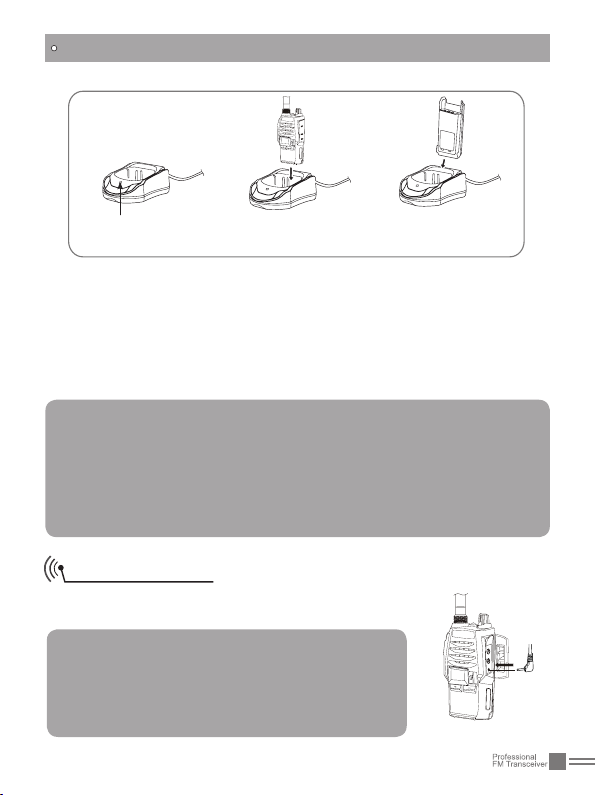
■To charge the battery directly or the transceiver via charger
You can charge the battery or transceiver separately.
Plug the AC adaptor into the AC outlet, and then plug the cable1.
of the AC adaptor into the DC jack located on the back of the
Charger.
Charging indicator---Green
05
Working Indicator
Charging Indicator
Transceiver Charge Battery Charge
Plug the Li-ion battery or the transceiver installed with Li-ion2.
battery into the matched charger.
A. Make sure that the battery is well connected with charging
connectors.
Charging indicator---Red
Fully charged. Charging indicator--Green.3.
BATTERY INFORMATION
Note:
It takes approximately 4 hours to fully charge the battery.
But, the actual charging time depends on the current battery
capacity. After fully charged, please remember to remove
the battery or transceiver out of charger. Over charging will
shorten the battery life and reduce its performance.
In Car Charging
Connect the transceiver directly with adaptor or
car charger to charge.
Note:
Please power off the transceiver before
charging the transceiver in this way. Also, it
takes longer time (totally 12hours) to fully
charge the transceiver in this way.

06
PREPARATION
Installing / Removing the Battery
■Installing the battery:
Match the battery pack with the corresponding guides on the back
of the transceiver, and push it upwards till it is fully locked by the
battery latch.
■Removing the battery pack:
Slide up the battery latch and remove the pack away from the
transceiver.
Installing / Removing the Antenna
■Installing the Antenna:
Screw the antenna into the connector on the top
of the transceiver by holding the antenna at its
base and turning it clockwise until secure.
■Removing the Antenna:
Turn the antenna anticlockwise to remove it.

07
PREPARATION
Installing / Removing the Belt Clip
■Installing the Belt Clip:
Place the belt clip to the corresponding
grooves on the back of the transceiver, and
then clockwise screw it.
■Removing the Belt Clip:
Anticlockwise turn the screws to remove
the belt clip.
Installing the Additional Speaker/ Microphone (Optional)
Switch the radio off. Remove the MIC-
SP jack cover and then insert the Speaker/
Microphone plug into MIC-SP jack.
Note: The transceiver is not completely
waterproof while using the Speaker/
Microphone.
Installing/ Removing the Hand Strap (Optional)
Slide the loop of the hand strap through the eyelet on the upper
rear of the transceiver; then pull the entire hand strap through the
loop to secure the hands strap in place and lastly tighten the hands
strap.

08
GETTING ACQUAINTED
Transmitting
TX Power
Narrow Band
Keypad
Lockout
Battery
Capacity
CTCSS
DCS
FM Radio
Code group
Battery capacity indicator (Full)
Battery exhaust ,please change battery or recharge
Left battery capacity
LCD Display Screen
On the screen, icons for the optional functions are displayed on
the screen. It helps a lot when you forget the functions settings.
Channel
09
5
6
7
GETTING ACQUAINTED
1
32
8
9
10
11
12

10
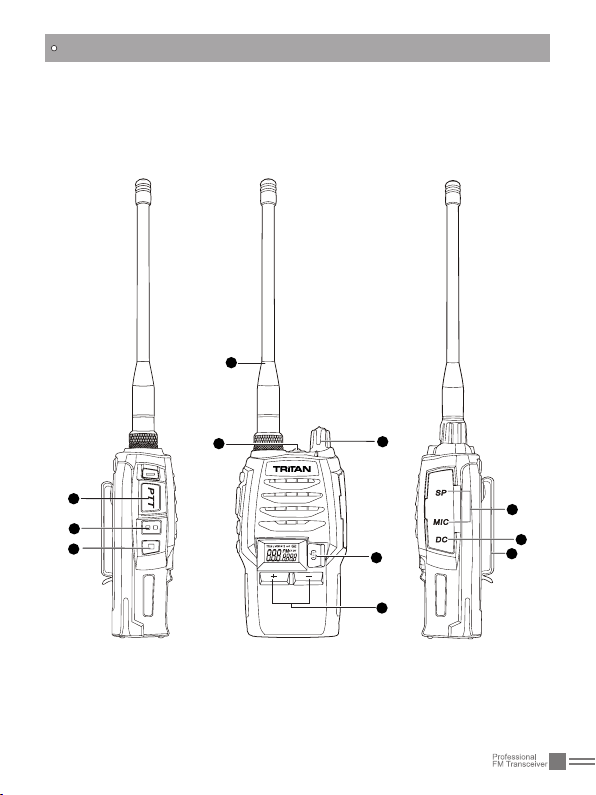
GETTING ACQUAINTED
Antenna1.
POWER / VOLUME Switch:2.
Turn clockwise to switch on the transceiver, and turn anticlockwise
till hearing "Ka" to switch off the transceiver. After switching on the
transceiver, turn clockwise to increase the volume and anticlockwise to
decrease the volume.
Flashlight:3.
under standby state, a short press to the ashlight Key will power on
the ashlight. Repeat same operation to turn off the light.
PTT Key5.
To make a call, please press and hold this key and speak into the
microphone. Release the key to receive.
PF1 Key6.
Squelch off.
PF2 Key7.
Hi/Low power switch
8. / Key
Press the buttons to select desired channel. press + to increase
channel, and - to decrease channel. / Key When FM is on, you
can press this key to search radio stations.
9. key
Press this key repeatedly to select desired function to setup. Press
this key together with / key to set desired function value.
External MIC/Loudspeaker Jack10.
Car Charging Jack11.
Belt Clip12.

11
GETTING ACQUAINTED
Backlight Status
Warning on low voltage
Transceiver emits a low voltage beep
at intervals of 60 seconds, and red
light ashes.
Receive Backlight eluminates all the time
Keypad operation
Transceiver emits"DU" when entering
a function menu, "DU DU" to exit any
function.
[PF1] & [PF2] Key
Press [PF1] Squelch off/on
Press [PF2] Hi/Low power switch

12
BASIC OPERATIONS
Switch on / off the Transceiver
Switch on the Transceiver: Under power-off state, turn POWER/
VOLUME knob clockwise till hearing "Click" to switch on the
transceiver.
Switch off the Transceiver: When the transceiver is in the open
state, turn POWER / VOLUME anticlockwise till hearing "Click" to
switch off the transceiver.
Switch on/off the Flashlight
Under standby state, a short press to the ashlight Key will switch
on the ashlight. Press the same key to switch off the light.
Volume Control
When the transceiver is in open state, turn POWER / VOLUME
knob to adjust the volume. Turn clockwise to increase the volume,
and anticlockwise to decrease the volume. You can press the
squelch off [PF1] to monitor current volume.
Current Channel Enquiry
Under Standby state, pressing or , the transceiver will
show current channel number.
Channels Selection
Under channel mode, to choose the desired channel. rstly users
need to press repeatedly till the channel number displayed on
the LCD ashes, secondly, press or to up or
down the channel number, and then the transceiver
will display the adjusted channel number. Press
to upward the channel number and to downward
the channel number. Press any key except , to confirm

13
and exit. After entering the setting mode, if users do not set the
channel or not exit the mode after adjusting the channel number, the
transceiver will exit the setting mode automatically after 10seconds.
Receiving
Once current channel is called, backlight lightens all the time, and
then you can hear other party calling.
NOTE:
•If current channel has been programmed with signaling, you
can only hear the call from a same signaling, other calls can’t
be heard.
Transmitting
Be sure that the channel you want to use is not in busy state
through monitoring for a while by pressing the
programmed Squelch off [PF1] key. Under these
conditions, press the [PTT] key and speak into
microphone. Please keep around 2.5-5cm distance between
microphone and your lip. And please speak in normal tone to make
the receiver obtain best tone quality.
Note:
Pressing and holding [PTT], the backlight lightens for 10seconds
and goes out afterwards and TX icon displayed on the LCD, the
transceiver is transmitting. Release the PTT to receive.
BASIC OPERATIONS

14
BASIC OPERATIONS
To prevent wrong operation, users can start Keypad Lockout
function to lock key and key.
To start Keypad Lockout function, press and hold flashlight key
while turning on the transceiver, and then release
the key when the transceiver emits "DU". Then, the
LCD displays the icon . The keys , ,
will be invalid when this functions is started. Repeat
the above operations to disable the keypad lockout
function with "DU DU" prompt.
Keypad Lockout

15
FUNCTIONS SETUP
Basic Functions Setup
1. Press repeatedly to select desired sub-menu to setup.
2. Press / to set desired function value.
3. Press [PF1] or [PF2] to save and exit.
FM Radio
Press1. repeatedly till "FM" on the LCD ashes.
Press2. / to on/off the FM radio function.
ON: turn on FM radio
OFF: turn off FM radio function (reset the transceiver
when FM radio is on can also turn this function off)
Press [PF1] or [PF2] to exit.3.
NOTE:
When FM radio function is on, press / to search FM
radio station and display current frequency. When a certain
radio station is detected, the radio will stop on the station. The
radio can transmit or receive when FM radio is on.
Beep Prompt
Press1. repeatedly till "BEP" on the LCD ashes.
Press2. / to on/off the BEEP prompt function.
ON: turn on the BEEP prompt.
OFF: turn off the BEEP prompt.
Press [3. PF1] or [PF2] to exit.
Table of contents


