Tronhelicopters Tron 5.5 User manual

MANUAL V 1.1.1

Pages Content
3 Safety notice
4-5 Features and about
6-7 Tools and electronics
8-9 Motor, esc, connectors,blades
10-11 Screws, nuts, shims and washers
12-15 Head assembly
16-22 Tail assembly
23 Servos preparation
24 Battery tray
25-28 Upper main frame assembly
29 Motor mount and pinion
30 Servo frame and motor support.
31-32 Upper and lower main frame assembly
33-36 Landing gear, servos, electronic assembly and wiring.
37-39 Main drive and head to frame assembly
40 Tail boom to main frame assembly
40-43 Final setup, canopy and pre-ight check
2
Index

3
Operate the helicopter in open areas with no people nearby.
Follow your countries air regulation rules.
You may need to join a local club and become a member before you can y the model.
Do NOT operate the helicopter in the following places and situations (or else you risk
severe accidents)
In places where children gather or people pass through in residential areas and parks,
indoors and in limited space in windy weather or when there is rain, snow, fog or other
precipitation. If you do not observe these instructions you may be held liable for personal
injury or property damage!
Always check the R/C system prior to operating your helicopter.
Keep in mind that other people around you might also be operating a R/C model. Ne-
ver use a frequency which someone else is using at the same time. Radio signals will be
mixed and you will lose control of your model.If the model shows irregular behavior, bring
the model to a halt immediately and disconnect the batteries. Investigate the reason and
x the problem. Do not operate the model again as long as the problem is not solved, as
this may lead to further trouble and unforeseen accidents.In order to prevent accidents
and personal injury, be sure to observe the following:Before ying the helicopter, ensure
that all screws are tightened. A single loose screw may cause a major accident.
Replace all broken or defective parts with new ones, as damaged parts lead to crashes.
Never approach a spinning rotor. Keep at least 5 meters/yards away from a spinning rotor
blades.Do not touch the motor immediately after use. It may be hot enough to cause
burns. Perform all necessary maintenance.
PRIOR TO ADJUSTING AND OPERATING YOUR MODEL, OBSERVE THE FOLLOWING
Operate the helicopter only outdoors and out of people’s reach as the main rotor opera-
tes at high rpm!
Note that a badly assembled or improperly adjusted helicopter is a safety hazard!
In the beginning, novice R/C helicopter pilots should always be assisted by an expe-
rienced pilot.
SAFETY FIRST! ALWAYS.
savety notice
YINTECH/Tronhelicopters.
3. Ke Yuan South Road, Guang Cheng
Qu.Dongguan City.
Dongguan 523009.
China.

Wide battery compartment with quick lock and release system.
Light, yet very sti and robust.
Mini or full-size tail servo option.
Motor mounting features a bearing block supported pinion, reducing overall wear on the power system and
drive train.
Compatible with a wide range of motor sizes. 4020, or 4025 series t with easy. From 1000kv-1350kv for 6s
5mm shaft and 6mm shaft diameter ) 14T/5mm included.
Octa boom design with oval side shapes, no boom supports needed.
Capable of using a wide range of lipos. 6,8,10 or even 12S. (6S-5000mAh to 5500mAh recommended).
Well engineered servo layout in conjunction with the FBL system and ESC.
Easy cable routing with various options to ensure a clean setup. Modern, sporty and functional design.
High visibility canopy for perfect orientation in ight.
Recommended main blade size 550-560mm. Tail blade size 86-93mm.
Sustainably produced.
Features.
4

About Tronhelicopters
Designed, engineered and manufactured by YINTECH and Tronhelicopters Switzerland.
Tronhelicopter’s team was built in 2019. Including professional RC Helicopter Pilot and RC
FPV Drone World Champion from 2017 Dario Neuenschwander, we partnered with YIN-
TECH, to provide high-quality manufacturing thanks to over 18 years experience within
the helicopter industry.
Partnered together, an idea was born to release a helicopter that satised the market
needs. Lightweight, strong, simple assembly, ease of maintenance, high quality, a wide
ight envelope with precision and responsiveness, all while delivering unique and sporty
robotic aesthetics.
After over a year of testing, the Tron 5.5 was found to deliver superior performance while
utilizing 550mm class rotor blades. Any pilots will nd not only a great ight experience
but also plenty of neat features of the model.
Pilots can power the Tron 5.5 with a wide variety of motors and battery setups, ranging
from 4020, and 4025 motors, as well as 6s, 8s, and even 12s power systems.
Low head speed and high head speed provide pilots the exibility they want in a helicop-
ter, to meet the performance they want.
No matter your needs as a pilot, the Tron 5.5 will meet them all.
5
CAUTION:
This radio controlled helicopter is not a toy.
The product is not suitable for children under 14 years of age.
SAFETY PRECAUTIONS:
This kit includes some preassembled components. Please check for any
loose screws and tighten them before you proceed with assembly. Use loctite where re-
quired as shown in this manual!
You are responsible for assembly, safe operation, maintenance, inspection and adjust-
ment of the model.
Before beginning assembly, please read these instructions thoroughly.
Check all parts. If you nd any defective or missing parts, contact your local dealer.
For the USA market, The Academy of Model Aeronautics (AMA) is
a national organization representing modelers in the United States.
Please refer to the National Model Aircraft safety code from Academy of
Model Aeronautics.

Tools required
6
2 component epoxy
Loctite 243 / medium strength
Grease
2*Wrench for tail shaft nut
Hex screwdriver
1.5mm/2mm/2.5mm/4mm/5mm
TR501-518 Pair of customized nut wrench for
tail shaft assembly. Optionally available at your
Dealer.
7
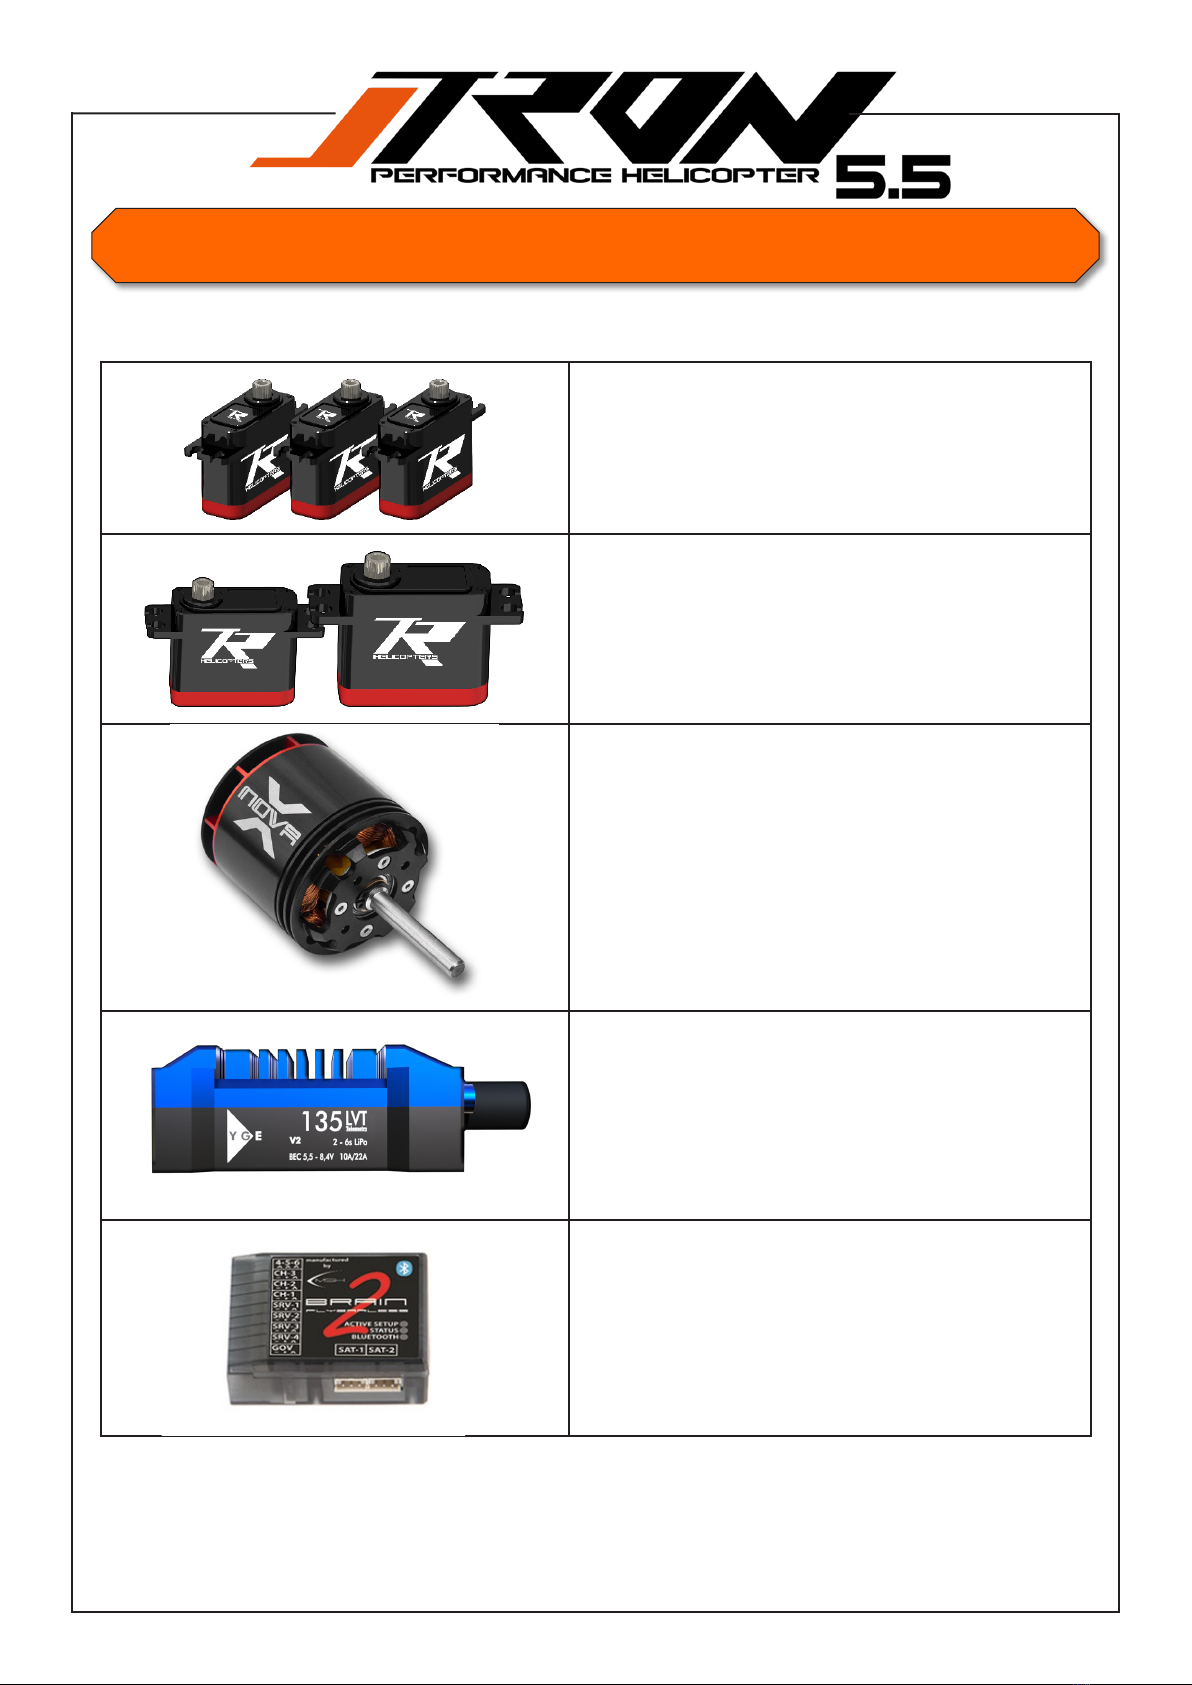
Electronics required
3*midi size servos for swashplate
1* midi or full size servo for tail
BL motor. 4020-4025 size/5mm or 6mm
shaft diameter with min. 22mm length
ESC 6S-12S 100A-155A
FBL device and receiver with 6 channel
transmitter.

• KOLIBRI-140-LV.
• PYRO 650-103-1030kv 5 or 6mm shaft.
• PYRO 650L-103-1030kv 5 or 6mm shaft.
Recommendation for Tron 5.5 if you use KONTRONIK equipment.
• TRIBUNUS II 06-120A SBEC ESC.
• TRIBUNUS 12-130A ESC SBEC ESC.
• SCORPION HK-IV-1100 kv 5 or 6mm shaft.
• SCORPION HK-IV 1060 kv 5 or 6mm shaft.
• SCORPION HK-IV 1320 kv 5 or 6mm shaft.
Recommendation for Tron 5.5 if you use SCORPION equipment.
• YGE 135 LVT. ESC.
• YGE AUREUS 135 HVT.ESC.
• HOBBYWING PLATINUM PRO 120A V4.
• HOBBYWING PLATINUM PRO 130A V4.
• XNOVA 4020-1200 kv LIGHTING OR PER-
FORMANCE series 5 or 6mm shaft.
• XNOVA 4020-1350 kv LIGHTING 5 or 6mm
shaft.
• XNOVA 4025-1120 kv LIGHTING 5 or 6mm
shaft.
Recommendation for Tron 5.5 if you use HW,XNOVA,YGE
equipment.
Motor and ESC.
8

Connectors,main and tail blades recommendation.
Motor and ESC.
Main blade recommendation for Tron 5.5 (545mm-560mm length).
Tail blade recommendation for Tron 5.5 (85mm-95mm length).
9
We do recommend to use quality connectors for a safe and solid running setup.
(ESC and battery)
• Supra X Pro S6
• RCPROPLUS Pro-D6 Supra X
10
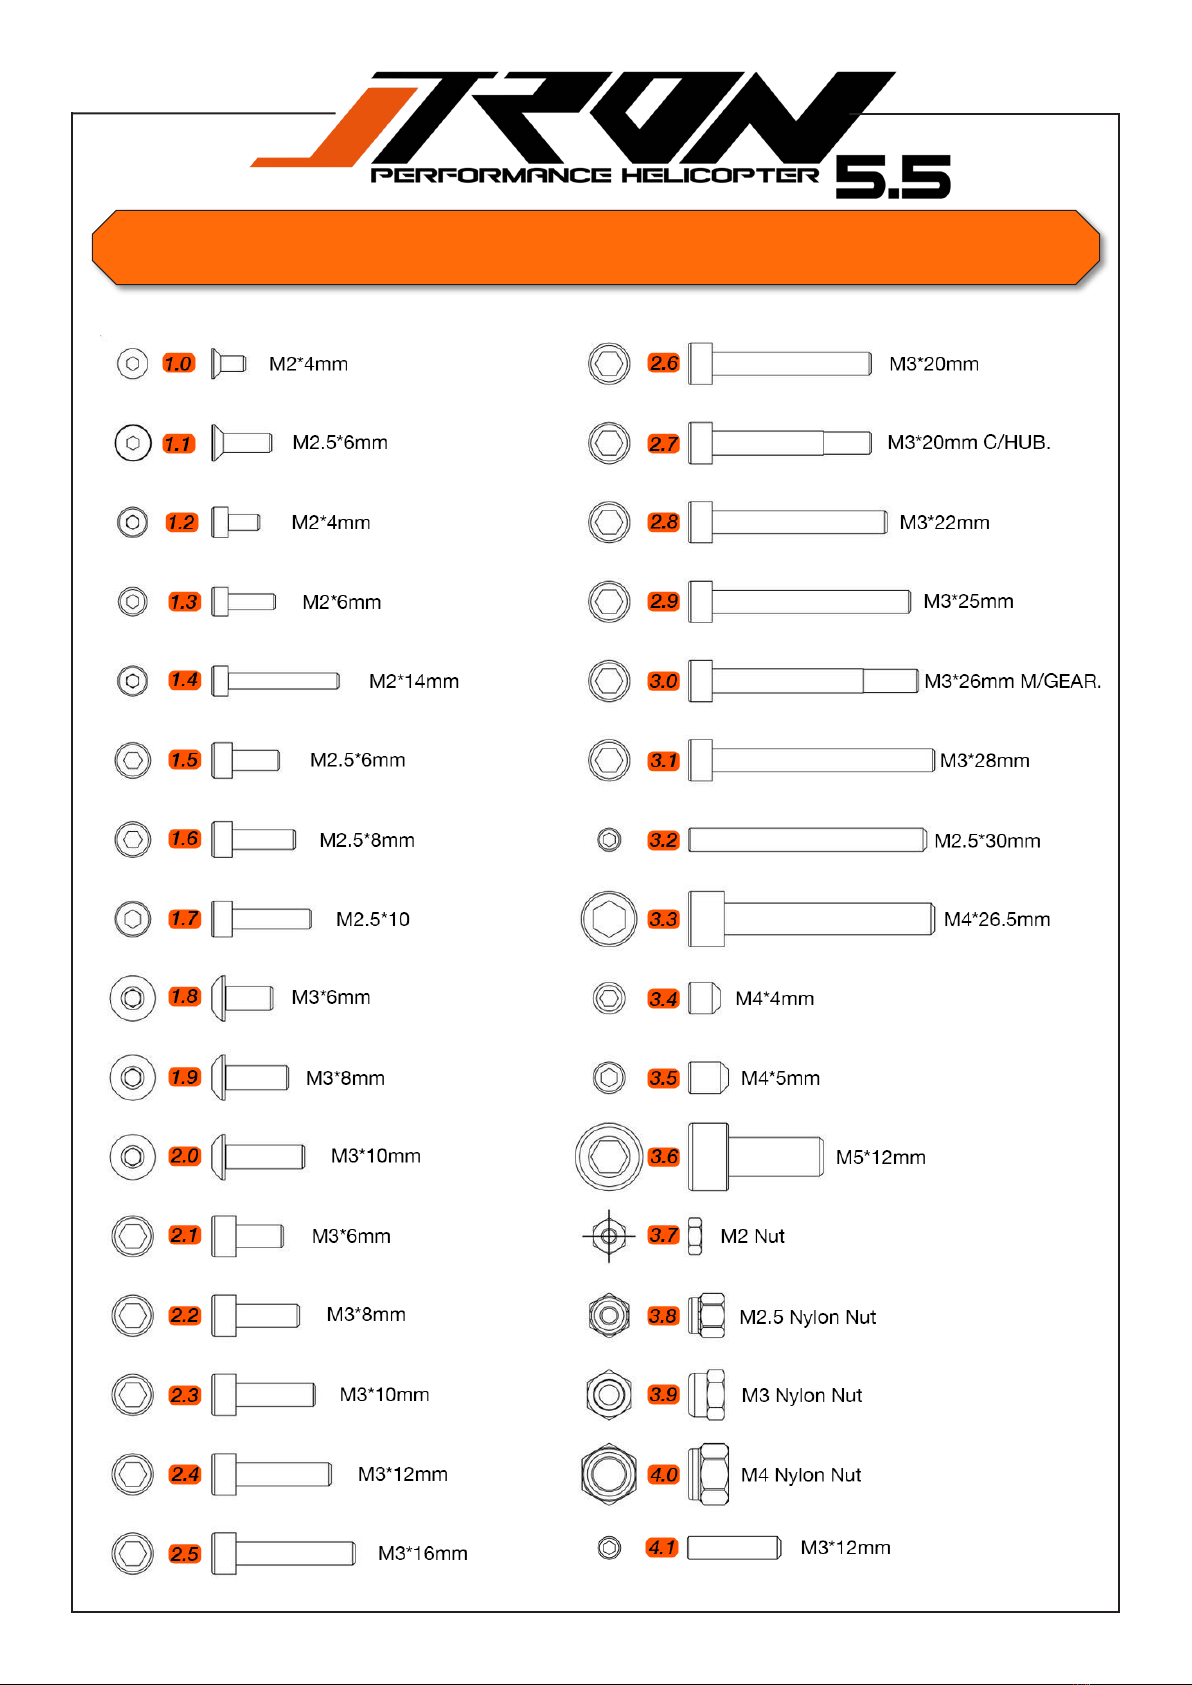
Screws and nuts.

Screws and nuts.
11
Shims and washers.

Head assembly.
TR502-103 Feathering shaft.
TR503-204 Feathering shaft support.
TR504-870 Head dampeners 70 shore, for Sport and moderate 3D ying.
(standard in kit).
TR550-001 Center Hub.
Internal hole bigger.
Apply grease.
TR550-804 Main grip bearings set, with thrust bearings and shims.
TR550-110 Pivot steel ball set
for head.
TR550-001 Center Hub , 70 shore dampeners included.
TR504-890 Head dampeners 90 shore for high rpm and hard 3D
ying style. (optional)
TR550-003 Main grip arms.
TR550-002 Main blade grip with bearings.
1.6
3.6
6.2
5.8
Pay attention to the orientation of the ball cage.
12
You will need:
Loctite 243 = blue
Grease = yellow

Head assembly. Head assembly.
You will need:
Loctite 243 = blue
2.2
2.5
5.1
5.3
TR550-105 Anti rotation arm set with
bearings,shims,screws and ball links.
TR550-103 Bearing set and
spacers for anti rotation arms.
TR504-100 Plastic ball link
set 2,5mm
5.1
TR550-105 Anti rotation arm set with
bearings,shims,scews and ball links.
2.6
Do not tighten now!
Do not tighten now!
13
Important note!
The ball links have a larger and a smaller
diameter. Always make sure the larger dia-
meter is pointing towards the pivot ball when
assembling!

1.2
5.0
TR550-008 Complete swashplate assembly.
1.4
TR550-110 Pivot steel ball set for head. (16pcs.)
Swashplate is preassembled in factory.
Please use loctite 243 on 1.2 and 1.4
Head assembly.
You will need:
Loctite 243 = blue
14

Head assembly.
Do not tighten now!
3* Linkage rod, servo horns to swashplate.
MKS, (15mm, others 18mm)
2* Linkage rod, swashplate to blade grip arms.
TR502-244 Main grip rod 2,5mm.
(27mm)
TR504-100 Plastic ball link
set 2,5mm
TR504-100 Plastic ball link
set 2,5mm
Groove indicates CCW tread!
TR502-230 Servos to swash-
plate linkage rod set. 2,5mm
2.7
3.9
2.4
TR502-104 Hollow main shaft.
1. Insert main shaft into center hub rst.
2. Tighten screw 2.7
3. Tighten screw 2.6 left and right step by step (use loctite 248).Make sure the shim 5.1 do not fall out.
12mm
Head assembly.
You will need:
Loctite 243 = blue
15
CW tread!
Important note!
The ball links have a larger and a smaller
diameter. Always make sure the larger dia-
meter is pointing towards the pivot ball when
assembling!
You will need:
Loctite 243 = blue
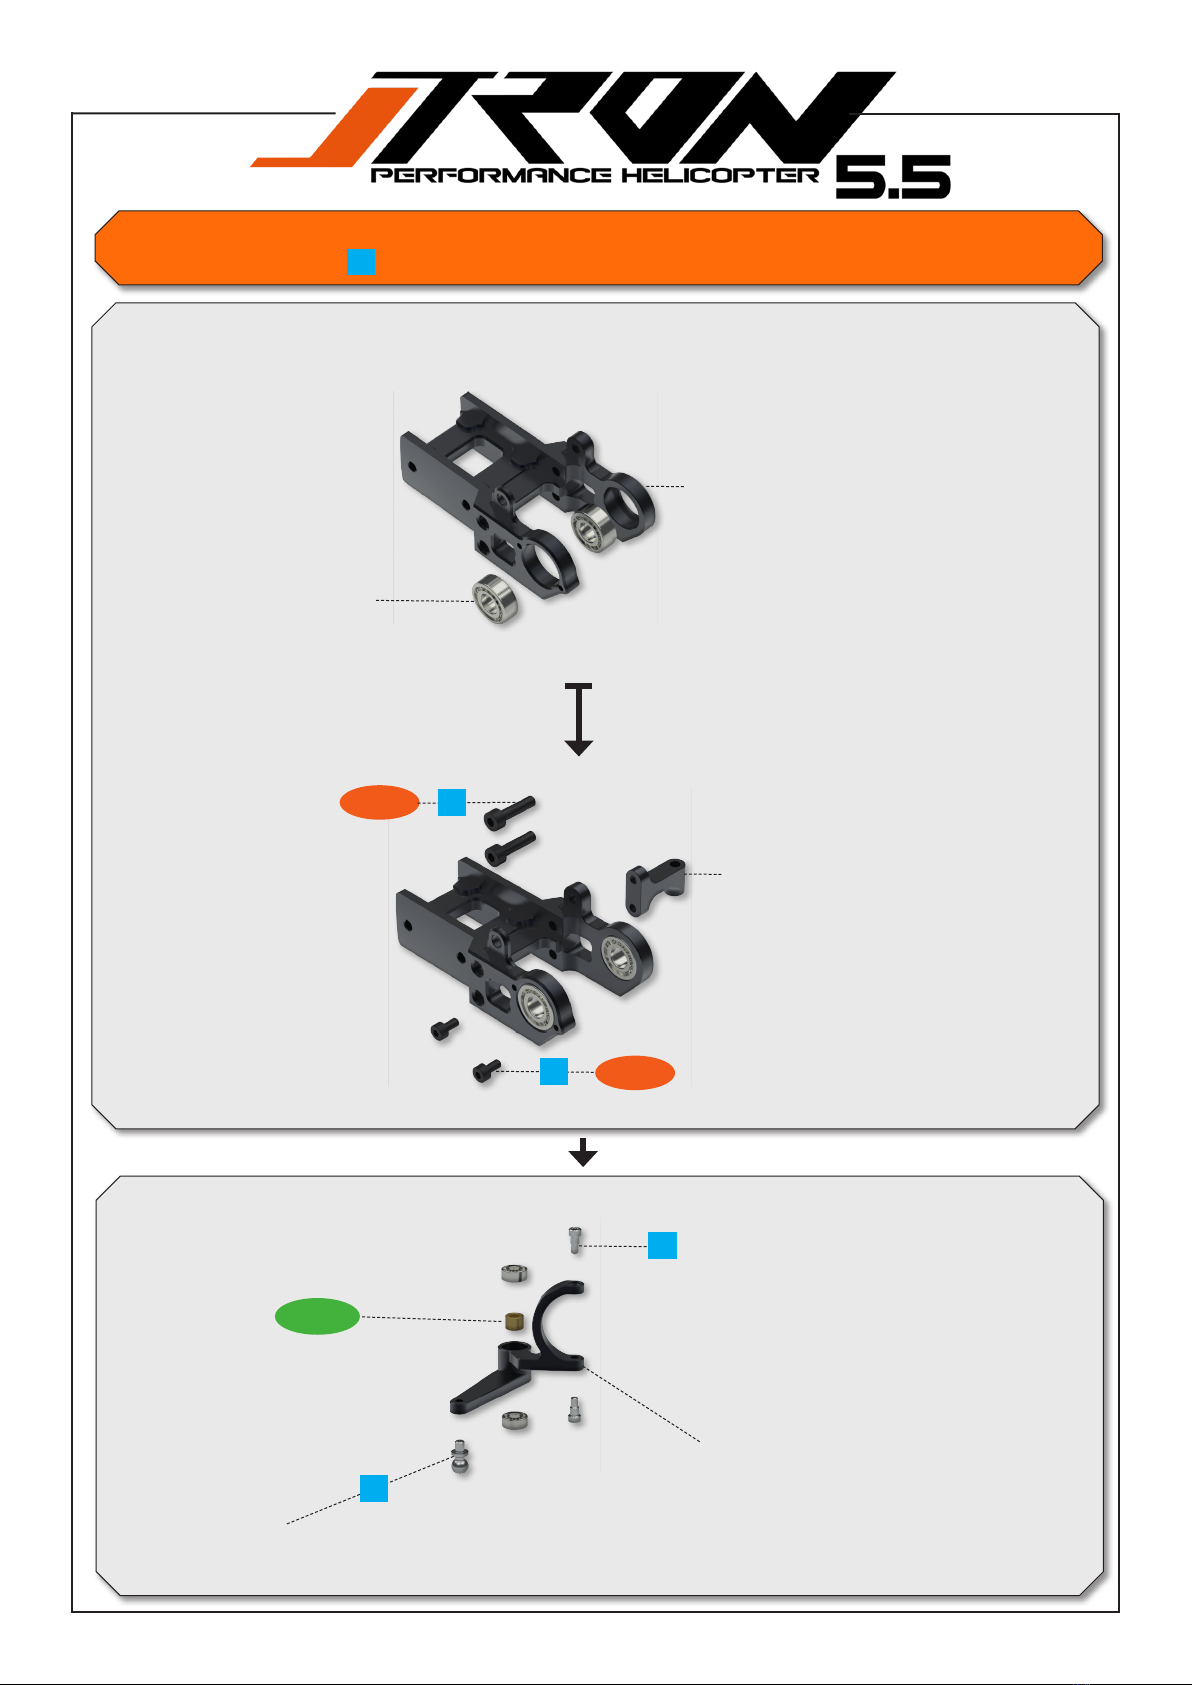
Tail assembly.
1.7
1.2
TR550-403 Tail case assembly including
bearings.
TR501-408 Tail pitch arm support
TR550-316 Tail pitch arm assembly.
5.5
TR550-110 Pivot steel ball set for head. (16pcs.)
TR506-511 Tail case bearings
16

Tail assembly. Tail assembly.
3.8
3.9
TR504-404 Tailshaft dampening set.
TR502-407 Tail shaft with dampeners.
TR502-324 Tail blade holder spindle.
TR550-110 Pivot steel ball set for
head. (16pcs.)
5.6
Internal hole bigger.
Apply grease.
Pay attention to the orientation
of the ball cage.
TR506-491 Tail blade holder thrust
bearing set.
TR550-401 Tail blade holder
bearing set.
17
You will need:
Loctite 243 = blue
Grease = yellow
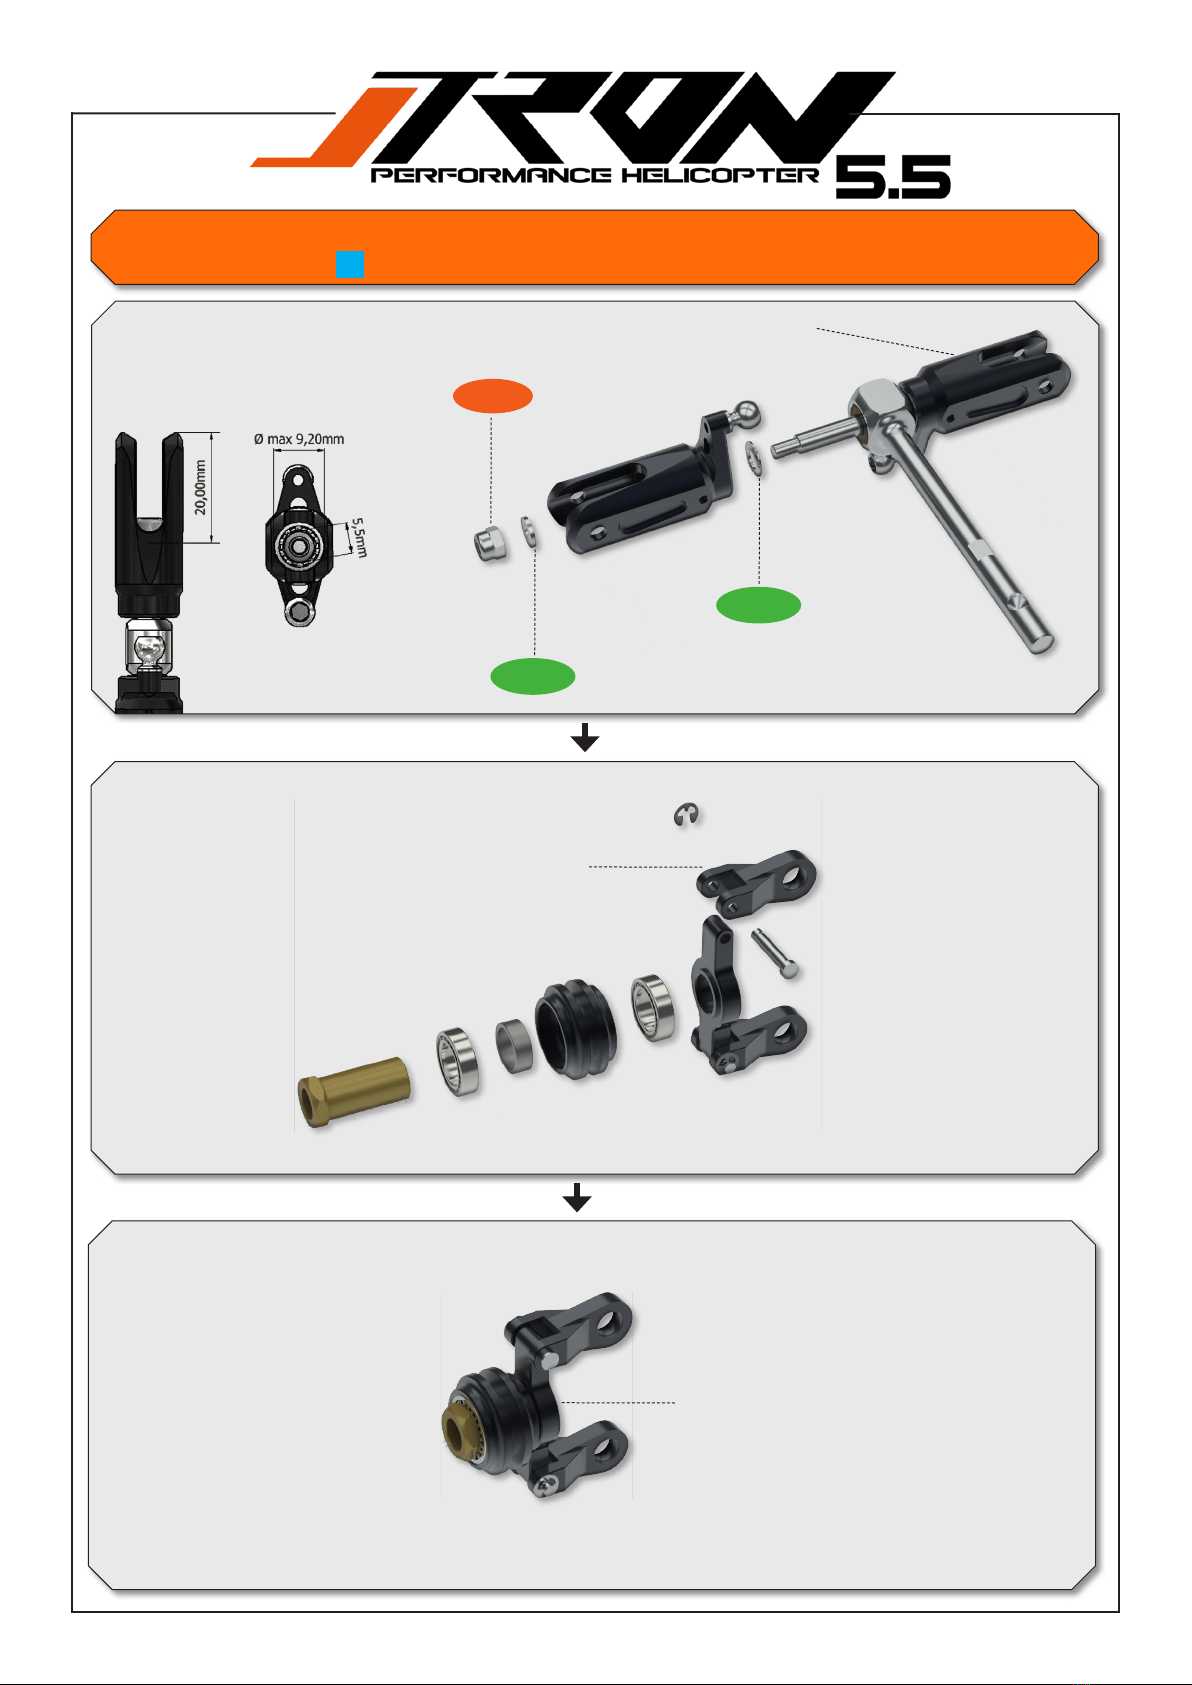
Tail assembly.
You will need:
Loctite 243 = blue
3.9
6.5
5.2
TR550-525 Tail blade holder set
complete.
TR550-428 Tail pitch slider assembly.
(complete)
TR550-322 Tail pitch linkage with c-clips
and shafts.
18
Wrench size for nut = 5.5mm.Outer diameter
should not exceed 9.2mm and min. 20mm
length is required.
Optional ( TR:501518 )

Tail assembly.
Insert belt here!
Tail assembly.
You will need:
Loctite 243 = blue
5.7
TR501-408 Tail pitch arm support
5.4
3.1
1.7
TR550-403 Tail case assembly including bearings
TR501-306 Tail shaft collar
3.5
3.4
TR501-319 Tail pulley 19T (included)
TR501-318 Tail pulley 18T (optionally)
TR501-320 Tail pulley 20T (optionally)
1.2
TR550-405 Tail case belt pulley assemble
Pay attention to the orientation of the at spots on the tail shaft when tight-
ern the set screws.Use a minimal amount of loctite 248 for the setscrews.
TR506-511 Tail case bearings
19
Screws are loctited by factory!
Important note!
The ball links have a larger and a smaller
diameter. Always make sure the larger
diameter is pointing towards the pivot
ball when assembling!

Insert nuts into the tail pushrod mounting device. Use the same direction as
shown in the illustration.
Use the tail pushrod temporary.
Insert the tail push rod with the nuts facing up into the boom.
Make sure that when you tighten the screws for the tail push rod guide,
your mounting device facing up like shown in the illustration.
Pull the mounting device out from the nuts.
Tighten the screws.
1.1
3.8
TR501-656 Tail boom for 550mm Blade length
Tron 5.5 including tail push guide.
TR503-216 Tail pushrod
guide. Include screw and nut
for assembling.
Tail assembly.
20
You will need:
A little bit of patience, when doing it for the rst time
Table of contents
Popular Toy manuals by other brands


 manual")


YUKI MODEL
YUKI MODEL C-400 Cornelius How-to

REVELL
REVELL P-51D Mustang Assembly instruction

The Learning Journey
The Learning Journey Techno Gears Marble Mania Twin Twister instruction manual

Mattel
Mattel Barbie Y6391 instructions

Mattel
Mattel Fisher-Price Rock'em Sock'em Robots CCX97 Assembly instructions

CY Moddel
CY Moddel Grumman TBF Avenger instruction manual

GREAT PLANES
GREAT PLANES Dynaflite Series Manual addendum

Eduard
Eduard Brassin Bf 109G-6 engine quick start guide

b4Adventure
b4Adventure American Ninja Warrior Megaphone manual

Nine Eagles
Nine Eagles Solo PRO180 3D instruction manual

Faller
Faller Town hall manual

Eduard
Eduard Su-25K interior quick start guide