TRUE RESIDENTIAL TR-30 Assembly instructions

TEC_TM_009 REV. E 03/31/2022 TR-30/36 INSTALL MANUAL
TRUE RESIDENTIAL®
TR-30 / TR-36
INSTALL GUIDE AND USER'S MANUAL
PRESERVE THE MOMENT®

TEC_TM_009 REV. E03/31/2022TRUE RESIDENTIAL®
INSTALLATION CHECKLIST
To ensure no part of the installation process has been overlooked, complete the checklist below.
☐Have all packaging materials been removed?
☐Are the anti-tip brackets securely installed and properly engaging the unit?
☐Has the unit been properly leveled? Do all leveling legs touch the floor?
☐Is the kickplate installed?
☐Is the doorstop being installed (if needed)?
☐Does the customer understand the unit’s operation?
☐Has the customer been given the key and literature package?
☐Have all stainless steel surfaces been inspected for imperfections?*
☐Is the unit operating correctly? If not, is the unit plugged in? Is the control turned on?
*To be completed by either an installer with the customer or an authorized True dealer upon
completion of installation. Stainless steel doors, handles, and shelves are covered by a
limited 30-day warranty for cosmetic defects.
THANK YOU
FOR YOUR PURCHASE

TEC_TM_009 REV. E 03/31/2022 Page 3 of 56TR-30/36 INSTALL MANUAL
CONTENTS
SAFETY INFORMATION & OWNERSHIP
OWNERSHIP 6
SAFETY PRECAUTIONS 6
DISPOSAL OF OLD REFRIGERATOR 6
CFC DISPOSAL 6
PRIOR TO INSTALLATION
SITE PREPARATION 8
ELECTRICAL REQUIREMENTS 10
ANTI-SWEAT FOAM END PANELS 10
WIRE RACK HANDLE FINISH APPLICATION
(TR-30DZW) 11
INSTALLATION PLAN VIEWS
TR-30 / TR-42 14
TR-30 /TR-48 15
TR-30 / TR-30 16
TR-30 / TR-30 / TR-30 17
TR-36REF / TR-36REF 18
TR-36REF / TR-30REF 19
INSTALLATION
UNCRATING 22
ANTI-TIP BRACKET INSTALLATION 25
LEVELING THE UNIT 27
JOINING KIT INSTALLATION 28
NOTE: AS WE STRIVE FOR CONTINUOUS IMPROVEMENTS, FEATURES AND SPECIFICATIONS
ARE SUBJECT TO CHANGE WITHOUT NOTICE.
CABINET SETUP
SHELVING, BINS, DRAWERS 34
REFRIGERATOR STORAGE 34
FREEZER STORAGE 35
KICKPLATE INSTALLATION 36
REFRIGERATOR/FREEZER OPERATION
REFRIGERATOR & FREEZER BASIC
ELECTRONIC CONTROL OPERATIONS 38
SHOWROOM MODE 44
DUAL ZONE OPERATION
DUAL ZONE BASIC ELECTRONIC CONTROL
OPERATIONS 46
SHOWROOM MODE 52
MAINTENANCE, CARE & CLEANING
STAINLESS STEEL EQUIPMENT
CARE & CLEANING 54
GENERAL MAINTENANCE 56
CONDENSATION 56
DATA TAG 56
REMOVING THE DOORS 56
CONTACT US 56
WARRANTY 57
TEC_TM_009 REV. E03/31/2022Page 4 of 56 TRUE RESIDENTIAL®
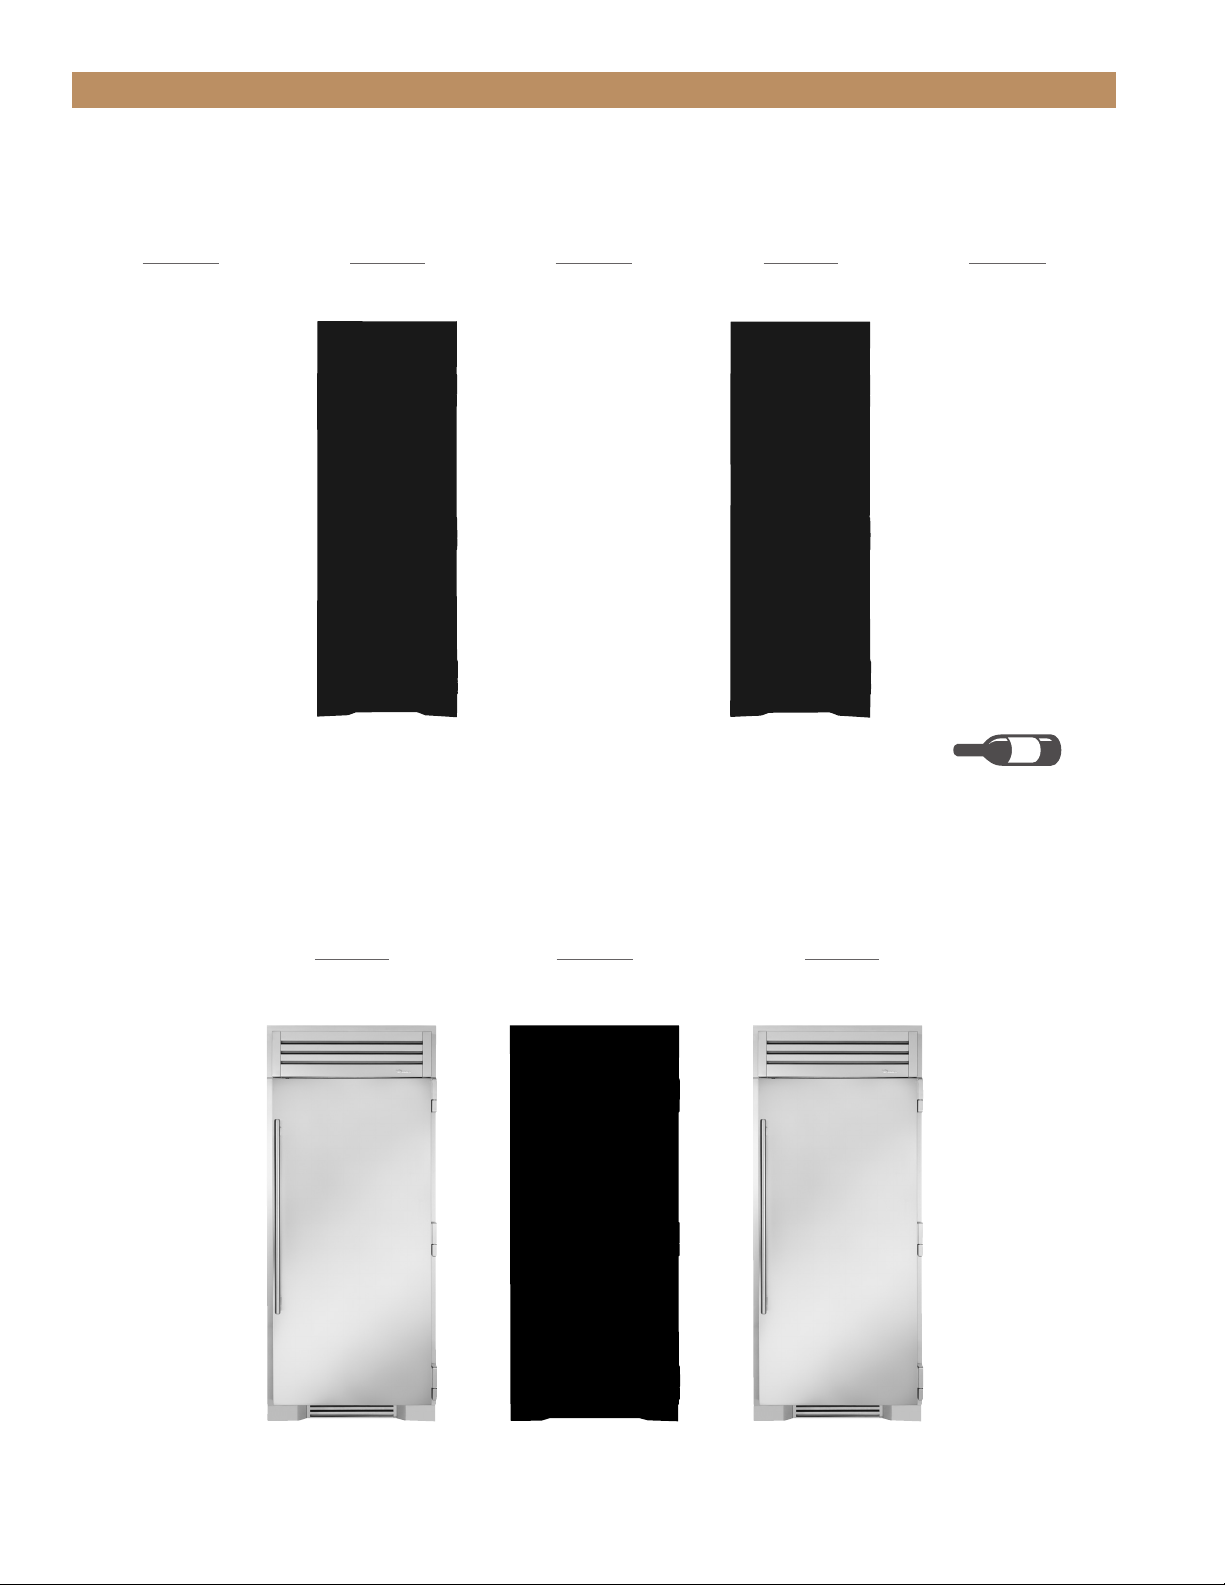
30 & 36 INCH REFRIGERATOR, FREEZER & DUAL ZONE COLUMN
30" FREEZER
COLUMN
STAINLESS SOLID DOOR
36" FREEZER
COLUMN
STAINLESS SOLID DOOR
30" REFRIGERATOR
COLUMN
STAINLESS GLASS DOOR
36" REFRIGERATOR
COLUMN
STAINLESS GLASS DOOR
30" REFRIGERATOR
COLUMN
STAINLESS SOLID DOOR
36" REFRIGERATOR
COLUMN
STAINLESS SOLID DOOR
30" REFRIGERATOR
BEVERAGE COLUMN
STAINLESS GLASS DOOR
30" DUAL ZONE
WINE COLUMN
STAINLESS GLASS DOOR
x150
LUXURY REFRIGERATION WITH COMMERCIAL DNA.

PRESERVE THE MOMENT®
TEC_TM_009 REV. E 03/31/2022 Page 5 of 56TR-30/36 INSTALL MANUAL
SAFETY INFORMATION & OWNERSHIP
OWNERSHIP
SAFETY PRECAUTIONS
DISPOSAL OF THE OLD REFRIGERATOR
CFC DISPOSAL
TEC_TM_009 REV. E03/31/2022Page 6 of 56 TRUE RESIDENTIAL®
SAFETY INFORMATION & OWNERSHIP
• DO NOT store or use gasoline or other flammable
vapors and liquids in the vicinity of this or any other
appliance.
• Keep hands away from the “pinch point” areas
(gaps between the doors and between the doors
and cabinet). Small areas are not necessarily safe.
• Unplug the refrigerator before cleaning and making
repairs.
• Setting temperature control to OFF only removes
power from the refrigeration system, it does not
remove power from other circuits. For example,
temperature control and lights.
NOTE: WE STRONGLY RECOMMEND THAT ANY
SERVICING BE PERFORMED BY A QUALIFIED
INDIVIDUAL.
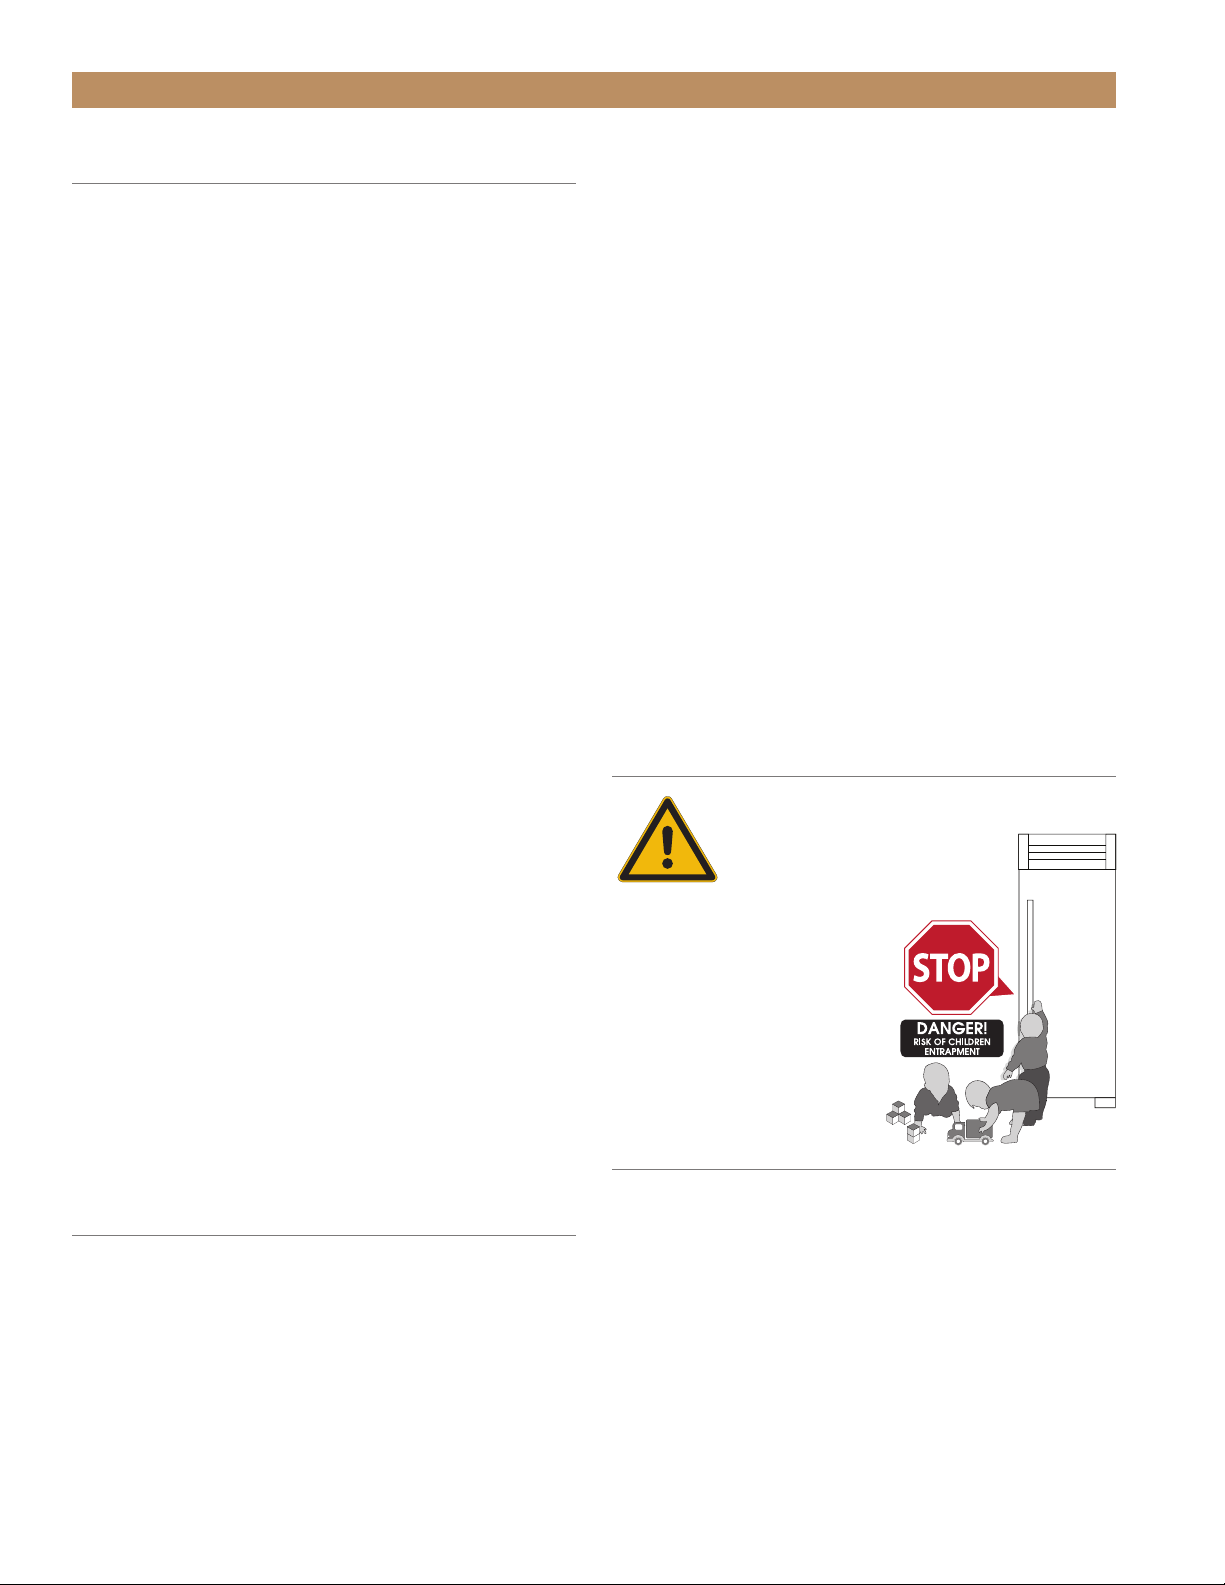
PROPER DISPOSAL OF THE OLD
REFRIGERATOR
DANGER! Risk of child entrapment.
Before you throw away your
old refrigerator or freezer:
• Take off the doors
• Leave the shelves in place
so that children may not
easily climb inside
CFC DISPOSAL
Your old refrigerator may have a cooling system that
used CFC's (chlorofluorocarbons). CFC's are believed
to harm stratospheric ozone. If you are throwing away
your old refrigerator, make sure the CFC refrigerant is
removed for proper disposal by a qualified service. If
you intentionally release this CFC refrigerant you can
be subject to fines and imprisonment under provisions
of the environment legislation.
OWNERSHIP
This appliance is not intended for use by persons
(including children) with reduced physical, sensory
or mental capabilities, or lack of experience and
knowledge, unless they have been given supervision
or instruction concerning use of the appliance by a
person responsible for their safety.
To insure that your unit works properly from the first
day, it must be installed properly.
NOTE: WE HIGHLY RECOMMEND A TRAINED
REFRIGERATION MECHANIC AND ELECTRICIAN
INSTALL YOUR TRUE RESIDENTIAL®CABIN E T.
THE COST OF A PROFESSIONAL INSTALLATION
IS MONEY WELL SPENT.
Before you start to install your True Residential®
Cabinet, carefully inspect it for freight damage. If
damage is discovered, immediately file a claim with
the delivery freight carrier. True is not responsible
for damage incurred during shipment. This appliance
is intended to be used in household and similar
applications such as:
• Staff kitchen areas in shops, offices and other
working environments;
• Bed and breakfast type environments;
• Catering and similar non-retail applications.
Any questions about the installation please contact
your True dealer or True Technical Service Department
at 844-746-9423. Please have your model and
serial numbers available when you call our Service
Department.
SAFETY PRECAUTIONS
• This refrigerator must be properly installed
and located in accordance with the installation
instructions before it is used.
• DO NOT allow children to climb, stand or hang on
the shelves in the refrigerator. They could seriously
injure themselves or damage the refrigerator.

PRESERVE THE MOMENT®
TEC_TM_009 REV. E 03/31/2022 Page 7 of 56TR-30/36 INSTALL MANUAL
SITE PREPARATION
ELECTRICAL REQUIREMENTS
ANTI-SWEAT FOAM END PANELS
WIRE RACK HANDLE FINISH APPLICATION (TR-30DZW)
PRIOR TO INSTALLATION

TEC_TM_009 REV. E03/31/2022Page 8 of 56 TRUE RESIDENTIAL®
Proud
TR-30 – 29-¾"
(756.7 mm)
TR-36 – 35-¾"
(908 mm)
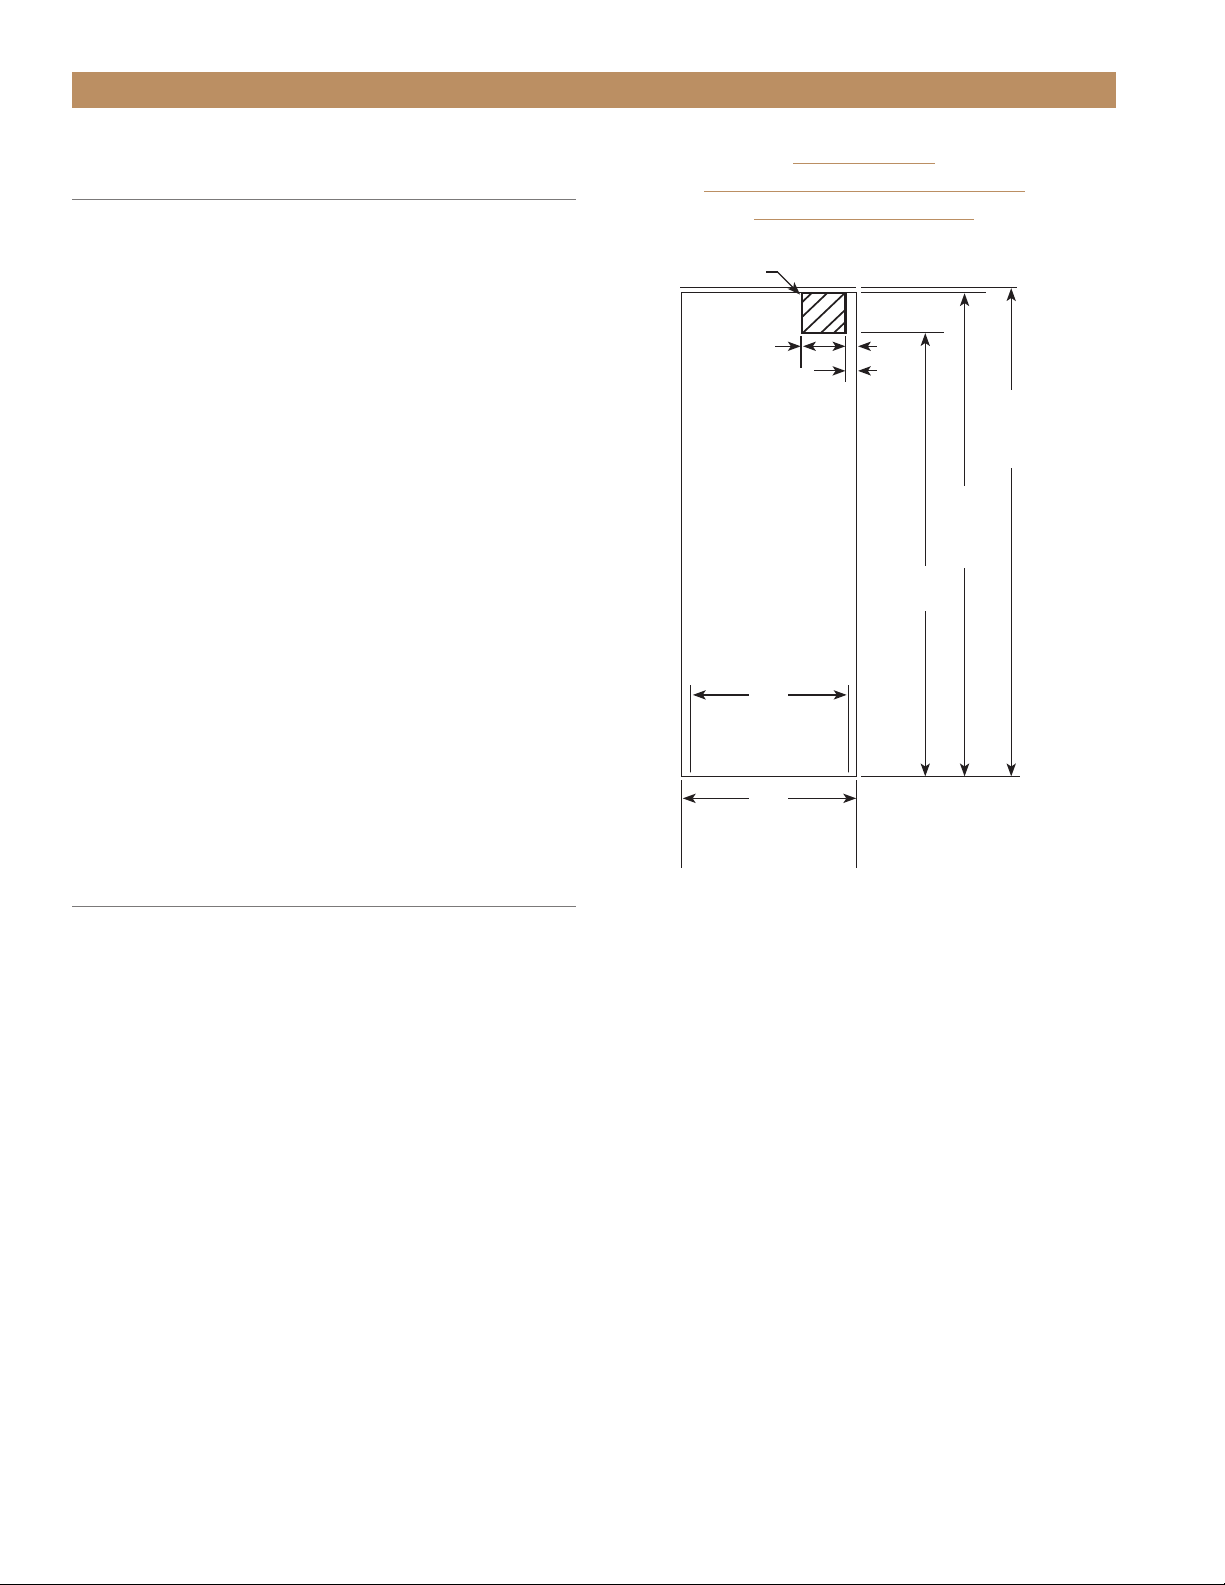
PRIOR TO INSTALLATION
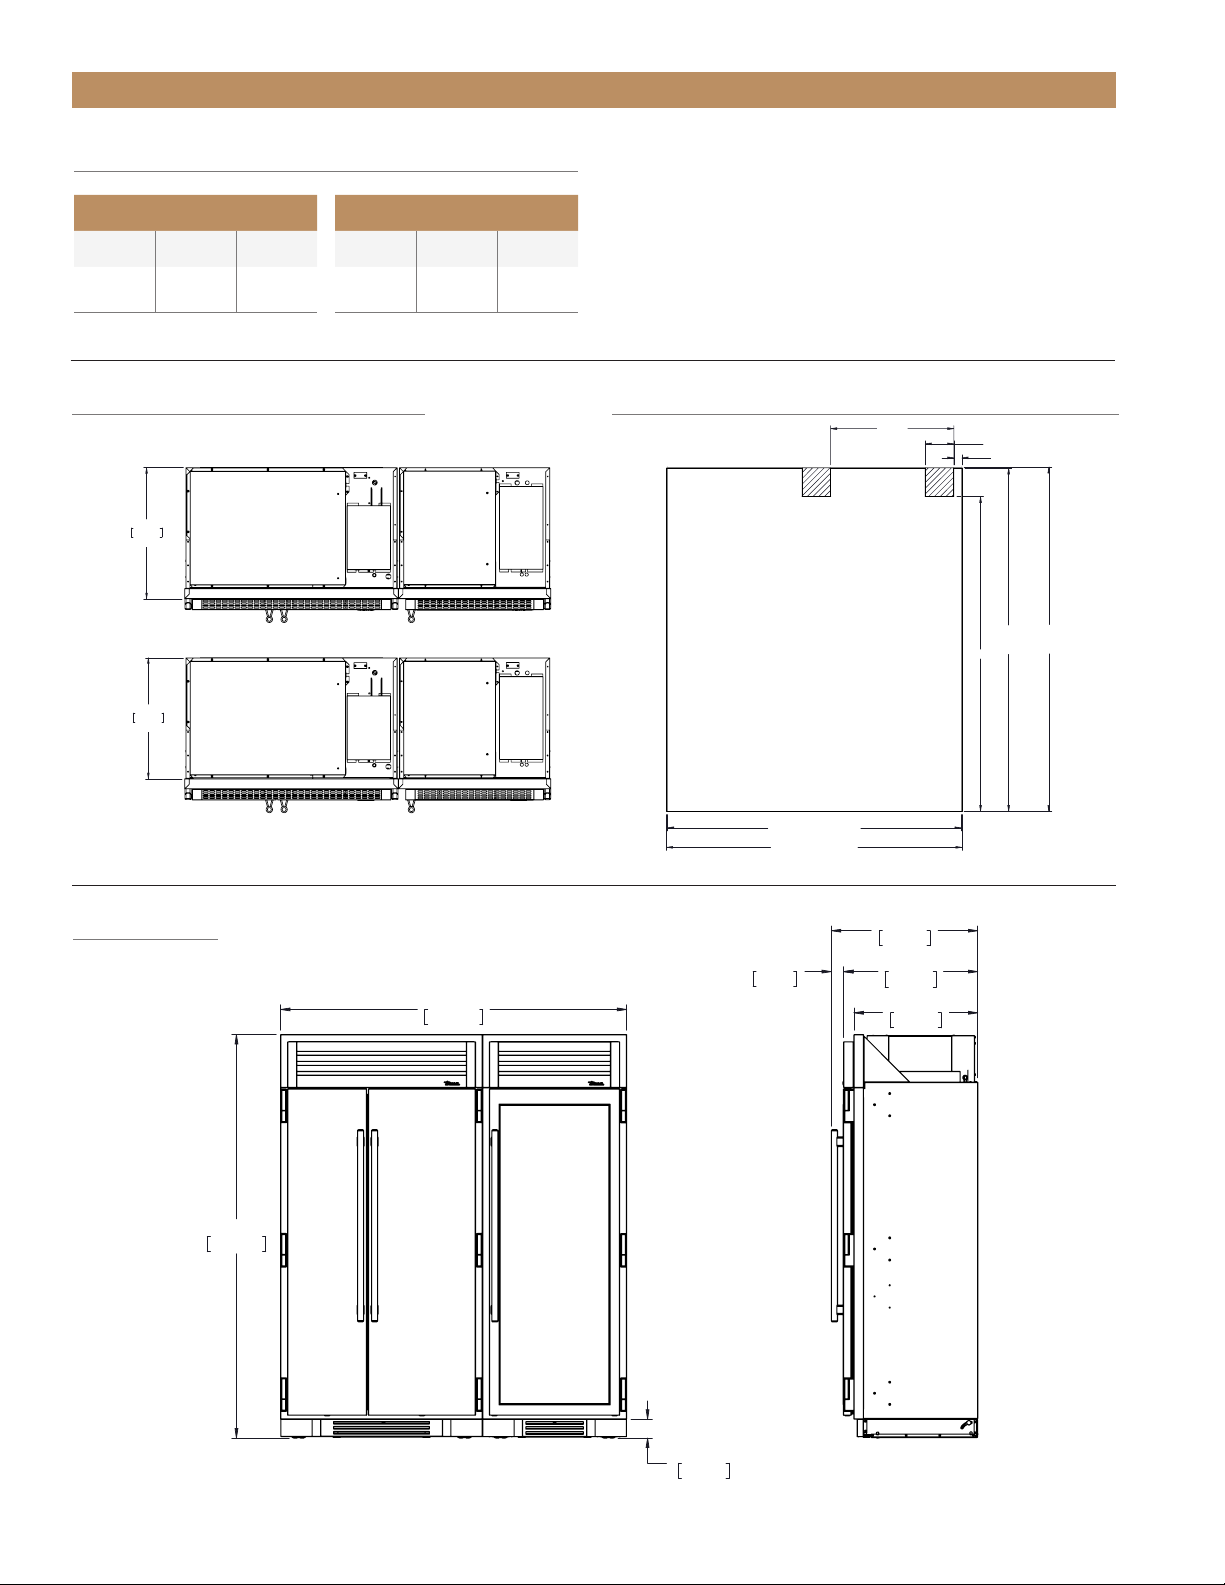
SITE PREPARATION
Rough Opening dimensions. (See figure 1). For FLUSH installations the front face of the unit will be flush with
the surrounding cabinets. (See figure 2). For PROUD (Standard) installations, the front face of the unit will extend
beyond cabinets. (See figure 3).
NOTE: IT IS NOT RECOMMENDED TO INSTALL UNITS SIDE BY SIDE WITH HINGES TOUCHING
EACH OTHER. IF YOU PLAN TO INSTALL UNITS HINGE TO HINGE, CALL TECH SUPPORT AT
844-746-9423 FOR INSTALLATION INSTRUCTIONS.
TR-30/36 – TOP VIEW
FIGURE 3 – PROUD INSTALL
23 25/32"
604mm
PROUD INSTALL
25 25/32"
655mm
FLUSH INSTALL
TR-30REF-R-SG-A
R
TR-30/36 – TOP VIEW
FIGURE 2 – FLUSH INSTALL
23 25/32"
604mm
PROUD INSTALL
25 25/32"
655mm
FLUSH INSTALL
TR-30REF-R-SG-A
R
TR-30 TR-36
*Because of the weight of this unit, it is recommended to consult a flooring expert prior to installation. The flooring beneath the unit
should be rated to support at least 150 pounds per square foot.
TR-30/36 – FRONT VIEW
FIGURE 1 – ROUGH OPENING
& ELECTRICAL AREA
84"
(2134 mm)
PROUD
INSTALL
841/4"
(2140 mm)
FLUSH
INSTALL
77"
(1956 mm)
2"
(51 mm)
8"
(204 mm)
Electrical located
in this area.
Dimensions may vary by ± 1/8" (3.2 mm)
Flush Opening Dimensions Proud Opening Dimensions
Width Depth Height Width Depth Height
30¼" 2525⁄32"84¼" 29¾" 2325⁄32"84"
Flush Opening Dimensions Proud Opening Dimensions
Width Depth Height Width Depth Height
36¼" 2525⁄32"84¼" 35¾" 2325⁄32"84"
Flush
TR-30 – 30-¼"
(769 mm)
TR-36 – 36-¼"
(921 mm)

TEC_TM_009 REV. E 03/31/2022 Page 9 of 56TR-30/36 INSTALL MANUAL
PRIOR TO INSTALLATION
TR-30 – TOP VIEW TR-30 – FRONT VIEW
TR-36 – TOP VIEW TR-36 – FRONT VIEW
83 15/16"
2132mm
30"
762mm
67 29/32"
1725mm
DOOR
HEIGHT
72 5/8"
1845mm
25 25/32"
655mm
27 29/32"
709mm
30 15/32"
774mm
2 9/16"
65mm
3 15/16"
100mm
90°
55 1/4"
1403mm
23 25/32"
604mm
29 15/32"
748mm
31 15/32"
799mm
29 9/16"
751mm
135°
20 11/16"
525mm
TR-30DZW-R-SG-A
R
83 15/16"
2132mm
30"
762mm
67 29/32"
1725mm
DOOR
HEIGHT
72 5/8"
1845mm
25 25/32"
655mm
27 29/32"
709mm
30 15/32"
774mm
2 9/16"
65mm
3 15/16"
100mm
90°
55 1/4"
1403mm
23 25/32"
604mm
29 15/32"
748mm
31 15/32"
799mm
29 9/16"
751mm
135°
20 11/16"
525mm
TR-30DZW-R-SG-A
R
30"
762mm
67 29/32"
1725mm
DOOR
HEIGHT
72 5/8"
1845mm
83 15/16"
2132mm
25 25/32"
655mm
27 29/32"
709mm
30 15/32"
774mm
2 9/16"
65mm
3 15/16"
100mm
135°
20 19/32"
523mm
23 25/32"
604mm
55 1/4"
1403mm
29 15/32"
748mm
31 15/32"
799mm
90°
29 9/16"
751mm
TR-30REF-R-SS-A
R
36"
915mm
83 15/16"
2132mm
72 5/8"
1845mm
67 29/32"
1725mm
DOOR
HEIGHT
3 15/16"
100mm
27 29/32"
709mm
25 25/32"
655mm
30 15/32"
774mm
2 9/16"
65mm
90°
23 25/32"
604mm
35 9/16"
903mm
61 1/4"
1556mm
37 15/32"
952mm
35 15/32"
901mm
135°
24 13/16"
631mm
TR-36REF-R-SS-A
R
36"
915mm
83 15/16"
2132mm
72 5/8"
1845mm
67 29/32"
1725mm
DOOR
HEIGHT
3 15/16"
100mm
27 29/32"
709mm
25 25/32"
655mm
30 15/32"
774mm
2 9/16"
65mm
90°
23 25/32"
604mm
35 9/16"
903mm
61 1/4"
1556mm
37 15/32"
952mm
35 15/32"
901mm
135°
24 13/16"
631mm
TR-36REF-R-SS-A
R
36"
915mm
83 15/16"
2132mm
72 5/8"
1845mm
67 29/32"
1725mm
DOOR
HEIGHT
3 15/16"
100mm
27 29/32"
709mm
25 25/32"
655mm
30 15/32"
774mm
2 9/16"
65mm
90°
23 25/32"
604mm
35 9/16"
903mm
61 1/4"
1556mm
37 15/32"
952mm
35 15/32"
901mm
135°
24 13/16"
631mm
TR-36REF-R-SS-A
R
36"
915mm
83 15/16"
2132mm
72 5/8"
1845mm
67 29/32"
1725mm
DOOR
HEIGHT
3 15/16"
100mm
27 29/32"
709mm
25 25/32"
655mm
30 15/32"
774mm
2 9/16"
65mm
90°
23 25/32"
604mm
35 9/16"
903mm
61 1/4"
1556mm
37 15/32"
952mm
35 15/32"
901mm
135°
24 13/16"
631mm
TR-36REF-R-SS-A
R
TR-30 – SIDE VIEW
30"
762mm
67 29/32"
1725mm
DOOR
HEIGHT
72 5/8"
1845mm
83 15/16"
2132mm
25 25/32"
655mm
27 29/32"
709mm
30 15/32"
774mm
2 9/16"
65mm
3 15/16"
100mm
135°
20 19/32"
523mm
23 25/32"
604mm
55 1/4"
1403mm
29 15/32"
748mm
31 15/32"
799mm
90°
29 9/16"
751mm
TR-30REF-R-SS-A
R
TR-36 – SIDE VIEW
Dimensions may vary by ± 1/8" (3.2 mm)
Dimensions may vary by ± 1/8" (3.2 mm)
TEC_TM_009 REV. E03/31/2022Page 10 of 56 TRUE RESIDENTIAL®
PRIOR TO INSTALLATION
ELECTRICAL REQUIREMENTS
TR-30/TR-36
For all built-in models, the electrical supply should
be located within the shaded area shown in the
illustration. Follow the National Electrical Code
and local codes and ordinances when installing
the receptacle. A dedicated circuit, supplying only
this appliance is required. A ground fault circuit
interrupter (GFCI) is not recommended and may cause
interruption of operation.
If the supply cord is damaged, it must be replaced
by the manufacturer, its service agent or similarly
qualified person in order to avoid a hazard.
• Power Supply 115 V AC, 60 Hz
• Circuit Breaker 15 amp
• Receptacle 3-prong grounding-type
NOTE: THE OUTLET MUST BE CHECKED BY A
QUALIFIED ELECTRICIAN TO BE SURE THAT IT
IS WIRED WITH THE CORRECT POLARITY.
VERIFY THAT THE OUTLET IS PROPERLY
GROUNDED.
ANTI-SWEAT FOAM END PANELS
When installing two units side-by-side, it is
recommended to leave a 5⁄8" gap between the
cabinets, to ensure that moisture does not develop.
Anti-sweat foam end panels can be purchased from
our parts department by calling (844) 849-6226, or
emailing trueresidentialparts@truemfg.com. If installing
anti-sweat foam end panels, we recommend that a
panel be applied to each of the units being joined
together.
TR-30/TR-36
FRONT VIEW ROUGH OPENING
& ELECTRICAL AREA
84"
(2134 mm)
PROUD
INSTALL
841/4"
(2140 mm)
FLUSH
INSTALL
77"
(1956 mm)
2"
(51 mm)
8"
(204 mm)
Electrical located
in this area.
Proud
TR-30 – 29-¾"
(756.7 mm)
TR-36 – 35-¾"
(908 mm)
Flush
TR-30 – 30-¼"
(769 mm)
TR-36 – 36-¼"
(921 mm)
TEC_TM_009 REV. E 03/31/2022 Page 11 of 56TR-30/36 INSTALL MANUAL
PRIOR TO INSTALLATION
See finish (e.g., paint or stain) for application
instructions and drying / curing times. Drying / Curing
times vary by finish. Follow recommended guidelines
associated with treating unfinished natural cherry
wood.
NOTE: REMOVE THE WINE RACK HANDLES
FROM THE WINE RACK ASSEMBLY BEFORE
APPLYING FINISH!
NOTE: FINISH ODORS FROM PANELS
INSTALLED BEFORE FULLY DRYING /
CURING CAN LINGER AND BE ABSORBED
BY THE CABINET’S INTERIOR. TRUE IS NOT
RESPONSIBLE FOR LINGERING FINISH ODORS
INSIDE THE UNIT.
REMOVAL
REQUIRED TOOLS
• Phillips Screwdriver or Bit Driver
• Drill (optional)
PROCEDURE
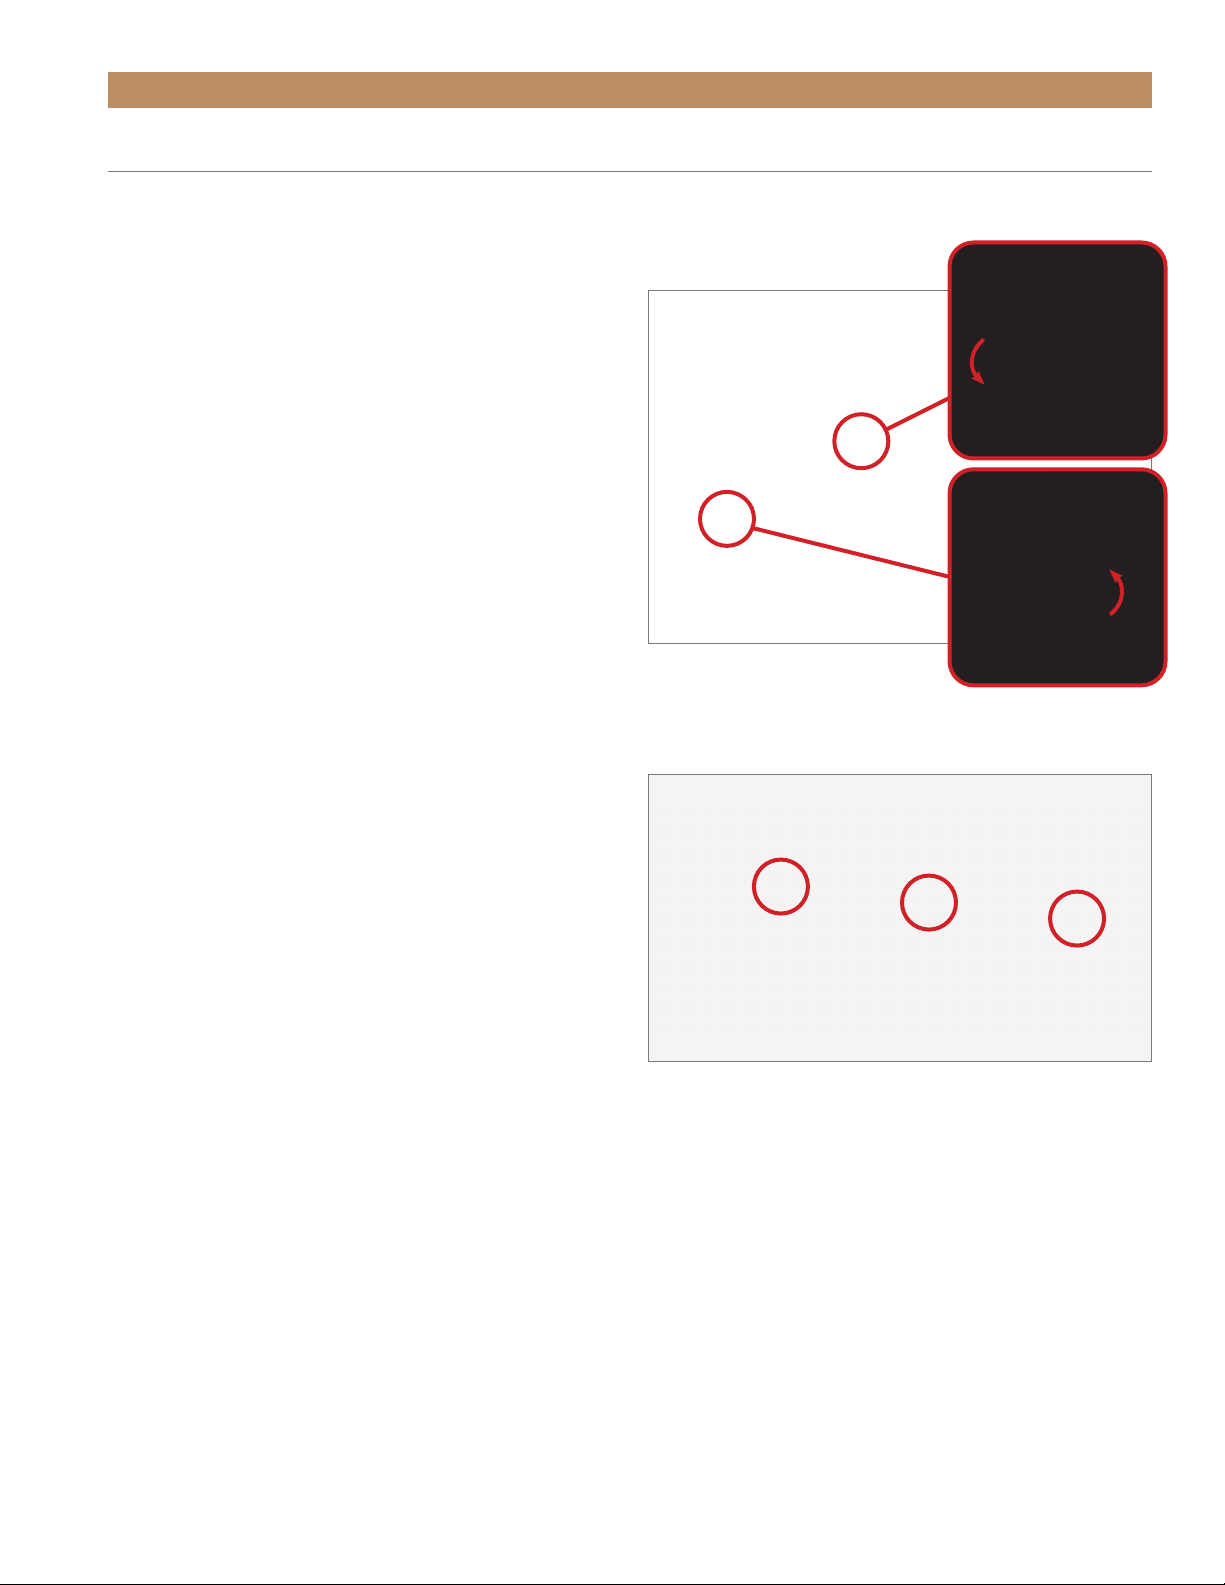
1. Pull the wine rack forward.
2. Push the slide release tabs as indicated by the
release arrows (see fig. 1) and pull the wine rack
forward.
3. Remove the wine rack handle from the wine rack
assembly. See fig. 2.
INSTALLATION
REQUIRED TOOLS
• Phillips Screwdriver or Bit Driver
• Drill (optional)
PROCEDURE
1. Install the wine rack handle on the wine rack
assembly. See fig. 2.
2. Position the wine rack on the slides and carefully
push the wine rack towards the back of the unit.
WIRE RACK HANDLE FINISH APPLICATION (TR-30DZW)
FIG. 1.
Push the left release tab up and the right release tab down.
FIG. 2.
Wine rack handle screw locations.

TEC_TM_009 REV. E03/31/2022Page 12 of 56 TRUE RESIDENTIAL®
NOTES

PRESERVE THE MOMENT®
TEC_TM_009 REV. E 03/31/2022 Page 13 of 56TR-30/36 INSTALL MANUAL
TR-30 / TR-42
TR-30 /TR-48
TR-30 / TR-30
TR-30 / TR-30 / TR-30
TR-36REF / TR-36REF
TR-36REF / TR-30REF
INSTALLATION PLAN VIEWS
TEC_TM_009 REV. E03/31/2022Page 14 of 56 TRUE RESIDENTIAL®
INSTALLATION PLAN VIEWS
23 25/32"
604mm
PROUD INSTALL
25 25/32"
655mm
FLUSH INSTALL
TR-42,30DZW
R
23 25/32"
604mm
PROUD INSTALL
25 25/32"
655mm
FLUSH INSTALL
TR-42,30DZW
R
71 3/4" PROUD INSTALL
72 1/4" FLUSH INSTALL
84"
PROUD
INSTALL
84 1/4"
FLUSH
INSTALL
77"
2"
7" TYP
30 1/8"
TR-42,30DZW
R
72 1/32"
1829mm
83 15/16"
2132mm
3 15/16"
100mm
30 15/32"
774mm
2 9/16"
65mm
25 25/32"
655mm
27 29/32"
709mm
TR-42,30DZW
R
TR-30 / TR-42
FLUSH VS. PROUD INSTALL ROUGH OPENING & ELECTRICAL AREA
Flush Opening Dimensions Proud Opening Dimensions
Width Depth Height Width Depth Height
72¼" 2525⁄32"84¼" 71¾" 2325⁄32"84"
Dimensions may vary by ± 1/8" (3.2 mm)
PLAN VIEW
TEC_TM_009 REV. E 03/31/2022 Page 15 of 56TR-30/36 INSTALL MANUAL
23 25/32"
604mm
PROUD INSTALL
25 25/32"
655mm
FLUSH INSTALL
TR-48,30DZW
R
23 25/32"
604mm
PROUD INSTALL
25 25/32"
655mm
FLUSH INSTALL
TR-48,30DZW
R
77 3/4" PROUD INSTALL
78 1/4" FLUSH INSTALL
84"
PROUD
INSTALL
84 1/4"
FLUSH
INSTALL
77"
2"
7" TYP
30 1/8"
TR-48,30DZW
R
83 15/16"
2132mm
78 1/32"
1982mm
3 15/16"
100mm
27 29/32"
709mm
25 25/32"
655mm
30 15/32"
774mm
2 9/16"
65mm
TR-48,30DZW
R
INSTALLATION PLAN VIEWS
TR-30 / TR-48
FLUSH VS. PROUD INSTALL ROUGH OPENING & ELECTRICAL AREA
Flush Opening Dimensions Proud Opening Dimensions
Width Depth Height Width Depth Height
78¼" 2525⁄32"8 4¼" 77¾" 2325⁄32"84"
Dimensions may vary by ± 1/8" (3.2 mm)
PLAN VIEW

TEC_TM_009 REV. E03/31/2022Page 16 of 56 TRUE RESIDENTIAL®
INSTALLATION PLAN VIEWS
23 25/32"
604mm
PROUD INSTALL
25 25/32"
655mm
FLUSH INSTALL
TR-30REF,30DZW
R
23 25/32"
604mm
PROUD INSTALL
25 25/32"
655mm
FLUSH INSTALL
TR-30REF,30DZW
R
59 3/4" PROUD INSTALL
60 1/4" FLUSH INSTALL
84"
PROUD
INSTALL
84 1/4"
FLUSH
INSTALL
77"
2"
7" TYP
30 1/8"
TR-30REF,30DZW
R
60 1/32"
1525mm
83 15/16"
2132mm
3 15/16"
100mm
25 25/32"
655mm
27 29/32"
709mm
30 15/32"
774mm
2 9/16"
65mm
TR-30REF,30DZW
R
TR-30 / TR-30
FLUSH VS. PROUD INSTALL ROUGH OPENING & ELECTRICAL AREA
Flush Opening Dimensions Proud Opening Dimensions
Width Depth Height Width Depth Height
60¼" 2525⁄32"84¼" 59¾" 2325⁄32"84"
Dimensions may vary by ± 1/8" (3.2 mm)
PLAN VIEW
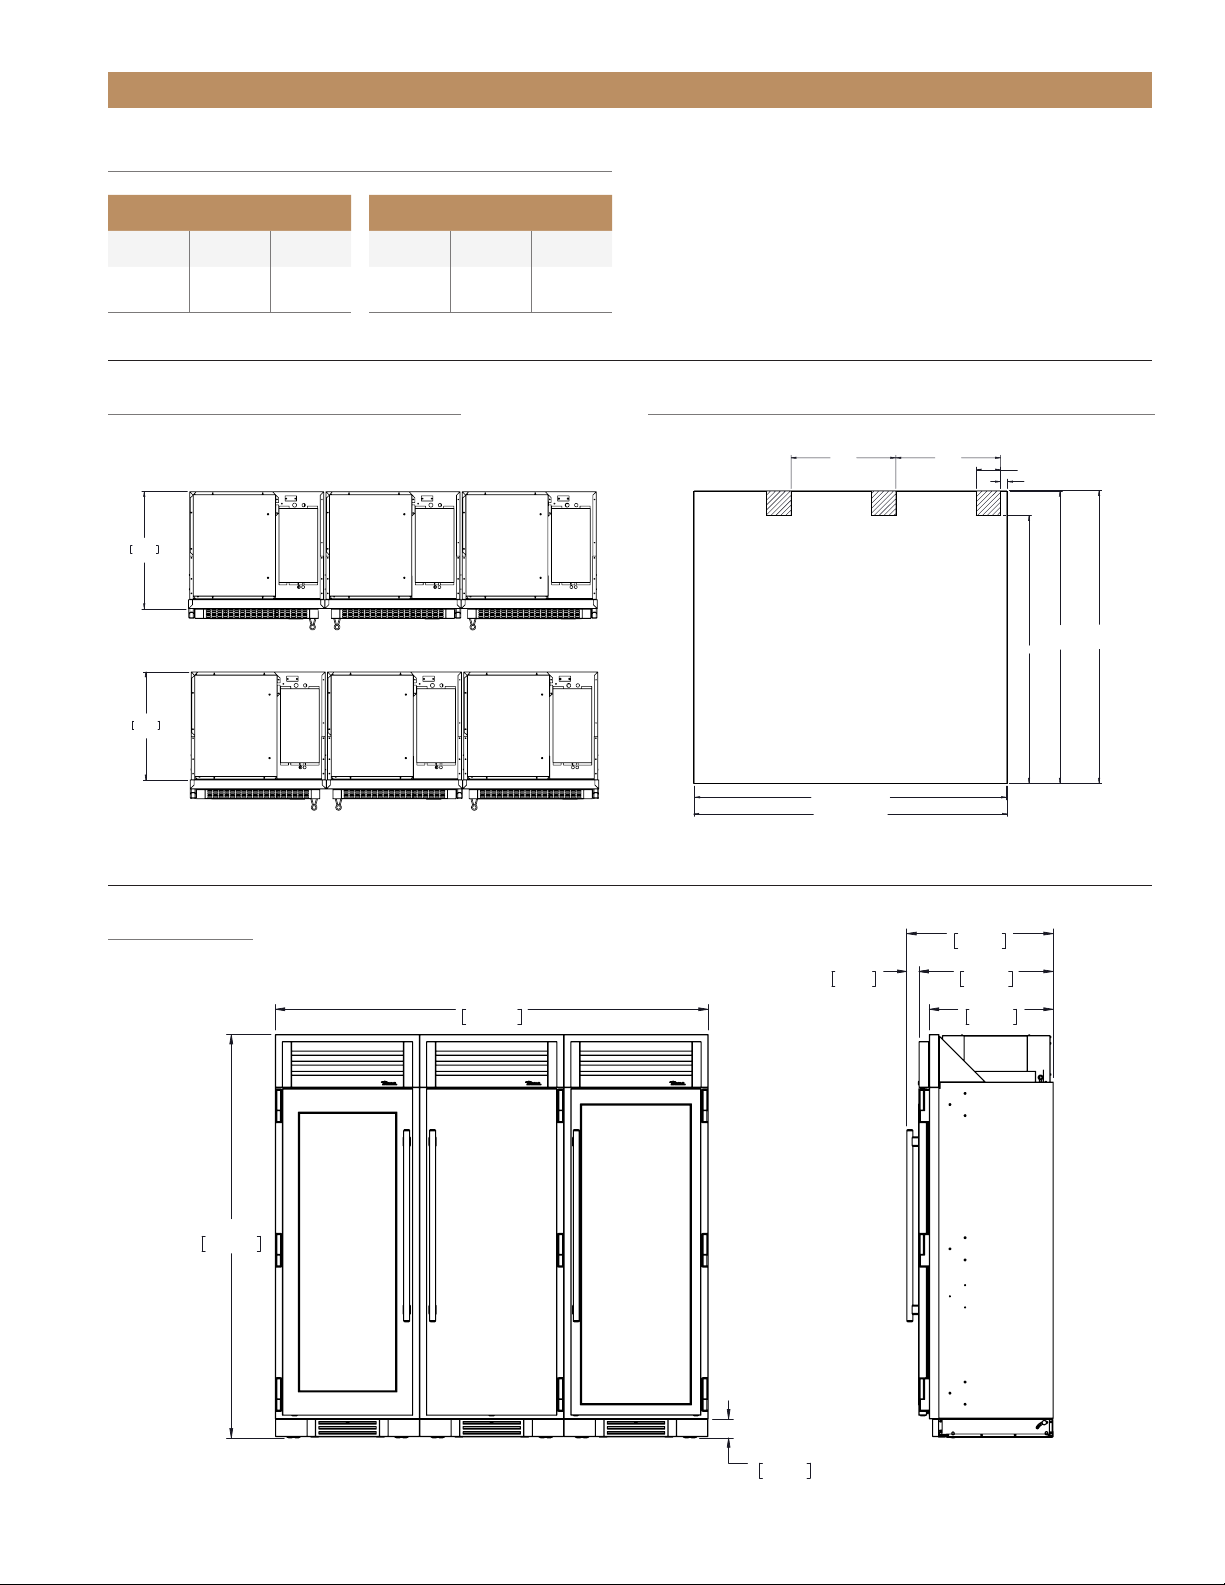
TEC_TM_009 REV. E 03/31/2022 Page 17 of 56TR-30/36 INSTALL MANUAL
INSTALLATION PLAN VIEWS
23 25/32"
604mm
PROUD INSTALL
25 25/32"
655mm
FLUSH INSTALL
TR-30REF,30FRZ,30DZW
R
23 25/32"
604mm
PROUD INSTALL
25 25/32"
655mm
FLUSH INSTALL
TR-30REF,30FRZ,30DZW
R
89 3/4" PROUD INSTALL
90 1/4" FLUSH INSTALL
84"
PROUD
INSTALL
84 1/4"
FLUSH
INSTALL
77"
2"
7" TYP
30 1/8" 30 1/8"
TR-30REF,30DZW
R
83 15/16"
2132mm
90 1/32"
2287mm
3 15/16"
100mm
25 25/32"
655mm
27 29/32"
709mm
30 15/32"
774mm
2 9/16"
65mm
TR-30REF,30FRZ,30DZW
R
TR-30 / TR-30 / TR-30
FLUSH VS. PROUD INSTALL ROUGH OPENING & ELECTRICAL AREA
Flush Opening Dimensions Proud Opening Dimensions
Width Depth Height Width Depth Height
90¼" 2525⁄32"84¼" 89¾" 2325⁄32"84"
Dimensions may vary by ± 1/8" (3.2 mm)
PLAN VIEW

TEC_TM_009 REV. E03/31/2022Page 18 of 56 TRUE RESIDENTIAL®
72 1/32"
1829mm
83 15/16"
2132mm
3 15/16"
100mm
25 25/32"
655mm
27 29/32"
709mm
30 15/32"
774mm
2 9/16"
65mm
TR-36REF,36REF
R
INSTALLATION PLAN VIEWS
71 3/4" PROUD INSTALL
72 1/4" FLUSH INSTALL
84"
PROUD
INSTALL
84 1/4"
FLUSH
INSTALL
77"
2"
8" TYP
36 1/8"
TR-36REF, TR-36REF
R
25 25/32"
655mm
FLUSH INSTALL
23 25/32"
604mm
PROUD INSTALL
TR-36REF,36REF
R
TR-36REF / TR-36REF
FLUSH VS. PROUD INSTALL ROUGH OPENING & ELECTRICAL AREA
Flush Opening Dimensions Proud Opening Dimensions
Width Depth Height Width Depth Height
72¼" 2525⁄32"84¼" 71¾" 2325⁄32"84"
Dimensions may vary by ± 1/8" (3.2 mm)
PLAN VIEW
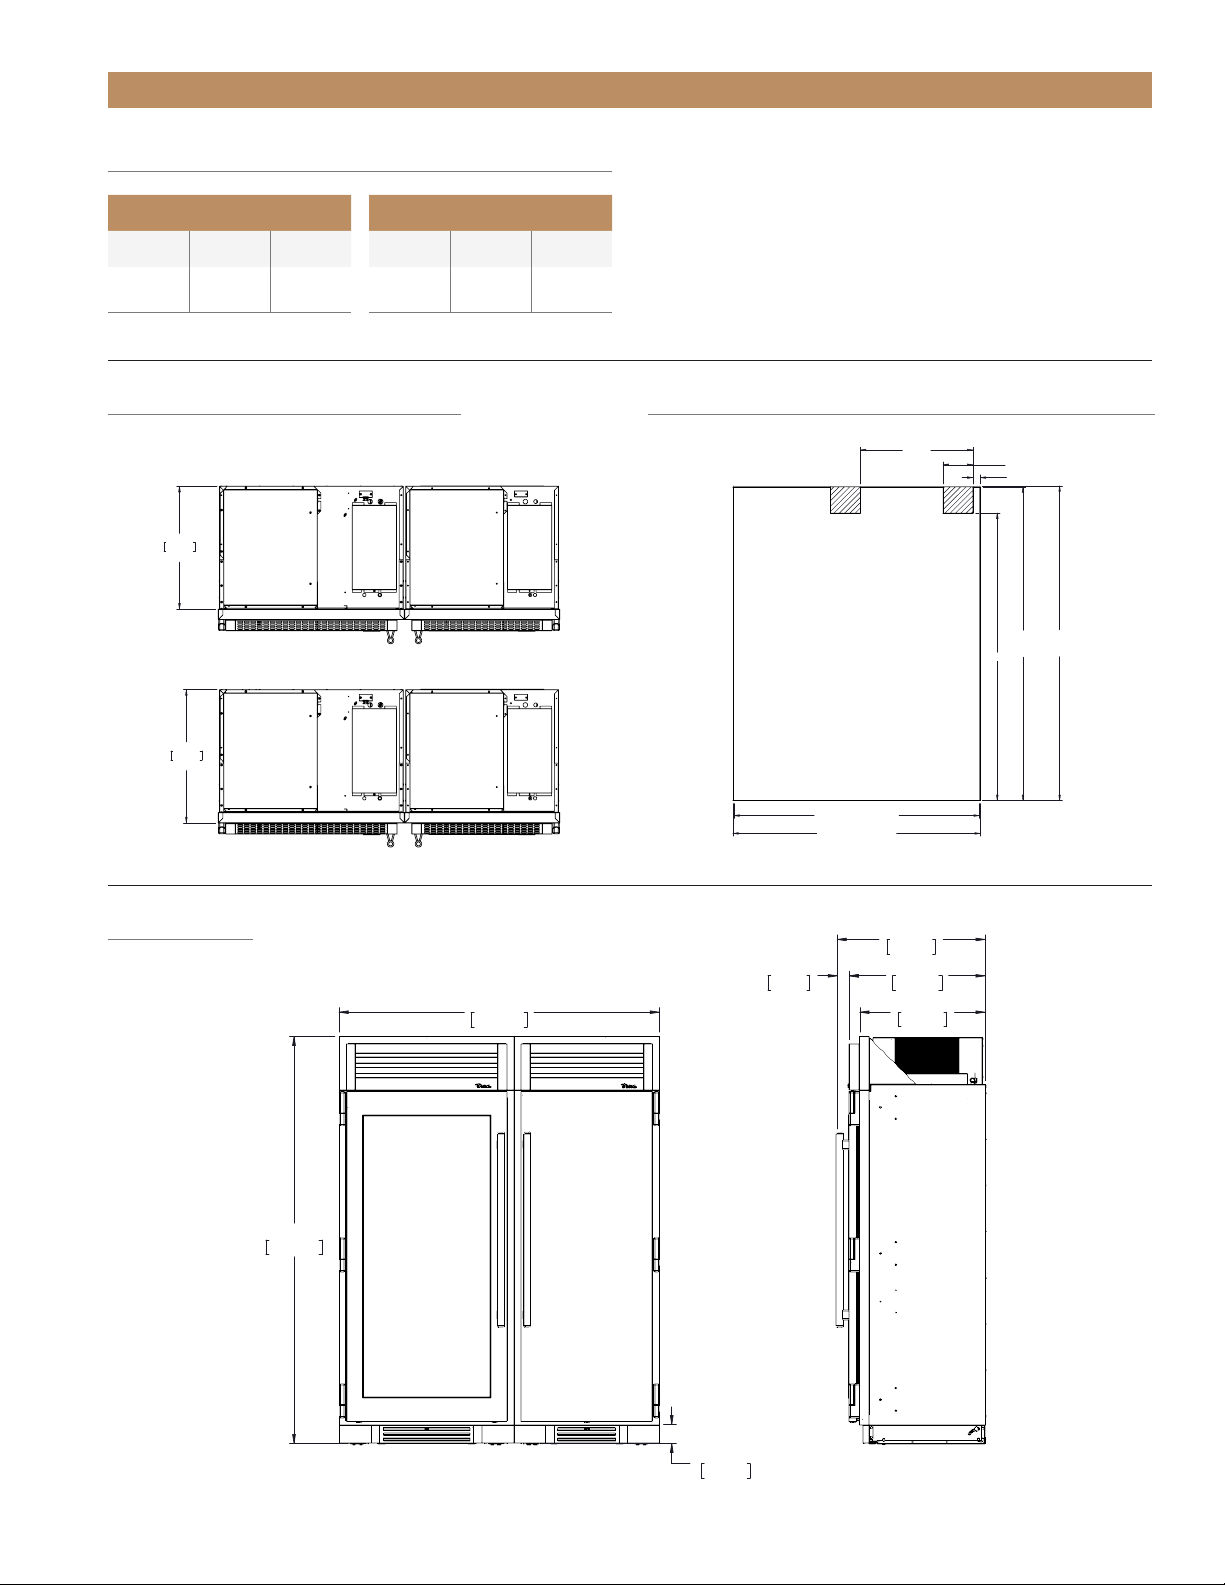
TEC_TM_009 REV. E 03/31/2022 Page 19 of 56TR-30/36 INSTALL MANUAL
INSTALLATION PLAN VIEWS
65 3/4" PROUD INSTALL
66 1/4" FLUSH INSTALL
84"
PROUD
INSTALL
84 1/4"
FLUSH
INSTALL
77"
2"
8" TYP
30 1/8"
TR-36REF, TR-30REF
R
66 1/32"
1677mm
83 15/16"
2132mm
3 15/16"
100mm
25 25/32"
655mm
27 29/32"
709mm
30 15/32"
774mm
2 9/16"
65mm
TR-36REF,30RFRZ
25 25/32"
655mm
FLUSH INSTALL
23 25/32"
604mm
PROUD INSTALL
TR-36REF,30REF
R
TR-36REF / TR-30REF
FLUSH VS. PROUD INSTALL ROUGH OPENING & ELECTRICAL AREA
Flush Opening Dimensions Proud Opening Dimensions
Width Depth Height Width Depth Height
66¼" 2525⁄32"84¼" 65¾" 2325⁄32"84"
Dimensions may vary by ± 1/8" (3.2 mm)
PLAN VIEW

TEC_TM_009 REV. E03/31/2022Page 20 of 56 TRUE RESIDENTIAL®
NOTES
Other manuals for TR-30
1
This manual suits for next models
1
Table of contents
Other TRUE RESIDENTIAL Refrigerator manuals


