TS Starscope 707 User manual
1Instruction manualStarscopes on azimuthal mount
Instruction manual
Starscope telescopes
on azimuthal mount
2
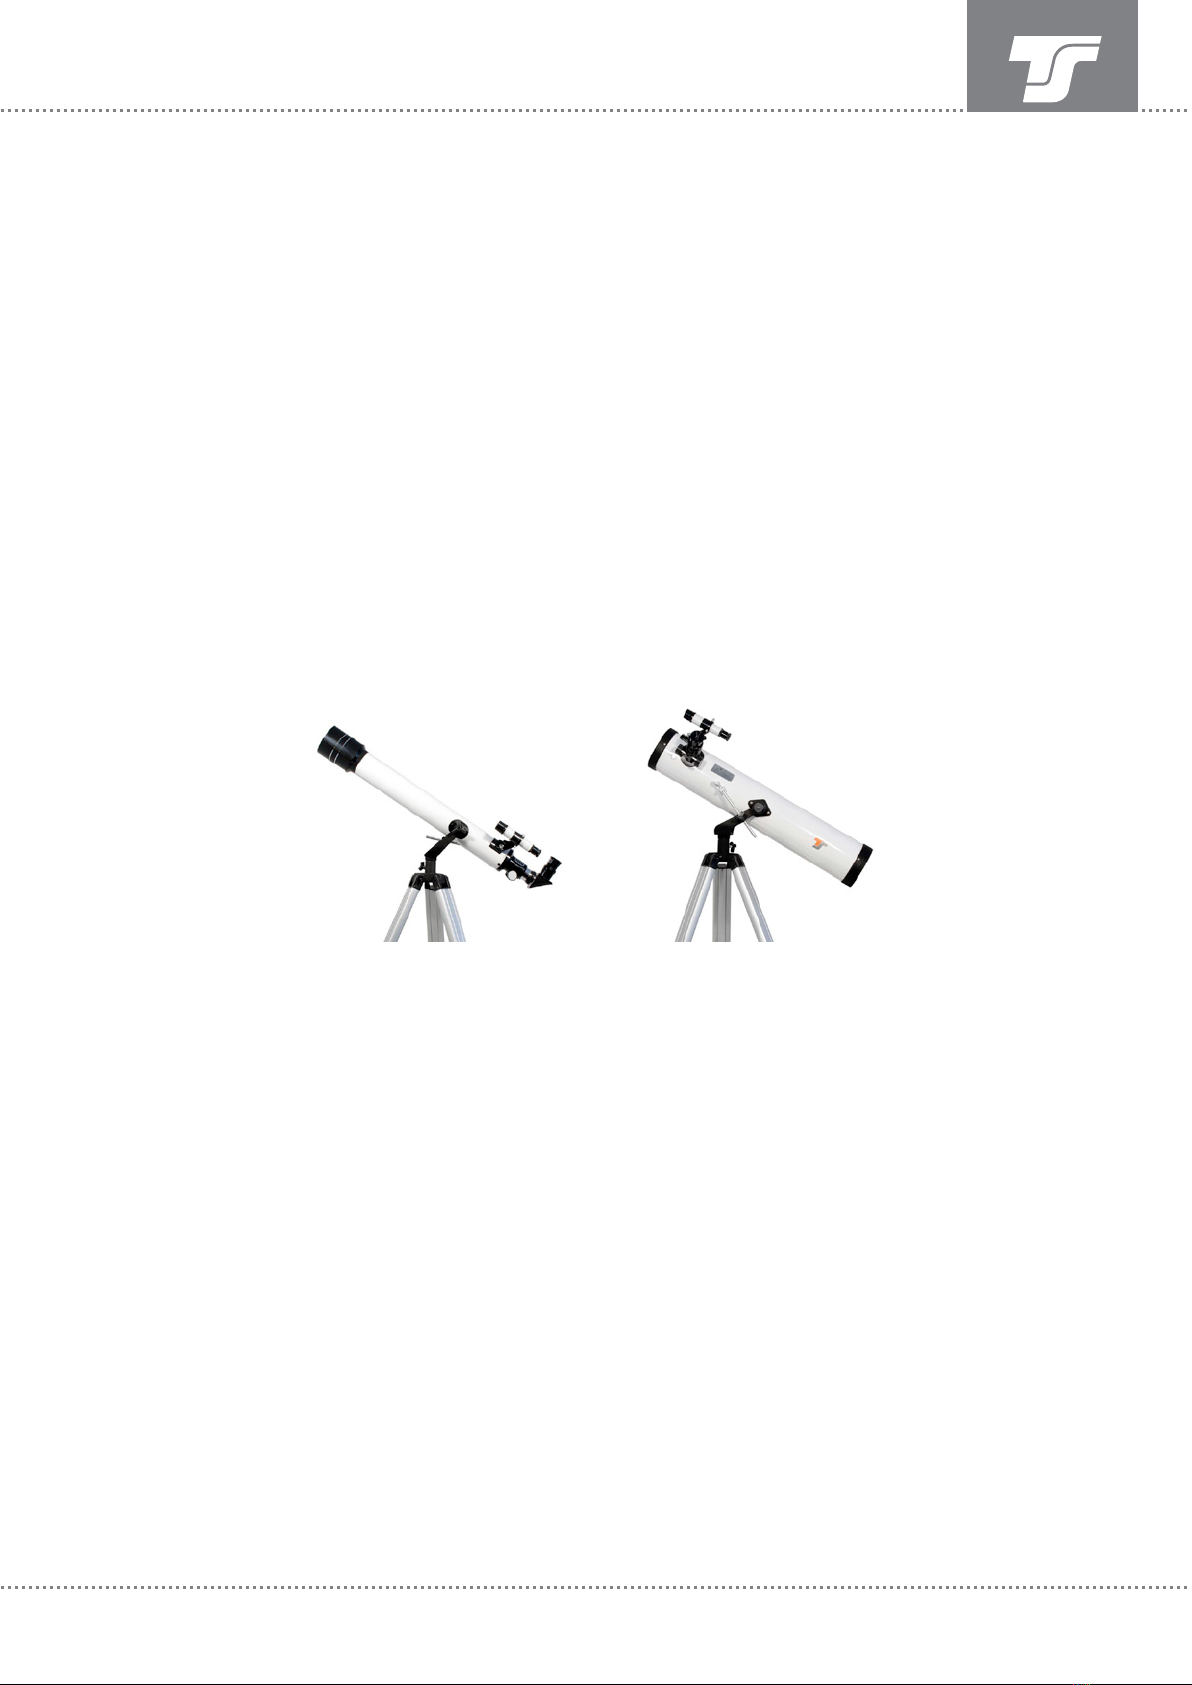
Starscope 767Starscope 707
Instruction manualStarscopes on azimuthal mount
These instructions are valid
for the telescope models shown
in the illustration

3Instruction manualStarscopes on azimuthal mount
Thank you for choosing a quality product
from Teleskop-Service. With the purchase
of this telescope you are now entering the
fascinating world of hobby astronomy. With
our beginner’s set you can make your first
experiences in the sky and take a look into
the past of the universe.
In order to enjoy this optical instrument for a
long time, we ask you to read these instruc-
tions carefully. The setup is sometimes not
easy for beginners. Therefore we want to help
you with this description to unpack your new
telescope and to assemble it professionally.
Only then you will have a lot of fun observing
celestial objects. Further helpful steps for
finding celestial objects or also for the care
of your telescope can be found at the end of
this manual.
If you have any special questions, our staff
will be happy to assist you. Just write an
e-mail or call us and we will be glad to help
you.
First information
Never look at the sun with a telescope or
any other optical device. Permanent and
irreversible damage would be done to
your eyes, which could lead to blindness.
For solar observation, there are special
solar filters that are mounted in front of
the front lens of the telescope. Please also
consider the small finder scope, which
must also be covered or equipped with a
solar filter.
Do not use eyepiece solar filters, as they
may crack and cause you to lose your
eyesight.
Also, please do not use the telescope for
solar projection. The heat generated inside
may destroy the telescope/eyepiece.
Never leave the telescope unattended,
especially when children are around. They
could endanger themselves and others
through lack of knowledge.
Only use the telescope for the type of ob-
servation described in these instructions.
WARNING!
4Instruction manualStarscopes on azimuthal mount
Contents
Unpacking and checking the contents of the package..................................5
Assembly of the mount • preparation ............................................................7
Assembling the mount ...................................................................................8
Mounting the telescope on the mount .........................................................10
Attaching and using the viewfinder telescope .............................................13
Using accessories on the eyepiece side ......................................................15
Highest and lowest useful magnification......................................................16
Observing with the telescope.......................................................................16
Optional accessories....................................................................................18
Maintenance and cleaning ...........................................................................19
Observation examples..................................................................................20
Frequently asked questions ........................................................................21
Technical Data.............................................................................................. 21
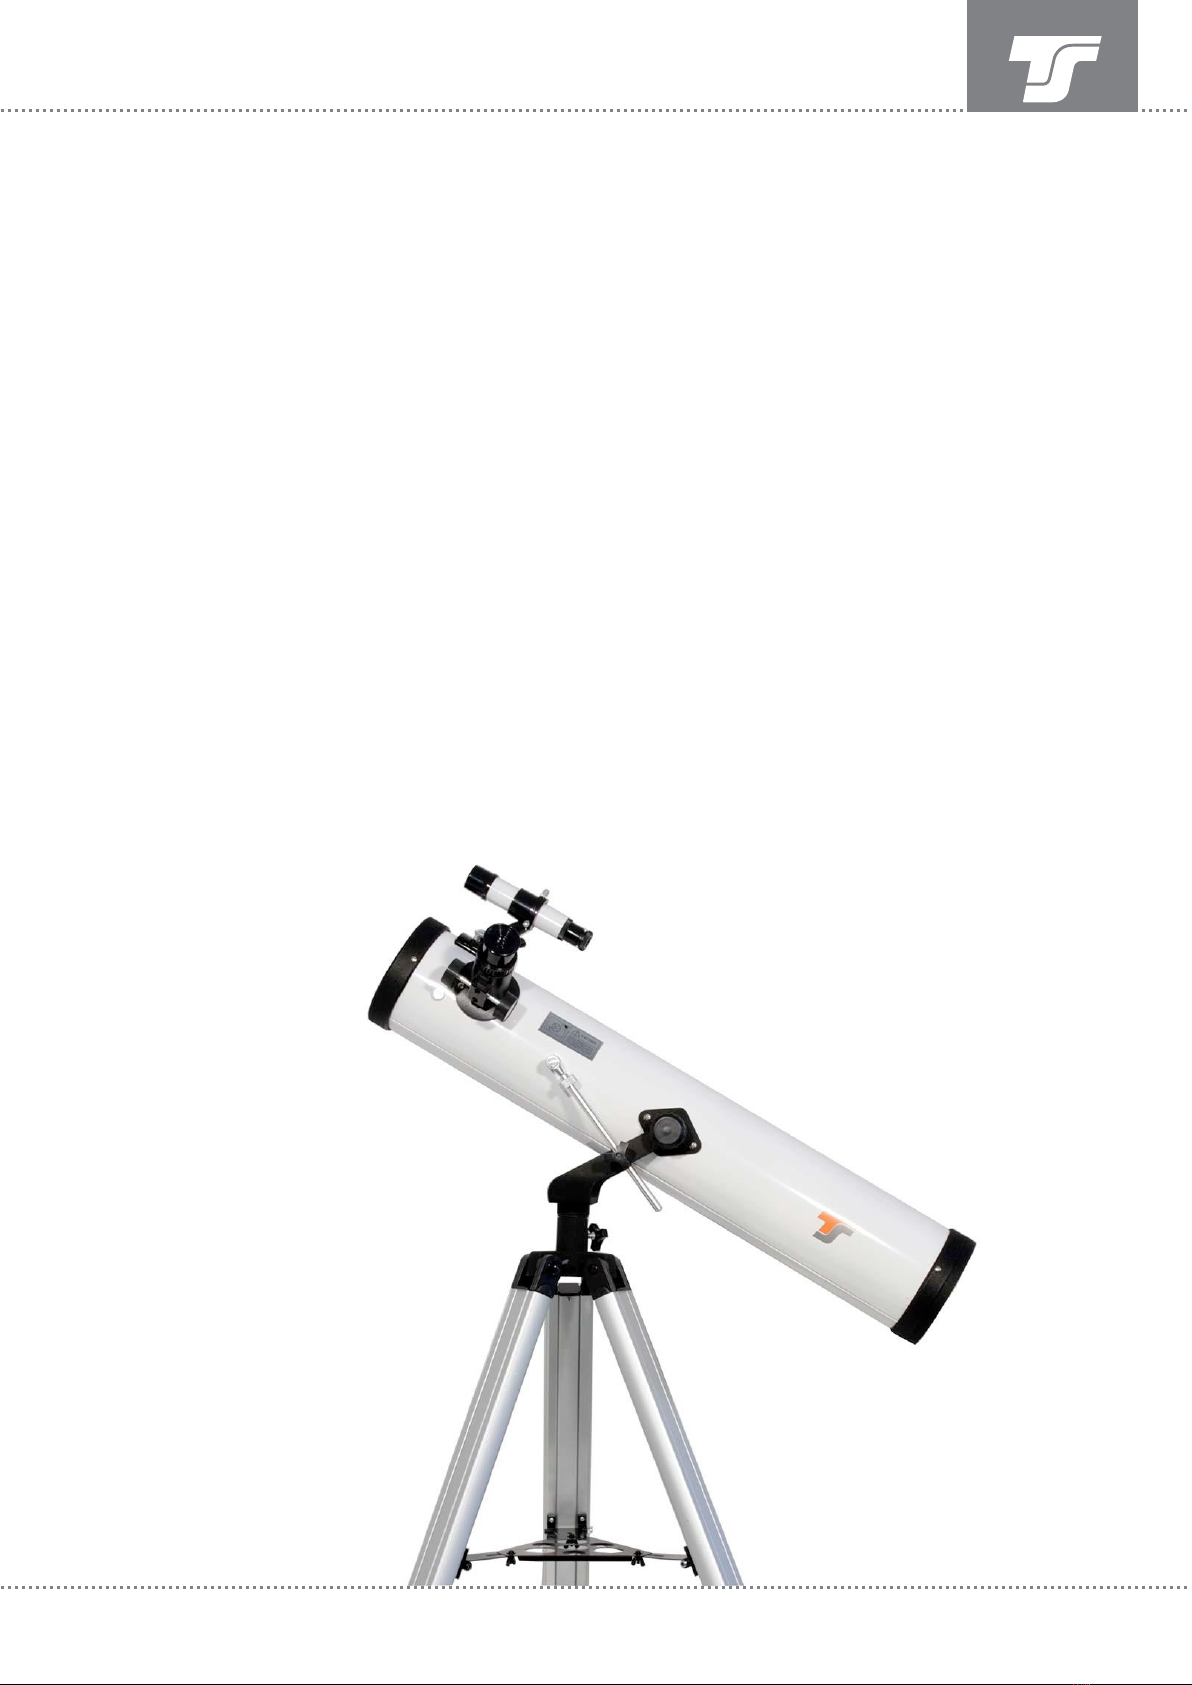
Note: The pictures in this manual show the Starscope 767
5Instruction manualStarscopes on azimuthal mount
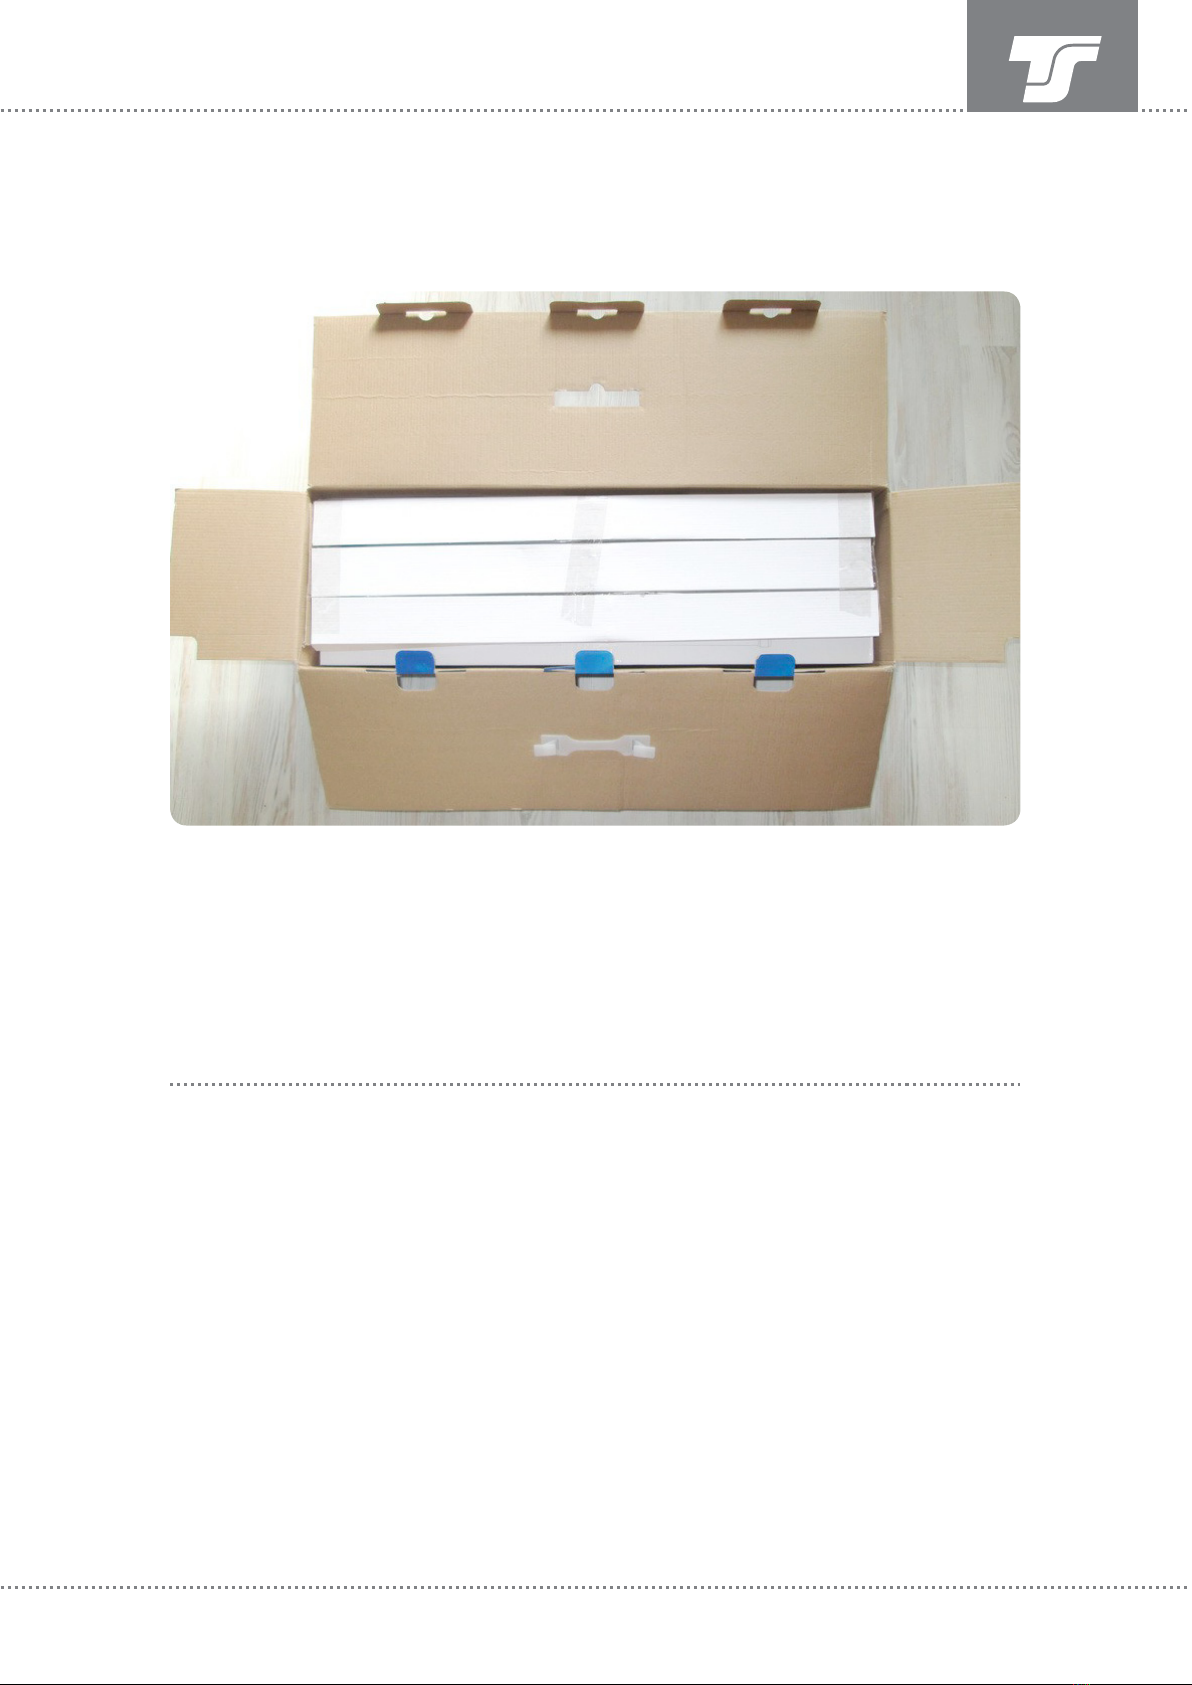
The outer packaging contains another box
and these instructions. This contains the
individually packed parts for the telescope
complete set.
Please unpack the individual parts conscien-
tiously and place everything carefully on the
floor.
Before starting the assembly, please check all
parts for their undamaged condition. Please
also check whether all parts are present.
If you are setting up a telescope for the first
time, please follow our assembly instructions
carefully, as incorrect assembly can result in
poor imaging of the optics or even damage to
them.
If, contrary to expectations, you should ever
notice damage to one of the parts when
unpacking or checking, please contact us
immediately before you finish assembling the
complete set.
Unpacking and checking the contents of the package

6
J
K
F
A
I
N
O
B
D C
G
H
M
L
Instruction manualStarscopes on azimuthal mount
A - Mount
B - Finder scope
C - Erect lens
D - Eyepieces
E - ---
F - Locking screws
for tripod legs
G - Support plate
H - Barlow lens
I - Fine adjustment
J - Screws/wing nuts
for tripod legs
K - Screws/wing nuts
for support plate
L - Optical tube
M - Tripod legs
N - Screws
O - Moon filter
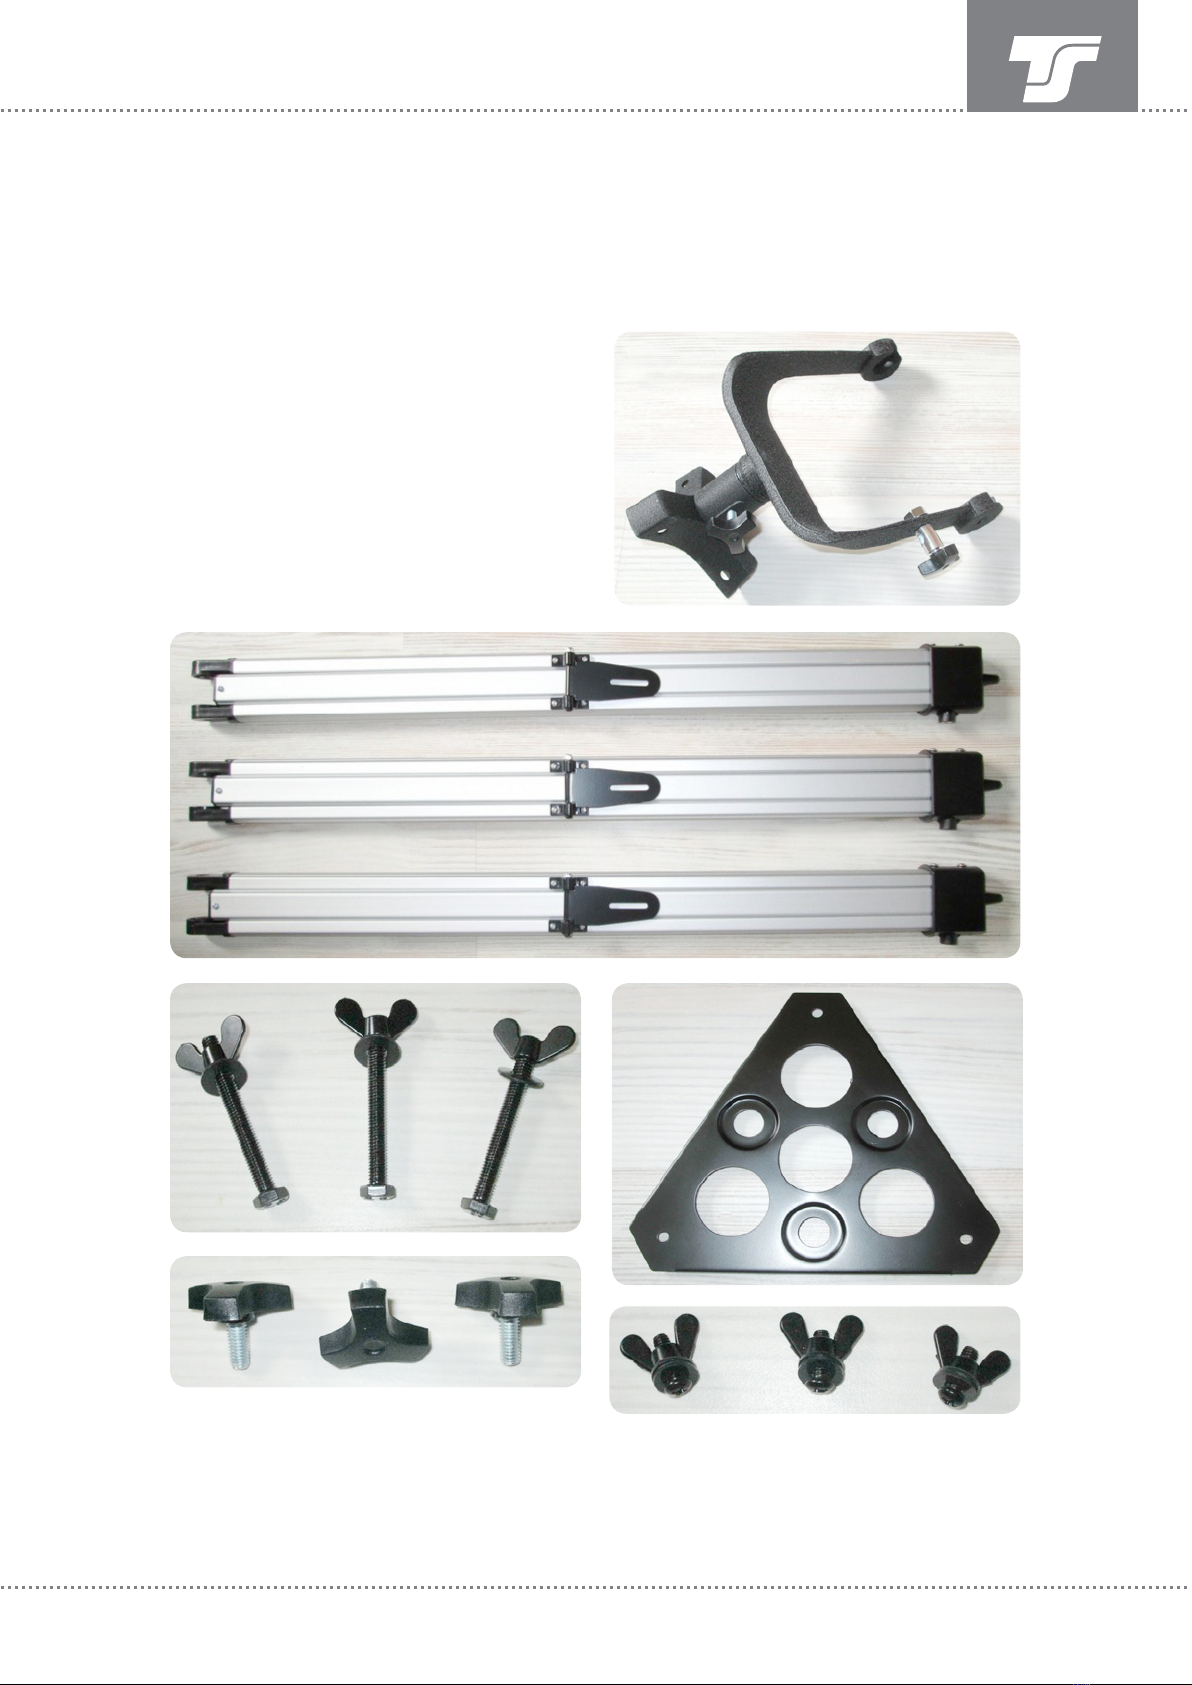
7Instruction manualStarscopes on azimuthal mount
• AZ mount head
• Tripod legs
• Screws for tripod leg clamping
• Screws with wing nuts
for the tripod leg mounting
• Storage plate for eyepieces
and accessories
• Screws with wing nuts
for the storage plate
Assembly of the mount • preparation
Take the parts needed for this and place
them ready for mounting.
You will need the following parts
for the mount:

8
1
2
3
1 3
4
Instruction manualStarscopes on azimuthal mount
When mounting the tripod
legs, make sure that the
three retaining plates for the
storage plate face inwards.
Then attach the tripod legs
to the mount head using the
three screws ‚J‘. You should
not tighten these screws too
much yet.
First screw the three screws ‚F‘ into the
threads of the tripod legs, but do not tighten
the screws too much, only „hand-tight“. You
can later use these three screws to change
the „working height“ of the tripod or to adjust
the tripod to an uneven floor.
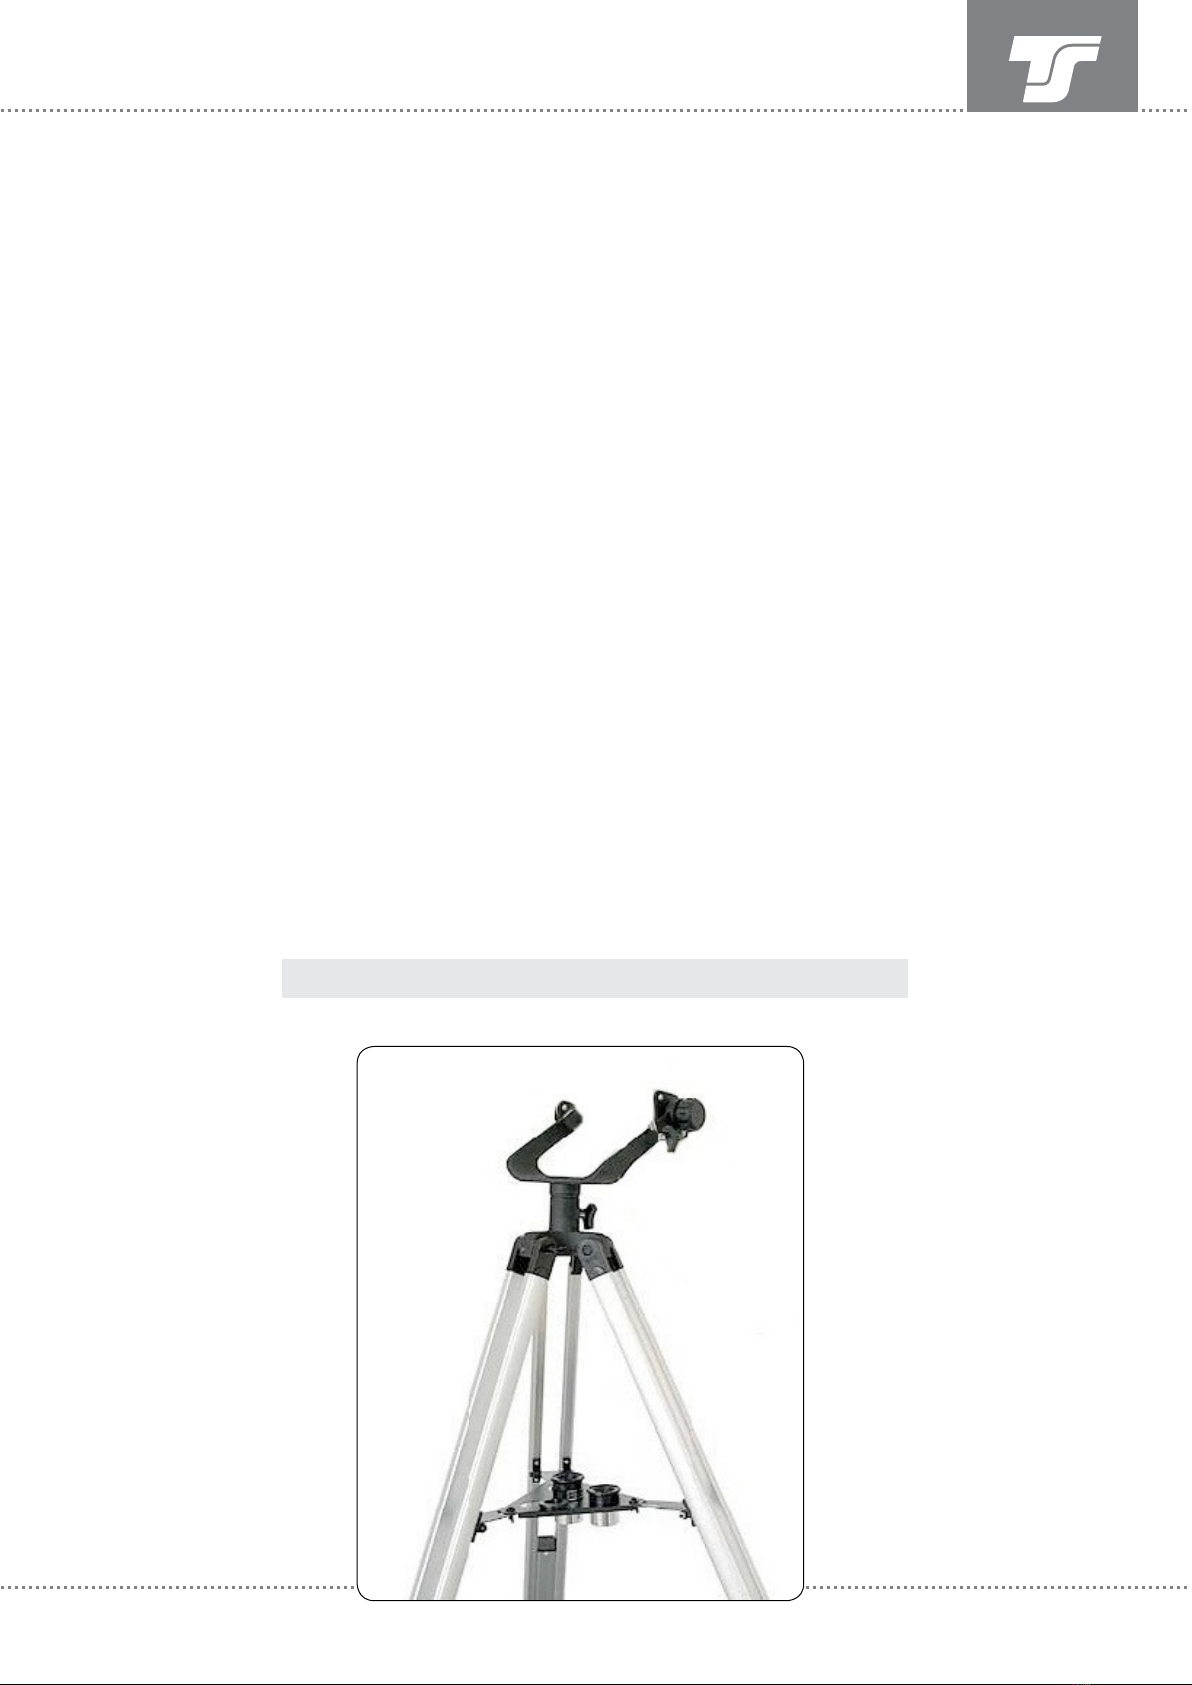
Assembling the mount
Now fasten the storage
plate to the retaining plates
of the ripod legs using the
three screws (K). To do this,
insert the screws with a
washer from above into the
holes provided for this pur-
pose in the storage plate ...
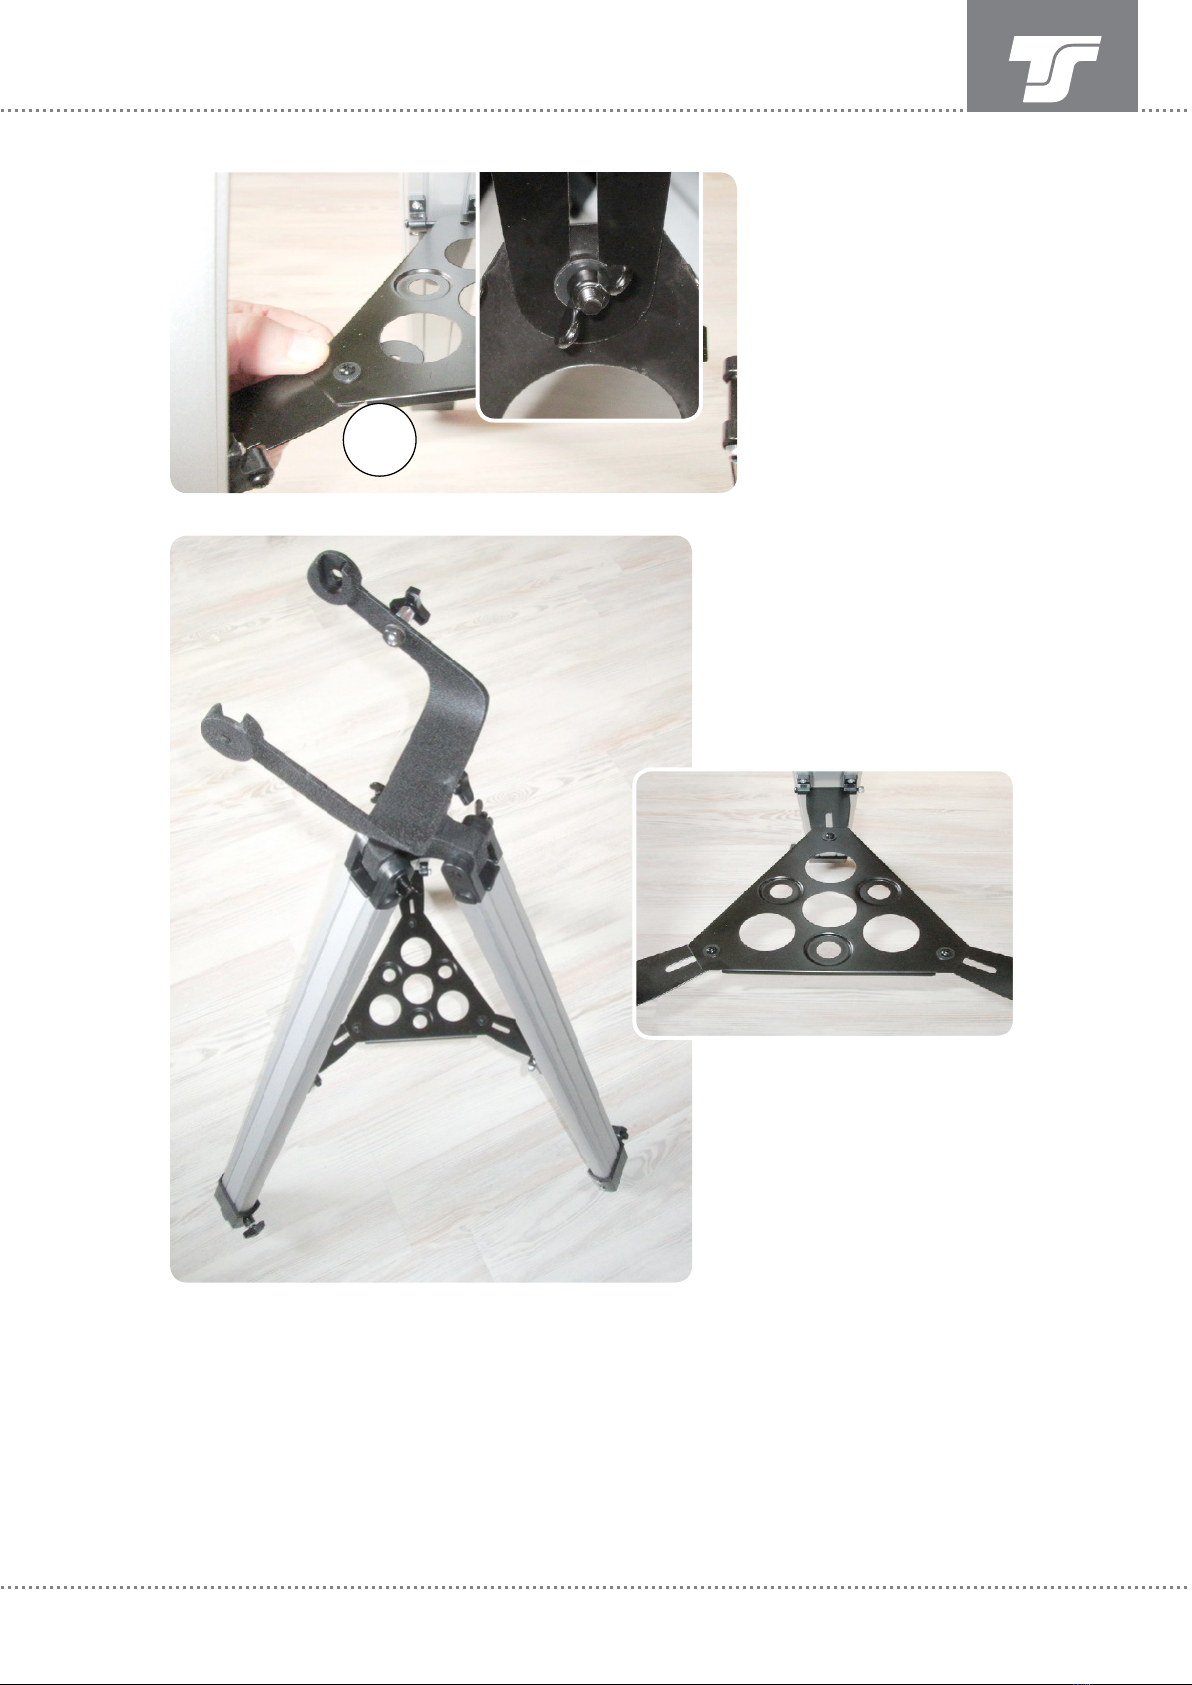
9
2
Instruction manualStarscopes on azimuthal mount
Now attach the storage pla-
te to the other two holding
plates.
Your AZ mount should now
be secure and stable and is
ready to receive the tele-
scope.
... and screw a wing nut
together with a washer onto
the screw from below. Do
not tighten the nut yet.
Then spread the three tripod
legs evenly and only then
tighten the three screws
(J) on the mounting head
„hand-tight“ (page 7).

10 Instruction manualStarscopes on azimuthal mount
Mounting the telescope on the mount
To mount the telescope on the
mount you need the following parts:
• 2 x screw (N) for tube mounting
• 1 x ne drive with screw (I)
• Telescope tube (L)
Now carefully take the telescope and place it
with the two holders in the two openings at
the top of the mounting fork.

11 Instruction manualStarscopes on azimuthal mount
When inserting the telescope, it is important
that the front end of the telescope (aperture)
points in the opposite direction of the tilt of
the mount fork.
Secure the telescope to the mount with the
two screws ‚N‘. Tighten the screws only
„hand tight“ so that the telescope can still be
moved in the mount.
Next, screw the holder for the fine adjustment
onto the mount.
Front
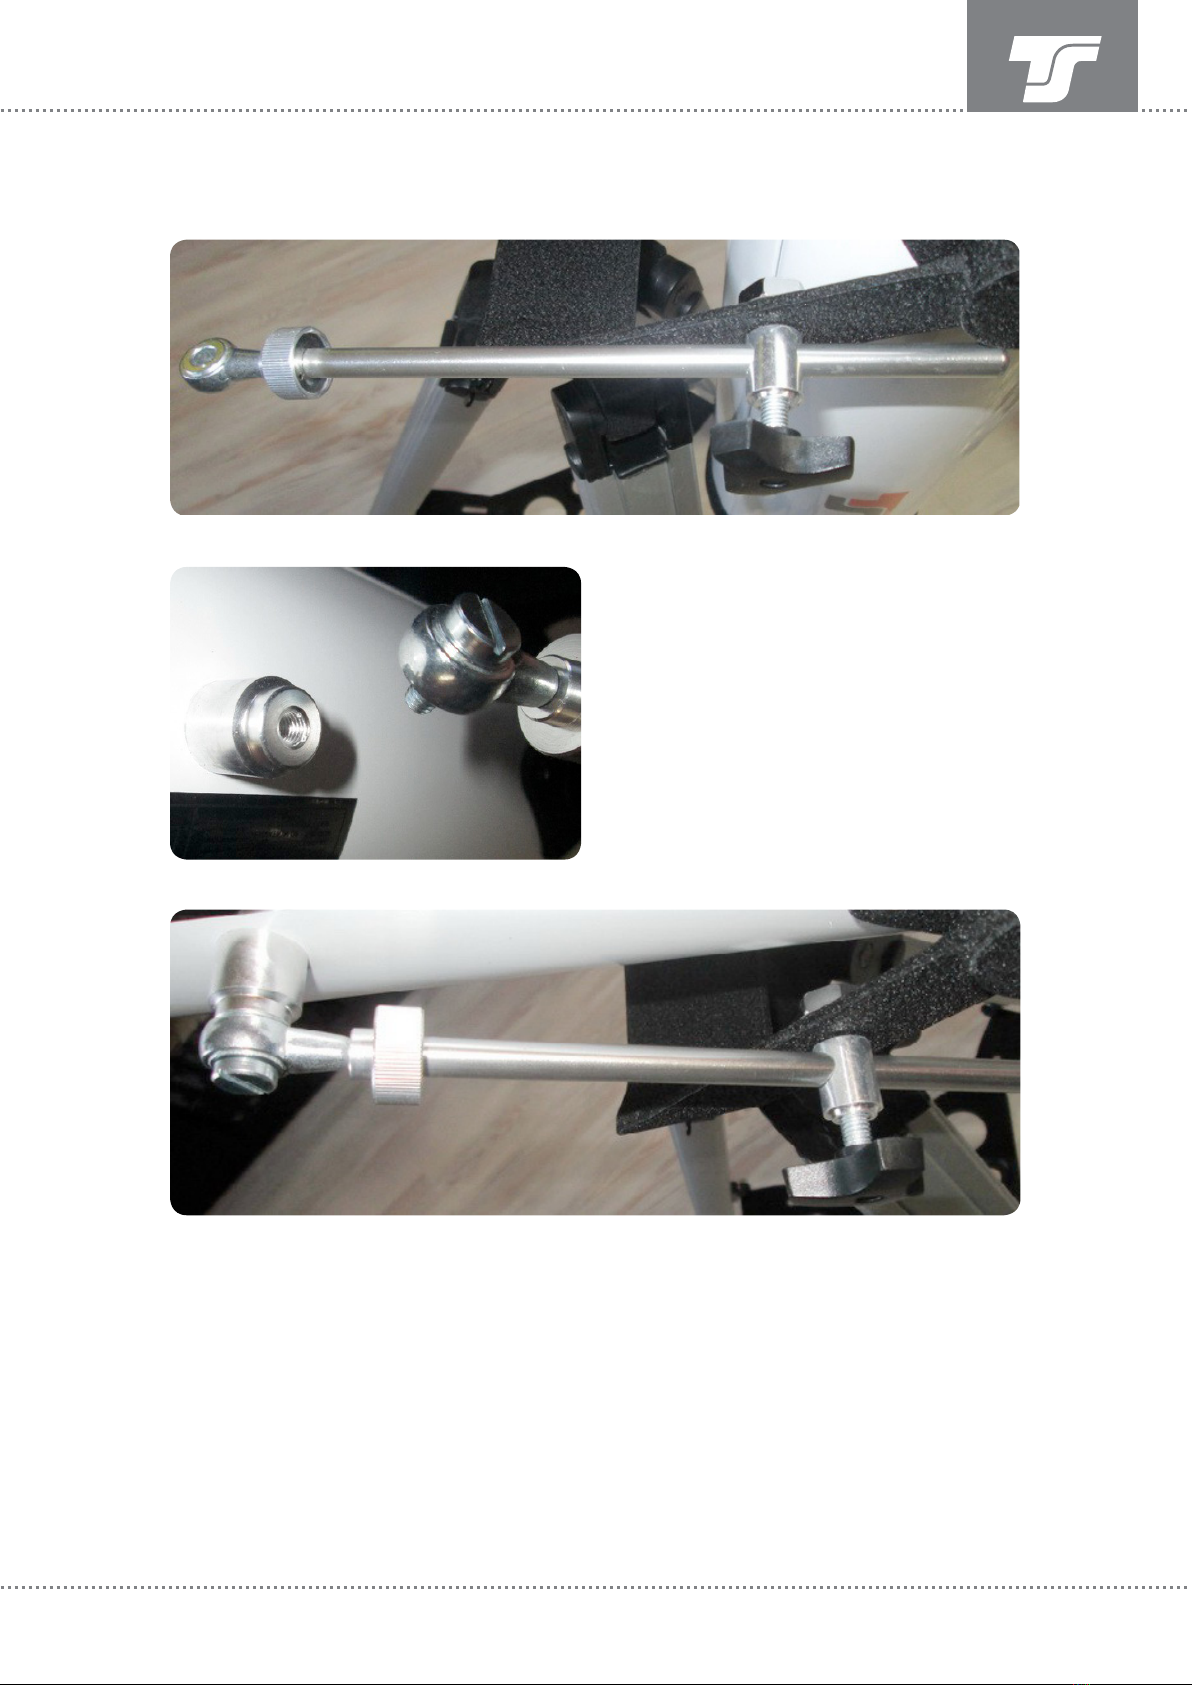
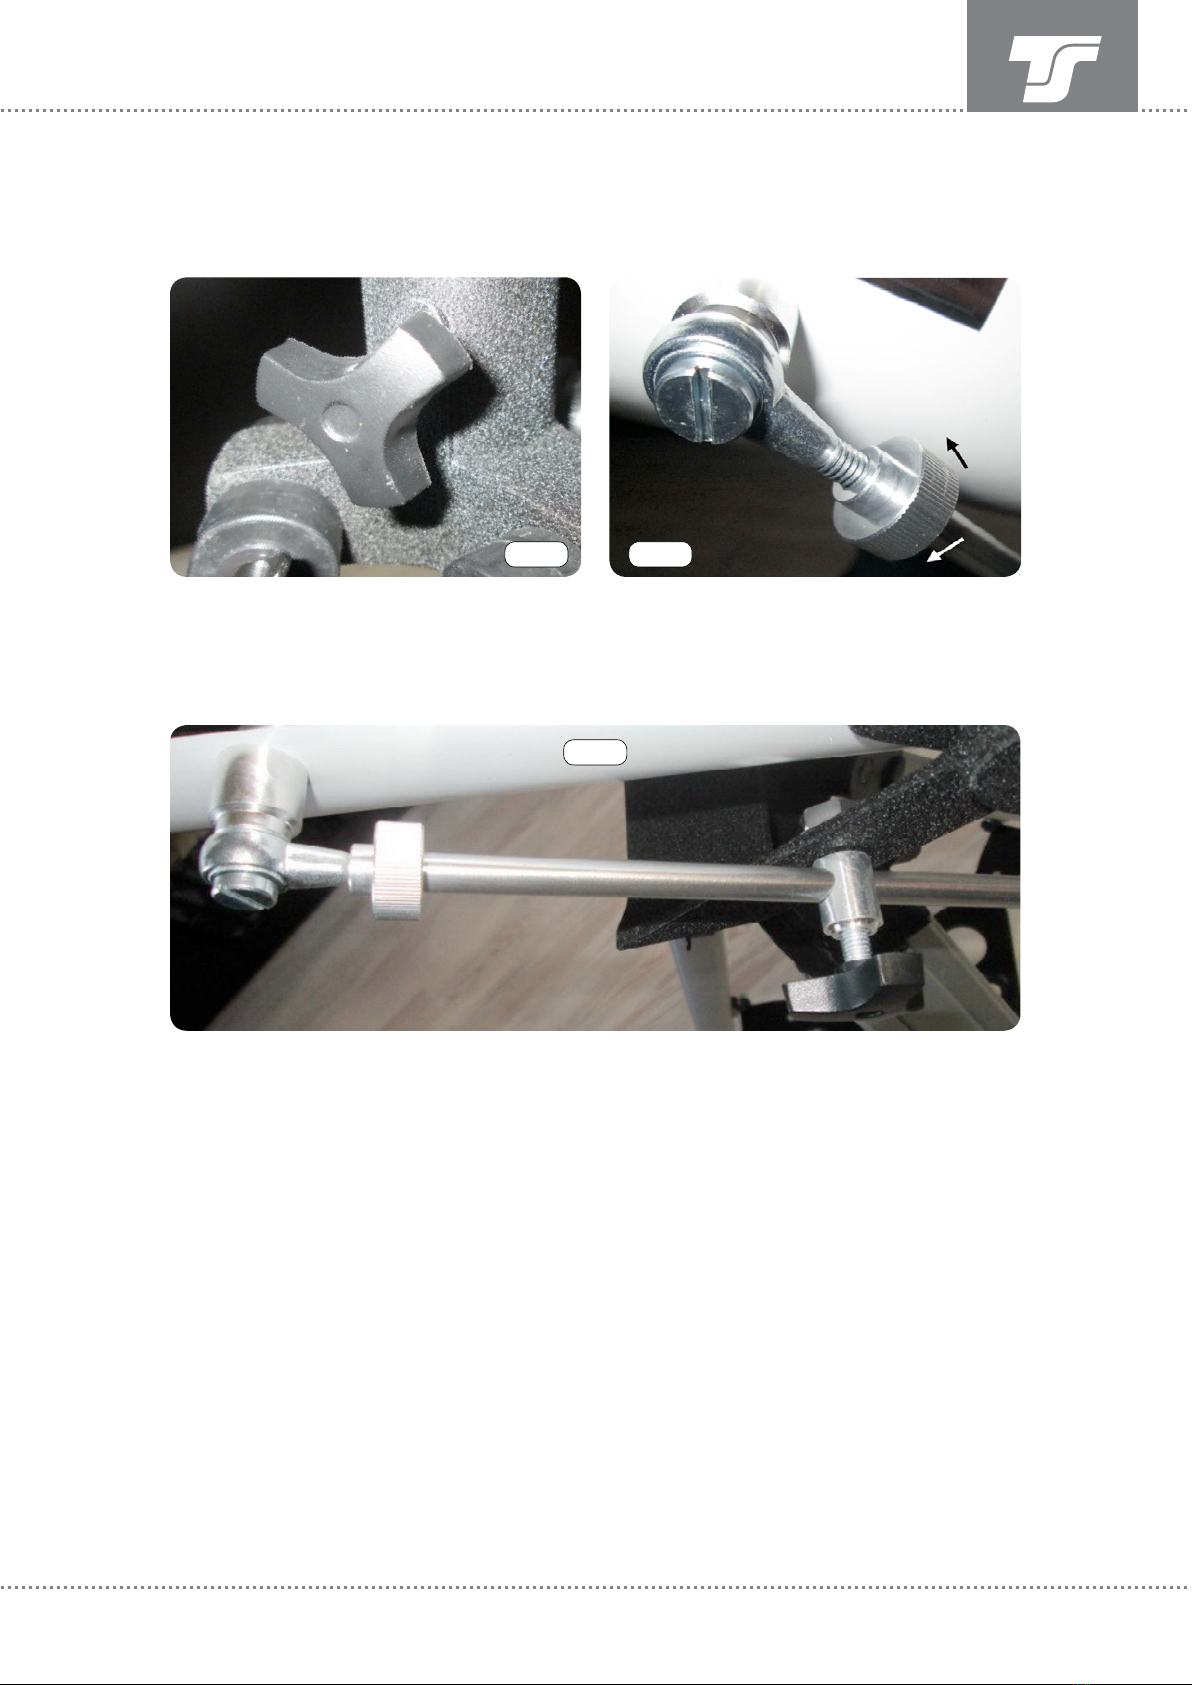
12 Instruction manualStarscopes on azimuthal mount
Insert the fine adjustment rod into the holder
on the mount.
Attach the fine adjustment knob to the threa-
ded bolt of the telescope using the screwdri-
ver provided.
Tighten the screw firmly, the fine adjustment
knob still remains movable.
Now clamp the fine adjustment knob to the
mount with the star knob screw.

13 Instruction manualStarscopes on azimuthal mount
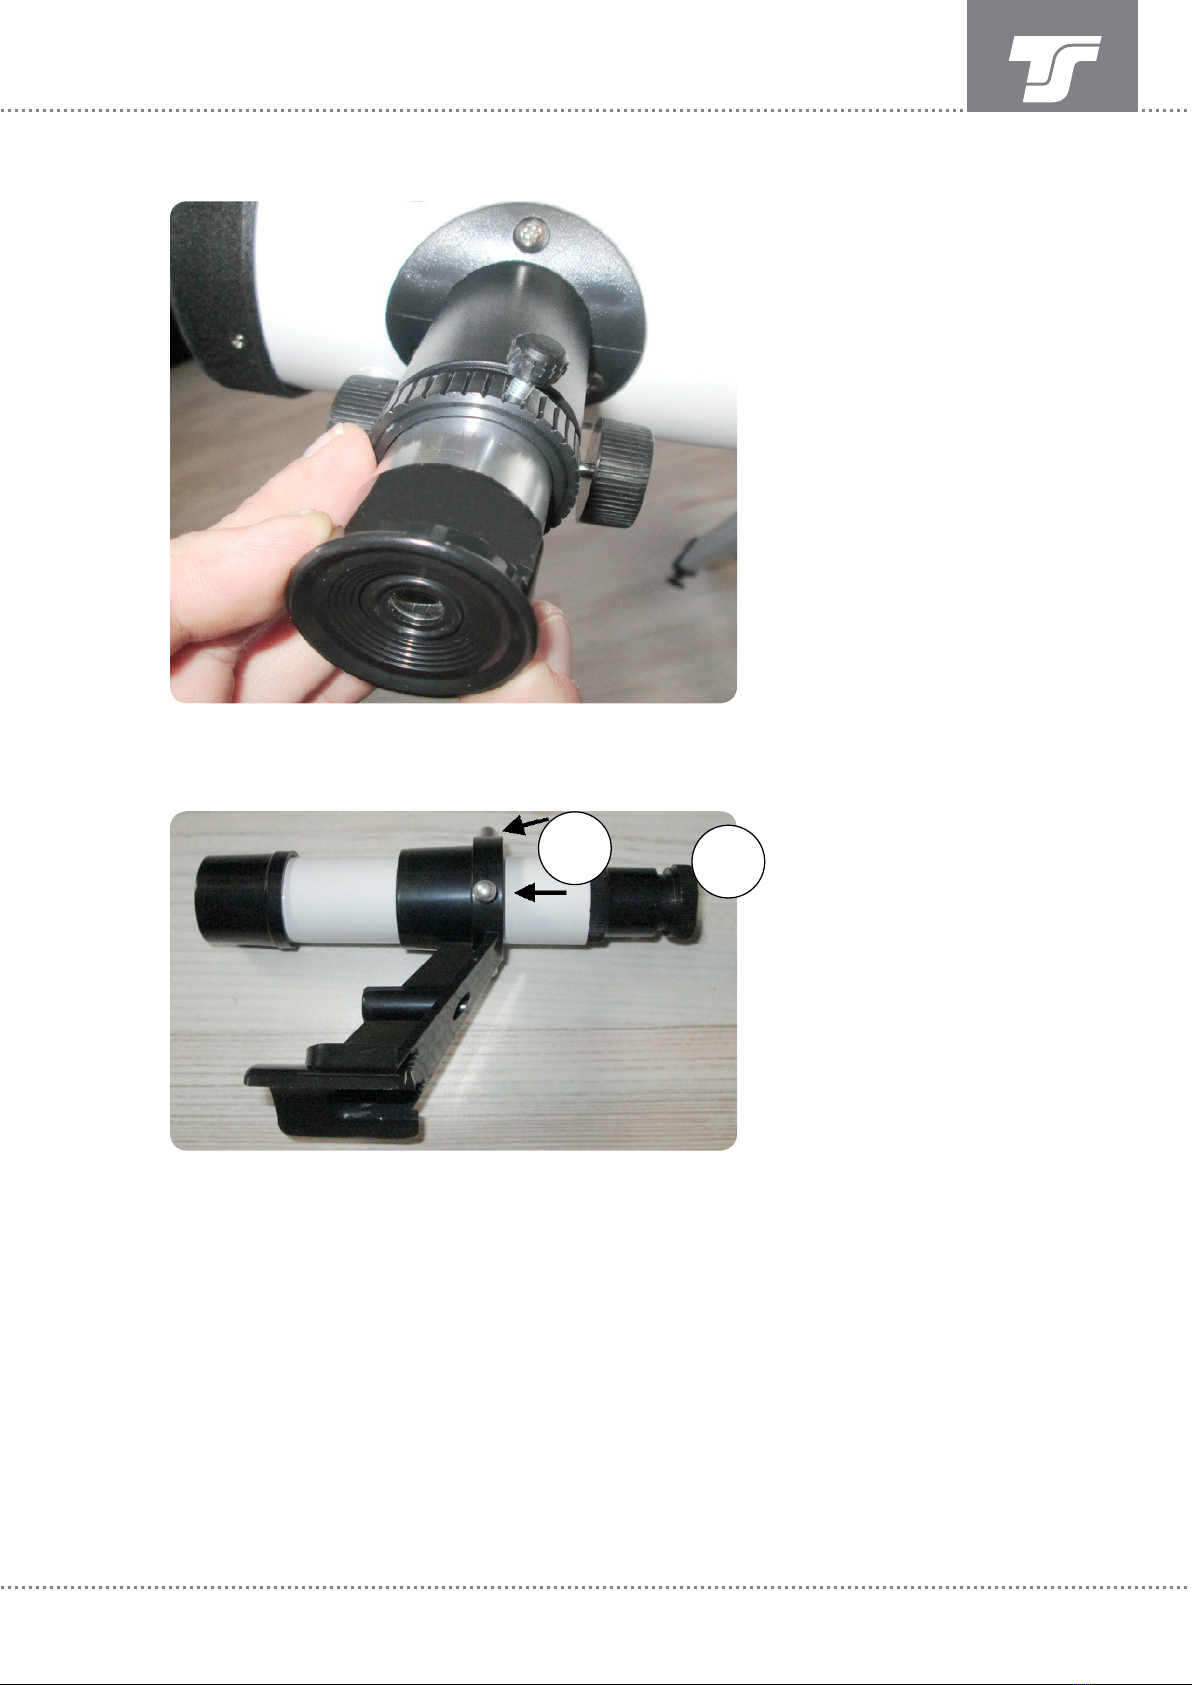
The entry-level package comes with either an
optical viewfinder or a so-called illuminated
dot finder. Both variants are attached to the
telescope.
First, remove the two knurled nuts so that
only the screws protrude from the tube.
Attaching and using the viewfinder telescope
Now take the viewfinder and place it on the
screws so that you can screw the knurled
nuts back onto it.
After you have screwed both knurled nuts
back onto the screws, the viewfinder is
mounted. When mounting the viewfinder,
make sure that the aperture of the viewfinder
telescope points in the same direction as the
aperture of the telescope.
14
1
2
Instruction manualStarscopes on azimuthal mount
Now look into the finder te-
lescope from behind (shown
in the adjacent image on the
right). Using the adjustment
screws (2), adjust the finder
until you see the same
object as in the eyepiece.
Focusing is done by rotating
the eyepiece.
Adjust the viewfinder so
that the selected object is
exactly in the center behind
the crosshairs or behind the
illuminated dot.
Now you have aligned your finder with the
telescope. Your telescope is now ready for its
first use.
Now you have to align
(adjust) the viewfinder to the
telescope. To do this, first
insert the eyepiece with the
largest focal length into the
focuser.
Now look for a distant,
earthly object (church tower,
high voltage pylon, chim-
ney, etc.) and look through
the eyepiece. Now align
the telescope so that your
selected object appears in
the center of the eyepiece.
For more detailed informa-
tion on how to move the
telescope on the mount, see
page 16.
15 Instruction manualStarscopes on azimuthal mount
To view the image captured by the telescope,
you need the eyepieces. The telescope
collects and focuses the light and creates an
image that you view with an eyepiece. The
focal length of the eyepiece determines the
magnification factor. The lower the mag-
nification, the larger the visible area (field
of view).The higher the magnification, the
smaller the field of view and the brightness
of the image decreases. Therefore, there is
a „useful magnification“ for each telescope.
The possible magnification also depends on
the so-called „seeing“ (air turbulence) as well
as the transparency of the atmosphere (haze
etc.).
The highest magnification can only be achie-
ved on particularly clear nights with very
calm, clear air. In addition to the eyepiece,
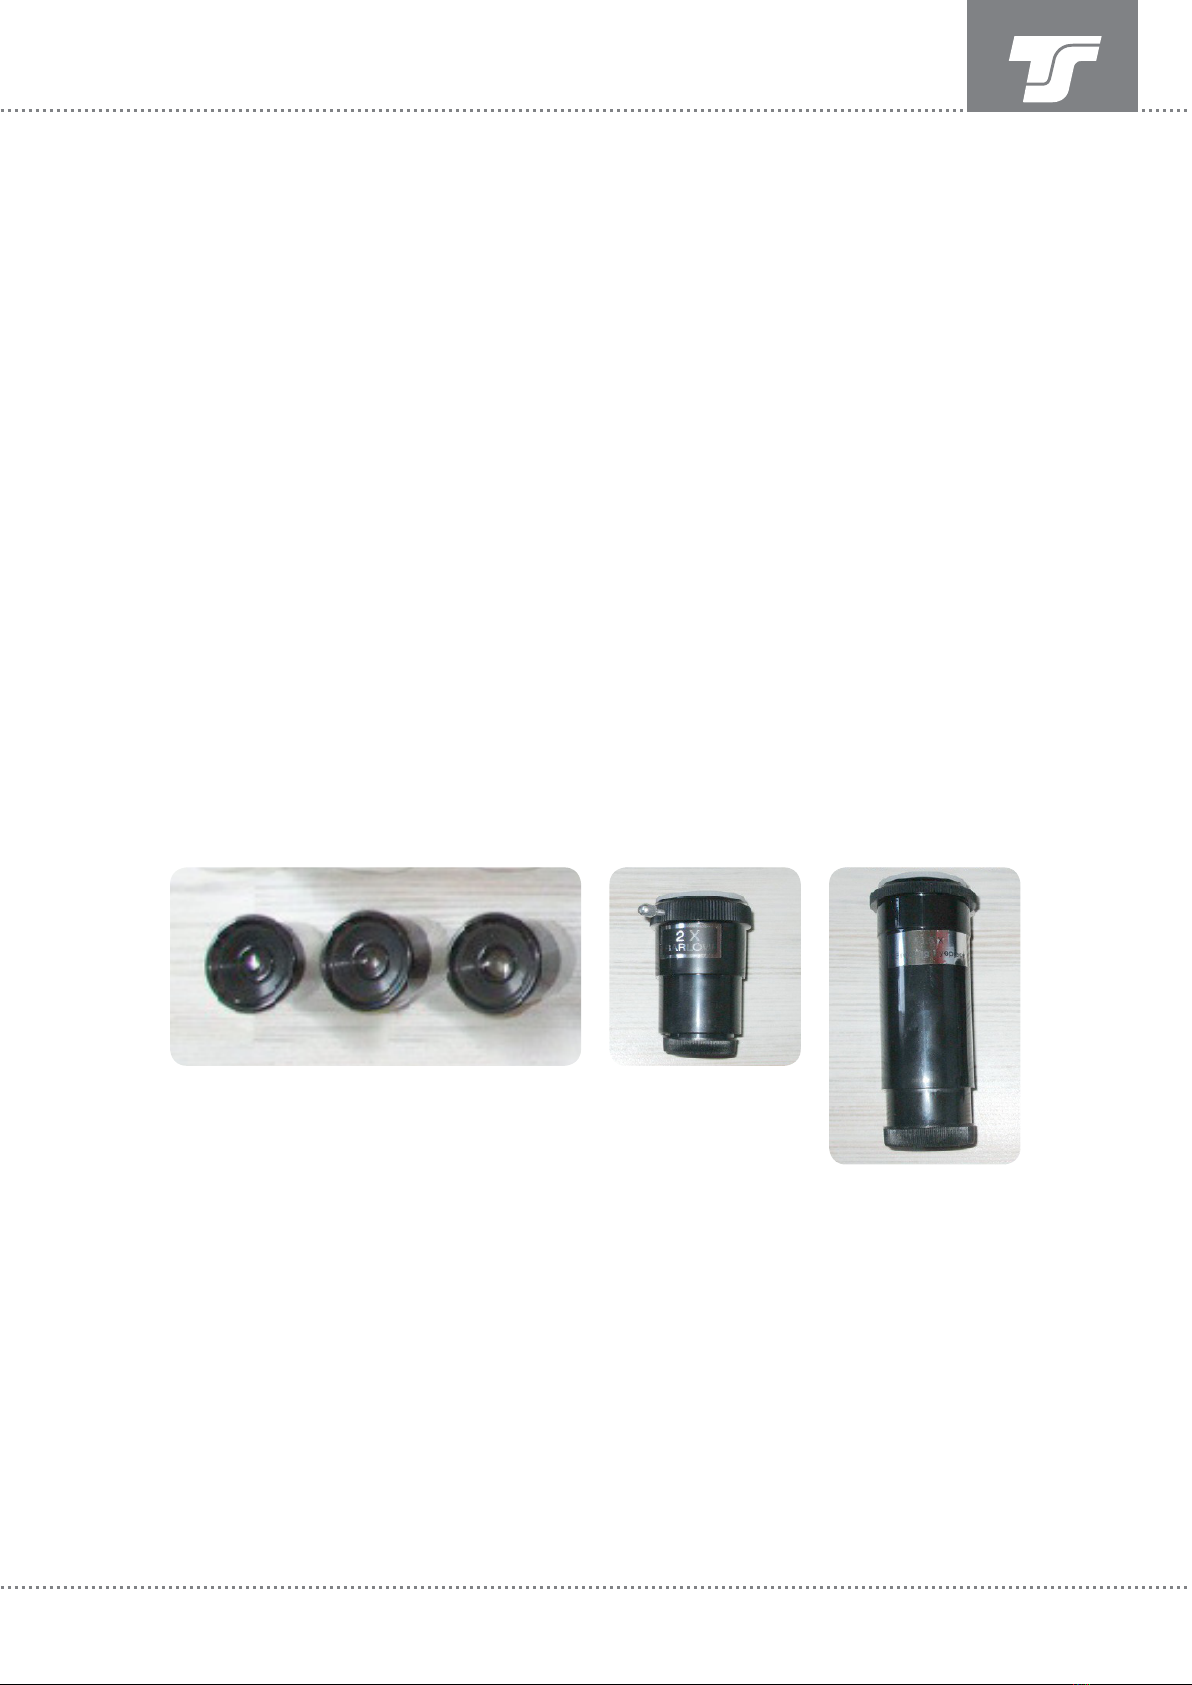
there are magnification lenses (barlow lenses)
which double the magnification value of the
eyepiece, for example. A 2x Barlow lens thus
turns a 12.5 mm eyepiece into a 6.25 mm
eyepiece. The focal length is halved and the
magnification is doubled!
It is not always advisable to use a Barlow
lens, especially with high magnification
eyepieces (e.g. 4 mm), because there is not
enough collected light for this magnification
in small telescopes. The image becomes very
dark.
If you also want to observe nature with your
new telescope, you will quickly notice that
the image is mirrored vertically and/or hori-
zontally, unlike the image of binoculars.
This is not a problem when observing the
sky at night, but an upright and laterally
correct image is an advantage when obser-
ving nature. To achieve such an image, there
are - depending on the type of telescope -
so-called erect lenses or amici prisms. The
upright lenses usually provide magnification
at the same time. These optical elements are
always inserted between the focuser and the
eyepiece. If your complete package does not
include these parts, you can order them in
our online store.
Using accessories on the eyepiece side
The magnification in a telescope is calculated
by dividing the focal length of the telescope
by the focal length of the eyepiece.
Example:
Telescope focal length 700 mm
Eyepiece focal length 12.5 mm
700/12.5 = 56x magnification
This means that the smaller the eyepiece
focal length, the higher the magnification.
With a 2x Barlow lens, the magnification dou-
bles, in the example to 112x.
Examples for a telescope with 700 mm
Focal length (eyepiece focal length/magnifica-
tion/magnification with 2x Barlow lens ):
20 mm 35 x 70 x
12.5 mm 56 x 112 x
4 mm 175 x 350 x
Useful magnifications and calculation formulas
f.l.: Eyepieces • Barlow lens • Erect lens

16 Instruction manualStarscopes on azimuthal mount
Theoretically, almost any magnification is
possible with a telescope if you use the right
eyepieces. As you can see in the table above,
in the example with the 4 mm eyepiece and a
2x Barlow lens even a magnification of 350x
can be achieved. With even smaller eyepiece
focal lengths and stronger Barlow lenses (e.g.
3x, 5x) this could be increased almost arbitra-
rily. However, the useful magnification range
is limited by the laws of optics.
For the highest useful magnification, the rule
of thumb is that you should choose a maxi-
mum magnification of twice the diameter of
the optics.
For example, if the telescope has an diameter
of 76 mm, the highest magnification should
the highest magnification should not be more
than 76 x 2 = 152x. If you go beyond this
range, the image will become dark and the
sharpness will decrease, so you will see less
detail despite the higher magnification.
Magnification is also often limited by what is
called „seeing“ (air turbulence in the Earth’s
atmosphere).
Depending on the night of observation, the air
may be calmer or less calm. The highest use-
ful magnification can only be achieved when
the air is as calm as possible.
The lowest useful magnification is limited by
the so-called exit pupil (EP). The exit pupil is
the diameter of the light beam that is directed
from the eyepiece into your eye.
Here’s how to calculate the exit pupil:
Aperture of the telescope / Magnification
= diameter of theexit pupil
If the exit pupil is larger than the pupil of your
eye, light is lost and the image becomes dar-
ker. It is believed that the human pupil dilates
to a maximum diameter of 5-7 mm in comple-
te darkness. Therefore, avoid magnifications
that result in an exit pupil that is too large.
Examples (aperture of the telescope and
lowest reaonable magnification):
60 mm 8,5–12x
70 mm 10–14x
76 mm 11–15x
Highest and lowest useful magnification
Observing with the telescope
1. Always set up the telescope outdoors. It is best to
place the telescope outdoors about 30 minutes before
observing so that the optics can adjust to the ambient
temperature. Observing from inside a building through
a window (whether open or closed) is not recommen-
ded, since the image quality deteriorates significantly
as a result of the air exchange.
2. choose a location for observation that is as dark as
possible. This is especially important if you want to
observe faint objects such as star clusters, gas ne-
bulae, or even galaxies. Spend some time in the dark
before observing to give your eyes a chance to adjust
to the dark. Avoid looking directly into bright light, as
this will undo the dark adaptation. Use a red light lamp
that is not too bright for orientation at night.
3. Remove the dust caps from the telescope before
observing. On some telescopes (e.g. 76/700 mm New-
tonian telescope) the cap is in two parts. Remove the
entire cap, not just the inner part.
17
16/1 16/2
16/3
Instruction manualStarscopes on azimuthal mount
4. Always use the eyepiece with the lowest
magnification at first. Once you have centered
the observation object in the telescope, you
can slowly increase the magnification.
5. To slew the telescope horizontally, simply
loosen the clamping screw at the bottom
of the mount head (Fig. 16/1). To slew the
telescope vertically, you can either loosen the
star knob screw on the fine adjustment drive
(Fig. 16/3) or adjust the knurled nut on the
fine adjustment drive (Fig. 16/2).
6. moisture (dew) may condense on the
optics during observation. If this happens,
DO NOT clean the optics with a cloth, as this
will damage the optical surfaces. Instead, you
should warm the optics slightly, e.g. with a
hair dryer or with optionally available ex-
change heaters. A slight warming is sufficient!
The optical elements must not become hot
under any circumstances!
7. If you bring the telescope back into a
closed room after observing, dew can form
on the surface due to the difference in
temperature and humidity. Short-term dew
condensation is not a problem. However, the
telescope should not be stored in a damp
condition. Leave it open (without the dust co-
ver) for about 1 hour until the optics have ad-
justed to the room temperature again and the
moisture has disappeared. Only then should
you place the dust covers on the telescope
aperture and the focuser.

18 Instruction manualStarscopes on azimuthal mount
All items are available in our online store: www.teleskop-express.de
TS Cleaner Kit -complete package#
Universal cleaning kit for almost all
optical surfaces
LED Red & White Light Lamp with Dimmer
Astro red light and white light
ready to use with battery
TS Zoom Eyepiece
7mm to 21mm Focal Length
Change the magnification according to your
needs - steplessly!
TS Optics 8-piece eyepiece and accessory
set in high-quality metal case
Useful and important accessories for nearly
every telescope
Optional accessories

19 Instruction manualStarscopes on azimuthal mount
If the telescope needs to be cleaned, this
should always be done with extreme care and
the proper cleaning materials.
Some important rules:
• Clean the telescope as infrequently as
possible. After frequent cleaning, the ima-
ging quality of the telescope will increasingly
suffer. Some dust or similar minor dirt on the
optics does not negatively affect the imaging
quality. Only when the optics are really heavi-
ly soiled should they be cleaned. It is recom-
mended not to clean a telescope more often
than once a year.
• The only exception to this rule: ngerprints
and pollen from flowers can damage the
coating of the mirror or lens. In this case, the
optics should be cleaned.
• Store the telescope only with the dust co-
vers attached. This is the best way to prevent
dust from accumulating on the optics.
• It is best to remove dust on the optics
without touching it using a bellows (available
in our online store).
• To remove ngerprints, pollen or dust that
cannot be removed with a bellows, you may
ONLY use special cleaning agents, such as
so-called „Lenspens“ (for eyepieces) or spe-
cial microfiber cloths (for telescope optics).
However, since this type of cleaning cannot
be done without contact, it should be done as
infrequently as possible.
• If you do not feel condent to clean the op-
tics, you can contact our customer service.
Maintenance and cleaning

20 Instruction manualStarscopes on azimuthal mount
A lot of interesting celestial objects are wai-
ting to be viewed by you. A detailed listing
would go beyond the scope of this guide.
There is very good literature on this subject
in our online store and, of course, a lot of free
information on the Internet and astronomy fo-
rums. Nevertheless, here are a few examples,
which are ideal especially for the beginner.
The Moon
The moon is the easiest and especially for
beginners an extremely productive observati-
on object. It is easy to find and shows a lot of
details even for the untrained eye. Especially
interesting is the observation of the light-dark
boundary, the so called „terminator“.
There the sun casts long shadows, so that
craters and mountains look especially vivid.
At full moon no shadows can be seen, the
moon then looks flat and overlit.
The planets
If you have some observing experience with
the moon, the planets are the next interesting
target. You can see especially much at Jupi-
ter and Saturn. Saturn‘s rings, for example,
or even Jupiter‘s four brightest moons can be
seen without much experience.
With a little more practice you will be able to
see many additional details, e.g. the cloud
bands on Jupiter.
Venus (also known as the morning or evening
star) already shows its phase shape even in
small telescopes, similar to our moon.
Mercury, Mars and Uranus are also within
reach of your telescope, but they show much
less detail than the planets Jupiter and Saturn
mentioned above. You should observe the
planets during a so-called „opposition“, since
they are closest to Earth then.
Note: Not all planets are visible in the sky at
all times. A celestial calendar tells you which
planets are visible and when and where they
can be discovered.
Objects outside our solar system
There are also numerous objects which are
within the range of your telescope.For the
beginning the perhaps most interesting „Deep
Sky Objects“.
• the „Ring Nebula“ M57 in Lyra
• the globular cluster M13 in Hercules
• the Andromeda Nebula M31, a huge galaxy
at a distance of about 2.5 million light years
(use as low magnification as possible).
• Open star clusters like the Pleiades in
Taurus, h and xi in Perseus or M11 in the
constellation Scutum.
Observation examples
This manual suits for next models
1
Table of contents
Popular Telescope manuals by other brands

Celestron
Celestron 31058 instruction manual

SKY-WATCHER
SKY-WATCHER 767AZ1 instruction manual

TeleVue
TeleVue NP127is operating guide

ORION TELESCOPES & BINOCULARS
ORION TELESCOPES & BINOCULARS Observer II instruction manual

Celestron
Celestron AstroMaster 90AZ instruction manual

Stellina
Stellina ST80 instruction manual


Vixen
Vixen Sphinx Hardware guide

Celestron
Celestron Micro Guide user guide

Celestron
Celestron 52228 instruction manual

Orion
Orion SpaceProbe 3 EQ 9039 instruction manual

Zhumell
Zhumell Dobsonian owner's manual

ORION TELESCOPES & BINOCULARSinstruction Manual
ORION TELESCOPES & BINOCULARSinstruction Manual SkyQuest xx12g instruction manual