Tsovet SLR FW42 User manual

INSTRUCTION MANUAL
WWW.TSOVET.COM/IM
For more details on operating this timepiece
please refer to the enclosed booklet or visit :
VOL.1.05 EN

SOLAR-POWERED WATCH
This timepiece is provided with a rechargeable
battery for exclusive use with the watch. Unlike
with conventional battery-powered watches,
therefore, battery replacement is not necessary.
Expose the watch to sunlight or strong artificial
light for charging.
The solar cell is a clean energy source and has no
adverse effect on the natural environment.
FEATURES
1.Solar-powered watch
This watch is a solar-powered watch containing
a solar cell underneath the dial to convert any
form of light into ''electrical energy'' and store
the power in a secondary battery.
2.Eliminating the need for battery replacement
Unlike conventional quartz watches, this watch
does not use a silver oxide battery, thus
eliminating the need for battery replacement.
3.You can use the dial which light transmittance
is more than 30%
It is possible to assemble the dial which
transmits light on the solar cell.
It enabled to cover the solar cell color, and you
can design variety colors of dials.
4.Running time
Expected running time from full charge to
stoppage will be around 6 months.
5.Power depletion warning function
The two-second intervals movement of the
second hand is a signal of energy depletion.
The watch continuous running time after
two-second intervals movement is approximate-
ly 1 week.
6.Over charge prevent function is equipped
If the secondary battery is charged more than
predetermined voltage, over charge prevent
function is operated to prevent the secondary
battery deterioration and breakage.
SLR FW42
SOLAR POWER CHRONOGRAPH
To ensure correct care, please take some time to
review the enclosed instructions to review how to
operate your watch.

DATE
SECOND
HAND
MINUTE
HAND
STOPWATCH
SECOND
HAND
STOPWATCH
MINUTE
HAND
HOUR
HAND
SCREW
DOWN
CROWN
BUTTON A
BUTTON B
DISPLAY
1
PLEASE READ THE FOLLOWING BEFORE
UNSCREWING THE CROWN:
SCREW-DOWN CROWN
Screw-down crowns are used to ensure water
resistance. ALWAYS be certain that your crown is
securely screwed down (Position [0] is secured.
Positions [1], [2] and [3] are not secured for water
resistance).
Do NOT unscrew your crown while you are in any
environment where moisture is present.
0 1 2 3
CLOSED:
SECURELY SCREWED
AND WATER RESISTANT
OPENED:
NOT SECURED
FOR WATER RESISTANCE
(2nd click)(1st click)
USING THE SCREW-DOWN CROWN
DO NOT PULL THE CROWN UNLESS IT IS
UNSCREWED FIRST:
TO UNSCREW:
Turn the crown anti-clockwise until
it turns freely without tension.
GENTLY pull the crown out to the
other desired positions for watch
setting (see specific operating
instructions on the following pages).
0
2
UNI-DIRECTIONAL
TURNING BEZEL

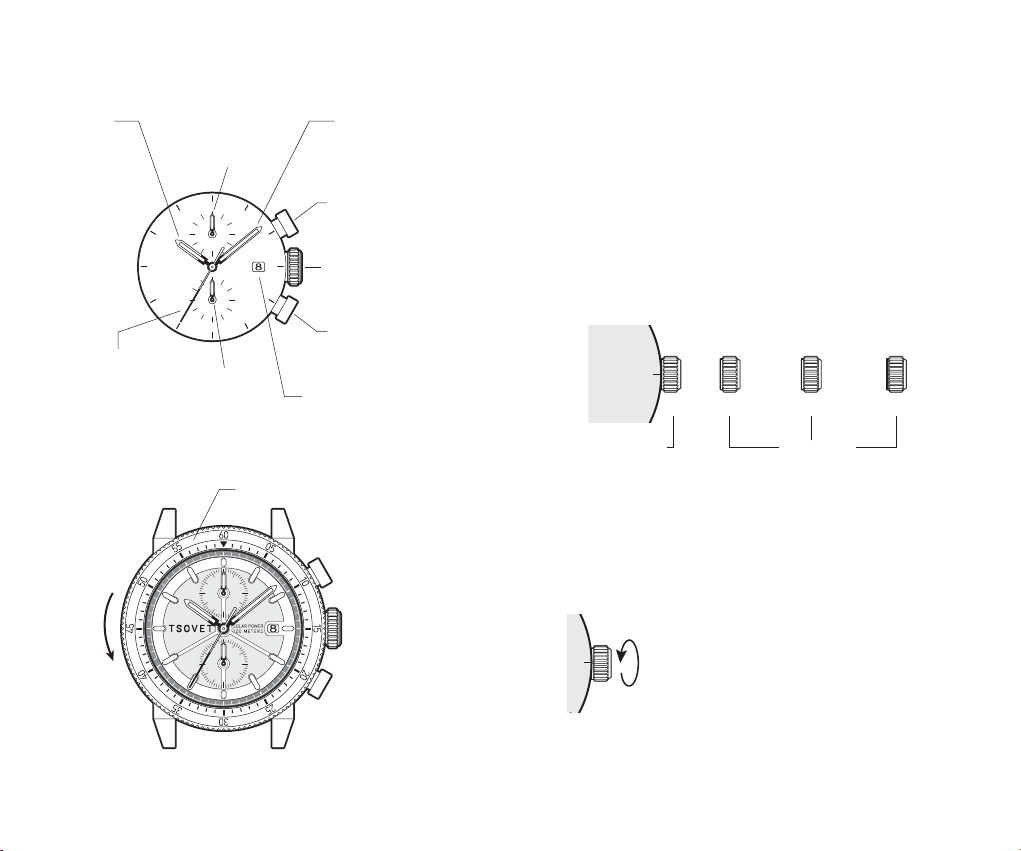
NOTE: Failure to SECURELY screw down the crown
after setting the watch may affect its water
resistance.
TO SCREW:
Push the crown ALL THE WAY IN
(towards the watch) THEN begin to
turn clockwise until it is securely
screwed down.
1
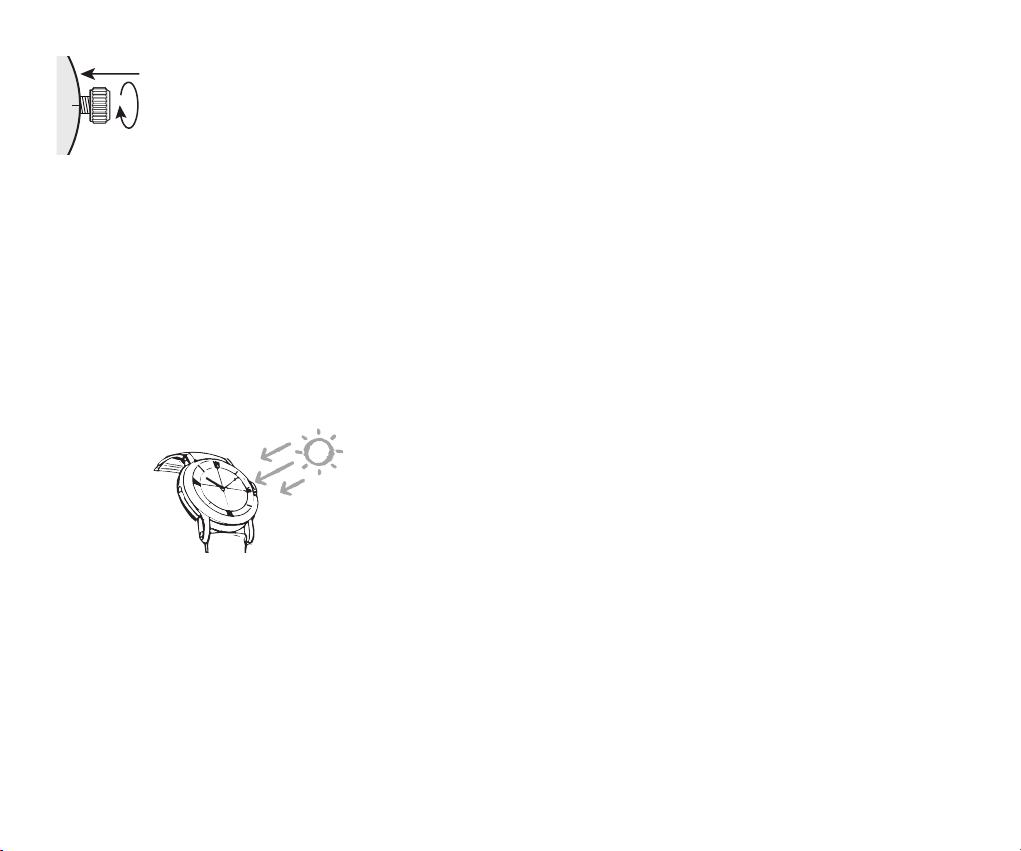
HOW TO CHARGE AND START
THE WATCH
CHARGING THE WATCH
When you start the watch or when the energy
remaining in the secondary battery is very low,
charge it sufficiently by exposing the watch to
light.
1. Expose the watch to sunlight or strong artificial
light (of more than 1,000 Lx).
When the watch has stopped operating, the
small second hand will start moving at
two-second intervals.
- The small second hand immediately starts
moving at two-second intervals, but the energy
stored in the secondary battery is not yet
sufficient. If the watch is turned away from the
light, it may stop operating.
It is not necessary to charge the watch fully. It
3
is important, however, to charge the watch
sufficiently, especially in the case of initial
charging.
2. Keep the watch exposed to the light until the
small second hand moves at one-second
intervals.
3. When the watch is charged after it has
completely stopped, set start usually moving at
one-second inrtervals.
CAUTION
When charging the watch, do not place it too close
to fluorescent lamp or other light sources as the
watch temperature will become extremely high,
causing damage to the parts inside the watch.
TO PREVENT ENERGY DEPLETION
• Avoid covering the watch face with your clothing
while wearing it.
• When the watch is not in use, leave it in a brightly
lit place for as long as possible. Make sure that
the watch temperature does not exceed 50°C.
POWER DEPLETION WARNING
FUNCTION
When the energy stored in the secondary battery
is reduced to an extremely low level, the small
second hand starts moving at two-second
intervals instead of the normal one-second
intervals. In that case, recharge the watch as
soon as possible by exposing it to light.
Otherwise, the watch may stop operating in about
1 week.
4

5
HOW TO SET THE TIME
1. Unscrew the crown and pull it out to position
[3]-(2nd click).
2. Turn the crown clockwise to set the correct time.
3. Push the crown in then screw it securely.
* Take a.m./p.m. into consideration when setting
the hour and minute hands to the desired time.
* Always be certain that your crown is SECURELY
SCREWED; this will prevent moisture from
entering in.
0
0
3
2
6
GUIDELINES FOR CHARGING
TIME
The below table provides only general guidelines.
Condition A: Time required for full charge.
Condition B: Time required for steady operation.
Condition C: Time required for 1 day’s charge.
(*) The values in this column represent the
charging times required until the small second
hand moves constantly at one-second intervals
after the watch starts operating with the small
second hand moving at two-second intervals.
Even if the watch is not charged for the time
specified in the column, the small second hand
may temporarily move at one-second intervals.
But it will soon resume moving at two-second
intervals; therefore, charge the watch for more
than the specified period.
Illumination
(Lux)
Source
of light Environment
Time required (approx.)
A B(*) C
700 - 35 hours 90 minutes
3,000 30w 20 cm 65 hours 8 hours 20 minutes
10,000 Sunlight
Fluorescent
lamp
Cloudy 18 hours 2,5 hours 6 minutes
100,000 Fine weather
Inside office
5 hours 1 hours 2 minutes

* Do not set the date between 9:00 P.M.
and 1:00 A.M.
0
0
2
7
HOW TO SET THE DATE
1. Unscrew the crown and pull it out to position
[2]-(1st click).
2. Turn the crown clockwise to set the correct date.
3. Push the crown in then screw it securely.
STOPWATCH FUNCTION
• The stopwatch can measure up to 60 minutes.
8
STANDARD MEASUREMENT
START STOP RESET
ACCUMULATED ELAPSED
TIME MEASUREMENT
STOPRESET
START STOP RESTART
Restart and stop of the stopwatch can be
repeated by pressing the button A.

SYSTEM RESET
When an abnormal display appears, reset the
built-in integrated circuit.
1. Pull the crown out to the [3]-(2nd click) position.
2. Press the buttons A and B at the same time for
longer than 2 seconds.
3. Push the crown back to the normal position.
910
START
FINISH TIME
OF 1ST
COMPETITOR
PRESS
LONGER THAN
2 SECONDS
2ND
COMPETITOR
FINISHES
SPLIT TIME MEASUREMENT
MEASUREMENT OF
TWO COMPETITORS
RESET
FINISH TIME
OF 2ND
COMPETITOR
STOPRESET
START
Measurement and release of split time can be
repeated as many times as necessary by pressing
the button B.
SPLIT SPLIT RELEASE
1 2 30 1 2 30

STOPWATCH HAND“0” POSITION
1. Pull crown out to the [3]-(2nd click) position.
2. Press button A for 2 seconds.
(Stopwatch Minute hand tums a full round and
can now be set to correct “0” position.)
3. Press button B repeatedly to set Stopwatch
Minute hand to "0" position.
4. Press button A for 2 seconds.
(Stopwatch Second hand tums a full round and
can now be set to correct "0" position.)
5. Press button B repeatedly to set Stopwatch
Second hand to "0" position.
6. Push crown back to normal position.
11 12
PRESS
LONGER THAN
2 SECONDS
PRESS
LONGER THAN
2 SECONDS
SET TO “0”
POSITION
SET TO “0”
POSITION
1 2 30
1 2 30
STOPWATCH
HANDS
"0" POSITIONS

WATER RESISTANCE
The water resistance indicated on your timepiece
serves only as a guide. Actual water resistance
may vary depending on a number of important
factors including temperature, water salinity, and
actual use under water.
The water resistance of your timepiece may
eventually be compromised over time with general
wear and tear and the use of your watch under
adverse conditions.
Always remember to employ the screw down crown
(if available) to maintain the water resistance of
your timepiece. Warranty may be voided if the
screw down crown has not been properly
employed.
Note that you should NEVER wear your watch in a
jacuzzi, hot shower or steam room where steam
may enter the case despite the watertight seals
used to protect your watch.
The steam may cause condensation inside your
watch, which may affect and damage the inner
workings of your watch – which would also not be
covered by the warranty.
13
HOW TO USE A DEPLOYANT
CLASP
1. Flip the cover.
2. Press the buttons on the clasp sides.
HOW TO RESIZE METAL
BRACELET
On the inside of the bracelet, you will see some
small arrows engraved on removeable links.
1.
2.
1
2
14

Nylon Head
Hammer
3. 5.
4.
15
6.
16

7.
Nylon Head
Hammer
FINISH
8.
9.
Micro size
adjustment
10.
17 18

11.
19
FINISH
12.
Table of contents
Other Tsovet Watch manuals